11. Notes and Journal
Outlook is loaded with features, some of which are complicated and confusing, but one of the most basic features is Outlook’s Notes. It doesn’t do much, but it’s handy if you need to securely store bits of text and notes.
Notes resemble sticky notes, and you can use them to replace the paper version, but they lack a lot of functionality you would expect to find in onscreen sticky notes. That’s not to say they aren’t useful—they just don’t have the features many people expect from electronic sticky notes.
If you used a previous version of Outlook and are familiar with either Notes or Journal, you’ll notice a number of changes. Microsoft has removed some functionality from Notes to make them simpler, and Microsoft removed all automatic Journal features.
Using Outlook’s “Sticky Notes”
Outlook’s Notes are useful for storing small pieces of text. You can add contacts or categories to your notes and locate the note quickly using Find. Because URLs in notes are clickable, you can paste a URL in a note and include comments about the site. You never have to remember to save notes; Outlook automatically saves them as soon as you move focus away from the note.
To simplify things and make Outlook’s options less overwhelming, Microsoft removed all the note options. A medium yellow note is your only choice, although you can drag the edges of a note to make the note larger (or smaller) and Outlook will remember the note size. If you want notes in different colors, assign Color Categories and the note will pick up the category color.
Notes uses a simple text editor that doesn’t support rich text formatting. As a result, you can’t highlight words or phrases with different colors or fonts or include images in a note. This doesn’t mean Notes aren’t useful—as an electronic version of Post-it style notes, simple is better. Notes are great for small snippets of text—usernames and passwords, email settings, and other short blocks of text are well suited for Notes.
The Notes feature is not listed on the Folder bar by default. Click the three dots on the bar and select Notes to open the Notes folder. Choose Navigation Options and create the maximum number of visible items or change the order of the folders on the Folder bar (see Figure 11.1). This allows you to see Notes on the Folder bar.

Creating Notes
As with all Outlook items, you can create new notes in several ways (see Figure 11.2).
• From the Notes module, use the mouse to select New Note from the ribbon. Type or paste text into the note form.
• From anywhere in Outlook folders, use the keyboard shortcut Ctrl+Shift+N to create new notes. If you prefer using menus, you’ll go to New Items, More Items, Choose Form, and select Note from the list of forms.
• Double-click between notes in the Notes list to open a new note. If you use an Icon view, double-click between the icons or double-click after the last note in List view. The note is now ready for you to enter text.
• Drag and drop a message to a note folder to save the entire message as a note.
• Select part of a message and drag the selection to a note folder. You aren’t limited to dragging selections from Outlook items; this works for any OLE document, such as Word documents, Excel spreadsheets, and Internet Explorer pages.
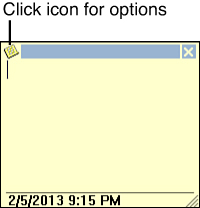
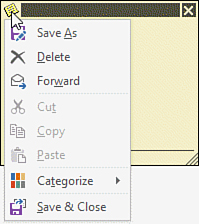
FIGURE 11.2 Outlook’s note has a simple interface and no toolbar. Click the small icon in the upper-left corner to access the options available for individual notes.
The status bar displays the time and date the note was last modified. The Modified Time field is updated to the current time when you edit a note.
 Note
Note
If it’s important for you to know the date a note was created, type the date into the note body—don’t rely on the Created and Modified Date fields in Outlook.
When you drag Outlook items to create notes, drop the text or message on the Note link at the bottom of Outlook’s window, on a Note folder, or anywhere in the Note list area.
When you’re done creating your note, you can use the Esc key or Alt+F4 to close it.
Outlook uses the first line of the note for the name of the note. The maximum length for the name is 256 characters, unless you begin a new paragraph. If you want a shorter name, press Enter to begin a new line.
Assigning Categories to Notes
Although you can’t see a Category field on a note form, you can assign categories to notes. When you use categories, you can create a group by category view, display the Category field in the Notes List view, or use Instant Search to find your notes.
You can add a category to notes in three ways:
• Click the Note icon in the upper-left corner and select Categories from the menu to display the Categorize menu.
• Right-click a note in the folder and choose Categorize.
• Use the List view and click to assign the Quick Click category or right-click in the Category field to choose a category (see Figure 11.3).
You can assign a category to several notes at once. After selecting the notes, right-click the selection and choose Categorize. You can also create a group by Category view and drag notes between category groups.
Saving Notes
Outlook automatically saves your notes to the default Notes folder when you close the note or when focus is no longer on the note.
When you use the File menu or keyboard shortcut to create a note, it’s saved in the default Notes folder. If you want to save a note in another note folder, you must open that folder, create the note, or move it from the default Notes folder after it’s created.
You can use the mouse to move or copy notes to another note folder. Drag and drop with the left mouse button to move the note, or use a right-click drag and drop to select between Move or Copy.
When you select two or more notes and right-click, one of the menu options is Move to Folder. Selecting this option opens the Move Items dialog; select the folder to move the notes to.
Instead of copying the content of a large note and pasting it into a document, you can save the note as an RTF file type and open it in a word processor.
You can save contents of a note to the Windows file system as notes, RTF documents, Outlook templates, or text files.
Outlook provides two print styles you can use—Table Style and Memo Style—for printing copies of your notes (see Figure 11.4). Use Table Style to print a list of your notes or Memo Style to print individual notes. For most views, you’ll choose your print style; however, Icon view supports Memo Style only.

Memo Style prints just one note per page. When the notes are short, use the Table Style to print your notes on one page. This style offers limited configuration settings beyond the type of paper used.
When a Table Style printout is selected, the printout contains all the fields exactly as they’re seen on the screen, including Message Preview lines, if enabled. Notes that contain fewer than 256 characters of text might print in their entirety when Message Preview is enabled.
Emailing Notes
It’s easy to send your notes to other people; just drag and drop the note on the Inbox or any mail folder. A new message form opens with the text of the note in the body of the message. The first line of the note is used for the subject, and the note’s last modified date is added to the message.
When you select multiple notes and drop them on the Inbox, one message is created with the contents of the notes in the message body. The subject field is left blank.
You can send notes as attachments, too. If you’ve already started an email message, choose the Insert File, Item toolbar selection when using Word as your editor or Insert, Item menu with the Outlook editor, and then browse to the Notes folder and select the note. When you select the note first, you can use Ctrl+F, or right-click and choose Forward Note.
Organizing Your Notes
When you have a lot of notes, you’ll want to organize them, either using folders or views. In some cases, creating additional note folders makes sense, but you can create custom views to show certain notes. Switch to the View tab and you’ll see the predefined views that are included with Outlook 2013:
• Icon—Choose from Small Icons, Large Icons, or List (see Figure 11.5).

• Notes List—Similar to the view used in the Inbox. Arrange by category or created date.
• Last Seven Days—A filtered view that shows only new notes.
You can customize these views or create new custom views. Select the View Settings button to customize a view.
This view uses the Notes List view with the notes grouped by date. Shared Notes is available for Exchange server users only.
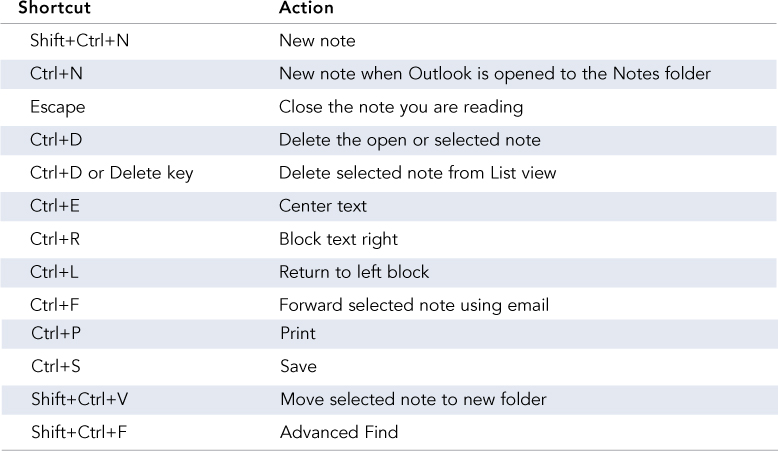
Keyboard Shortcuts
Notes uses a very basic text editor that doesn’t have a ribbon or toolbars. Some of the commands, like New Note and Print are available on the ribbon when you select a Note, but not all commands are in the ribbon. Many users, myself included, use the mouse for everything, but with no toolbars, the mouse is useless. Keyboard shortcuts work in Notes and can be used for simple tasks, such as center text or align it to the right.
Many of these shortcuts work with the other Outlook items too.
Outlook’s Hidden Journal
Outlook includes a hidden module called Journal. This can be used as a diary to create a record of your activities. However, Microsoft removed as much of the Journal as possible from Outlook 2013. If you used it in a previous version of Outlook, you can access your old journal entries and create new ones, but the best features of the Journal were removed.
Note
If you need to keep a journal or diary, I recommend creating a new calendar to record your activities in or use Microsoft OneNote, which is included with all Office suites.
Creating Journal Entries
To open the Journal folder, you can use the keyboard shortcut Ctrl+8 from anywhere in Outlook 2013 or by selecting the Journal folder in the Folder pane (Ctrl+6).
The keyboard shortcut for new journal entries was removed from Outlook. You can open a new journal by clicking New Item, then More Items, and selecting the Choose Form menu to open the Journal form; or you can switch to the Journal folder by using the Ctrl+8 shortcut and clicking the Journal Entry button to create new entries.
Yes, Microsoft is trying to discourage people from using the Journal, and they may eventually remove it from future versions of Outlook.
 Tip
Tip
If you are going to use the Journal, I have a macro that creates new journal entries and one that switches to the Journal folder. When you add the macro to the ribbon, creating new journal entries is much easier. See http://slipstick.me/journal for the code.
Although Microsoft is discouraging its use, you may find it useful to keep a record of phone calls, meeting notes, and other activities such as the following:
• Letters, documents, and faxes you send or receive
• Telephone calls or conversations
• Meetings you plan or are invited to
• Remote sessions you participate in
Note
The list of Journal Entry types is hard-coded, and although you can’t type a new entry type into the field, you can edit the Registry to add new entry types. The instructions needed to edit the Registry are at http://slipstick.me/je.
The journal form (see Figure 11.6) contains a few basic fields:
• Subject
• Entry Type
• Company
• Duration
• Notes

After you’ve entered the information in the fields, click the Save button and your journal item is finished. You can create your own entries for anything you want to keep in your journal, including home and car repairs or visits to the doctor. Because Outlook doesn’t have entry types for all the types of items you might need, you’ll have to make do with one of the existing entry types or create new entry types that meet your unique needs.
Create Journal Items
1. Switch to the Journal folder and select Journal Entry to open a new journal form.
2. Enter a subject and select an Entry Type for your new journal entry.
3. Enter the Start date and time.
4. Click the Start Timer button if you need to record the duration. If the activity has already ended, select the duration from the Duration menu.
5. Enter notes in the Notes field, insert links to attachments, and add color categories to the journal item, if desired.
When you’ve finished entering notes, click the Save and Close button. The timer stops and the duration field updates to the elapsed time.
If you’re inserting documents or files, use the Attach File button on the ribbon; use the Outlook Item button to insert Outlook items. When you insert file attachments, you can select how to insert the files on the expanded Insert button (see Figure 11.7):
• Insert—Insert the file as an attachment.
• Insert as Text—Available only for text files.
• Insert as Hyperlink

Using the Insert as Hyperlink option keeps the size of your mailbox smaller and is recommended.
You can also insert any item from Outlook’s data file as text only, as an attachment, or as a shortcut to the item. In most cases, you’ll want to use the As Shortcut to the Item or As Text Only setting, rather than duplicating an existing item.
Choose As Attachment or As Text to ensure that you always have the original item saved with the journal entry. Hyperlinks fail if you move, rename, or delete documents or Outlook items that the journal’s hyperlinks point to.
Journaling Appointments, Tasks, and Email
You can use several ways to create your own journal entries, often with very little typing. These methods create a new journal entry with the fields already filled in.
1. Use the Move, Copy to Folder command and select the Journal folder as the Copy To folder. This creates a journal entry with the item attached.
2. Drag the Outlook item to the Journal folder.
3. Right-click and drag an Outlook item to the Navigation bar button. When you release the right button, you can choose between copying the entry as a shortcut to the original item, copy as an attachment, or move as an attachment.
When you are using one of the preceding methods to journal calendar or task items, the new journal entries have the same subject as the appointment or task. The start time, duration, contacts, and categories are also the same as on the appointment. A shortcut to the appointment is added to the notes field of the journal entry. After adding notes about the meeting, you need only to save and close the journal entry.
When you drag an email to the Journal folder, the message subject is used for the journal subject, and the date and time the message was received are the start date and time. The Contact field contains the sender’s name if a contact exists or the email address if you don’t have a contact record for the sender, and a shortcut to the message is added to the journal body.
You can also create new journal entries and insert calendar or task items using the Insert, Item menu selection. However, you’ll need to complete the journal fields yourself.
Journal Views
The journal comes with four predefined views, using Timeline or Table layouts. You can customize these views or create your own custom views. You aren’t limited to using Timeline or Table views with the journal: Day/Week/Month views also work well, but Icon and Card views do not.
The timeline view defaults to showing the journaled items for the current week. You can change this to Day, which is segmented by the hour, or one month by clicking the Day or Month toolbar button. You can return to a seven-day view by clicking the Week button. You can jump to any date by selecting the date in the Go to Date dialog. Open it using the Ctrl+G shortcut, right-clicking in an open area, and selecting Go To Date, or by clicking the expand arrow in the lower-right corner of the Arrangement section of the Journal ribbon (see Figure 11.8).
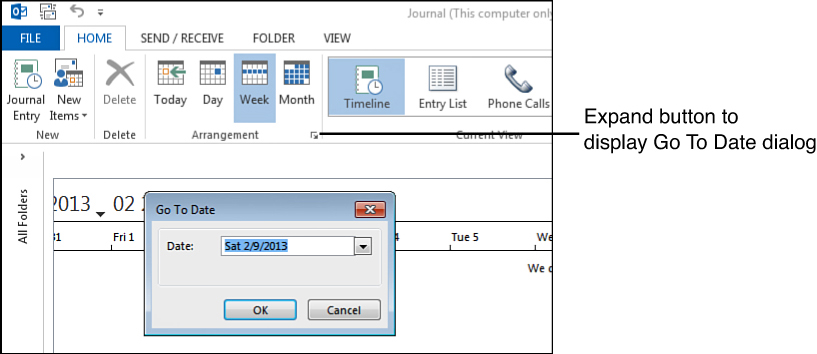
FIGURE 11.8 Click the Expand button in the Arrangement section of the ribbon, and then select a date from the Go to Date command to jump to a date.
The predefined Table views have filters controlling what you see:
• Entry List—No filter used
• Last 7 Days—Filtered to display entries created within the past seven days
• Phone Calls—Filtered to display only phone calls.
You can customize any of these views and create new views using your own criteria. Switch to the View ribbon and choose View Settings to open the Advanced View Settings dialog and customize the current view to your liking. If you want to restore the default settings for the view, click the Reset button in the View ribbon.