
Hour 6. Unfolding UVs and Applying Textures
What You’ll Learn in This Hour:
![]() How to edit and align UVs on a polygonal mesh
How to edit and align UVs on a polygonal mesh
![]() How to decide on a good UV layout
How to decide on a good UV layout
![]() How to create materials
How to create materials
![]() How to apply materials to your objects
How to apply materials to your objects
Without materials, your models are going to be gray and lifeless. Maya has state-of-the-art shading tools, and you’ll enjoy the flexibility the program offers. Your objects will get their color, shininess, even reflection from texture maps—image files that are projected or painted onto the surface of your geometry. But before you can apply a texture map to your objects, you have to edit the UVs of your object. What are UVs? Imagine you have a map of the earth and you want to paste it on a globe. If you just try to wrap up the globe inside the map, there’s going to be excess paper hanging off the globe, and it won’t fit correctly. This is where UVs come in. UVs represent the “flattened-out” version of your model, so that textures can be applied correctly. You decide where the seams should be and then essentially unfold the shell to be flat. Take that globe and hammer it flat, and you can simply lay the map on top of it.
Note: Shaders, Textures, and Materials
There is a difference between these three terms. A shader is the code that determines the render properties of a surface. A texture is any image that is applied to a node in a material. And, finally, a material is all of the connected nodes that make up the final rendered look. You may hear “materials” referred to as “textures” by some artists, but we will not confuse terms here.
In this Hour, you will see a proper UV layout for our hammer model, and how to get there. You will learn how we decide on material properties, and how to load textures into the appropriate slots. After all, the final quality of a 3D object is dependent at least 50% on the quality of the texture in conjunction with the geometric detail.
What Are UVs?
Let’s take a look at a primitive object’s UVs. A primitive sphere will illustrate our point nicely. To see an object’s UVs, we open the UV Texture Editor with an object selected by going to Window, UV Texture Editor (see Figure 6.1).

FIGURE 6.1 This sphere comes with UVs laid out nice and flat. As you can see, there is a seam where the flattened-out UVs wrap around the sphere and connect. To see the UV borders, Shift+RMB click in the UV Texture Editor.
Now let’s look at how UVs actually work. Figure 6.2 shows a sphere with something called a “ramp” texture already applied. Ramp textures let you apply a gradient shading look to your objects. In this figure, you can see the association between the gradient colors on the object and the gradient colors in the UV Texture Editor. You can see the seam that is created by the UV border, and hopefully the concept of the “flattened-out” object will become very clear (see Figure 6.2).

FIGURE 6.2 A basic ramp shader applied to the color channel of this sphere’s material. As you can see, the color wraps around the sphere. Look closely where the seam is on the sphere, and you will see that the far-left color (red) and far-right color (blue) correspond to the borders of the UV space.
With a texture applied, UVs become a lot more easy to understand. You can see the colors wrapped around this mesh as well as how the UVs line up in the UV Texture Editor.
UVs can only be moved in the UV Texture Editor, not in a 3D workspace panel. In the UV Texture Editor, RMB clicking and dragging brings up the familiar marking menu that allows you to choose UVs, and the Move tool works as expected.
More Complicated Models
Now that you’ve seen how UVs work on a basic primitive, let’s look at how they work on our hammer model from Hour 3, “File Types and Managing Assets.” In this Hour’s scene files, open the file hammer_Texture.ma. Once this file loads, selecting the hammer loads its UV sets into the UV Texture Editor as expected.
However, the UVs do not look nicely laid out as they do with the primitive sphere. It is up to you to create UVs and make them look nice on your custom models. Figure 6.3 shows the poorly laid-out UVs on the hammer model.

FIGURE 6.3 The UV Texture Editor shows polygonal objects’ UVs. An object might not have UVs, or it might have a poor UV layout (like shown) for one reason or another, but we can create UVs easily.
Tip: Finding the UV Texture Editor Window
Even though we associate UVs with texturing, they are actually a property of a polygonal object. So, the UV Texture Editor window is found under the Polygons menu set (F3) under Edit UVs, UV Texture Editor. However, because this editor is so commonly accessed (like the Outliner), Maya also makes it available permanently under Windows, UV Texture Editor in the menu as well.
A common workflow to create nicely laid-out UVs is to begin with an automatically created UV set and then manually adjust the UVs in the UV Texture Editor to fit your model. To begin working with an object’s UVs, press F3 to get to the Polygons menu set and then go to the Create UVs menu. You will see a host of choices. In general, choose a mapping shape that matches your object roughly. A sphere will use spherical; a lamppost should be cylindrical. Automatic Mapping creates a series of cuts (seams) to make it so that the least amount of distortion occurs when applying your texture. You can’t depend on Maya’s automatic UV mapping to give you perfect results, but it will add UVs to the model that can be changed later. The exception to the rule of using a UV projection shape that is close to your model shape is if you have an object that is symmetrical, like ours:
![]() In the case of symmetry, you want to use Planar, so click Create UVs, Planar
In the case of symmetry, you want to use Planar, so click Create UVs, Planar ![]() (remember, the
(remember, the ![]() symbol means you will be opening a tool’s options before applying).
symbol means you will be opening a tool’s options before applying).
![]() Set the projection axis to Project From the Z Axis. Leave the rest of the options at their defaults for now and click Apply.
Set the projection axis to Project From the Z Axis. Leave the rest of the options at their defaults for now and click Apply.
Note: Messy UVs Are Par for the Course
Whenever you use the box-modeling technique, the UVs are not going to be laid out correctly to apply textures immediately. The polygon primitives that you can create already have UVs, but because it’s almost always necessary to edit primitives before they are ready to use in your scene, correct UV editing is an essential skill.
After you have applied automatic mapping to your object, you next must decide where the texture seams are going to be on your model. With a model that is symmetrical like this hammer, it makes sense that both sides should have the same texture. That means the UV seam can be right down the middle along the center edge loop that exists.
The two commands you absolutely need to know about (in the UV Texture Editor) are the Polygons, Cut UV Edges command and the Polygons, Sew UV Edges command, shown in Figure 6.4.

FIGURE 6.4 These two commands—Cut UV Edges and Sew UV Edges—are essential to your UV workflow. The two tools create and remove seams, respectively, in your UVs.
Using these two commands in conjunction with the Move and UV Smooth tools in the UV Texture Editor will get you 90% of the way there. Now follow these steps:
![]() Switch to Edge component mode by RMB clicking on your object in the panel and dragging upward. Select the new edge loop that runs up the center of the hammer in your perspective panel. You can do this by Shift+LMB clicking on each edge, double-clicking on a single edge in the edge loop (preferred method), or selecting a single edge loop and pressing the left arrow key on your keyboard.
Switch to Edge component mode by RMB clicking on your object in the panel and dragging upward. Select the new edge loop that runs up the center of the hammer in your perspective panel. You can do this by Shift+LMB clicking on each edge, double-clicking on a single edge in the edge loop (preferred method), or selecting a single edge loop and pressing the left arrow key on your keyboard.
![]() In the UV Texture Editor, go to Polygons, Cut UV Edges. Then select all the other edges besides the center edge loop. (You can quickly do this by holding down Shift and dragging a selection box around the entire hammer in the Persp panel. This toggles the selection and therefore will invert the selected edges.)
In the UV Texture Editor, go to Polygons, Cut UV Edges. Then select all the other edges besides the center edge loop. (You can quickly do this by holding down Shift and dragging a selection box around the entire hammer in the Persp panel. This toggles the selection and therefore will invert the selected edges.)
![]() Back in the UV Texture Editor, click Polygons, Sew UV Edges.
Back in the UV Texture Editor, click Polygons, Sew UV Edges.
![]() Select the center edge loop one more time. Pressing Ctrl+RMB in the UV Texture Editor brings up a marking menu to convert your selection from one component type to another (from faces to vertices, or in this case, edges to UVs). This marking menu is available at all times and not just when you’re working with UVs. Convert your selection to UVs, as shown in Figure 6.5.
Select the center edge loop one more time. Pressing Ctrl+RMB in the UV Texture Editor brings up a marking menu to convert your selection from one component type to another (from faces to vertices, or in this case, edges to UVs). This marking menu is available at all times and not just when you’re working with UVs. Convert your selection to UVs, as shown in Figure 6.5.
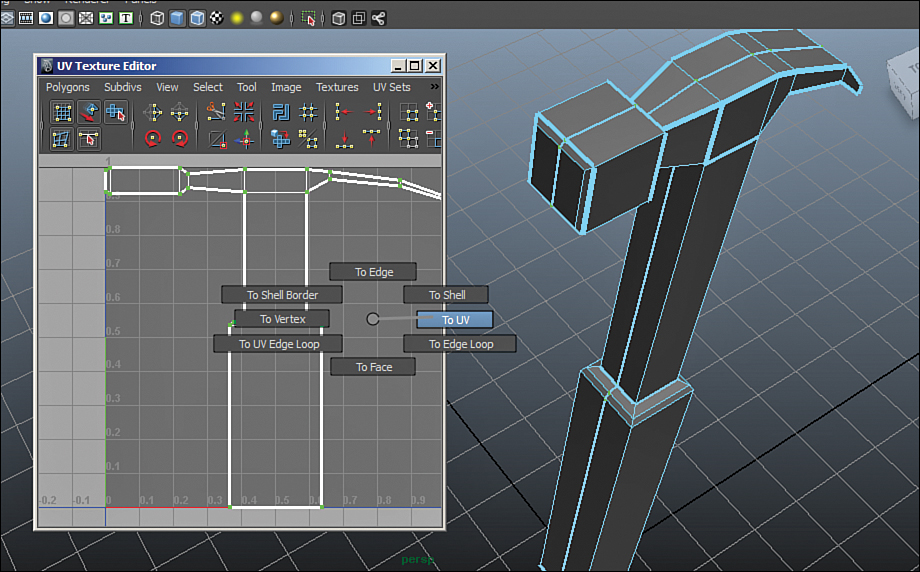
FIGURE 6.5 The hammer has planar mapping, but we want to make sure the UVs along this center seam are laid out; otherwise, they will not pick up any texture information when we apply a map.
Now if we use the Smooth UV tool, the UVs in this middle seam will move out from behind the other UVs and get some UV space for themselves, as in Figure 6.6.
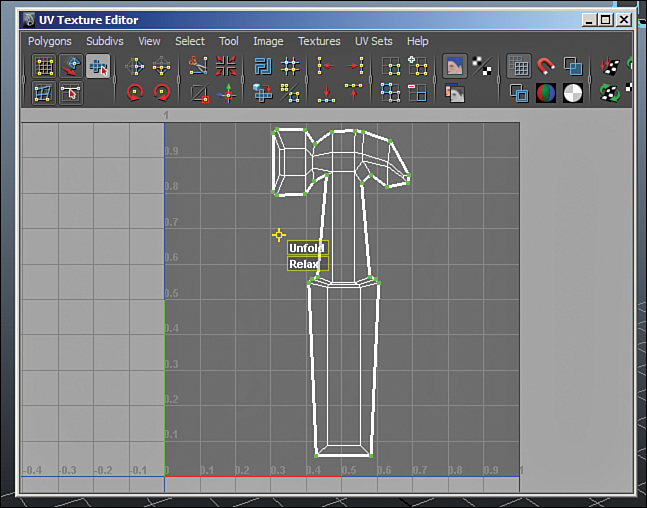
FIGURE 6.6 The Smooth UV tool (top left, highlighted) gives you interactive control over the Relax and Unfold commands. Selecting either Unfold or Relax and dragging the mouse will add or remove iterations in real time. I unfolded the UVs that made up the seam, and now they have some UV area dedicated to them.
Tip: Symmetry Is Our Friend
Taking advantage of the symmetry of a model can be a great timesaver. This is especially true if the axis of symmetry runs through the axis of your object that isn’t seen as much, like our hammer. The best way to take advantage of symmetry is to place your UV seam (cut UV edges) along the axis of symmetry.
Now that you understand how to arrange our UVs nicely, let’s apply a custom texture and use some of Maya’s great texturing tools.
As you can see in all of the figures of the UV Texture Editor, only the space between 0,0, and 1,1 is shaded on the graph. UV space is parametric, meaning that you are manipulating points on a graph that will later tell Maya what value (between 0 and 1) to assign to each part of the model. When the image is rendering, Maya looks at the surface and then finds the corresponding UV coordinate to decide what part of the texture should be applied to the pixel. For correct texturing and rendering, all of your UVs must fall within the 0-to-1 range in UV space. Scaling, rotating, and assembling UV shells is a talent in and of itself. Look ahead to Hour 7, “Creating Node Networks in the Hypershade,” if you want to see some complex character UV layouts.
Texturing in Maya
Maya has industry-standard (and some industry-leading) texturing tools available. These are the tools you will use to make your models go from gray and lifeless to colorful and beautiful. There are two basic types of textures in Maya: 2D textures and 3D textures. 2D textures such as ramps and image files require UVs to display correctly, as you just learned. 3D textures do not require UVs because Maya makes a projection in 3D space onto the model. Think of it like certain areas of the scene have paint floating in them; when you render, Maya finds the 3D position of the object it is drawing and takes the corresponding color from the paint floating in the same place, without regard for where the UVs sit on the surface.
The Hypershade is the main menu that deals with texturing. To access the Hypershade, go to Windows, Rendering Editors, Hypershade (see Figure 6.7).
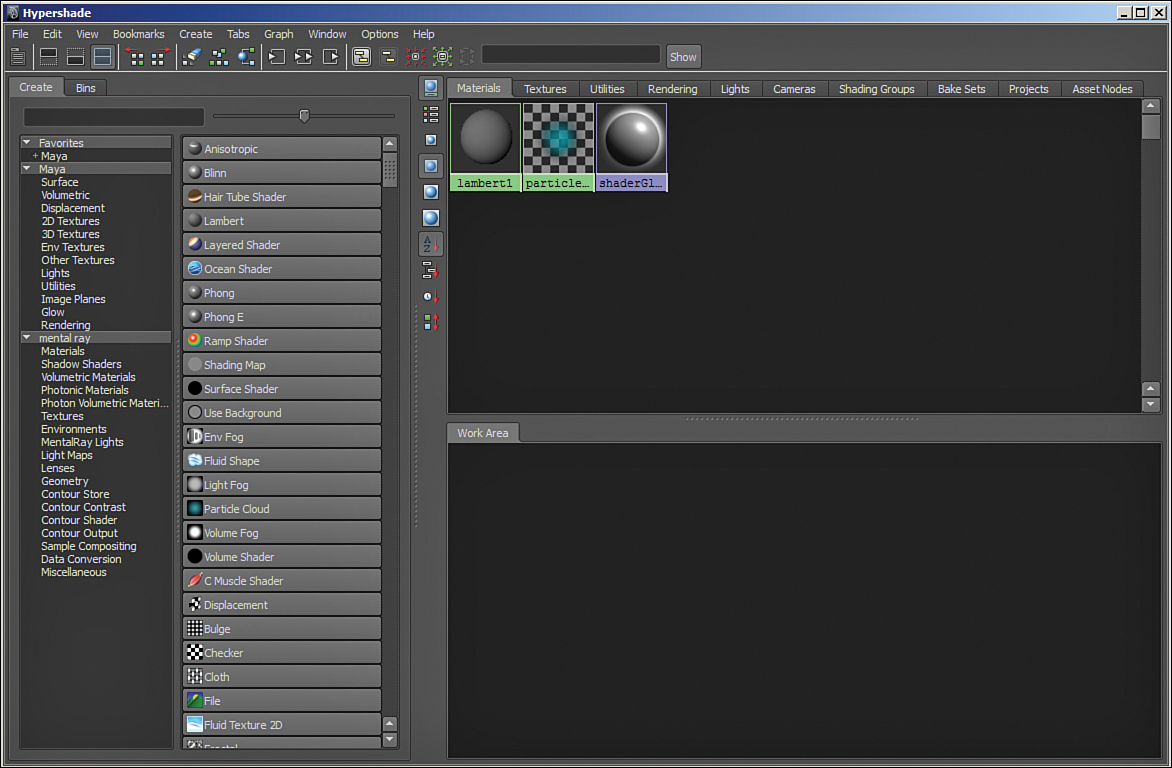
FIGURE 6.7 The Hypershade is broken into three main areas with the menus and buttons at the top. On the left is the Create panel; clicking on any of these buttons will created the associated node. The top-right box holds your nodes, and the bottom-right area is called the Work Area.
When you are connecting nodes together and building what are called “shading networks,” you will primarily be using the Work Area. By default, every object is assigned the gray lambert shader called lambert1 when it is created. All of the objects we create in Maya will need custom materials, so let’s start by creating a new material for our hammer.
Note: The Ubiquitous Lambert1
Maya requires unique node names to avoid conflicts when importing objects and references. If you edit lambert1 in one scene, it might either get lost when you import it into another scene or overwrite the lambert1 already in that scene. Just don’t touch lambert1—think of it as a necessary node Maya needs to display objects. It should never be used as a material for a production model.
With the Hypershade open, we can start creating some materials. You can follow this procedure to create nearly infinite combinations of materials in the Hypershade, but I’ll show you how to put nodes together to make the hammer have some nicer material properties to it. First thing we’ll do is create a Blinn material. Blinn is a material that has reflectivity and a specular highlight to it. It comes standard with most 3D programs. When you click on Blinn, the newly created node appears in the Work Area. Double-clicking any node in the Hypershade opens that node in the Attribute Editor, as shown in Figure 6.8.

Scrolling down the menus in the Attribute Editor reveals the great control Maya gives you over the look of your materials. Let’s take a brief look at some of the material options, and go over what each one does. Most of the options are the same or similar for your standard materials.
Applying Our Texture
It’s common to apply a material before you customize it to see your updates happening in panel and to make sure you are changing the attributes to the correct values. To apply the material, MMB drag this Blinn from the Hypershade onto the hammer in the Persp panel. Alternatively, you can select an object in any panel or the Outliner, and then in the Hypershade RMB, click and drag upward on the Blinn node. Then, in the marking menu that appears, choose Assign Blinn1SG to Selection, as I am doing in Figure 6.9.

FIGURE 6.9 The process of applying a material to an object using the marking menu in the Hypershade. Alternatively, you can MMB drag the material directly from the Hypershade onto the surface of the object in the panel to apply it.
Standard Material Options
Listed here are the common options found in most materials in Maya. Understanding the function of these options will help you quickly learn which materials will give you the results you desire:
![]() Color—This channel is normally your main concern. It is what it sounds like—the color of the texture. Whether it is a Maya checker texture or a File node (the way to load your own images as textures), you can load almost any node into this channel.
Color—This channel is normally your main concern. It is what it sounds like—the color of the texture. Whether it is a Maya checker texture or a File node (the way to load your own images as textures), you can load almost any node into this channel.
![]() Transparency—This channel controls how see-through your material is. It determines the amount of transparency by black (value of 0) being completely opaque and white (value of 1) being totally clear. If you are using raytraced shadows, the shadow will be affected by this channel as well (more on shadows in Hour 19, “Lighting Your Scene Correctly”). You can use this channel to make “holes” in your material also, like a tattered pirate’s flag for example.
Transparency—This channel controls how see-through your material is. It determines the amount of transparency by black (value of 0) being completely opaque and white (value of 1) being totally clear. If you are using raytraced shadows, the shadow will be affected by this channel as well (more on shadows in Hour 19, “Lighting Your Scene Correctly”). You can use this channel to make “holes” in your material also, like a tattered pirate’s flag for example.
![]() Ambient Color—This channel lightens and blends the color attribute with the color chosen here. If there are ambient lights in your scene, they will determine how this channel contributes to the final color of your texture.
Ambient Color—This channel lightens and blends the color attribute with the color chosen here. If there are ambient lights in your scene, they will determine how this channel contributes to the final color of your texture.
![]() Incandescence—This channel makes the object appear to have a light source emitting from within it. Although it won’t actually emit light from its surface when this attribute is used, it will appear to. The difference between Ambient Color and Incandescence is this: An Ambient Color of white will make an object in total darkness render its pure color channel, whereas an Incandescence of white will make the same object pure white (totally unaffected by shadow).
Incandescence—This channel makes the object appear to have a light source emitting from within it. Although it won’t actually emit light from its surface when this attribute is used, it will appear to. The difference between Ambient Color and Incandescence is this: An Ambient Color of white will make an object in total darkness render its pure color channel, whereas an Incandescence of white will make the same object pure white (totally unaffected by shadow).
![]() Bump Mapping—This channel adds surface relief at render time. You can create the effect of subtle grain to your surfaces, or maybe small details such as rivets in metal, stitching in clothing, and so on. The surface is not actually displaced; bump mapping only gives the illusion that it is.
Bump Mapping—This channel adds surface relief at render time. You can create the effect of subtle grain to your surfaces, or maybe small details such as rivets in metal, stitching in clothing, and so on. The surface is not actually displaced; bump mapping only gives the illusion that it is.
![]() Diffuse—Diffuse is the power of the reflection of light, put simply. Because we only see an object by the light that reflects off of that object back into our eye, changing the diffuse value is like raising and lowering the amount of light an object reflects. In turn, the Color value is affected by brightening and darkening. In a way, it’s the opposite of Ambient—at 1.0, Diffuse will make the object render at brightest its pure Color value when not in shadow, and at 0.0, it will render black regardless of the lights in the scene.
Diffuse—Diffuse is the power of the reflection of light, put simply. Because we only see an object by the light that reflects off of that object back into our eye, changing the diffuse value is like raising and lowering the amount of light an object reflects. In turn, the Color value is affected by brightening and darkening. In a way, it’s the opposite of Ambient—at 1.0, Diffuse will make the object render at brightest its pure Color value when not in shadow, and at 0.0, it will render black regardless of the lights in the scene.
![]() Translucence—The amount of light that passes through an object. This can be used to simulate surfaces that have light diffusing through them, such as wax, paper, leaves, and so on. The simplest way to describe the effect of adding translucency is to think of a thin object such as a leaf that has a shadow being cast on the bright side, and being able to see that shadow on the other side of the leaf (see Figure 6.10).
Translucence—The amount of light that passes through an object. This can be used to simulate surfaces that have light diffusing through them, such as wax, paper, leaves, and so on. The simplest way to describe the effect of adding translucency is to think of a thin object such as a leaf that has a shadow being cast on the bright side, and being able to see that shadow on the other side of the leaf (see Figure 6.10).

FIGURE 6.10 The effect of translucence on a material. The left plane has no translucence; the right plane has .5 translucence.
![]() Translucence Depth—Controls the way the light travels through the object by using a distance value.
Translucence Depth—Controls the way the light travels through the object by using a distance value.
![]() Translucence Focus—This controls how much the light is scattered in all directions or focused as it is transmitted through the surface. A low value is recommended for very thin objects such as paper where the shadows are going to be fairly sharp on the other side of the object. A high value is good for objects such as wax because the light truly spreads out very widely as it enters this material.
Translucence Focus—This controls how much the light is scattered in all directions or focused as it is transmitted through the surface. A low value is recommended for very thin objects such as paper where the shadows are going to be fairly sharp on the other side of the object. A high value is good for objects such as wax because the light truly spreads out very widely as it enters this material.
Notice how the shadow that the sphere is casting on the right plane can be seen from the back of the plane as if it is a piece of thin paper or a leaf. Also notice how the shadow on the ground is not affected (only transparency affects shadow color).
Standard Materials
Before we customize our Blinn to make it look like a shiny metal hammer, let’s first take a quick look at a few of Maya’s built-in materials. They are described here in laymen’s terms:
![]() Anisotropic—This material has specular and reflection, but uses an algorithm than warps the specular highlight the way a brushed steel kettle would.
Anisotropic—This material has specular and reflection, but uses an algorithm than warps the specular highlight the way a brushed steel kettle would.
![]() Blinn—This material is a good standard material for shiny and reflective objects. You can get a good range of plastic to metal materials using Blinns.
Blinn—This material is a good standard material for shiny and reflective objects. You can get a good range of plastic to metal materials using Blinns.
![]() Hair Tube Shader—This material is useful for application on hair, due to its extremely warped specular highlight that simulates the way hair reflects light.
Hair Tube Shader—This material is useful for application on hair, due to its extremely warped specular highlight that simulates the way hair reflects light.
![]() Lambert—This material is good for objects that do not reflect or have any shininess to them and therefore don’t need a specular highlight. Good examples would be clay and dirt.
Lambert—This material is good for objects that do not reflect or have any shininess to them and therefore don’t need a specular highlight. Good examples would be clay and dirt.
![]() Layered Shader—To combine multiple shaders into one, you can use the layered shader. For instance, you can apply a Blinn’s specular highlight to a Lambert’s color to create the texture of dirt in a glass jar.
Layered Shader—To combine multiple shaders into one, you can use the layered shader. For instance, you can apply a Blinn’s specular highlight to a Lambert’s color to create the texture of dirt in a glass jar.
![]() Ocean Shader—This is a dynamic material that creates an animate ocean. The default settings create a simple, attractive water that is a good launch point for more advanced FX.
Ocean Shader—This is a dynamic material that creates an animate ocean. The default settings create a simple, attractive water that is a good launch point for more advanced FX.
![]() Phong—Very much like the Blinn, the Phong shader is good for objects with shininess. The Phong specular highlight algorithm is geared a little bit more toward plastics.
Phong—Very much like the Blinn, the Phong shader is good for objects with shininess. The Phong specular highlight algorithm is geared a little bit more toward plastics.
![]() Phong E—The same as Phong, but with added control over the specular highlights.
Phong E—The same as Phong, but with added control over the specular highlights.
![]() Ramp Shader—This powerful shader is useful for creating gradient effects based on properties of the scene. You can make the edges of objects a different color based on the angle the surface is relative to the camera, or you can make a stark two-tone color gradient for areas of shadow and light to simulate a cartoon render.
Ramp Shader—This powerful shader is useful for creating gradient effects based on properties of the scene. You can make the edges of objects a different color based on the angle the surface is relative to the camera, or you can make a stark two-tone color gradient for areas of shadow and light to simulate a cartoon render.
![]() Shading Map—This is a shader that mixes different shaders together, sort of like a Layered Shader, but uses properties such as the color and brightness of shaders to determine how they are mixed together rather than their transparency. It is not very commonly used.
Shading Map—This is a shader that mixes different shaders together, sort of like a Layered Shader, but uses properties such as the color and brightness of shaders to determine how they are mixed together rather than their transparency. It is not very commonly used.
![]() Surface Shader—This is a very commonly used material; it’s a simple way to load color, alpha, and transparency to other channels in Maya. The color will always display pure no matter what the lighting condition.
Surface Shader—This is a very commonly used material; it’s a simple way to load color, alpha, and transparency to other channels in Maya. The color will always display pure no matter what the lighting condition.
![]() Use Background—This is an extremely useful shader; it displays whatever background is in your scene—be it a color or an image plane. This material is commonly employed when rendering effects for film and television, or for creating shadow renders for compositing.
Use Background—This is an extremely useful shader; it displays whatever background is in your scene—be it a color or an image plane. This material is commonly employed when rendering effects for film and television, or for creating shadow renders for compositing.
Customizing Our Blinn
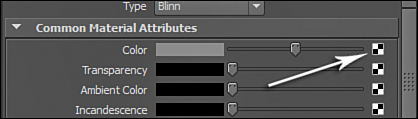
We will now customize our Blinn with the images that were created for it. We will apply a color map and a specular. First, we open the Hypershade and double-click on our Blinn. In the Attribute Editor, which should have just appeared, we will click on the little icon next to the “color” attribute that looks like a checkerboard, as shown in Figure 6.11. This icon means you can apply a map to a value.
Selecting File creates a file node, which is how we load our images as textures. Click the folder icon in the file1 attribute panel to open an explorer window to browse for the textures we’ve created for this hammer (see Figure 6.12).

FIGURE 6.12 After you load a file node as a texture attribute, you must then load the image you created for this attribute. The file node has many options, but by default you will get results that are good for most common texture uses.
Navigate to the Hour 6 directory where the hammer’s image maps are found and choose hammer_Color.tga for the color. Select the Blinn in the Hypershade one more time so we can load another map into its attributes. Click on the “specular color” map button and choose “file” one more time. In the new file node, click the browse button and choose hammer_specColor.tga. This file has a white value on the metal parts and a black value on the handle area—to make it so there is no specular highlight on what is supposed to be the soft rubber grip. Figure 6.13 shows the hammer with the material edited to be more like rubber.

FIGURE 6.13 The Blinn material with color and specular color maps applied. Apply the texture to the selected hammer by RMB clicking on the marking menu in the Hypershade.
In this bonus video, I show you a common workflow for creating and laying out UVs for our finished character model, Sam. I walk through the first stages of creating automatic UVs and then move on to show you how to cut, sew, and lay out the UVs smoothly.
Summary
To apply texture in Maya, it is first necessary to lay out your UVs. We created UVs for our hammer model by using a planar projection, because it is common to create some form of automatic UV set and then adjust them. We next adjusted them by first making sure our seam was on the center edge loop using the Cut UV Edge and Sew UV Edge tools. We then moved the UVs into place by hand in the UV Texture Editor and then unfolded the UVs that were hidden using the UV Smooth tool. We then looked at the common material types and their common attributes, and applied a Blinn material to our hammer model. A common workflow is to apply the material first and then adjust the material’s attribute to give yourself the effect you desire. We also loaded the custom images as textures in the color and specular color attributes, to give our hammer the color and shininess we expect. Open hammer_Textured_Finish.ma in this Hour’s folder to see the final result.
Q&A
Q. When should I create/edit the UVs of a polygonal object?
A. You can wait until a model is finished to create its UVs, or if you don’t want to have to remember to use a certain mapping type and so on, you can create and edit UVs as you go along. Manipulating geometry will not mess up already created and edited UVs, but it might create new UVs that get in the way of your customized ones.
Q. Can an object have more than one UV set?
A. Yes, you can add as many UV sets as you want to an object by going to the Create UVs menu and selecting Create Empty UV set. An instance when this might be useful is if you want a character’s face to have a different material than his clothes, and you create a UV set for just his head.
Q. The UV Texture Editor is square. What do I do if my texture is not square?
A. You should be using square textures as a rule because of this reason, but if you absolutely can’t, you can always resize the UVs to match the texture as it shows up in the UV Texture Editor.
Q. Can I apply more than one material to an object?
A. Certainly, and there are a few ways to do this. Let’s say you want to use two different materials for the hammer (the metal part and grip). The easiest way is to RMB click and drag your mouse, choose “face” and select the faces you want to apply the new material to, and then MMB drag the material from the Hypershade onto these faces. You can also use a Layered shader and use an image as a mask to determine where the two materials are going to show up on the object.
Workshop
The workshop contains quiz questions and exercises to help you solidify your understanding of the material covered. Try to answer all questions before looking at the “Answers” section that follows.
Quiz
1. Where is the UV Texture Editor found?
2. What two tools do you use to create the seams in your UVs?
3. What material type would be the best for a nonreflective surface such as a tablecloth?
4. What material attribute controls how “see-through” an object is?
5. How do you create a new material in the Hypershade?
Exercise
Create a simple polygonal object, such as a can of soup, a box of cereal, or any other very simple 3D object. Look at the object’s UVs in the UV Texture Editor and decide if you want to start over by creating UVs or if you can use the Cut and Sew tools to make your own seams. Unfold and Relax the UVs using the Smooth UV tool, and get your UVs to a place where they are laid out in a way they look nice and straight, and no unreasonable amount of stretching is occurring.
Open the Hypershade and create an appropriate material. Depending on the object you’ve made, load your texture file into the color attribute of your material. Finally, drag the material onto the object to apply it.
Answers
1. In the Polygon menu set (F3), Edit UVs menu, or in the main menu under the Windows menu.
2. The Cut UV Edges tool and the Sew UV Edges tool allow you to create the seams in your UVs so that the object can be flattened out nicely in the UV Texture Editor.
3. Lambert materials are good for objects with no shininess.
4. Transparency is the attribute that makes an object see-through. Do not confuse this with translucency, which creates the effect of light passing through an object.
5. The Create pane on the left side of the Hypershade houses all the buttons of material nodes you can use to build shading networks. Clicking on any one of these will create that node and place it in the Work Area.