
Hour 9. Relationships and Making Nodes Work Together
What You’ll Learn in This Hour:
![]() How to see a relationship between objects
How to see a relationship between objects
![]() How to create a relationship between nodes
How to create a relationship between nodes
![]() The different types of relationships you can create
The different types of relationships you can create
![]() How to choose the right relationship to create
How to choose the right relationship to create
Maya’s versatility stems mainly from the fact that Autodesk does not try to predict or control the way their users will take advantage of Maya’s tools. Instead, they create a wide array of tools that can be connected in a near infinite number of ways. Ingenious Maya users around the world discover new ways to utilize Maya’s features in new ways every day. We’re going to take a look at how some relationships and connections are created for you, and how to create them yourself.
Note: Under the Hood
In actuality, every single node is connected in some way as you create it. A shape node is connected to a transform node to make up an object. Its surface is connected to a shading group so that it renders correctly. And all the lights in the scene are connected to the objects as well. Under the hood, Maya is connecting every node you create. You do not have to worry about connecting 99% of the nodes that make Maya work, only coming up with ingenious solutions to problems as they present themselves.
In this Hour, you will see the many subtle ways Maya connects nodes, and you’ll connect some yourself. You will also see how the different nodes can work together to produce some pretty impressive results, and you will hopefully get ideas for new ways to elevate Maya’s functionality further.
Viewing Relationships
Let’s quickly take a look at the different connections that Maya generates for you automatically. Start a new Maya scene (press Ctrl+N or run the Maya program). Create a polygonal sphere by clicking Create, Polygons, Sphere. If you have not turned Interactive Creation off, you will need to click on the grid and drag the sphere’s radius to create it. With the new sphere still selected, go to Windows, Hypergraph: Connections. It will look like Figure 9.1.

As you can see, even creating something as simple as a polygonal sphere creates multiple nodes that are connected. The creation node (with the sphere’s creation attributes) outputs to the shape node, the shape node is a child of the transform node, and so on. Clicking on the initialShadingGroup node and then clicking on Windows, Hypergraph: Connections again will open a second Hypergraph, showing all of the connections that this shading group has created. Figure 9.2 shows just how many connections are present for default nodes! The number of connections that are created by default even for the most rudimentary objects and effects is quite staggering. Again, though, you need not concern yourself with 90% of the connections that are made; only how to make custom connections to achieve specific results.

FIGURE 9.2 Even the default material generated by Maya when you create a new scene is “wired up” with plenty of connections. These relationships are necessary to make Maya work.
The Hypergraph is one of the easiest ways to see connections, because you can graph all of the connections of a selected node with the click of a button. Lines that go into the left side of a node in the Hypergraph are inputs, and lines that go out the right side are outputs. You can see the direction of a connection by the arrows that are drawn along the lines (the direction meaning a connection goes from the output of one node to the input of another). The Hypershade also graphs connections similarly. I created a very simple shading network and graphed it for you to demonstrate the similarity in Figure 9.3.

Tip: Connections Are Everywhere
You can actually see your connections in many different places in the Maya UI. For starters, all of the inputs and output connections of a selected node are normally displayed in the Channel Box on the right. Also, you can reorder and adjust connections by right-clicking on an object and choosing either Inputs or Outputs. Even though the Hypershade is most often used for creating materials, you can graph any type of node network in the work area as well. In the Connection Editor, loading two nodes that have connections will change the display of the connected attributes to italicized text. There are more ways to view connections, but suffice it to say you will never be at a loss finding connected nodes.
This is a simple shading network, showing all of the connections Maya creates automatically. The Ramp texture was created by simply clicking on the texture button to the right of the color channel. Maya created the correct connections when I chose the Ramp.
Creating Connections
To create connections, all you have to do is use Maya’s top-level tools and Maya will do the rest. When you want to explicitly connect nodes and create a relationship, you have several ways to do so. You can type in the MEL command to connect attributes, you can drag and drop nodes in the Hypergraph, but probably the simplest and most straightforward way to connect a node is to use the Connection Editor.
The Connection Editor
Indeed, the Connection Editor even presents itself when making anything other than a default connection in the Hypershade or Hypergraph anyway. You may as well open it up and become comfortable and familiar with the interface. Make a new Maya scene and then click on Window, General Editors, Connection Editor. The Connection Editor will appear as it does in Figure 9.4.

To make a connection in the Connection Editor, click on any attribute in the left panel (Outputs) and click on one or more attributes in the right panel (Inputs). You can have a single output connect to more than one input, but you cannot connect multiple outputs to the same input. Let’s load some attributes into these panels so we can start creating connections.
Maya will automatically load the attributes of the selected object into the left pane of the Connection Editor. We opened this editor in a blank Maya scene, so nothing showed up.
Create a polygonal sphere by clicking Create, Polygon Primitives, Sphere. In the Connection Editor, click at the top left where it says “Reload Left.” You will see that all of the potential outputs have loaded into the left pane, as in Figure 9.5.

FIGURE 9.5 The sphere’s attributes are loaded into the left pane. These can all be selected as outputs.
Click on “Reload Right” on the top right and see the attributes load in the Inputs pane, as in Figure 9.6.

Selecting an attribute on the left makes it so Maya will use the output of this attribute as the input of one or many attributes on the right. Remember what was said in about compatible data in Hour 7, “Creating Node Networks in the Hypershade”? You can only connect an attribute that outputs compatible data to your desired input. Maya gives you visual feedback by graying out any input that is incompatible with the selected output. Let’s see this in action. In Figure 9.7, you can see that if we select the “caching” attribute, Maya grays out most of the inputs on the right because they do not use the same type of data.
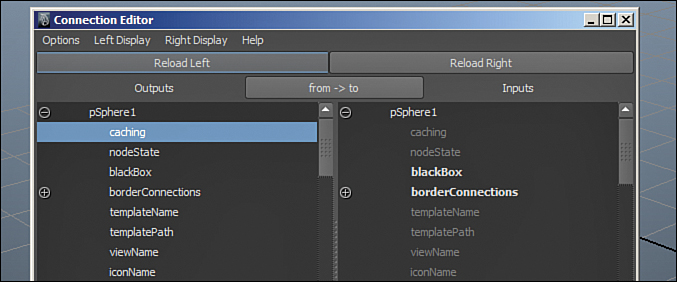
FIGURE 9.7 Maya will only let you connect compatible attributes. So, for instance, you cannot connect an RGB output (data in the format [x,x,x]) to a visibility input (data in the format [on/off]).
We will now connect an attribute that is compatible and see the result. On the left pane, click on the + sign next to Translate and then click on translateZ. On the right pane, click on the + sign next to Scale and then click on scaleY. Maya has connected these two attributes. You will notice that like in Figure 9.8, the sphere has completely flattened. This is due to the fact that the current translateZ value is 0.

Open the Channel Box on the right of the screen and look at the channels for the sphere. The translate Y attribute is highlighted, which is Maya’s way of showing you that an attribute has a connection. As you see in Figure 9.9, Maya does not show you the output connection on Translate Z (the attribute that is controlling Scale Y); only the input channel is highlighted.

Now we’re going to test the connection. In the Persp panel, select and move the sphere along the Z axis. Notice as you move the sphere, the height (scaleY) is changing to match the translateZ values, as in Figure 9.10. Also notice that the connection is in real time, and does not require any calculation. Later on you will see that certain types of Maya tools and commands update at different times, such as expressions and constraints.

Note: Care in the Connection Editor
Once you connect an attribute in the Connection Editor, that attribute will change to the new input—meaning if you have some customized values for attributes that you accidentally connect, these values will be overwritten even if you disconnect the attributes again. Therefore, you have to be careful when connecting attributes, or locking attributes, that you do not want to change (right-click on the attribute or channel and choose Lock Attribute or Lock Selected, respectively).
This connection is interesting, but it does not have much real-world application. Let’s make a connection that might be made in a real-world application, one that will help us in Hour 10, “Basic Rigging: Preparing Objects for Animation,” when we start creating basic rigs.
Connecting New Attributes
Create a new Maya scene and then create a polygon sphere and a NURBS circle (click Create, Polygon Primitives, Sphere and then click Create, NURBS Primitives, Circle). Scale them to match mine, as shown in Figure 9.11.

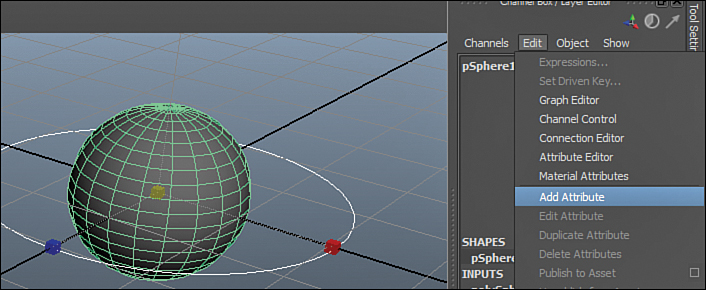
With the objects scaled nicely, we will create a connection between a custom attribute on the NURBS curve and an attribute on the sphere. Select the circle and open the Channel Box. At the top of the Channel Box, click on Edit, Add Attribute, as shown in Figure 9.12.
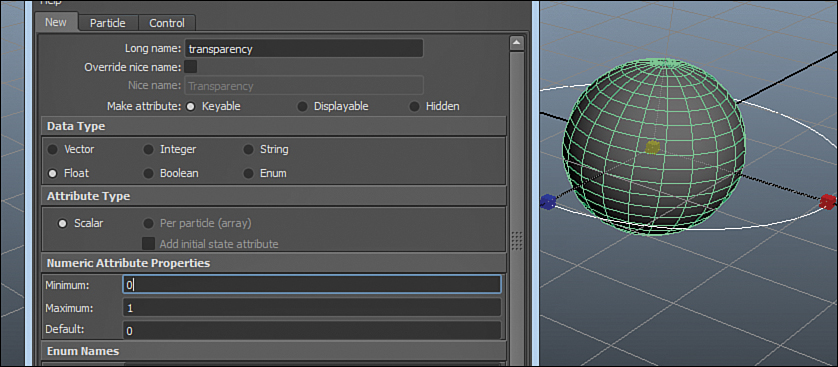
Now in the resulting menu that opens, we are going to create a new attribute that will later control the sphere material’s transparency. In the Long Name attribute, type in “transparency.” Leave the Data Type on “float” and make the Minimum 0, the Maximum 1, and the Default 0, like I did in Figure 9.13.
Click Ok, and you will see a new attribute called “Transparency” has been added to the Channel Box. Now we will connect this attribute to lambert1’s transparency channel. With the circle still selected, open the Connection Editor. Its attributes should be loaded on the left. Your custom attribute of “transparency” should be all the way on the bottom of the list on the left. Now open the Hypershade (click Windows, Rendering Editors, Hypershade). Select lambert1 and in the Connection Editor click on Reload Right. The attributes of lambert1 should all load into the right pane. Now we will make the connection. Scroll down all the way in the left pane and find “transparency.” Click on it and then find “transparency” in the right column as well. Click on the + symbol to expand its attributes and then click on transparency R, G, and B. If done correctly, it should look like Figure 9.14. The circle’s custom attribute is now doing what is commonly called “driving” the transparency of lambert1.
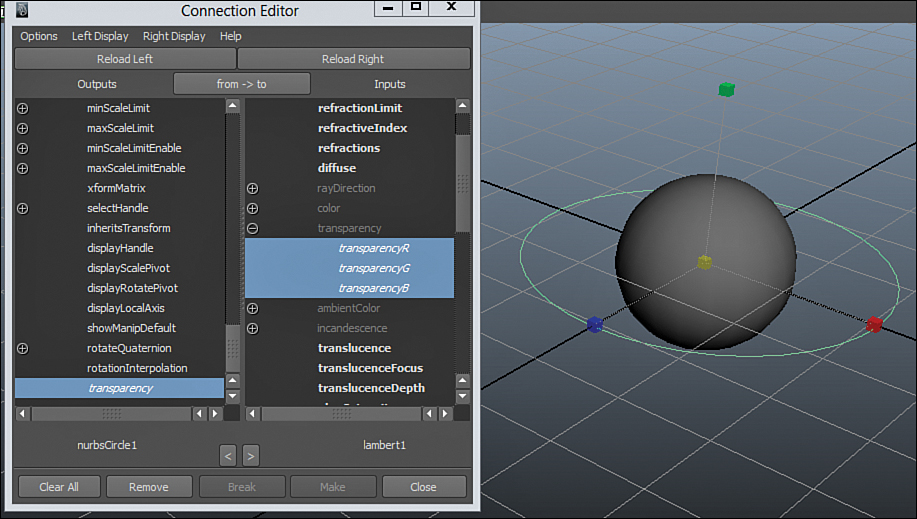
FIGURE 9.14 The new transparency attribute connected to the transparency R, G, and B attributes of the lambert1 material.
Note: Relationship Terms
Maya has a few different ways to connect attributes, but in general we use the term “driving” to indicate that attributes are connected, and to also indicate which attribute is the output and which attribute is the input. The output “drives” the input. This is worth mentioning because Maya also has something call “driven keys,” which we will talk about in a bit.
Select the circle in the Persp panel, and in the Channel Box, click on the Transparency attribute and MMB drag back and forth to test out the connection. If working properly, the attribute will make it possible for you to control and animate the transparency of the material directly. In Figure 9.15, I have adjusted the attribute to .5, which is giving me a 50% transparent material.

FIGURE 9.15 The connection is working properly; I have my attribute set to .5, and the sphere’s material is showing a 50% transparency.
Other Relationships
There are more ways objects and attributes can relate to each other in Maya than simply being connected. This section details some of these ways.
Expressions
Expressions are small pieces of code that are executed as a scene updates. You can create expressions in the Script Editor, or you can create them in the Expression Editor. The syntax looks very similar to what you would expect from MEL script. For instance, to create the same functionality of the Translate Z driving the Scale Y of a sphere, you would type the following into the Expression Editor (click Window, Animation Editors, Expression Editor):
pSphere1.scaleY = pSphere1.translateZ
This is simply telling Maya that when it evaluates the transformations of pSphere1, to make the Scale Y equal to the Translate Z value.
Although there is really no limit to the functionality you can achieve with expressions, it should be noted that expressions are very high level, and as such are evaluated late in the process of a scene update and can slow down a scene considerably depending on what the expression is doing. There are many low-level nodes that are very fast and can offer the same functionality as an expression in most cases, and are not affected by the same problems, such as scene updating and the order of operations. Still, we will talk more about creating expressions in Hour 13, “Animation: Adding Movement to Your Scene.”
Driven Keys
Driven keys are yet another way to make one node’s attributes affect another’s. This menu is found in the Animation menu set (press F2) by clicking Animate, Set Driven Key. The way it works is Maya allows you to have an attribute drive other attributes by using keys or points on a graph. For instance, you would set a key (make a graph point) at 0,0 by “keying” the transparency attribute at 0 while the transparency RGB is also at 0,0,0. Then key (make another graph point) at 1,1 by keying the transparency attribute at 1 while the transparency RGB is also at 1,1,1. Maya then interpolates the values in between, depending on the shape of the curve. I went ahead and keyed the same relationship I just described, and it looks like Figure 9.16.

FIGURE 9.16 Driven keys provide a way to set up a relationship with fine control over the way the connected attributes behave. We will look closer at this type of relationship in Hour 13.
Driven keys have the benefit of working very well and updating in real time, but have the drawback of being very high level and, as such, cause scene slowdown. They might give a lot of control but they are not the most computationally inexpensive way to create relationships between nodes. We will go over driven keys in more depth in Hour 13.
The Relationship Editor
Now that we have seen the ways Maya offers to connect attributes, we should look at the Relationship Editor. This menu allows you to connect nodes in predefined ways to allow Maya to apply the correct effect, calculation, render, tool, and so on. Open the Relationship Editor by going to Window, Relationship Editors, Sets.
Note: One Relationship Editor
It’s a little confusing the way Maya shows many different Relationship Editors when you go looking for the menu. There is really only one editor, but Maya offers the choices so that when you open the editor, it will display the correct nodes for you to connect.
Figure 9.17 shows the Relationship Editor open, with the Sets menu set loaded within it. Note that we will always choose what type of node we want to connect in this editor by using the drop-down box in the top left instead of opening a new Relationship Editor window through Maya’s main menu.

FIGURE 9.17 The Relationship Editor. Notice the drop-down box in the top left is where you can choose the menu set for the Relationship Editor only.
We used the Connection Editor first so that you would have some familiarity with the paradigm of choosing attributes on the left and connecting them on the right. This is the same thing. On the left pane, Maya displays all of the possible nodes you can use to create a relationship, and in the right pane, all of the possible nodes that can be included in that relationship. To create a relationship, or to include a node in a set, simply select the correct node on the left and then select the node you want to add on the right. Maya has this special editor because the tasks to create the relationships manually would be very tedious. Suffice it to say, this editor makes it very easy to include or exclude objects from a set you’ve created, make lights affect certain objects and not affect others, or choose what UV set a texture uses when it is applied to a mesh.
Choosing the Right Relationship
In order to know how to connect nodes, you first need to decide what the functionality is supposed to be. If the connection is very simple, it is probably best to just connect the two nodes using the Connection Editor. For instance, if you want a sphere’s Scale Y to be driven by its Translate Z, as we did in our example, then connecting the nodes is the simplest and fastest way to do that. When you start to need some more functionality, you still want to see if you can get the functionality out of a straight connection, because it is the fastest and lowest-level way to make nodes affect one another. For example, if you want a sphere’s scale Y to equal half of its Translate Z, that is still possible with connections. Maya has a node (accessible in the Hypershade) called Multiply/Divide. This node allows you to input values and either multiply or divide them. In Figure 9.18, I connected the sphere’s Translate Z attribute as the input into a Multiply/Divide node, which is set to multiply all values by .5, and then connected the output back to the sphere’s Scale Y. This gives us the functionality we want using only connections that calculate quickly, update in real time, and are easier to modify and see than the other relationship types. You are not expected to know where to find these nodes or to be able to create this relationship type after only a few hours of exposure to Maya, but I’ve saved the file in this Hour’s source files folder for you to see, as scale_Multiply.ma.
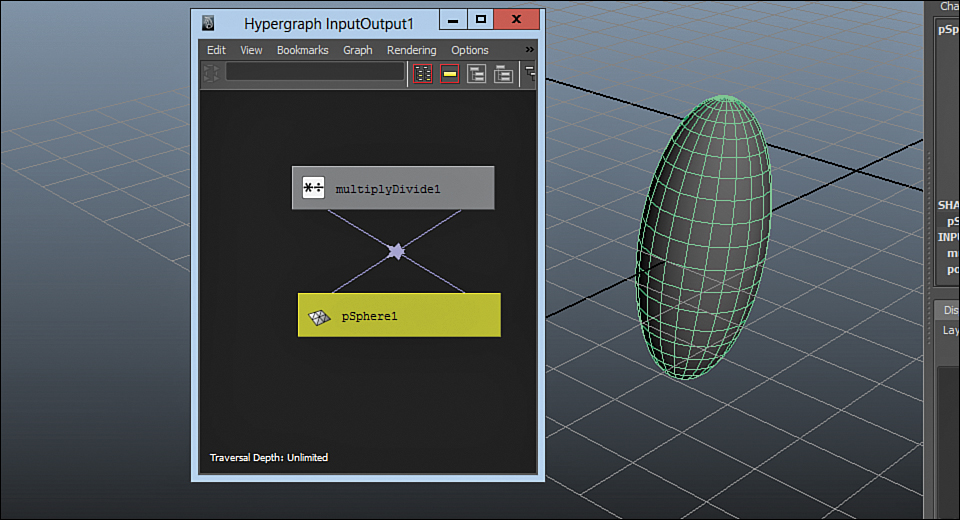
FIGURE 9.18 The Multiply/Divide node has both an input and an output connection. As you will see when you open the file, the Scale Y is exactly half the value of the Translate Z. Utility nodes like this one extend the functionality of connections and make a huge amount of control possible.
Now, the same type of functionality is possible with expressions. If we wanted this functionality with an expression, we would type the following in the Expression Editor:
pSphere1.scaleY = .5 * pSphere1.translateZ
As you might guess, the more complicated the relationship, the more difficult it can be to find the correct nodes to connect. Expressions might need to take over as the complexity goes too high to build the right node network for the result you desire. Finally, if control is really important, and you are going for an intuitive relationship, a driven key is a great idea. We will go over them in depth in Hour 13, but know that they offer an intuitive way to control the effect one node as on another—effects that could be extremely cumbersome to create with connected nodes, or require a very high level of math knowledge to achieve with expressions.
Depending on what you are looking for, choosing the right relationship to create normally starts with connections and then goes to expressions or driven keys as the complexity and/or control goes up.
![]() Video: Making Common Connections
Video: Making Common Connections
In this video, I demonstrate some common connections artists make in Maya. I show some of the relationships that are made by default when you create objects in Maya, and how they are manipulated in real-world applications. We also view these connections in different editors.
Summary
We can view relationships in the Hypergraph and Hypershade, but also see what nodes are connected in many different editors and menus, including the Attribute Editor, the Channel Box, even RMB clicking on an object. To create connections, the easiest way is to use the Connection Editor. We tried a few connections ourselves and saw this functionality in work. There are a few different ways that nodes can be connected—be it with connections, driven keys, expressions, or in very low-level ways that Maya wants to handle, ways that we can modify using the Relationship Editor. This all-in-one editor holds the information regarding many relationships within Maya, ranging from light sets to character sets and UV sets. Last, to decide on how to create the right relationship, you should think about functionality and how complex the relationship needs to be, and then decide between a connection, expression, or driven keys, or if your relationship is one of the types Maya handles through the Relationship Editor.
Q&A
Q. Why can’t I connect two attributes in the Connection Editor?
A. They are not compatible! You must make sure that the data you want to drive another attribute comes in the same format that the attribute reads. For instance, a color swatch reads data in the format [r,g,b], with each value being between 0 and 255. You can’t simply connect a translation value to it; Maya doesn’t know what to do with data coming in a different format.
Q. What is the fastest way to delete a connection?
A. If you want speed, the fastest way is to right-click on the attribute in either the Channel Box or Attribute Editor and choose Break Connections. This is break all of the connections on that attribute, though. If you have more than one connection, you may instead want to select the connection in the Hypershade or Hypergraph and delete it, or deselect the node in the Connection Editor.
Q. Why can’t I change the value of a connected attribute?
A. You probably created the connection in the wrong direction. An attribute becomes basically locked when it has an input connection. You can only change the value of the attribute driving the connection, so check and see if you have the nodes switched in the Connection Editor.
Q. Why does the Relationship Editor not show any attributes?
A. The Relationship Editor connects nodes in predefined ways. For instance, it allows you to connect a UV set with a texture. This is a common task that in order to do manually through other editors would be cumbersome. Maya gives you this editor so that you can quickly create a small number of relationships that are common and essential to Maya. However, Maya can’t predict the other infinite connections you can create with the Connection Editor, which is why it is totally open.
Workshop
The workshop contains quiz questions and exercises to help you solidify your understanding of the material covered. Try to answer all questions before looking at the “Answers” section that follows.
Quiz
1. Where is the Connection Editor found?
2. What does it mean that an attribute is “driving” another?
3. Which type of connection allows you to create keyframes that act as grid points to control a connection?
4. What are the drawbacks of using expressions to connect attributes?
5. How many different Relationship Editors are there?
Exercise
Try connecting many different attributes and see if you can create some interesting results. Explore the Hypershade’s nodes, specifically the Utility nodes, and create some unique effects.
Answers
1. In Window, General Editors. For some reason, Maya does not centralize the Connection Editor, Expression Editor, or driven keys.
2. An attribute whose output is connected to the input of another node is “driving” that node.
3. Driven keys are relationships that are edited on a grid called the Graph Editor.
4. Expressions are calculated at a high level and therefore can be buggy and not evaluate correctly in a complex scene. They also can cause scene slowdown.
5. There is only one Relationship Editor. Maya breaks up the more common relationship types into different menus so that when you open the Relationship Editor, you are immediately presented with the correct menu set.