
Hour 13. Animation: Adding Movement to Your Scene
What You’ll Learn in This Hour:
![]() How to create keyframes and work with the Timeline
How to create keyframes and work with the Timeline
![]() Which animation editors should be used and for what purposes
Which animation editors should be used and for what purposes
![]() How to create and manage constraints in animation
How to create and manage constraints in animation
![]() What other tools can be used to create animation
What other tools can be used to create animation
Animation, or creating the illusion of movement through the rapid display of successive frames in a sequence, is Maya’s forte. Well, to be fair, Maya has many fortes. But truly, the animation tools in Maya are fantastic, and contribute greatly to the reason why Maya is the de-facto standard animation program used by feature animation studios and visual effects firms worldwide. Although lauded as the toughest skill to master in all of CG, animation is actually based on some very simple principles. It is the combination of these principles in conjunction with skillful application of Maya’s keyframe and dynamic animation tools that makes a true animator shine.
Note: Artistry Versus Technique
Animation is truly the most challenging aspect of CG. Animators train for years before they are trusted with the scenes you see in your favorite animations and visual effects. If you are serious about becoming an animator, you should find artistic support in the form of books, online forums, or even school. This book will teach you how to operate Maya’s animation tools, but cannot make up for the kind of artistic information you will need to create engaging performances.
In this Hour, you find out how to use Maya’s animation tools to create motion in a scene. You will learn the different animation editors and get some exposure to manipulating animation. You will also have some practice animating constraints and see other tools that Maya offers in animation.
The Principles of Animation
Although this book offers a technical walkthrough of Maya’s animation tools, no section on animation in any book would be complete without discussing the following principles of animation. These 12 principles, developed and refined by the “Nine Old Men” of Disney, have survived and persisted through history to inform even the most cutting-edge animators from movies to games and everything in between. These principles will never be lost, only built upon, expanded, and taken to the next level by generations of animators... maybe starting with you!
Squash and Stretch
This principle dictates that bodies and objects tend to squash and stretch as they go from extreme poses. For instance, a ball squashes when it hits the floor and stretches out as it goes into the air. A cat squashes into a small form before it stretches out, leaping forward. The application of this principle in animation can lead to some very cartoonish animation very quickly.
Anticipation
This principle says that before any action, a body or an object will first move in the opposite direction to build energy for the action. Before you jump off of the ground, you bend your legs and swing your arms backward. This principle not only helps us understand the motion of an object, but it also allows the audience to follow along better, because their eyes can much more easily track an object that gives warning of its movements.
Staging
Staging deals with the “setup” of your entire scene—the position of the characters, the position of the set and props, the camera angle, and the plan to have the action execute in a way that the audience will understand what is going on. Think of staging as the clarity of your idea of what you would like to animate, in terms of the visual setup of the scene. If you have one character punching another, it is hard to see what is happening if the camera is behind one of them. You would probably stage that action in profile, so we can see both characters the whole time.
Straight-Ahead Action and Pose to Pose
This is not so much a principle as it is the two techniques you can use to create character performances. Straight-ahead action is action in which it is easier to create keyframes in sequence, moving forward in time and making a small change to the rig and then moving on again. This method is akin to animating stop motion or clay animation. Pose to pose, on the other hand, is the process of determining a group of strong poses you would like to see the character strike, and then timing those poses individually on the timeline. When you are done creating the poses, you then begin smoothing and interpolating the movement to give a seamless performance.
Follow Through and Overlapping Action
Follow through and overlap deal with the way objects that are jointed or connected move. Follow through is basically the idea of inertia; an object in motion tends to stay in motion. So when a character is running and comes to a stop, the feet, spine, and waist all “overshoot” their rest position before they settle back into the rest pose. Follow through is what determines how far past the end pose an object will travel. Overlapping action is kind of like the opposite of follow through; think of it like “drag.” If you swing a bat, the end of the bat is going to “lag” behind the motion of your body and arms in the beginning of the action. That is overlap.
Slow In and Slow Out
This fundamental describes the tendency of objects to come to gradual stops and have gradual starts. Only mechanical objects such as robot arms can accelerate instantly. Humans and other natural characters should have a bit of ramp-up time to their movements, and should gradually change directions as well.
Arcs
In nature, almost all motions follow curved trajectories. This is due mostly to the fact that our joints are rotational joints; therefore, we move in arcs as we move our limbs. To avoid mechanical motions, move all of your motions on arcs, if possible, even such things as head turns, walk cycles, and so on.
Secondary Action
Secondary action is action that contributes to the main action of a scene, without being so prominent that it distracts from the main action. A character fiddling with his buttons nervously as he talks to his boss would be a good example of secondary action. Secondary action is great for making a scene feel much more “full” and natural. It also allows the audience to see a subtle layer of a character’s performance, in the way that the secondary action is executed.
Timing
Timing is another one of the fundamentals that is not as much a fundamental as much as it is a part of animation itself. Timing deals with experimenting with different ways to execute an action in an interesting way—breaking physics and mechanics to show the audience something they’ve never seen before. An experimental attitude is easy with Maya’s many timing tools.
Exaggeration
In animation, we have the opportunity to create fantasy, so although everything should not be exaggerated, a little bit of emphasis goes a long way. You should look out for chances to embellish what would normally be a boring, run-of-the-mill animation with some flair.
Solid Drawing
This fundamental is slightly antiquated in the digital age. It deals with drawing the characters with volume, and respecting the construction of a model. It still has some application in the 3D medium, though; in Maya, working with models that can break if you stretch the rigs too far means that respecting the physical structure of a model plays a large role in animating. Solid drawing deals with knowing the limits of the characters you are working with, and still getting great animation.
Appeal
Appeal is one of the most important fundamentals, but alas one of the most difficult to describe, or attain for that matter. Appeal means that your animation is interesting and engaging. In terms of characters, even villains, they are fun to watch. No matter how evil a character is, they should still be designed and move in an appealing way. Your goal should always be to engage your audience!
Now that we have briefly familiarized you with some of the fundamentals and guidelines of good animation, let’s see how to technically achieve this in Maya.
Time in Maya
Since the dawn of animation, we have depended on the rapid display of successive frames to give the illusion of movement. Maya handles time in just this way; by breaking 1 second of time into 24ths, you are manipulating “frames” that will display at 24 frames per second (24fps). When you watch the frames at this speed, smooth motion occurs. Other time formats are available as well. Some common time formats are 12fps and 30fps. These formats help us match stop-motion animation and television display formats, respectively. Regardless of what time format you are using, you should know that even though a frame displays for a fraction of a second, Maya actually calculates time with near-infinite precision. Even though we are playing the animation at 24fps, in between those frames there is transformation information being calculated in fine detail. You are going to become very familiar with this calculation when we start working with “interpolation” in Maya. So rather than think of a frame as a photo, think of it as the positions and orientations you’ve chosen for the objects in your scene at a given point in time—and only the playback of those positions displays at set intervals (12fps, 24fps, and so on).
The Timeline
Remember from our discussion of the Maya UI in Hour 2, “Menus and Navigating the Maya UI,” that the bottom area holds the Timeline and Range Slider. As you can see in Figure 13.1, the default Maya UI displays the Timeline prominently.

The controls to the right of the Timeline are standard VCR controls, such as play forward, play backward, frame forward, and frame backward. You can also advance to the nearest keyframe forward or backward as well. Truthfully, once learning the hotkeys, most Maya users do not use the buttons to play animation or advance frames. Let’s learn them quickly:
![]() To play animation, press Alt+V. Esc or Alt+V will stop playback.
To play animation, press Alt+V. Esc or Alt+V will stop playback.
![]() To advance one frame, press Alt+. (period). To reverse one frame, press Alt+,.
To advance one frame, press Alt+. (period). To reverse one frame, press Alt+,.
![]() To advance to the next keyframe, simply press the period key. To reverse to the previous keyframe, press the comma key (,).
To advance to the next keyframe, simply press the period key. To reverse to the previous keyframe, press the comma key (,).
The Timeline displays the current time by drawing a shaded box with a white frame label. Click anywhere on the Timeline and notice that the box moves to that time. You can see the frame labels on the Timeline, and by default you will have 24 frames in your scene. Let’s change that.
The Range Slider
The Range Slider allows us to change the number of frames in our scene, or view only a portion of the frames for editing animation in a more detailed way. The Range Slider sits just below the Timeline. Follow these instructions to change the frames of your scene:
![]() Start a new Maya scene.
Start a new Maya scene.
![]() Notice the left and right sides of the Range Slider have two boxes. The far-left and far-right boxes are the scene range—how many frames are in your scene. The near-left and near-right boxes are the playback range—the frames that will display if you play the animation.
Notice the left and right sides of the Range Slider have two boxes. The far-left and far-right boxes are the scene range—how many frames are in your scene. The near-left and near-right boxes are the playback range—the frames that will display if you play the animation.
![]() Change the far-right (scene end time) box’s value to 100.
Change the far-right (scene end time) box’s value to 100.
![]() Notice you still have 24 frames in your timeline, but that the Range Slider bar is now smaller. This is because you are displaying a smaller amount of frames relative to the total scene length.
Notice you still have 24 frames in your timeline, but that the Range Slider bar is now smaller. This is because you are displaying a smaller amount of frames relative to the total scene length.
![]() To display a different range of keys, drag the slider in the middle of the Range Slider back and forth. You will see the Timeline update as you move it back and forth.
To display a different range of keys, drag the slider in the middle of the Range Slider back and forth. You will see the Timeline update as you move it back and forth.
![]() To display all the frames in your scene, you can either make the values in the playback range boxes the same as the scene-start and scene-end range boxes, or simply drag the square handles on either end of the Range Slider to expand or contract the playback range.
To display all the frames in your scene, you can either make the values in the playback range boxes the same as the scene-start and scene-end range boxes, or simply drag the square handles on either end of the Range Slider to expand or contract the playback range.
Now that you have adjusted the scene length and the playback range, you are ready to add keyframes to the timeline.
What Is a Keyframe?
In hand-drawn animation, a keyframe was a drawing done by an animator that defined an important moment in the scene. It could be the extreme pose of an action, the dramatic wind-up of anticipation, and so on. An “in-betweener” would then gather the keyframes drawn by a lead animator and then fill in the drawings in between (hence the name) the keyframes. In Maya, a keyframe is when you define an explicit position for an object at a specific time. This is akin to a keyframe in hand-drawn animation in that you are assigning a certain amount of importance to this frame. However, remember that the idea of a frame is arbitrary; in between the displayed frames, there is still movement occurring. When you “set a key,” you are telling Maya that at a certain point in time, you want an object to be positioned and oriented in a certain way. You can also set keys on many attributes. Doing so also tells Maya that at a certain point in time, you want the value of the attribute to be whatever you decide. Keyframes are also referred to as simply “keys.” A keyframe is represented by a red line on the timeline, as seen in Figure 13.2.
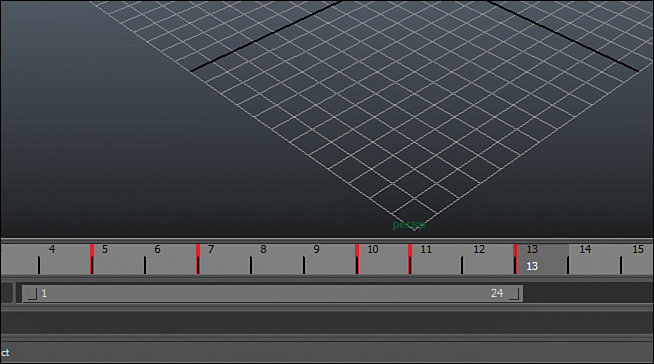
FIGURE 13.2 The Timeline shows keyframes for any selected object or node. Keys are displayed as red tick marks.
To make sure your keys are displaying on the Timeline in a clearly visible way, let’s increase the Timeline height and increase the Key Tick size. Click on Window, Settings/Preferences, Preferences. In the Time Slider menu listed under the Display category on the left side of the Preferences window, change Time Slider Height to 2, change Key Tick Size to 4, and then click Save.
Creating Keyframes
To create a keyframe, you simply press the S key with any object selected. By default, a key will be set on all the channels that are active in the Channel Box. If you want to set a key on only specific channels, you can change your preferences to do so. However, the default functionality of Maya is what most animators use. Right-clicking on almost any attribute or channel in almost any editor will bring up a marking menu that allows you to set a key as well. Let’s try:
![]() Open key_Test.ma in this Hour’s files. There is a sphere sitting in the middle of the scene.
Open key_Test.ma in this Hour’s files. There is a sphere sitting in the middle of the scene.
![]() Select the sphere and go to frame 1 by clicking on frame 1 on the Timeline.
Select the sphere and go to frame 1 by clicking on frame 1 on the Timeline.
![]() Press S. All of the channels in the Channel Box should turn a bright pink, and a key is set on frame 1, as in Figure 13.3.
Press S. All of the channels in the Channel Box should turn a bright pink, and a key is set on frame 1, as in Figure 13.3.
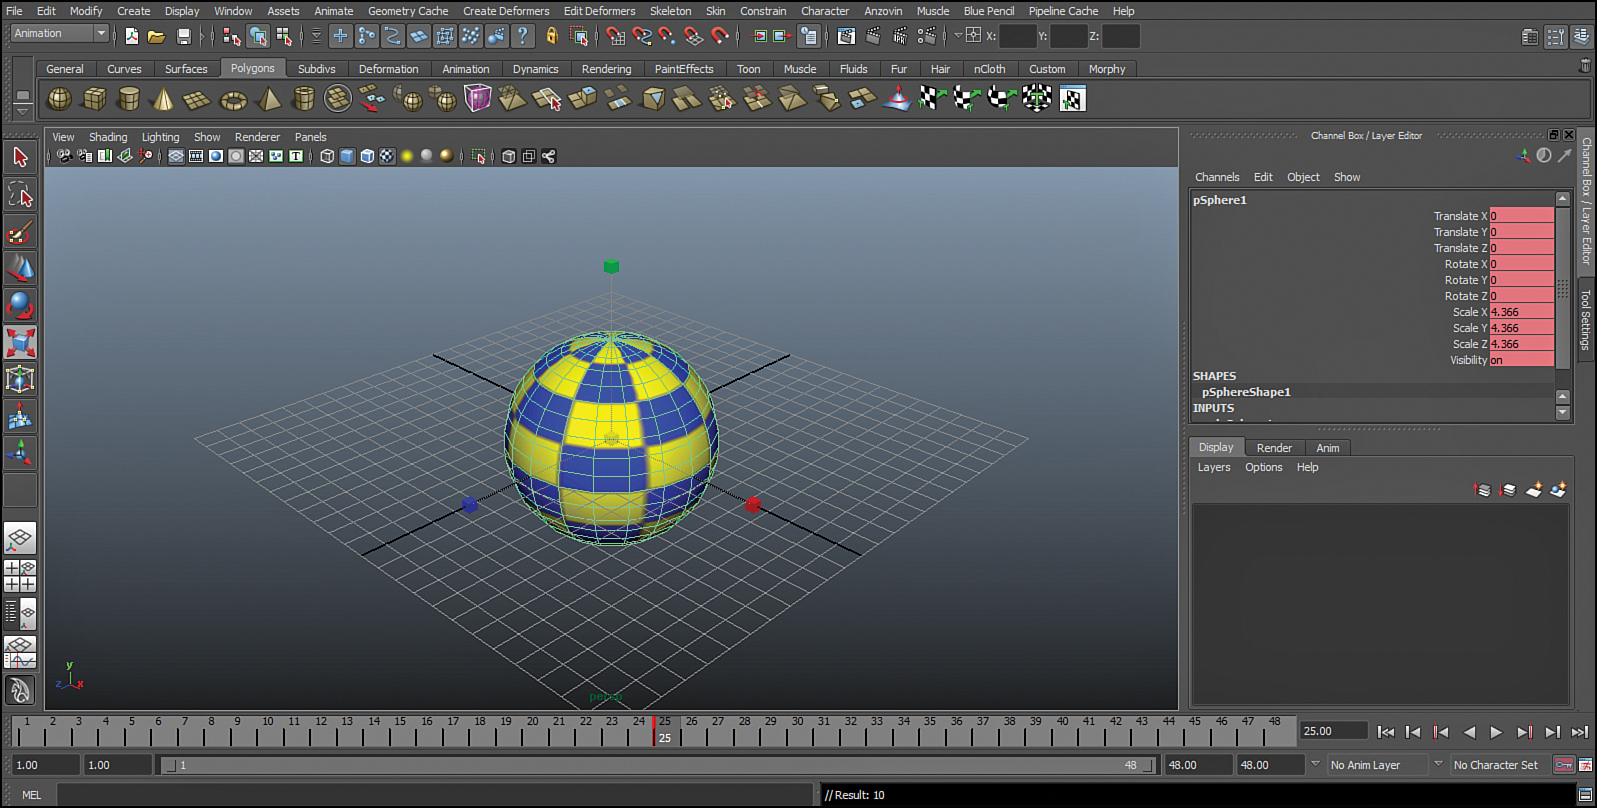
FIGURE 13.3 When you set a key, it will appear on the Timeline and all channels in the Channel Box will turn pink.
You can tell that you have “keyed” (vernacular for creating a keyframe) all channels by looking at the Script Editor bar. Notice how it says “//Result: 10.” This is telling you that 10 channels have just received a keyframe. Counting the number of channels on the sphere’s transform node confirms this. Whenever you are not sure if you have set a key, look for the “Result” to confirm that you have.
We’ve created a single keyframe on the sphere; now let’s create animation:
![]() Select the sphere.
Select the sphere.
![]() Click on frame 50 on the Timeline.
Click on frame 50 on the Timeline.
![]() Press W to switch to the Move tool. Move the sphere along the Z axis about 10 units.
Press W to switch to the Move tool. Move the sphere along the Z axis about 10 units.
![]() Press the S key.
Press the S key.
![]() Play back the animation by pressing Alt+v.
Play back the animation by pressing Alt+v.
Notice how the sphere is now moving from the origin to the end position over 50 frames. Also notice that the sphere does not simply “pop” to its new position on frame 50, meaning that new keyframe is not really akin to a drawing. Instead of being a new “frame,” that keyframe represents the position the sphere needs to be in at that specific time, and Maya interpolates the in-betweens for you. We will look even closer at interpolation in a bit.
Using AutoKey to Set Keys
You have created some animation now, but it can be cumbersome to have to hit S every single time you want to create a key. Maya has a feature called AutoKey that satisfies this problem. When AutoKey is turned on, any change to a channel that has at least one keyframe set on it will automatically create a new key on that frame. Many professional animators rely on AutoKey to save time when animating. Let’s turn on AutoKey and do some testing with it:
![]() In the bottom-right corner of the Maya UI, click on the small button with a picture of a key on it that looks like this:
In the bottom-right corner of the Maya UI, click on the small button with a picture of a key on it that looks like this: ![]()
![]() Once it is toggled, AutoKey is now active. Any change to any channel that is already keyed will set a new key on the current frame.
Once it is toggled, AutoKey is now active. Any change to any channel that is already keyed will set a new key on the current frame.
![]() Click on Frame 75 on the Timeline.
Click on Frame 75 on the Timeline.
![]() Select and move the sphere upward in Y about 10 units, or as high as you’d like.
Select and move the sphere upward in Y about 10 units, or as high as you’d like.
![]() Notice that on frame 75, even though you have not pressed S, there is a new keyframe on the Timeline.
Notice that on frame 75, even though you have not pressed S, there is a new keyframe on the Timeline.
Note: AutoKey and Channels
AutoKey only sets a key on the channels that are affected! This means that because you have only moved the sphere upward in Y, only the TranslateY channel has a keyframe on it. This is important to remember as we create animation, because sometimes you will actually want to press S to set a key on all channels at the same time; other times, you will only want translate keys or rotate keys.
Manipulating the Timeline
We are going to manipulate the Timeline to practice moving and scaling keys. Start from the scene you are currently working on, making sure a good number of keys is spread across the entire Timeline. Do as follows:
![]() To select a range on the Timeline, Shift+LMB click and drag the range you would like to select. It will turn red, as in Figure 13.4.
To select a range on the Timeline, Shift+LMB click and drag the range you would like to select. It will turn red, as in Figure 13.4.

![]() To deselect a range on the Timeline, click anywhere outside the range you have selected.
To deselect a range on the Timeline, click anywhere outside the range you have selected.
![]() To select the entire Timeline, double-click with the LMB on the Timeline.
To select the entire Timeline, double-click with the LMB on the Timeline.
![]() To scale a range of keys on the Timeline, use the arrow manipulators on the left and right sides of the selected range.
To scale a range of keys on the Timeline, use the arrow manipulators on the left and right sides of the selected range.
![]() To move the selected range of keys, use the double-arrow manipulator in the center of the selected range.
To move the selected range of keys, use the double-arrow manipulator in the center of the selected range.
Animators frequently will select a single frame with the intent of moving one key. Shift+LMB clicking on one frame will work the same as selecting a range of frames, and the manipulator handles the function the same as well.
Copying and Pasting Keys
There are many methods of copying and pasting keys in Maya. One of the quickest ways is to select a range on the Timeline, right-click and choose Copy, and then click on a new frame. This frame will act as the start frame for the pasted animation. Right-click on the new frame and choose Paste, Paste.
Another method involves using the Copy Keys tool in Maya. This is an underused tool because it allows you copy animation between scenes by using the Windows clipboard. Follow along and you will see:
![]() Save your scene as copy_Test.ma.
Save your scene as copy_Test.ma.
![]() Select the sphere.
Select the sphere.
![]() Click on Edit, Keys, Copy Keys and the options box
Click on Edit, Keys, Copy Keys and the options box ![]() .
.
![]() Copy the settings shown in Figure 13.5 and click Copy Keys.
Copy the settings shown in Figure 13.5 and click Copy Keys.

![]() Now open key_Test.ma.
Now open key_Test.ma.
![]() It is the same scene you started with, except with no keys on the sphere.
It is the same scene you started with, except with no keys on the sphere.
![]() Select the sphere.
Select the sphere.
![]() Click on Edit, Keys, Paste Keys and the options box
Click on Edit, Keys, Paste Keys and the options box ![]() .
.
![]() Copy the settings shown in Figure 13.6 and click Paste Keys.
Copy the settings shown in Figure 13.6 and click Paste Keys.
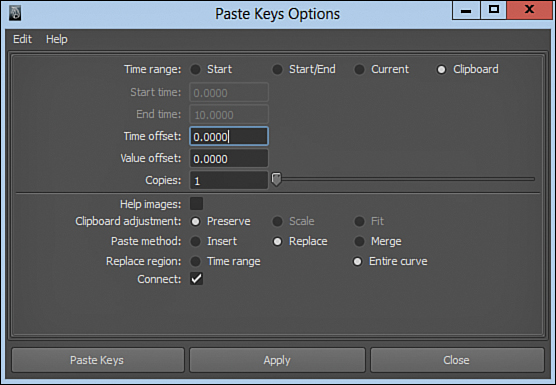
FIGURE 13.6 The settings for pasting keys from the clipboard. Copy these settings and click Paste Keys.
![]() If you copied my settings correctly, your animation should be pasted into this blank scene as it was in the copy_Test.ma scene.
If you copied my settings correctly, your animation should be pasted into this blank scene as it was in the copy_Test.ma scene.
![]() Play back the animation by pressing Alt+v.
Play back the animation by pressing Alt+v.
A commonly used method for copying keys is executed on the Timeline. It is not strictly a method for copying keys as much as it is a method for copying the current “state” of the Channel Box. In other words, it will copy the current values of all channels of a selected object or node for you to paste somewhere else on the Timeline. Let’s give it a try:
![]() In your animation scene, click on frame 1.
In your animation scene, click on frame 1.
![]() Take note of the position, rotation, and scale of the sphere.
Take note of the position, rotation, and scale of the sphere.
![]() Now MMB click and drag from frame 1 to frame 24 on the Timeline.
Now MMB click and drag from frame 1 to frame 24 on the Timeline.
![]() When you release the MMB, nothing will appear to happen, but what Maya has done in the background is actually copy all of the values in the Channel Box on frame 1 into the clipboard. Also notice that the sphere did not move to where it actually is on frame 24; it is still in its frame 1 position.
When you release the MMB, nothing will appear to happen, but what Maya has done in the background is actually copy all of the values in the Channel Box on frame 1 into the clipboard. Also notice that the sphere did not move to where it actually is on frame 24; it is still in its frame 1 position.
![]() Set these values on frame 24 by pressing S.
Set these values on frame 24 by pressing S.
![]() Play back the animation and notice that you have successfully copied the sphere’s information from frame 1 to frame 24.
Play back the animation and notice that you have successfully copied the sphere’s information from frame 1 to frame 24.
Remember, the MMB-drag trick does not require there to be a keyframe on the frame you are copying. Try it a few more times on frames that do not have keys on them. You will see that you can copy the “state” of an object anywhere on the Timeline.
The Graph Editor and Editing Keys
The most powerful animation editor and arguably the longest to master is the Graph Editor. This editor displays the mathematics behind the motion, in the form of what are called animation curves. If you are familiar with algebra, you will know that a graph displays the relationship between two different variables. In Maya’s Graph Editor, the relationship on display is that between time and value. Click on Window, Animation Editors, Graph Editor to open the Graph Editor and begin to see its functionality. It will look like Figure 13.7.
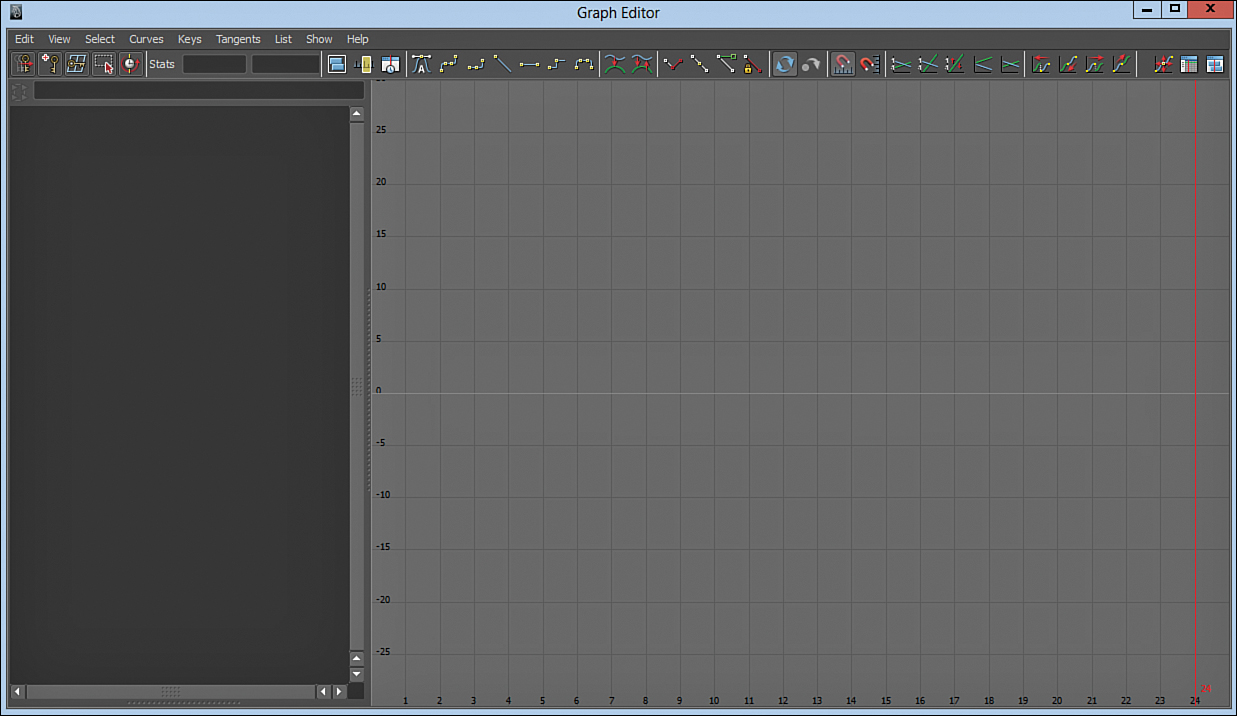
FIGURE 13.7 The Graph Editor is a powerful editor for animation. Learning to work with this editor is essential to creating lifelike and engaging animation.
At the top of the window are the menus for editing the different components of animation: Curves, Keys, Tangents, and so on.
Select your sphere. You will see that all of your animation curves load automatically into the Graph Editor, as in Figure 13.8.

Look closely at the two axes in the Graph Editor. Along the bottom of the window, the frame numbers are displayed. Along the left side of the graph, values are displayed. So, as time goes by, the values change, and you can see what a value will be on any given frame. See this in action by pressing Alt+v and the red vertical line representing the current time moving across the graph.
Working with the Graph Editor
The Graph Editor is used primarily for polishing your animation. You will work by assessing the smoothness of the curves and then selecting and moving keys and adjusting tangent handles (described next) to take your animation that last 10% of the way. All of the black dots represent keys, and the colored lines represent the animation curves of your channels. Let’s click on a few of the tools and menus to see what they do:
![]() Select any of the black dots that represent keys.
Select any of the black dots that represent keys.
![]() You can move a key by pressing W and then MMB dragging it. Dragging left or right changes the frame that the key falls on. Dragging up or down changes the value of the key.
You can move a key by pressing W and then MMB dragging it. Dragging left or right changes the frame that the key falls on. Dragging up or down changes the value of the key.
![]() LMB dragging while near a key will move the key, too. The Rotate tool does not work in the Graph Editor, but the Scale tool does.
LMB dragging while near a key will move the key, too. The Rotate tool does not work in the Graph Editor, but the Scale tool does.
![]() Switch to the Scale tool.
Switch to the Scale tool.
![]() MMB dragging up and down scales the values, and MMB dragging left and right scales the time. Notice that the center point of the scale is wherever you initially click on the Graph Editor.
MMB dragging up and down scales the values, and MMB dragging left and right scales the time. Notice that the center point of the scale is wherever you initially click on the Graph Editor.
![]() Select any one of the channels on the left side of the window. You will see that only that channel’s animation curve displays when it is selected. You can return to viewing the entire object’s channels by selecting the object in the left side of the Graph Editor.
Select any one of the channels on the left side of the window. You will see that only that channel’s animation curve displays when it is selected. You can return to viewing the entire object’s channels by selecting the object in the left side of the Graph Editor.
Interpolation and Tangents
You may notice that when selected, a key has a handle attached to it. This is called a tangent handle. Manipulating this handle will adjust the animation curve as it passes through the key, and the handle will always stay tangent to the curve itself. Manipulating tangents is the primary method of smoothing animation using the Graph Editor. You will see all of the different tangent types as buttons along the top of the Graph Editor, as in Figure 13.9.
The terms “tangents” and “interpolation” are generally interchangeable in Maya, as you use the different tangent types to access different types of interpolation between keys.
We call the animation curves between keys “interpolated” frames. Maya has some default interpolation types, but really all they determine is the angle of the tangents. When you use keyframes sparingly and use the tangents to get the animation curve that you want, you are using good keyframe economy, but on the other hand, you may have to do a lot of serious tangent polishing to get your scene to look finished. Let’s look at some of the interpolation types:
![]() Open graph_Editor.ma.
Open graph_Editor.ma.
![]() Select the sphere.
Select the sphere.
![]() Open the Graph Editor.
Open the Graph Editor.
![]() Click on the RotateY channel on the left and see just that channel’s animation curve load.
Click on the RotateY channel on the left and see just that channel’s animation curve load.
![]() Press F to frame the curve in the Graph Editor.
Press F to frame the curve in the Graph Editor.
![]() Your Graph Editor should look like mine in Figure 13.10.
Your Graph Editor should look like mine in Figure 13.10.

FIGURE 13.10 The RotateY animation curve has all the different types of interpolation on it for us to see.
There are actually only three different types of interpolation, even though there are seven different tangent types. The three interpolation types are linear, spline, and stepped. The seven tangent types are Auto, Spline, Clamped, Linear, Flat, Stepped, and Plateau. The two I did not specifically build into this animation curve are Auto and Spline, because Auto tangents simply try to anticipate the smoothness you are trying to create and will use a combination of the other tangent types. Finally, with Spline tangents, Maya will always try to make your animation curves as smooth as possible, no matter what you intended the shape to be. Next we’ll discuss each one of these tangent types:
![]() The very first keyframe uses Linear interpolation. This means Maya will move all of the objects linearly between keys. This type of movement is considered mechanical and boring.
The very first keyframe uses Linear interpolation. This means Maya will move all of the objects linearly between keys. This type of movement is considered mechanical and boring.
![]() The second key has Linear as well.
The second key has Linear as well.
![]() The third key has Flat tangents. This is a form of spline interpolation, where the tangents have Slow In/Slow Out applied to them. As the time advances toward the key on frame 22, the rotation in the Y axis comes to a temporary stop, before it accelerates out of that key again.
The third key has Flat tangents. This is a form of spline interpolation, where the tangents have Slow In/Slow Out applied to them. As the time advances toward the key on frame 22, the rotation in the Y axis comes to a temporary stop, before it accelerates out of that key again.
![]() The fourth key is Flat as well, but it was generated by using the Plateau tangents. Plateau tangent types gives you Flat tangents between two keys that have close values, and Smooth tangents between keys that have large change in values. The only difference between Plateau and Clamped tangents is that Plateau will also create Flat tangents at the beginning and end of your animation, and Clamped will make them Smooth.
The fourth key is Flat as well, but it was generated by using the Plateau tangents. Plateau tangent types gives you Flat tangents between two keys that have close values, and Smooth tangents between keys that have large change in values. The only difference between Plateau and Clamped tangents is that Plateau will also create Flat tangents at the beginning and end of your animation, and Clamped will make them Smooth.
![]() The fifth key is Stepped interpolation. This type of interpolation is akin to stop-motion animation. A key with Stepped interpolation will hold the value until the next keyframe, no matter how much time passes. This tangent type is commonly used in the very early blocking stages of animation, because it is easier to view your animation with no interpolation than to try to imagine your animation with rough interpolation removed.
The fifth key is Stepped interpolation. This type of interpolation is akin to stop-motion animation. A key with Stepped interpolation will hold the value until the next keyframe, no matter how much time passes. This tangent type is commonly used in the very early blocking stages of animation, because it is easier to view your animation with no interpolation than to try to imagine your animation with rough interpolation removed.
Now that you have seen the different interpolation types, let’s see a few of them in practice in an animation scene with a little more practical application:
![]() Open bouncing_Ball.ma in this Hour’s files.
Open bouncing_Ball.ma in this Hour’s files.
![]() Play the animation by pressing Alt+v to see the ball bouncing.
Play the animation by pressing Alt+v to see the ball bouncing.
![]() Stop the animation by pressing Esc.
Stop the animation by pressing Esc.
![]() Select the sphere and open the Graph Editor.
Select the sphere and open the Graph Editor.
![]() Select the Translate Y channel in the left panel of the Graph Editor and press F to frame the curve in the window.
Select the Translate Y channel in the left panel of the Graph Editor and press F to frame the curve in the window.
![]() Notice how the shape of the animation curve resembles the motion of a bouncing ball itself. As you learn to animate, you will begin to notice patterns like this in the Graph Editor, and motion becomes easier to manipulate and smooth.
Notice how the shape of the animation curve resembles the motion of a bouncing ball itself. As you learn to animate, you will begin to notice patterns like this in the Graph Editor, and motion becomes easier to manipulate and smooth.
![]() Select any one of the keys at the bottom of one of the bounces.
Select any one of the keys at the bottom of one of the bounces.
![]() It has a tangent that is “broken,” as in Figure 13.11.
It has a tangent that is “broken,” as in Figure 13.11.

To get the sharp impact on the floor, the tangent handles needed to be broken. You can do that by pressing the button with the folded tangent handles in a “V” shape in the middle of the row of buttons at the top of the Graph Editor. Once you have broken a tangent handle, you can individually manipulate either side to give any shape you like.
What does the tangent look like at the top of the bounce? If you said “flat,” you are correct. We need a Slow In/Slow Out motion at the top of the arc of a bouncing ball because that is how gravity affects an object in air. However, those tangents are not just flat, they are weighted.
![]() Select any of the top keys on the Translate Y animation curve in the Graph Editor.
Select any of the top keys on the Translate Y animation curve in the Graph Editor.
![]() Notice how the circles at the end of the handles are not solid like normal tangents, but hollow. This is because they are weighted tangents. Weighted tangents can be stretched to give greater or lesser influence on the animation interpolation between keys.
Notice how the circles at the end of the handles are not solid like normal tangents, but hollow. This is because they are weighted tangents. Weighted tangents can be stretched to give greater or lesser influence on the animation interpolation between keys.
![]() With one of the keys at the top of the curve still selected, click on Curves, Non Weighted Tangents.
With one of the keys at the top of the curve still selected, click on Curves, Non Weighted Tangents.
![]() You will see the curve goes back to the default tangent that you are used to.
You will see the curve goes back to the default tangent that you are used to.
![]() You can use the Curves menu in the Graph Editor to make any key, or to make any selected curve, use Weighted or Non Weighted tangents. Your default tangent types can also be set by clicking Window, Settings/Preference, Preferences and then adjusting the options in the Animation tab in the preferences window.
You can use the Curves menu in the Graph Editor to make any key, or to make any selected curve, use Weighted or Non Weighted tangents. Your default tangent types can also be set by clicking Window, Settings/Preference, Preferences and then adjusting the options in the Animation tab in the preferences window.
Buffer Curves
Buffer Curves is a tool in the Graph Editor that allows you to switch between two different “snapshots” of an animation curve. Follow along to learn how to use these curves:
![]() Let’s pretend we want to try a version of our bouncing ball scene in which the ball travels twice as high. Select the Translate Y animation curve by clicking anywhere on the curve that is not on a keyframe.
Let’s pretend we want to try a version of our bouncing ball scene in which the ball travels twice as high. Select the Translate Y animation curve by clicking anywhere on the curve that is not on a keyframe.
![]() Click Curves, Buffer Curve, Snapshot. You have just made a Buffer Curve snapshot, which you will be able to snap your animation curve back to at any time.
Click Curves, Buffer Curve, Snapshot. You have just made a Buffer Curve snapshot, which you will be able to snap your animation curve back to at any time.
![]() We are not viewing Buffer Curves yet, so click on View, Show Buffer Curves.
We are not viewing Buffer Curves yet, so click on View, Show Buffer Curves.
![]() Now select all of the keys at the top of the bounces, and MMB drag them upward, like in Figure 13.12.
Now select all of the keys at the top of the bounces, and MMB drag them upward, like in Figure 13.12.

FIGURE 13.12 The keys at the top of the bounces moved upward in the Graph Editor, revealing the Buffer Curves beneath them.
The Buffer Curves are the dark gray curves that are left behind as you adjust the animation. This snapshot can be used to “undo” your animation back to the previous snapshot with a single click.
![]() Let’s now pretend that you don’t like the new animation. Click on Curves, Swap Buffer Curve.
Let’s now pretend that you don’t like the new animation. Click on Curves, Swap Buffer Curve.
![]() The animation curves swap back to the snapshot that you first made, and a new snapshot is left behind in their place.
The animation curves swap back to the snapshot that you first made, and a new snapshot is left behind in their place.
Buffer Curves save into a Maya file, can be swapped an infinite number of times without messing up the animation, and best of all, are outside the normal Undo queue and therefore will not be affected by you undoing actions in the scene. This is a very handy tool for viewing multiple versions of an animation, comparing ideas, and saving revisions for review later.
Note: Graph Editor Use and Scene Lifespan
As you create a scene in Maya, it is typical to work less and less in the panels and more and more in the Graph Editor. At an advanced stage, an animated scene will have hundreds of controls, each with dozens of animation curves in the graph editor. However, problems in the panel such as unsmooth animation and jerky motion are still easier to diagnose from looking at your animation curves than to fix in panel. A scene that is ready for final polish will normally be finished by working about 75% in the Graph Editor and 25% in panel, checking results.
The Graph Editor has many more tools for retiming animation, manipulating keys, and working with animation curves. Use Maya’s help to explore the buttons and menus.
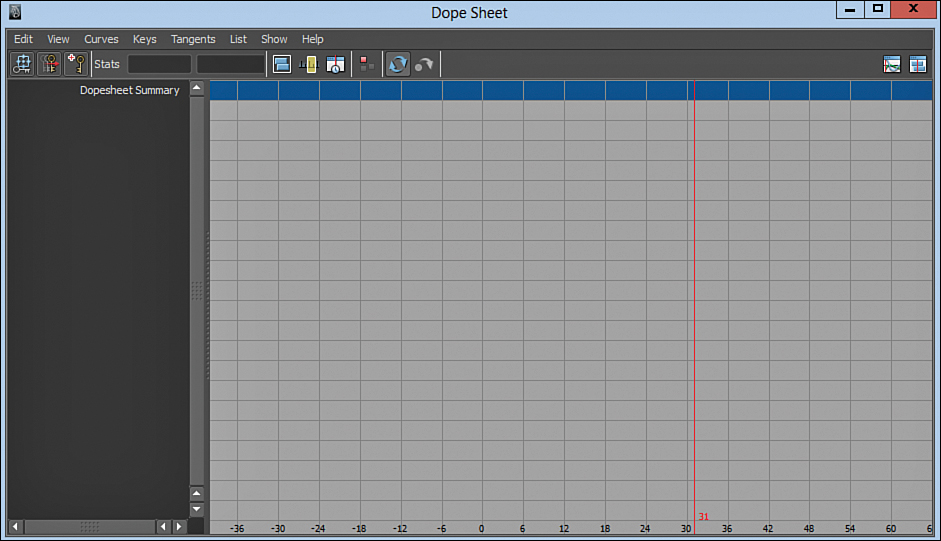
The Dope Sheet
Another useful animation editor is the Dope Sheet. This editor looks and behaves like a spreadsheet, in which keyframes are designated by colored cells. You can move and scale ranges of cells, but you cannot change the values of any of the keys. In this way, the Dope Sheet is used for gross retiming of your animations. Let’s use it in this way to retime an animated scene:
![]() Open bouncing_Ball_Squash.ma in this Hour’s files.
Open bouncing_Ball_Squash.ma in this Hour’s files.
![]() This is the bouncing ball scene we’ve been looking at, but with Squash and Stretch applied to the ball. However, the timing is totally off. We will retime this with the Dope Sheet.
This is the bouncing ball scene we’ve been looking at, but with Squash and Stretch applied to the ball. However, the timing is totally off. We will retime this with the Dope Sheet.
![]() Click on Window, Animation Editors, Dope Sheet.
Click on Window, Animation Editors, Dope Sheet.
![]() The Dope Sheet will open, like in Figure 13.13.
The Dope Sheet will open, like in Figure 13.13.
![]() Play back the animation and see how poorly timed the Squash and Stretch effect is applied.
Play back the animation and see how poorly timed the Squash and Stretch effect is applied.
If you are using a pose-to-pose method of creating animation, the Dope Sheet is useful in the early blocking stages of your shot. You can have at-a-glance feedback on the timing of your keys, as well as access all of the keyframes in the scene without having to make complex selections. Let’s fix the timing now:
![]() In the Dope Sheet, click on View, Scene Summary. This turns on the display of all of the keyframes in your entire scene. This is valuable for very high-level retiming of an animation.
In the Dope Sheet, click on View, Scene Summary. This turns on the display of all of the keyframes in your entire scene. This is valuable for very high-level retiming of an animation.
![]() We want to retime the Squash and Stretch keys only, so we will need to display them.
We want to retime the Squash and Stretch keys only, so we will need to display them.
![]() On the left side of the Dope Sheet click on the plus sign (+) next to the Scene Summary to expand it. All of the names of all of the animated channels will appear. You will see “Squash” is one of them.
On the left side of the Dope Sheet click on the plus sign (+) next to the Scene Summary to expand it. All of the names of all of the animated channels will appear. You will see “Squash” is one of them.
![]() Click on the Squash channel.
Click on the Squash channel.
![]() The keys of the Select channel will turn yellow to indicate they are all selected.
The keys of the Select channel will turn yellow to indicate they are all selected.
![]() Use the MMB to drag the keys in the Squash channel three frames to the left (earlier in time).
Use the MMB to drag the keys in the Squash channel three frames to the left (earlier in time).
![]() The Squash keys will line up much better with the rest of the animation, as in Figure 13.14.
The Squash keys will line up much better with the rest of the animation, as in Figure 13.14.

FIGURE 13.14 The “squash” keys have been moved in the Dope Sheet to be in better timing with the rest of the keys.
![]() Now play back the animation, and see the keyframes are timed much better than before.
Now play back the animation, and see the keyframes are timed much better than before.
![]() As an alternative to using the Scene Summary view to see all of the animation channels in a scene (particularly when a scene contains many animated controllers), the Dope Sheet will load the channels of any selected object.
As an alternative to using the Scene Summary view to see all of the animation channels in a scene (particularly when a scene contains many animated controllers), the Dope Sheet will load the channels of any selected object.
The Dope Sheet has menus and options for manipulating keys similar to the Graph Editor. Explore the menus and use the Maya Help to get you started learning this powerful tool.
Editing Motion with the Trax Editor
Maya allows for nonlinear animation. You can import, export, copy, and paste animation “clips” and arrange them in a window called the Trax Editor. This view is analogous to video-editing software; layers of clips can be arranged as well, and the resulting animation will be added together. You can even do some retiming in this view. You will see how to simply import and apply clips to an object and from there you can experiment with retiming and editing the clips. Follow these steps to familiarize yourself with using the Track Editor:
![]() Open trax_Start.ma.
Open trax_Start.ma.
![]() This scene contains just our bouncing ball rig but no animation. Let’s import some animation clips onto this ball.
This scene contains just our bouncing ball rig but no animation. Let’s import some animation clips onto this ball.
![]() Click on Window, Animation Editors, Trax Editor.
Click on Window, Animation Editors, Trax Editor.
![]() The Trax Editor opens and it will be blank, as in Figure 13.15.
The Trax Editor opens and it will be blank, as in Figure 13.15.

The Trax Editor functions similar to any nonlinear editing program; you can import clips and move them anywhere you want in time, and even copy and paste multiple clips into new layers. Let’s try something a little simpler to start:
![]() Select the sphere.
Select the sphere.
![]() In the Trax Editor, click File, Import Animation Clip to Characters.
In the Trax Editor, click File, Import Animation Clip to Characters.
![]() Navigate to this Hour’s source files and choose bouncing_Clip.ma.
Navigate to this Hour’s source files and choose bouncing_Clip.ma.
![]() Play back the animation. The ball bounces a few times and then comes to a sudden stop.
Play back the animation. The ball bounces a few times and then comes to a sudden stop.
![]() Select the sphere again and in the Trax Editor, click File, Import Animation Clip to Characters.
Select the sphere again and in the Trax Editor, click File, Import Animation Clip to Characters.
![]() Choose rolling_Clip.ma.
Choose rolling_Clip.ma.
![]() You should have two clips in your Trax Editor, as in Figure 13.16.
You should have two clips in your Trax Editor, as in Figure 13.16.

![]() Now select and drag rolling_Clip so that the start frame is on the last frame of bouncing_Clip.
Now select and drag rolling_Clip so that the start frame is on the last frame of bouncing_Clip.
![]() Play back the animation and watch the ball bounce, stop, and roll a bit to the side.
Play back the animation and watch the ball bounce, stop, and roll a bit to the side.
![]() Experiment by importing more copies of both clips and assemble the animation in a unique way in the Trax Editor.
Experiment by importing more copies of both clips and assemble the animation in a unique way in the Trax Editor.
![]() Remember that the layers are additive, so you can have some unpredictable results if you blend animation that was not created to be blended.
Remember that the layers are additive, so you can have some unpredictable results if you blend animation that was not created to be blended.
![]() To export animation clips, you can simply click on File, Export Animation Clip in the Trax Editor and it will export all of the animation on the currently selected channels or objects as a clip for you to use later.
To export animation clips, you can simply click on File, Export Animation Clip in the Trax Editor and it will export all of the animation on the currently selected channels or objects as a clip for you to use later.
The Trax Editor offers the ability to layer and edit animation clips in an intuitive way. Create your own animation clips and assemble them in an interesting way using the Trax Editor.
Constraints and Animating
One of the biggest concerns of animators is making objects “stick” to one another when animating. A character holding a prop, for instance. This comes up so often that we had to include a section on constraints in this Hour so as not to be remiss in our duties.
Constraint Versus Parent
You’ve seen the use of constraints already, so you know that they function similar to parenting or grouping. What constraints offer above and beyond parenting is the ability to turn the relationship on and off, and to even animate this ability. Using constraints, you are able to create an animation of a character picking up a hammer and even putting it down again. What you need to remember, however, is that the relationship of the object constrained to another cannot be animated, only the strength of the constraint. In other words, once an object is picked up, it cannot be moved around within the hand that is constraining it; it is “locked” into the position that it is constrained in. However, we have a simple workaround for this problem: using locators and/or groups as our constraining objects, thus leaving our props free to animate even when their parent is constrained.
We’ll take a look at this relationship now. To begin, open constraints_Start.ma. The familiar robot arm from Hour 12, “Skinning: Attaching Geometry to a Rig,” is in this scene, and it is rotating around in a circle. When the arm comes to a stop, the cup on the conveyor belt arrives in the robot’s claw. We want the claw to pick up the cup and move it over the barrel, then release it. We already have a rig set up that is built for this kind of action. Both the claw and the ball have locators that will serve as the constraint points:
![]() Play the animation back. The cup rolls to the end of the conveyor belt but is not taken by the robot arm.
Play the animation back. The cup rolls to the end of the conveyor belt but is not taken by the robot arm.
![]() Select cup_CTRL. It is the box that is around the cup itself, not the locator.
Select cup_CTRL. It is the box that is around the cup itself, not the locator.
![]() Move it around to see that cup_CTRL is parented under the locator and can freely move around. Undo your movements to get the cup back to its original position.
Move it around to see that cup_CTRL is parented under the locator and can freely move around. Undo your movements to get the cup back to its original position.
![]() Go to frame 50 by clicking on it on the Timeline.
Go to frame 50 by clicking on it on the Timeline.
![]() In the perspective panel, select the locator called claw_Locator.
In the perspective panel, select the locator called claw_Locator.
![]() Shift-select the locator called cup_Constrain_HERE.
Shift-select the locator called cup_Constrain_HERE.
![]() Switch to the Animation menu set by pressing F2.
Switch to the Animation menu set by pressing F2.
![]() Click on Constrain, Parent.
Click on Constrain, Parent.
![]() Press S to set a key on frame 50 on the locator.
Press S to set a key on frame 50 on the locator.
![]() Change to frame 49 by pressing Alt+, on your keyboard.
Change to frame 49 by pressing Alt+, on your keyboard.
![]() Select the cup_Constrain_HERE locator and in the Channel Box, change the value of the Blend Parent channel to 0. Scroll down until you see the input called cup_Constrain_HERE_parentConstraint1. Change the channel marked “Claw Locator W0” to 0 and set a key by right-clicking on the channel and choosing Key Selected. We just turned off the parent constraint so that the cup is free to move in the frames leading up to frame 50.
Select the cup_Constrain_HERE locator and in the Channel Box, change the value of the Blend Parent channel to 0. Scroll down until you see the input called cup_Constrain_HERE_parentConstraint1. Change the channel marked “Claw Locator W0” to 0 and set a key by right-clicking on the channel and choosing Key Selected. We just turned off the parent constraint so that the cup is free to move in the frames leading up to frame 50.
![]() Click on frame 80 on the Timeline.
Click on frame 80 on the Timeline.
![]() Select the cup_Constrain_HERE locator and press S to set a key. Also, right-click on the Claw Locator W0 channel and choose Key Selected.
Select the cup_Constrain_HERE locator and press S to set a key. Also, right-click on the Claw Locator W0 channel and choose Key Selected.
![]() Click on frame 81 on the Timeline.
Click on frame 81 on the Timeline.
![]() Select the cup_Constrain_HERE locator and in the Channel Box, change the value of the Blend Parent channel to 0. Scroll down until you see the input called cup_Constrain_HERE_parentConstraint1. Change the channel marked “Claw Locator W0” to 0 and set a key by right-clicking on the channel and choosing Key Selected. The constraint is “off” again, so we can now freely animate the cup.
Select the cup_Constrain_HERE locator and in the Channel Box, change the value of the Blend Parent channel to 0. Scroll down until you see the input called cup_Constrain_HERE_parentConstraint1. Change the channel marked “Claw Locator W0” to 0 and set a key by right-clicking on the channel and choosing Key Selected. The constraint is “off” again, so we can now freely animate the cup.
![]() Click on cup_CTRL and press S to set a key.
Click on cup_CTRL and press S to set a key.
![]() Click on frame 100 on the Timeline.
Click on frame 100 on the Timeline.
![]() In the Persp panel, select and move cup_CTRL down in Y until it is inside the barrel.
In the Persp panel, select and move cup_CTRL down in Y until it is inside the barrel.
![]() Press S to set a key.
Press S to set a key.
![]() Play back the animation. The cup should roll down the conveyor belt, get picked up and move over the barrel, and then be dropped into the barrel, as in Figure 13.17.
Play back the animation. The cup should roll down the conveyor belt, get picked up and move over the barrel, and then be dropped into the barrel, as in Figure 13.17.

I have saved the final version of this animation as constraints_Finish.ma. Open the scene and make sure your version matches the animation I created. You should have a nice loop of animation of the cup appearing and then disappearing into the barrel. Constraints offer the functionality of a parent/child relationship, but with the added ability to turn the relationship on and off. Remember, you cannot change the positioned of a constrained object; try to move the locator cup_Constrain_HERE in any of the frames between 50 and 80. It will move, but then will snap back to its constrained position. The cup_CTRL, however, is free to move because it is simply parented to the locator. This is the reason we always create a rig for props—to give animators a point to constrain to.
Using Other Animation Tools
As you can probably tell from the numerous menus in the Animation menu set, there are literally hundreds of methods of creating movement in your Maya scene. Take some time to explore tools such as Ghosting, Editable Motion Trails, and even animating some of the deformers on objects and characters. The Maya Help is very valuable for understanding the basic function of these tools.
Creating Dynamic Relationships with Expressions
The Expression Editor is listed under Animation Editors because the relationships you can create with it are dynamic and useful for creating scripted movements. Let’s create a dynamic relationship to see this in action. To begin, open expression_Start.ma. You’ll see a sphere that is animated moving up and down in Y. The cone is static. We are going to use an expression to make the cone animate based on the movement of the sphere:
![]() Click on Window, Animation Editors, Expression Editor.
Click on Window, Animation Editors, Expression Editor.
![]() It will look like Figure 13.18.
It will look like Figure 13.18.

![]() The Expression Editor allows you to create links and execute equations by creating what are called “expressions” in the bottom of the editor. Select the sphere.
The Expression Editor allows you to create links and execute equations by creating what are called “expressions” in the bottom of the editor. Select the sphere.
![]() Notice how the sphere’s name loads in the left panel of the Expression Editor and its attributes load into the right side.
Notice how the sphere’s name loads in the left panel of the Expression Editor and its attributes load into the right side.
![]() Click on translateY on the right side.
Click on translateY on the right side.
![]() In the center of the Expression Editor, the name pSphere1.translateY appears in the box labeled Selected Object and Attribute.
In the center of the Expression Editor, the name pSphere1.translateY appears in the box labeled Selected Object and Attribute.
![]() Copy this down into a Notepad window (if you are using Windows) or a text editor application of your choice.
Copy this down into a Notepad window (if you are using Windows) or a text editor application of your choice.
Note: Copy Down Expressions
The Expression Editor is constantly refreshing depending on what is selected, so you can lose your place easily. It’s best to copy down the attributes you want to use so you don’t lose them when the Editor loads newly selected objects.
![]() Now select the cone.
Now select the cone.
![]() In the right side of the Expression Editor, select the scaleY attribute.
In the right side of the Expression Editor, select the scaleY attribute.
![]() Copy the result from the center of the Expression Editor, which should be pCone1.translateY in your notepad as well.
Copy the result from the center of the Expression Editor, which should be pCone1.translateY in your notepad as well.
![]() Now we will create the expression. Using your notepad to copy and paste the correct attributes, put the following into the bottom box of the Expression Editor, labeled “Expression”:
Now we will create the expression. Using your notepad to copy and paste the correct attributes, put the following into the bottom box of the Expression Editor, labeled “Expression”:
pCone1.scaleY = pSphere1.translateY * 2
![]() Press Enter.
Press Enter.
![]() Play back the animation. You will see that the cone now scales in the Y axis along with the movement of the sphere.
Play back the animation. You will see that the cone now scales in the Y axis along with the movement of the sphere.
Hundreds of commands and functions are available to you in the Expression Editor, but our simple math function serves nicely as a demonstration of the power of expressions. You can create a dynamic connection between any two attributes in Maya using this tool, which makes it an impressive part of the software’s animation offering.
Creating Animation on a Path
Motion paths offer a wide array of uses. From camera animation to animating particles, to animating a roller coaster on a track, paths serve many purposes. They are quick to set up as well. Let’s create a simple path animation using these steps:
![]() Open path_Start.ma. There is a sphere and a NURBS curve created by randomly clicking the EP Curve tool. You can also use any NURBS shape that you want, such as a line or a NURBS circle.
Open path_Start.ma. There is a sphere and a NURBS curve created by randomly clicking the EP Curve tool. You can also use any NURBS shape that you want, such as a line or a NURBS circle.
![]() Select the sphere.
Select the sphere.
![]() Shift-select the curve.
Shift-select the curve.
![]() Switch to the Animation menu set by pressing F2.
Switch to the Animation menu set by pressing F2.
![]() Click on Animate, Motion Paths, Attach to Motion Path.
Click on Animate, Motion Paths, Attach to Motion Path.
![]() The sphere now follows the path of the curve.
The sphere now follows the path of the curve.
![]() It is moving very fast, though. Let’s change that. Open the Graph Editor by clicking on Window, Animation Editors, Graph Editor.
It is moving very fast, though. Let’s change that. Open the Graph Editor by clicking on Window, Animation Editors, Graph Editor.
![]() Select the sphere in the Persp panel.
Select the sphere in the Persp panel.
![]() The animation curve for the motion path is labeled “u value.” Select the key on frame 24 and Shift+MMB drag it to the right until the key sits on frame 72.
The animation curve for the motion path is labeled “u value.” Select the key on frame 24 and Shift+MMB drag it to the right until the key sits on frame 72.
![]() Type 72 into both the playback range end and the scene end boxes in the Range Slider.
Type 72 into both the playback range end and the scene end boxes in the Range Slider.
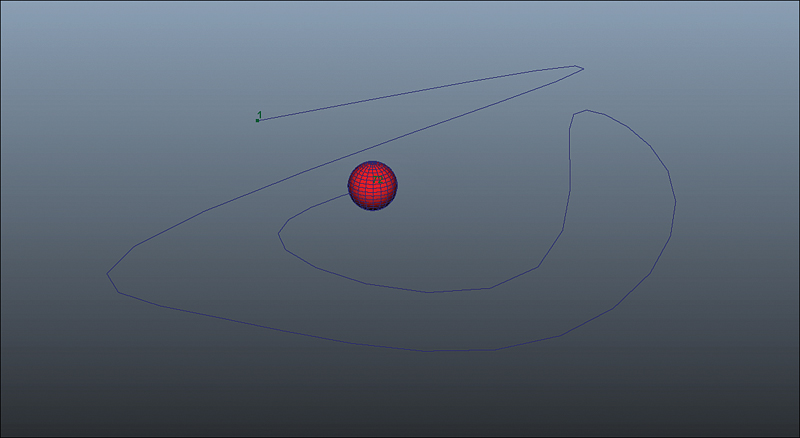
![]() Play back the animation, and like in Figure 13.19, the sphere should now only finish the path animation by frame 72.
Play back the animation, and like in Figure 13.19, the sphere should now only finish the path animation by frame 72.
Motion paths have some interesting features, such as the ability to change which direction the object faces (and to animate that attribute) and to have the object automatically bank on turns. Explore the attributes of the motion path by selecting the sphere, going into the Attribute Editor (Ctrl+A), and looking at the “motion1” tab.
Driven Keys
Driven Keys made their debut in Hour 9, “Relationships and Making Nodes Work Together,” and they are definitely a good tool to know in terms of creating relationships. They are also a good animation tool. For instance, if you want to make a wheel automatically roll when you move it along the ground, a Driven Key makes that possible. Follow these steps to familiarize yourself with Driven Keys:
![]() Open driven_Start.ma. We have a wheel sitting on the ground, ready to animate.
Open driven_Start.ma. We have a wheel sitting on the ground, ready to animate.
![]() Switch to the Animation menu set by pressing F2.
Switch to the Animation menu set by pressing F2.
![]() Select the wheel.
Select the wheel.
![]() Click on Animate, Set Driven Key, Set.
Click on Animate, Set Driven Key, Set.
![]() The Set Driven Key window will open, and the wheel is loaded as the Driven Object. Click on Load Driver.
The Set Driven Key window will open, and the wheel is loaded as the Driven Object. Click on Load Driver.
![]() In the Driver section (top section) of the Set Driven Key window, click on Translate X. In the Driven section (bottom), click on Rotate Z.
In the Driver section (top section) of the Set Driven Key window, click on Translate X. In the Driven section (bottom), click on Rotate Z.
![]() Click Key.
Click Key.
Because we know that the circumference of a circle is pi times the diameter, we will use that equation to make the right amount of rotation on the wheel as the wheel moves. Let’s apply this knowledge to a Driven Key setup:
![]() Select the sphere and in the Channel Box, type 6.28 in the translateX channel and press Enter. (That’s pi times the diameter of the wheel, the diameter being 2.)
Select the sphere and in the Channel Box, type 6.28 in the translateX channel and press Enter. (That’s pi times the diameter of the wheel, the diameter being 2.)
![]() Type -360 in the Rotate channel and press Enter.
Type -360 in the Rotate channel and press Enter.
![]() Back in the Set Driven Key window, click on Key.
Back in the Set Driven Key window, click on Key.
![]() Open the Graph Editor by clicking Window, Animation Editors, Graph Editor.
Open the Graph Editor by clicking Window, Animation Editors, Graph Editor.
![]() Select the wheel, and when the animation curve for the Driven Key appears, select it. Your window will look like Figure 13.20.
Select the wheel, and when the animation curve for the Driven Key appears, select it. Your window will look like Figure 13.20.

FIGURE 13.20 By setting our Pre Infinity and Post Infinity types to linear, the wheel will always have the correct rotation value no matter the translate value.
![]() In the Graph Editor, click on Curves, Post Infinity, Linear. Click on Curves, Pre Infinity, Linear. You just made it so that all ranges to infinity will have the same rotational relationship.
In the Graph Editor, click on Curves, Post Infinity, Linear. Click on Curves, Pre Infinity, Linear. You just made it so that all ranges to infinity will have the same rotational relationship.
![]() Close the Graph Editor and the Set Driven Key window and then select and move your wheel. Notice how the wheel rotates realistically no matter which direction you move it, and no matter how far in either direction it moves.
Close the Graph Editor and the Set Driven Key window and then select and move your wheel. Notice how the wheel rotates realistically no matter which direction you move it, and no matter how far in either direction it moves.
Driven Keys are not only a great way to set up relationships, they are very helpful when you need to automate some animation. You can create some very interesting movements by chaining together multiple Driven Key systems. In fact, some very complex animated relationships that you’ve seen in major feature films, such as the metal panels shifting as a car transforms into a robot, are controlled and animated using Driven Keys.
An Animated Scene
Even though teaching an entire character animation pipeline would fill a book twice the size of this one, I wanted to include some animation so you can see all of the principles and the technical animation tools in Maya in action. Therefore, I’ve created a scene with Sam and did a little bit of animation on him.
I’ve included a scene with Sam doing a simple motion for you to open and play with. It is called sam_Greeting.ma. Although character animation is outside the purview of this book, hopefully you will be inspired to create some animation with Sam after seeing this scene. Open the scene and look in the Graph Editor as you select his different controls and see how I’ve dealt with the tangents. Look at the controls on the hammer prop and see how I’ve set up the constraint. Click around and view the different keyframes I’ve placed on the character and learn about how they work by making your own little adjustments to the animation. Only by practicing daily will you learn to move characters in a convincing, engaging way.
Summary
Animation, or creating the illusion of movement, is easy to do in Maya. However, just because you can create keyframes with the click of a button doesn’t mean your animation will be engaging or appealing. You must first master the use of the animation tools and become intimately familiar with the many animation editors if you want to advance to the level of a true animator. Start with small, simple animation tests like the ones shown in this book (bouncing ball, robot arms, and so on). Then move on to doing very simple gestures with the Sam_v2 rig I’ve provided for you. Only after you have created some very detailed and dynamic (yet simple) scenes using our character rig will you be ready to tackle even more difficult scenes. Scenes with complex character rigs (believe it or not, Sam is very simple), scenes with dialogue and acting, and scenes with multiple characters should only be attempted after at least a year of practicing. Trying to create these very complex animations too soon can be very discouraging to a learning animator. Luckily, Maya makes the tools simple to use and easy to learn; the rest is up to you.
Q&A
Q. My animation does not play back at 24fps. Why?
A. To set your playback to 24fps, click on Window, Settings/Preferences, Preferences. Then in the Time Slider section, find the Playback Speed drop-down box and choose 24fps.
Q. My objects are moving all over the scene but I never set any keys. Why?
A. Is AutoKey turned on? Look in the bottom-right corner of the Maya UI. If the button that shows a key is highlighted, you are setting keys any time you make a change to a channel (or, in this case, move an object that has been keyed already). Most animators like AutoKey, yet many work without it.
Q. My Graph Editor doesn’t show any animation curves. Why not?
A. By default, the Graph Editor shows the animation curves for only selected objects. If you find it cumbersome to have to select the objects you are animating (if you are only animating one object in a scene, for instance), you can change the functionality of the Graph Editor by clicking on List, Auto Load Selected Objects. With that unchecked, you can load the objects you want to animate a single time.
Q. Why is my constrained object still moving with the locator even though the Blend Parent is set at 0?
A. You must animate two channels if you want to turn a constraint off. The first is the Blend Parent channel located underneath the object’s channels in the top of the Channel Box. The second channel is the actual weight of the constraint, located in the inputs listed in the bottom of the Channel Box. The weight channel will be called something like Locator W0. These two channels need to be animated in concert to turn a constraint on or off.
Workshop
The workshop contains quiz questions and exercises to help you solidify your understanding of the material covered. Try to answer all questions before looking at the “Answers” section that follows.
Quiz
1. How do you set a key on all channels?
2. Which animation editor offers you quick access to keys for retiming?
3. The steepness or smoothness of an animation curve is controlled by a handle called what?
4. True or false? A constrained object can be animated and change position.
5. Why is it a good idea to copy objects and attributes names out of the Expression Editor and into a notepad or other text editor?
Exercise
I’ve provided several animation scenes you can peruse to learn how to move objects in a convincing (or at least technically correct) way. For your exercise, try to re-create one of these scenes from scratch, be it the bouncing ball or perhaps the robot arm. Use the Timeline to set your keys and the Graph Editor to adjust them. Manipulate the curves and adjust the tangent handles. When you are finished, you may want to save your scene for later use in the lighting and rendering hours!
Answers
1. The S key sets a key on all channels in the Channel Box.
2. The Dope Sheet offers at-a-glance viewing of the timing of all keys in a scene.
3. The smoothness of animation curves is controlled using tangent handles. These can be any of the seven built-in types that Maya offers, or they can be customized.
4. False. A constrained object has all of its channels locked while it is constrained. You can turn off the constraint to move the object once again—or better yet, you can apply your constraints to objects that are the parents of the actual object you want to be animated. This way, you can still animate the object within the parent.
5. The Expression Editor annoyingly refreshes with every single newly selected object. Once you have found the object and attribute name you are going to use in your expression, the best idea is to start a notepad that you can copy these long names into and avoid typing them out again.