
Hour 15. Making Diverse Shapes with BlendShapes
What You’ll Learn in This Hour:
![]() What a BlendShape is and how to create one
What a BlendShape is and how to create one
![]() How you can add articulation to characters with BlendShapes
How you can add articulation to characters with BlendShapes
![]() When it is a good idea to use corrective BlendShapes
When it is a good idea to use corrective BlendShapes
![]() How to use BlendShapes for other purposes
How to use BlendShapes for other purposes
Maya has a deformer called the BlendShape node. It requires special mention because of the wide array of uses it has. From being the literal backbone of facial animation, to being an alternative to many other deformers, the BlendShape node is a staple of animation in Maya.
Note: Clean Geometry
The BlendShape node, perhaps more than most other deformers, depends on your geometry being clean—that is, no history, a centered or zeroed pivot point, and all of the geometry edits finished. Making edits to a model with a BlendShape node on it is very taxing computationally, and very cumbersome.
In this Hour, you find out how to create a BlendShape deformer on a skinned model. You will see how to create a diverse range of BlendShapes for the model to give it the articulation in the face necessary to perform facial animation. You will create some corrective BlendShapes that adjust the model based on parameters you set. Finally, you will see that BlendShapes can serve other purposes, and in some cases offer a good replacement to other deformers. Once you start to explore the power of BlendShapes, chances are you will be using them for many functions in your Maya scenes.
BlendShape Node
The BlendShape node is accessed in the Animation menu set (F2). The function of this node is simple. Given two models with identical topology (same number of vertices, edges, and faces), the BlendShape node allows you to “blend” a model into another. It will move the vertices into their new position as you slide the BlendShape’s channel from 0 to 1.
There are a few key things to remember when starting with the BlendShape node. First, and most importantly, a vertex’s position is calculated relative to the object’s pivot point. This is why it is important to have a model that is very clean, with transforms frozen, the geometry centered, and the pivot at the world origin. Two models that have the exact same topology, but pivots in different locations, will produce very unpredictable results when a BlendShape is applied.
The second thing to remember is that the blending of different models is additive. Any transformation on a vertex in relation to the pivot will be added on top of other transformations you have done with other BlendShapes applied to the same model. We will take a closer look at this.
Open BlendShape_Intro.ma in this Hour’s files. You are presented with three spheres, as in Figure 15.1.
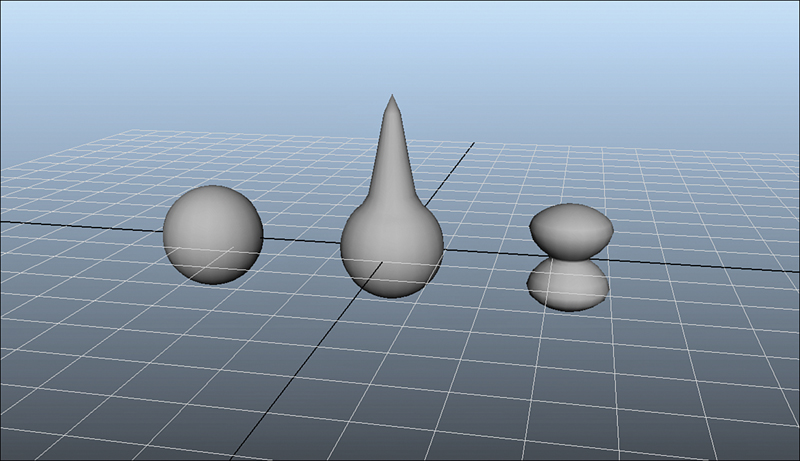
FIGURE 15.1 This scene will help you learn how to use BlendShapes. The two modified spheres will be added as BlendShapes to the default sphere on the left.
The three spheres all have different modifications to them, but they all have the same topology. They have the identical vertices, vertex numbers, edges, and faces. They also have pivots in the same position relative to the object.
Caution: Centered Doesn’t Mean Zeroed
If you make a modification to a model to use it as a BlendShape, use great caution with the pivot point. The best rule is to make the modifications on a freshly duplicated copy of the original model. This normally rules out problems with the pivot. If you accidentally center the pivot on a model that has changes to the position of some of the vertices, then the new center will be calculated on the average of the new model. Therefore, vertices that have not moved will be in a different relative position to the pivot. Your results will be bad.
Applying a BlendShape
To apply a BlendShape node, simply Shift-select all of your source models and then click on the target model last (the target model is the one that will have the BlendShape node applied to it). When you are done selecting, click on Create Deformers, BlendShape.
Let’s try this on our scene. Select the two modified spheres, then the base sphere, as in Figure 15.2.
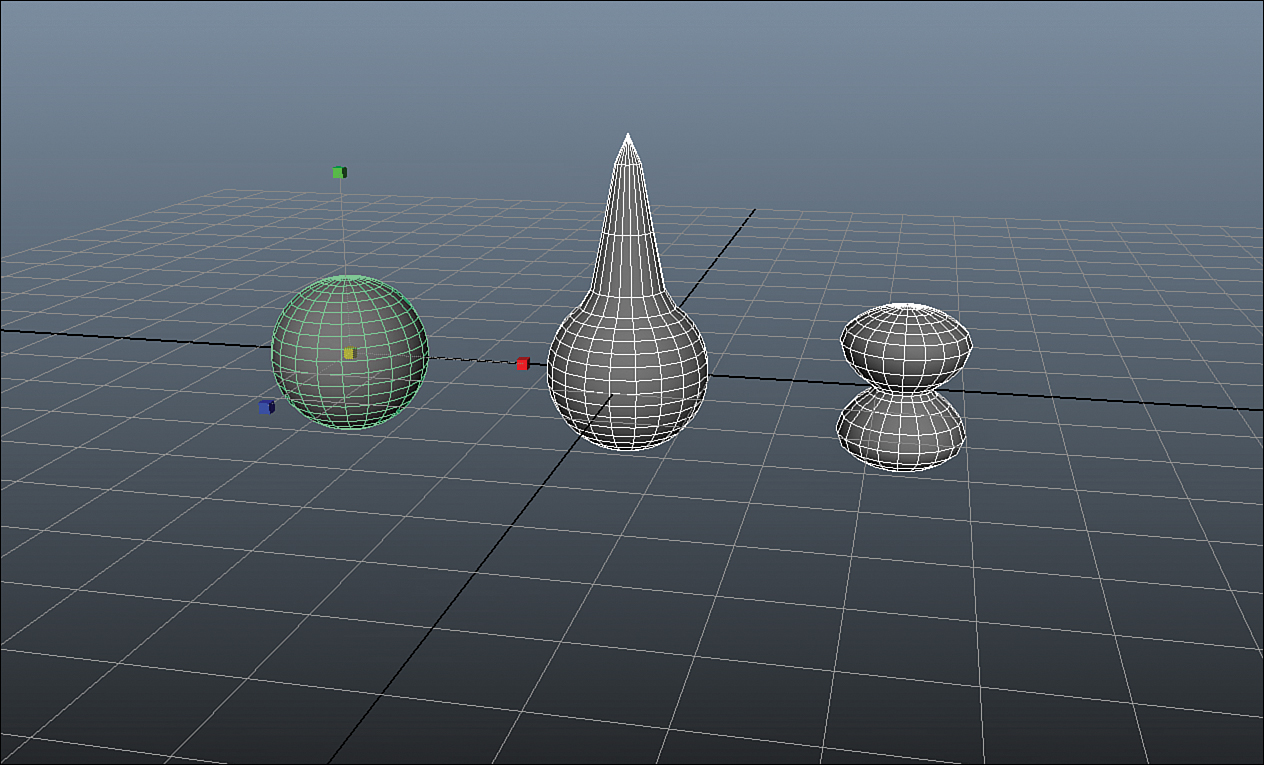
FIGURE 15.2 The spheres selected in the proper order. Note that the last object selected is always highlighted in green.
Now click on Create Deformers, Blend Shape. Select the base sphere and go into the Channel Box. As in Figure 15.3, you will see that there is a new BlendShape node on the sphere.

Expand the BlendShape node in the Channel Box by clicking on it. The names of the modified spheres “spiky” and “bulgy” are listed with channels next to their names. A value of 0 means that there is no blending happening, whereas a value of 1 means that the base model will transform all of its vertices to match the target 100%.
Let’s see some of this blending in action:
![]() Type in .5 in the “spiky” channel and press Enter.
Type in .5 in the “spiky” channel and press Enter.
![]() As shown in Figure 15.4, you will see that the base sphere is a 50% blend of its base model and the spiky sphere. You could say that it is exactly halfway “between” the two models.
As shown in Figure 15.4, you will see that the base sphere is a 50% blend of its base model and the spiky sphere. You could say that it is exactly halfway “between” the two models.

FIGURE 15.4 With the spiky BlendShape added at a weight of .5, the base sphere is a perfect blend between its own rest shape, and the shape of the spiky sphere just to its right.
![]() Type in 1 in the “spiky” channel and press Enter.
Type in 1 in the “spiky” channel and press Enter.
![]() Now the sphere totally matches the “spiky” sphere. All of the vertices have traveled to their new position relative to the object’s pivot point.
Now the sphere totally matches the “spiky” sphere. All of the vertices have traveled to their new position relative to the object’s pivot point.
![]() Type 0 into the “spiky” channel, type 1 into the “bulgy” channel, and press Enter.
Type 0 into the “spiky” channel, type 1 into the “bulgy” channel, and press Enter.
![]() The base sphere is now 100% blended into the “bulgy” one.
The base sphere is now 100% blended into the “bulgy” one.
![]() Now type in 1 in the “spiky” channel and press Enter.
Now type in 1 in the “spiky” channel and press Enter.
![]() As shown in Figure 15.5, the two channels are adding together. The spike is protruding from the bulging top of the sphere.
As shown in Figure 15.5, the two channels are adding together. The spike is protruding from the bulging top of the sphere.
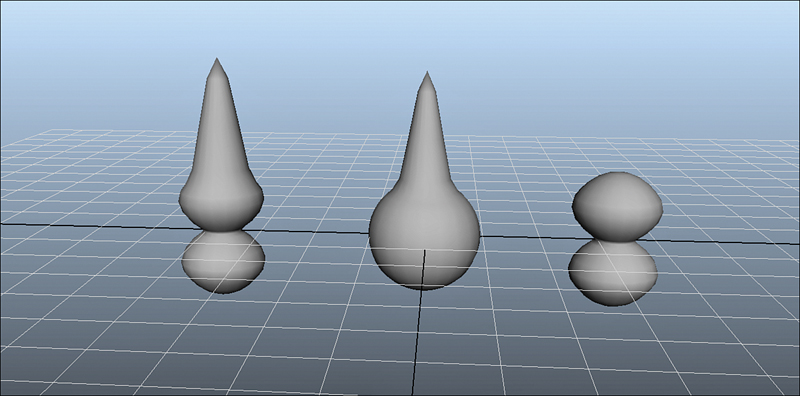
FIGURE 15.5 At 100% weight of both BlendShapes, the base sphere is now an even blend of both shapes. Notice how this effect is additive—both the bulging of the top of the sphere and the spike are shown.
As you just saw, the additive nature of BlendShapes can produce some interesting results. It can also produce some very bad results. In the case of character facial performances, animating too many BlendShapes together can make for some very unattractive facial poses.
Creating BlendShapes
You’ve seen how to apply the BlendShape node and how to access it in the Channel Box; now let’s create some BlendShapes for our character to be used in facial animation.
Open sam_Blend_Start.ma in this Hour’s files. You will see our character has a couple of BlendShapes created already, as in Figure 15.6.

These are some common visimes, or shapes of the mouth we see when speaking. We will use the Sculpt tool to make a happy face and a sad face to add to our BlendShape library on this character.
Sculpting Geometry
The first thing you may notice is that all of the BlendShapes are within a group called BlendShapes_GRP within the geo_GRP group. Stay organized when creating BlendShapes by having a separate group that contains all of the shapes you’ve created for your character.
Second, notice how there is a “base” model in the group. It has not had any modifications done to it. It is a good idea to have a clean model in this group because you can duplicate it at will without risk of messing up your skinned model.
We will take a look at the common tools used to “mold” a model like clay. Why do we use these tools when making BlendShapes? Many reasons:
![]() We cannot make topology changes to a model that is being used in BlendShapes. The tools we are going to employ merely “push” and “pull” the geometry around, the way that muscles would. For this reason, they are well suited to creating face shapes.
We cannot make topology changes to a model that is being used in BlendShapes. The tools we are going to employ merely “push” and “pull” the geometry around, the way that muscles would. For this reason, they are well suited to creating face shapes.
![]() The tools we use make use of symmetrical changes to the geometry. Much like mirroring your object when you are creating polygons, the sculpting tools we use will make congruent changes to both sides of your model.
The tools we use make use of symmetrical changes to the geometry. Much like mirroring your object when you are creating polygons, the sculpting tools we use will make congruent changes to both sides of your model.
![]() These tools are specifically designed to model the mesh like clay, with push, pull, and smooth tools built in. This sculpting paradigm makes a lot of sense when you think about the way muscles and skin works; we want our results to look like real face shapes, not “modeled polygons.”
These tools are specifically designed to model the mesh like clay, with push, pull, and smooth tools built in. This sculpting paradigm makes a lot of sense when you think about the way muscles and skin works; we want our results to look like real face shapes, not “modeled polygons.”
Let’s begin making the first shape, which is the happy shape:
![]() Select the base model in the top-left corner of the displayed BlendShapes.
Select the base model in the top-left corner of the displayed BlendShapes.
![]() Press Ctrl+D to duplicate this model.
Press Ctrl+D to duplicate this model.
![]() Rename the new mesh smile_BS in the Channel Box or the Outliner.
Rename the new mesh smile_BS in the Channel Box or the Outliner.
![]() Move it away from the rest of the shapes in an area where you can work on the model.
Move it away from the rest of the shapes in an area where you can work on the model.
![]() Press F to frame the model in the perspective panel.
Press F to frame the model in the perspective panel.
![]() Your Persp panel should resemble the one shown in Figure 15.7.
Your Persp panel should resemble the one shown in Figure 15.7.
![]() With the smile_BS model selected, switch to the Polygons menu set by pressing F3.
With the smile_BS model selected, switch to the Polygons menu set by pressing F3.
![]() Click on Mesh, Sculpt Geometry Tool.
Click on Mesh, Sculpt Geometry Tool.
Load the Tool Settings window by clicking on the Tool icon in the top-right corner of the screen or by going to Window, Settings / Preferences, Tool Settings. Let’s point out a few of the features of the Sculpt Geometry tool so you can use it effectively.
The six different modes of this tool are Push, Pull, Smooth, Relax, Pinch, and Erase. They work almost exactly like you would expect them to. Each tool has an area of effect that can be grown or shrunken by hovering your mouse over the model, holding down the B key, and then LMB scrolling left or right. To increase or decrease the maximum displacement (basically the strength value), hold down the M key and LMB scroll left or right on the model. Follow these steps with the Sculpt Geometry tool to get the smile_BS face started:
![]() Turn on the symmetrical brush by clicking in the Tool Settings window on Reflection, found in the Stroke tab. The reflection axis should be the X axis.
Turn on the symmetrical brush by clicking in the Tool Settings window on Reflection, found in the Stroke tab. The reflection axis should be the X axis.
![]() Change to the Push brush by clicking its icon, and then change the radius to 5 and the max displacement to .5.
Change to the Push brush by clicking its icon, and then change the radius to 5 and the max displacement to .5.
![]() Push the character’s cheeks out under his eyes with the LMB button to make them bulge a bit.
Push the character’s cheeks out under his eyes with the LMB button to make them bulge a bit.
![]() Push the sides of the mouth out a little, too, as in Figure 15.8.
Push the sides of the mouth out a little, too, as in Figure 15.8.

Now let’s pull the corners of the mouth inward. To do this, we will use the symmetry function of the Move tool:
![]() Select the character model and RMB drag to bring up the component marking menu.
Select the character model and RMB drag to bring up the component marking menu.
![]() Choose Vertex.
Choose Vertex.
![]() Press W to switch to the Move tool and open the Tool Settings window once again.
Press W to switch to the Move tool and open the Tool Settings window once again.
![]() Under Soft Selection, check the box labeled Soft Selection and change the radius to 1.
Under Soft Selection, check the box labeled Soft Selection and change the radius to 1.
![]() Now, under the Reflection tab, turn on reflection and make sure the axis is set to the X axis once again.
Now, under the Reflection tab, turn on reflection and make sure the axis is set to the X axis once again.
![]() Select the corners of the character’s mouth and then translate them upward in Y and backward in Z.
Select the corners of the character’s mouth and then translate them upward in Y and backward in Z.
![]() Hold down B and LMB drag to change the size of the Soft Selection falloff. Using the Move tool, create a very cheeky smile shape, like in Figure 15.9.
Hold down B and LMB drag to change the size of the Soft Selection falloff. Using the Move tool, create a very cheeky smile shape, like in Figure 15.9.

FIGURE 15.9 The finished smile BlendShape has a nice volume to the cheeks and the lips are pulled back.
![]() Once you have a good version that you are fairly happy with, exit component mode by pressing F8 twice, and switch back to the Sculpt Geometry tool.
Once you have a good version that you are fairly happy with, exit component mode by pressing F8 twice, and switch back to the Sculpt Geometry tool.
![]() Hold down the Shift key to temporarily toggle the Smooth tool, and lightly smooth the corners of the mouth region.
Hold down the Shift key to temporarily toggle the Smooth tool, and lightly smooth the corners of the mouth region.
![]() When you are satisfied, press 3 to see the smooth mesh preview. It should resemble the model in Figure 15.10.
When you are satisfied, press 3 to see the smooth mesh preview. It should resemble the model in Figure 15.10.

If you would like to add your own shapes, you can continue with your own Maya scene, or you can open sam_Blend_Add.ma to follow along from this point:
![]() Select the BlendShapes “smile_BS” and “sad,” or any shapes you would like to add to the skinned model, and then Shift-select the skinned model last.
Select the BlendShapes “smile_BS” and “sad,” or any shapes you would like to add to the skinned model, and then Shift-select the skinned model last.
![]() In the Animation menu set (F2), click on Create Deformers, Blend Shape and then click the Options box
In the Animation menu set (F2), click on Create Deformers, Blend Shape and then click the Options box ![]() .
.
![]() In the resulting box that opens, type in sam_BlendShape in the Blend Shape Node box and then click Create.
In the resulting box that opens, type in sam_BlendShape in the Blend Shape Node box and then click Create.
![]() RMB click and hold on Sam’s body and select Inputs, All Inputs.
RMB click and hold on Sam’s body and select Inputs, All Inputs.
![]() MMB drag the BlendShape node almost to the bottom of the deformer list, just above tweak1.
MMB drag the BlendShape node almost to the bottom of the deformer list, just above tweak1.
![]() Select the skinned model and open the BlendShape node in the Channel Box; you will see that all of the BlendShapes in the scene are added to the channel list.
Select the skinned model and open the BlendShape node in the Channel Box; you will see that all of the BlendShapes in the scene are added to the channel list.
Making Controllers
It is not enough to have a BlendShape node on the skinned model, because like everything else in a character rig, it is most useful to have a NURBS curve controller used to give animators control over an attribute.
We will now add these BlendShapes to the controller next to the character’s head that is shaped like a face. You can use any shape for your controllers, but it is common to use controllers that resemble the body part they are controlling. Remember back in Hour 9, “Relationships and Making Nodes Work Together,” you learned how to connect nodes. We are going to do the same for the BlendShape controls.
Select the face_CTRL curve and look in the Channel Box. There are already many channels added, but they are not connected to the BlendShape node yet. We will add the happy and sad shapes to this controller, too. Follow these steps:
![]() In the Channel Box, select Edit, Add Attribute.
In the Channel Box, select Edit, Add Attribute.
![]() Make the Long Name “smile,” the type “float,” the Minimum 0, Maximum 1, and Default 0.
Make the Long Name “smile,” the type “float,” the Minimum 0, Maximum 1, and Default 0.
![]() Click on Add.
Click on Add.
![]() The dialog box will not close, so we can add another attribute.
The dialog box will not close, so we can add another attribute.
![]() Make the new attribute’s Long Name “Sad” and keep all of the other settings the same.
Make the new attribute’s Long Name “Sad” and keep all of the other settings the same.
![]() Click on OK to add this attribute and close this dialog box.
Click on OK to add this attribute and close this dialog box.
The two new channels “smile” and “sad” should be added to the controller’s channels in the Channel Box. Now let’s connect these channels to the BlendShape node’s channels:
![]() With the controller select, click Window, General Editors, Connection Editor.
With the controller select, click Window, General Editors, Connection Editor.
![]() Select the skinned character model.
Select the skinned character model.
![]() Open the Attribute Editor (Ctrl+A).
Open the Attribute Editor (Ctrl+A).
![]() Find and click on the tab labeled sam_BlendShape to load the BlendShape node’s attributes.
Find and click on the tab labeled sam_BlendShape to load the BlendShape node’s attributes.
![]() At the bottom of the Attribute Editor, click the button labeled Select. You have now selected just the BlendShape node itself.
At the bottom of the Attribute Editor, click the button labeled Select. You have now selected just the BlendShape node itself.
![]() Back in the Connection Editor, click on Reload Right at the top right of the editor.
Back in the Connection Editor, click on Reload Right at the top right of the editor.
![]() The BlendShape’s attributes load in the Connection Editor.
The BlendShape’s attributes load in the Connection Editor.
![]() In the right column, find and click to expand the attribute labeled “weight.”
In the right column, find and click to expand the attribute labeled “weight.”
![]() Now, for every channel on the left that belongs to the NURBS controller, find the corresponding BlendShape weight channel. Click on the channel in the left column first, then the similar channel in the right column, as in Figure 15.11.
Now, for every channel on the left that belongs to the NURBS controller, find the corresponding BlendShape weight channel. Click on the channel in the left column first, then the similar channel in the right column, as in Figure 15.11.

FIGURE 15.11 The familiar Connection Editor with the Oooh control connected to the ooh_BS BlendShape.
When you are done and the attributes are all connected, close the Connection Editor and select face_CTRL. In the Channel Box, test and make sure the channels are properly connected. You should be able to make some pretty interested facial shapes using these controls. Best of all, you have your control at your fingertips with the NURBS curve, as opposed to hunting for the BlendShape node when doing facial animation.
Corrective BlendShapes
BlendShapes aren’t solely used for facial animation. Sometimes we use BlendShapes to correct deformations in the model when it is skinned and animated.
Open sam_Corrective.ma in this Hour’s files. This file has our character with some simple animation on his arm. However, when his arm bends, you can see that the elbow gets thinner and overall does not look right in the crease. To fix this, we will make a corrective BlendShape that automatically activates when he bends his arm. Do as follows:
![]() Duplicate the base model in the BlendShape group and rename it to rElbow_Correct.
Duplicate the base model in the BlendShape group and rename it to rElbow_Correct.
![]() Add it to the BlendShape node by Shift-selecting Sam’s body geometry, clicking Edit Deformers, Blend Shape, Add, and then clicking the options box
Add it to the BlendShape node by Shift-selecting Sam’s body geometry, clicking Edit Deformers, Blend Shape, Add, and then clicking the options box ![]() . Choose the only BlendShape node in the scene when the options box opens.
. Choose the only BlendShape node in the scene when the options box opens.
![]() To access your BlendShape channels in your scene, you can also click on Window, Animation Editors, Blend Shape. Do that now.
To access your BlendShape channels in your scene, you can also click on Window, Animation Editors, Blend Shape. Do that now.
![]() Turn the channel rElbow_Correct up to 1. We are doing this so that we can see the effect of our sculpting in real time.
Turn the channel rElbow_Correct up to 1. We are doing this so that we can see the effect of our sculpting in real time.
![]() Scroll the timeline to frame 24. The elbow is bent on our skinned character on this frame, so we will sculpt the elbow on the corrective BlendShape to make it work correctly.
Scroll the timeline to frame 24. The elbow is bent on our skinned character on this frame, so we will sculpt the elbow on the corrective BlendShape to make it work correctly.
![]() Select the rElbow_Correct mesh, use the Sculpt Geometry tool and the Move tool on the vertices, and create a slight bulge near the inside of the elbow, as in Figure 15.12.
Select the rElbow_Correct mesh, use the Sculpt Geometry tool and the Move tool on the vertices, and create a slight bulge near the inside of the elbow, as in Figure 15.12.

FIGURE 15.12 The elbow with a slight bulge added. This will correct the pinching that occurs when Sam bends his elbow.
Using the methods we discussed in Hour 9, we are going to add this shape as a Driven Key:
![]() Select lElbow_FK_CTRL in our skinned model.
Select lElbow_FK_CTRL in our skinned model.
![]() In the Animation menu set (F2), click on Animate, Set Driven Key, Set....
In the Animation menu set (F2), click on Animate, Set Driven Key, Set....
![]() In the BlendShape window (reopen it if you’ve close it), click on Select at the bottom of the sam_BlendShape tab.
In the BlendShape window (reopen it if you’ve close it), click on Select at the bottom of the sam_BlendShape tab.
![]() Back in the Set Driven Key Window, click on Load Driven.
Back in the Set Driven Key Window, click on Load Driven.
![]() Now in the top-right column of the Set Driven Key window, choose RotateY. In the bottom-right column (the driven channels), find the rElbow_Correct channel and select it.
Now in the top-right column of the Set Driven Key window, choose RotateY. In the bottom-right column (the driven channels), find the rElbow_Correct channel and select it.
![]() Make sure you are on frame 24 and click on Key. This shape is now keyed to be at a weight of 1 when the elbow is bent.
Make sure you are on frame 24 and click on Key. This shape is now keyed to be at a weight of 1 when the elbow is bent.
![]() Go to frame 1.
Go to frame 1.
![]() In the BlendShape window, turn the weight of rElbow_Correct to 0.
In the BlendShape window, turn the weight of rElbow_Correct to 0.
![]() In the Set Driven Key window, click on Key. When the arm is straight, the elbow corrective BlendShape is not needed.
In the Set Driven Key window, click on Key. When the arm is straight, the elbow corrective BlendShape is not needed.
![]() Click on Play in the Timeline and watch as the BlendShape automatically dials in and out to correct bad deformations on a model.
Click on Play in the Timeline and watch as the BlendShape automatically dials in and out to correct bad deformations on a model.
![]() You can delete the animation on the elbow while on frame 1 because it is no longer needed.
You can delete the animation on the elbow while on frame 1 because it is no longer needed.
You can use this method to correct any number of bad deformations on a model. You may also notice there is already a corrective BlendShape on Sam’s mouth for when the jaw is opened. Select the jaw controller and rotate it down; you will see that the corners of the mouth smooth like they would in reality. You can make any number of corrective BlendShapes to finalize the deformations on a skinned model.
Other Uses for BlendShapes
As mentioned before, BlendShapes aren’t necessarily only used to create facial animation. Sometimes a BlendShape is a good replacement for any number of deformations you have done to a model. One example would be if you wanted to make a model look like it is damaged. If you have a car model that needs to be animated in a crash, you could use a BlendShape of a dented bumper that you animate as the car hits a wall.
A BlendShape could be used to animate the page of a book turning, or to give a little bit of life to a falling leaf. You can even apply a BlendShape to a NURBS curve, so any resulting geometry or any animated effects using curves could get some added variety through the use of BlendShapes.
When you are creating BlendShapes and their controls, it is common to need to have individual control on either side of the face. Rather than create a specific left and right BlendShape for each facial pose, we can take advantage of the Paint BlendShape Weights tool. Look in the Bonus folder for a video showing you exactly how to accomplish this.
Summary
BlendShapes is a powerful animation tool in Maya, giving the user the ability to dynamically animate a model on the component level with relative ease. They serve as the foundation of facial animation in Maya. Remembering to start with clean geometry; creating BlendShapes is as easy as sculpting in Maya. When they are done, connect the weights of the shapes to controllers for ease of access. Corrective BlendShapes can make up for errant deformations in skinning, and beyond the obvious uses, BlendShapes can augment or replace all the other deformer types in Maya for some very interesting results.
Q&A
Q. My entire model is moving when I adjust the weight of a BlendShape. What is happening?
A. At some point, the pivot was changed in your model. Did you freeze transformations? BlendShapes work by moving vertices to a new position based on their relative position to the pivot. Make sure you do not freeze transformations.
Q. After I added a BlendShape node to Sam, none of the controls work. Why?
A. Deformation order is of the utmost importance here. What is happening is the deforms from the clusters and the skin are happening to the model, and then the BlendShape node is moving all of the vertices back to their original position. You must have skipped the step of accessing the All Inputs menu and reordering the inputs to put the BlendShape first.
Q. Can I split a shape so that it only affects the left or the right side of the face?
A. Yes, this is easy to do. Simply add the BlendShape to the BlendShape node twice, and then use the Paint BlendShape Weights tool in the Edit Deformers menu to paint the influence of a certain BlendShape. The tools and controls are the same as the Paint Skin Weights tool and the Paint Cluster Weights tool, so it should be straightforward to use.
Q. I added a BlendShape, and the name is something like Base1 and I want to change it. Where can I do that?
A. Go to Window, Animation Editors, Blend Shape. You can rename any channel by typing in a new name at the bottom of the channel’s slider and pressing Enter.
Workshop
The workshop contains quiz questions and exercises to help you solidify your understanding of the material covered. Try to answer all questions before looking at the “Answers” section that follows.
Quiz
1. What tools are the most useful for creating BlendShapes?
2. How do you activate reflection on the Move tool in the quickest way?
3. What is the highest weight of a BlendShape by default?
4. What do we call a BlendShape that is used to fix deformation in the model?
5. Are BlendShapes additive, subtractive, multiplicative, divisive, or none of these?
Exercise
Create a library of BlendShapes for Sam. I have included the most common BlendShapes in his model as well as some good corrective shapes, but there are dozens that could be helpful to animators using this rig. Also, when you are adding the controls, add the connections to mouth_CTRL, nose_CTRL, brow_CTRL, and so on, depending on what kind of BlendShape it is.
Answers
1. The Sculpt Geometry tool and Move tool (at the vertex component level) are the most useful tools for making BlendShapes, with reflection turned as well.
2. Reflection is accessible through the Tool Settings window, but the quickest way to activate it is to hold down W and LMB click and drag upward on the model.
3. A BlendShape’s channel goes up to 1.0 by default, but you can type in any value you like into the channel and get overdriven results.
4. A corrective BlendShape fixes bad or undesired deformations on a skinned model.
5. BlendShapes are additive. Any BlendShape will add on top of another, which is why you must take care to not animate too many shapes at the same time.