
Hour 3. File Types and Managing Assets
What You’ll Learn in This Hour:
![]() The different file types Maya uses
The different file types Maya uses
![]() The Maya Project folder and file structure
The Maya Project folder and file structure
![]() Converting files for use in Maya
Converting files for use in Maya
![]() Common issues with files
Common issues with files
Maya is a complex program. A major contributing factor to the complexity of Maya is the fact that it reads and writes so many different types of files. Even Adobe Photoshop, with all of its versatility, doesn’t read anywhere near the number of files or generate the amount of different file types that Maya does. To understand workflow in Maya, you will learn what the different file types mean.
Note: Project Management
We will be covering the different Maya file types that are commonly used in this hour, but not how to organize them on your computer yet. To understand how to properly organize your files to be the most productive, you need to understand project management, which is covered in Hour 23, “Correct Project Management and Scene Workflow.”
In this hour, you find out what file types are generally better than others to read and write with Maya. You will also gain a little bit more of an understanding of how the different assets work together as we look at file types and how they relate to one another in the pipeline. We won’t get too ahead of ourselves here; it’s important to get the basics of file types and asset types before we go too deep into a production workflow.
3D File Types
We’ll first take a look at the many 3D file types. These are files that hold object information, animation information, particle information, cloth information, and so on. All of the following types have different uses and/or they are specifically designed to store a specific type of information.
Maya Scene Files
A Maya “scene” is all of the interconnected nodes and attributes in a single file. Everything from geometry to lights, cameras, and animation has information contained in the connected nodes that needs to be saved when you create a scene. Maya can save scene files in two different formats: binary and ASCII. The binary format file extension is .mb (Maya Binary) and the ASCII format file extension is .ma (Maya ASCII).
There are numerous reasons to choose either of the Maya scene files formats, so let’s go over each one.
Maya Binary
Maya binary files are greatly smaller in size than ASCII format due to the fact that the nodes and associated edits are saved into this format in a computer-readable-only format. The amount of size reduction between a binary and ASCII file depends greatly on the type of information within the file, but it is safe to say that if file transfer or storage space is an issue for you, or if you are just starting out with Maya, a binary file should be chosen.
Binary files are also known for saving the information in a little more “clean” manner, meaning that sometimes when a file is in .ma format and causes errors, one of the first things to try is to save it as an .mb file instead. This has not been detailed specifically in developer documentation, and it is extremely case specific, so you will have to leave it up to fate to be able to test this. Suffice it to say that for some reason, some scene files seem to work better in .mb format. My personal testing indicates slightly that the more advanced Maya features save better in .mb than .ma, such as complex rig systems, nCloth, and so on.
These are the two main advantages. The disadvantages of the .mb format are that it is not human readable and not generally backward compatible (although improved recently, but still not bulletproof).
Maya ASCII
As a tradeoff for file size, ASCII files are “human readable.” You can open an .ma in any text editor and see every single command that built your scene. In fact, Maya executes your .ma file almost exactly like you are typing in MEL script when you open it. The major advantage of this is that you can make edits to an .ma file without even having to open it. For instance, if a particular node is causing your scene to crash, you can comment out that node in the ASCII file using a text editor and then open the cleaned file in Maya. You can also change the file path for a referenced node, change the plugins required to open a scene, and even change the version number of Maya that is saved into the file. This makes .ma files generally much more backward compatible with previous versions of Maya than their binary counterparts. All nodes may not load correctly when you do this, but it is still generally a better bet to use .ma files when multiple versions of Maya are involved in your pipeline. Again, the tradeoff is file size. It is common for an .ma that contains a very high polygon environment, with textures, lighting information, and maybe some dynamics and effects to be in the hundreds of megabytes. With Incremental Save (described next) turned on, a folder with a few versions of a work-in-progress high-poly model might balloon to the gigabytes.
Nearly all visual effects studios save their files in ASCII format so that Technical Directors can make fixes to crashed or corrupted files. They are normally on the cutting edge of network speed and storage capacity as well, so the issue of file size does not come into play.
Try It Yourself: Setting the Default Maya Scene File Type
1. Open Maya, and in the main menu, click File, Save Scene As ![]() . (The
. (The ![]() denotes you need to click on this icon to open the options dialog for a given menu.)
denotes you need to click on this icon to open the options dialog for a given menu.)
2. Change the file type from Maya Binary to Maya ASCII and then choose Save and Close.
3. Check that your file type has been changed to ASCII by clicking on File, Save. The save options dialog should open, and Maya ASCII is loaded as default.
We’ll keep the default Maya file type as ASCII for the time being. Only switch to binary if you are positive you will not have to read the file in a text editor to make changes or fixes, or if the .ma file is continuously crashing or freezing.
Other 3D File Types
You’ll find that in the course of creating a fully fleshed-out 3D scene, Maya may read and write a dozen different file types. The formats Maya displays by default only represent a portion of the files it can potentially read, and yet still there is quite a long list of them, as shown in Figure 3.1. There are a few you should know, and many others you will learn as you work in Maya and the program generates them automatically.

OBJ
A simple 3D geometry format, OBJ stores polygonal models without textures. This format is both readable and writeable by Maya and most other 3D software. This format stores UV information as well (the information as to how 2D images are stretched onto the 3D geometry).
You will be exporting and importing .obj files when you use other software to create textures or high-detail geometry from a base mesh from Maya. You may even elect to save your models as .obj so that you always have a very simple copy of them if you want to import them at a later time. Most online 3D model repositories offer their models in OBJ format to accommodate Maya users.
FBX
The FBX file format is a robust format that contains much more information than OBJ, but still less than the full .ma or .mb Maya scene file. This format offers the ability to export and import a variety of materials, animation data, as well as lights and camera data. This format was designed to provide a high degree of interoperability between Autodesk products. You work with FBX files when you are working with other Autodesk programs extensively, such as 3ds Max and MotionBuilder. Because it can export most basic material types, FBX is good for saving models and is preferred over OBJ for downloading models from an online repository.
ANIM
The ANIM file format is not loaded by default, but it is very useful. Therefore, you should load the import/export plugin. This format saves the animation data on selected nodes for later use. You might do this if you want to reuse a piece of animation in another scene, if your current file is getting cumbersome and you’d like to apply the same animation to a fresh scene, or if you want to save your animation to a library for future projects.
ATOM
The new ATOM file format is an update to the ANIM file format, and is very powerful. This format allows you to not only apply the animation to the same hierarchy, but to use search strings to apply the animation to differing hierarchies. On top of that, this format exports and imports animation data on constraints and driven keys.
2D File Types
For the most part, you will be working within Maya scene files and loading and creating 2D images from the program. These 2D file types include texture files (images that are used to give color or shading properties to objects, as discussed in Hour 6, “Unfolding UVs and Applying Textures”), images that control attributes such as skin weight maps, and renders that you save from the program.
Texture File Types
You may already be familiar with some of the different file types that Maya reads based on your use of them in other programs or in general everyday use. Now that you are applying them in a high-end 3D animation software package, you have a few things to consider when working with the following file types.
JPG
Maya can read and write JPG files (pronounced jay-peg). They can be saved as your render output or loaded as a texture. The upside to a JPG file is that it is a fairly compressed, 8-bit-per-channel image, meaning the file size is normally pretty small. Because Maya loads your textures into RAM as it renders an image, managing the amount of data going into the scene is very important. The huge downside of JPG files is that they are unsuitable for high-end production because of the amount of compression they contain. They also contain no transparency information (or “alpha channel”), so a separate transparency image must be loaded if you are using JPG files for textures. We compare them to TGA files next. However, if you are doing a lot of post-processing to your renders, are using a non-photorealistic renderer, or if you want to preview effects and lighting, JPG files are fine to use.
TGA
The standard image file format for high-end usage is TGA (Targa). These images can be saved with 8 bits per channel and an extra 8 bit alpha per pixel, so they have a transparency channel. This format is relatively ubiquitous (can be read and written by all other high-end graphics software) and, as such, is a good format to use for textures. The format can be saved lossless, which is another good reason to use this format for textures. If the situation calls for high-quality 8-bit-per-channel images, TGA is the right choice. See how TGA files compare to JPG files for use as textures in Figure 3.2 (top) and Figure 3.3 (bottom).
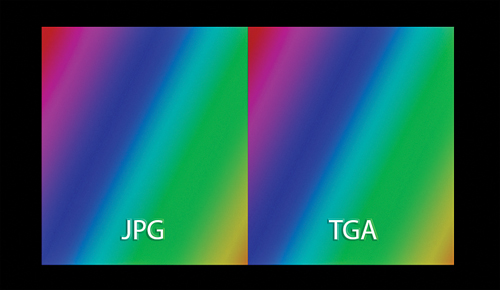
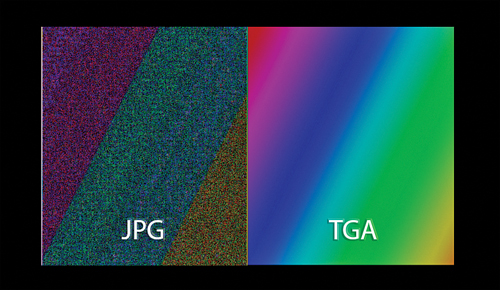
FIGURE 3.2 (top) and FIGURE 3.3 (bottom). The same rainbow-colored image was saved as a JPG and a TGA file. I then rendered these two images as textures from Maya (top). They look very similar, right? Well, when I overlay the original image onto the rendered image, the JPG reveals a lot of compression (bottom). The end quality of your renders depends on the quality of your source images.
EXR
For some instances, an image with more color depth is necessary. OpenEXR is a format designed for just that. Each channel has 32 bits, meaning that the number of colors possible in the format is in the trillions. When would you need this much color information? Imagine you are using an image to displace geometry (in other words, to make a relief-map). If you are only using an 8-bit-per-channel image format, you have only 256 (2^8) possible levels of detail. Imagine if you are trying to displace or extrude a mountain range out of a highly detailed plane. With only 256 possible levels of detail, that mountain is going to look pretty jagged. With an EXR image instead, the mountain will have as much detail as you can imagine in its topology (you’ll actually run out of RAM calculating the geometry long before you run out of detail in the EXR displacement map to drive the geometry in the first place).
Maya can write EXR images as well, which is useful for compositing for television VFX and film, where color needs to be matched to a raw image with high color depth. For most intents and purposes, however, animation destined for the Web and TV that has no color matching does need to take advantage of this format.
PNG
Comparable to the size of JPG files, but with the added benefit of carrying a transparency channel, PNGs are a good middle ground for most users. For most of your work, a PNG offers the best of both worlds, with lossless compression and transparency. You should be careful using PNGs, because Maya will automatically load a transparency even if you are not using one. Some attributes do not like PNGs for the way they handle transparency.
IFF
The Maya Image File Format (IFF) is the default format written from Maya. This format does not have much compression, but it reads fast. It also supports alpha channel, and goes up to 16 bits per channel, giving you film-quality color in your renders. Maya, for lack of a better word, “loves” IFF files. It reads them and writes them quickly, and can use IFFs in any texture slot without problems.
Note: Choosing the Right Image Format
Choosing the correct image format can be a very important decision. Although Maya reads over two dozen formats and can read even more with plugins, there is such thing as the wrong format for the job. You don’t need a 32-bit image as your transparency channel, the same way an 8-bit-per-channel image will not work for a displacement map. In general, TGAs are safe to use for textures, rendering as IFFs is fine for Web and TV, and if there’s film or color matching involved, a 16-bit IFF or EXR is perfect.
Miscellaneous Formats
Maya writes dozens and dozens of files when creating scenes—from particle cache and geometry cache files, swatch files, render settings presets, render logs, and more. You will learn about these files types in their respective Hours. All the same, whenever you are working with Maya, it is important to set your project. When you do so, Maya will create the respective folders you need to store these files. Let’s learn how to set a project and save your files in the correct folders.
![]() Video: File Types
Video: File Types
In this video, I demonstrate some of the pros and cons of the many file types that Maya can read and write. You will see me save and open a few formats, as well as edit a Maya ASCII file using a text editor.
Maya Projects
The Maya Project folder structure is set up so you have all the directories you need to organize your files. Maya also looks for your files in their respective folders automatically, so keeping them organized is pivotal to your success. We will go over higher-level project management in Hour 23.
Set Project
In Maya, in the File menu, you have the option to set your project. This chooses a folder on your hard drive or a network location as a type of home directory. By default, Maya chooses the “default Project” folder in your My Documents folder if you are using Windows, or your Users folder if you are using a Mac. If the appropriately named and organized folders are present, Maya will save automatically generated files into their respective directories. If there are files present in the directories, Maya knows where to look for them by looking at the workspace.mel file created in every Project directory.
Tip: Default Workspace
Setting a project in a directory that is not in the normal Project directory structure will prompt Maya to ask you to either use a default workspace (a workspace.mel file that will assume your asset files are in the normal directories) or create a new one. It’s a good idea to work with Maya’s Project structure, so creating a default is a good bet.
Creating a Project
To create a project, you simply choose the directory you want to create the project within and then choose a project name. In its simplest form, Maya is creating a few default folders and a workspace.mel file to tell the program (whenever you set this project) where to look for certain files. To create a project, go to File, Project Window and then choose New. You will have the chance to choose a directory and a name for your project (see Figure 3.4).
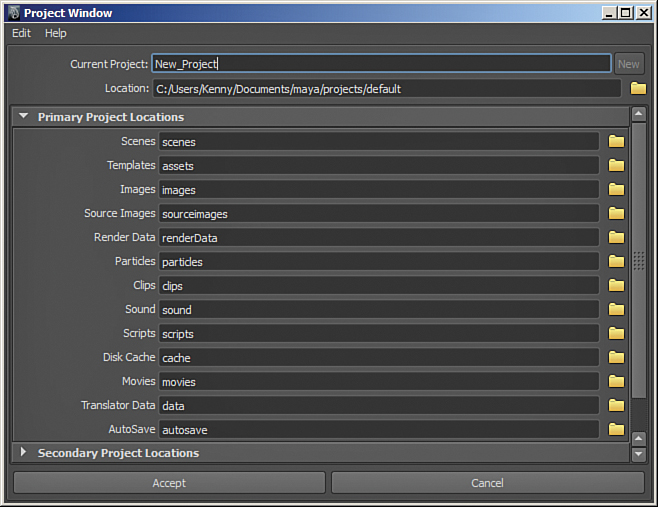
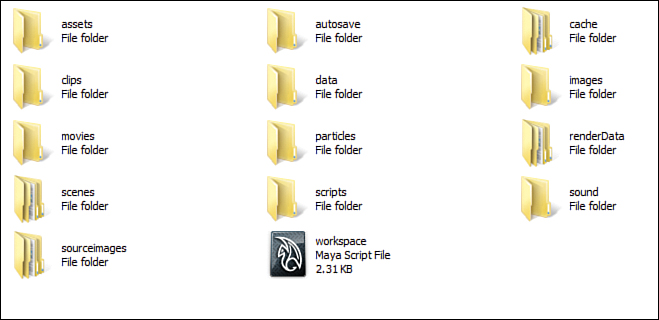
As you can see, the default directories are created for you. These directories hold almost all of the files you will ever create in conjunction with a 3D project in Maya. When creating a project, you have the option to remove the directories you do not think you will need by clearing the fields before clicking Accept. Most Maya users learn how to look past the infrequently used directories and focus on the important ones; deleting unused directories doesn’t really clear up clutter, and can be a pain when it’s time to generate an asset and the folder needs to be created by hand. In Figure 3.5, we see the folder structure of a Maya project as viewed in Windows Explorer.
You will rarely need to change this structure, and we will discuss when and why to do so in Hour 23.
Summary
We’ve taken a look at what a Maya file contains and a few of the issues of saving using the different file types. We’ve also looked at the other types of 3D assets that Maya can read and write. Because you will be using many different image file formats in Maya, we also discussed the advantages and disadvantages of popular formats, and decided on some good ones to use for most tasks. We talked about the miscellaneous formats Maya will create when working in a scene, and finally where they will all be saved to, by creating your first Maya project.
Q&A
Q. It sounds like I should always be saving as .ma for all the benefits it has, right?
A. The file size issue can actually become pretty prohibitive. I have seen Maya files in the hundreds of megabytes. If you are transferring files frequently, .mb makes sense. Major visual effects studios that have blazing-fast networks and petabytes of storage space don’t worry about these issues though.
Q. Shouldn’t I use the highest bit depth images I possibly can for all my 2D needs?
A. No, it depends on the final destination of your 3D project. If you are rendering for display on the Web, for instance, you should keep in mind that monitors only display 8 bits per channel. Although it’s true you will get slightly different values in your final renders if you use a very “deep” format, the amount of scene overhead and RAM required to render your scene will quickly become overwhelming.
Q. Do I have to set my project to work?
A. No, you can work in Maya without setting your project to the correct one. Maya creates a default project in your Documents directory that it will use until you make your first project. After that, it will always load the last-used project when it opens. Beware: Even though it’s not necessary to set your project to work on a file, you could overwrite important files if you don’t set it correctly.
Q. Can I delete the unused folders in my project directory?
A. Yes, but it’s probably a better idea to get used to them. Different scenes will require different assets. If you are constantly trying to trim down your directory structure, you will by definition be spending less time creating.
Workshop
The workshop contains quiz questions and exercises to help you solidify your understanding of the material covered. Try to answer all questions before looking at the “Answers” section that follows.
Quiz
1. What does .ma stand for? What does .mb stand for?
2. Which exportable/importable format saves the most information within it?
3. Which image format has the least amount of information within it and is the most compressed? Which has the most amount of information in it?
4. What is the window called that is used to set the directories Maya will use to locate files associated with your scene?
5. The MEL script that is created within all projects and lists the project’s directory settings is called what?
Exercise
We will be using a lot of different types of files in this book. It is a good idea to set up a project for the files you will be loading and editing. Create a folder on your computer called STYMAYA (for Sams Teach Yourself Maya). Within this folder, create a new project called 3D. Accept the defaults for the project that Maya gives you. Close Maya and navigate in Windows to the 3D directory and make sure it created a workspace.mel file. Reopen Maya and double-check that the project is set correctly. Try saving the empty file as an .mb and .ma file in the scenes directory as well.
Answers
1. .ma stands for Maya ASCII, and .mb stands for Maya Binary. Only ASCII files are editable and human readable, and they are generally backward compatible.
2. FBX files have the most robust information saved within, saving everything from geometry and texture information, to lights and camera data. Some formats that only save one type of data are OBJ (geometry) and ANIM (animation).
3. JPG has the least amount of information in it, at 8 bits per channel and no alpha. JPGs are also highly compressed. EXR files can have up to 32 bits per channel (trillions of colors) and no compression.
4. This is called the Project window, and it is found under the File menu in the main menu.
5. Every project directory contains a workspace.mel file that contains the information as to where Maya should look for the files connected to your scene.