
Hour 2. Menus and Navigating the Maya UI
What You’ll Learn in This Hour:
![]() What menus are available to you
What menus are available to you
![]() How to navigate Maya’s interface
How to navigate Maya’s interface
![]() How to change menu sets
How to change menu sets
![]() How to navigate a scene file in 3D panels
How to navigate a scene file in 3D panels
Being familiar with Maya’s interface and menus is the first essential step in learning to use this powerful program. There are hundreds of menus in Maya, but they are organized in a way that ensures they are not cumbersome as you try to get work done. The key skill is learning how to quickly access menus you need for your current task and how to let the rest of Maya’s functionality wait in the background, ready to be used.
In this hour, you will open Maya and explore the different menu and dialog box types. You will load the different menu sets and see their functionality, and also learn the basic camera movements within panels for navigating in 3D.
The Maya Interface
Opening Maya, we are presented with the main application window. This layout presents the user with the most commonly used tools and menus. Many 3D programs first present the user with an array of very tightly packed menus and buttons, whereas Maya’s interface contains primarily evenly spaced icons that have a helpful image to indicate what each option does. For this reason, Maya’s interface stands out as one of the more user-friendly experiences available in CG. As you can see in Figure 2.1, the main Maya UI is clean and easy to browse.

FIGURE 2.1 The main Maya window. These default loaded menus and buttons offer the user almost all of Maya’s commonly used functionality at startup.
Starting from the Default Maya Interface
Make sure you are starting from the default Maya interface. If you are working from a fresh install, move ahead with this lesson. If not, you can get a default layout by either:
![]() In Maya, go to Window, Settings/Preferences, Preferences and then choose Edit, Restore Default Settings. Then go to Display, UI Elements, Restore UI Elements.
In Maya, go to Window, Settings/Preferences, Preferences and then choose Edit, Restore Default Settings. Then go to Display, UI Elements, Restore UI Elements.
![]() Delete the “prefs” folder in My DocumentsMaya2013 (or whatever version you have).
Delete the “prefs” folder in My DocumentsMaya2013 (or whatever version you have).
Maya’s interface has five main areas that contain the eight main UI elements. They are as marked in Figure 2.2:
![]() The top area, which contains the main menu, Status Bar, and Shelf
The top area, which contains the main menu, Status Bar, and Shelf
![]() The center area, which contains panels
The center area, which contains panels
![]() The left area, which contains the Tool Box and Tool Settings
The left area, which contains the Tool Box and Tool Settings
![]() The right area, which contains the Attribute Editor and the Channel Box/Layer Editor
The right area, which contains the Attribute Editor and the Channel Box/Layer Editor
![]() The bottom area, which contains the Time Slider, Range Slider, Command Line, Help Line, and Status Line
The bottom area, which contains the Time Slider, Range Slider, Command Line, Help Line, and Status Line
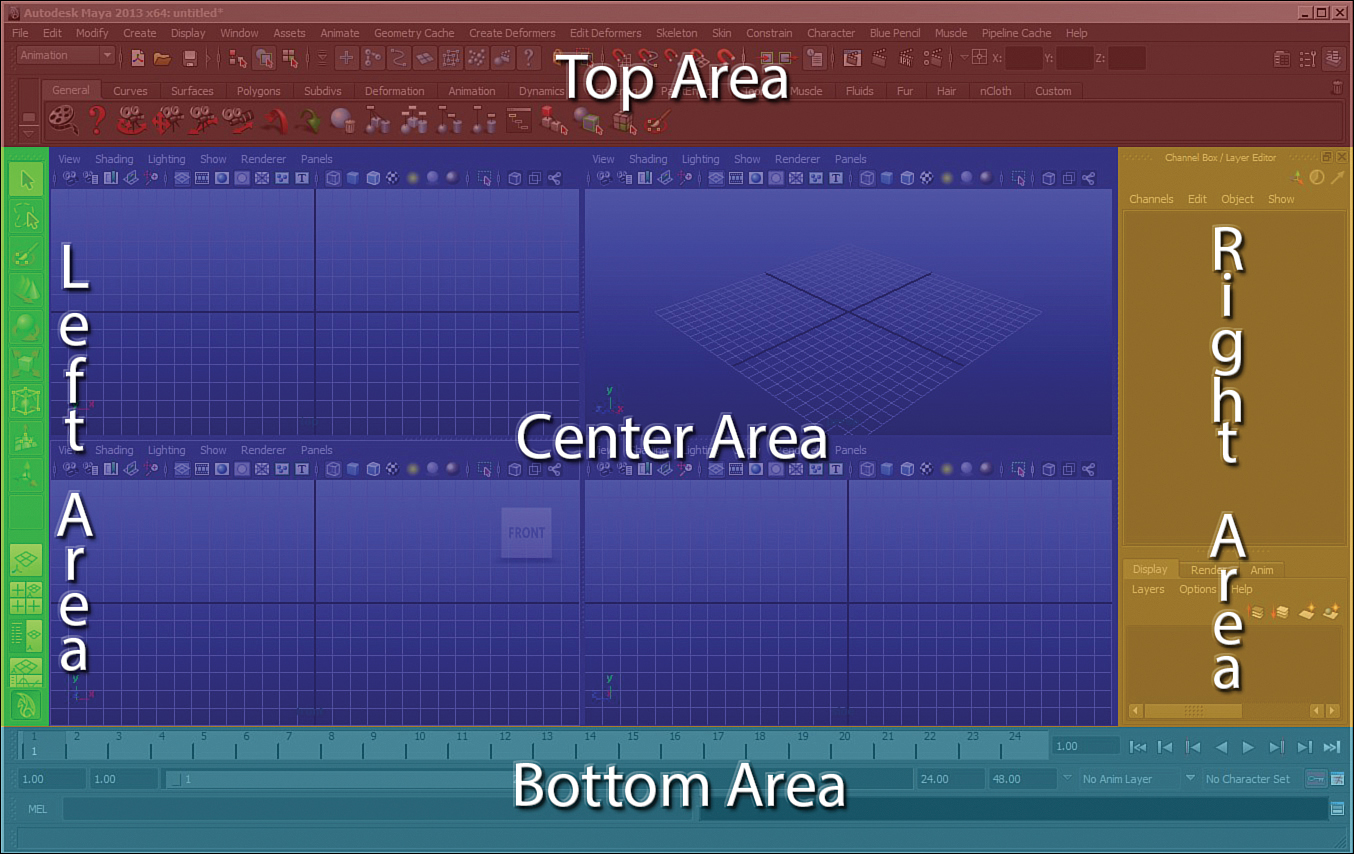
FIGURE 2.2 The interface can be simplified into five main areas. These areas will not change, though you can hide some or all of them to remove clutter from your workspace.
Note: Naming the Areas
The areas named in Figure 2.2 are not named as such in any official help file or resource; these are the naming conventions created for this book. I’ve found that designating general areas helps when trying to describe the location of menus, because as you can see, different areas have their own top menus.
The Top Area
We will start by looking at the top of the Maya interface. Almost all of the available commands are accessible through the menus and icons shown here. As you become more familiar with the software, you will return less frequently to the top area by the use of hotkeys and shortcuts, but it’s good to know that Maya’s core functionality is concentrated in one area.
The Main Menu
Maya’s main menu area provides text-based menus at the top of the Maya window, and graphical buttons directly underneath in the Status Line. These buttons offer quick access to common tasks and options. Maya provides a variety of groups of menus (menu sets) to choose from, according to the task being carried out (see how to change your menus in the section “Switching Menu Sets”). This means that some of the listed text menus will change according to the menu set selected, but the good news is that a default set of menus remains constantly displayed: File, Edit, Modify, Create, Display, Window, and Assets (at the left of the listed menus) are shown in Figure 2.3. These menus contain tools, options, and commands common to every menu set. It is also good to note that “Help” is always displayed to the right of all the main menu items, and is also accessible by pressing F1 at any time.
FIGURE 2.3 The main menu. These first seven menus stay the same no matter what menu set you have loaded.
![]() The File menu contains options and commands for loading and saving files, setting and configuring your Maya project, using references, and interacting with other Autodesk software.
The File menu contains options and commands for loading and saving files, setting and configuring your Maya project, using references, and interacting with other Autodesk software.
![]() The Edit menu contains commands for copying and pasting nodes; selecting, duplicating, and deleting nodes; and, finally, grouping and parenting.
The Edit menu contains commands for copying and pasting nodes; selecting, duplicating, and deleting nodes; and, finally, grouping and parenting.
![]() The Modify menu contains options, tools, and commands for manipulating object attributes, snapping and aligning objects, converting geometry, and access to the common tools in the Tool Box.
The Modify menu contains options, tools, and commands for manipulating object attributes, snapping and aligning objects, converting geometry, and access to the common tools in the Tool Box.
![]() The Create menu contains tools for creating all of the common object types in Maya.
The Create menu contains tools for creating all of the common object types in Maya.
![]() The Display menu contains options for controlling types of objects to display, changing display options for different object types, showing and hiding nodes, and controlling user interface display.
The Display menu contains options for controlling types of objects to display, changing display options for different object types, showing and hiding nodes, and controlling user interface display.
![]() The Window menu contains all of Maya’s main windows and saved UI arrangements.
The Window menu contains all of Maya’s main windows and saved UI arrangements.
![]() The Assets menu contains options and tools for using Maya’s Asset system to lock, unlock, and publish attributes on objects to reduce the possibility of errors introduced in production later.
The Assets menu contains options and tools for using Maya’s Asset system to lock, unlock, and publish attributes on objects to reduce the possibility of errors introduced in production later.
These seven menus will never change no matter what menu set is currently loaded. They contain other menus, tools, options, and commands that are necessary to perform all of Maya’s functionality.
Maya has more than one way to access almost every menu. From the main menu, to hotkeys, to the hotbox, the menu you need is never more than a click away.
Switching Menu Sets
Maya allows you to load the different menu sets, arranged for convenient access to menus commonly used in conjunction. To switch between menu sets, you can hit the F2 through F6 keys, or use the drop-down box in the top-left corner of the screen. Changing menu sets replaces the menus to the right of the first seven menus (to the right of the “Assets” menu). Figure 2.4 shows the Menu Set drop-down list.

FIGURE 2.4 This drop-down box shows you the currently loaded menu set. Loading new menu sets is as easy as choosing a new one from this list.
Animation Menu Set
By pressing F2 or choosing Animation on the Menu Set drop-down box, you can access the Animation menu set (see Figure 2.5). This menu set contains tools and commands to create deformers, create keyframe and path animation, set up skeleton and skinning, to cache your scene, and more.
Polygons Menu Set
Pressing the F3 key or choosing Polygons in the Menu Set drop-down box will give you access to polygonal modeling tools and UV tools, as shown in Figure 2.6. Polygonal modeling is the standard surfacing type for modern animation and visual effects. Creating and editing UVs (or “UV’ing”) is the method by which we define how textures stretch over a 3D object.
FIGURE 2.6 The Polygons menu set contains the menus you will need for modeling and texturing polygonal objects.
Surfaces Menu Set
Pressing the F4 key or choosing Surfaces in the Menu Set drop-down box reveals all of the NURBS modeling tools as well as the Subdivision Surfaces tools. NURBS and “Sub-D’s” (as they’re called) are becoming antiquated technology, but support for these geometry types will persist for a few years yet. Figure 2.7 shows the Surfaces menu set.
FIGURE 2.7 The Surfaces menu set contains tools and commands for creating and editing NURBS geometry.
Dynamics Menu Set
Pressing F5 brings up the Dynamics menu set, which is also available by choosing it in the Menu Set drop-down box. This menu set loads Maya’s legacy particles and dynamics systems, as shown in Figure 2.8. With the addition of nDynamics, Maya has been moving away from these tools, but support for them may persist for some time.
Rendering Menu Set
F6 is the last hotkey programmed to change the menu set, by default, and it is reserved for the Rendering menu set. You can also access the Rendering menu set by selecting it from the Menu Set drop-down box. This menu set offers access to Maya’s lighting, texturing, rendering, toon shading, Paint Effects tools, and more, as seen in Figure 2.9.
FIGURE 2.9 This menu set is the hub of your lighting, surfacing, and rendering tasks. Also, toon rendering, muscle options, and paint effects reside here.
nDynamics Menu Set
Although no hotkey is defined for nDynamics, you can still access this menu set by selecting it in the top Menu Set drop-down box. nDynamics have replaced normal dynamics for most uses in Maya. You can set up particles and fields as well as nCloth objects for cloth and soft body simulation. Figure 2.10 shows the nDynamics menu set loaded.
FIGURE 2.10 The nDynamics menu set has no hotkey assigned, by default. This is only because the legacy Maya dynamics have not yet been written out of the program.
The Status Line
Below the main menu text buttons sits a bar containing graphical buttons. This menu is rarely changed because it contains some very important tools and menus. Starting from the left, as shown in Figure 2.11, we have the following items:
1. The Menu Set drop-down box
2. New File, Open File, Save File
3. Select by type: Hierarchy, Object, Component
4. Selection masks, for choosing what objects can and cannot be selected
5. Lock selection and highlight selected toggle
6. Snap to grid, curve, point, view plane, or make object live
7. Toggle construction history
8. Open render view, render the current frame, IPR render current frame, Render Globals
9. The input line box

FIGURE 2.11 Below the main menu is a menu bar called the Status Line. These buttons provide added control and options for manipulating objects and scene files.
The Shelf
The Shelf contains common commands and tools used frequently in Maya. The default shelves align basically with the default menu sets, but offer quick access to tools and commands that are a few extra clicks away if you were to navigate to them using the main menu. By far the most powerful aspect of the Shelf is that you can create your own shelves and organize your tools and commands in an infinite number of ways.
Note: Get Comfortable and Then Customize
It cannot be overstated how many different ways you can access the same menu, tool, or command in Maya. The main menu is a good go-to place and is simple to navigate, albeit rudimentary. Once you begin to use custom shelves, marking menus, and the like, you’ll find your own comfortable workflow and can start removing clutter from your UI by hiding menus.
The Center Area
Although the top area contains the menus you will access most often, you will be working within the panels that occupy the center area 90% of the time. You can load almost any of Maya’s many panels into the center area, as well as any camera or perspective view. If Maya was a tool shed, the top area would be where your tools hang and the center area would be your work bench.
Panels
The center area is where your main panels display (sometimes referred to as “viewports” or “workspace”). Which panels display here is entirely up to you, and you will find that part of a great workflow is finding convenient panel layouts and saving them for later use by going to the Panels, Saved Layouts menu. Any panel can display any camera or main application panel, such as the graph editor, outliner, or hypershade. You can maximize any panel to the entire panel area by tapping the spacebar when your mouse is hovering over it. Panels can also be resized by clicking on the panel borders.
Loading a new camera is simple: In the panel you want to change, select Panels and then choose either a Perspective, Stereo, or Orthographic view to change the camera. Alternatively, you can select the camera in the scene and go to Panels, Look Through Selected. A third way (there are many) to change cameras is to hold down the spacebar and then LMB click in the center of the hotbox that appears. The default camera choices will appear, and you can drag your mouse in the direction of the camera you would like to use. There are still more ways to change cameras, but let’s get a little familiar with using panels so you can navigate your 3D scene.
Tip: Find the Menus Before the Hotbox
We are not going to go too deep into the hotbox in this book because although it is a timesaving tool for some tasks, it is fundamentally just a different presentation of the same menus you have available to you in the rest of Maya, albeit appearing in a panel whenever you hold down the spacebar. Learn to find your tools and commands in the normal Maya menus before you customize or even start to depend on the hotbox so when a command is not available to you there, you don’t get lost searching for a menu you’ve misplaced. Again, it is a good timesaving tool for intermediate to advanced Maya users, but will be cumbersome to you as a beginner.
Using a Camera Panel
To rotate a camera in a panel, hold the Alt button while LMB dragging within the panel. The camera orbits around a center point. To move a camera along its Z axis (in other words, move the camera forward and backward), hold Alt and drag the right mouse button. This is mistakenly referred to as “zooming” in many tutorials and books. We’ll cover true zooming in Hour 14, “Creating and Adjusting Cameras.” Finally, to move your camera up and down, and side to side, hold Alt while dragging with your MMB.
The Left Area
The Toolbox and Tool Settings reside in the left area. By default, the Toolbox is displayed, but somewhat confusingly, the button to display the Tool Settings is in the top-right corner of the main Maya window. I’ve copied the button here because it can be quite hard to find without seeing it first. Take a look:
The Toolbox
This area holds commonly used tools, such as the move, rotate, and scale tools, but also the universal manipulator and soft selection. Most very experienced Maya users hide the Toolbox eventually, because of the easily learned hotkeys to access the tools. However, one very convenient feature of the Toolbox is that it shows the last-used tool below the Show Manipulator Tool. This can give you at-a-glance information that is useful for speeding up your workflow. To access the last-used tool, click on that button or press the Y key.
Tool Settings
To load the Tool Settings window, click the tool settings button in the top-right corner of the screen. Any tool that you load will display its options in this box. Alternatively, you can double-click on any tool loaded in the Toolbox, and the Tool Settings window will load with that tool selected. When you have loaded a tool and are ready to use it, the Tool Settings window gives you the options associated with your tool. These options range from the radius of your brush, with the Paint Skin Weights Tool, to the number of edge loops to insert with the Insert Edge Loop Tool. Remember that in Maya, any action that requires your input to determine the results is considered a tool. Although many commands have options boxes next to their name in the menu (which look like this ![]() ), you can bet that all tools have that box; you can set your tool’s starting options by clicking that box before entering a tool. The settings will carry over when you open the Tool Settings window.
), you can bet that all tools have that box; you can set your tool’s starting options by clicking that box before entering a tool. The settings will carry over when you open the Tool Settings window.
Common Tools
Maya delineates between a tool and a command. A command is executed and then the command is done. A tool is something that is able to be “in use.” You manipulate a tool and your input changes the results you get onscreen. Some examples of commands are deleting geometry, removing history, and creating a sphere. Some examples of tools are the Insert Edge Loop Tool, the PaintFX Tool, and the Move Tool.
Select Tool
To select any 3D object that is displaying in a camera panel, press Q and use your LMB to click directly on the object or drag a selection box around the objects.
To toggle select objects (select if unselected, or deselect if selected), hold down the Shift key when selecting or dragging a selection box.
To add to selection, hold down Ctrl+Shift when selecting. To deselect, hold down just Ctrl when selecting.
Move, Rotate, and Scale Tools
All three of these tools will select an object if unselected: You simply LMB click on it. You can also use the selection box by clicking and dragging with your LMB to select, deselect, or toggle select, just like with the selection tool. These tools have manipulators, however, which look like axes that float in the panel. These are the literal handles you use to manipulate these tools. The advantage of using the selection tool over always making your selections with the Move, Rotate, and Scale Tools is that sometimes you will not be able to select an object that is blocked by a tool’s manipulator (especially the Rotate Tool’s manipulator, being the largest).
The W key activates the Move Tool. A three-axis move manipulator will appear at the pivot point of the selected object, or the last selected object if you have selected multiple objects. To move the object, select any one of the axis handles on the manipulator to move along that axis, or to move the object freely, relative to the camera, MMB drag anywhere in the panel and the object will follow.
The E key actives the Rotate Tool. A spherical rotation manipulator will appear at the selected object’s pivot. LMB clicking on any of the three rotation axes will allow you to rotate along that axis, or LMB dragging anywhere within the radius of the rotation manipulator will activate a “virtual trackball” in which you can freely rotate the object. MMB dragging anywhere in the panel rotates the object on the currently selected axis.
Finally, the R key activates the Scale Tool. This tool resembles the Move Tool with its three-axis manipulator. Using the LMB to click-drag on any of the three axes scales along that axis. LMB clicking on the center of the manipulator and dragging scales the object uniformly. MMB dragging anywhere in the panel scales the object along the currently selected axis.
The Right Area
The right area of the Maya interface holds some of the most commonly accessed menus. The Channel Box, the Attribute Editor, and Layer Editor all reside here. Nearly all editable and animatable attributes can be accessed through the menus visible in the right area.
The Channel Box
By default, the Channel Box is the displayed menu in the right area. This menu shows you the channels (editable attributes) of the selected object in a list format. The channel name is on the left, and the current value is listed on the right, as you can see in Figure 2.12. You can select the value box and type in a new value, or you can MMB click-drag on the channel name to slide the value up and down. You’ll learn how to add attributes later on.

FIGURE 2.12 The Channel Box displaying the attributes of a selected object. The channel shows in the left column, the current value of a channel in the right.
The Attribute Editor
Clicking the Attribute Editor button or pressing Ctrl+A opens the Attribute Editor. By default, it will load and replace the Channel Box in the right area. When finer control is necessary, the Attribute Editor is the menu to use. This is where all of your “options” truly exist. Most of the editable top-level nodes are arranged across the top of the Attribute Editor in tabs. Clicking on a tab will load the attributes for that node, allowing you to change attributes as you see fit. Some nodes will always be shown, specifically an object’s transform node and shape node, as you can see in Figure 2.13.
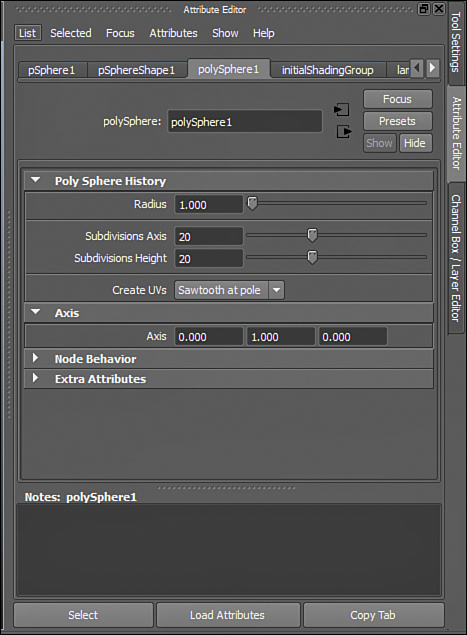
FIGURE 2.13 The Attribute Editor offers the most robust control over the attributes of nodes in Maya. All of the inputs and outputs associated with a selected node will normally display as tabs across the top of the Attribute Editor.
The Layer Editor
Beneath the Channel Box and Attribute Editor resides the Layer Editor. The three tabs here represent the three different types of layers Maya allows you to add to your scene (as shown in Figure 2.14):
![]() Display layers are like groups that control the visibility and selectability of objects in your scene. An object can belong to multiple display layers, but it should be known that an object will be hidden if the highest layer it belongs to is hidden, regardless if layers below are showing.
Display layers are like groups that control the visibility and selectability of objects in your scene. An object can belong to multiple display layers, but it should be known that an object will be hidden if the highest layer it belongs to is hidden, regardless if layers below are showing.
![]() Render layers allow you to separate objects into layers at render time. This is useful for rendering objects separately for compositing together into a single image later.
Render layers allow you to separate objects into layers at render time. This is useful for rendering objects separately for compositing together into a single image later.
![]() Animation layers allow you to add multiple layers of movement onto objects. This is useful for applying movement that would be destructive to your overall animation if you had to change it later, such as adding a little bit of shivering on a character that is cold. Once you add the kind of small details it would take to make the shivering believable, the rest of the body animation would be very hard to change due to the amount of details piled onto the controls.
Animation layers allow you to add multiple layers of movement onto objects. This is useful for applying movement that would be destructive to your overall animation if you had to change it later, such as adding a little bit of shivering on a character that is cold. Once you add the kind of small details it would take to make the shivering believable, the rest of the body animation would be very hard to change due to the amount of details piled onto the controls.

FIGURE 2.14 The Layer Editor contains the three layer types. Most of their functionality as far as adding and removing objects from a layer is the same among the layer types. We will make extensive use of these in later lessons.
The Bottom Area
This area may only hold a few menus, but it provides a lot of the power behind Maya’s animation toolset. In addition, the feedback you get from the bottom area will be invaluable as you encounter errors or need tooltips as you work.
The Time Slider
The single most useful part of the bottom area is the Time Slider. As you start creating animation, you will see how easy it is to use; simply LMB click anywhere on the Time Slider to set the current frame. On the right of the Time Slider are normal VCR controls, with an additional frame forward, frame backward, keyframe forward, and keyframe backward. The keyboard shortcut to start playback is Alt+V, and Esc stops. To frame forward is Alt+. and frame backward is Alt+,.
The Range Slider
Here is where you determine how long, in frames, your scene file will be. You can type in values on the left and right side of this slider. When you have a scene length (the outermost numbers), you zoom in on a certain section of your scene by either typing in values in the innermost boxes, or even by LMB clicking and dragging the two handles on the ends of the Range Slider. This is useful when you have a long scene and you need to focus on a small section of keys. To the right of the Range Slider are options for choosing animation layers and character sets, to toggle AutoKey, and to change your animation preferences. We will go in depth on these options later.
The Command Line
The Command Line is a useful bar that gives you feedback about the commands you execute, as well as a small script box in which you can type in MEL or Python commands. Whenever you execute any command or finish using any tool, Maya will output some feedback on the Command Line. In essence, you are seeing simply the last line of the Script Editor (the button on the far right of the Command Line). It is still very useful, though, because sometimes feedback about errors that shows up here will cue you to open the Script Editor and take a closer look.
The Help Line
Hovering over any tool or command will make a helpful tooltip appear in the Help Line in most cases. From giving you the order in which you need to select objects to make a certain command work, to giving you a description of a tool and how to use it, the Help Line is your best friend when first starting in Maya. In fact, now would be a good time to hover with your mouse over some buttons and see what Maya has to say about them. With the feedback from the Help Line, it is quite possible to learn the basics about nearly all the tools once you have learned the basics of Maya.
Axes, Planes, Coordinates
As in all 3D programs, Maya has our standard Cartesian axes. The three axes are X, Y, and Z. All transforms (moving, rotating, and scaling) are done using these three axes. Because Z is normally considered “depth,” you can consider this as the “forward and backward” axis. That leaves X to be “side to side” and Y to be “up and down.” When Maya first loads, you are staring at the construction plane, or the world origin. This origin is at XYZ values of 0,0,0. This means that negative values on transforms, rotations, and scales are common. “Backward” in Z space is negative, “down” in Y space is negative, and “left” in X space is negative. You can see the current orientation of the XYZ plane by looking in the bottom-left corner of any panel (the lines point toward positive X, Y, and Z). Alt+LMB click and rotate the Persp panel around to see the effect on the coordinate axes.
The Outliner
The last important panel to become familiar with is the Outliner. You will, of course, encounter many menus as you go through this book and discover more about Maya, but the Outliner is used ubiquitously throughout all the steps of 3D production. Going to Window, Outliner loads the Outliner. As you can see, it is basically a hierarchical view of the entire Maya scene (see Figure 2.15). By default, the Outliner displays only nodes that have transform or shape nodes associated with them. Meaning textures, images, and other utility nodes are not displayed in the Outliner. This is a good thing because you need a way to see only the important nodes in your scene—nodes such as geometry, controllers, effects, and the like.

FIGURE 2.15 The Outliner will become your best friend. This simple hierarchical view of your scene file allows you to see how objects relate to one another. It also allows you to do simple tasks such as group and parent objects and, of course, make selections.
Typing in text in the top bar narrows the display to matching terms, and an asterisk (*) is a wildcard. For instance, if you want to find all of the spheres in your scene, you can type pSphere* in the box. Bear in mind this box is case sensitive, like all areas of Maya. Selecting an object by LMB and MMB dragging it will either move its position in the Outliner (only for organizational purposes; it is not like the Layer Editors). Or, if you MMB drag an object and let go while it is hovering directly on another object, the dragged object will “parent” underneath that object. This means the parent object controls the position, orientation, and scale of the child object. Don’t worry too much about this now, because we will discuss hierarchies in depth in Hour 9, “Relationships and Making Nodes Work Together,” and Hour 10, “Basic Rigging: Preparing Objects for Animation.”
The one slightly odd thing about the Outliner is that while Ctrl+LMB is the action to deselect objects in the panel, it is how you toggle a selection in the Outliner. Shift+LMB selects all the objects between the two objects you clicked in the Outliner.
Summary
Maya’s interface can be daunting, but it can also be very empowering and easy to use when you are used to it. The switching of menu sets allows you to focus on the task at hand, be it modeling, or animating. The rearrangement of panels makes it so that you can work in a way that suits your workflow. Tearing off menus means the tools you need are always at your fingertips. For ease of use, the same camera manipulation tools work in almost every single Maya panel—be it a perspective camera or the Graph Editor—so learning to move, dolly, and rotate the camera in panel will serve you in navigating all of Maya’s many editors.
![]() Video: Menu Setups
Video: Menu Setups
Watch the bonus video included in this Hour’s files for a quick run-through of common menu setups in Maya. You will see how fast it is to save menu layouts, and how to restore a layout saved previously.
Q&A
Q. I’ve been playing around in Maya and it doesn’t look “default” anymore. How can I reset it?
A. Although it is possible to reset individual settings and preferences, a sure-fire way to revert your Maya installation back to default is to simply close Maya, delete the “prefs” directory on your computer found in the Documents/Maya/2013/directory, and then reopen Maya.
Q. Can I access tools in one menu set when another is loaded?
A. Yes, however, it is almost always easiest to switch menu sets quickly. You can set hotkeys (discussed in Hour 24, “Ideal Settings, Preferences, and Hotkeys”) for all of the Maya commands, but there are so many that you will quickly run out of keys if you are not careful. You can load any menu or command as a torn-off window too, which is a good alternative to having to switch menu sets constantly if you are doing a repetitive task.
Q. Is there a way to display both the Attribute Editor and the Channel Box at the same time?
A. You can move the Attribute Editor to either side of the Maya interface and tear it off. More powerfully, any menu that loads into the Attribute Editor can be torn off by clicking the Copy Tab button at the very bottom. The nice thing about this is that this copy of the Attribute Editor will always show the attributes for the object you had selected when you copied it.
Q. Can I change the coordinate system to have Z “up” like in other programs?
A. I highly recommend keeping your axes in their default configuration to avoid major problems down the road. However, if you are working closely with another program and need the interoperability, you can change it in Windows, Settings/Preferences, Preferences and then loading the Settings menu.
Workshop
The workshop contains quiz questions and exercises to help you solidify your understanding of the material covered. Try to answer all questions before looking at the “Answers” section that follows.
Quiz
1. How many areas are there in the default Maya interface?
2. What interface item holds sets of commonly used commands and tools, organized by menu set?
3. What area of the Maya interface is the Channel Box found in?
4. What is the 3D coordinate (X, Y, Z) of the world origin?
5. If an object is 4 units to the “left,” 3 units “up,” and 6 units “back,” what is its 3D coordinate?
Exercise
Open Maya and make sure you are in your default interface. Load different menu sets, and tear off menus and arrange them how you like. Open the Attribute Editor, the Tool Settings window, and the Channel Box and get familiar with their layout. Choose a few layouts that are located below the Toolbox on the left and see how these arrangements make use of the five areas available. You can even create your own layout and save it by clicking the following in any panel: Panel, Saved Layouts, Edit Layouts.
Answers
1. Five areas. These can be hidden and re-arranged, but there are only ever five areas to dock menus and load items.
2. The Shelf holds these items. You can edit the shelves by right clicking on the Shelf (in Maya 2013).
3. The right area. It shows and hides depending on if the Attribute Editor is showing at the same time (Ctrl+A).
4. (0,0,0)
5. (-4, 3, -6). Remember to face the Cartesian plane with Z being your “depth” and you will not get confused.