
Hour 24. Ideal Settings, Preferences, and Hotkeys
What You’ll Learn in This Hour:
![]() How to check or change settings and preferences
How to check or change settings and preferences
![]() What different settings and preferences to check or change when needed
What different settings and preferences to check or change when needed
![]() How to use hotkey shortcuts to quickly work with many of Maya features
How to use hotkey shortcuts to quickly work with many of Maya features
![]() How to delete user preferences files to restore Maya back to the defaults
How to delete user preferences files to restore Maya back to the defaults
One look at Maya’s user interface will tell you that there are a lot of features available in Maya. Behind the scenes of those features are numerous settings, too. Fortunately, Maya’s default settings come in handy for most of your needs, at least to get started. But sometimes you will prefer other settings because of a certain task or project you are working on, or just because you like a different setup better. Maya lets you specify your own user preferences and settings for the user interface, tools that you work with, how objects are displayed, and how you prefer to work with many of its features. Maya also provides you with a large range of keyboard shortcuts known as “hotkeys” to help your workflow, too. You will need to know some right away, and will most likely want to pick up others depending on what you are working on. Ideal settings, preferences, and hotkeys are really what you want or need for your task or project. But whether you’re just starting out or are an experienced user, it’s a good idea to have a look at what is available. And just in case you make some changes, and wish you hadn’t, Maya also provides options to reset everything back to Maya’s defaults.
Note: Default Settings and Preferences
Maya lets you change all sorts of settings and preferences to help you work the way you want to, but every now and then, you might regret a change you make and not know how to fix it. Fortunately, as you will find out in this Hour, Maya has options to let you restore things back to the default settings.
In this Hour, you will learn about some of the settings and preferences that are already provided as defaults for you in Maya, and how to change them to meet your needs. You will also learn how to restore to default settings just in case you make a change and then regret it. Plus, you will learn about using some of the most commonly used keyboard shortcuts, known as “hotkeys,” to speed up your workflow.
Settings and Preferences Basics
The default settings that Maya provides right out of the box will get you a long way to completing any task you want to do, but it is good to be aware of what settings you are taking for granted so that you can change them when you need to. Specifying your own preferences throughout Maya not only aids your workflow by saving time, but it also helps prevent errors through incorrect settings. Animators have to be careful to animate at the correct number of frames per second, for example, so they should check settings before they begin work.
You can access the main settings and preferences for Maya through the Window menu, and then select Settings/Preferences to choose from the listed options, as shown in Figure 24.1.

FIGURE 24.1 Use Windows, Settings/Preferences to access settings and preferences for the features you use in Maya.
Tip: Shortcut to Preferences
You can use the Preferences button located toward the lower right of your Maya screen to go straight to the Preferences window ![]() .
.
Figure 24.1 shows that there are also settings for tools and hotkeys, plus editors for shelves and panels, and even color, too. Hour 17, “Scripting and Automating Common Tasks,” touches upon the Shelf Editor and customizing shelves, so have a look if you are interested to know more. This Hour focuses on the Preferences window, which gives you access to your main user preferences and also points out some particular things to pay attention to.
Note: Tool Settings and Menu Options
The tools you use and many of the menu items you select also have options you can set. Instead of using Window, Settings/Preferences to change tool settings for the tools in the Toolbox, simple double-click the tool button for the tool you need. Menus items also often have options to set. To access options from menus, click on the option box next to a menu item’s name. Maya will remember the settings and options you choose for tools or menu items, so if you don’t want to be surprised by anything unexpected next time, use the Reset Tool button on the Tool Settings window or look for Edit, Reset Settings on the windows you use to put everything back to their defaults when you are done.
User Preferences
You can set preferences for Maya’s features through the Preferences window. To access Preferences, select the Window menu, then Settings/Preferences, and then Preferences. The Preferences window will open, as Figure 24.2 shows.

The preferences are divided into categories, which are listed in main groups on the left side of the Preference window. To check or change preferences, click on the category you want on the left panel and make the changes using the right. Table 24.1 gives a brief description of each main group.

Let’s have a closer look at some of the options for working with the user interface, display, and main settings from the Preferences window next.
Customizing the User Interface
The Interface category group within the Preferences window is where you will find preferences for the look of Maya’s interface. The general Interface category, shown in Figure 24.2, lets you choose which menu set for Maya to load up when you start, plus provides options to show or hide menu bars in the main window or within the panels. Maya 2014 also lets you decide whether to highlight new features and what color to highlight them. Use the UI Elements category to hide or display additional UI (user interface) elements such as the shelves, Time Slider, Command Line.
Tip: Show/Hide UI Elements with Maya’s Display Menu
The Display menu from the main Maya menus also lets you pick and choose UI elements to show and hide. Maya provides hotkeys to let you hide unwanted elements, so it’s a good idea to know where to go to find them again if you hide anything by accident!
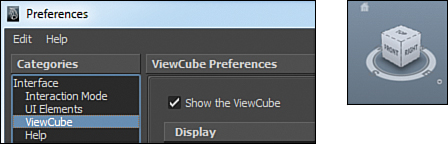
Still within the Interface grouping, the ViewCube category lets you show or hide the ViewCube, as shown in Figure 24.3 (left). The ViewCube can be useful to navigate between scene views. You can click to change views to perspective, front, side, top, or right, or tumble in perspective view by dragging. You can also use the ViewCube category to show or hide the Compass. The Compass can sit underneath the ViewCube to give you a north/south/east/west perspective orientation, as Figure 24.3 (right) shows.
The Help category within the Preference window lets you show, hide, or change the display of the in-view help messages that appear for certain tools, operations, and features. The font size for the messages can be changed, too, plus how long the messages are displayed for. ToolClips, which were introduced in Maya 2014, can be enabled or disabled here, or modified to have the popup only display the tool name and shortcut without the ToolClip contents.
Tip: Color Settings
You can change the colors of your user interface, wireframes, manipulators, viewport background, and any of the other default color settings for pretty much anything you work with in Maya. Go back to Window, Settings/Preferences and then select Color Settings. If you decide to have a play, rest assured you can set everything back to normal by using Edit, Reset to Defaults right within the Color Editor window.
Tip: Panel Layouts
You can also change the layout and contents of the panels of your viewports to help you work on specific tasks. For instance, if focusing on fixing final renders, you could use a three-panel layout. The top-left panel might host the Render View window, and the top right your perspective view. The panel underneath might show the Hypershade so that you can tweak materials while checking the render as you go. To change layouts and panels, either use the options from the Panel menu within a viewport panel, or go back to Window, Settings/Preferences and then select the Panel Editor. Within the Panel Editor, you will find a Layout tab where you can choose from or create your own panel layout.
Display Preferences
The Interface category group we just discussed is all about changing the general look of Maya’s graphical user interface. The Display categories, on the other hand, enable you to check or change preferences related to the display of objects and the features related to the objects that you work with. Animators and riggers would want to check out the Kinematic preferences to adjust the display size of joints, for example. Modelers, on the other hand, might want to have a look at the preferences for how NURBS, polygons, and subdivisions are displayed. Texture displays are also dealt with in the general Display category. You can increase the resolution of textures displayed to improve their appearance within Maya, or decrease this for a bit more working speed. Furthermore, if you notice that your texture swatches within materials attributes or the Hypershade show up as empty squares instead of previews of the textures, you can also bump up the maximum resolution for the texture swatches here, if needed. Generally, whatever task you are working on, you can look through the Display category group to find something of use.
Note: Display Menu Options
The Display menu from Maya’s main menus lets you access preferences for displaying objects and features. An important one for modelers to know is turning on or off backface culling, by using Display, Polygons, Backface Culling. This lets you hide or show the object’s backface to speed the display or manipulation. Showing or hiding normals and softening and hardening edges are found here, too. Plus, you’ll find Heads Up Display to display your polygon counts and such. However, the Display menu isn’t just for the modelers. For instance, animators and riggers can alter the size of joints by going to Display, Animation, Joint Size.
Tip: Manipulator Size
The size of the manipulators can be changed by going to the general Display category, but you should note that a much quicker way is to use the hotkey shortcuts of + to increase the manipulator size and - to decrease. Hotkeys are Maya’s keyboard shortcuts, which we will discuss later in this hour.
Settings Preferences
The Settings category group within the Preference window is one you should check out to define preferences and default values for tools, plus related operations when working on specific projects or tasks. You should be aware of some of the main settings whatever the task, but animators definitely need to check these out!
The main Settings category lets you choose your world coordinate system and working units, as shown in Figure 24.4. Notice that you can change the world coordinate system from Maya’s default settings of using Y as the up coordinate to Z if you are used to working with Z as up in other packages, or if you have a project that requires it. You can also set measurement units and working angles. Animators will need to set the time units here to the frames per second their project requires.

FIGURE 24.4 The Settings category within the Preferences window lets you set default values for features and operations that you will use for carrying out tasks and projects.
Note: Undo
If you check out the Undo category, you will see that Maya lets you specify the number of actions it will store in the undo queue. By default, Undo is set to 50, which means Maya will let you reverse up to 50 actions. You can increase this by typing into the Queue size field, or you can even switch on Queue infinity to have an unlimited number of Undos. Although an infinite number of available Undos sounds great, be aware that it can also use up a lot of memory and make Maya more sluggish when the queue gets too big.
If you want to have Maya automatically save your work periodically, you can use the Files/Projects settings to turn on AutoSave and then specify how often you want to save.
Whether you’re modeling, rendering, working with dynamics, or just generally working with Maya, it is a good idea to have a look through the categories that might apply to your tasks. Animators need to double-check settings using a few different categories from the Settings group. Table 24.2 lists some useful settings animators should be aware of.


The Grease Pencil tool is new to Maya 2014. It lets you draw right on the screen with a virtual marker. Although of particular interest to animators, it can be used to mark up your screen to help in whatever task you are doing. Double-click the tool to adjust settings for the tool itself. You can also set preferences for how the frames that use Grease Pencil are displayed in the Time Slider. Use the Time Slider category within the Preferences window, and then the Time Slider section to find options for Grease Pencil. You can choose to have Grease Pencil frames displayed on the time slider for the active camera only, to display frames for all sequences regardless of camera, or to hide the Grease Pencil frame indicators altogether.
Saving and Deleting Preferences
Maya stores your customized settings in user preference files. This way, Maya is all ready to go according to your own preferences each time you use it. To save preferences, use File, Save Preferences. Make sure you have enough space on your disk to save, though, because Maya won’t let you know if you don’t! The preference files are stored in the paths shown in Table 24.3, depending on the operating system you use.

If you need to restore the preferences to the defaults for any reason, close Maya and locate the user preference files on your system, as shown by Table 24.3, and delete the preference files you want to restore. Maya will next open with the default preferences back in place.
Tip: Restoring to Defaults
Don’t forget that the tools and features of Maya also have options to reset to default. Within the tool settings or the windows that you use, look for the Reset Tool button, or Edit, Reset Tool, Edit Revert to Saved (preferences window), or Edit, Reset Setting.
Note: Saving Preferences on Exit
The Save Actions category lets you set whether or not to save preferences upon exiting Maya.
Hotkeys
Hotkeys are Maya’s keyboard shortcuts that help your workflow by providing quick access to navigate your scene, work with tools and objects, display and hide features, and just about anything else you can think of. Before we talk about specific hotkeys, the hotbox and marking menus that Maya provides are worth a mention because some of the hotkeys we are about to discuss bring up the hotbox and marking menus.
Hotbox and Marking Menus
Maya’s hotbox and marking menus provide access to Maya’s entire feature set right on the active viewport. In any viewport, hold the spacebar down to bring up the hotbox, and you will see what seems like a screen full of menus, as shown in Figure 24.5 left. Although this can seem overwhelming at first, as you become more familiar with Maya, using the hotbox can help your workflow. To access any menu from the hotbox, hold the spacebar to show the hotbox and then click the menu you want, but keep your LMB pressed down. The menu options will appear, and you can then drag down to the item you want and release the LMB to select it.

FIGURE 24.5 Holding down the spacebar will show the hotbox to let you choose from Maya’s menus from the viewport (left). Click and hold the LMB over the central Maya label to bring up a marking menu for changing views (right).
Maya also provides marking menus that let you quickly select actions to perform. Marking menus appear in the viewports when you use particular key and mouse combinations. For example, if you hold the spacebar down to reveal the hotbox, and then click and hold your LMB on the word Maya in the center, a marking menu will appear to let you change to perspective, side, front, or top view, as shown in Figure 24.5 (right). Maya 2014 will also let you choose from a few other views, too, as shown in Figure 24.5. To select an item from a marking menu, LMB drag in the direction of the item you want to select. As soon as you see the item highlighted, release the mouse. There is no need to be precise. Maya lets you quickly sweep near, on, or beyond the item to select, as shown by Figure 24.6.

Note: Using Hotkeys to Access Marking Menus
Some marking menus are assigned to hotkeys; for example, you can hold down the h key plus hold down your LMB to bring up the marking menu that lets you switch between menu sets, as shown in Figure 24.6.
Tip: Context-Sensitive Marking Menus
RMB on a selected object to bring up context-sensitive marking menus for the object you are working with. For example, RMB on a polygon to switch between component and sub-object modes using a marking menu.
Common Hotkeys
As you have learned, hotkeys are keyboard shortcuts that let you quickly access many of the features in Maya. The list of hotkeys that Maya provides can be overwhelming, but some commonly used ones are good to know. Have a look through the hotkeys listed here and try them out as you go, using a scene of your choice. We point out some hotkeys to pay particular attention to in the paragraphs that follow, but look through the tables to find more. Try to familiarize with a basic set first, and as you become more familiar with Maya, try adding some others to your repertoire.
Probably the most important hotkeys to learn are the ones that let you move around your viewports as you work. Use the Alt key and hold down your left, middle, or right mouse button to tumble (orbit), track (move left to right, or up and down), and dolly (move forward and back), as Table 24.4 shows.

Tip: Tumble, Track, and Dolly in Other Maya Windows
Try using your Alt key and mouse buttons in other Maya windows, such as Render View and the Graph Editor, and you will see that some of the windows let you move around them just as you would in your viewports.
Have a look through Table 24.5 to try out some of the hotkeys that you will find useful for your general workflow. Two important hotkeys to learn from this table are Ctrl+a and the spacebar. Ctrl+a switches between the Attribute Editor and the Channel Box. Because almost everything you do in Maya requires working with attributes, this is a good one to learn! You will also often want to toggle between different panel layouts as you work. Tap the spacebar to toggle between single-perspective view and a four-panel view layout. Just be aware that holding the spacebar down brings up the hotbox instead.

Tip: The Spacebar
Tapping the spacebar toggles between panel views (single-perspective and four-panel view by default). Holding the down spacebar, however, brings up the hotbox to let you access all of Maya’s features from your viewport.
Caution: Maya Is Case Sensitive
Maya is case sensitive, so using an uppercase character instead of a lowercase one will give you a different hotkey. Lowercase z is used for Undo, but uppercase Z is Redo, for example.
Use the QWERTY keys on your keyboard to access commonly used tools. The q key lets you select, w move, e rotate, and r scale. The t key shows the manipulator tool. And if your manipulator handles are too big or too small, use + to increase or - to decrease their size, as Table 24.6 shows.

Tip: Tool Marking Menus
Hold your LMB with either q, w, e, or r pressed down to access the marking menu options for the tool you selected.
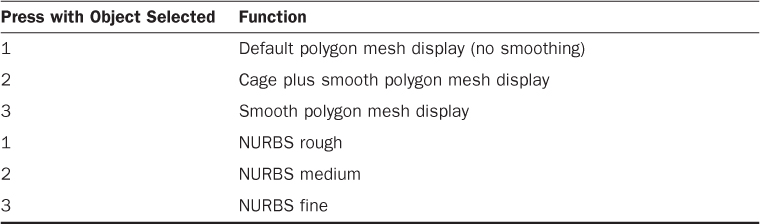
Maya lets you view your scene in different ways to help you with the task at hand, as Table 24.7 shows. Much of the time you might prefer to work in shaded mode with textures on by pressing 6, although if you want to see the geometry without the textures, you can turn them off by pressing 5. If you are modeling and trying to tweak a few vertices, you might want to press 4 to view in wireframe mode. When working with lights and shadows, pressing 7 will come in handy.

Maya’s menus are grouped into menu sets, and you can choose the set you want to work with according to the task you are doing. Use F2 through F6 to switch between commonly used menu sets, as shown in Table 24.8. If you prefer, you can press h+spacebar to bring up a marking menu that lets you switch between the menu sets. You can also hide menus in your panels to get more working space, and show them once again when you need them, as listed in Table 24.8.

Tip: The Paint Effects Panel
Pressing 8 will bring up the Paint Effects panel, with the Paint Effects tool all ready to go. That’s great if you meant to do that, but it can be a nuisance if you didn’t. A quick way to exit is to press 8 again to close the panel, and then press q to switch away from the Paint Effects tool.
Table 24.9 lists some useful commands. Where would we be without good old Undo to reverse unwanted actions? To use undo in Maya, all you need to do is press the z key although if you are used to using Ctrl+z in other packages, this will work too. Shift+Z lets you redo. Another particularly useful key is g to repeat your last action. Just created a NURBS sphere and need another one? Press g. Just extruded a face on a polygon and need to extrude another face? Select the face, and press g. Have a look through Table 24.9 to see what else you might find useful.

There are many useful hotkeys for modeling in Maya. Most of the hotkeys listed in this section will help, but Table 24.10 through Table 24.13 show quite a few more. Modelers should make sure to know to right-click objects to choose between object and component mode, and be sure to learn how to access pivot points by using the Insert or Home key. You can also hold down the d key to access pivot mode.
Mac users can hold down the d key to access pivot mode because Mac keyboards have no Insert key!
Modelers will also find it helpful to display different degrees of object smoothness by selecting the object and then pressing 1, 2, or 3 on the keyboard, as shown in Table 24.10. Using 1 can help you model by keeping complexity down to a minimum, showing the geometry in rough format. Pressing 3 can help you preview how it will look when smoothed.
Right-clicking an object will let you access the marking menus to let you switch between objects and components, but you can also use the hotkeys listed in Table 24.11. Notice, too, that you can grow your selection regions by using > and shrink them by using <.

If you’re using a Mac, the Exposé hotkeys (F9, F10, F11) may conflict with Maya’s hotkeys. As a workaround, either edit the Maya hotkeys by using the Hotkey Editor in Window, Settings/Preferences or change the Exposé hotkeys in the System Preferences panel of the Mac OS X machine.
When moving objects or components, you can use x, c, or v to snap to a grid, curve, or point, as shown in Table 24.12. For example, select an object and then press w to activate the Move tool. Next, hold down the x key as you LMB drag the Move tool’s manipulator in the direction you want to go. You should see your object snapping to the grid as you pull it along. If you use MMB drag instead, you can click on the area you want and the object will jump straight to it. The j key is also useful when you want to rotate something by 45 degrees, for example. Holding down j will snap the rotations to discrete intervals so that you can snap to 15, 30, then 45 degrees as you rotate.

Maya scenes can quickly fill up with many different objects. Sometimes it is useful to hide selections with Ctrl+h, so that you can focus on what you need. If you want to isolate the object you want to work with, use Shift+I to temporarily hide the other objects. When you want your other objects back, make sure you have no objects selected and then use Shift+I again. See Table 24.13 for more hotkeys related to displaying and hiding objects.

Did You Know?: Finding Hidden Objects
You can use the Outliner to find hidden objects and display them again. Use Window, Outliner and then find your missing object on the list. Objects that are hidden have their Visibility attribute set to 0 and are grayed out on the list. Once you have found the one you want, turn its Visibility attribute back on in the Channel Box by typing 1. Alternatively, you can find the object in the Outliner and use Shift+H to show it again. Note that Isolate works a bit differently. If you have isolated something and want everything back, make sure to have nothing selected and then use Shift+I again to exit isolation view.
Animation hotkeys let you set a key by pressing s, and play and pause your animations using Alt+v. Another useful hotkey involves holding the k key down and using your LMB to use a virtual slider to drag in the viewport or Time Slider to scrub through your animation. Have a look through Table 24.14 for some more hotkeys to try.

If you are working with an animated sequence, you are going to want to play it within Maya, and to pause play or step through the animation. See Table 24.15 for playback hotkeys.

Table 24.16 gives you a few extra hotkeys to try out.

![]() Bonus: Hotkeys
Bonus: Hotkeys
This Hour covered many of the hotkeys available in Maya, but there are plenty more (for working with paint effects and for modeling, for example). You will find a comprehensive listing in this Hour’s folder on the DVD. We have provided a list by category and an alphabetical listing by hotkey. Alternatively, you can search for All Maya Hotkeys using Maya’s Help menu, or you can use Window, Settings/Preferences, Hotkey Editor, List All.
Summary
This Hour covered hotkeys, marking menus, and the hotbox to help you speed up your workflow. It also covered useful settings and preferences you can use to set up Maya and its features for working on particular tasks—or just because that’s the way you prefer things! The key point to remember from this Hour is that if you make changes and regret it, you can close Maya and then delete your own user preference files to have Maya reopen the next time with everything set back to the defaults.
Q&A
Q. Where have all my menus and toolbars gone?
A. It is possible that you accidentally hid them. Try using Ctrl+spacebar to see if you are in full-screen view. If that didn’t work, use Ctrl+spacebar to get back to where you were. Next, try using Display, UI Elements to locate your missing user interface elements. You can also look in Window, Settings/Preferences, Preferences and then the Interface category group.
Q. Why isn’t my hotkey doing what it should?
A. Maya is case sensitive, so double-check that you are using the proper case for the character used for the hotkey. Also, double-check that you haven’t accidentally left Caps Lock on.
Q. How can I change the background color in the viewports?
A. Alt+b will toggle through a few options for the background color, but otherwise use Window, Setting/Preferences, Preferences, Color Editor to customize.
Q. Where have my manipulator handles disappeared to?
A. If the handles on your manipulators have disappeared, it is possible you accidentally used a hotkey to make them either so small that you cannot see them or so big that the Maya viewport can’t contain them. Either use the hotkeys + (to increase) and - (to decrease) to resize, or use your Preference window to find the Manipulators category and adjust the size there.
Workshop
The workshop contains quiz questions and exercises to help you solidify your understanding of the material covered. Try to answer all questions before looking at the “Answers” section that follows.
Quiz
1. Where can you set up your frame rate if you are animating?
2. Where can you turn on AutoSave if you want to use it?
3. How can you reset things back to their defaults?
4. Where is the button that opens up the Preferences window without going to the Window menu?
5. Where can you increase the number of actions Maya will let you undo?
Exercise
Have a look through the list of hotkeys and start to learn and use some of the ones you feel most comfortable with. Also, experiment with some of the settings and preferences discussed—and even ones we didn’t discuss—to become more comfortable setting up and using Maya to meet your own needs.
Answers
1. Use the Preferences window, General Settings category to set up the time value for the number of frames per second (fps) you want to use.
2. AutoSave options are found in the Preference window, within the Files/Project category.
3. Within the tools or windows that you might have changed, look for the Reset Tool button, or Edit, Reset, or even Edit, Restore. If that doesn’t do the trick, you will have to close Maya, delete your user preference files, and reopen Maya to restore everything back to the defaults.
4. The button located second to the bottom on the lower right of your Maya screen should open up the Preferences window and bypass the Window menu.
5. Undo has its own category in the Preference window. You can increase the value up to infinity if you want, but be aware that the Undo queue can start hogging resources and even slow down Maya if it has numerous actions stored up.