
Hour 19. Lighting Your Scene Correctly
What You’ll Learn in This Hour:
![]() How to add lights to your scene
How to add lights to your scene
![]() The fundamentals of three-point lighting
The fundamentals of three-point lighting
![]() How to deal with shadows
How to deal with shadows
![]() How to link lights to specific objects
How to link lights to specific objects
Maya has many different ways to help an artist light a scene. Lighting a scene correctly depends on the look you wish to achieve or replicate. Lights can be set up to replicate the type of lighting you would find outside on a sunny day, or set a mood for interior lighting. Lighting can match the realism found in the real world, or can be designed to add drama or subtlety. Studio lighting of cars, food, or models as seen in the glossy magazines can also be replicated. What is nice about lighting in Maya is the fact that it provides you with the tools to be artistic and experiment with different moods. Whether aiming for realism, dramatic effect, cartoon world stylization, or artistic effects, the choice is up to you. However, in order to get the correct look that you are aiming for, it’s a good idea to first learn the basics of lighting, as discussed in this Hour.
Note: Lighting, Materials, and Rendering
To get the correct look you are aiming for, you should be aware that lighting, rendering, and working with materials that you apply to surfaces all go hand in hand. For example, you cannot create a shiny apple in Maya without applying a material to the apple object, which has been set up to let the surface shine. Plus, you need a light to shine on the surface and you need to render the final image! Hour 7, “Creating Node Networks in the Hypershade,” covers materials. This Hour touches on rendering the final image to get you started with lighting, but also see Hour 21, “Rendering Final Imagery,” if you’re interested to know more about rendering.
In this Hour, you will get an overview of lighting in Maya, including fundamental principles of three-point lighting, which is a classic technique used in the real-world for studio, photography, and theatrical lighting, and is also commonly used in 3D worlds, too. You will learn how to create and place lights, how to cast shadows, and how to tweak the attributes of the lights and shadows to aim for the look you want. You will also learn how to use light linking to specifically target which objects you want to illuminate.
Lighting Basics
When lighting a scene in Maya, you can start by thinking of choosing lights for a room in your own home. In the real world, you would decide what kind of lights you want and how many. You would also choose how bright they should be, what kind of shades they would have, and where you want to place the lights. For example, you might decide upon a bright ceiling light, plus a couple more subdued table lamps. Similarly, in Maya, you can select from a few different light types, place them where you want, and modify their intensity, color, shadows, and other attributes to simulate the looks you would get from your ceiling light, your shaded bulbs, or any other light source. There are many similarities between lighting a 3D scene and lighting in the real world. However, there are also some fundamental differences you can take advantage of. For example, once you have created and positioned your light, it is up to you to decide whether or not you want the light to cast shadows, and it’s up to you to decide how sharp or how soft the shadows are. You can even decide to cast shadows on particular objects and leave other objects out. There are many choices to get the look you are aiming for, but whether you are aiming for realistic lighting or dramatic artistic lighting, a good place to start is by observing light in the real world.
Observing Light and Shadows
Observing how light works in the real world will help provide you with the skills to light scenes as you wish in Maya. As you observe light, make particular note of how shadows are softer or harder, longer or shorter, depending on the different strengths, direction, and position of the light source. Also notice how light can bounce from one surface to illuminate another, and how light can cause color to bleed from one material to another. Light also reflects, gets absorbed, or refracts depending on the type of material it hits. Reflection refers to light waves bouncing back off the surfaces, absorption soaks in light, and refraction refers to light that bends as it passes through a surface. For example, a glass will disperse, refract, reflect, illuminate, and cast a shadow from direct light. A dull rubber eraser is more likely to absorb the light, although depending on its color (for example, a bright red eraser), it may bleed its color onto a nearby surfaces such as a piece of white paper. The eraser will cast a shadow in direct light, and it will have a soft close proximity shadow known as occlusion, which doesn’t need strong light to be seen.
Try playing with different materials in the real world, and moving them in front of light and close to one another. Use different types of light, such as a flashlight, table lamp, and outdoor light, at different times of the day and in different weathers, for example. It will also be helpful to look at real-world photography techniques to consider applying them to your 3D scene. Useful techniques include those used to bounce light into an otherwise dim area, or to highlight that perfect specularity across a contour of a shiny new sports car or to light a shot of some tasty mouthwatering food. Observation is the key to understanding lighting.
Creating Lights and Shadows
Lighting is a key aspect of your scene, interacting with the materials that you apply, and setting the mood for the piece. A typical lighting workflow includes planning the look that you are going for, such as where the light and shadows are coming from, and how strong you want the light and shadows to be. The next step is to create the lights and move them into place. Lights that you create in general do not automatically cast shadows, so you will need to decide which is the main source of light (or lights) that you want to cast shadows from and turn on the shadows. Although you may initially find it strange that Maya lights do not instantly cast shadows, as you work more with Maya lighting you will see the benefits. Choosing which lights do or do not cast shadows lets you light with fine precision. The attributes of the lights and shadows can be tweaked to get just the look you are going for. For example, you can adjust the intensity and color of each light individually, and you can also decide whether to have soft or hard shadowed edges, and even what color the shadows should be. Once your lighting and shadows are in place, you can then add some supplementary lighting effects such as glows, fog, or even lens flares. This section will discuss how to create lights and shadows as well as how to make adjustments. Once the basics are covered, we will move on to a three-point light setup, which is a commonly used lighting technique in visual media. To follow along as you go, open up a file to experiment as you read:
![]() Create your own simple scene containing a few polygon primitive shapes such as spheres and cubes, or open lighting_v1.ma from this Hour’s source files on the bonus DVD. This scene contains a few colorful spheres for you to light.
Create your own simple scene containing a few polygon primitive shapes such as spheres and cubes, or open lighting_v1.ma from this Hour’s source files on the bonus DVD. This scene contains a few colorful spheres for you to light.
![]() Bonus: Scene Files
Bonus: Scene Files
Take a look in this Hour’s source files and you will find a few scene files for you to experiment with. We have included a scene with some colored spheres for you to light. We have also included some scenes at various stages of a three-point lighting setup that is covered in the “Getting Started with Three-Point Lighting,” later in this Hour.
![]() To create a light, use the Create menu from any of the menu sets and then select Light to choose from the available light types, as shown in Figure 19.1. Choose the Spot Light option for now. Light types are discussed next.
To create a light, use the Create menu from any of the menu sets and then select Light to choose from the available light types, as shown in Figure 19.1. Choose the Spot Light option for now. Light types are discussed next.

FIGURE 19.1 Create direct lights in Maya by using any menu set to choose Create, Lights and then choose from the available light types.
Tip: Creating Lights from the Rendering Shelf
You can also use the buttons on the Rendering shelf to create the desired light type, as shown in Figure 19.2.
FIGURE 19.2 The Rendering shelf has buttons to create ambient, directional, point, spot, area, and volume lights.
Maya Light Types
Looking at the Create, Lights options in Figure 19.1, you can see that Maya provides six different light types: ambient, directional, point, spot, area, and volume lights. All the lights have common attributes, such as color, intensity, and shadow options. However, each type of light also has its own set of unique attributes that make it useful in particular lighting scenarios, just as different types of light are useful for different purposes in the real world. For example, real-world spotlights are great for studio, stage, sports, and security, but you are more likely to choose domestic bulbs to light the interior of your own home. Maya provides lights to simulate real-world lights, including Maya spot lights for real-world spotlights and Maya point lights for bulbs.
A Maya spot light shines a beam of cone shaped light out from a small point in space. It is a very versatile light, similar to a flashlight, car headlight, or, of course, a spotlight in the real world. Spot lights are also useful to simulate table lamps with shades, overhead lighting, and to target very specific areas or even wide-reaching areas. The bottom row of Figure 19.3 shows some spheres lit with spotlights in Maya. Notice that the light comes from the direction that the spot light is aimed toward, and that the shadows are cast out from that single angle. Because spot lights emit a beam of light from one point in space to another, it is important to position the spot light where you want the light to come from, and to point the spot in the direction of the surface you want to illuminate. You will also need to make sure the cone angle of the beam is wide enough to encompass the target.

FIGURE 19.3 Spheres illuminated in Maya to show the direction of the light source and shadows cast. Top left uses a single point light, top right a directional light. The bottom left and bottom right each use a single spot light.
Tip: Following Along
If you would like to experiment as you follow along, open lighting_v1.ma from this Hour’s source files or use your own scene to create any of the lights discussed. Later in the Hour, we provide a more structured exercise in the “Getting Started with Three-Point Lighting” section.
Point lights emit light in all directions from a point in space. They are commonly used to simulate the illumination from an incandescent light bulb or spherical-shaped lights. Notice that because the light rays come from different directions, the shadows are also cast out in many directions, as Figure 19.3 top left shows. Where you place the point light in the scene is important, but the angle is not. Because the light is emanating from all directions, unlike a spot light with a focused beam, there is no need to angle it to aim it in a particular direction.
![]() To add a shadow, select the light and find the Shadows section in the Attribute Editor. You can choose between Use Depth Map Shadows and Use Ray Trace Shadows, which are discussed in more detail shortly. For now, check Use Depth Map Shadows to turn them on.
To add a shadow, select the light and find the Shadows section in the Attribute Editor. You can choose between Use Depth Map Shadows and Use Ray Trace Shadows, which are discussed in more detail shortly. For now, check Use Depth Map Shadows to turn them on.
Directional lights emit parallel rays of light from an infinitely far away distance. A common use for directional lights is to simulate rays from the sun or moon. In some ways, directional lights are the opposite of point lights. Because the parallel rays of directional lights are coming from a great distance, the actual position you place the directional light does not make a difference. To explain this further, think of the beam of the spotlight. The rays are emitting out from one point in space as a cone shaped beam in the distance. Elements outside the beam will miss out on receiving the illumination from the spotlight. The parallel beams coming from the directional light, on the other hand, simulate rays from a light source such as the sun that will encompass the whole scene. However, although the position isn’t critical, the direction is. Because the directional light is emitted in a single direction, it is important to set the angle to the direction you want. The top-right image of Figure 19.3 shows spheres lit by a directional light.
Tip: Previewing Lights in the Scene
On any of your viewport panels, use Lighting, Use All Lights to see the effects of your lights in a preview mode as you work, or press 7 on your keyboard. Use Lighting, Use Default Lighting, or press 6, to return to your normal view when done. You can also render the image to see the more complete look by using the Rendering menu set to choose Render, then Render Current Frame. Rendering is covered in more detail in Hour 21.
Figure 19.4 shows the different icons used to represent lights in Maya for each light type. When the type of light you select emits light from a single direction, as is the case for directional, spot, and area lights, the icons all have an indicator to let you know what direction the light is being emitted from. Directional and spot light icons use directional arrows, and the area light icon uses a center pointer as the indicator. Because ambient, point, and volume lights do not emit light in one single direction, there is no need for the icon to indicate directionality.
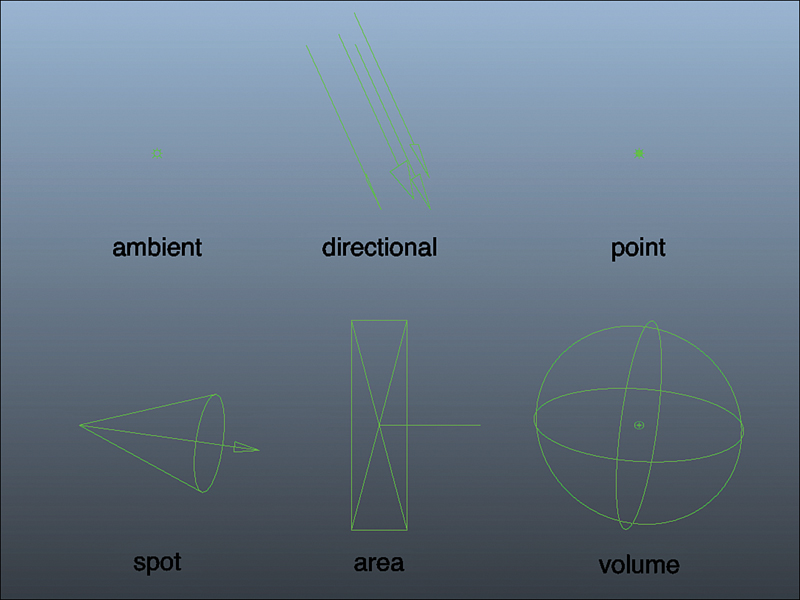
FIGURE 19.4 Icons for different light types in Maya. Where direction is important, the icon will have an indicator, as the directional, spot, and area light icons show.
Ambient lights provide general soft diffuse illumination emitting from all directions, but in contrast to the point light, have no visible point of emission. Ambient lights can be used to fill in shadowed areas that need a bit of lifting, but should be used with care. Ambient lights do not add any specularity (reflections of bright areas) to the scene. Additionally, ambient lights do not contribute toward bump map calculations, intended to simulate elevations and depressions in surfaces. Thus, although potentially useful, ambient lights can flatten out your scene, robbing it of depth and richness if used unwisely.
Area lights are physically based two-dimensional rectangular lights useful for simulating light coming through large areas, such as windows, recesses, and overhead lighting. They can also be used to simulate reflections of windows on surfaces. Area lights should be positioned where you need them, and rotated into place to angle them in the desired direction. Scaling the icons for directional, spot, point, and ambient lights will not make a difference to how the light source is emitted for those lights. However, scaling does impact area lights. You can scale the area light icon to match the size of the area you want to have the light emitted from (matching the size of a window, for example).
Volume lights emit light from a volumetric shape. By default, creating a volume light will provide a spherical volume that you can resize to simulate light from a small candle, for example, or enlarge to encompass a room. Altering the size influences how far the light reaches. It is also possible to change the volumetric shape to a box, sphere, cylinder, or cone by adjusting the Volume Light Attributes, Light Shape attributes of the volume light in the Attribute Editor.
Tip: Direct (Local) Versus Indirect (Global) Illumination
This Hour focuses on direct illumination, which provides local illumination through direct beams of light emitting from a light source. However, in the real world, light also bounces across surfaces, further contributing to illumination in the scene as it goes. Think of the example of the red eraser on a white background, with the color of the eraser bleeding onto background. Maya lets you simulate such real-world inter-reflected light through global illumination options in the mental ray renderer. Global illumination is beyond the scope of this book, but if you are interested to know more, have a look at Hour 21 to learn about rendering in general, and then have a look at the global illumination options that mental ray provides.
Casting Shadows
Shadows are vital to add realism to your scenes. Without shadows, objects will appear to hover off ground, making it more difficult to distinguish foreground objects from background ones. Shadows can be used to add contrast to elements in your scene as well as to add dramatic effect. By default, lights created in Maya previous to version 2014 will have all shadows turned off. Maya 2014 lights, on the other hand, have a shadow type known as “raytraced” turned on by default, although not necessary ready to appear because additional render settings have to be set. The additional settings and shadow types are discussed shortly. Meanwhile, to see the available shadow types, or to turn shadows on or off, select the light and use the Shadows section of the Attribute Editor, as detailed here:
![]() Using your own file, or lighting_v1.ma with a spot light created, select the spot light.
Using your own file, or lighting_v1.ma with a spot light created, select the spot light.
![]() In the Attribute Editor, scroll down to the Shadows section to see that Maya provides a choice between Use Depth Map Shadows and Use Ray Trace Shadows. In Maya 2014, Use Ray Trace Shadows will be on by default, but previous versions of Maya will have no shadows turned on. Check the box next to Use Depth Map Shadows to turn on depth map shadows for this Hour.
In the Attribute Editor, scroll down to the Shadows section to see that Maya provides a choice between Use Depth Map Shadows and Use Ray Trace Shadows. In Maya 2014, Use Ray Trace Shadows will be on by default, but previous versions of Maya will have no shadows turned on. Check the box next to Use Depth Map Shadows to turn on depth map shadows for this Hour.
Depth map shadows are easy to use and quicker to calculate than raytraced shadows, and they can produce similar results, so we will use them during this Hour. Depth maps are essentially a form of texture that Maya layers over your scene to produce your final image when rendered. The default resolution of the depth map is 512, although you can increase this resolution to improve the quality of your shadows. For example, if the edge of the shadows appear jagged, increase this resolution to try to smooth out the edges. You can also increase the Filter size, which controls the softness of the edges.
Note: Shadow Quality
The quality of shadow edges is also linked to rendering quality. See Hour 21 for more detail on improving shadow renders.
Raytraced shadows can produce soft and transparent shadows, which are physically more accurate than depth map shadows but can also be very time consuming to produce. Raytracing involves Maya calculating rays of light emitted from the light source to their destination—the camera. We will stick to depth map shadows in this Hour, but if you are interested in trying out raytraced shadows, you will also need to make sure that Raytracing options are turned on within the Render Settings in order for the shadows to appear. Maya 2014 does this by default for renders that use mental ray, but otherwise you will need to make sure to switch on the settings yourself. You can use the Render Settings button at the top of your Maya screen to access render settings, but see Hour 21 for further detail.
Tip: Casting Shadows per Object
If you want some objects to cast shadows, but others not to, first select the objects (rather than the light). Next, find the Render Stats attributes for the objects in the Attribute Editor. You can then choose whether or not to have the objects cast shadows, receive shadows, and more. You can even choose to hide the objects by turning off Primary Visibility, but still have them cast a shadow.
Positioning Lights
Maya lets you choose from a few different methods to accurately place your light in the scene. Complete the following steps to practice placing your lights. Where you actually position them is not important at this stage, although you may want to try to light an object nicely as you practice. In the three-point lighting example later in the Hour, we will position lights more accurately:
![]() Use your own file, with a spot light created, or continue to use lighting_v1.ma with the spot light you created earlier.
Use your own file, with a spot light created, or continue to use lighting_v1.ma with the spot light you created earlier.
![]() Select the spot light in the Outliner, or its icon in the scene view, to move (w on your keyboard), rotate (e), and scale (r) like you would any other object in Maya. Note that scaling will not affect the intensity of most lights. It will instead only make the icon larger in most cases.
Select the spot light in the Outliner, or its icon in the scene view, to move (w on your keyboard), rotate (e), and scale (r) like you would any other object in Maya. Note that scaling will not affect the intensity of most lights. It will instead only make the icon larger in most cases.
![]() You can also use the Channel Box to input numerical values to place lights precisely where you want. This is particularly handy when trying to match the height or angle of a light. For example, you could copy over the Translate Y value from one light to another to copy the height and rotational values to match an angle.
You can also use the Channel Box to input numerical values to place lights precisely where you want. This is particularly handy when trying to match the height or angle of a light. For example, you could copy over the Translate Y value from one light to another to copy the height and rotational values to match an angle.
Tip: Switching Panel Layouts to Help You Work
Changing your panel layouts by switching between single- and four-scene views can help you position your lights or any other object. Viewing four panels at once provides more viewing angles, whereas a single view provides a larger viewing area. Therefore, a common workflow is to switch back and forth between the two. If already in single viewport layout, you can switch to the four-scene view by simply tapping the spacebar. To return to a single view, click on the panel you want (for example, perspective) and then tap the spacebar. Alternatively, you can switch using the Single Perspective View button in the Toolbox on the left side of your Maya screen, as shown in Figure 19.5 (top), or the Four View button, as shown in Figure 19.5 (bottom).
FIGURE 19.5 The Single Perspective View button (top) and the Four View button (bottom), located on the left side of your Maya screen, let you swap between different layouts.
Look Through Selected
Maya also provides an interactive placement mode to let you look through a spot, area, or directional light. With this method, you look through the light as if you were looking through the lens of a camera. Use your Alt and LMB, RMB, and MMB drags to angle and position the light, as if adjusting a camera view:
![]() With your spot light selected, use your scene view menus to choose Panels, Look Through Selected. You should now notice a green circle that represents the boundary spot light’s cone, with you looking through it onto the scene. Objects outside this boundary will not be illuminated by the spot.
With your spot light selected, use your scene view menus to choose Panels, Look Through Selected. You should now notice a green circle that represents the boundary spot light’s cone, with you looking through it onto the scene. Objects outside this boundary will not be illuminated by the spot.
![]() Figure 19.6 gives an example of looking through the spotlight in lighting_v2.ma. The inner circle represents the boundary of the cone of light. The outer edge represents the penumbra area, which blurs the edge of the light to give it the appearance of losing intensity around the edge to give a softer look. Spotlights are covered in more detail later in this Hour.
Figure 19.6 gives an example of looking through the spotlight in lighting_v2.ma. The inner circle represents the boundary of the cone of light. The outer edge represents the penumbra area, which blurs the edge of the light to give it the appearance of losing intensity around the edge to give a softer look. Spotlights are covered in more detail later in this Hour.

FIGURE 19.6 Selecting the spot light and choosing Panels, Look Through Selected lets you view your scene directly through the cone of the spot light.
![]() In the view that lets you look through your spotlight, use your Alt key and mouse buttons to position and angle the light.
In the view that lets you look through your spotlight, use your Alt key and mouse buttons to position and angle the light.
![]() Once you are done experimenting, to exit out of Interactive Placement mode, switch back to perspective view by selecting Panels, Perspective, Persp or use the Single Perspective View button shown in Figure 19.5.
Once you are done experimenting, to exit out of Interactive Placement mode, switch back to perspective view by selecting Panels, Perspective, Persp or use the Single Perspective View button shown in Figure 19.5.
Light Manipulators
Certain light sources in Maya can be adjusted interactively in the scene view by selecting the light and then pressing t on your keyboard or clicking on the Show Manipulator Tool button from the Toolbox, as shown in Figure 19.7. In Maya 2014, if you do not see the Show Manipulator Tool button in the Toolbox, press t on your keyboard to activate the tool, and the button should appear for future use in your current Maya session.
![]() With your spotlight selected, press t on your keyboard, or click on the Show Manipulate Tool button shown in Figure 19.7. Manipulators will appear around your light, as shown in Figure 19.8.
With your spotlight selected, press t on your keyboard, or click on the Show Manipulate Tool button shown in Figure 19.7. Manipulators will appear around your light, as shown in Figure 19.8.

![]() Position your light using the manipulator at the top of the spot light. To aim the spot light, use the manipulator at the opposite end.
Position your light using the manipulator at the top of the spot light. To aim the spot light, use the manipulator at the opposite end.
You can also interactively modify additional attributes of the light by clicking on the small blue index icon that appears near the light, as shown in Figure 19.8. Clicking repeatedly cycles through various options according to the light source. Although this is useful, if you are new to Maya, you may find adjusting attributes in the Attribute Editor easier to begin with.
Common Light Attributes
Although the different light types in Maya all have unique attributes to make them suitable for specific purposes, they also have some key attributes in common with each other. Figure 19.9 shows some of the attributes for the point light that are commonly found on other Maya light types.

Each light has a Type attribute that defines the Maya light type, as shown in Figure 19.9. Clicking on the drop-down list for Type lets you change the type of light you have created. This is useful when you have already positioned your light and then realize that a different light source would be better. Rather than delete the light, you can change from one type to another. Be aware that it is often better to just delete the light and create a new one to avoid any possibilities of confusion in the lighting calculations potentially caused by the swap.
Changing the color of lights can have a significant impact on the final look for your scene. Color can be adjusted by clicking on the color swatch next the label for the Color attribute shown in Figure 19.9, or by using the adjacent slider.
Intensity for each light can also be adjusted through use of the slider adjacent to the Intensity attribute shown in Figure 19.9. Higher values make the lights brighter, and lower values decrease the brightness. If the slider does not provide a high enough value, just type the value you want into the value field.
The Decay Rate shown in Figure 19.9 can be used to simulate real-world lighting falloffs. In the real world, light intensity decreases (decays) the further the beam is away from its source. Think of shining a flashlight into darkness. The light will only travel so far before fading away into the distance. By default, Maya lights do not decay, so to turn on decay, select from one of the options on the drop-down list. A quadratic decay is often used to simulate realistic lighting decay. Be aware that you may have to increase the intensity of the light significantly to make it reach your object if you do apply decay. In fact, instead of increasing intensity by single digits, you may have to think in terms of increasing intensity by 10 or even 100 or more.
Other significant common attributes shown in Figure 19.9 include the Illuminates by Default option, which generally acts as the on/off switch for your light. The Emit Diffuse and Emit Specular options control whether or not you want to emit diffuse light or the specular light (bright reflections). Figure 19.10 shows a sphere with a shiny (specular) Blinn material applied and lit normally with both options on by default on the left. You can see that the sphere has color and a specular highlight. The middle image shows the same sphere lit by specular light only. If you look closely, you will see only the specular highlight has been lit, but because there is no diffuse light, the object has no color and cannot be seen. This can be useful to add to additional lights to really make the specular highlights pop without affecting the general color. The final image on the right shows the sphere lit by diffuse light only. Its specular highlight is gone, but the diffuse color remains.

FIGURE 19.10 A Blinn material sphere lit with a spotlight emitting diffuse and specular light (left), the same sphere lit with specular only (middle), and the sphere lit with diffuse light only (right)
Note: Material Settings Are Important
Properties of materials that you apply to your surfaces interact with the lights to help get the look you want. The shiny sphere in Figure 19.10 (left) is shiny because the light is emitting both diffuse and specular rays plus the Blinn material is set up to have specular attributes. A lambert material would have appeared like the sphere in Figure 19.10 (right) because it does not have specular properties. This shows the importance of knowing your materials. See Hour 7 for more information on materials.
Spot Light Attributes
In addition to the common attributes just listed, each light has its own unique attributes. Creating lights and adjusting the attributes one by one to get a feel for what they do will help you explore the possibilities. Discussing all the attributes is beyond the scope of this Hour; however, spot lights are a special case due to their versatility and are therefore worth a mention here.
Just like any other light, you can adjust a spot light’s color, intensity, decay, and whether it illuminates at all or uses just specular or just diffuse light. Additionally, you can adjust its cone angle and other attributes to create a hard or soft edge to the light that lands on the surface. See Figure 19.11 for commonly used spot light attributes.

The Cone Angle in the Spot Light Attributes section lets you set values for the cone boundary. Smaller values decrease the size of the cone, thus narrowing the beam. Larger values increase its size and correspondingly widen the beam. The Penumbra Angle can be adjusted to blur the outer edge to give the light a softer appearance, as the light from the cone decreases in intensity in this area. Use the adjacent slider or type in the value you want to use. The Dropoff values let you control the intensity and light falloff from the center to the edge.
Tip: Light Shape Sample
As you adjust attributes such as the intensity, cone, penumbra angle, and dropoff, the Light Shape sample shown in Figure 19.11 provides a preview of the intensity and shape that the spot light will cast.
Getting Started with Three-Point Lighting
Three-point lighting is a commonly used technique for lighting almost any subject within visual media, including stage, screen, and photography. A three-point lighting setup requires at least three different light sources, each with a different purpose: a key light, a fill light, and a back light.
The key light is the main source of illumination that sets the direction of the light. Setting the angle, intensity, and color of the key light also sets the mood for your shot. As the main light source, it also sets the tone for casting shadows. The key light is normally placed to the side of the camera, aimed toward the subject, with the fill light on the opposite side. Placing the key light so that it illuminates the subject from one far side will provide strong contrast and can set a dramatic mood. Aiming the key light from a more central position will create less contrast in general.
The main purpose of the fill light is to control the darkness of the shadowed areas and fill in some subtle lighting to the areas that the key light doesn’t quite reach. For example, when lighting a person or a computer-generated character, you might want to lighten up strong shadows under the nose and chin. The fill light is normally placed still facing the subject, but on the opposite side of the camera to the key light. The fill light is normally softer and less intense than the key light because its purpose is to fill in some of the darker areas rather than act as the primary (or key) light source.
The back light is placed behind the subject, aimed toward the subject’s back. At times it is angled more to one side to target that particular side more than the other. If you look in almost any glossy magazine, for example, you are likely to quickly spot people who have a strong highlight over one shoulder coming from a back light largely targeting that side of the body. Illuminating the subject from behind provides a rim of light that enhances dimensionality and helps the subject to pop out from the background. It is also, therefore, often referred to as the “rim light.”
Tip: Four-Point Lighting
Four-point lighting is similar to three-point lighting but adds a fourth light behind the subject aimed at the background. Four-point lighting setups are used when the background needs some extra illumination, or to help eliminate or lessen the effect of shadows cast by objects in the foreground.
Creating the Key Light
Now that you have an idea of what the purpose of a three-point lighting setup is, let’s get started lighting a scene. We want to create a good strong light from a 45-degree angle in front of the subject to be our key light. Placing the key light at a 45-degree angle can provide contrast without being overdramatic, so this is what we will do in our exercise. Once we have created the key light, we will go on to add our fill light to help lift the ambience of the whole subject. We will then add our back (or rim) light to help the subject pop out by highlighting the outline rim of the object from behind. Follow these steps to light a scene with three-point lighting, and learn some tips along the way:
![]() Open the scene lighting_v2.ma, which contains a simple egg in an egg cup to light, from this Hour’s source files.
Open the scene lighting_v2.ma, which contains a simple egg in an egg cup to light, from this Hour’s source files.
Note: Render Camera
We have created a camera called Camera_MAIN with a composed view of the scene for you to work with for scenes in lighting_v2.ma through lighting.v6.ma. We swapped the top view panel to show the Camera_MAIN view by using the Panels menu in that viewport to select Perspective, Camera_MAIN. If you select the camera and look in the Channel Box, you will note that the attributes in the Channel Box have been grayed out. This is because we have locked the camera so you cannot accidentally change it. If you want to switch back to top view, use the Panels menu within the viewport to select Orthographic, Top. To switch back again to the Camera_MAIN view, use the Panels and then Perspective, Camera_Main. See Hour 14, “Creating and Adjusting Cameras,” if you are interested to learn more about working with cameras.
To get an idea of how the lights will affect the scene, you can render along the way, because Maya does not fully calculate the lighting until you do. Rendering final imagery is covered in more detail in Hour 21, but it will be helpful to introduce the basics now, to see how our scene starts off and to see how it progresses as the lighting is changed:
![]() To view the current render, select the view that you want to render (Camera_MAIN in this case). From the Rendering menu set, choose Render, then Render Current Frame. The shot renders with Maya’s default lighting. Although this gets the job done initially, it certainly can be improved by adding our own lighting.
To view the current render, select the view that you want to render (Camera_MAIN in this case). From the Rendering menu set, choose Render, then Render Current Frame. The shot renders with Maya’s default lighting. Although this gets the job done initially, it certainly can be improved by adding our own lighting.
![]() We are going to use a spot light for our key light, so from any of the menu sets, choose the Create menu and then select Lights, Spot Light. A spot light will appear in your scene partially hidden by the egg cup. We will move the light into position shortly, but first let’s see how the render appears now.
We are going to use a spot light for our key light, so from any of the menu sets, choose the Create menu and then select Lights, Spot Light. A spot light will appear in your scene partially hidden by the egg cup. We will move the light into position shortly, but first let’s see how the render appears now.
Note: Key, Fill, and Back Lights in Maya
When looking at the types of light you can create in Maya, you probably noticed that there were no options for key, fill, and back lights. This is because it is up to you to choose what type of light you would like to create to act as a key, back, or fill light. It is then up to you define its purpose by its position and other settings.
![]() Once you have created your spot, choose the Render menu to then select Render Current Frame.
Once you have created your spot, choose the Render menu to then select Render Current Frame.
![]() Continuing with your own scene or lighting_v2.ma, select the newly created spot light to get ready to move it into place.
Continuing with your own scene or lighting_v2.ma, select the newly created spot light to get ready to move it into place.
Because the purpose of the spot light is to act as a key light, our goal is to move it so that it is in front of the egg and off to the side at about 45 degrees and pointing down at the egg. Figure 19.12 provides an indicator of where the lights should be placed, but if you would like a more specific idea, save your current file and open up lighting_v6 to make note of the placement of each light. Once you understand what you are aiming for, return to your lighting_v2.ma file to create and position each light yourself using the following steps.

FIGURE 19.12 A three-point lighting setup in top view (left) and side view (right). The camera is in green, the key light is the wide-angled spot, the fill is the spot on the opposite side of the camera from the key, and the back light is the spot behind the egg.
To quickly preview how your lights are affecting the scene in real time, you can use the Viewport 2.0 or High Quality Renderer option on your viewport to preview the effects. The next step tells you how:
![]() In your perspective viewing panel, use the Renderer menu to select Viewport 2.0. This enables Maya’s hardware rendering through the use of your graphics card to preview real-time effects such as lighting and shadows.
In your perspective viewing panel, use the Renderer menu to select Viewport 2.0. This enables Maya’s hardware rendering through the use of your graphics card to preview real-time effects such as lighting and shadows.
![]() You can toggle between textured view with the default viewport lighting and textured view plus lighting by pressing 6 and 7, respectively. For now, we want to press 7 to active lighting in our viewports.
You can toggle between textured view with the default viewport lighting and textured view plus lighting by pressing 6 and 7, respectively. For now, we want to press 7 to active lighting in our viewports.
If your graphics card does not support Viewport 2.0, use the Renderer menu on the perspective viewport to select High Quality Renderer instead. If your machine does not support that either, you will have to resort to occasionally rendering your scene as described at the beginning of the “Creating the Key Light” section. You can find more detail in Hour 21.
![]() Select the spot light. Then, using your preferred method of positioning the spot light, translate it in front of the egg cup.
Select the spot light. Then, using your preferred method of positioning the spot light, translate it in front of the egg cup.
![]() Pull it back just behind the camera in top view, but still in front of the egg cup. Translate it up in Y until its about parallel to the camera and then rotate it downward at about 45 degrees or so to aim it at the egg.
Pull it back just behind the camera in top view, but still in front of the egg cup. Translate it up in Y until its about parallel to the camera and then rotate it downward at about 45 degrees or so to aim it at the egg.
![]() Figure 19.12 shows the suggested placement of the key spot light in the top and side views. The camera is the green icon and the key light is the wide-angled spot. With the spot light selected, use the Attribute Editor to locate the Spot Light Attribute section and use the Intensity attribute to increase the intensity in the light’s attributes to 1.500.
Figure 19.12 shows the suggested placement of the key spot light in the top and side views. The camera is the green icon and the key light is the wide-angled spot. With the spot light selected, use the Attribute Editor to locate the Spot Light Attribute section and use the Intensity attribute to increase the intensity in the light’s attributes to 1.500.
![]() With the light sill selected, use the Attribute Editor to scroll to the Shadows section. If you’re using Maya 2014, the Use Ray Traced Shadows option will be on by default, although no shadow types will be on if you’re using previous versions. Either way, we want to instead use depth map shadows, so check Use Depth Map shadows. Shadows should now appear.
With the light sill selected, use the Attribute Editor to scroll to the Shadows section. If you’re using Maya 2014, the Use Ray Traced Shadows option will be on by default, although no shadow types will be on if you’re using previous versions. Either way, we want to instead use depth map shadows, so check Use Depth Map shadows. Shadows should now appear.
![]() Now we can see that our key light is casting a strong shadow and we don’t even have to render. However, you can also use the Rendering menu set to choose Render, Render Current Frame if desired.
Now we can see that our key light is casting a strong shadow and we don’t even have to render. However, you can also use the Rendering menu set to choose Render, Render Current Frame if desired.
![]() Now we can see that the edge of the light (the cone) is very harsh. To soften this, raise the Penumbra Angle setting to 10. If the slider does not move up to 10, you can just type it in. Now the light falls off nicely.
Now we can see that the edge of the light (the cone) is very harsh. To soften this, raise the Penumbra Angle setting to 10. If the slider does not move up to 10, you can just type it in. Now the light falls off nicely.
![]() Before we create our next light, change this light’s name to “Key” by double-clicking the light in the Outliner and renaming it. Save your file.
Before we create our next light, change this light’s name to “Key” by double-clicking the light in the Outliner and renaming it. Save your file.
Creating the Fill Light
To create the fill light, to help control the darkness of the shadowed areas and provide overall subtle illumination, complete the following steps:
![]() Continue with your previous file, or open lighting_v3.ma to start with a key light already created.
Continue with your previous file, or open lighting_v3.ma to start with a key light already created.
![]() Use Create, Lighting, Spot Light to create another spot light.
Use Create, Lighting, Spot Light to create another spot light.
![]() Move the spot light into a similar position as the key light, but on the opposite side of the camera and a little bit higher up in Translation Y. The fill light position is shown in Figure 19.12. The fill light is the light on the opposite side of the camera to the wide-angled key light (top view), and the one that is positioned uppermost in the scene in side view in Figure 19.12.
Move the spot light into a similar position as the key light, but on the opposite side of the camera and a little bit higher up in Translation Y. The fill light position is shown in Figure 19.12. The fill light is the light on the opposite side of the camera to the wide-angled key light (top view), and the one that is positioned uppermost in the scene in side view in Figure 19.12.
![]() With the light still selected, in the Spot Light Attributes section of the Attribute Editor, turn down the Intensity on the new spot light to 0.500 and adjust the Penumbra Angle to 10. Widen the cone angle to about 50.000.
With the light still selected, in the Spot Light Attributes section of the Attribute Editor, turn down the Intensity on the new spot light to 0.500 and adjust the Penumbra Angle to 10. Widen the cone angle to about 50.000.
![]() If you’re using Maya 2014, use the Shadows section of the Attribute Editor to switch off Use Ray Trace Shadows. This is not necessary in previous versions of Maya because no shadows are cast by default anyway, which is what we want here.
If you’re using Maya 2014, use the Shadows section of the Attribute Editor to switch off Use Ray Trace Shadows. This is not necessary in previous versions of Maya because no shadows are cast by default anyway, which is what we want here.
![]() Name this light “Fill” and save your file.
Name this light “Fill” and save your file.
Note: Pick and Choose Lights to Cast Shadows
We did not turn shadows on for the fill light because its purpose is to fill in a bit more light, and not to cast shadows. If all our lights had shadows, the scene would most likely look unrealistic, with shadows would be coming from everywhere. Turn on shadows only when you need them.
Creating the Back Light
Once the key and fill lights have been created, we have more control of the overall lighting of our subject and can adjust accordingly for different effects. Next, we want to add our back light as follows:
![]() Continue with your previous scene, or open lighting_v4.ma to use a scene with the key and fill lights already created.
Continue with your previous scene, or open lighting_v4.ma to use a scene with the key and fill lights already created.
![]() Use Create, Lighting, Spot Light to create another spot light and name the new light “Backlight.”
Use Create, Lighting, Spot Light to create another spot light and name the new light “Backlight.”
![]() If you’re using Maya 2014, use the Shadows attributes in the Attribute Editor to turn off Use Ray Traced Shadows. Lights in previous versions of Maya should not cast shadows by default anyway.
If you’re using Maya 2014, use the Shadows attributes in the Attribute Editor to turn off Use Ray Traced Shadows. Lights in previous versions of Maya should not cast shadows by default anyway.
![]() Position the light approximately opposite the camera behind the egg, and aimed at the egg. Adjust to place and angle the spot light to the back and left of the egg to try to pick up a highlight on the side of the egg shell. This is where our viewport lighting feedback comes in handy.
Position the light approximately opposite the camera behind the egg, and aimed at the egg. Adjust to place and angle the spot light to the back and left of the egg to try to pick up a highlight on the side of the egg shell. This is where our viewport lighting feedback comes in handy.
![]() Render to see the result by using the Rendering menu set to select Render, Render Current Frame.
Render to see the result by using the Rendering menu set to select Render, Render Current Frame.
You should notice a few things. First, we wanted no shadows to come from the back light or the fill light. Shadows are unnecessary for some lights you create and can actually cause confusion when used incorrectly. The key light is the main shadow-casting light here, so there is no need to add shadows to the other lights. The other thing to note is that the back light is affecting the ground, which is not what we want. We only want the subject to be backlit. Fortunately, this can easily be resolved by breaking the connection between the backlight and the ground, as the next section shows.
Breaking Links
Maya lets you pick and choose which lights illuminate which objects. By default, the lights and shadows affect all objects in the scene, but it is possible to break the links between the lights and the objects. The following steps will show you how:
![]() Continue with your own file, or open lighting_v5.ma with a key, fill, and back light already created.
Continue with your own file, or open lighting_v5.ma with a key, fill, and back light already created.
![]() Switch to the Rendering menu set by pressing F6 on your keyboard, or by using the drop-down menu set list in the top-left corner of your Maya screen.
Switch to the Rendering menu set by pressing F6 on your keyboard, or by using the drop-down menu set list in the top-left corner of your Maya screen.
![]() Use the Outliner to select the floor and use Ctrl to also select the backlight.
Use the Outliner to select the floor and use Ctrl to also select the backlight.
![]() With floor1 and backlight selected, use the Rendering menu set to choose the Lighting/Shading menu and then select Break Light Links.
With floor1 and backlight selected, use the Rendering menu set to choose the Lighting/Shading menu and then select Break Light Links.
![]() Use Render, Render Current Frame to see the results; you should notice that the backlight is now only affecting the eggcup.
Use Render, Render Current Frame to see the results; you should notice that the backlight is now only affecting the eggcup.
Tip: Linking Lights
You can link lights to particular objects (excluding other objects) or objects to particular lights. Using the Rendering menu set, choose Lighting/Shading, Light Linking Editor. To link a light to objects, based on selecting the light first, choose Light-Centric. To link based on selecting the object first, choose Object-Centric. Use the dialog box that opens to link lights to objects by selecting them simultaneously in the left and right panels, or unlink them by deselecting.
![]() We can do the exact same thing with the fill light. Select floor1 and Ctrl-select the fill light. Use Lighting/Shading, Break Light Links to break the links between the light and the selected object.
We can do the exact same thing with the fill light. Select floor1 and Ctrl-select the fill light. Use Lighting/Shading, Break Light Links to break the links between the light and the selected object.
![]() If you now render your image, you should notice the fill light no longer affects the floor. We want to leave the key light illuminating the floor and casting its shadow, but the cone angle could be widened to spread the light out more and provide a softer shadow.
If you now render your image, you should notice the fill light no longer affects the floor. We want to leave the key light illuminating the floor and casting its shadow, but the cone angle could be widened to spread the light out more and provide a softer shadow.
![]() With the key light selected, use the Attribute Editor to change Cone Angle to 100.
With the key light selected, use the Attribute Editor to change Cone Angle to 100.
![]() If you render the image, you will see that this has given the egg a much softer shadow, but because we have a larger cone angle, it would be a good idea to also turn up the depth map shadow resolution to improve the results.
If you render the image, you will see that this has given the egg a much softer shadow, but because we have a larger cone angle, it would be a good idea to also turn up the depth map shadow resolution to improve the results.
![]() With the key light selected, use the Shadows section of the Attribute Editor to turn Resolution (underneath Use Depth Map Shadows) up to 2048.
With the key light selected, use the Shadows section of the Attribute Editor to turn Resolution (underneath Use Depth Map Shadows) up to 2048.
As a few last tweaks, you can try experimenting by changing the color of the lights. A nice touch would be to mimic the blue of the sky bouncing off of the egg shell, so try changing the color of the backlight to blue. Render to see the results. Once you have tried that, you can also change the color of the key light to resemble the color of the sun. An off-white or yellow would do the trick here.
You may also want to change the color of the shadow to a midnight blue, by adjusting Shadow Color in the Shadows section of the spot light’s attributes. Experiment with different intensities of light to create greater highlights. Perhaps try turning different light completely down to see exactly how the individual lights work. The lighting_v6.ma scene from this Hour’s source files on the bonus DVD provides a suggested finalized lighting setup.
![]() Video: Setting Good Light Presets
Video: Setting Good Light Presets
Watch the bonus video included in this Hour’s files for a quick run-through of setting good light presets. Using light presets will help you light your scenes more efficiently by letting you save and reusing favorite settings for your lights.
Summary
In this Hour, you learned about the different light types in Maya, how to create them, how to modify their key attributes, such as intensity and color, and how to create and modify shadows. Using the three-point lighting techniques discussed in this Hour will help you light subjects in the real world as well as your 3D worlds. Remember that no matter what look you are aiming for, your observations of lighting will help you to re-create what you want in Maya. Also, remember to make use of Maya’s facilities to pick and choose what scene elements you want to light, what lights you want to cast shadows, and what objects you want to have shadows. As a final tip, if you are aiming for realism, make sure your shadows make sense according to the direction of the primary light source. For example, if bright light is coming in from one direction, it makes sense to cast shadows from that light rather than from others.
Q&A
Q. Why don’t I have any shadows?
A. Lights in Maya do not in general automatically cast shadows. To turn on shadows, select the light and turn on Use Depth Map Shadows in the Attribute Editor, or Use Ray Trace Shadows. If using raytraced shadows, you will also have to check that Raytracing options are turned on in the render settings.
Q. How can I turn off a shadow on a particular object?
A. Select the object and in the attributes for the object (rather than for the light), find the Render Stats attributes. Here, you can choose whether an object casts shadows and/or receives shadows.
Q. What can I do about jagged depth map shadow edges?
A. Increase the resolution for the depth map shadows in the Attribute Editor. You can also increase the filter size. See Hour 21 to learn about improving the quality of the render.
Q. I keep turning up the intensity of my light but nothing seems to happen. What’s going on?
A. If you have set a decay rate, you will also have to increase the intensity of the light significantly. Rather than bumping up the values by single units, try increasing by units of tens, hundreds, or even thousands. If you have not used decay rates, make sure that the light is turned on and that it is positioned so that you can see its effects.
Workshop
The workshop contains quiz questions and exercises to help you solidify your understanding of the material covered. Try to answer all questions before looking at the “Answers” section that follows.
Quiz
1. What are the main light sources needed for three-point lighting?
2. How can we adjust a light’s position in a more dynamic way?
3. How can we stop a light hitting a surface but allow it to hit another?
4. What can we adjust to make the edges of a spot light softer?
5. Apart from spot lights, what are the other types of light can we create in Maya?
Exercise
Try to find some good photographic reference online or in a magazine and see if you can mimic that particular lighting by using the lights covered in this Hour. Additionally, familiarize yourself with how the properties of lights and materials interact with each other in Maya by using your own scene, or lighting_v1.ma, with a spot light or light of your choice. Change the material properties of the spheres to see how the light affects the changes to the properties of the surfaces. You may have noticed that the blue sphere in lighting_v1.ma (and in some of the figures used in this Hour) does not have a shiny specular highlight. This is because it uses a lambert material that has no specular properties.
As a final suggestion, now that you know how to light a scene, you may want to go back through exercises you have completed in previous Hours to light up your work.
Answers
1. Three-point lighting uses a key light source for main illumination, a fill light to essentially provide control for the more shaded areas, and a back (or rim) light to make the subject pop from its background.
2. Use the panels menu to look through the selected light to adjust it as if looking through a camera lens.
3. We can use light linking to set up specific links between lights and objects, and break links between objects if necessary.
4. Adjusting the spot light’s penumbra angle can add softness to the edge. Use dropoff to control the intensity from its center to its outer ring.
5. In addition to spots, Maya provides directional, area, ambient, volume, and point lights.