
Hour 21. Rendering Final Imagery
What You’ll Learn in This Hour:
![]() How to generate final images through rendering
How to generate final images through rendering
![]() How to render single images in Render View
How to render single images in Render View
![]() How to create batch renders to render animated sequences
How to create batch renders to render animated sequences
![]() What main settings you will need to use to set up your renders
What main settings you will need to use to set up your renders
Rendering is the step you use to generate the final images for your scene. You can render frames out to a variety of commonly used image formats, such as TIFF (tiff), TARGA (tga), JPEG (jpg), or select different options including Maya’s own IFF (iff) format. Maya lets you define the size and resolution you want and which frames you want to render, either as single images or using Batch Rendering to render out animated sequences. But rendering is more than choosing your image format and resolution. Rendering is about making choices related to quality and speed as well as what rendering engine you want to use, which will impact the final outcome. The rendering engine (or renderer) is the brains behind all the calculations to generate the final look of the light and shadows, the motion, and the effects and all the elements in your scene. Maya provides different renderers for your use, including Maya Software and Mental Ray, to name two very popular ones. Each renderer has its own unique set of features to help you achieve the look you want. Depending on what you have set up in your scene, rendering a single frame can take anywhere from a fraction of a second, to minutes, or longer to perform all the calculations required to generate the final look. This means there are often tradeoffs to be made between the speed and the quality of the renders, but fortunately Maya provides tools and settings to help with those decisions along the way.
Note: Rendering, Lighting, Materials
Rendering is the step that generates your final images, and there are many important settings to help you get the quality and look you are aiming for. However, the final look also depends on what lighting and shadows you use, plus what materials you apply to the surfaces. Therefore, at some point make sure you have a look at Hour 7, “Creating Node Networks in the Hypershade,” and Hour 19, “Lighting Your Scene Correctly.”
In this Hour, you will learn how to use rendering to generate single images using Render View, and also animated sequences using Batch Rendering. You will also learn how to make comparisons between renders as you make adjustments by keeping images in Render View. Interactive Photorealistic Rendering (IPR) lets you tweak your scenes and see the results in close to real time, so we will take a look at that too. We will also, most importantly, look at some of the settings you will need to successfully render out your images.
Render Basics
As you create your scenes in Maya, the viewports render objects so that you can work with them efficiently, but this is not the final quality render. Figure 21.1 shows the viewport view of a scene on the left, and on the right the final image that has been rendered using Mental Ray, which is one of the rendering engines Maya provides. When we talk about rendering, we usually mean generating the final image, similar to that shown in Figure 21.1 (right). You should notice that the render on the right shows that the lights, shadows, colors, and particles have all been calculated, generating quite a different look from the viewport scene on the left.

A few render engines are bundled inside Maya, including Maya Software, Maya Hardware, Maya Vector, and Mental Ray. Maya Software is Maya’s own renderer that works efficiently with Maya, and produces good results without too much fuss. The Mental Ray renderer has a wider feature set, including sophisticated options to simulate real-world lighting. The most popular features of Mental Ray over Maya Software are global illumination, physical sun and sky, final gather and caustic light, and much more. A combination of these features with some setup and understanding can allow the artist to create more realistic-looking images than using of Maya Software. You can also create render passes to separate elements such as shadows, occlusion, specularity, and reflections, to name a few. The tradeoff is more complexity over using Maya Software; plus, Maya Software has its own advantages, such as letting you render things such as Maya’s paint effects whereas Mental Ray doesn’t.
Maya Vector renderer lets you render in a stylized format (such as cartoon-like) or in 2D vector formats such as Adobe Flash. Maya Hardware rendering, which puts your computer graphics card to work, is faster than software rendering, but not always as high quality. However, it can be very useful for rendering dust particles and fairy dust.
Maya Software is the easiest to get started with, so we will focus on that, but we will mention Mental Ray along the way, too. Both are very popular and commonly used renderers, so it’s worth having a look at both.
Render Buttons
The Render buttons (shown in Figure 21.2) at the top of your Maya user interface are very useful for your rendering workflow in Maya. The buttons provide easy access to render your images and adjust settings. This Hour will cover how to do all that, but first let’s have an overview of the buttons that will be used throughout.
FIGURE 21.2 The buttons in the Rendering buttons group provide easy access to create and adjust renders.
Let’s look from left to right at the buttons shown in Figure 21.2. The first opens the Render View window, which has many useful features to deal with rendering images. The second renders the current frame. The third button opens Render View with the IPR (Interactive Photorealistic Rendering) feature active, which lets you tweak your scene and see how it affects the render in real time. The final button on the far right gives you access to Maya’s rendering settings. The settings enable you to select the image size and resolution you want to render, to pick the renderer you would like to use, and to adjust features to change the quality versus speed of your renders.
Rendering Single Images
You can render a single image with the click of a button. To learn about rendering a single image, and experiment as you are following along, complete these steps:
![]() Open up rendering_v1.ma from this Hour’s source files, or use any of your own scenes. Rendering.v1.ma is a modified version of the scene used in Hour 19. We have lit the scene a bit differently and have animated the diffuse color and glow intensity on the eggMAT material of the egg to give you a short and manageable animated scene to work with.
Open up rendering_v1.ma from this Hour’s source files, or use any of your own scenes. Rendering.v1.ma is a modified version of the scene used in Hour 19. We have lit the scene a bit differently and have animated the diffuse color and glow intensity on the eggMAT material of the egg to give you a short and manageable animated scene to work with.
![]() Click on the viewport that contains the scene composition that you want to render. In this case, just to get started, click on Perspective View and compose the scene to your liking.
Click on the viewport that contains the scene composition that you want to render. In this case, just to get started, click on Perspective View and compose the scene to your liking.
![]() Click on the Render Current Frame button toward the top-right corner of your Maya screen to render. The Render View window opens, and renders your image according to the Render Settings, which we will have a look at shortly.
Click on the Render Current Frame button toward the top-right corner of your Maya screen to render. The Render View window opens, and renders your image according to the Render Settings, which we will have a look at shortly.
Tip: Rendering the Current Frame
To select a specific frame for rendering, scrub along the Timeline or click Play and then stop when you reach the frame that you want to render. You can then render the frame by using the Render Current Frame button, shown in Figure 21.2 (second to the left).
Render View
The Render View window in Maya has many features to view renders of single frames. It can be used both as a previewing tool and to render out a finalized single image. Just select the viewport that has the scene composed as you want it, scrub along the Timeline to the frame you want, and click the Render Current Frame button.
![]() If you haven’t already done so, with rendering_v1.ma open, click on Perspective View and click the Render Current Frame button, which will open the Render View window, and render the image. Use this scene, or a scene of your choice, to experiment with any of the features discussed in this section.
If you haven’t already done so, with rendering_v1.ma open, click on Perspective View and click the Render Current Frame button, which will open the Render View window, and render the image. Use this scene, or a scene of your choice, to experiment with any of the features discussed in this section.
Render View renders the frame that has been selected from the viewpoint or camera view that you have selected, as shown in Figure 21.3. If you change your scene composition in Perspective View and click the Render Current Frame button again, you should see that the new render shows the updated composition. You can also scrub along the Timeline to select a different frame for rendering and then render that, too.

Looking along the top of the Render View window, you will see menus and buttons are provided to access further features. One thing to note right away is that the button located below the File menu looks like the Render Current Frame button you used earlier, but is actually slightly different. It is the Redo Previous Render button, which will render from the same camera/viewport previously used. To render a different camera:
![]() Click on the viewport that contains the camera view you want to render and then use the Render Current Frame button at the top of your Maya screen. If necessary, you can use the Panels menu within the viewports to change to any existing camera first. Alternatively, use the Render menu within the Render View window and then select Render to choose from a list of available cameras.
Click on the viewport that contains the camera view you want to render and then use the Render Current Frame button at the top of your Maya screen. If necessary, you can use the Panels menu within the viewports to change to any existing camera first. Alternatively, use the Render menu within the Render View window and then select Render to choose from a list of available cameras.
We have provided a camera called camera_MAIN with a composed view of the scene for you to render from if you would like to. We have replaced your top view with the camera_MAIN view. You should also note that camera_MAIN has also been locked to prevent accidental changes. See Hour 14, “Creating and Adjusting Cameras,” for more information on working with cameras.
![]() You can also swap between renderers by using the Select Renderer list at the top of the Render View window. If Mental Ray is not listed, you will have to load it. See the tip on loading Mental Ray and Maya Vector to do so.
You can also swap between renderers by using the Select Renderer list at the top of the Render View window. If Mental Ray is not listed, you will have to load it. See the tip on loading Mental Ray and Maya Vector to do so.
Tip: Loading Mental Ray and Maya Vector
If Mental Ray is missing from your renderers list, use Windows, Settings/Preferences, Plugin Manager to find and load Mayatomr.mll. Also, check Auto Load, if you want it to be automatically loaded in the future. If the Maya Vector renderer is missing and you would like to use it, too, then use the Plugin Manager to load the VectorRender.bundle also.
![]() To zoom in and out of the image in Render View, or pan around to view any sections of particular interest (use the normal Alt and mouse buttons as you would use on any viewport). To return back to the original size, use the 1:1 Display Real Size button.
To zoom in and out of the image in Render View, or pan around to view any sections of particular interest (use the normal Alt and mouse buttons as you would use on any viewport). To return back to the original size, use the 1:1 Display Real Size button.
Render View provides useful information about your render at the bottom of its window. This includes the image size, zoom ratio, and renderer used along the top row, and frame number, render time, and camera along the bottom, as Figure 21.4 shows. Monitoring render times here is a good habit to get into. Keeping an eye on how changes affect render times helps you decide whether or not the changes are worth keeping. Remember that a few more seconds on a single image might not make much difference, but they can add up when dealing with multiple images in animations.

Render View renders using the current settings in Render Settings. You can either use the Render Settings button on the top of your Maya screen or use Options, Render Settings within Render View to open up the Render Settings window.
Rendering Regions
Waiting for an entire new image to be rendered each time you make a change and want to see what is happening can be very time consuming. Fortunately, Maya gives you the option to render regions of the image instead. Rendering just a region saves time, and also helps you problem solve quickly by re-rendering just the area you need. For example, if you want to soften shadows or the falloff area from a spot light cone, selecting a region to render along the targeted edge provides quick feedback. To render a region, follow these steps:
![]() In Render View, marquee select a region by clicking and dragging over part of the image. A red marquee line should appear, indicating the boundary of your selection, as shown in Figure 21.5. To modify the region, simply click and drag to marquee select again.
In Render View, marquee select a region by clicking and dragging over part of the image. A red marquee line should appear, indicating the boundary of your selection, as shown in Figure 21.5. To modify the region, simply click and drag to marquee select again.

FIGURE 21.5 Render regions let you marquee select an area to quickly preview changes without waiting to render the entire image.
![]() Once you have a red boundary, indicating that a region has been selected for render, click the Render Region button in the Render View window, as shown in Figure 21.5.
Once you have a red boundary, indicating that a region has been selected for render, click the Render Region button in the Render View window, as shown in Figure 21.5.
![]() You can zoom closer to a region by using Alt RMB, or you can use View, Frame Region from the Render View menus. Use the 1:1 Return to Real Size button to return to the original size.
You can zoom closer to a region by using Alt RMB, or you can use View, Frame Region from the Render View menus. Use the 1:1 Return to Real Size button to return to the original size.
Tip: Automatically Render Regions
You can automatically render the region as you drag by using the Options menu within Render View to turn on Auto Render Region. Just be aware that the time-saving tradeoffs are balanced by the risk of accidentally setting off a render when you click and drag!
Tip: Auto Resize and Rendering Regions
When you zoom in to a render region, or any other area of the image, by default the next render will zoom you back out. If you prefer to keep your zoom ratio intact, use the Options menu on the Render View to disable Auto Resize.
Comparing Saved Images
You will probably want to make adjustments to the scene and will also want to see whether your adjustments are making things better, worse, just different—or if the changes are even noticeable! Render View lets you keep renders in the window to compare between different versions, as shown in Figure 21.6.

FIGURE 21.6 Use the Keep Image button to keep images within Render View, and use the Remove Image button to delete. Drag the bottom scroll bar to view stored images.
Follow these steps to keep and compare images within Render View:
![]() Render an image and then click the Keep Image button within Render View to store it for viewing later, as shown in Figure 21.6 (left).
Render an image and then click the Keep Image button within Render View to store it for viewing later, as shown in Figure 21.6 (left).
![]() Scrub along the Timeline to a different frame, or make a change to your scene, such as changing a light color or intensity, a material color, or any other change of your own choice. Render the image again. Click the Keep Image button to keep the new render in Render View as well.
Scrub along the Timeline to a different frame, or make a change to your scene, such as changing a light color or intensity, a material color, or any other change of your own choice. Render the image again. Click the Keep Image button to keep the new render in Render View as well.
![]() If you want to remove an image, click on the Remove Image button, as shown in Figure 21.6 (right).
If you want to remove an image, click on the Remove Image button, as shown in Figure 21.6 (right).
You should notice that once you keep an image in Render View, a scroll bar appears at the bottom to let you easily scroll between images, as shown in Figure 21.6. You can save multiple images, from any camera or any frame. You can also keep images from other scenes, too. Even if you accidentally close the Render View window, the images are still safely stored in Render View, although they are not saved if you close and reopen Maya.
Tip: Commenting
Render View lets you annotate saved images in the window by right-clicking the Keep Image button and selecting Keep Image With Comment. Commenting can help keep a record of changes, to let you retrace your steps if you need to.
To save images permanently, use the File menu within Render View to choose Save Image in the format you specify. By default, Maya will place saved images into the images folder of the project directory that you are working with. You can also load an existing image by using File, Open Image.
Fine-Tuning with IPR
For instant feedback on changes, Interactive Photographic Rendering (IPR) can be used for Maya Software or Mental Ray. IPR lets you make a change and have it almost instantly update in Render View as you go. To tune your scene with Interactive Photographic Rendering, follow these steps:
![]() Click on the IPR rendering button on your Maya user interface, or use the Redo the previous IPR render button within Render View. If you are rendering using Maya Software, the image will render as normal; however, if you are using Mental Ray, the image will appear in wireframe, as shown in Figure 21.7.
Click on the IPR rendering button on your Maya user interface, or use the Redo the previous IPR render button within Render View. If you are rendering using Maya Software, the image will render as normal; however, if you are using Mental Ray, the image will appear in wireframe, as shown in Figure 21.7.

FIGURE 21.7 A Mental Ray IPR render. IPR lets you select one or more regions and have the render update interactively in close to real time as you make changes in your scene.
![]() Marquee select a region to fine-tune in IPR by dragging over the image. You can select the whole image, or just a region, although the larger the region size, the slower IPR will update the render. As you drag, you should see the region rendering, as shown in Figure 21.7. Now you can make changes in your scene and have them almost instantly show up in the region you have selected.
Marquee select a region to fine-tune in IPR by dragging over the image. You can select the whole image, or just a region, although the larger the region size, the slower IPR will update the render. As you drag, you should see the region rendering, as shown in Figure 21.7. Now you can make changes in your scene and have them almost instantly show up in the region you have selected.
Tip: Add to the Region
If you want to add regions to the IPR, just click and drag while IPR is on. Newly selected regions will automatically be added to the IPR render.
Render Settings
Use Render Settings to choose the renderer you want to use as well as to control the quality versus speed of the render and the image size, resolution, format, and other settings that will impact the final look. Render Settings apply to single images as well as to any animated sequences. To access render settings, follow these steps:
![]() Open Render Settings by clicking the Render Settings button on the top of your Maya scene, or use Options, Render Settings within Render View.
Open Render Settings by clicking the Render Settings button on the top of your Maya scene, or use Options, Render Settings within Render View.
The Render Settings window opens up with a Common tab for basic settings you will want to make no matter what renderer you choose, plus render-specific tabs to give you access to the unique feature sets that the selected renderer offers. Figure 21.8 shows the Render Settings window open with Mental Ray selected as the renderer.

FIGURE 21.8 The Render Settings window with available tabs specific to the renderer selected, such as the Mental Ray options shown here.
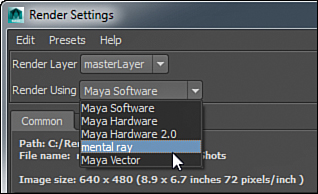
![]() To select the type of renderer, use the Render Using drop-down list to choose from the available list, as shown in Figure 21.9. If you want to use Mental Ray and it is in not on the list, you will need to load it first. To load it, use Windows, Settings/Preferences, Plugin Manager to find Mayatomr.mll. Turn on Loaded to load and Auto Load if you want it to automatically load in the future.
To select the type of renderer, use the Render Using drop-down list to choose from the available list, as shown in Figure 21.9. If you want to use Mental Ray and it is in not on the list, you will need to load it first. To load it, use Windows, Settings/Preferences, Plugin Manager to find Mayatomr.mll. Turn on Loaded to load and Auto Load if you want it to automatically load in the future.
Common Settings
Regardless of your choice of renderer, you will need to set up some basics, such as filename, path, image size, format, camera that you want to render, and the frames you want. The settings on the Common tab let you do all this, as shown in Figure 21.10. If you have a version of Maya that is previous to Maya 2014, do not be concerned if you do not see the Scene Assembly and Render Options sections shown in Figure 21.10. They are new additions for Maya 2014, and we will not need them in this Hour. Let’s have a look at some important settings that you should be aware of.
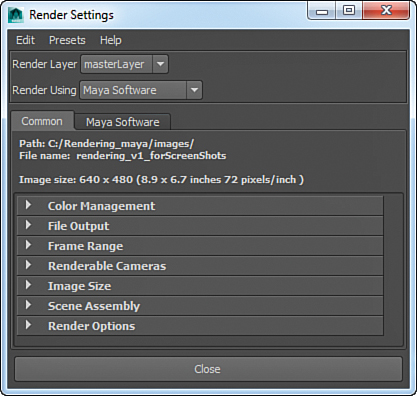
FIGURE 21.10 The Common tab in Render Settings lets you set fundamental options such as filename and image size and format, plus the frame range you want to render.
The File Output section is for entering the filenaming conventions, including filename, image format, and numbering system. By default, Maya uses your scene name as the filename, as shown in Figure 21.11, but you can type into the File Name Prefix field to enter your own if you prefer. The path that the images will be rendered to is, by default, the image directory for the project that you have set. If you want to change the path to another, at the top of the Render Settings window, use Edit, Change Project Image Directory.

FIGURE 21.11 The File Output section lets you enter a filename, image format, and frame/animation extension to set up where Maya puts the numbers in the filename.
The Image format by default is Maya’s own Maya IFF image format, which is the best quality and most efficient format for Maya to work with. However, other standard formats that are commonly used alternatives, such as TIFF (tiff) and JPEG (jpg), can be selected from the drop-down list shown in Figure 21.11.
To render out a range of frames, you first need to set up a filenaming convention that includes how to use numbering for the images. Use the Frame/Animation Ext: list (as in Figure 21.11) to select anything other than the Single Frame extension options. The format of “name.#.ext” is one of the most commonly used, however, because many applications will understand this format. This means that the name of the file will be first, followed by the number of the image, then the extension (the format of the image). For example, renders from a file named myScene with an image format of tiff would become myScene.1.tiff, myScene.2.tiff, and so on.
Once you have chosen something other than the Single Frame options from Frame/Animation Ext:, Maya knows you want to render more than one frame, so the Frame Padding section (grayed out in Figure 21.11) will become active, and so will Frame Range. Use Frame Padding if you want to give the image number the same number of digits by adding in preceding 0’s. For example, a Frame Padding setting of 3 would create the series as 001, 002, and so on.
Any time you want to render more than one frame, you will want to make sure to enter a Start and End frame in the Frame Range section. By default, Maya renders starting from frame 1, and ending at frame 10, as shown in Figure 21.12. Therefore, unless you just want 10 frames, make sure to enter your own settings! New to Maya 2014 is the Skip Existing Frames option, shown in Figure 21.12. Enable this when you have already rendered some images, but have deleted some and want to keep others. This will save time by letting the renderer detect existing frames and only render out the missing ones.

To access the Frame Range or Frame Padding, set up Frame/Animation Ext: to anything other than Single Frame options; otherwise, Maya assumes you only have one frame to render! Once you have selected something like “name.#.ext,” Frame Range and Frame Padding will then become active.
The Renderable Cameras section is used to tell Maya which camera or cameras you want to render your scene from. By default, the perspective camera is your renderable camera, but you can switch cameras or add more to the list by using the drop-down list next to any camera. To swap one renderable camera for another, use the drop-down list next to the existing renderable camera that you don’t need and then select from the cameras available. To add an additional one, use the drop-down list next to any camera to select Add Renderable Camera. Figure 21.13 shows an example. An additional camera will appear. If it is not the one you want, use the drop-down list next to the newly added renderable camera to switch.

FIGURE 21.13 Use the drop-down list next to any existing camera to make it renderable by selecting Add Renderable Camera.
Tip: Make Unwanted Cameras Unrenderable
Rendering from cameras that you don’t need to can waste time and resources, especially when you’re rendering animated sequences with many frames. To make a camera unrenderable, click the trash can icon next to it in the Renderable Cameras section of the Common tab.
The Image Size section is used to set image size and resolution, as shown in Figure 21.14. Maya lets you choose from a variety of industry-standard resolutions by using the drop-down Presets list, or you can just type a custom size directly into the Width and Height boxes if you prefer. Make sure you select Maintain Width/Height Ratio if you want to keep the same width to height ratio as you currently have. This allows you to type in either the width or height, and Maya will work out the other for you. You can also change Resolution and Resolution Units settings to adjust the resolution and size from the display-ready resolution of 72.00 pixels per inch (ppi), to something more suitable for print, such as 300 ppi, if needed.
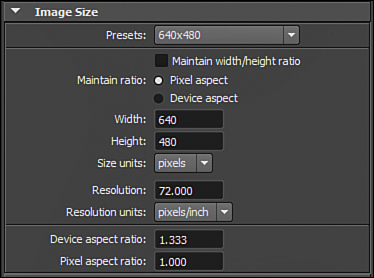
Tip: Resolution Gate
Use the Resolution Gate button (blue sphere) along the top of the camera’s viewport to see how any changes in resolution affect the composition. Anything in your scene appearing outside the gate will not show up in the render for that camera, so you will need to adjust the resolution or the camera composition if you want them included.
Quality Presets
When dealing with improving quality of renders, you are likely to come across the terms aliasing and anti-aliasing. Aliasing artifacts are the jagged or stair-stepped edges that sometimes appear around edges in your scene, such as shadowed edges or areas of high contrast. Anti-aliasing is the process of smoothing out these areas to improve the appearance. Improving the anti-aliasing will improve the quality of the render, but also usually means longer render times. Decreasing the quality can speed up your workflow while you are making adjustments, but can make the jagged lines more obvious. The choice between quality and speed is really up to you. It is beyond the scope of this Hour to cover all the options you can choose to improve the quality of your renders, but you can make a start by looking at the existing presets that Maya provides.
Presets save time and energy by letting you reuse custom settings. You will find a few useful additional presets for rendering from this Hour’s section on the DVD. Make sure to also have a look at the video tutorials on setting presets from Hour 18, “Using Particles to Create Effects,” and Hour 19. These tutorials will help you gain a better understanding of using presets.
Maya lets you control the quality of your renders to provide quick draft-quality renders for previewing, or full production quality renders, which take longer but are much better quality for final renders. You also have a number of other presets in between these two options. For Maya Software rendering, use the Maya Software tab to select between Quality presets listed in the Anti-aliasing section, as shown in Figure 21.15 (left). In versions of Maya previous to 2014, with Mental Ray rendering, use the Quality Presets list at the top of the Quality tab. For Maya 2014 Mental Ray rendering, use the Presets menu, as in Figure 21.15 (right), at the top of the Render Settings Window, combined with options for quality in the Sampling section of the Quality tab.

FIGURE 21.15 Use presets Maya Software’s Anti-aliasing Quality (left) or the Quality tab (right) in Mental Ray to choose what quality of render you want.
If you want to see what a difference rendering quality makes, open up rendering_v1.ma from this Hour’s source files. Use the Render View window to render a frame, and use the Keep Image button at the top of the Render View window to save the renders. Next, change some of the quality settings and repeat. For example, try rendering in Maya Software at Preview quality and compare it to Production quality by scrubbing between the saved images in the Render View window. Rendering_v1 was created for Maya Software rendering, but it doesn’t hurt to see what happens when you render it in Mental Ray too.
Tip: Turning on Raytraced Shadows
If you have created lights with raytraced shadows, you will need to turn on raytracing in Render Settings to see them. Raytracing settings can be found in the Raytracing Quality section on the Maya Software tab if you’re using Maya Software to render. If using Mental Ray, look for Raytracing options on the Quality tab. Maya 2014 made a few updates to the raytracing settings, so you might find that Mental Ray has already turned on raytracing by default, but it is always a good idea to check. Also note that you can use the Raytracing options both in Render Settings and in attributes for the shadow on the lights that use them to improve the look of raytraced shadows.
Rendering Animations with Batch Render
Batch rendering is used to render a range of frames or an entire animated sequence. In theory, rendering using batch render is as simple as setting up a few things and then launching a batch render, but that is rarely a good idea without careful checks first. Rendering out sequenced images can be time consuming, and it can be frustrating if you don’t form good habits early on. Otherwise, you might find yourself waiting for a batch render of your beautiful animation, only to find you rendered from the wrong camera, at the wrong resolution, and only got 10 frames out, because you forgot to set the frame range to the end! Even worse is when you forget to set your filename and path, and so your bad render just overwrote files that you wanted to keep! It is therefore important to have a good workflow practice of checking and rechecking before you render. So let’s first have a look at the settings we want to use.
Check Render Settings for Batch Rendering
Before setting off the render, you should make sure your project directory is set. Plus, you should set up the basics in common settings, and any quality settings or other features that you want to use. These common settings were discussed in the previous section, but Table 21.1 shows a reminder list. The first two columns list the main settings to watch out for. The third column provides suggested settings if you want to render the sample file render_v1.ma.
![]() Open rendering_v1.ma or a scene of your own choice.
Open rendering_v1.ma or a scene of your own choice.
![]() Click the Render Settings button to open up Render Settings. Use the suggested settings within Table 21.1 to set up the scene for a batch render. If you’re using your own scene instead, make sure to enter settings that make sense for your scene.
Click the Render Settings button to open up Render Settings. Use the suggested settings within Table 21.1 to set up the scene for a batch render. If you’re using your own scene instead, make sure to enter settings that make sense for your scene.

![]() Once you have finished setting up your render, save the file to get ready to batch render.
Once you have finished setting up your render, save the file to get ready to batch render.
By default, Maya will render images to the image directory of the current project. The path is shown at the top of the Common tab, as you can see in the example in Figure 21.16. Filename, frame range, and image size are also shown.
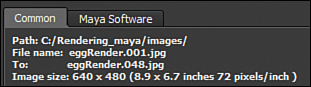
FIGURE 21.16 Use the top of the Common tab to double-check your path, filename, and numbering, plus frame range, image size, and resolution.
To Batch Render
Once you have checked your settings, it is a good idea to preview some frames first, just to make sure everything is in order. Scrub along the Timeline and then use the Render Current Frame button to check a few frames. Once you think you are all set to go, you might also want to save your file before you launch the render. Batch renders sometimes go wrong, and you don’t want any crashes to lose your settings:
![]() Continue with your previous file, or open up render_v2.ma from this Hour’s source files, to start with a file already set up for batch rendering in Maya Software.
Continue with your previous file, or open up render_v2.ma from this Hour’s source files, to start with a file already set up for batch rendering in Maya Software.
![]() To launch the batch render, use the Render menu set to select Render, Batch Render.
To launch the batch render, use the Render menu set to select Render, Batch Render.
![]() Once the batch render is running, you can keep an eye on how it is getting along in a couple different ways. If you look at the lower-right corner of your Maya screen, you should see progress messages in the Command feedback bar. You can also open up the Script Editor using the button in the very bottom right of your Maya screen. You should see progress indicators whiz by, letting you know which frame is being rendered.
Once the batch render is running, you can keep an eye on how it is getting along in a couple different ways. If you look at the lower-right corner of your Maya screen, you should see progress messages in the Command feedback bar. You can also open up the Script Editor using the button in the very bottom right of your Maya screen. You should see progress indicators whiz by, letting you know which frame is being rendered.
![]() To preview the most recently rendered image while the batch render is in progress, use Render, Show Batch Render from the Render menu set. Maya’s image viewer FCheck should open up with the most recently rendered frame.
To preview the most recently rendered image while the batch render is in progress, use Render, Show Batch Render from the Render menu set. Maya’s image viewer FCheck should open up with the most recently rendered frame.
![]() To cancel the render if there is a problem or you have changed your mind, from the Render menu set, just go to Render, Cancel Batch Render. You will then be asked to confirm whether or not you want to cancel.
To cancel the render if there is a problem or you have changed your mind, from the Render menu set, just go to Render, Cancel Batch Render. You will then be asked to confirm whether or not you want to cancel.
You can continue to work with Maya while batch rendering, but you might notice that it is sluggish compared to normal. This is because the batch rendering is taking up some of the resources.
Tip: Batch Rendering with Maya Closed
Batch rendering will continue to run even with Maya closed. If you close Maya and then decide you want to cancel the batch render, you will need to use Ctrl+Alt+Del to select the Task Manager. In the Process tab, select the Render.exe process and click the End Process button.
Note: Video Formats
By rendering to an image sequence, if the render goes wrong at some point, you can still most likely salvage some of the images and only have to render out the missing ones. This wouldn’t be possible if rendering straight to a video format such as AVI or MOV. Once you render as a sequence, you can then use an application such as Adobe After Effects or Adobe Premiere Pro, or one of the freely available applications to convert your sequences to the video format that you want.
Viewing in FCheck
Maya comes bundled with its own image viewer called FCheck. You can use this to view your renders. To launch FCheck through Maya, use Maya’s File, View Image to view a single image, or File, View Sequence to play a sequence of images. To launch FCheck through Windows, use Start, All Programs, Autodesk, Autodesk Maya 2014, FCheck. For earlier versions of Maya, look in the Autodesk Maya folder for the Maya version that you have.
Figure 21.17 shows FCheck open with a rendered image. If necessary, use the File menu and select Open Image to open a single image, or select Open Animation to open a sequence. To play a sequence, use the Play button located toward the top-left corner of the scene. To scrub through, drag with your mouse.

Summary
In this Hour, you learned about rendering. You can render out single frames, or multiple frames from animated sequences using batch render. Speed versus quality of renders is always a factor, but you can use Maya’s Render View to keep images to compare, and you can use IPR to help make those decisions. Rendering the look you want depends on making the right lighting, shadows, and materials choices, too. For example, when shadow edges aren’t quite how you want them, if improving render quality isn’t getting what you want, you might have to go back to the shadows on the lights to make adjustments there. The great thing about rendering in Maya is that Maya provides many features to help you along the way.
Q&A
Q. Why can’t I enter a frame range?
A. You need to make sure you select a Frame/Animation extension such as “name.#.ext.” Otherwise, Maya will think you only want to render a single frame and not let you access the frame range options.
Q. Why doesn’t my render match the composition I set up?
A. You may have selected the wrong camera or viewport. In Render View, use the Render menu to then choose Render again and select the correct camera. If you’re batch rendering, double-check that the camera you want is renderable.
Q. How can I see my images once they are rendered?
A. You can use FCheck, which is bundled with Maya, or can use most other image viewers. You can open FCheck from Maya by using File, Open Image or File, Open Animation.
Q. How can I speed up my renders for previewing?
A. You can use the quality settings to reduce the quality of your renders to something like draft or intermediate quality. Check out the Maya Software tab if you’re using Maya Software, or Mental Ray’s Quality tab if you’re using Mental Ray in versions of Maya earlier than 2014. Use the Presets menu from the top of the Render Settings window if you’re using Mental Ray in Maya 2014, and also reduce the quality options in the Sampling section of the Quality tab. You can also reduce the image size using the Common tab for Maya Software or Mental Ray.
Workshop
The workshop contains quiz questions and exercises to help you solidify your understanding of the material covered. Try to answer all questions before looking at the “Answers” section that follows.
Quiz
1. How do we render lots of images together in sequence?
2. If Mental Ray isn’t loaded, where can you load it?
3. What is the common frame/animation extension used when rendering sequences?
4. What can be used in the Render window for real-time feedback?
5. How can a render be stopped while it is still in progress?
Exercise
Maya allows the artist to render in layers, too, so that you can tweak individual elements for greater control when compositing in postproduction. Render layers can be added by selecting the geometry you want to add to a layer and creating a new render layer under the Render tab in the Channel Box or Layer Editor. You can name these layers, and Maya will create extra folders in the images folder for the specific objects in any one layer. For example, we could render the particles separately and control their color when post-processing the image. Create a simple scene with just a few objects, and add each one to its own render layer. Don’t panic if some of your objects seem to disappear! Just click back on the masterLayer to reveal them all again.
As a final suggestion, now that you know how to render a scene, you may want to go back through exercises that you have completed in previous hours to render your work.
Answers
1. Maya provides batch rendering to render out any of your image sequences.
2. You can use Windows, Settings/Preferences, Plugin Manager to find and load Mayatomr.mll to load Mental Ray.
3. A commonly used frame/animation extension format is “name.#.ext.” This puts the filename first, then the image number, and then the image extension.
4. IPR (Interactive Photorealistic Rendering) can be used to select regions to render, and see changes made to the scene update in near to real time. IPR is available for Maya Software and Mental Ray.
5. Use the Render menu set to choose Render, Cancel Batch Render to cancel a batch render in Maya. If you have closed Maya, you will need to use Ctrl+Alt+Del to select the Task Manager and then, in the Process tab, select the Render.exe process and click the End Process button.