
Hour 18. Using Particles to Create Effects
What You’ll Learn in This Hour:
![]() How to create and emit particles
How to create and emit particles
![]() How to modify the look and speed of your particles
How to modify the look and speed of your particles
![]() How to copy attributes by using presets
How to copy attributes by using presets
![]() How to cache your scene to enable real-time playback
How to cache your scene to enable real-time playback
Particles are used in lots of different ways for many different effects and media. If you need to create dust and debris from explosions, fireworks, smoke, rain, tornados, and more, particles are for you. Imagine creating and animating numerous tiny specks of dirt and elements by hand. Fortunately, you don’t have to. Maya’s particle systems let you emit customized particles to suit your needs.
Note: Particles Are for More Than Just Dust
Particles are not just for small specks of dust, dirt, and other tiny elements. You can also use the particle systems in Maya to emit other objects that you need en masse, such as wasps swarming from a nest.
In this Hour, you will get an overview of Maya’s particle systems, focusing on nParticles, and can follow along by creating a vapor trail for an animated character flying around with a jet pack. You will learn how to create and emit particles, how to make adjustments to their look and speed, and how to cache your scene to view it in real time. You will also learn how to use presets to copy attributes from one node to another to save time when setting up extras.
What Are Particles?
Maya particles are largely physics-based points in 3D space that can be displayed in a variety of ways, including as dots, blobby surfaces, and streaks. Particles are used in lots of different ways for many different effects and media. We have already mentioned dust and debris from explosions, but particles aren’t just limited to small points. We can tell each particle to use an object (geometry) instead. This is called “geometry instancing” and can usually be seen in blockbuster movies such as The Matrix, where the sentinels and other robots appear en masse. The animators can animate certain parts of objects such as the sentinels and then attach them to a particle system to have many of them (sometimes hundreds) all follow a similar path or pattern rather than animate each and every one individually.
Particles can be seen on TV, in games, and in the movies as natural background extras. Imagine requiring bubbles of air rising up underwater. Who wants to animate a million of those by hand? No, we’ll leave all this to Maya’s powerful particle system to create the smoke, fire, water, dust, tornados, plasma, explosions, and so on. The list is long!
What Is an Emitter?
Particles have to come from somewhere, however, and they are nothing without an emitter. An emitter is where particles are born and shoot out from. To create the particles, we must create an emitter to give birth to the particles and emit them into the scene. Emitters can release particles from a point in 3D space or from geometric objects. An example of this would be to have grains of sand emitting from a hand or an entire body, much like the effect in the movies Spiderman and The Mummy. Once the emitter has been created, we can tweak many attributes to control our particles, all based on physics. We can add forces such as gravity fields, Newton fields, turbulence, and many more. These attributes give us an almost completely unlimited amount of options to play with.
Particles or nParticles?
Maya’s nParticles are similar to Maya’s “standard” particles but are powered by Maya’s nucleus dynamic simulation framework. nParticles have a few different attributes and options and can integrate and collide with other nDynamic systems in Maya, such as nMeshes and nCloth right out of the box. By this, we mean that if you use Maya standard particles and you want a particle to bounce off of a cube, you need to tell the particle to collide with the cube. This would be similar to what we did in Hour 16, “Animating Using Dynamics and Simulations.” Using Maya’s standard dynamic system in Hour 16, we specified the apple as an active rigid body and the ground as a passive rigid body so that the simulation knew that the apple could react to the ground. However, if you do the same thing with an nParticle and a cube that has been converted to an nCube, they will automatically interact with each other. nParticles also have the ability to simulate other natural elements such as water. Standard particles and nParticles have many features in common, however. Therefore, when we refer to the term “particles” without specifying which kind, the topic applies to either type of particle system.
It would be good to start with the basics of Maya nParticles, so let’s get started!
Getting Started with nParticles
We are going to get started with Maya’s nParticle system, using the Sam character introduced in Hour 8, “Character Modeling.” Sam has been given some basic animation, plus a jet pack for you to create a vapor trail for using nParticles:
![]() Open particles_v1.ma from this Hour’s source files to see Sam and his jet pack, as shown in Figure 18.1.
Open particles_v1.ma from this Hour’s source files to see Sam and his jet pack, as shown in Figure 18.1.

The particles scenes provided on the DVD for use in this Hour have a camera, called Camera_MAIN, provided to give you a composed view of the scene. We have replaced the top viewport panel with Camera_MAIN, although you can use the Panels menu within the viewport to switch back to the top view if you prefer. Camera_MAIN has been locked to avoid accidental changes. For more information on working with cameras, see Hour 14, “Creating and Adjusting Cameras.”
If you click on the Camera_MAIN viewport and click Play (from the lower-right corner of your screen), you will see that Sam has some basic animation applied which has him take off, become slightly unstable before deciding to call it a day and land. The animation doesn’t make a whole lot of sense yet, until we create the vapor trail. What we need here are some jet pack effects, and for this, we will use nParticles. Follow the steps below to add the vapor trail:
Tip: Animating Sam
We have only provided some basic animation on Sam. Therefore, if you would like to have a go at improving or changing it, you can show Sam’s animation controllers by using the Show menu in one of the viewing panels to reveal NURBS curves. Character animation is beyond the scope of this book, but feel free to have a try if you’re interested.
![]() Use the drop-down menu set list located at the top-left corner of your Maya screen to select the nDynamics menu set, as shown in Figure 18.2.
Use the drop-down menu set list located at the top-left corner of your Maya screen to select the nDynamics menu set, as shown in Figure 18.2.
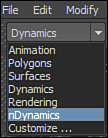
FIGURE 18.2 You can swap to the nDynamics menu set by using the drop-down menu set list in the top-left corner of your Maya screen.
![]() Once you have the nDynamics menu set selected, you should see some available menus that include nParticles.
Once you have the nDynamics menu set selected, you should see some available menus that include nParticles.
![]() From the nDyamics menu set, select the nParticles menu and then Create nParticles. You can see from Figure 18.3 that a few options are available. The top half of the menu options are essentially asking how we want to emit the particles, and the bottom half of the menu options are asking what type of particle we would like to emit.
From the nDyamics menu set, select the nParticles menu and then Create nParticles. You can see from Figure 18.3 that a few options are available. The top half of the menu options are essentially asking how we want to emit the particles, and the bottom half of the menu options are asking what type of particle we would like to emit.
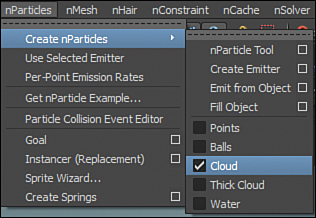
FIGURE 18.3 Create nParticles lets you choose the particle type in the lower half of the menu options as well as how you want to emit the particles from the top.
![]() Figure 18.3 shows that we have the choice of Points, Balls, Cloud, Thick Cloud, or Water. All of these have different attributes. We are going to use Cloud nParticles created from a point emitter (rather than being emitted from an object).
Figure 18.3 shows that we have the choice of Points, Balls, Cloud, Thick Cloud, or Water. All of these have different attributes. We are going to use Cloud nParticles created from a point emitter (rather than being emitted from an object).
![]() Double-check that Cloud is selected and then choose Create Emitter.
Double-check that Cloud is selected and then choose Create Emitter.
Maya has now created an emitter, along with the all-important nucleus dynamic systems, which enable everything to work. The emitter has been placed right on the ground in the middle of Sam’s base. You can switch to wireframe mode by pressing 4 on your keyboard to see it, as shown in Figure 18.4. You can also see from the Outliner that an emitter node, nParticle node, and nucleus node have been created. Switch back to shaded view by pressing 6 on the keyboard when you are ready to continue.
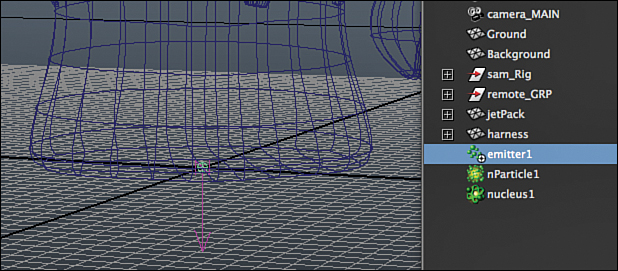
FIGURE 18.4 An emitter should appear at the base of Sam, and the Outliner should now have nodes for an emitter, nParticle, and nucleus.
![]() Click the Play button (lower right of your Maya screen) to see the particles being discharged from the emitter on the floor. You will see that as Sam moves, the particles keep emitting from the ground rather than from the jet pack. We need to position the emitter inside one of its jets, and make sure that it moves along with Sam.
Click the Play button (lower right of your Maya screen) to see the particles being discharged from the emitter on the floor. You will see that as Sam moves, the particles keep emitting from the ground rather than from the jet pack. We need to position the emitter inside one of its jets, and make sure that it moves along with Sam.
![]() To position the emitter inside one of the jets, select the emitter from the Outliner and translate it until it is just up inside the hole of the first jet. If we were to click Play now, we would see Sam fly off but the emitter stay put. To fix this, we need to parent constrain the emitter to the jet pack. This will enable the emitter to always follow the jet pack, even if we change the animation of Sam later on.
To position the emitter inside one of the jets, select the emitter from the Outliner and translate it until it is just up inside the hole of the first jet. If we were to click Play now, we would see Sam fly off but the emitter stay put. To fix this, we need to parent constrain the emitter to the jet pack. This will enable the emitter to always follow the jet pack, even if we change the animation of Sam later on.
![]() To find the Constrain menu, change to the Animation menu set by pressing F2 or by using the drop-down list in the top-left corner of your Maya screen and then choose Animation. The Animation menu set should appear, along with the Constrain menu.
To find the Constrain menu, change to the Animation menu set by pressing F2 or by using the drop-down list in the top-left corner of your Maya screen and then choose Animation. The Animation menu set should appear, along with the Constrain menu.
![]() In the scene, select the jet pack geometry and then hold Shift down to select the emitter.
In the scene, select the jet pack geometry and then hold Shift down to select the emitter.
![]() With the jet pack and emitter selected, choose Constrain and then Parent to constrain the emitter to the jet pack. Now if we click Play, we can see the particles emitting from the parented emitter, moving along with the jet pack.
With the jet pack and emitter selected, choose Constrain and then Parent to constrain the emitter to the jet pack. Now if we click Play, we can see the particles emitting from the parented emitter, moving along with the jet pack.
Tip: Jet Pack Still Misbehaving?
If for some reason the jet pack remains on the ground, it is possible that you constrained the jet pack to the emitter, rather than the other way around. Use the z key to undo, and try again. Make sure that you select the jet pack first, then Shift-select the emitter before trying again.
![]() Once you are satisfied that the emitter is moving along with the jet pack, save your file.
Once you are satisfied that the emitter is moving along with the jet pack, save your file.
The jet pack particles don’t quite have the look we are after, however, so let’s begin tweaking them in the next section.
Note: Parent Constraint Versus Parenting
Rather than parent constraining the emitter to the jet pack, we could have first selected the emitter, Shift-selected the jet pack, and pressed p on the keyboard. This would create a permanent parent/child relationship, rather than a constraint, which can be animated on and off. A constraint was used instead so that the emitter remains easy to find in the Outliner, rather than being moved in the hierarchy under its parent.
Editing the Attributes of an Emitter
In the previous section, we created a point emitter that releases particles directly, and then we parent constrained the emitter to a jet pack to make it appear that the jet pack was emitting the particles. We are going to continue modifying our nParticles apparently emitted from the jet pack, but it is worth noting that Maya also provides different options for emitting nParticles. Both nParticles and standard particles can be emitted from points on a surface, points on a curve, all CVs and vertices of a selected object, as well as selected vertices, CVs, and edit points. Additionally, nParticles and standard particles can be emitted from volume shapes such as cones, spheres, and cylinders.
We can control the direction, quantity, speed, and initial direction of emitted particles by setting attributes while we are creating the emitter, or by adjusting attributes on the emitter once it has been created. Select the square options box next to the menu label to set options as you create, as shown in Figure 18.5.

FIGURE 18.5 Select the square options box on any menu item, such as Create Emitter, to set options as you go.
Tip: Emitting nParticles from an Object
To emit nParticles from an object, select the object. Then use the nDynamic menu set to choose nParticles, Create nParticles, Emit from Object.
Emitter attributes can also be modified once created, which is a good thing because we need to change some attributes on our emitter. Follow the steps outlined here to adjust some attributes to improve your vapor trail—and learn more about emitters and particles as you go:
![]() Continue with the file you created earlier, or open particles_v2.ma to start with Sam with a default emitter parent constrained to his jet pack. If you click Play to see the particles that are being emitted, you should see that the particles are not really coming out as a nice vapor trail, but rather are coming out from all directions. This is because our emitter is set up as an “omni” emitter. This will be adjusted in the next steps.
Continue with the file you created earlier, or open particles_v2.ma to start with Sam with a default emitter parent constrained to his jet pack. If you click Play to see the particles that are being emitted, you should see that the particles are not really coming out as a nice vapor trail, but rather are coming out from all directions. This is because our emitter is set up as an “omni” emitter. This will be adjusted in the next steps.
An emitter can come in the form of an omni, directional, surface, curve, or volume emitter. An omni emitter discharges particles in all directions (omnidirectional), whereas a directional emitter emits in the direction specified by its Direction X, Y, and Z attributes. Surface emitters release particles from positions on or near polygonal or NURBS surfaces. Similarly, particles from curve emitters are released from positions on or near a curve. Finally, particles from volume emitters are discharged from a closed volume such as a cube or sphere shape.
![]() In your scene, select the emitter in the Outliner, and let’s look in the Attribute Editor at the different types of emission available. If necessary, use Ctrl+a to bring up the Attribute Editor, as shown in Figure 18.6.
In your scene, select the emitter in the Outliner, and let’s look in the Attribute Editor at the different types of emission available. If necessary, use Ctrl+a to bring up the Attribute Editor, as shown in Figure 18.6.

Tip: Display the Attribute Editor
Use Ctrl+a to toggle between the Channel Editor and the Attribute Editor. Alternatively, you can use the Editor buttons in the top-right corner of your Maya screen, as Figure 18.7 shows. Be aware that versions of Maya previous to 2014 will only have three buttons rather than the four shown in Figure 18.7.

FIGURE 18.7 You will find the button for the Attribute Editor in the top-right corner of your Maya screen.
![]() We want to change the type of our emitter from Omni to Directional. With the emitter selected, expand the Basic Emitter Attributes section, if necessary, by clicking on the drop-down arrow to the left of the label. Figure 18.8 shows the Basic Emitter Attributes section expanded to reveal the Emitter Type options.
We want to change the type of our emitter from Omni to Directional. With the emitter selected, expand the Basic Emitter Attributes section, if necessary, by clicking on the drop-down arrow to the left of the label. Figure 18.8 shows the Basic Emitter Attributes section expanded to reveal the Emitter Type options.

![]() Click the drop-down list next to the Emitter Type menu to select Directional instead of Omni, as Figure 18.8 shows.
Click the drop-down list next to the Emitter Type menu to select Directional instead of Omni, as Figure 18.8 shows.
![]() If we click Play now, we can see the particles coming out in a more uniform way, but they are going in the wrong direction, so we need to make further adjustments. Therefore, with the emitter still selected, return to the emitter attributes in the Attribute Editor and scroll down to the Distance/Direction Attributes, as shown in Figure 18.9. The default value of Direction X is 1.000, which is why our particles are going in the wrong direction.
If we click Play now, we can see the particles coming out in a more uniform way, but they are going in the wrong direction, so we need to make further adjustments. Therefore, with the emitter still selected, return to the emitter attributes in the Attribute Editor and scroll down to the Distance/Direction Attributes, as shown in Figure 18.9. The default value of Direction X is 1.000, which is why our particles are going in the wrong direction.
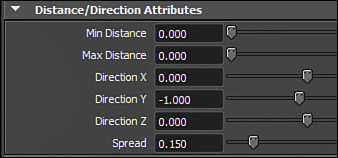
FIGURE 18.9 In the Distance/Direction Attributes section, set Direction Y to -1.000, Spread to 0.150, and the other distance attributes to 0.000.
![]() Set the value of Direction X to 0, and set the value of Direction Y to -1.000. This should enable the particles to travel downward.
Set the value of Direction X to 0, and set the value of Direction Y to -1.000. This should enable the particles to travel downward.
![]() Click Play to check the flow of the particles and you should see them emitting downward from the jet pack, which is the correct direction for this example. If you scroll through the available attributes for our emitter, you will see there are many attributes we can still modify. For instance, within the Distance/Direction Attributes section, we can add a bit more spread to the particles. The Spread attribute controls the emission spread angle for Directional and Curve emitters. Think of a cone and the particles emitting from the point of the cone and spreading out into the outer area. Smaller values will give a more concentrated stream of particles (a more narrow cone), and larger values (up to 1) a wider cone. Setting the value to 1 produces an emission angle of 180 degrees, and a value of 0.5 produces an angle of 90 degrees.
Click Play to check the flow of the particles and you should see them emitting downward from the jet pack, which is the correct direction for this example. If you scroll through the available attributes for our emitter, you will see there are many attributes we can still modify. For instance, within the Distance/Direction Attributes section, we can add a bit more spread to the particles. The Spread attribute controls the emission spread angle for Directional and Curve emitters. Think of a cone and the particles emitting from the point of the cone and spreading out into the outer area. Smaller values will give a more concentrated stream of particles (a more narrow cone), and larger values (up to 1) a wider cone. Setting the value to 1 produces an emission angle of 180 degrees, and a value of 0.5 produces an angle of 90 degrees.
![]() With the emitter selected, adjust the Spread value to between 0 and 1. Click Play to see how changing these values affects the stream of particles.
With the emitter selected, adjust the Spread value to between 0 and 1. Click Play to see how changing these values affects the stream of particles.
![]() With the emitter still selected, when you have finished experimenting with the Spread attribute, set the value to 0.15 and click Play. Figure 18.9 shows our final values for the Distance/Direction Attributes, but you can set them to your own preferences.
With the emitter still selected, when you have finished experimenting with the Spread attribute, set the value to 0.15 and click Play. Figure 18.9 shows our final values for the Distance/Direction Attributes, but you can set them to your own preferences.
Your jet pack should now have a nice stream of particles flowing from it. We can still adjust some more attributes to further improve it, however. In addition to modifying attributes for the emitter, we can modify the attributes for the particles themselves:
![]() Select nParticle1 in the Outliner to open the attributes for this node.
Select nParticle1 in the Outliner to open the attributes for this node.
![]() In the Attribute Editor, click on the tab for nParticleShape1 so that we can make a small adjustment to the size of the particles.
In the Attribute Editor, click on the tab for nParticleShape1 so that we can make a small adjustment to the size of the particles.
![]() To find the radius of the particles, expand the Particle Size section by clicking on the arrow next to the label. Increase the value of the radius until you get the look you want. We have chosen 0.500 for this example. Figure 18.10 shows the Radius attribute located in the Attribute Editor.
To find the radius of the particles, expand the Particle Size section by clicking on the arrow next to the label. Increase the value of the radius until you get the look you want. We have chosen 0.500 for this example. Figure 18.10 shows the Radius attribute located in the Attribute Editor.
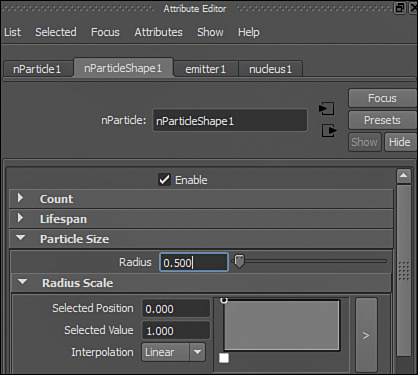
FIGURE 18.10 Select the nParticle node and then the nParticleShape tab in the Attribute Editor to find the particle radius attribute.
![]() Save your file.
Save your file.
Tip: Adjusting the Radius of Particles
To get instant visual feedback about the size of your particles, play the animation until the particles just start to come out of the jet pack and then stop. Adjusting the value for the particle radius will now be reflected in your viewing panel.
Making More Adjustments
Next we want to animate and change the speed of the particles. Currently, the particles just slowly emit from the jet pack without the force one would expect. Follow these steps to animate the speed of the particles:
![]() Continue with your own file, or open particles_v3.ma to start from this point.
Continue with your own file, or open particles_v3.ma to start from this point.
![]() Select the emitter to make further adjustments.
Select the emitter to make further adjustments.
Tip: Tabs in the Attribute Editor
If you look at Figure 18.10, you will see that the nParticleShape1 node attributes are showing, but there are also tabs available in the Attribute Editor for the emitter and nucleus nodes. To swap between the particles, emitter, and nucleus attributes, simply select the relevant tab.
![]() Scroll down to Basic Emission Speed Attributes and increase Speed to 5.000 and also enable Scale Rate by Speed. Speed acts as a multiplier for the original emission speed when Scale Rate by Speed is enabled. A value of 1 leaves the speed as it is, a value less than 1 reduces the speed, and a value greater than 1 increases the speed. Our value of 5 will multiply the original emission speed by 5.
Scroll down to Basic Emission Speed Attributes and increase Speed to 5.000 and also enable Scale Rate by Speed. Speed acts as a multiplier for the original emission speed when Scale Rate by Speed is enabled. A value of 1 leaves the speed as it is, a value less than 1 reduces the speed, and a value greater than 1 increases the speed. Our value of 5 will multiply the original emission speed by 5.
If you want to see how many particles are being emitted, select the nParticle1 node and make sure to also select the nParticleShape1 tab in the Attribute Editor. Expand the Count section and then click Play. When you stop playback, the Count figure will update to reflect the number of particles that have been emitted up to that point in time (frame).
![]() With the emitter selected, scroll up to Basic Emitter Attributes to adjust the rate at which the particles are being emitted per second. Set the value for Rate (Particles/Sec) to 500 to give us a lot more particles.
With the emitter selected, scroll up to Basic Emitter Attributes to adjust the rate at which the particles are being emitted per second. Set the value for Rate (Particles/Sec) to 500 to give us a lot more particles.
![]() Click Play, and you should notice that more particles are now emitted. However, although the particles are now looking more like a vapor trail, they are still being emitted before we need them. If you look at the animation, Sam presses the buttons to start the jet pack around frame 25. We don’t want our particles to start emitting until then, so we can animate the Rate attribute to emit zero particles until we need them.
Click Play, and you should notice that more particles are now emitted. However, although the particles are now looking more like a vapor trail, they are still being emitted before we need them. If you look at the animation, Sam presses the buttons to start the jet pack around frame 25. We don’t want our particles to start emitting until then, so we can animate the Rate attribute to emit zero particles until we need them.
![]() Make sure you are on frame 1 on your Timeline, and with the emitter selected, in the Attribute Editor turn the Rate down to 0.
Make sure you are on frame 1 on your Timeline, and with the emitter selected, in the Attribute Editor turn the Rate down to 0.
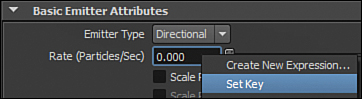
![]() Right-click inside the Rate value field and select Set Key, as shown in Figure 18.11. Because the rate is now zero particles per second, our particles won’t be emitted at all now. The value field will turn red to indicate you have successfully set a key.
Right-click inside the Rate value field and select Set Key, as shown in Figure 18.11. Because the rate is now zero particles per second, our particles won’t be emitted at all now. The value field will turn red to indicate you have successfully set a key.
![]() Play the animation to around frame 25, until just before Sam hits the buttons.
Play the animation to around frame 25, until just before Sam hits the buttons.
![]() At frame 25, with the emitter still selected, right-click inside the Rate value field again and once more select Set Key. Setting a key on the Rate value as 0 on frame 1 and frame 25 keeps the rate constant at 0 between those frames. This means we won’t emit particles between frame 0 and frame 25.
At frame 25, with the emitter still selected, right-click inside the Rate value field again and once more select Set Key. Setting a key on the Rate value as 0 on frame 1 and frame 25 keeps the rate constant at 0 between those frames. This means we won’t emit particles between frame 0 and frame 25.
![]() As soon as Sam hits the buttons, we want to start emitting particles. However, because they are unlikely to come out all at once, we need to give them the time to build up to full speed. We are therefore going to set a key for the full rate at frame 35. So, scroll to frame 35 on the Timeline, change the Rate value to 500, and right-click to set a key. This means that at frame 25, no particles will be emitted, but then will begin to emit on frame 26, and build up until they are emitting at 500 particles per second by frame 35.
As soon as Sam hits the buttons, we want to start emitting particles. However, because they are unlikely to come out all at once, we need to give them the time to build up to full speed. We are therefore going to set a key for the full rate at frame 35. So, scroll to frame 35 on the Timeline, change the Rate value to 500, and right-click to set a key. This means that at frame 25, no particles will be emitted, but then will begin to emit on frame 26, and build up until they are emitting at 500 particles per second by frame 35.
![]() Play the animation to see the effect. The beginning has been improved, but how about the end? When we reach the landing part of the animation, Sam releases the buttons, and it is here where we want to animate the value of the particle rate back to zero.
Play the animation to see the effect. The beginning has been improved, but how about the end? When we reach the landing part of the animation, Sam releases the buttons, and it is here where we want to animate the value of the particle rate back to zero.
You may think that going to frame 420 and then setting a key to 0 in the Rate value is the way to go, but this will only animate the rate from 500 down to 0 over a long period of time. To be more precise, because we set the rate to 500 at frame 35, the rate would be decreasing from 500 at frame 35 through to 0 at frame 420, which is not what we want. Instead, we need to anchor the value of 500 at the point we want the particles to start to switch off. Let’s set the Rate value at 500 on frame 400, and then trail it down to 0:
![]() Scroll through the Timeline to frame 400. With the Rate value at 500, right-click the value field to set a key.
Scroll through the Timeline to frame 400. With the Rate value at 500, right-click the value field to set a key.
![]() Scroll through the Timeline to frame 420 and change the Rate value to 0. Right-click the value to set a key. The particles should now start to decrease from 500 particles per second at frame 400, and trail off to 0 at frame 420. Save your file before continuing.
Scroll through the Timeline to frame 420 and change the Rate value to 0. Right-click the value to set a key. The particles should now start to decrease from 500 particles per second at frame 400, and trail off to 0 at frame 420. Save your file before continuing.
Now play the scene. The particles only start emitting at the point where Sam hits the buttons. They also finish at about the right time when he lets go of the buttons! Great! Now we have a more focused vapor stream.
Tip: Adjusting the Rate Animation
To adjust the keyframes for the particle rate values, select the emitter to show the keyframes on the Timeline. With the emitter selected, you can also use the Graph Editor to modify your animation by selecting Window, Animation Editors, Graph Editor. Also note that other attributes can be animated by right-clicking their values in the Attribute Editor to set a key.
Changing the Color of Particles
The particles we created are blue, which gives a nice slightly cartoony feel to our vapor trail, but this might not be what we want. The next step is to fine-tune the shading:
![]() Continue to use your own file, or open particles_v4.ma from this Hour’s source files to start from here.
Continue to use your own file, or open particles_v4.ma from this Hour’s source files to start from here.
![]() Select the nParticle1 node in the Outliner, and click on the nParticleShape1 tab in the Attribute Editor.
Select the nParticle1 node in the Outliner, and click on the nParticleShape1 tab in the Attribute Editor.
![]() Scroll down to the Shading section in the Attribute Editor. You may have to expand it by clicking on its arrow to the left of its label. Here, we can tweak opacity, color, and incandescence, and even change the particle render type.
Scroll down to the Shading section in the Attribute Editor. You may have to expand it by clicking on its arrow to the left of its label. Here, we can tweak opacity, color, and incandescence, and even change the particle render type.
![]() To achieve a smoky look, first expand the Color section within the Shading section. You will see a white circle and a blue circle above a rectangular color ramp, as shown in Figure 18.12.
To achieve a smoky look, first expand the Color section within the Shading section. You will see a white circle and a blue circle above a rectangular color ramp, as shown in Figure 18.12.
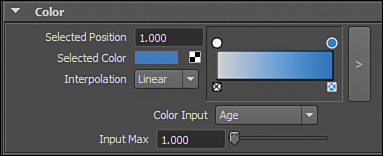
FIGURE 18.12 The Color settings found in the Shading section of the nParticlesShape attributes allow you to modify the colors of your particles.
![]() The smoky look can be achieved by changing the white circle to a dark gray and changing the blue circle to a light gray. To do this, first click to select the white circle above the color ramp, and then click on the color swatch next to Selected Color. Choose a dark gray.
The smoky look can be achieved by changing the white circle to a dark gray and changing the blue circle to a light gray. To do this, first click to select the white circle above the color ramp, and then click on the color swatch next to Selected Color. Choose a dark gray.
![]() Next, click on the blue circle above the ramp to select it. Using the Selected Color swatch, change the color to a light gray.
Next, click on the blue circle above the ramp to select it. Using the Selected Color swatch, change the color to a light gray.
![]() Once you have finished adjusting the settings to your liking, save the file.
Once you have finished adjusting the settings to your liking, save the file.
Copying Attributes by Using Presets
Now that we have our particle system working just the way we want it to, we need to create another one for the other jet on the other side. We do not have to repeat all the preceding steps, however. Have no fear: We can save a preset of the first particle system and use this on the second one. Presets let you save attributes on one node and then apply them to another. Do as follows:
![]() Continue with your own file, or open particles_v5 to start from here.
Continue with your own file, or open particles_v5 to start from here.
![]() Select the emitter node in the Outliner.
Select the emitter node in the Outliner.
![]() Click on the Presets button toward the top of the Attribute Editor, as shown in Figure 18.13. Select the option Save pointEmitter Preset and give the preset a name, such as emitterSAM, and then save it.
Click on the Presets button toward the top of the Attribute Editor, as shown in Figure 18.13. Select the option Save pointEmitter Preset and give the preset a name, such as emitterSAM, and then save it.

![]() Select the nParticle1 node in the Outliner and click on the nParticleShape1 tab. Use the Presets button to save this as a preset by repeating the preceding steps. Give the preset a name, such as nParticleShapeSAM, and save.
Select the nParticle1 node in the Outliner and click on the nParticleShape1 tab. Use the Presets button to save this as a preset by repeating the preceding steps. Give the preset a name, such as nParticleShapeSAM, and save.
![]() We now need to create a new emitter and place it up inside the second jet. Follow the steps toward the beginning of the “Getting Started with nParticles” section to create a new emitter, place it inside the second jet, and parent constrain it to the jet. There is no need to adjust the attributes, however, because that is the purpose of using the preset. Once you have constrained the emitter to the jet pack, return to these steps to use the preset.
We now need to create a new emitter and place it up inside the second jet. Follow the steps toward the beginning of the “Getting Started with nParticles” section to create a new emitter, place it inside the second jet, and parent constrain it to the jet. There is no need to adjust the attributes, however, because that is the purpose of using the preset. Once you have constrained the emitter to the jet pack, return to these steps to use the preset.
![]() Once the new emitter is in place, select it and in the Attribute Editor, click on the Presets button again. This time select the name of the saved preset from the list that appears and choose Replace, as shown in Figure 18.14.
Once the new emitter is in place, select it and in the Attribute Editor, click on the Presets button again. This time select the name of the saved preset from the list that appears and choose Replace, as shown in Figure 18.14.

FIGURE 18.14 With the new emitter selected, click the Preset button in the Attribute Editor to select the saved emitter (emitterSAM) and then choose Replace.
![]() Select the new nParticle2 node created when you created the new emitter. Click on the nParticleShape2 tab to use the Presets button to replace this node with the saved nParticleShapeSAM preset.
Select the new nParticle2 node created when you created the new emitter. Click on the nParticleShape2 tab to use the Presets button to replace this node with the saved nParticleShapeSAM preset.
![]() You may find that the emitter jumps to the position of the other emitter. Don’t worry; simply move it back into place.
You may find that the emitter jumps to the position of the other emitter. Don’t worry; simply move it back into place.
Watch the bonus video included in this Hour’s files for a quick run-through of setting presets to help your workflow. Presets save time by letting you save attributes on one node and apply to another when needed.
![]() Now we have to reassign the keyframes from the first emitter to the second emitter. Select the first emitter and make a selection over the keyframes in the Timeline by Shift dragging from frame 0 to the end of the Timeline. Alternatively, you can double-click the Timeline to select all the keyframes.
Now we have to reassign the keyframes from the first emitter to the second emitter. Select the first emitter and make a selection over the keyframes in the Timeline by Shift dragging from frame 0 to the end of the Timeline. Alternatively, you can double-click the Timeline to select all the keyframes.
![]() Once the frames on the Timeline have been selected, all the frames will be highlighted and the Timeline will turn red. With the Timeline still red, right-click the Timeline to select Copy.
Once the frames on the Timeline have been selected, all the frames will be highlighted and the Timeline will turn red. With the Timeline still red, right-click the Timeline to select Copy.
![]() Now go to frame 1 and select the second emitter. Right-click on the Timeline (still on frame 1) and select Paste to paste the keys from emitter1 onto emitter2. Click on Play. When you are happy with your scene, save the file.
Now go to frame 1 and select the second emitter. Right-click on the Timeline (still on frame 1) and select Paste to paste the keys from emitter1 onto emitter2. Click on Play. When you are happy with your scene, save the file.
Creating a Cache
It is likely that there will come a time when Maya starts to moan about the amount of particles in the scene. In fact, it may already be doing it with the current scene by displaying error messages. For example, you may get an error saying that nucleus evaluation has skipped due to a large frame rate. There are a couple ways around this. To keep previewing our animation, we can use Playblast to see it in real time. To do this, select the panel you want to playblast and then go to the Window menu and select Playblast. Alternately, you can right-click the Timeline to select Playblast. This lets you view the scene in real time, but you do have to wait until Maya creates the Playblast in order to see it.
Next up is caching, which is a process where Maya performs the calculations necessary and then stores the sequences for you to recall them at the time of playback. This means that if you cache your scene, you can also then scrub back and forth on the Timeline. Cache files can be quite large, however, depending on your scene, so keep an eye on your cache folder within your project. To create a cache, follow these steps:
![]() Continue with your own file, or open particles_v6.ma to start from here.
Continue with your own file, or open particles_v6.ma to start from here.
![]() To cache a scene, select the particles that need caching; in the Outliner, select nParticle1 and use Ctrl on the keyboard to also select nParticle2.
To cache a scene, select the particles that need caching; in the Outliner, select nParticle1 and use Ctrl on the keyboard to also select nParticle2.
![]() If necessary, swap to the nDynamics menu set, but using the drop-down menu set list in the top-left corner of your Maya screen.
If necessary, swap to the nDynamics menu set, but using the drop-down menu set list in the top-left corner of your Maya screen.
![]() With nParticle1 and nParticle2 selected, choose the nCache menu and then click Create New Cache. Maya will now automatically play through your Timeline and cache the scene for you.
With nParticle1 and nParticle2 selected, choose the nCache menu and then click Create New Cache. Maya will now automatically play through your Timeline and cache the scene for you.
Tip: Deleting the Cache
Remember that if you need to tweak something in your scene, you will have to delete the cache and re-create it again. Otherwise, Maya will continue to play the cached sequence and you will not see your changes. To delete the cache, on the nDynamics menu set, choose the nCache menu and then Delete Cache.
As a final note about particles, remember there are many attributes you can tweak on the emitter node, particles node, and even on the nucleus node. It’s always a good idea to just tweak one thing at a time while you are learning, though, so that you can pinpoint what attribute is responsible for the changes.
Summary
In this Hour, you had a look at particles to create effects. You specifically looked at Maya’s nParticle system, which you used to create a vapor trail for a jet pack. An emitter was used to discharge the nParticles from a point in your scene. The emitter was parent constrained to the character’s jet pack so that it could move along with the jet pack, and provide the appearance of particles being emitted from the jet pack itself. This Hour also covered editing attributes to customize the look and speed of your particles, plus copying the attributes across to other nodes using presets. In order to view the scene in real time, we also covered creating a cache.
Q&A
Q. Why isn’t my jet pack moving with Sam?
A. You may have accidentally parent constrained the jet pack to the emitter rather than the emitter to the jet pack. Either retrace your steps or find the parent constraint in the Outliner and delete it. Select the jet pack and then Shift-select the emitter to re-create the parent constraint.
Q. Can I kill off some of my particles as new ones still are emitting?
A. Yes, you can specify a lifespan for particles and nParticles so that they fade away after reaching a specified age. To do this, select the shape node for the particle or nParticle and then modify the lifespan attributes.
Q. How can I change the particle type from a cloud to a streak?
A. To change the render type of the particles from a cloud to a streak (or blobby surfaces and so on), select the nParticle, and in the Attribute Editor, use the nParticleShape tab to find the Shading attributes. Within this section, you can select from a variety of render types.
Q. I’m getting an error message about nucleus evaluations skipping frames when I try to play my scene. What can I do?
A. Cache your scene to store the sequence of events and enable Maya to play it back in real time.
Workshop
The workshop contains quiz questions and exercises to help you solidify your understanding of the material covered. Try to answer all questions before looking at the “Answers” section that follows.
Quiz
1. What attribute do we need to keyframe to limit or initiate an amount of particles coming from our emitter?
2. When we create an emitter, what does Maya automatically create for us?
3. What can we use to copy attributes from one particle emitter node to another?
4. Do we have to add gravity to our particle once we create an emitter?
5. What can we use to play our scene in real time?
Exercise
Why not try creating a fun effect with instances? Rather than settle for particle types that Maya provides for you, you can create your own objects and have them emitted as particles instead. Using your existing scene, create a polygon cube. In the Outliner, select the cube and then Ctrl-select nParticle1. Use the nDynamics menu set to choose the nParticles menu and then Instancer (Replacement). Your particles have now been replaced with instances of the cube. You can scale and change the color or texture of the cube, and the changes will be reflected in your instanced cube particles. You can then hide the original cube by selecting it and setting its Visibility attribute to 0 in the Channel Box.
If you have animation on your cube or other object, it will also be carried over all instances. The particles can be replaced with any object you can think of. The jet pack could be emitting thousands of animated monkeys if you wanted!
Answers
1. The emitter’s Rate (Particles/Sec) attribute, which is found in the Basic Emitter Attributes section. Rate refers to the particles per second that are being emitted.
2. An nParticle node and a nucleus node, assuming we are using nParticles. If we were using standard particles instead from the Dynamics menu set (rather than nDynamics menu set), Maya would create a particles node along with the emitter.
3. We can save a preset and use that on another node to copy across the attributes.
4. No, there is no need because gravity is built into the nucleus node. If you select the nucleus node and look in the Attribute Editor, you will see a section for Gravity and Wind.
5. We can create a cache. However, we need to remember to delete the cache and create a new one if we make changes to the scene.