Lesson 3. Working with Auditions
One of the most unique and powerful innovations in Final Cut Pro X is auditions. This feature allows you to combine multiple shots in a single clip and swap between the different source footage on the fly during editing.
Auditions can help you compare and select between different takes of the same shot in a narrative project, sample different angles (such as a close-up and a wide shot) on a single action, and try out different B-roll ideas in a documentary environment. They can even be used to experiment with different filters or other effects on a single shot.
Auditions are powerful because they’re so easy to implement and use. There’s no CPU performance penalty, and they actually can make clip management easier and tidier than traditional editing methods.
The more comfortable you become with the audition workflow, the more you’ll find yourself using it on nearly every shot in your project. You’ll probably find unexpected and innovative uses for auditions well beyond the simple examples described in this lesson.
Creating Auditions
An audition is simply a group of clips treated as a single clip. Only one of the shots (the pick) displays when you play the clip, but you can switch between any of the alternates on the fly.
Auditions can be created in the Event Browser prior to being added to a project, or you can add alternates to any clip currently in a project, thereby creating an audition dynamically.
Creating Auditions in the Event Browser
When you have a group of related clips you want to compare in the context of the scene, you can group them into an audition in the Event Browser.
1. In the Event Library, select the Romantic Night In Keyword Collection in the Lesson_03 event.
2. In the Event Browser, play each of the three clips.
These clips are three different performances of a particular line of dialogue. When you create an audition containing all three clips, you can delay the decision of which version to use.
Note
Although this exercise represents one of the most common uses of the audition feature, you can audition any group of clips. They don’t even have to be of the same subject. You could have five different “audience reaction” shots for a concert scene or a collection of different “fields of grain” for the documentary scene in Lesson 2.
3. Select the three clips, and choose Clip > Audition > Create, or press Command-Y. An audition clip is added to the event. Note that it has a different icon than the regular clips.

The name of the clip reflects the current pick. In this case, it assumed the name of the last of the clips selected when it was created.
Changing Picks
You can select a new active pick from among the alternates at any point in the Audition window.
1. In the Event Browser, select the MCU Christina_02 audition clip.
2. Choose Clip > Audition > Open, or press Y. The Audition window opens displaying the contained clips. The current pick is marked with a star.

3. Press Left Arrow to view the alternate take.

4. Press L or Shift-/ (slash) to play the alternate.
5. Press Left Arrow again and play the first clip.
6. Click Done (or press Return) to close the Audition window.
The active clip when you close the window becomes the new pick.
Editing with an Audition
Once you create an audition, you can edit it as if it were a regular clip.
1. In the Project Library, double-click Lesson 03 > Project 03 to open it into the Timeline.
2. Play the project, which is another version of the project you worked on in Lesson 2.
3. Position the playhead (or skimmer) to the moment just after the man says, “Eat somewhere else,” at around 50:10. This is a perfect time to add a shot of the woman and show how she’s feeling about the fiasco.

4. Press D to overwrite the audition clip into the project.

5. Play over the section of the project containing the new clip. It fits well, but you can still change your mind and select one of the alternate clips at any time.
See how the different performances affect the feel of the whole scene. In some takes, the actor is patient, in others he’s impatient. The choice of performance you make affects how the audience reads the other actor’s response. Make no mistake: It’s the editor who chooses how an actor’s performance plays in each scene. This is why smart actors befriend the editors on their films.
6. In the Timeline, select the audition clip, and choose Clip > Audition > Next Pick, or press Control-Right Arrow.
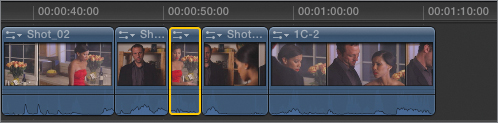
The audition clip changes to show the new pick. Notice that this pick is shorter than the previous one. The Timeline automatically ripples to accommodate the new clip length.
7. Play over the section again to play the alternate in context.
Previewing Auditions
While these sample clips contain exaggeratedly distinct performances, in the real world, you’ll frequently choose between picks that are very similar. To judge such clips accurately, you need to compare the alternate versions in context in rapid succession. The audition preview function enables this comparison.
1. With the audition clip selected in the Timeline, choose Clip > Audition > Preview, or press Command-Control-Y.
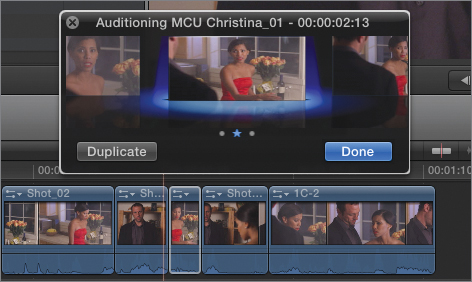
The Audition window opens, and the project begins playing a few seconds prior to the new clip and extends a few seconds afterward. Playback will continue to loop (regardless of the state of the global looping setting), allowing you to change picks and immediately see each clip in context.
The duration of the pre-roll and post-roll are set in the Playback pane of Final Cut Pro Preferences.
2. Press Left or Right Arrow to select a new pick. When you choose a new pick, the preview begins over again at the beginning.
Tip
You can also click the thumbnails in the Audition window to select a pick.
3. Watch each of the takes in context, switching between them by pressing the Right and Left Arrow keys.
Note
Although the Audition window opens adjacent to the audition clip, feel free to move it anywhere on the screen.
4. Press Spacebar to stop the looping playback. Press Spacebar again to resume looping playback.
5. Settle on the middle clip (MCU Christina_01) and click Done, or press Return.
Creating Auditions in the Timeline
You can add new clips to any existing project clip to create a new audition clip. You can also choose whether the newly added clip is saved as an alternate (leaving the Timeline unaffected), or is selected as the current pick.
1. In the Event Library, select the we’ll come back Keyword Collection in Lesson_03.

2. In the Event Browser, play each of the three shots, which are all alternate versions of the next line in the scene.
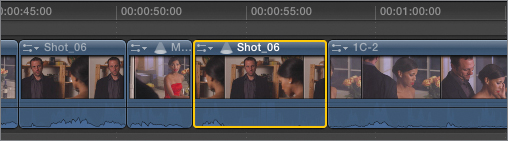
3. In the Timeline, drag the first clip, CU Barry_01, on top of the second instance of Shot_06 (at approximately 52:23). When Shot_06 turns white, release the mouse button. The Replace menu appears.

4. Choose “Replace and add to Audition.” CU Barry_01 replaces Shot_06 in the Timeline, but Shot_06 isn’t deleted. Instead, the two clips are converted into an audition clip, and Shot_06 is saved as an alternate.

5. Select the CU Barry_01 audition clip, and press Control-Right Arrow to make Shot_06 appear in the Timeline.
6. Press Control-Right Arrow to once again to swap the two clips.
When navigating the shots in an audition, if you get to the rightmost clip and press Control-Right Arrow again, the selections will loop around to the leftmost clip (and vice-versa).
You can add more clips to this audition. Doing so allows you to judge how differently the scene plays with a close-up or medium close shot, or how different performances will affect the rest of the shots in the scene. There is no right or wrong answer. Auditions allow you to trust your instincts and make the best choice for each situation.
7. In the Event Browser, select CU Barry_02 and MCU_Barry_02.

8. Drag the two clips onto CU_Barry_01 in the Timeline, releasing the mouse button when that clip turns white.

9. In the Replace menu, choose “Add to Audition.” Although nothing changed in the Timeline, the two shots were added to the audition as alternates.
Note
If you choose “Add to Audition” prior to making a clip an audition, the Timeline clip is automatically converted into one.
10. In the Timeline, click the Audition icon to the left of the clip’s name, or press Y to open the Audition window.

11. Press Spacebar to preview the audition, find the take you most prefer, and click Done or press Return.
Modifying Auditions
One of the best things about auditions is that creating them and leaving them in your project has no downside. No matter how many alternates you save, your project files don’t get significantly bigger, playback doesn’t require more RAM, and you experience no slowdown.
Still, you eventually may want to tidy your projects by removing alternates you’re sure are out of the running that you don’t intend to use.
1. Select the Shot_06 audition clip, and press Y to open the Audition window.
2. In the Audition window, select the rightmost clip.

3. Press Delete to remove this alternate from the audition.

4. Click Done, or press Return.
Finalizing an Audition
You can convert an audition back into a regular clip, or finalize it, using the current pick. Finalizing auditions, however, isn’t required. You can safely output or share your project with auditions in it. Removing auditions from your project is strictly an organizational choice.
1. Select the MCU Christina_01 audition clip.
2. Choose Clip > Audition > Finalize Audition, or press Shift-Option-Y, to replace the audition with the single MCU Christina_01 clip.

Audition icon is gone
Using Auditions and Effects
Another common use of auditions is to sample different effects or effects settings on a single clip. In this scenario the audition contains multiple versions of the same clip, each with different effects applied.
Duplicating a Clip into an Audition
Let’s say that you want to add a “look” to this project to make it more memorable. But before you choose to apply an effect to the whole project, you want to experiment with your options. Let’s apply those options to a single clip and then use an audition to compare the results.
1. In the toolbar, click the Effects button, or press Command-5, to open the Effects Browser.
2. In the sidebar, select the Looks section.

3. In the Timeline, select the last clip in the project, 1C-2.

4. In the Effects Browser, double-click the Romantic effect to apply it to the selected clip. A blurred vignette is added to the edges of the clip, but on this clip, the result is very subtle.
Tip
You can also drag the effect onto the clip in the Timeline, or onto an open Audition window.

5. Play or skim over the last clip in the project.
6. Open the Video Inspector, and increase the Amount slider in the Romantic effect to 80 to increase the visibility of the effect.

This effect might work for the scene, but let’s try some other options so we’re sure to choose the optimum effect.
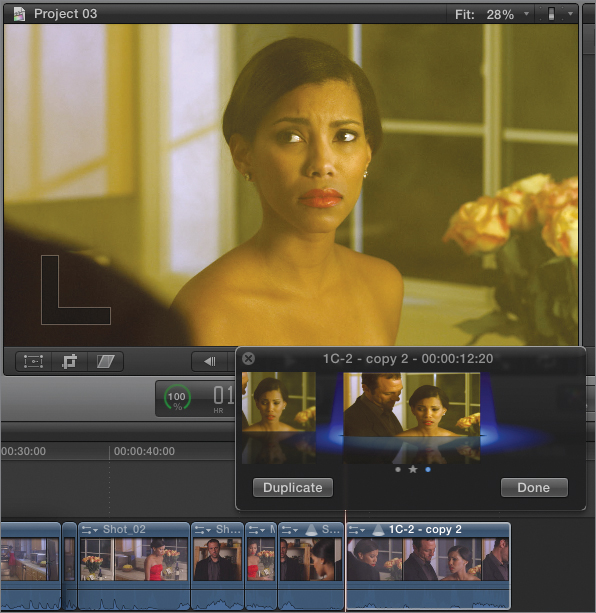
7. With the same clip selected in the Timeline, choose Clip > Audition > Duplicate as Audition, or press Option-Y. The clip is converted into an audition clip, and a duplicate of the shot with the Romantic effect applied is saved as an alternate.

Tip
You can also click the Duplicate button to duplicate the current pick in the Audition window.
8. Press Y to open the Audition window. The Audition window shows two identical shots. At this point, switching between them would yield no noticeable result. Applying a new effect will change the appearance of the copy.

9. In the Effects Browser, double-click the Memory effect. The effect is applied, in addition to the Romantic effect, to the current pick.

10. Press Spacebar to preview the audition, and press the Left or Right Arrow to switch between the two versions.
Duplicate from Original
In the previous exercise, you duplicated a shot and added the copy as an alternate, so both shots were initially identical before you applied an effect. But on some occasions, you may want to add a duplicate to the audition without any effects applied to it.
In your current project, you have a copy of the clip with the Romantic effect, and one with Romantic and Memory effects added. But the version with both effects applied seems a little overwrought. What if you want to compare these versions with a version that has the Memory effect by itself?
1. With the audition clip selected in the Timeline and the Audition window still visible, choose Clip > Audition > Duplicate from Original. A new copy of the original clip appears in the Audition window with no filters applied.

2. In the Effects Browser, double-click the Memory effect to add it to the pick. The result is a more subtle effect that might be perfect for the scene.
3. Press Spacebar to preview the audition, and press Left or Right Arrow to switch between the three versions of the clip. Be sure to end on the version with the Memory effect applied.
Duplicating a Clip While Applying an Effect
There’s yet another way to a duplicate a clip to create a new alternate with another effect applied to it.
1. In the Effects Browser, select the Glory effect.
2. Drag the effect over the audition clip in the Timeline and continue to hold down the mouse button.
3. Hold down the Control key and release the mouse button.

A new alternate is created with both the Memory and the Glory effects applied.
Note
Dragging an effect to the Audition window always applies the effect to the current pick.
Applying an Effect to All Picks
You might also want to add an effect to all the clips in the audition. In the current project, you still haven’t chosen between the different looks, but have decided that whichever effect is chosen, it will need a vignette effect.
1. In the Effects Browser, select the Stylize category.
2. Scroll down to the bottom of the stack and find the Vignette effect.
3. Drag the effect onto the clip in the Timeline, but before releasing the mouse button, hold down the Option and Control keys. Release the mouse button to add the effect to all four clips in the audition.

4. Preview the audition and press Left or Right Arrow to switch between the four clips.
5. When you’ve chosen a favorite clip as the pick, press Return, or click Done.
Adding Effects to Other Clips
When you’ve finally chosen the perfect effect or combination of effects, you can copy the pick in the audition and choose Paste Effects to apply the effect to the rest of the project clips. You can also paste those effects as a duplicate, which turn all of the other project clips into auditions with the effect-altered clip added as the pick and the original clip retained as an alternate.
1. In the Timeline, select the last clip, and choose Edit > Copy, or press Command-C to copy the clip to the clipboard.
2. Select the rest of the clips in the project, excluding the last clip.

3. Choose Clip > Audition > Duplicate and Paste Effects, or press Command-Option-Y.

Each of the selected clips is converted into an audition, and the effects are applied to the pick, while leaving the original version as an alternate you can easily access using audition commands.
Note
If any of the selected clips were already auditions, the added clip would simply be added to the audition, and selected as the current pick.
Lesson Review
1. True or false: The more clips placed in an audition, the more computing power you need to process your project.
2. True or false: Clips within an audition can be of different durations.
3. When previewing an audition, where do you set the duration of the pre-roll and post-roll?
4. Must the Audition window be open to change picks?
5. Must the Audition window be open to delete alternates?
6. How many of your auditions must be finalized before sharing a project?
7. How do you add an effect to only the current pick?
8. How do you add an effect to a newly created alternate?
9. How do you add an effect to all picks in an audition?
Answers
1. False. The number of clips in an audition has no impact on performance.
2. True
3. You set the duration of the pre-roll and post-roll in the Playback pane of Final Cut Pro Preferences.
4. No, you can use keyboard shortcuts to change picks without opening the Audition window.
5. Yes
6. None. You can share or output a project with as many auditions as you like.
7. Apply an effect by dragging it to a pick in the Timeline, or double-click the effect (just as you would for an ordinary clip) to apply it to the currently selected pick.
8. Control-drag an effect onto a clip to create a new alternate with that effect applied to it.
9. Option-Control-drag the effect onto an audition clip in the Timeline.
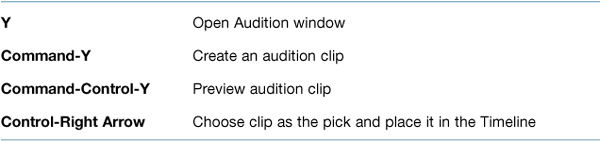
Keyboard Shortcuts