Lesson 7. Keying and Compositing
While you are familiar with the feature-rich editing capabilities of Final Cut Pro X, you may not know that you can also create complex, multilayered, and animated composite images directly in the Final Cut Pro Timeline.
In this section of the book, you’ll explore compositing, effects, titling, and animation in Final Cut Pro while building a show open. You can combine the extensive library of titles, transitions, effects, and generators built into Final Cut Pro to add professional title sequences, lower thirds, animated graphics, and other composited elements to your projects, even if you have little or no original content.
This lesson focuses on laying the foundation: editing video clips, timing clips to music, and then combining layers of video and graphics to form a composite image. You’ll explore keying green screen footage, using generators for content, working with a luma keyer, and compositing with blend modes.
Laying the Groundwork
Assume you were asked to create an opening title sequence for a new web show called iJustine: a fun, campy, weekly video podcast featuring Internet personality Justine E. The producers provided you with a few clips of Justine shot in front of a green screen, a simple graphic, and a music clip. It’s up to you to create a fast-paced, light, and fun introduction to the show.
To get started, you’ll edit the video clips together and time them to the music clip to create the basic project structure. Then you’ll replace the green background behind Justine with some background graphics.
Using a Compound Clip in the Event Browser
The show open you create is intended for a project that hasn’t yet been made, and will be used in multiple projects for each show that is produced. Therefore, you’ll start by creating a compound clip directly in the Event Browser, and then build the show open in this compound clip. This method makes the open available for editing into any project right from the Event Browser. To start, you’ll need to mount the disk image for the Advanced Compositing and Effects section.
1. In the Finder, locate and double-click the APTS FCP X ADV Part 2.sparseimage disk image to mount it.
2. In Final Cut Pro X, click the disclosure triangle for the Disk APTS FCP X ADV Part 2 image mounted drive in the Event Library, if necessary, and then select the iJustine Event.
Tip
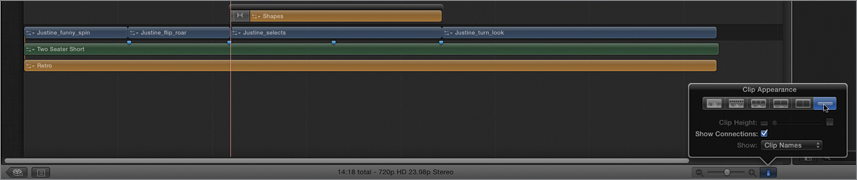
To ensure that the clips in your Event Browser match the following images, from the Action pop-up menu, choose Name, or choose Arrange Clips By > Name and choose Group Clips By > None. Then drag the Duration slider all the way to the right (the word All will appear next to it). Click the Clip Appearance button and set the slider so that you can see all six clips in the Event Browser and still read the complete clip names.
This Event contains four video clips, a graphic, and an audio clip. The video clips and audio clip each have a range rated as a Favorite. You’ll use these ratings when creating a compound clip.
3. From the Filter pop-up menu, choose Favorites, or press Control-F.

Now only the range marked as a Favorite for each clip is available.
4. Select each video clip and press the / (slash) key to preview them in turn.
Tip
If you enable looping (choose View > Playback > Loop Playback, or press Command-L), you can press / (slash) once and then press the Up and Down Arrow keys to navigate to each clip and view each of them in playback.
Each clip shows Justine performing a short action. Together, they will serve as the foundation for your show open. You’ll edit them into a compound clip and then time them to the audio clip.
5. Select the Justine_funny_spin clip. Then Command-click Justine_flip_roar, Justine_selects, and Justine_turn_look to select all four clips
6. Choose File > New Compound Clip, or press Option-G.
7. In the window that appears, name the clip Show Open, and click OK.

Tip
When you are working with clips in different formats, resolutions, and frame rates, or when you want to render to a different codec, you can click the Use Custom Settings button and choose custom video properties, audio properties, and render properties.
A new compound clip named Show Open appears in the iJustine Event.
Note
The Filter pop-up menu has automatically returned to Hide Rejected so that you can see the compound clip.
8. Double-click the Show Open compound clip to open it in the Timeline.

The compound clip contains just the range of each clip that was rated as a Favorite, and the clips have been edited into the clip in the same order you selected them.
Note
Because you’ll change these clips frequently in these three lessons, you should consider turning off background rendering by choosing Final Cut Pro > Preferences, clicking the Playback icon, and deselecting the “Background render” checkbox.
9. In the Event Browser, scroll down, if necessary, and click the green bar at the top of the Two Seater Short audio clip to select the Favorite range.
10. With the playhead at the beginning of the Timeline, press Q to connect this clip to the primary storyline at the playhead.
11. Press Command-2 to make the Timeline active, and then press Shift-Z to fit the audio clip to the window.

The compound clip now contains the primary elements you’ll use to create the show open.
12. Press the Home key and play the Timeline.
The sequence obviously needs work, but the key elements—the shots of Justine combined with the music clip—are in place. The next step is to time the video clips to the music.
Timing Edits with Markers and Hold Segments
To introduce the character of iJustine, you’ll freeze the video of Justine after each move she makes, and onscreen text will describe aspects of her show persona. To determine how long she should freeze, you can use beats in the music track that you’ll identify with markers.
1. In the Timeline, select the Two Seater Short audio clip, and play it from the beginning. As it plays, count the beats in (four beats per measure), and press M to set a marker on the first beat of each measure.

When you’ve gone through the entire clip, you’ll have a total of four markers, each positioned at or near these timecode values: 2:05, 4:07, 6:14, and 8:17.
Tip
Press Control-’ (apostrophe) to jump to the next marker, or press Control-; (semicolon) to return to the previous marker. When the playhead is parked on a marker, you can nudge it forward or backward in time by pressing Control-. (period) or Control-, (comma), respectively. You can also choose these commands from the Mark menu.
Now you can use Hold segments to extend the duration of each clip to a marker.
2. Select the first clip, Justine_funny_spin.
3. Press the Down Arrow to move the playhead to the first frame of the next clip, and then press the Left Arrow to move the playhead to the last frame of that clip.
4. In the toolbar, click the Retime pop-up menu and choose Hold or press Shift-H to create a 2-second Hold segment starting at the playhead.

Retiming bars automatically appear over the clip, including the new Hold segment. The hold duration extends well past the first marker.
5. Drag the end point of the first clip to the left to trim it back to the first marker.
Tip
You can turn on snapping (choose View > Snapping, or press N) to snap the edit point to the marker. Press Command-= (equal sign) to zoom into the Timeline to make it easier to trim the clip to the marker.

You’ll repeat this process for the second clip.
6. Select the second video clip, Justine_flip_roar, and press the Down Arrow followed by the Left Arrow to place the playhead at the end of the that clip. Press Shift-H to create a Hold segment on the last frame of the clip, and trim the end point of the clip back to the second marker.

The third video clip extends well past the next two markers, so instead of extending it with a Hold segment, you’ll shorten it by speeding it up to fit to the last marker. The action in this clip is a little slow for a fast-paced opening title anyway, so speeding up the clip will also improve the pacing.
7. Select the third video clip, Justine_selects, click the Retime pop-up menu, and choose Show Retime Editor (or press Command-R).
8. Drag the retiming handle located at the right edge of the green speed segment to the left until it aligns with the last marker.
Note
This time you aren’t trimming the end point of the clip, but rather changing the speed of the clip by dragging the retiming handle.

The speed segment turns blue to indicate that it will now play faster. It shows a speed of about 115%.
For the last clip, you’ll hold the final frame until the end of the music clip.
9. Select the last video clip, Justine_turn_look, and move the playhead to the last frame (press Down Arrow followed by Left Arrow). Press Shift-H to create a Hold segment, and then drag the retiming handle of the red speed segment to line up with the end point of the audio clip.
Note
Be sure to drag the retiming handle of the red speed segment, and not the retiming handle of the very small green speed segment next to it.

The clips are retimed so that the edit points land on key beats of the music.
10. If necessary, press Shift-Z to fit the Timeline to the window, move the playhead to the start of the sequence, and play the Timeline.
The timing looks good. Even though there is no edit point on the third marker, Justine’s action of spreading her arms nicely matches that beat.
11. Select all the video clips in the Timeline, and press Command-R to hide the Retime Editor for every clip. Then press Command-Shift-A to deselect everything. You no longer need to see the timing properties and you now have more screen real estate for editing additional content.
With the basic project timing of the project in place, you can now start compositing layers together by removing Justine from the green background using a process known as keying.
Using Keying and Masking Effects
Keying is the process of removing part of a video or graphic based on color or luminance (brightness) information. The video clips of Justine were shot in front of a bright green wall so that the editor could remove this background and replace it with something else—anything else! Final Cut Pro X contains a category of keying effects for this purpose. In this exercise, you’ll combine a keying effect and a masking effect to remove that green background.
Keying Automatic and Manual Sampling
We’ll begin by using automatic and manual color sampling to create a key.
1. In the toolbar, click the Effects button, or press Command-5, to open the Effects Browser.

The Effects Browser contains over 200 video and audio effects you can use in your projects, all organized into categories.
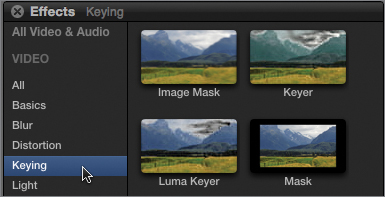
2. Select the Keying category.
Note
You’ll work with several other effects categories in a later lesson.
The Keying category contains four effects, each designed to remove elements of a video clip. The Keyer effect can remove, or key, a colored background out of a shot.
Note
The Keyer effect does a remarkable job of pulling a good key on most footage, but you’ll get the best results with a shot in which the colored background is evenly lit and adequate separation exists between the background and the subject.
3. Select the first video clip in the Timeline, Justine_funny_spin, and then move the pointer over the Keyer effect (without clicking the mouse).
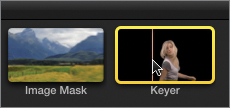
The selected clip appears in the effect’s thumbnail and also in the Viewer against a black background. Using these views, you can preview the effect before applying it.
4. Double-click the Keyer thumbnail image to apply the effect to the selected clip. Then, reselect the first Justine clip.
In the Viewer, Justine appears in front of a black background. This new background is actually transparent, which will become obvious later when you composite a new background beneath it. But first, let’s examine and adjust the Keyer effect.
5. In the toolbar, click the Inspector button, or press Command-4 to open the Inspector.
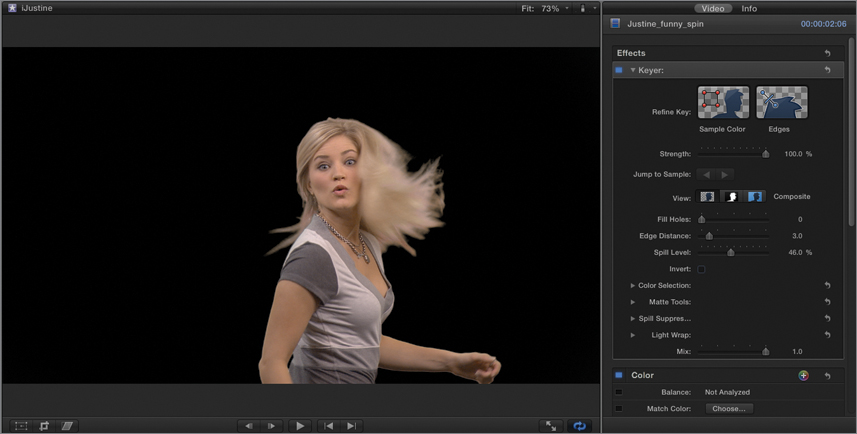
In the Video tab of the Inspector, you have access to all the parameters of applied effects, as well as controls to adjust the color and other properties of the video clip.
The keyer seems to have done a great job of removing the green background without the need to adjust anything at all, but let’s check it out a little more thoroughly to make sure. By doing so, you’ll also learn how to key a shot by manually sampling colors. After all, not every green screen shot is lit as well as this.
6. In the Timeline, skim through the clip, stopping on a frame where Justine’s hair is flying in the air—such as at 0:13.
Strands of hair can be challenging to separate from the background, so it’s a good idea to select a frame that includes fine detail.
You are currently looking at the final results of the Keyer effect, the composite. But another way to examine the key is to look at the matte that creates the key.
7. In the Video Inspector, to view the matte, select Matte (the center button) in the View area.

The Matte view uses grayscale values to indicate areas of the image that are visible or transparent. Anything that is white is fully opaque; anything that is black is completely transparent; and shades of gray indicate partial transparency.
By default, the Keyer effect works in an automatic color sampling mode: It samples the background color and determines how the matte should appear on the inside (the core matte) and on the edges (the edge matte).
A good matte (and, therefore, a good key) will appear as solid white on a solid black background, while the edges of the subject may have areas of gray, particularly around soft areas such as hair.
Any areas within the subject that are not completely white will be partially transparent in the composite. If any areas of the background are not completely black, some of the green screen will still be visible in the composite. When keying footage, you may need to deal with either or both of these situations.
When the automatic sampling results aren’t quite good enough, you can also key a shot by sampling colors manually. Although the automatic results are very good in this example, sampling the colors manually will help you to understand how to address less than ideal situations.
8. Select Composite in the View area (the black silhouette on the checked background) to return to the Composite view.
9. Drag the Strength slider to 0%.
The Strength parameter determines how much of the automatic color sampling is being used by the Keyer effect. At 0%, no automatic color sampling is used, allowing you to manually select the color you want to key out of the video. If the automatic key doesn’t provide satisfactory results, setting the slider to 0% is a good first step toward sampling manually.
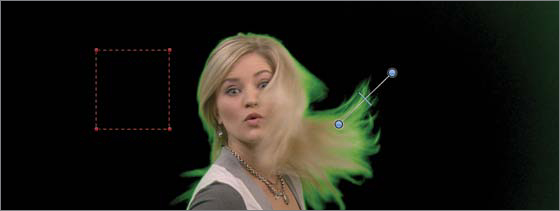
10. In the Refine Key controls, click the Sample Color thumbnail, and then in the Viewer, drag a selection rectangle over a representative section of the green background.

Sample an area of the background color close to the subject being keyed because the key color can change near the frame’s edges when the lighting is not even. Note the slight halo around the edges of the shot. The green color is slightly darker at the edges and hasn’t been completely removed by the keyer.
Note
You can draw more selection rectangles to take additional color samples in multiple regions of the screen. Multiple samples can be helpful when your subject moves around in the shot or the lighting is uneven. You can even take color samples in different frames of your video clip, and the Keyer effect will adjust the key over time to compensate for any changing lighting conditions.
Sampling the background color creates the core matte, separating the primary subject from the green screen. To refine the edges of the matte, you can use the Edges tool.
11. Click the Edges thumbnail and then draw a line across Justine’s hair so that one end of the line is in a transparent area and the other is in an opaque area.

12. In the View controls, select Matte to switch to the Matte view, and drag the line between the two end points of the edge sample to adjust the transparency of the fine hair detail. If you move the line too close to the core matte, the inside of the white matte will start to turn to shades of gray, indicating areas of transparency, which is not what you want. Drag the line back toward the end point in the transparent area until the core matte returns to a solid white.

Note
You can also reposition the end points of the Edges sample, and add multiple samples to the image. If you still cannot get the fine edge detail without introducing areas of transparency to the core matte, drag the Fill Holes slider to “clean up” the core matte. The Edge Distance parameter determines how close to the edge of the matte the Fill Holes parameter will work.
13. Select Composite in the View controls to return to the composite image.
When a subject is shot in front of a colored background, that color often bounces or spills back on the subject, introducing a green cast along subject edges and hair. The Keyer effect’s Spill Level parameter automatically attempts to correct for this spill. Let’s see what it’s doing in our example.
14. Drag the Spill Level slider to 0%.
The green spill is now obvious in Justine’s hair and along the edges of her arms.
15. Increase the Spill Level to 100%.

To correct for the green spill, the Keyer effect adds the complementary color, magenta. When complementary colors are added in the additive RGB color space of Final Cut Pro X, the result is shades of gray. In other words, all hue and saturation is removed. However, if too much magenta is added, the result is the pink/purple tint we see here on the subject.
16. Adjust the Spill Level until any green or magenta color cast disappears. Skim the clip.
Note
As you skim or play the clip, you’ll notice that the color and edge samples disappear. This occurs because the samples were applied to just one specific frame of the clip. To see them, click the appropriate Jump to Sample arrow in the Keyer controls in the Inspector.
Your key is looking pretty good. However, the outer edges of the matte are still not completely transparent. Rather than create another color sample, you can generate a mask to hide the edges of the shot.
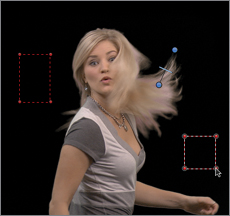
Using a Garbage Mask
Frequently a green screen shot will contain extraneous elements you don’t want to see. For example, a light stand or a boom mike may appear in the shot, or perhaps the edges of a small portable green screen. To eliminate these items—or just to reduce the overall keying area to the most evenly lit part of the background—you can use a mask. Often called a garbage mask or garbage matte, you use the mask to quickly matte out the “garbage” that can litter the edge of a green screen shot. After applying and adjusting the mask, you’ll refine the key and then quickly key all the rest of the shots in the Timeline using a copy-and-paste operation.
1. Make sure the first clip in the Timeline is still selected. (It should have a gray outline.) Then in the Effects Browser, double-click the Mask effect to apply it to the selected clip.

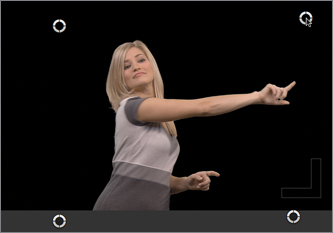
In the Viewer, onscreen controls appear at the four corners of the mask. You may notice that the background of the video inside the mask is not as black as the areas outside of the mask. The key isn’t quite as good as we thought!
2. Drag the onscreen controls to adjust the shape of the mask. Skim the clip to make sure Justine’s hair and arms never move outside the mask.
Tip
If you don’t see the onscreen controls, select the Mask effect in the Video Inspector.

Note
Depending on your screen resolution, you may need to adjust the Viewer zoom level to be able to adjust the position of the matte corners using the onscreen controls.
3. In the Inspector, in the Keyer effect, select Original (the silhouette on the blue background) in the View controls to switch to the original view of the Keyer effect. This view lets you see the mask more clearly.
4. Click the disclosure triangle to reveal the Mask effect parameters, if necessary. Increase the Feather and Roundness values to create a softer edge.

A softer mask edge is likely to key more easily. Now you’re ready to finalize the key.
5. In the Inspector, click the word Keyer to select the Keyer effect, and then return to the Composite view.
6. Click the Jump to Sample arrows to locate the frame containing the color and edge samples, and create another color sample within the masked area to eliminate any remaining traces of the background.
You now have a nicely keyed shot. Only three more shots to go! Instead of repeating this entire process three more times, you can copy and paste these effects to the other clips, and then set the other clips to be keyed with automatic sampling.
The stacking order of effects can impact your key. Specifically, if you first apply the Mask effect, and then apply the Keyer effect, you may see the edges of the mask. To eliminate the edges, in the Inspector, drag the Keyer effect above the Mask effect.
7. Select the first clip in the Timeline, and press Command-C to copy it.
8. Drag a selection rectangle around the last three clips in the Timeline, and choose Edit > Paste Effects (or press Command-Option-V).
The Video Inspector now shows the effects applied to all three selected clips as indicated by the “Inspecting items” text at the top. You can adjust the effect on all three clips at once.
9. In the Inspector, drag the Strength slider to 100% to enable automatic sampling.

10. Select just the second clip, select the mask in the Inspector, and adjust the onscreen controls as necessary. Skim the entire clip to make sure that Justine’s arms and hair are not cut off by the mask. (Feel free to switch to the Original view if you find it helpful.)
11. Adjust the mask on the remaining two clips and adjust the key, if necessary.
All the shots are now nicely keyed.
Using Advanced Keying Features
While these shots were not too difficult to key, the Keyer effect includes several advanced controls for more challenging situations. Let’s see how they work.
1. In the Timeline, select the second clip, Justine_flip_roar, and move the playhead to a frame where she is flipping her hair up into the frame, at about 2:13.

Because of the motion blur created by the rapid movement, her hair looks unnaturally thick with very little detail. While you could probably make it look better with the Edge tool, let’s look at how much more control you have with the advanced features.
2. In the Inspector, select the Keyer effect. Make sure the Strength parameter is set to 100%, and then click the disclosure triangle for the Color Selection controls.
When using the Color Selection tools, you can start with an automatically sampled key such as we have here, or with a key in which you manually sampled the color and edges of the matte. However, the Strength parameter must always be greater than zero to access all of the Color Selection controls.

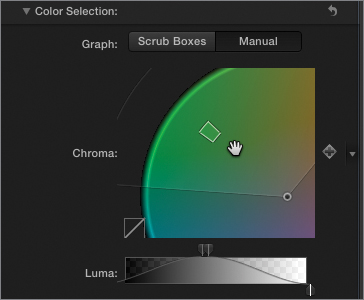
The heart of the Color Selection controls is the Chroma color wheel. It lets you set the range of hue and saturation included in the key.
You interact with this wheel in two modes based on your Graph selection. Scrub Boxes, the default, allows you to affect only the edge transparency, while leaving the core transparency untouched. The edge transparency is represented by the highlighted “pie slice” on the wheel.
The impact of changing the Chroma color wheel can often be more clearly seen in the Matte view.
3. In the View controls, switch to the Matte view.

4. Move the pointer over the right edge of the “pie slice” in the Chroma wheel. This is the outer graph. Drag right to expand the range of hues that are being keyed out.

The edges of the matte thin out, revealing more hair detail and transparency.
To adjust the range of hue and saturation that is keyed further, you use the Chroma Rolloff parameter.
5. Drag the Chroma Rolloff slider to zero to reveal more detail in the matte.

This Chroma Rolloff allows you smooth the transition between colors that are keyed and those that are not, thereby creating a softer edge.
Tip
To best evaluate the matte, set the Viewer zoom level to 100%.
The Luma curve under the Chroma wheel represents the brightness, or luminance, of the pixels that are being keyed, and allows you to adjust the range of pixels included in the key. You can feel free to drag the curve, but you’ll likely find that it won’t improve this particular key. The Luma Rolloff parameter is analogous to the Chroma Rolloff parameter: It adjusts the smoothness of the transition between keyed and non-keyed pixel, but based on brightness rather than color.
To reveal a little more detail in Justine’s blurred hair, you will want to adjust the core transparency. It is represented by the small box inside the “pie slice” on the Chroma wheel, called the inner graph. It can only be adjusted with the Graph set to Manual.
6. In the Graph controls, click the Manual button.
Note
Once you have selected Manual, if you want to return to Scrub Boxes, you should reset the Color Selection by clicking the Reset button (hooked arrow) to avoid unexpected combinations of color samples.
The core transparency box is very small. Let’s get a closer look.
7. Hold down the Z key and click several times on the green box in the top left of the Chroma color wheel to zoom in. Then hold down H and drag to center the box in the frame.
8. Drag the left and right sides of the inner graph to expand the range of hues included in the key for the core matte (and thus being removed from the matte).

9. Drag the top and bottom sides of the inner graph to expand the range of saturation included in the key (which are being removed from the matte). Don’t go too far, or you’ll start removing edge detail.
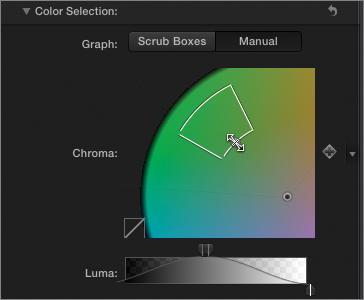
You should now see more detail in the matte.

You can refine the matte further using the Matte Tools.
10. Click the disclosure triangle to reveal the Matte Tools parameters.
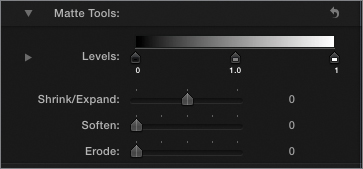
Here, you can adjust the contrast, shrink or expand, soften, and erode the matte. You want to use these tools sparingly, if at all, to avoid damaging the work you’ve already done. Feel free to experiment, but then reset these tools by clicking the Reset button because you don’t need them for this key.
11. In the View controls, select the Composite view to see the result of your adjustments.

The next advanced feature, Spill Suppression, is best used when viewing the composite image.
12. Open the Spill Suppression controls.
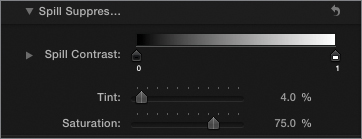
This section gives you more control over the Spill Level you set above. In particular, the Spill Contrast gradient can eliminate gray fringing you may see around the edges of your keyed subject by making it darker or lighter. It can also help recover some motion-blurred detail.
13. Drag the White point handle (under the right edge of the Spill Contrast gradient) to the left to about 0.82. This will reduce the fringing and reveal more detail in Justine’s hair.

The Tint and Saturation parameters can help restore the natural color to the video that was affected by the spill suppressor.
14. Set Tint to 0% and Saturation to about 85%.

The last advanced feature, Light Wrap, matches a keyed element to a background element more naturally by blending the background colors into the keyed image. You can try it out once you have a background in place.
Just because this frame looks good, doesn’t mean you are finished.
15. Press the Arrow keys to step through all the other frames of the clip. If you find any hairs that are separated from Justine because you got too aggressive with the key, adjust the inner graph on the Chroma wheel to make a smaller hue selection (a skinnier box). Then set the Viewer zoom level back to Fit.
The advanced features of the Keyer give you the power to make a poorly-lit green screen shot workable—and a well-lit shot beautiful.
Compositing Generators
In the next exercises, you’ll be transforming, animating, and adding effects to these shots of Justine; but first let’s give her a background so that she’s not just hanging around in empty space.
Although you could add any video or graphic as a background element, Final Cut Pro X includes a large amount of content you can use in your projects. This content takes the form of Motion projects called generators. In this exercise, you’ll browse, apply, and modify generators for use as background and foreground elements. To get started, you’ll choose a background for your show open.
1. In the Timeline, click above the primary storyline to deselect everything, and then move the playhead back home.
2. In the toolbar, click the Generators button.
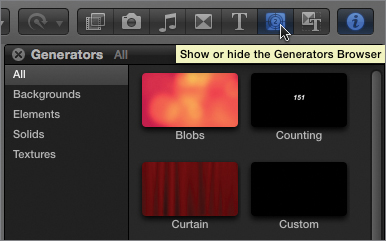
The Generators Browser contains 26 generators, including several that have multiple design options. You can preview the default state of each generator by skimming its thumbnail.
3. Move the pointer over several of the generator thumbnails to preview them.
The preview appears in both the thumbnail and in the Viewer. Some generators are animated; others contain still graphics.
As opposed to effects, which are applied to a clip in the Timeline, generators are clips in and of themselves that you can use much as you would a video clip.
4. Select the Grunge thumbnail, and press Q to connect the generator to the primary storyline. Then, drag its end point to trim it to match the duration of the primary storyline. (If snapping isn’t enabled, press N.)
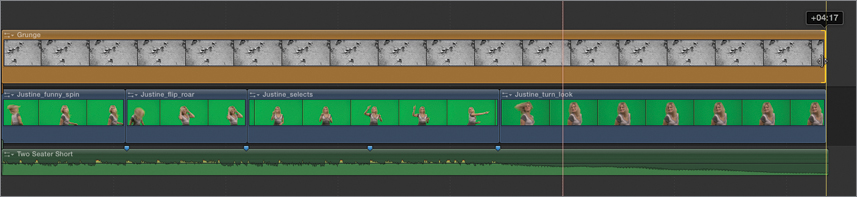
By default, generators are connected above the primary storyline, but that’s not what you want to do here.
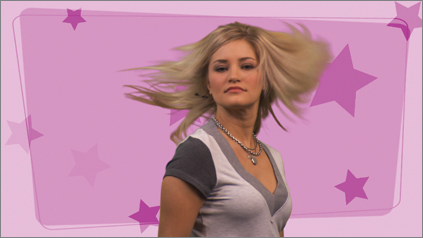
5. Select the Grunge clip in the Timeline, and then Shift-drag it below the primary storyline. Justine now appears properly composited on top of the generator.
Tip
Holding down the Shift key while dragging prevents the connected clip from moving left or right.

Let’s look at the options for this generator.
6. In the Inspector, select the Generator tab, if necessary, and then try out the Published Parameters, including Type options, Tint Color, and Tint Amount.

As you can see, you can make this generator look much different than the default settings.
All generators—as well as almost all the effects, titles, and transitions—are Motion projects that were published to Final Cut Pro. The Published Parameters in the Generator Inspector are Motion parameters that were published by the generator designer to appear in Final Cut Pro. You can modify any of these effects in Motion, or you can create your own. For more information, see Apple Pro Training Series: Motion 5 by Mark Spencer (Peachpit Press).
The grungy textures are interesting, but none are appropriate for this show open. Rather than deleting the generator, you can replace it, as you would replace a video clip.
7. In the Generators Browser, scroll down to locate the Retro thumbnail. Drag it to the Grunge generator in the Timeline, and choose Replace from Start.

8. Select the new generator in the Timeline and look at the Inspector.
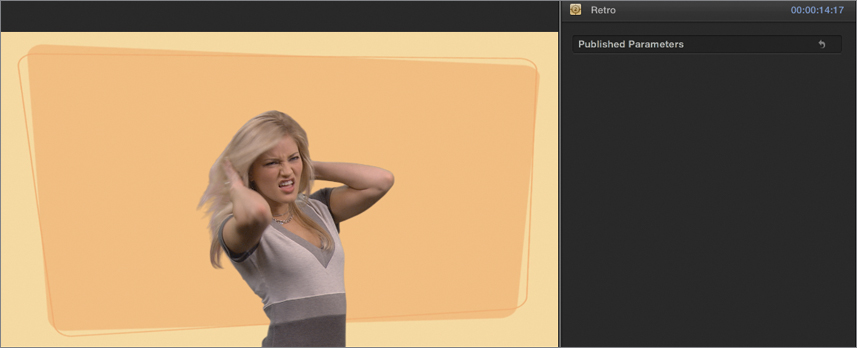
The producer loves this graphic but wants it to have more of a purple-pink color. Unfortunately, this particular generator has no published parameters! No problem. Just as you can apply effects to video clips, you can also apply them to generators.
9. Return to the Effects Browser, and select the Basics category. Here you’ll find 11 handy effects.
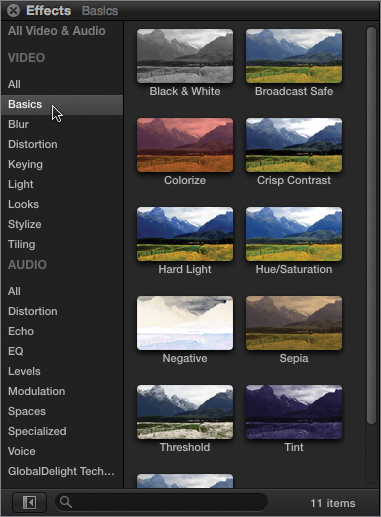
10. Drag the Tint effect onto the Retro generator in the Timeline. Select the generator, and in the Inspector, click the Video tab to locate the Tint effect. To change the color to a bright purple, you can click the triangle next to the color swatch and use the eyedropper to sample a color. Or, you can click the color swatch directly to open the Mac OS X color picker and enter specific values for the color you want.

With the background in place and tinted, you’ll now add a foreground element.
Now that you have a background placed and tinted, feel free to select the second Justine clip, and in the Keyer effect, try out the Light Wrap controls.
11. Select the third video clip, Justine_selects, press / (slash) to play it, and press X to select a range for the clip.
In this clip, Justine sees something above her, drags it down, stretches it out, and finally tosses it to the side. You can use a generator to serve as this object. By selecting a clip range, you can edit the generator to match the clip duration.
12. Open the Generators Browser, and then select the Elements category.

This category includes a Counting generator that can display animated numbers, a Placeholder generator for adding storyboard images, a Timecode generator, and the Shapes generator you’ll use here.
13. Select the Shapes generator, and press Q to connect it to the primary storyline based on the range you selected in the Timeline.

14. In the Timeline, select the Shapes generator. In the Generator tab of the Inspector, change the Shape to a Square. Deselect Fill, change the Outline color to a dark purple, and increase the Outline width to 40.
Rather than dragging the slider to adjust the Outline Width parameter, you can click the number to the right and type in an exact value.

You’ll animate this shape’s scale, position, and other properties to follow Justine’s hand movements in a later lesson. For now, let’s add a transition to animate the shape onto the screen.
15. Click the left edge of the Shapes generator to select the start point, and then in the toolbar, click the Transitions button.

The Transitions Browser contains 89 transitions you can preview by skimming their thumbnails. You can apply transitions to the edit points between clips or to the start or end of any clip. You can even apply transitions directly to connected clips and automatically create a storyline.
16. Skim the thumbnails of several transitions to see how they animate. Then select the Dissolves category and double-click the Cross Dissolve transition to apply it to the selected edit point of the Shapes generator in the Timeline.

A new storyline is created for the generator, and the transition is added to the beginning of the clip. However, the transition is much too long for this fast-paced show open.
17. Control-click (or right-click) the transition and choose Change Duration from the shortcut menu. Type 10 (to set the transition duration to 10 frames), and press Return.
You’ve added two generators, an effect, and a transition to your composite. Next, you’ll turn your attention to a few more compositing techniques, including compositing graphics based on luminance values and compositing using blend modes.
Compositing Graphics
In addition to compositing generators with your footage, you can composite graphics or video you imported into the Event Library. If the graphics don’t contain any transparency, you can remove the brighter or darker areas using a luma key effect. You can even composite copies of video clips on top of themselves and make the layers interact using blend modes. Before adding any more layers to your composite, make some room in the Timeline by adjusting the clip appearance.
1. Press Shift-Z to fit the Timeline to the window, then at the lower-right side of the Timeline, click the Clip Appearance button, and select the smallest display option at the far right. Now you have plenty of room for compositing more elements. Click the button again to hide the window.
Let’s start by spicing up the background with a graphic.
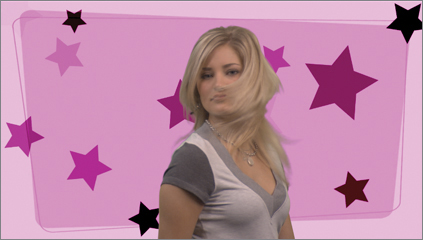
2. Move the playhead to the start of the Timeline, and in the Event Browser, select the Stars graphic. Press Q to connect this graphic to the primary storyline at the playhead position. Then, trim the clip to match the end of the last video clip. (The Shapes clip will move up to make room as you drag.)

3. Select the Stars clip, and then Shift-drag it between the Justine clips and the Retro generator. (It doesn’t matter whether it is above or below the audio clip.)

Because this graphic doesn’t have any transparency, it completely obscures the Retro generator underneath it. You’ll want to remove the white background from this graphic to reveal the generator. You can do this using a blend mode.
4. In the Video Inspector, scroll down to the Compositing section and click the Blend Mode pop-up menu.
Blend modes combine the selected clip with one or more clips beneath it by performing mathematical operations on the RGB values of each overlapping pixel. These modes are available in many applications that allow for compositing of layers, such as Adobe Photoshop and Motion.
The modes are separated into logical groups from top to bottom. The default mode, Normal, just displays the selected clip. The first grouping contains five blend modes that usually darken the combined image. Because these blend modes eliminate brighter pixels, they are good candidates for separating the stars in your graphic from the white background.
5. Try each of the five blend modes in the first grouping. Then try the Overlay mode in the third grouping.
While all the blend modes in the first group knock out the white background, some reveal the Retro generator pattern inside the stars. Subtract turns the Retro generator completely black. Color Burn reveals the generator and also blends a color into some of the stars, but a few are turned black.
Notice how Overlay doesn’t remove the white background intact, but it does blend a nice color into all the stars. It would be great if you could keep the Overlay blend mode and knock out the white background.
Fortunately, there is a technique that will allow you to remove the white areas, and apply a blend mode independently. You’ll do this using a luma key.
6. Return the Blend mode to Normal. In the Effects Browser, in the Keying category, drag the Luma Keyer effect onto the Stars clip in the Timeline.
7. Select the Stars clip and go to the Luma Keyer section of the Video Inspector.
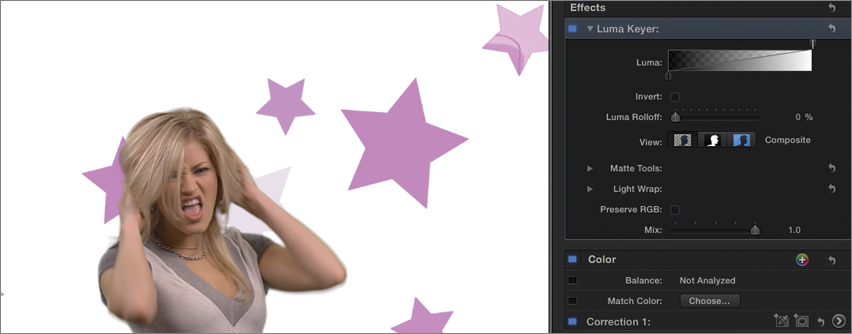
The Luma Keyer’s controls look similar to the Keyer effect controls because they work much the same way. But instead of keying out a specific color range, the Luma Keyer keys out a specific brightness, or luminance, range you can adjust. By default, it keys out the darker pixels in the image.
8. In the Luma Keyer, select the Invert checkbox.
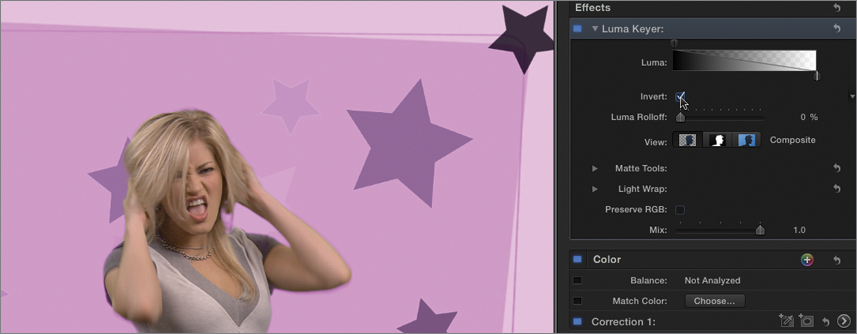
Inverting the keyer knocks out the white pixels, but now some of the stars are partially transparent. The brightest pixels are completely removed, but some of the darker pixels are also removed, as indicated by the slope in the Luma graph.
9. Drag the Luma Rolloff slider to 100%, while you watch the Luma graph and the opacity of the stars in the Viewer.

The stars become more opaque, as reflected by the steeply sloping Luma graph.
Tip
The Luma Keyer effect has a set of advanced controls that work almost exactly like the Keyer effect: Matte Tools and Light Wrap.
Now that the background is “out of the picture,” you can choose a blend mode that works best for the stars.
10. Scroll down in the Video Inspector and change the blend mode to Overlay. Experiment with the other blend modes as well, and then return to Overlay.

The Overlay blend mode creates a nice look. By keying out the white background with the Luma Keyer, you have many more creative options when using blend modes.
Another interesting use of blend modes is compositing a clip on top of itself.
11. Select the last clip, Justine_turn_look, and press the Up Arrow to move the playhead to the start of the clip.
12. Press Command-C to copy the clip, and choose Edit > Paste as Connected Clip (or press Option-V).

This command connects a copy of the entire clip starting at the playhead location. Because the playhead was placed at the start of the clip, the copy is perfectly registered above the original clip. Blend modes applied to the copy will combine the two clips.
13. Select the top clip. Scroll down to the bottom of the Inspector and experiment with different blend modes, finally selecting Hard Light.

The blend modes in the third group increase contrast and add some “punch” to the clip. However, that punch is a little too intense. Fortunately, it’s easy to modify the impact of a blend mode by lowering the opacity of the clip.
14. Decrease the Opacity parameter to about 60%.


You’ve made good progress on your show open by editing clips into a compound clip timed to a music clip, keying footage, and compositing a few elements. In the next chapter, you’ll take things further with transformations, effects, and titles.
Lesson Review
1. What is the advantage to creating a compound clip in an Event rather than in a project?
2. How can you freeze a video clip at a specific frame?
3. Describe the difference between the Keyer effect and the Luma Keyer effect.
4. How do you turn off automatic sampling in the Keyer effect?
5. What value must the Strength parameter of the Keyer effect be set to in order to use the Manual graph mode for the Color Selection?
6. How can you preview an effect, generator, or transition without adding or applying it to the Timeline?
7. True or false: Transitions can be added only to connected clips that are part of a storyline.
8. Can effects and transitions be applied to generators?
9. Name two blend modes that will remove the white areas of a clip if placed over a clip that has no white pixels.
10. How can you alter the impact of a blend mode?
Answers
1. Compound clips in an Event can be edited into a project just like any other clip.
2. Select the clip, move the playhead to the desired frame, and then click the Retime pop-up menu in the toolbar and choose Hold (or press Shift-H). Then, trim the duration of the Hold segment in the Timeline.
3. The Keyer effect creates transparency in a video clip or graphic by removing a specific color range. The Luma Keyer creates transparency by removing a specific range of brightness values.
4. Change the value of the Strength parameter to 0.
5. The Strength parameter can be set to any value other than 0 to set the Color Selection graph mode to Manual.
6. Skim the thumbnail of any effect, generator, or transition to see a preview in both the thumbnail and in the Viewer.
7. True. However, adding a transition to a connected clip automatically creates a storyline if one doesn’t already exist.
8. Yes
9. Any of the blend modes in the first grouping—Subtract, Darken, Multiply, Color Burn, and Linear Burn—will replace white pixels with something darker as long as no white pixels are underneath.
10. Reduce the opacity of the clip to which it’s applied.
Keyboard Shortcuts
