Appendix A. Using DSLR Footage
One of the most exciting and growing groups of filmmakers are those using digital SLR cameras (such as the Canon 7D, Nikon D90, and Panasonic XL-1) instead of traditional video cameras.
Editing footage shot with a DSLR (sometimes called HDSLR or video DSLR) is no different than editing footage shot with any other device, but Final Cut Pro X has a few features specifically designed to smooth the DSLR workflow and improve the editing experience.
This appendix covers several aspects of Final Cut Pro X that will particularly appeal to DSLR users, including the ability to edit video files without transcoding, the ability to begin editing immediately without waiting for media to be copied (or transcoded, if you choose to trans-code), and an extremely easy method for syncing audio and video recorded on separate devices.
Importing DSLR Footage
DSLR cameras record footage in various formats and to a variety of storage media such as secure digital (SD), compact flash (CF), SxS memory cards, and others. In most cases, you can import files into Final Cut Pro X using the Import Files command.
1. Connect your camera to your computer using the cable that came with the camera, and turn it on.
If your camera doesn’t appear as an icon in the Finder, remove the camera’s memory card and insert it into the card slot on your Mac (if it has one) or into an external card reader. The card appears in the Finder as a new volume.
Tip
Because most users will record over the memory card in the camera, it is wise to copy the entire memory card onto a hard disk to create a backup. See “Backing Up Your Media” in this appendix for more information.
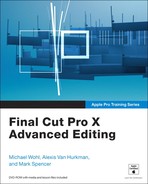
2. In Final Cut Pro X, choose File > Import > Import Files to open the Import Files window.
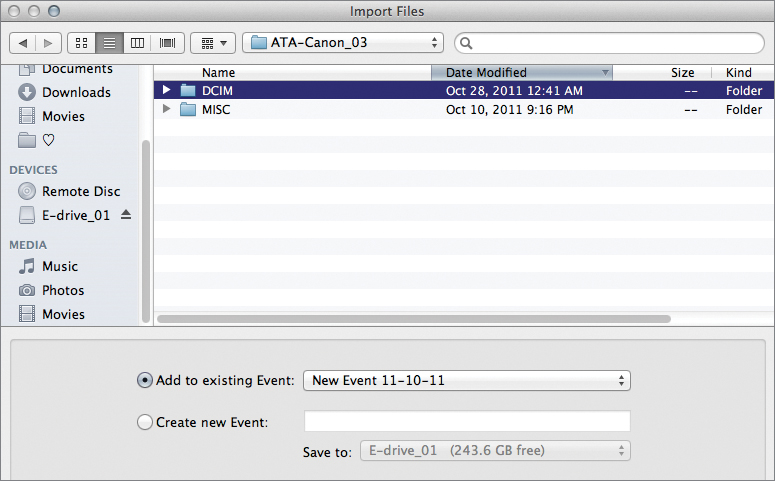
3. Locate the DCIM folder inside the camera folder, and then locate the still image or video files you want to import. The files may be in the root of the DCIM folder or in a folder one or two levels down. File structures vary by camera model and manufacturer.
4. Select the files you want to import. Command-click to choose multiple files.
5. Choose the appropriate settings in the Import Files window.

If you’re importing directly from the camera or memory card, be sure to select the “Copy files to Final Cut Events folder” checkbox.
You probably do not want to select “Import folders as Keyword Collections” because it will assign keywords—such as DCIM and other folder names—to all of your clips.
More Info
For more about the transcoding options, see the “No Transcoding Necessary!” sidebar in this appendix.
The Video and Audio analysis options can all be performed during the import or at any point later in the editing process. For more about clip analysis, see Lesson 1.
6. Click Import to add the selected clips to the current event.

Tip
You can always choose to transcode the imported files at a later time using the Transcode Media command.
Note
If either conversion has already been performed, that option is dimmed in the Transcode Media sheet.
Backing Up Your Media
Always make backup copies of your camera-original footage. Ideally, you should create a minimum of two copies stored on separate hard disks in case one drive unexpectedly fails.
Tip
If your production was particularly expensive to produce or was a one-of-a-kind event, you might consider creating a third backup archive and storing it at a separate physical location.
Final Cut Pro cannot create a camera archive from most DSLR memory cards, so your best bet is to simply duplicate the entire memory card by dragging its icon from the Finder to your backup hard disk.
Alternatively, you could use Disk Utility (found in Macintosh HD > Applications > Utilities) to create a new disk image containing the contents of your memory card.
Be sure to name your backups in a very clear, easy-to-identify way. Although immediately after shooting you may believe that you’ll never forget which backup is which, in a few months or years you’ll be very thankful your naming convention left nothing to chance.
A wise naming scheme is to label the backup folder with the full date, camera name, and reel number for the card being backed up. If you produce many programs with overlapping shoot dates, you might also add the name of the show or project, or store the backups in an appropriately named parent folder.
Editing During Import
Another feature that benefits DSLR users is the ability to begin editing immediately after importing the footage into an event.
You can begin viewing and editing your footage even while Final Cut Pro X imports the files from the camera memory card. You can watch the clips, and add metadata, markers, clip ratings, and keywords. You can make selections and add them to projects. The only thing you can’t do is move or delete clips because, technically, those clips don’t exist yet.
During importing, Final Cut Pro will access the files directly from the memory card (or from the folder containing the backup you’re importing) until they’re successfully copied; and then as each clip is fully imported, Final Cut Pro will transparently switch to using the versions in the Event folder.
If you choose to transcode into optimized versions, you can continue to work while the computer generates the new files in the background. As the optimized files are successfully created, Final Cut Pro uses those versions instead of the camera originals.
Synching Audio and Video
One of the few disadvantages of DSLRs is that they are primarily still-image cameras, so they lack professional audio recording capabilities. Because of this, many DSLR video producers record sound to a separate audio recorder.
As long as you record scratch audio on the DSLR camera, Final Cut Pro X can sync up the audio and the video and generate a compound clip, allowing you to edit with one file that contains both the video and the high-quality audio (even though they exist as separate files on your hard disk).
1. Use the Import Files command to import your audio files and video files into a single event.
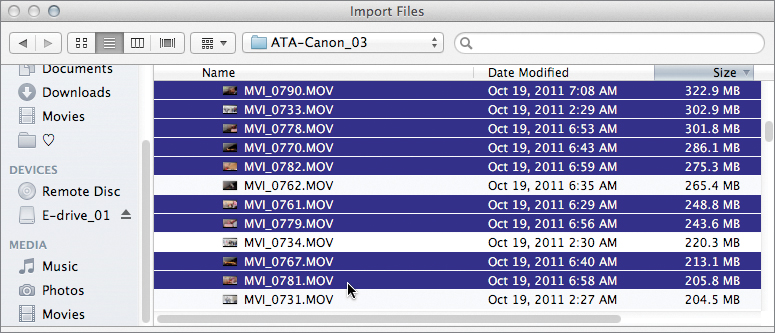
You may need to add metadata to the clips or change the clip names so you can identify which audio and video clips belong together. In this example, the clip names include the scene and take number, making it very easy to find the corresponding clips.
2. Select a video clip and its companion audio clip.

3. Choose Clip > Synchronize Clips, or press Command-Option-G.

A new synchronized clip—containing the perfectly synchronized content of the two clips—appears in the Event Browser.
Note
If the audio clip begins before, or ends after the video clip, you will see black frames at the start or end of the compound clip.
4. Repeat steps 2 and 3 for each clip you want to sync.
5. Select all the compound clips and add a keyword (such as Synced) so they will be easy to locate without wading through all the original files.
Choosing Audio Channels
When you create synced clips, each clip contains the scratch audio from the camera as well as the high-quality audio from the audio recorder.
Before editing these clips, you should silence the scratch audio, so you hear only the high-quality audio when editing the clips into a project.
1. Select a synced clip.
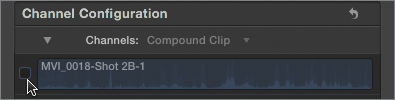
2. Open the Audio Inspector and expand the Channel Configuration section.

Each of the channels is labeled, and you can skim them individually to verify which is the high-quality audio and which is the scratch audio.
3. Deselect the scratch audio channel.
4. Repeat these steps for each synchronized clip.
Editing with DSLR Footage
That’s all you have to do to work with DSLR source footage. You can take advantage of all the features and powerful editing options in Final Cut Pro X just as you can when using footage shot with any other type of camera.