Lesson 12. Color Matching
Matching the color and contrast of one shot to another is one of the most fundamental aspects of the color correction process, and dates back to the photochemical color timing process used for decades in film.
Of course, it’s no longer necessary to time a film, develop an answer print, and develop it prior to making your next pass. You can simply adjust the Final Cut Pro X Color Board controls and see how your scene improves, all in real time.
With Final Cut Pro X, you can automatically or manually match one shot to another. Each method has its advantages and disadvantages, and in this chapter you’ll learn both. Furthermore, you’ll also apply a single correction to multiple shots, and combine multiple corrections to streamline your workflow.
Understanding Shot Matching
Shot matching (sometimes referred to as scene-to-scene correction) is key to ensuring that your edit plays seamlessly to your audience. In a narrative project, a five-minute scene may consist of shots photographed over an entire day, or if the material is ambitious, shots made over several days or weeks. You may even be expected to match insert shots taken months later during reshoots.
Subtle variations in lighting, shadow, and color temperature make cuts more obvious than they ought to be. For example, cutting from a brighter shot to a darker shot within an evenly lit room will call attention to that edit point, even if an audience member might not identify the exact problem.
Shot-to-shot variation can also be a problem in documentary filmmaking. A camera operator may “ride” the exposure on the fly, adjusting for rapidly changing conditions. A cinematographer might make a mid-interview adjustment to a room’s lighting to improve the visuals. Or, an available-light field shoot may simply have so many different angles that, after editing, the lighting appears chaotic.
All of these conditions necessitate matching one shot to another, also referred to as scene balancing. The idea is to adjust the contrast and color within every shot to create the illusion that a scene was photographed at one time and in one place.
Matching Clips Automatically
There’s no shame in admitting that scene balancing is not going to be the most exciting part of your day. As fun as grading can be, once you’ve defined the look of a shot, adjusting the rest of the shots in that scene to match your grade can be tedious.
To make your day more enjoyable, Final Cut Pro X has an automatic Match Color tool you can use to quickly match one clip to another. As with all automatic tools, the result is not always perfect, and you give up a certain degree of control. However, this tool can be effective with the right type of footage, and can certainly speed things up when it produces the results you desire.
Performing Simple Clip Matching
In the following exercise, you’ll use the Match Color tool to automatically balance all the shots in a documentary scene.
1. In the Project Library, display the contents of the APTS FCP X ADV Part 3 disk image, and then click the disclosure triangle next to the Lesson_12 folder to show its contents.
2. Double-click the Agriculture project to open it, and press Shift-Z to expand its clips to the available width of the Timeline. Then press Command-4 to open the Inspector.
3. Click the first and fourth clips in the project, and compare how they look.

The first and fourth clips compared
Notice that the first shot is considerably yellower than the fourth shot. In fact, by clicking each of the five clips in this project, you should notice that each has a slightly different color cast.
4. Click the first clip to select it, and then in the Color group of the Inspector, click the Match Color checkbox.

When you select the Match Color checkbox, the Viewer changes to a two-up display titled Match Color. At the bottom of the Viewer you are directed to “Skim to a frame you want to match, and click to preview.”
5. Move the pointer over the fourth clip in the Timeline, and then click the clip. As you move the pointer over the fourth clip, the frames you’re skimming are displayed on the left, and the current frame of the clip you want to adjust is on the right. When you click, the frame on the right is automatically adjusted to match the frame on the left.

However, clicking only previews what that match will be like using the frame you clicked on.
6. Click a different frame within the fourth clip. Notice that the automatic adjustment is subtly different. As you can see, choosing different frames yields different results. For this reason, the interface encourages experimentation before you decide on a match.
7. Click the fourth clip a few more times until you find a match you like. Then, click Apply Match, or press Return.

When you click Apply Match, an adjustment is made and stored within the Match Color parameter of the Color group in the Inspector. The Viewer once again displays just the frame at the position of the playhead. The Correction 1 settings are not affected. If necessary, you can always change the Match Color adjustment.
8. With the first clip still selected, in the Inspector, click the Match Color parameter’s Choose button.
The 2-up display reappears in the Viewer, ready to match another clip.
9. Click a variety of frames of the last clip in the Timeline, and click Apply Match (or press Return) when you’re finished.
There’s considerably more variation when choosing different frames from the last clip, so make sure that you preview several sections of the clip before making a final choice.
Matching Corrected Clips
In the previous exercise, you matched the first clip to an uncorrected clip elsewhere in the Timeline. You can also match clips to other clips that are already color corrected.
1. Click the middle of the third clip to select it, and in the Video Inspector, click the Correction 1 Color Board button to open the Color Board.
2. Press Command-7 to open the video scopes. If necessary, set the video scopes to display the RGB Overlay and Histogram.
3. Click Exposure. Drag the Global slider down until the left side of the shared gray portion of the Histogram is just to the left of 0. Then drag the Midtones slider up until the tallest green and red spikes in the Histogram touch 75.

4. From the video scope Settings pop-up menu, choose Vectorscope. In the Color Board, click Color, and drag the Highlights color control up toward a blue/cyan split until the Vectorscope graph is somewhat centered and a large blue arm points toward the B target.

5. Click Saturation, and drag the Midtones saturation control up to approximately +36%. At this point, you should have a contrasty, cool version of the image.
6. Click the first clip in the Timeline to select it, and in the Color Board, click the back arrow button to return to the Video Inspector.
7. Click the Match Color parameter’s Choose button, and click any frame of the third clip (the one you just adjusted). Click Apply Match. The Match Color preview updates to match the color treatment you created in the third clip.

This technique provides you with a bit more control than simply matching uncorrected clips. If you want to impose a particular look on a scene, you can first make a primary adjustment to a clip that’s most representative of the scene, and then use Match Color to match the rest of the clips in the scene to it.
Take 2
Use the Match Color tool to match the rest of the clips in the Agriculture project to the third clip. Next, reset the color controls of all the clips in the project, and try creating a different look using a different clip, using the Match Color controls to match the other clips in the project to your new look.
Matching Clips Manually
It’s tempting to think that the Match Color tool will solve all of your problems. The truth is, it often works well, but sometimes the results are not quite what you would prefer. You can see this situation in the following exercise.
1. Open the Project Library, and double-click the Hero Scene project to open it in the Timeline.
2. Select the fourth clip in the Timeline to open it in the Video Inspector.

3. In the Video Inspector, select the Match Color checkbox, and click the fifth clip in the Timeline to preview the resulting match.

While the general quality of shot 4 now approximates that of shot 5, you should immediately see that the skin tone and highlights of the image are considerably flattened and blown out. The automatic choices made to match these two shots are too brute force for the material. In this situation, manual matching will allow a more deft adjustment.
4. Click Cancel to skip the operation.
Breaking Down a Scene
Successful scene balancing requires organization. Before you do anything, you need to watch the entire scene to get a sense of what you’re starting with, and where you need to take it, grading-wise.
After watching the scene, pick a single clip that best represents the location of the scene and the people within it. This might be a long shot; it might be a medium two-shot; or it could be a close-up, if it’s a tightly photographed scene. Whichever clip you use, it should be representative of the color, contrast, and content found throughout that scene.
This is important because you’ll be making your first adjustments to this reference clip, and then comparing every other shot in the scene to that reference as you match every other clip to it.
This method prevents you from chasing your tail in an unending, overlapping series of undisciplined revisions. For example, you would grade shot 1, and play around with it for a while until you’re sure you like the result. Then match shots 2, 3, and 4 to shot 1, and you’re finished.
However, if you grade shot 1, and then match shot 2 to shot 1, and then match shot 3 to shot 2, the comparative color balance might work for that cut, but could be noticeably different from shot 1. Then you match shot 4 to shot 3, introducing more inadvertent variation. In the end, shot 4 doesn’t really match shot 1, and you need to start all over again.
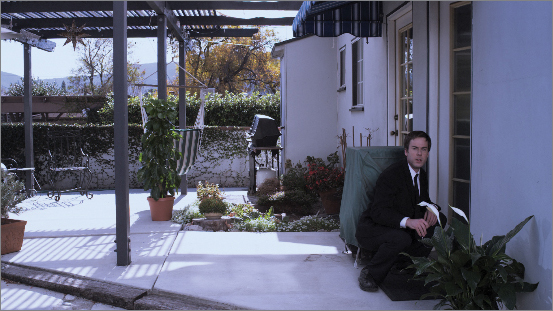
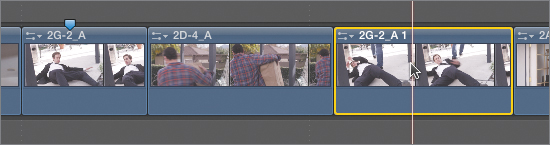
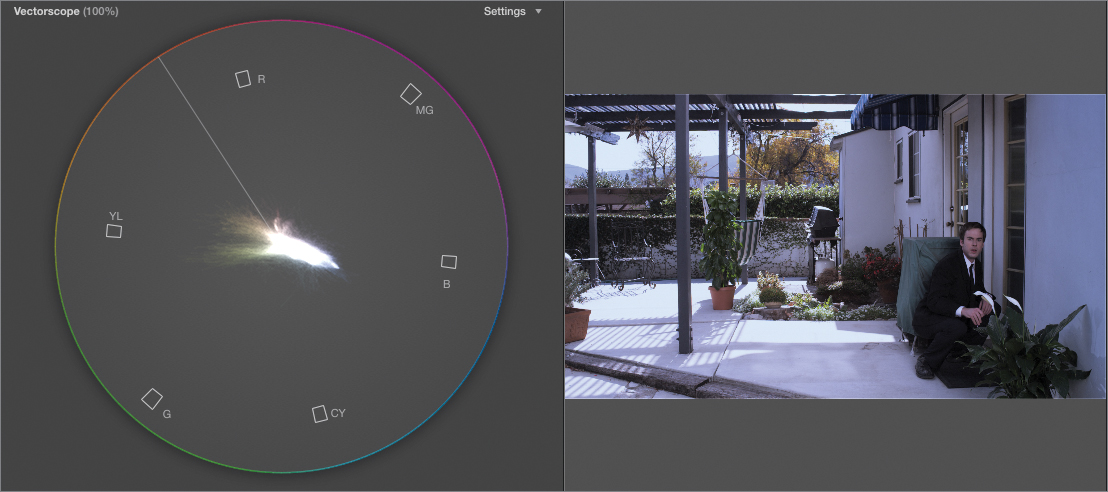
For the next exercise, see if you can choose a good image to use as a reference from the following series of clips:

If you chose the first clip, that is, in fact, a very good reference candidate for the scene. It’s a nice wide shot that shows the overall location, its lighting is representative of all the angles within the scene (including the sunlit patio and the shaded doorway), and the main character can be seen clearly.

Here’s something else to keep in mind. Sometimes a scene is a mixed bag of clips from a qualitative point of view. Half of the clips may be wonderfully lit and noise free, while the other half may be compromised as a result of changing lighting conditions or a problem during the shoot.
In situations when some of the clips might be difficult to correct, you may need to choose a reference clip from one of the problem clips to determine the best adjustment to make under the circumstances. By so doing, you’ll have a far easier time matching higher-quality to lower-quality clips, than taking on the (perhaps impossible) task of matching the poor-quality clips to the high-quality.
In the following series of exercises, you’ll match clips within a scene with one another to achieve good continuity of color and contrast.
Grading the First Clip
Once again, your first order of business is to choose a reference clip, and make a correction that best suits the scene.
1. If necessary, open the Project Library, and double-click the Hero Scene project to open it in the Timeline.
2. Click in the last third of the first clip in the Timeline to select it and open it in the Video Inspector. The Viewer shows the black-suited man crouched in front of the door.
3. Click the Color Board button of Correction 1, and press Command-7 to open the video scopes, if necessary.
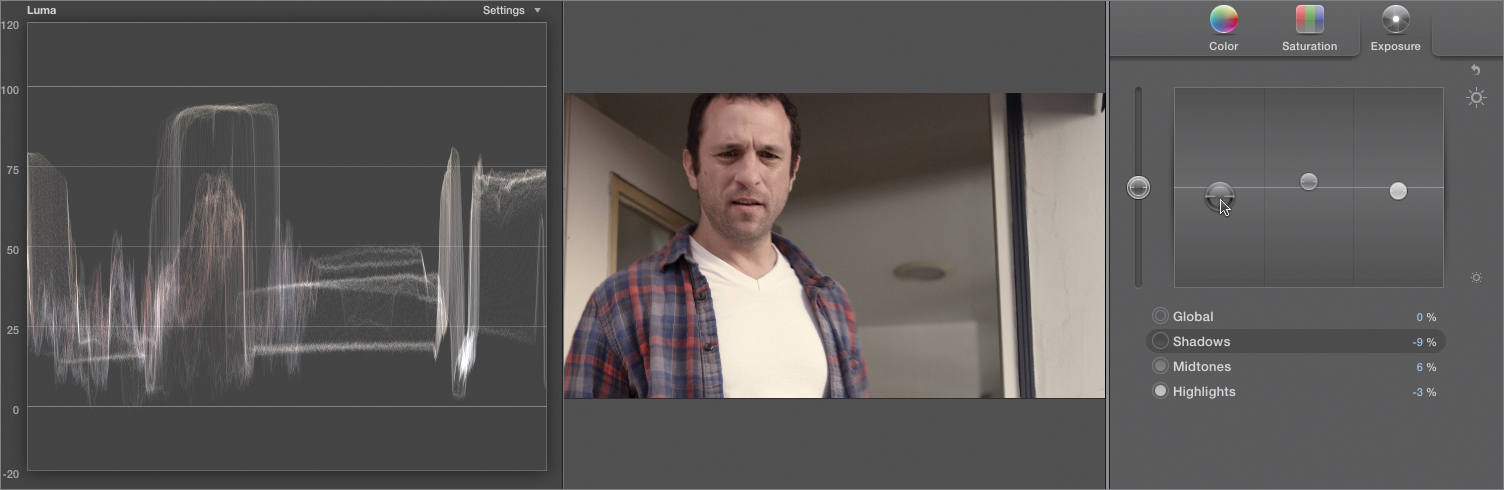
4. From the video scope Settings pop-up menu, choose Waveform (make sure it’s set to Luma), and then in the Color Board, click Exposure.
5. Drag the Shadows exposure control down until the bottom of the waveform graph just touches 0, and drag the Midtones control up to around +9%. This raises the contrast of the image, while lightening the midtones a bit to make sure that you can clearly see the details within the man’s black suit.

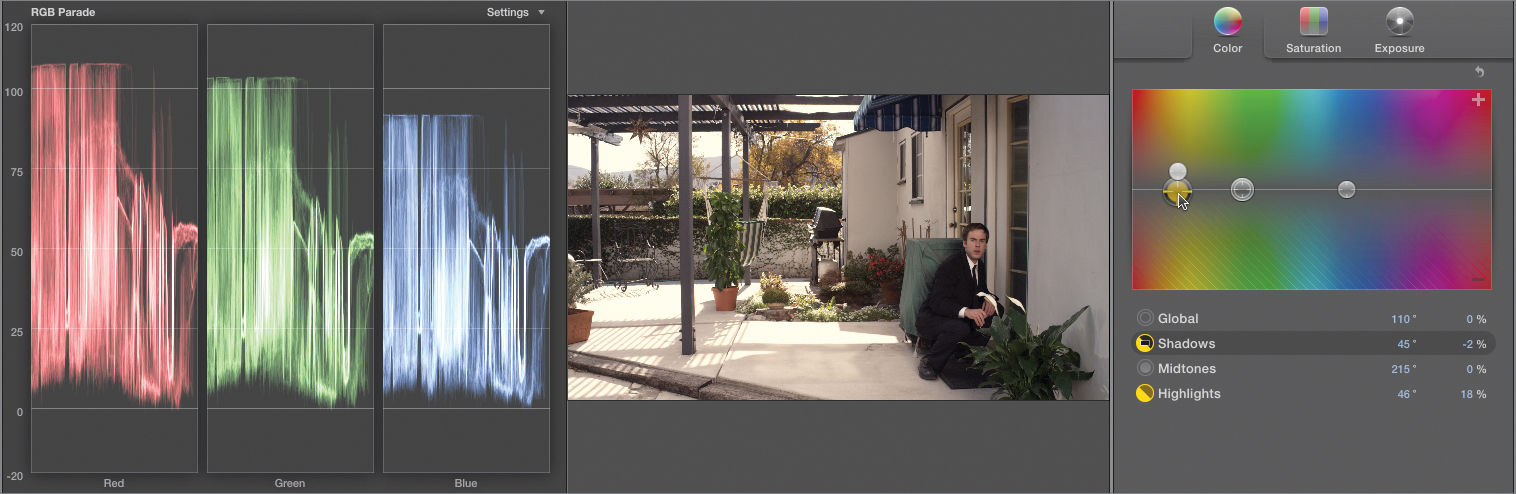
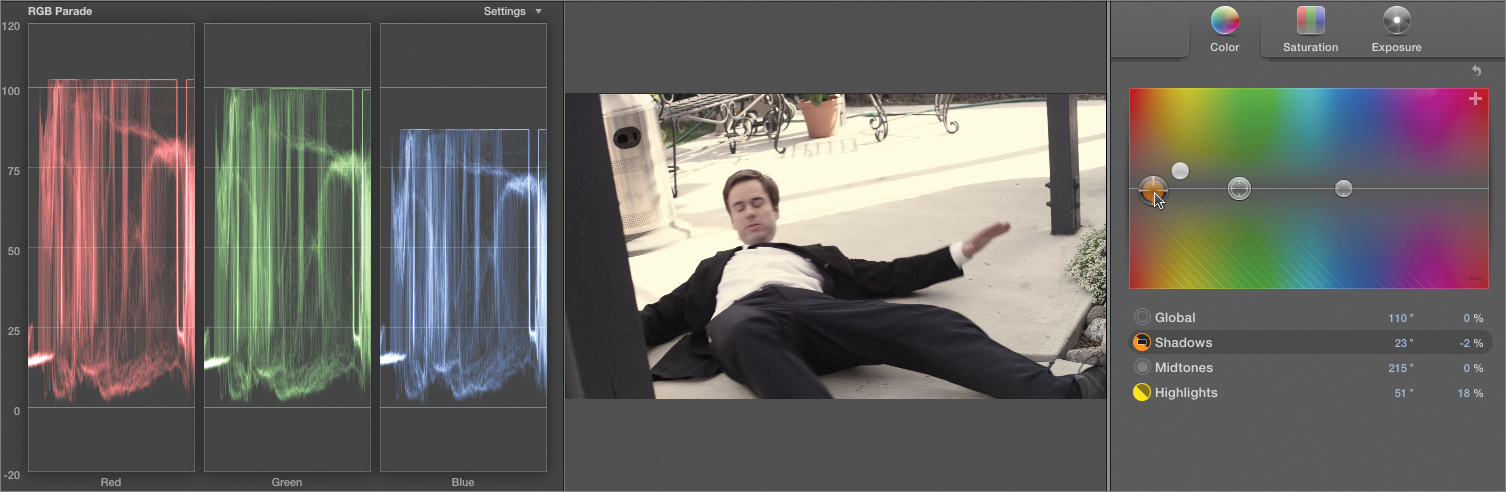
6. From the Settings pop-up menu, choose RGB Parade. In the Color Board, click Color.
7. Drag the Highlights color control up just a bit into the orange part of the spectrum (around 46°, +18%) to warm up the image. Drag the Shadows color control down to negative orange until the very bottoms of the red, green, and blue waveforms line up again. This warms up the environment to give some heat to the day, while keeping the black of the man’s suit deep and untinted.
8. Click Saturation, and drag the Midtones saturation control down to around –15% to mute the skin tones and greens of the shot just a bit.
9. For one last check, set the video scope to display the luma waveform. The luma waveform is over 100, so click Exposure, and lower the Highlights exposure control so that the top of the graph just touches 100.
In general, the luma levels of a video signal should never go above 100 because you risk clipping out detail you might want to keep. You may also get into level trouble if you’re handing your program off for broadcast playback.
If you’d like to compare the corrected clip with the original, click the back arrow button to return to the Video Inspector, and select and deselect the Correction 1 checkbox to turn the correction on and off.
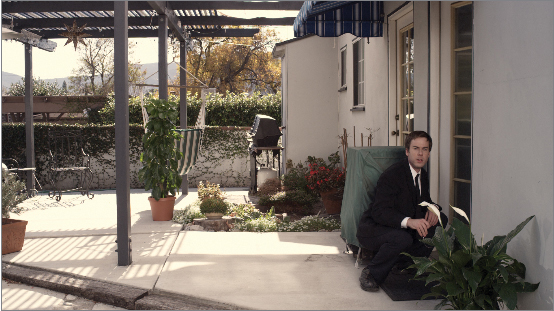
Before correction
After correction
Match Other Clips to the Reference Clip
Now that you’ve set a grade for the initial clip, it’s time to start matching other clips to clip 1. In this exercise, you’ll compare two clips in the Timeline, and learn how to spot differences quickly using video scopes to guide your corrections.
1. Return to the Timeline. Press ; (semicolon) and ’ (apostrophe) to jump back and forth between the beginning of the first clip and the beginning of the second clip.
Using these keyboard commands is the easiest way to compare two clips and see their visual differences. You’ll see both full-frame shots in rapid succession, which helps overcome your eye’s built-in ability to adapt to the ambient color within a scene.
For example, after staring at the grade from the previous exercise for a few minutes, you may have thought that the adjustments you made were fairly subtle; but jumping back and forth between it and the next ungraded clip reveals just how big the difference is.
Using these keys, while convenient, has one shortcoming: You can’t choose the frames you’re comparing. To compare two specific frames, you need to use markers.
2. Drag the playhead to the frame you were viewing while adjusting the shot in the previous exercise (somewhere in the last third of the first clip). Press M to place a marker.
3. Drag the playhead to an appropriate frame of the second clip. (There’s a lot of motion, so you’ll want to choose the frame with the least amount of motion blur.) Press M to place another marker.
4. With both markers placed, press Control-; (semicolon) and Control-’ (apostrophe) to jump between the clips at these two adjacent markers. By looking at the black-suited man’s face in both shots, you’ll clearly see the differences between the two clips; but if you also use the video scopes, you’ll be able identify the kinds of adjustments needed to make the second clip match the first.
5. If necessary, move the playhead over the second clip, and press C to select it.
6. From the Settings pop-up menu of the video scope, choose Luma (make sure it’s set to Waveform). Then press the Control-; (semicolon) and Control-’ (apostrophe) to compare the waveform graphs of the first and second clips.

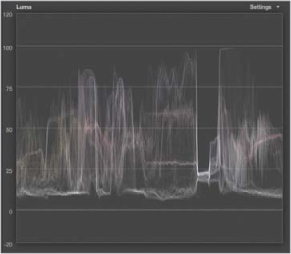
Clip 1 luma waveform
Clip 2 luma waveform
Examining both clips, you can see how the waveform graph really shines. Knowing where the man’s suit corresponds to the waveform in each clip, you can directly compare the black points of the luma graphs to compare the heights. Similarly, you can see where the highlights of the sky peak in each graph, as well as how the average midtones compare within each graph. Using these graphs as guides, you can adjust exposure as necessary to match the contrast of the second clip to the first.
7. Select the second clip in the Timeline. In the Color Board, click Exposure, and drag the Shadows, Highlights, and Midtones exposure controls so that the bottom, top, and middle of the luma graph of the second clip matches as closely as possible that of the first clip.
Tip
Use the values shown in the following figure as a guide.
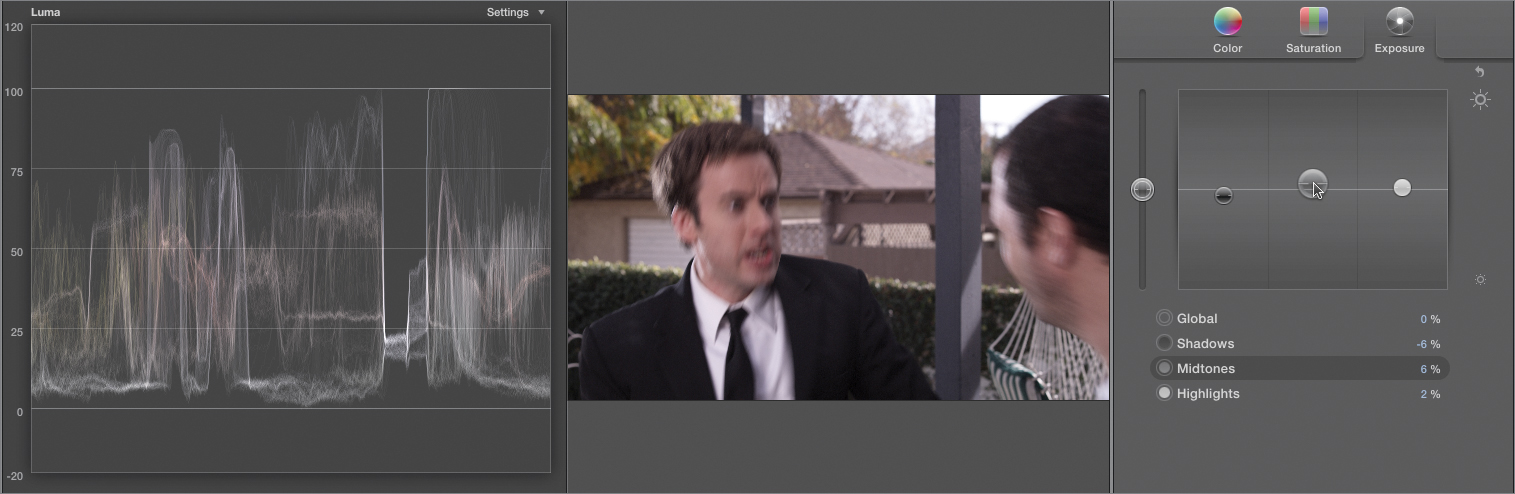
Keep one eye on the video scopes and the other on the image. When the extremities and averages of the waveform graphs more or less line up, use the image as your final guide. Keep in mind that you’re evaluating image lightness, not color.
8. With exposure adjusted, from the Settings pop-up menu of the video scope, choose RGB Parade; and in the Color Board, click Color.
9. Use the keyboard shortcuts to compare the two clips.

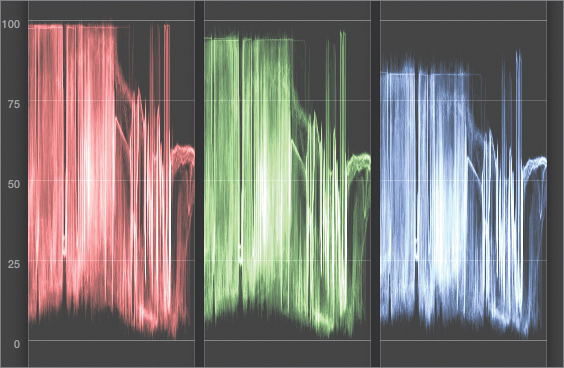
Clip 1 RGB Parade waveform

Clip 2 RGB Parade waveform
10. Drag the Highlights color control up toward orange until the tops of the red, green, and blue waveforms corresponding to the second clip are offset to match those of the first. The results won’t be exact, just similar, with red highest, green lower, and blue lowest.
11. Continue to flip between both clips, and drag the Shadows control down toward negative orange so that the bottoms of the red, green, and blue waveforms of clip 2 line up similarly to those of clip 1.
12. Apply whatever small tweaks are necessary to make the tops and bottoms of the RGB Parade scope line up as closely as possible.

Again, the results at this point won’t be identical. You’ll want to keep an eye on the image to ensure that the general hue and quality of the highlights match, but don’t spend too much time on it. At this point, it’s more important that the shadows, rather than the highlights, are well adjusted.
13. From the Settings pop-up of the video scope, choose Vectorscope, and flip between the two clips to compare the Vectorscope graphs.
The Vectorscope graphs won’t be identical no matter what you do—both shots have different distributions of color—but the orientation and centering of both graphs should be recognizably similar. If not, a small adjustment to the Highlights color control might improve the match.
If you’re satisfied that the waveforms of both clips are oriented approximately the same, and that they’re both centered similarly, it’s time to adjust saturation.
14. From the Settings pop-up menu of the video scope, choose 133%, and flip back and forth to compare the graphs of both clips.

Clip 1 Vectorscope close-up

Clip 2 Vectorscope close-up
In both clips, notice a small arm of the Vectorscope graph stretching out along the Skin Tone Indicator. This represents the man’s face, and if your color matching is good, this segment should be along the same angle in both graphs. On the other hand, this segment should also be smaller in the first clip (which you deliberately desaturated) than in the second clip. Next, you’ll adjust to correct this.
15. Click Saturation, and while flipping between clips, lower the Midtones saturation control until the segments of each Vectorscope graph corresponding to the Skin Tone Indicator are approximately of equal length.

At this point, the color quality of both the first and second clips should be looking similar, if not identical.
16. Set the video scope to display the luma waveform. With all these adjustments, you should notice that the top of the waveform is over 100.
17. Click Exposure, and lower the Highlights exposure control so that the top of the graph just touches 100.
If you take the time to look at the RGB Parade waveform before and after making this last adjustment to the highlights exposure, notice that in addition to bringing the highlight exposure of the second clip in line with that of the first, the RGB levels are now of equal height.
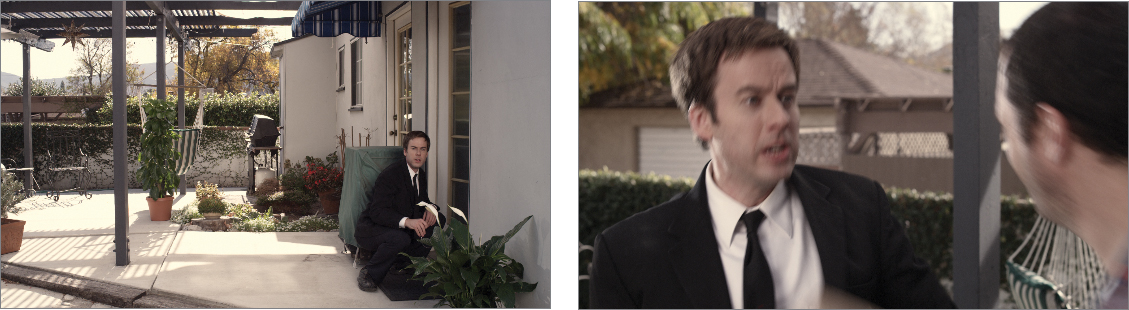
The first and second clips compared after matching
This may seem like a lengthy process, but with practice (after you’ve matched several hundred clips), you’ll get faster, and matching one clip to another will become second nature.
Eventually, you’ll find you no longer have to examine the video scopes so closely every time, but matching using scopes will continue to be a valuable skill for those difficult-to-match shots in which it’s hard to spot the exact differences.
Copying Grades
Now that you have two balanced corrections, you might want to see if one of them might make a good starting point for adjusting another clip in the scene. When copying adjustments from one clip to another unrelated clip, the chances are it won’t work perfectly; but if it comes close, you may spare yourself from completely reinventing the wheel. In the next exercise, you’ll learn how to paste effects from one clip to another, and fine-tune the result to match yet another clip to the your reference.
1. Select the second clip in the Timeline, and press Command-C to copy it.
2. Select the fourth clip, and choose Edit > Paste Effects, or press Command-Option-V.
When using the Paste Effects command, all effects, including color adjustments, are duplicated from the clip you copied and pasted to the target clip. This is an all-or-nothing operation. You cannot select which effects are pasted and which are not.

The fourth clip before and after copying and pasting effects from the second
The result is pretty good, but a few more adjustments will make a more perfect match. First, you need to relocate the markers to better compare this clip to the reference clip.
Tip
Starting with a copied correction that’s close and tailoring it to a new clip is often faster than starting anew, but not always. If you can’t make a copied correction match within four or five tweaks, you might want to consider resetting the correction and starting over.
3. With the playhead over the fourth clip, press M to place a marker at the current frame.
4. Press Control-; (semicolon) to move the playhead to the previous marker on the second clip, and press Control-M to delete the marker.
5. Open the Waveform Monitor, and in the video scope, set it to Luma. Press Control-; (semicolon) and Control-’ (apostrophe) to flip between the first and fourth clips and compare their waveform graphs.
Notice that the black point of the fourth clip isn’t quite as low as that of the first clip. Also, the brightest highlights of the fourth clip aren’t as bright as in the first clip; but that’s all right, the man’s shirt probably shouldn’t be as bright as the sunlit sky in the reference. In this situation, you need to make a judgment call based on the content of the image, and not simply make the waveforms match.
6. To make the black point match, make sure the fourth clip is selected, and then open the Color Board, if necessary. Click Exposure, and drag the Shadows control down so that the lowest point of the waveform just touches 0.
This is a small change, but notice that the shadows within the scene become denser, providing a better match to the reference clip.
7. Use the shortcut keys to flip between the two clips and compare them.
Using Hidden Commands to Apply Corrections
At this point in the process, a few angles of coverage are adjusted and matched. Now is a good time to see if you can simply apply any other corrections from one graded clip to other clips with the same angle of coverage.
This is an important technique for working faster, especially when correcting narrative programs with well-defined angles of coverage; or documentary shows with a variety of interview subject headshots that each have a single correction you can use over and over again.
Three commands in Final Cut Pro X are somewhat hidden. They’re not in any menu, and they’re not assigned default keyboard shortcuts. These commands are for applying corrections from one, two, or three clips back, and are incredibly useful for scene balancing. In this lesson, you’ll expose these commands, and use them to continue matching more of this scene to the reference clip.
1. Choose Final Cut Pro > Commands > Customize.
2. In the search field at the top right of the Command Editor, type apply.
Three commands appear at the top of the list of found commands: “Apply Color Correction from Previous Edit,” “...from Three Edits Prior,” and “...from Two Edits Prior.” These commands have no keyboard modifiers applied to them.
3. Choose “Apply Color Correction from Previous Edit,” and press Shift-Control-1 to assign that keyboard shortcut to the command.
4. In the dialog that appears, click Make Copy, type a name for your command set, and click OK.
5. Choose “Apply Color Correction from Three Edits Prior,” and press Shift-Control-3 to apply a shortcut.
6. Choose “Apply Color Correction from Two Edits Prior,” and press Shift-Control-2 to apply a shortcut.
7. Click Save, and close the Command Editor. Now that you’ve assigned keyboard shortcuts to these three commands, you can use them to copy color corrections in the Timeline.
8. Click the fifth clip in the Timeline to select it. Notice that the fifth clip (in which the man is lying down) is from the same angle as the second clip (in which the man stands up). Chances are good that the same adjustment may work for both.

9. Press Shift-Control-3 (three edits prior) to copy the adjustment from the second clip to the fifth clip.
10. Select the sixth clip. This shot is from the same angle, so press Shift-Control-1 (previous edit) to copy the adjustment from the fifth to the sixth clip.

11. Play through the fourth through sixth clips to see how well they match. You may notice that the fourth and sixth clips match well, but the fifth clip seems a bit bright and a bit yellow.
12. Select the fifth clip, set the video scopes to display the luma waveform, and open the Color Board of Correction 1, if necessary.
13. Click Exposure, and lower the Highlights exposure control until the top of the waveform graph just touches 100.
14. To evaluate the color, set the video scope to display the RGB Parade waveform.
15. Remove the marker from the fourth clip, add a marker to the fifth clip, and press the keyboard shortcuts to jump between the first and sixth clips while comparing the two images.
Even though a comparison of clips four through six revealed a discrepancy, you still want to match them to the reference clip (in this case the first clip) to make sure that you’re doing a consistent and accurate match.
Comparing the RGB Parade graph of the fifth clip to the first, notice that the bottoms of the red, green, and blue graphs are offset, lending more of a color cast in the shadows of the clip than is desirable.
16. Click Color, and drag the Shadows color control toward negative orange until the bottoms of all three graphs align (somewhere around 23°, –2%).
At this point, flipping between the two clip markers should reveal a reasonably good match, with one exception. You may notice that the man’s face seems less saturated in the fifth clip than in the first. This can be verified using the Vectorscope.
17. Set the video scope to show the Vectorscope, and flip between the first and fifth clip markers. Sure enough, the Vectorscope of the fifth clip is smaller than the first, indicating that it’s less saturated.
18. With the fifth clip selected, click Saturation, and drag the Midtones saturation control up until the arm of the Vectorscope graph running along the Skin Tone Indicator is equal to the length of the arm in the first clip’s Vectorscope graph.

At this point, you should have a convincing match between the first and fifth clips, and you shouldn’t see a distracting difference between shots when playing the fourth through sixth clips. With this done, you can continue copying grades.
19. Click the seventh clip, which is identical to the fifth clip, and press Shift-Control-2 (two edits prior) to copy the adjustment from the fifth clip to the seventh clip.
20. Select the eighth clip. This clip is clearly from the same angle as the fourth clip, but it’s too far away to be able to use the Apply Color Correction commands. In this case, you’ll once again have to use the Paste Effects commands.
21. Select the fourth clip, and press Command-C. Then select the eighth clip, and press Command-Option-V.
22. Use Paste Effects to copy the correction from the second clip to the ninth clip, and from the first clip to the eleventh clip.
23. Select the tenth clip, and press Shift-Control-2 to apply the correction from the eighth clip. You can see that once you’ve graded at least one representative clip from each angle of coverage, you can quickly copy and apply those corrections to similar clips throughout a scene.
Tip
Of all the Apply Color Correction commands, “Apply Color Correction from Two Edits Prior” is the most useful in situations where an edit takes the form of A-B-A-B-A, cutting between two angles of coverage.
Matching Insert Clips
So far, you’ve matched all the clips to the reference of the first clip in the scene. Of the first 11 clips, only the third clip remains ungraded. If you play the third and fourth clips together, you’ll see that this is a push-in sequence because the fourth clip is a closer take of the third. For this reason, it is even more critical to achieve a good match.
1. Select and copy the fourth clip. Select the third clip, and press Command-Option-V to paste the effects.

2. Set the video scope to display the Vectorscope, and click Color to reveal the color controls.
3. Flip between the third and fourth clips using shortcut keys (the clips are right next to one another, so you needn’t set markers), and compare their Vectorscope graphs.


When matching two clips in which one is a tighter version of the other, you always want to compare them to achieve the closest match possible.
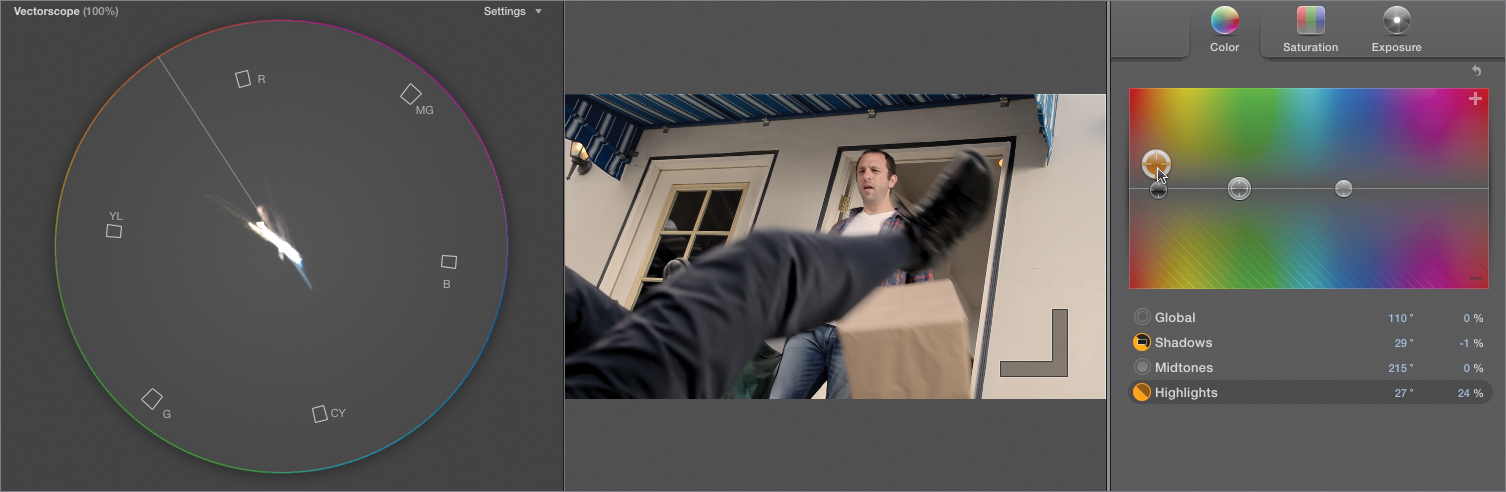
In this case, as you flip back and forth, notice that the Vectorscope graph moves down and to the left in the third clip compared to the fourth clip. This movement, and the fact that the third clip is yellower then the fourth clip, is a clue to the kind of adjustment you need to make.
4. Click Color, and with the third clip selected, drag the Highlights color control up and to the left (toward a redder orange). Flip between the clips as you continue adjusting the Highlights color. Ultimately, the arm of the Vectorscope that most closely aligns with the Skin Tone Indicator should be roughly in the same position for both clips, and the lighting of both clips should visually match (possibly at around 27°, +24%).
5. When you believe you’ve achieved a good match, view the entire scene to see how well it plays.
At this point, you should have a well-balanced scene, in which no one clip stands out as noticeably different in color or contrast. However, you won’t always get things right on the first pass, so if you see anything that sticks out, go ahead and continue tweaking.
Take 2
Now that you’ve balanced the first half of this scene, balance the last eight shots using the same techniques.
Using Additional Corrections and Effects in a Scene
Having balanced a scene in the previous exercises, you’ll now learn how to build upon a base correction, adding more adjustments and effects to create ever more sophisticated looks.
Adding Corrections to Individual Shots
Although every clip edited into a project starts out with one default color correction (named Correction 1), you can add more corrections to apply more adjustments. These adjustments can modify the base look of a clip or add an additional “style” change on top of an underlying correction. In this exercise, you’ll apply additional color corrections to contribute a bit of style to the Hero Scene project.
1. If necessary, open the Hero Scene project into the Timeline. This exercise assumes that you matched the first 11 clips of this sequence in the previous exercises.
2. Select the first clip in the Timeline, and open its parameters into the Video Inspector. If the Color Board is currently open, click the back arrow button to return to the Inspector.
3. To add a new correction, click the Add Correction button at the top of the Color group in the Video Inspector.
A new correction appears, Correction 2, and it’s stacked underneath Correction 1. Its Color Board button is still dimmed, indicating that it has not yet been modified.

4. Click Correction 2’s Color Board button to open the Color Board. Although the base grade you’ve already created is a nice, warm look, additional corrections will let you experiment with other looks while keeping what you’ve already done. If you don’t like your experiments, there’s no harm. You can simply disable or remove the additional correction and recover your original corrections.
5. Drag the Highlights color control towards positive blue, to cool down the image and add a very subtle bluish tinge to the bright areas. (The example uses Highlights color values of 224°, +36%.)
6. Click Exposure, and drag the Midtones exposure control down to darken the inside shadows of the clip, thereby creating a more subdued look. (The example uses a Midtones exposure value of –9.)
7. Click Saturation, and drag the Midtones saturation control all the way up to boost the intensity of color. Then lower the Shadows saturation to reduce color intensity in the darkest parts of the image, while leaving the lighter parts of the image more saturated than they were before (–45% should be good).
The result is very a cool, overcast day type of lighting.
8. Click the back arrow button, and deselect and select the Correction 2 checkbox to compare your change to the original.

The original correction

With an additional cool blue correction
Because your “overcast look” has been applied in a separate correction, disabling it lets you return to the previous, underlying look you created. Because all color calculations are done at extremely high quality behind the scenes, pushing and pulling the color and contrast of a clip like this does nothing to reduce its quality.
Saving and Applying Correction Presets
Now that you’ve created a new look, you can apply it to the other clips. In this exercise, you’ll learn to save individual correction settings for future use.
1. Select the first clip in the Timeline. Make sure that Correction 2 (the new “overcast” look) is turned on, and click its Color Board button.
2. From the Color Board’s Action pop-up menu, choose Save Preset.

3. When the New Preset dialog appears, type Overcast Day, and click OK. The Action menu contains a variety of Color Board presets to create stylized looks. When you save your own preset, you store the settings from the currently open correction to this menu. If you reopen the Action menu, you’ll see your Overcast Day preset at the bottom of the list. Now, you need to apply this look to other clips in the project.
4. Select the second clip in the Timeline. Click the back arrow button to open the Video Inspector, and click the Add Correction button.
5. Click the Color Board button for Correction 2, and from the Action menu, choose your Overcast Day preset.
The second clip now has the overcast look. If you play the first two clips together, they should match. Because the settings you’ve added to them are identical, if the underlying corrections create a good match, they should continue to match.
This is one way to apply a consistent overlying look to a series of previously graded clips. Furthermore, all the presets you store in this menu are available for future projects, so you can develop a library of frequently used looks to create a series of “secret sauce” adjustments for the future.
Adding Corrections to an Entire Scene Using Compound Clips
Preset adjustments are powerful, but when you have long scenes, separately applying additional corrections to every clip can be cumbersome. Another way is to turn your balanced scene into a compound clip and then apply a single grade to all the clips at once.
1. Remove Correction 2 from the first and second clips in the Timeline by selecting each clip, selecting Correction 2 in the Video Inspector, and pressing Delete.
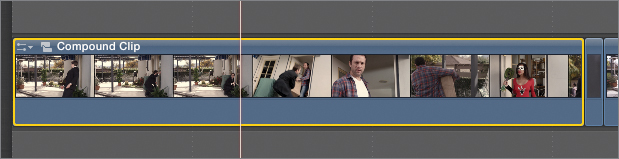
2. Select the first 11 clips in the Timeline by dragging a selection rectangle around all of them, or by clicking the first clip and Shift-clicking the eleventh clip.

3. Choose File > New Compound Clip, or press Option-G, to turn the selected clips into a single compound clip.
Compound clips share a single group of effects settings, which is extremely useful for applying one set of color corrections to an entire scene worth of clips. If you examine Correction 1 in the Video Inspector, you’ll see that the default correction for the compound clip is empty, ready to be used to affect the entire sequence of clips found within.
4. With the new compound clip selected in the Timeline, click the Color Board button.
5. From the Action menu, choose the Overcast Day preset.
6. Play through the compound clip to see how all the clips are equally affected by this preset. Not only is this an effective way to quickly apply a single set of corrections to multiple clips, it’s also very convenient when you need to make revisions.
7. From the Action menu, choose Sewer.

Immediately, the entire scene is graded to this new look. You can try applying several presets to see how they look, but don’t expect all of them to work well. The effect of each preset is highly dependent on the range of contrast and color found in your clips. A very bright clip will respond differently to a preset than will a very dark clip.
Tip
Several presets boost image highlights. When you apply these to an image that already has bright highlights, the result might be an extremely clipped image with flat, detail-less pools of white. Although this may be what you’re going for, when it becomes a problem you can add another correction to the compound clip to readjust the highlights and midtones and recover the detail you need in the image.
Changing to Compound Clips
Remember that compound clips can be opened by double-clicking them to reveal the individual clips within. Individual clips in an open compound clip can be adjusted just as in any project, so you can easily make individual tweaks and adjustments to single clips within a compound clip.
After you’ve opened a compound clip, click the left arrow (at the upper-left corner of the Timeline) to return to the full Timeline of your project.
Finally, if you start creating a lot of compound clips to adjust your scenes, renaming them might help you keep track of which compound clip corresponds to which scene. To rename a compound clip, select it in the Timeline, click Info in the Inspector, and then choose Edit Compound Clip Settings from the Action pop-up menu at the bottom right of the Inspector. Type a new name for the clip, and click OK.
Adding Other Effects to a Grade
Final Cut Pro X has many other effects you can use to stylize your project’s images. You can apply these effects to a balanced scene to achieve a creative effect, just as you previously applied presets. Also, like color corrections, effects can be applied to individual clips and to compound clips.
1. Using the Hero Scene project from the previous exercise, select the compound clip. If the Color Board is open, click the back arrow button to open the Video Inspector.
2. Press Command-5 to open the Effects Browser, and select the Stylize video category. Scroll through the thumbnails until you find the Projector effect, and double-click it to apply it to the compound clip.

3. Play through the compound clip. In conjunction with the Sewer preset you added to Correction 1, the Projector effect gives this part of the scene a rough, “grindhouse cinema” feel. Because the underlying clips match, any effects you apply to this scene will affect each clip in the same way. You can use effects to apply looks that are simply not achievable using color correction.
Using Broadcast Safe
Effects can have a dramatic impact on the video signal levels of a clip, so it’s important to understand the Final Cut Pro X order of operations when it comes to video processing. You’ll see what this means in the following exercise.
Understand that whatever an effect does to the video signal takes place before any corrections you apply. This is significant when you’re trying to respect the outer boundaries of 0 to 100 (as measured by the Histogram and waveform video scopes) required when submitting a program for broadcast and some other types of distribution.
1. With the compound clip still selected, delete the Projector effect, and click the Reset button for Correction 1 to return the scene to its previously graded state.
2. Double-click the compound clip to open it up, and then select the first clip of the series. When you first graded this clip, you capped the highlights at 100 to avoid any excess clipping. Now, you’re going to boost these highlights to blow them out.
3. If necessary, open the video scope (press Command-7), and set it to display the luma waveform.
4. Click the Color Board button for Correction 1, click Exposure, and drag the Highlights exposure control up until the highlights are at around 110.

The highlights get white hot, creating harsh, bright patches of light. Assuming you like the results of clipping out the highlight detail, you can apply the Broadcast Safe effect to limit the maximum signal to 100, thereby avoiding a QC (quality control) violation with the broadcaster.
5. Click the back arrow button to return to the Video Inspector, and then open the Effects Browser. Select the Basics video category, and double-click Broadcast Safe to add it to the current clip.

In the Waveform Monitor, notice that absolutely nothing happens to the video signal. Broadcast Safe is supposed to clip the video signal at the outer boundaries of 0 and 100, but in this case nothing happened because video effects are applied before color corrections. Your color adjustment is applied after the Broadcast Safe effect.

6. In the Video Inspector, delete the Broadcast Safe effect. Click the left arrow button to go back in Timeline history, and click the beginning of the compound clip to select it again.
7. Double-click the Broadcast Safe effect to add it to the compound clip. You should now notice that the highlights are capped at around 95.

Effects applied to compound clips are processed after the color corrections are applied to its individual clips. This is how you can get around the limitation of effects applied before corrections and manually change the order of operations.
Now, knowing that 0 and 100 are the outer boundaries of broadcast safe for the luma component of a video signal, the automatic adjustment made by the Broadcast Safe effect seems excessive. In fact, you can reduce the Amount parameter to lessen the amount of the signal that is clipped. However, before you do that, take a look at another aspect of the video signal.
8. From the Settings pop-up menu of the video scope, choose RGB Parade.
In most cases, 0 and 100 are also the outer allowable boundaries for a video signal decoded to RGB. Notice that if you turn off the Broadcast Safe effect in the Video Inspector, the red and green channels are well above 100. The Broadcast Safe effect is limiting the RGB components of the signal as well, and the result is a reduced luma level. However, the current effect is a bit conservative, so you can minimize it.
9. In the Broadcast Safe effect, drag the Amount slider to the left, reducing how much the signal is attenuated, until the top of the red channel just touches 100. At this point, the signal is probably fine, and you’re ready to move on with other adjustments.
In general, it’s better to limit your signal between 0 and 100 manually—using corrections of your own that are tailored to each clip—than it is to arbitrarily reduce overly bright detail using the Broadcast Safe effect. However, if you’re deliberately looking to blow out highlights or crush shadows as part of the look you’re trying to achieve, the Broadcast Safe effect is the right tool for the job.
Lesson Review
1. Where is the Match Color control?
2. What’s the best way to specify two frames for comparison?
3. What’s the first thing you should do when starting to balance a scene?
4. What’s an ideal scope for comparing color balance in the highlights or shadows?
5. What’s an ideal scope for comparing saturation?
6. Which two scopes are good for comparing image contrast?
7. Which video scope can you zoom into?
8. How do you copy effects from one clip to another?
9. What three commands aren’t initially assigned but useful for copying color corrections in the Timeline?
10. Can you use the Broadcast Safe effect to limit the results of a correction made to the same clip?
Answers
1. In the Color group of the Video Inspector
2. Use markers.
3. Choose a reference clip to compare all other clips in the scene to.
4. The RGB Parade scope
5. The Vectorscope
6. The waveform set to Luma and Histogram set to Luma
7. The Vectorscope
8. Copy a clip, and then select another clip and use Command-Option-V to paste effects.
9. The Apply Color Correction from Previous Edit, ...from Two Edits Prior, and ...from Three Edits Prior commands.
10. No
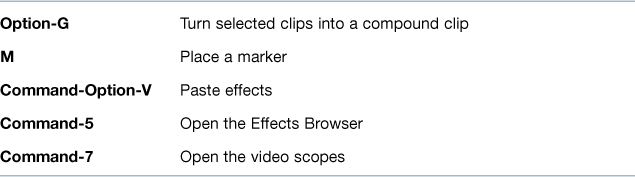
Keyboard Shortcuts