Lesson 9. Creating Animation
Video is all about movement: engaging the eye with moving light and shadow that the viewer interprets as a sun rising, a man and woman dancing, or smoke drifting lazily from a chimney.
You can support and enhance movement in your videos by creating motion of your own, as you did in the previous lesson with animated titles. In this lesson, you’ll learn how to enhance any clip by animating its properties.
In Final Cut Pro X, you can create animation with keyframes. You set keyframes with different values for a single parameter at two points in the Timeline, and Final Cut Pro will animate, or interpolate, the parameter values between the keyframes.
You can also create animation using transitions, and certain effects can be animated to turn on and off with a simple slider.
In this lesson, you’ll complete your show open by animating the position of the video clips, animating an effect, and animating the rectangle shape to match Justine’s hand movements. You’ll build on your compositing skills as you make her appear in color inside the rectangle. Finally, you’ll apply transitions to create animation from one clip to the next.
Animating Clip Position
Justine makes a dramatic move at the beginning of the first two video clips: spinning around in the first clip, and flipping back her hair in the second. But in each shot, she starts onscreen with her back to the camera. You can use keyframes to slide her onto the screen as she makes her move.
A keyframe locks the value of a specific parameter value—such as position, scale, or blur amount—at a specific point in time. By creating two or more keyframes at different points in time, each with different values, Final Cut Pro will change, or interpolate, the parameter value between the keyframes, thereby animating the parameter.
You can create and manipulate keyframes in the Viewer, the Inspector, and the Timeline.
To start working with keyframes, you’ll continue to use the Show Open compound clip you’ve been building in the preceding two lessons.
Note
If you didn’t complete the last lesson, you’ll find a completed project for you to use on the APTS FCP X ADV Part 2 mounted disk image. In the Project Library, open the Lesson 9 folder, and duplicate the Lesson 9 Start project (don’t include the render files.) Double-click the duplicate to open it into the Timeline.
Keyframing in the Viewer
You can set keyframes to animate clip transformations directly in the Viewer. In this exercise, you’ll animate the position of the starting video clip so that Justine flies in from the left as she spins around to face the camera.
1. In the Timeline index, make sure that only the English titles are enabled, and then close the Timeline Index and any Effects Browsers. Press Shift-Z to fit the project to the window.
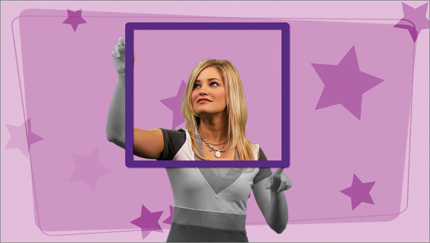
2. In the Timeline, select the Justine_funny_spin clip, and then move the playhead to the start of the project. This is the first frame of the first video clip, and Justine’s back is to the camera. You’ll move her offscreen at this frame.
3. In the Viewer, click the Transform button to enable the Transform effect.
As you’ve already seen, a bounding box appears around the clip.
4. In the Viewer, drag the clip to the left until Justine disappears completely offscreen. Watch the bottom of the bounding box to keep the clip aligned to the bottom of the frame.
You’ve now changed the position of the clip for every frame—so Justine will never appear. You want to set this new position value for the starting frame only; you do so by setting a keyframe.
5. At the top left of the Viewer, click the Add Keyframe button.

The white diamond turns orange to indicate that a keyframe now exists at the current playhead location for all the Transform properties: Position, Rotation, Scale, and Anchor. The values for each of these parameters are now “fixed” for this frame. The only parameter you want to change is Position.
However, adding a keyframe for a parameter at one point in time does not create animation. You need at least two keyframes, at different points in time, with different values.
6. Tap the Right Arrow key six times to move the playhead forward six frames, to 0:06.
This is the frame where you want Justine to arrive at her “landing” position.
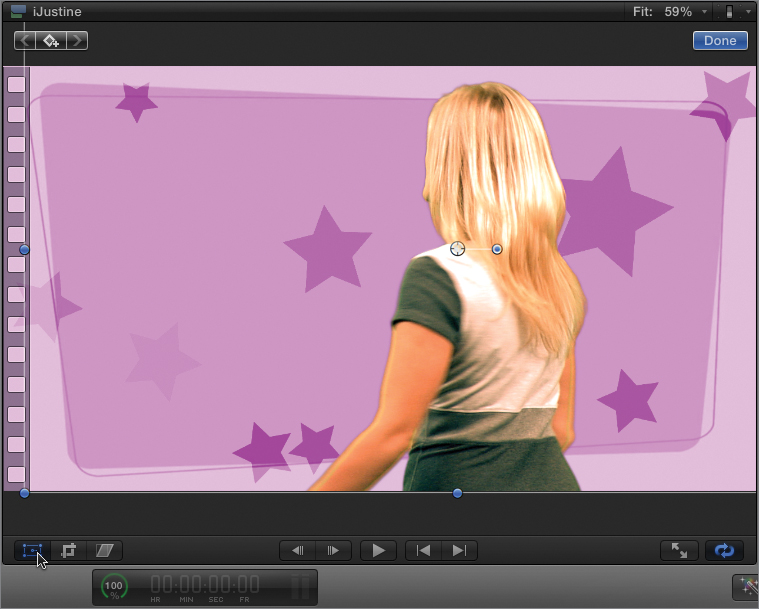
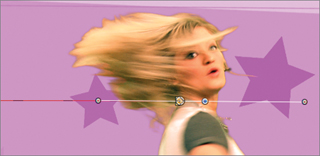
7. In the Viewer, drag the clip right to the middle of the frame. Make sure to keep the bottom bounding box line just outside the frame so that Justine isn’t cut off.
Because you already set one keyframe for the position of this clip at a different point in time, Final Cut Pro automatically sets a keyframe when you change the position of the clip directly in the Viewer. The red line, called the motion path, indicates the clip’s line of movement.
8. Press the / (slash) key to play the clip. Observe the animation, and then stop playback if looping is enabled.
Justine now animates onto the screen from the left as she spins around. However, since she stops in the center of the frame, the word Bold appears on top of her.

To fix this, you must adjust the value of this second keyframe; but to do so, you need to park the playhead on the frame that contains it. You can navigate to keyframes directly in the Viewer.
9. Stop the playhead when you can see the Bold title over Justine so that it is past the second keyframe. In the Viewer, click the left arrow near the Add Keyframe button to move the playhead to the last keyframe.
The Add Keyframe button turns orange to indicate that the playhead is parked on a keyframe.
10. In the Viewer, drag the clip to position Justine a bit farther to the right. Then, play the clip.
11. If you’ve moved her so far that her left hand is cut off, stop playback, move the playhead back to the second keyframe, and readjust her position.
Note
If you adjust the position of the clip when the playhead is not parked on a keyframe, you’ll set a new, third keyframe at this frame.
Tip
To move the entire motion path without setting a new keyframe, Command-Option-drag one of the keyframes on the red motion path line.

Using two keyframes, Final Cut Pro creates a straight motion path. But you can also create a curved path.
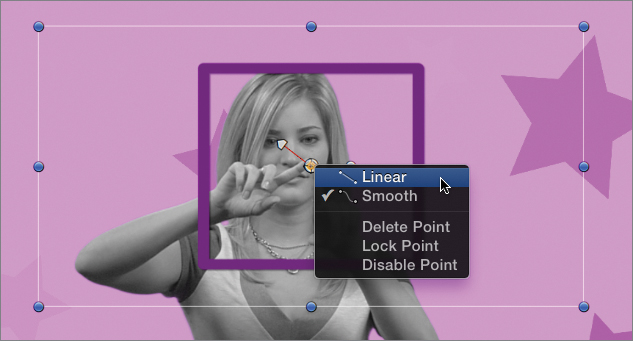
12. Control-click (or right-click) the endpoint of the motion path, and from the shortcut menu, choose Smooth.
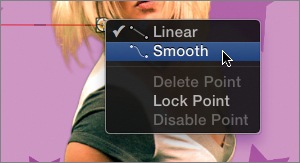
With Smooth chosen, you can create a curved motion path by dragging the Bezier handles that extend from the endpoint of the motion path.
13. Drag an end of the Bezier handles to create a curve in the motion path, and then play the clip to see the result.
Tip
To see exactly how the animation unfolds, tap the Right and Left Arrow keys to step through the animation frame-by-frame.

Justine now dips down as she comes into the frame and then pops up again. For this clip, however, a straight horizontal animation is all you need.
14. Adjust the Bezier handles so that they are horizontal with the motion path.
Setting keyframes in the Viewer is tactile and intuitive, but it does have limitations. For example, when you dragged the clip of Justine left and right, you might also have accidentally dragged her up or down, changing the end points of her motion path. You also can’t set specific values for keyframes in the Viewer, and you can’t change the location of keyframes in time to speed up or slow down the animation.
To perform those actions, you use the Inspector and the Video Animation Editor.
Keyframing in the Inspector
In the Inspector, you can set keyframes for just those parameters you want to animate, and you can change their values precisely. Let’s use the Inspector to animate the position of the second video clip.
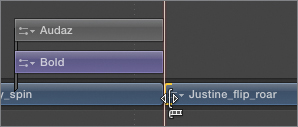
1. In the Timeline, select the Justine_flip_roar clip, and then tap the Up Arrow until the playhead moves to the start of the clip.

In this first frame, Justine is bending forward before she rises up and flips back her hair. Let’s position her below the screen, and then animate her up into view. You’ll work backwards this time: first, you’ll set the keyframe for her final position, and then you’ll set the keyframe for her offscreen starting position.
2. Tap the Right Arrow key six times to move the playhead forward six frames, to about 2:12. Make sure the Transform effect is still active in the Viewer (the button should be blue, and you should see a bounding box around the clip).
This six-frame animation will match the duration of the first clip’s animation.
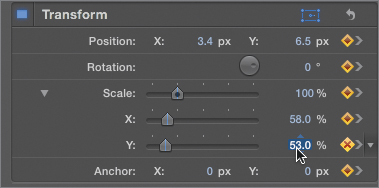
3. Open the Inspector, if necessary (press Command-4), and scroll down to the Transform section.
For the previous clip, you clicked the Add Keyframe button in the Viewer to set a keyframe. Let’s now see exactly what that does.
4. In the Viewer, click the Add Keyframe button while keeping an eye on the Inspector.

In the Inspector, orange diamonds appear next to all four Transform parameters, indicating that a keyframe is set for each parameter at the current playhead location. It doesn’t hurt to have them all keyframed (because you need two keyframes at different points in time with different values to create animation), but by creating keyframes in the Inspector instead of in the Viewer, you can set keyframes for just those parameters you want to animate.
5. Press Command-Z to undo the keyframes. Then in the Inspector, move the pointer over the Position parameter, click the triangle that appears to the right, and from the pop-up menu, choose Add Keyframe.
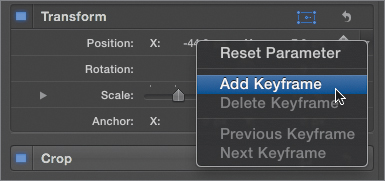
Now an orange diamond appears only next to the Position parameter, indicating a keyframe at the playhead.
Tip
You can also create a keyframe by clicking the gray diamond that highlights yellow with the + (plus sign) when you move the pointer over a parameter.
With the clip’s ending position locked in place, you can now set its starting position.
6. Press the Up Arrow to move the playhead to the start of the clip.
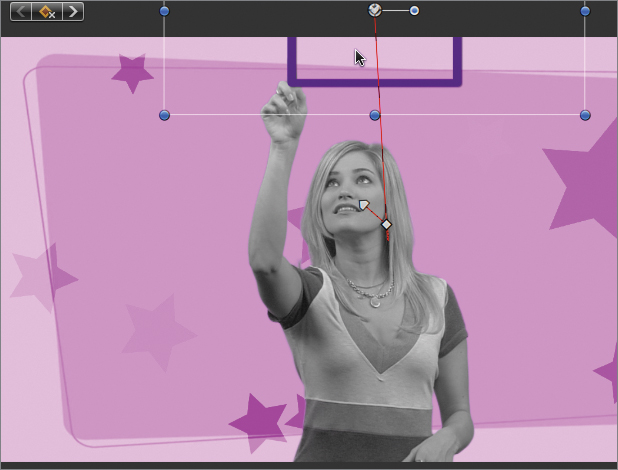
7. In the Inspector, drag left on the Position Y value until Justine moves down out of the shot. A red line in the Viewer indicates the motion path, and a small gray arrow indicates the starting and ending keyframes.

8. Press / (slash) to play the clip.
Justine now animates up from offscreen. And because you changed just the Y-position value in the Inspector, you know her motion path doesn’t shift right or left.
Note
You don’t need to enable the Transform effect to set keyframes in the Inspector. However, you can’t see the resulting motion path or switch between Linear and Smooth without enabling the effect.
Keyframing in the Video Animation Editor
You’ve keyframed the position of the first two video clips using both the Viewer and the Inspector. But you can also work with keyframes in the Timeline using the Video Animation Editor. You can set keyframes, move keyframes in time, change the value of certain parameters, and fade certain effects.
1. Select the first video clip, Justine_funny_spin, and choose Clip > Show Video Animation (or press Control-V). Then press Command-= (equal sign) to zoom in. You may need to scroll vertically and/or horizontally to frame the clip.
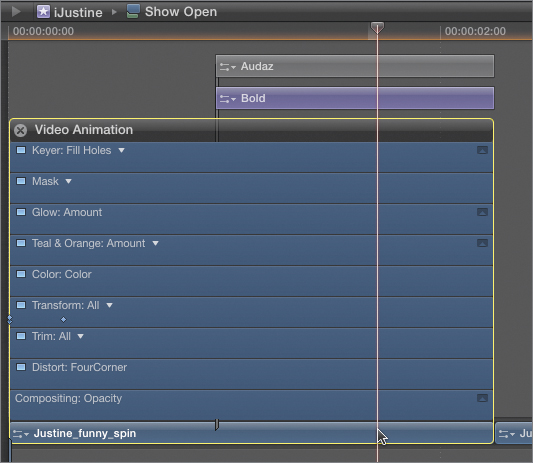
The Video Animation Editor opens above the selected clip with blue bars for opacity, transformations, color corrections, and applied effects stacked up from the bottom. As in the Inspector, each bar contains a blue checkbox you can click to toggle the effect on or off.
2. Click the blue checkbox for the Transform effect, and then play the clip.

The bar turns gray to indicate that the effect is disabled, and the clip position no longer animates.
The diamonds along the line in the Transform effect bar indicate the keyframes for this effect. Notice that two diamonds are stacked on top of each other at the start point of the clip. These indicate that keyframes are set for at least two parameters on this frame. You can choose which keyframes to display.
3. Enable the Transform effect again, and then click the triangle next to “Transform: All”, and choose Position.

Now only the single Position keyframe appears at the start point of the clip.
You can change the timing of a keyframed animation by moving the keyframes in the Video Animation Editor.
4. Drag the second keyframe to the right and play the clip.

Justine now takes much longer to slide across the screen.
You can also use the Video Animation Editor to animate other effects.
5. Undo the keyframe move, click the close button (X) at the upper left to close the Video Animation Editor for this clip, and then select the next video clip. Press Control-V to open the Video Animation Editor for that clip.
Tip
Pressing Control-V will also close the Animation Editor if it is open.
Effects that include a small disclosure triangle in the upper right of the bar can be animated to fade in and out by dragging handles.
6. Click the disclosure triangle for the Graphic effect to expand it. If necessary, click the triangle next to the name of the Graphic effect and select the Amount parameter.
Tip
You can also double-click any effect that has a disclosure triangle to expand or collapse it.
The horizontal line in the middle of the bar represents the value of the selected parameter—in this case, the Amount for the Graphic effect. You can drag up or down on the line to change the value.
7. In the Video Inspector, locate the Graphic effect, and note that the Amount value is around 50. In the Video Animation Editor, drag up and down on the horizontal control to change the value, noting the change in the pop-up window, the Inspector, and the Viewer.

Rather than setting a constant value, we’d like this effect to “turn on” over time. In other words, we’d like the Amount value to change from 0 to 50. You can accomplish this task in the Video Animation Editor by dragging the fade handles or by creating keyframes.
8. Drag the left fade handle to the right about 15 frames to fade in the Amount parameter, and play the clip.
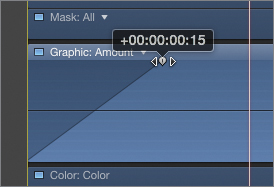
The effect now animates on during the first 15 frames. But it would look better if the effect didn’t start fading on until the point that Justine freezes. For this task, you need to use keyframes.
9. Undo the fade adjustment, or drag the fade handle back to 0.
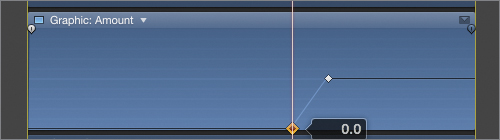
10. Move the playhead to the frame where Justine freezes, at about 3:11 (where the titles start). Then, Option-click the horizontal control at the playhead to set a keyframe.

Option-clicking anywhere on the horizontal control sets a keyframe for the selected parameter.
11. Set a second keyframe about six frames later.
Tip
You don’t have to move the playhead to the frame where you want the keyframe, but doing so can help guide you to a specific frame.
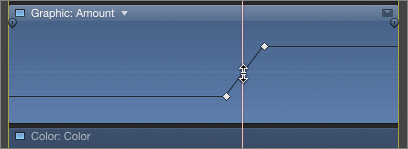
12. Drag the first keyframe all the way down to 0, and then play the clip.
The clip starts out with no effect applied, and then the Graphic effect ramps up quickly when Justine freezes.
You can even change how an effect changes between the two keyframes.
13. Control-click the sloped line between the two keyframes.

The pop-up menu includes four options. The default option, Linear, creates a constant rate of change between the parameter values. The other options create a smoother start or ending to the animation, or both. In this case, the animation is so short that these changes won’t be perceptible.
You can also adjust all the keyframes on a curve at once.
14. Click to close the pop-up menu, then drag the sloped curve up between the keyframes. The entire curve moves up so that the Amount parameter starts with a non-zero value.
Tip
When more than two keyframes are applied, dragging a segment between two keyframes moves only part of the curve. To move the entire curve in those cases, Command-Option-drag any part of the curve.
Now that you’ve covered the basics of creating animation in the Viewer, Inspector, and Video Animation Editor, let’s tackle an animation that requires animating more than one parameter and more than two keyframes.
Note
The Audio Animation Editor, also available from the Clip menu, works in a similar fashion when animating audio effects.
Animating a Generator
In the third video clip, Justine reaches up to grab something, pulls it down, expands it, gives an approving look, and finally swipes it away. In an earlier lesson, you composited a rectangle on top of her using a generator. Now, you’ll use keyframes to animate the rectangle to follow her hand movements. As you work, you’ll use the Viewer, Inspector, and Video Animation Editor.
1. With the second video clip selected, press Control-V to close its Video Animation Editor. Now select the storyline containing the Shapes generator, and scroll over in the Timeline to frame it.

Note
Make sure you’ve selected the Storyline containing the Shapes generator and not the clip itself.
Animating the generator will be easier if it isn’t in a storyline.
2. From the Clip menu, choose Break Apart Clip Items, or press Shift-Command-G. In the warning dialog that appears, click Break Apart.

The storyline and the transition are removed, and you have direct access to the connected Shapes clip.
3. Press Control-V to reveal the Video Animation Editor for the Shapes clip, and zoom in and scroll down, if necessary, to frame it in the Timeline.
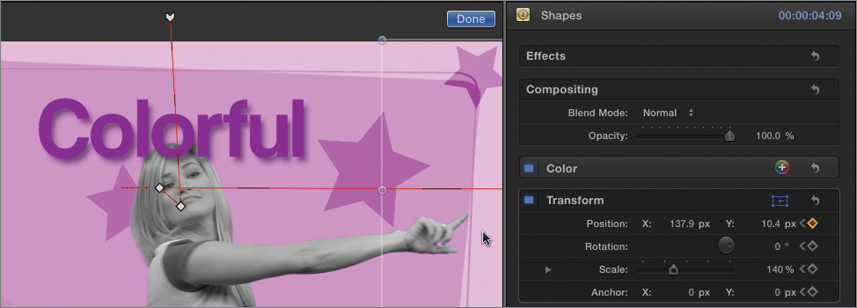
You’ll animate both the Position and Scale parameters of this generator to have it follow Justine’s fingers. You’ll start in the middle of the clip, at the point Justine has expanded the rectangle to its full size, and then work backward and forward from this frame.
4. Move the playhead to the frame where Justine has finished moving her fingers outward to expand the square, at about 6:16.
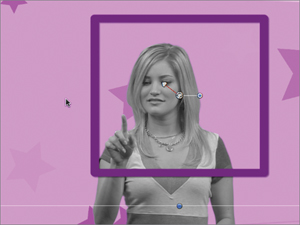
This is the frame where the rectangle will stop scaling up. You’ll use the Transform effect to line up the rectangle corners with her fingers, and then set keyframes for Scale and Position parameters.
5. In the Viewer, click the Transform effect button if necessary, and then scale and reposition the square so that the upper-left and lower-right corners align with Justine’s fingertips. Drag the control handles along the sides of the bounding box to scale it non-proportionally, as needed.

Tip
You may want to change the zoom level in the Viewer to make it easier to select the bounding box handles, and you may also want to turn off snapping by pressing N.
6. In the Video Inspector, set keyframes for Position and Scale.

With the rectangle now locked in place at this frame, you’ll move to the frame where Justine starts to drag out the edges, add keyframes for Position at that frame, and then move the rectangle to once more align with her fingers.
7. Press the Left Arrow key to move back frame by frame until just before Justine’s fingers start to move apart, at about 6:04.
8. In the Viewer, drag the center of the bounding box to position it on Justine’s fingertips.
Tip
You could make the rectangle small enough to place her fingers behind the corners, but the overall animation will work better if you leave it large enough to frame her eyes and center it on her fingers.

A red motion path appears in the Viewer, yellow diamonds appear for all the Transform parameters in the Inspector, and blue double diamonds appear in the Video Animation Editor in the Timeline.
9. Press / (slash) to play the clip.
The rectangle moves into position, but it doesn’t grow at all. We didn’t change its scale because of what Justine does before this animation.
10. Move the playhead to the frame where Justine stops pulling her finger down, at about 5:08.
At this frame, her finger is quite far from the center of the rectangle. To deal with this, we can scale down the rectangle so that its edge covers her finger here.
11. With the playhead positioned at 5:08, in the Viewer, drag a corner bounding-box handle to decrease the scale until it covers her finger.

This action set new Scale keyframes at 5:08.
12. Play through the animation.
It’s getting there, but you don’t want the scale of the rectangle to change between 5:08 and 6:04. So, you need to place a Scale keyframe at 6:04 with the exact same values as at 5:08.
13. In the Inspector, click the disclosure triangle for Scale to reveal the individual X and Y parameters. Change their values to the nearest whole number to make them easier to remember.
14. Click the arrow to the right of the yellow Scale keyframe icon in the Inspector to move to the next keyframe at 6:04. At that frame, enter the same Scale X and Scale Y values.
If you don’t remember a value, click the arrow to the left of the keyframe icon to jump back to the earlier keyframe.
15. Skim, scrub, or step through the animation.
The rectangle seems to move just a small amount between the first two keyframes, before she moves her fingers apart.
When you create a motion path with more than two keyframes, Final Cut Pro assumes you want a smooth interpolation between the frames, which can result in movement between them, even if the keyframes have the same values.
16. In the Viewer, Control-click the gray arrow at the bottom of the animation path, and from the shortcut menu, choose Linear. Step through the animation.
The rectangle now stays rock solid and motionless between the first two keyframes. With the middle part of the animation completed, you can move to its beginning and the end.
17. Move the playhead to the frame just before Justine begins to drag her finger down, at about 4:21.
18. In the Viewer, drag the rectangle up and over so that Justine is touching the left edge near the bottom corner. The new motion path appears in the Viewer.
19. Tap the Right Arrow key to step through the animation.
The shape moves down with her finger; but once again, it continues to move after the keyframe at 5:08—even though the next keyframe at 6:04 has the same position values. (You can verify this by clicking the arrows on either side of the keyframe icon in the Inspector.)
Even though you set the keyframe to Linear, another keyframe is actually beneath it that isn’t selectable.
Note
If the keyframe is already set to Linear, you’ll still need to perform the following steps.
20. In the Viewer, drag the white diamond to the right to reveal the keyframe underneath it.
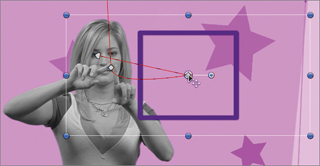
You can see that one segment of the motion path is curved and the other is straight.
21. Change the exposed keyframe’s interpolation to Linear, and then drag the moved keyframe back on top of it. In the Inspector, click the arrows on either side of the keyframe icon to move between these two keyframes. Type values for X and Y so that they match exactly. Then play the clip.
Now you just need to animate the shape off the screen.
22. In the Inspector or the Video Animation Editor, set a keyframe for the position of the shape at about 8:09, just before Justine swipes her finger off to the right. Change the interpolation of this keyframe to Linear, if necessary, so the shape will remain still between 6:04 and 8:09.
23. Press the Down Arrow and then the Left Arrow to move the playhead to the last frame of the clip, and in the Viewer, drag the shape straight off the right edge of the screen. If necessary, change the keyframe in the Viewer to Linear.
24. In the Viewer, click Done to disable the Transform effect, and play the clip. Adjust the position and font size of the English and Spanish titles to align with the new shape position.
By setting and adjusting keyframes in the Viewer, Inspector, and the Video Animation Editor, you’ve created a fun, engaging animation. In the next exercise, you’ll complete the effect by making Justine more colorful.
Creating a Travel Matte
A travel matte, a mask also known as a travelling matte, creates transparency that changes over time. The Keyer effect you used in an earlier lesson is a type of travel matte.
Another type of travel matte applies transparency to a clip based on the transparency of another clip. For example, you could mask a video clip so that it appears only inside a shape from a generator clip.
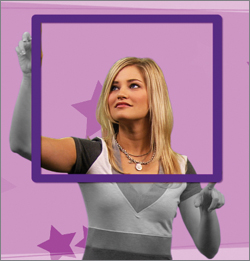
Your goal is to keep Justine black and white outside the rectangle shape, but appear in full color inside the shape—no matter how the rectangle moves and scales.
To accomplish this task, you’ll build on the compositing skills you developed earlier by duplicating clips, employing a compound clip, and using a blend mode to create the travel matte.
1. In the Timeline, with the Shapes clip selected, click to close the Video Animation Editor (or press Control-V).
2. Trim the Start point of the Shapes clip to match the start of the video clip. Select the Shapes clip, move the playhead to its start point, press Command-C to copy it, and then press Option-V to paste the copy as a connected clip at the playhead. Select the copy and Shift-drag it below the titles.
Note
If the copy is pasted a frame early, undo the paste operation, move the playhead forward one frame, and paste again.
You will use this copy to matte a full-color copy of the Justine clip below. First, you need to make a copy of that video clip and put both copies into a compound clip.
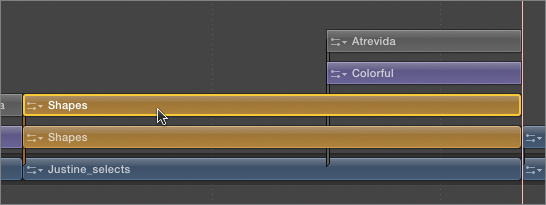
3. Select the Justine_selects clip. Move the playhead to the start point, press Command-C to copy it, and then press Option-V to paste it as a connected clip at the playhead. Select the copy and then Shift-drag it below both Shapes clips.

Now you’ll combine the two middle clips into a compound clip.
4. Select the lower Shapes clip, and Shift-click the upper Justine_selects clip. Choose File > New Compound Clip, or press Option-G.

You have created a connected clip “sandwich.” You will leave the top Shapes clip and the bottom video clip unaltered. In fact, if you play the clips now, you’ll see that nothing has changed. You’ll use the copies inside the compound clip to create the travel matte. To do so, you need to open the compound clip.
5. Double-click the compound clip to open it in the Timeline. Move the playhead to the point where Justine has expanded the shape, at about 2:08.

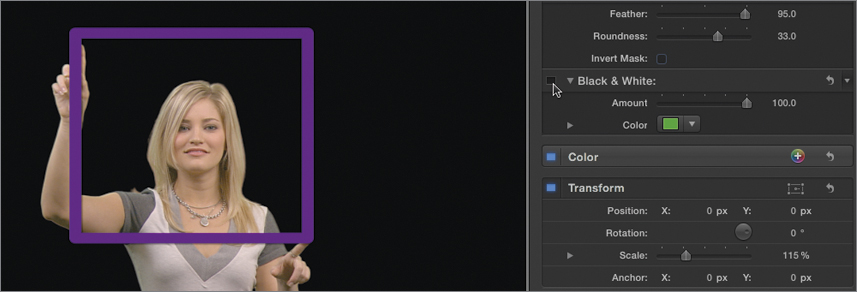
You are now looking at just the copied clips outside the context of the full project. Because the clip copies contain all the applied effects, Justine appears in black and white, keyed over a black (transparent) background.
In this compound clip, you want Justine to appear in color, and only inside the shape.
6. Select the Justine_selects clip, and in the Video Inspector, deselect the Black & White effect.
For Justine to be visible only inside the rectangle, you’ll need to fill it with a solid color so that you can apply a blend mode to reveal her.
7. Select the Shapes layer, and in the Generator Inspector, select the Fill checkbox.
Note
The fill color does not matter. The key is that no transparency exists inside the shape.

8. Select the Video Inspector, and set the Blend Mode to Stencil Alpha. Play the clip.
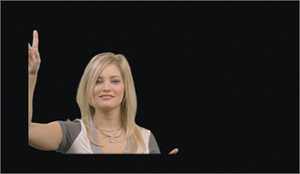
Justine appears only inside the animating shape. Let’s see how this compound clip looks in the context of the project.
9. At the upper left of the Timeline, click the left arrow to go back in the Timeline history, and then play the clip.

Sure enough, Justine is in color inside the shape, and black and white on the outside. However, the difference is a little too subtle. Let’s see if we can make her even more colorful.
10. At the upper left of the Timeline, click the right arrow to return to the compound clip (or double-click the clip.)
11. Select the Justine_selects clip, move the playhead to its start point, press Command-C to make a copy, and then press Option-V to paste the copy as a connected clip at the playhead. Select the copy and Shift-drag it below the Shapes clip.

12. With the upper video clip selected, go to the Video Inspector, scroll down, and from the Blend Mode pop-up menu, choose Hard Light. The blend mode increases the intensity of the color.
13. Click the left arrow at the top left of the Timeline to return to the full project. Play the compound clip.
Justine now appears much more colorful inside the shape.
Your project is almost complete. To give it a final polish, you’ll use transitions to create animation between video clips.
Animating with Transitions
Transitions offer fast and easy ways to create animation without setting keyframes. The Transitions Browser includes myriad ways to animate from one clip to the next. For this project, the Slide transition can animate Justine on and off the screen.
1. Press Shift-Z to fit the Timeline to the window, and then move the playhead to the edit point between the first and second clips. Press Shift-/ (slash) to play around the playhead.
Tip
You may want to disable the audio clip by selecting it and pressing V. You may also want to enable looping by pressing Command-L.
Currently the edit point is a straight cut from the first clip to the second. You can insert a transition to animate Justine off the screen at the end of the first outgoing clip.
2. In the Timeline, click either side of the edit point to select it. It doesn’t matter which side you select.
3. In the toolbar, select the Transitions Browser. Then select the Movements category, scroll down, and double-click the Slide transition to apply it to the selected edit point.

4. Select the transition in the Timeline, and in the Transition Inspector, change Type to Slide Push, while leaving Direction as Right. Press the Left and Right Arrow keys to step through the transition.
Tip
When selecting the transition, be careful not to click too close to the middle or the edge or you will select an edit point.

The outgoing clip slides off the screen as the incoming clip slides in (and also slides up because you earlier animated its Y-position with keyframes).
You can apply a variation of this transition to the next edit point.
5. Option-drag the transition from the first edit point to the second to create a copy.

6. In the Transition Inspector, change Direction to Left, and then step through the transition. The second clips flies out to the left, and the third clip files in from the right.
The compound clip above the third video clip does not need the transition because you don’t see Justine in color until she pulls down the box several frames after the transition’s end. But for the next edit point, you’ll need to place a transition on both the primary storyline and on the edit point between the connected clips.
7. Select the first transition in the Timeline (between the first and second video clips), and Option-drag it to the edit point between the third and fourth video clips. Step through the transition.
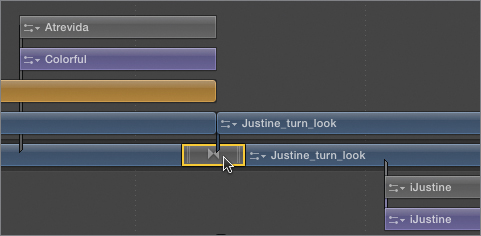
The outgoing clip slides out to the right, and the incoming clip slides in from the left; but because no transition exists between the connected compound clip and the copy of the Justine_turn_look clip, you can see offset copies of the video in the Viewer.

In an earlier exercise, you saw that adding a transition from the Transitions Browser to a connected clip automatically places the clip into a storyline. In this case, however, it is more convenient to copy the existing transition in the Timeline to keep the changes intact. Since you can’t Option-drag a copy of a transition onto a connected clip that isn’t in a storyline, you’ll first create the storyline, and then add the transition.
8. Select the compound clip, and then Shift-click the upper Justine_turn_look clip next to it.

9. Choose Clip > Create Storyline, or press Command-G.

The clips are now part of a storyline. However, if you try to Option-drag the transition to the edit point, it still won’t work because you don’t have any extra media, or handles, in the compound clip with which to create the transition. Luckily, it’s an easy fix.
10. Double-click the compound clip to open it in the Timeline.
11. Trim the end point of all three clips to extend each by seven frames.

The transition is 13 frames, so it needs 6 or 7 frames of handles on each side of the edit point. The dark area into which you are extending the clips indicates that you are creating handles. In other words, you are not changing the overall project duration.
12. Click the left arrow at the upper left of the Timeline to go back in the Timeline history to view the full project. Notice that all the clips and connected clips still end on the same frame.
13. Select the transition below the connected storyline, and then Option-drag it to the edit point between the two clips in the connected storyline. Step through the transition.
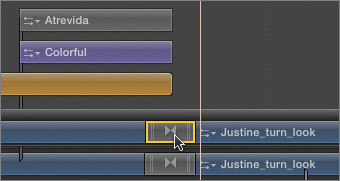
The two copies of each side of the transition are now in perfect registration.
14. If necessary, enable the audio clip, and then play the full project.
Great work. In this lesson, you’ve learned how to create and manipulate keyframes to create animation, and you’ve employed transitions, blend modes, and compound clips to complete your show open.
Over the course of the preceding three lessons, you’ve built a complete show open from scratch, employing a great variety of compositing and animation techniques that you can now apply to your own projects.
Lesson Review
1. How many keyframes do you need to create animation?
2. Identify the three locations where you can create and edit transformation keyframes.
3. When does changing a parameter value automatically set a keyframe?
4. Describe three ways to park the playhead directly on a Position keyframe.
5. You have enabled the Transform effect in the Viewer and clicked the Add Keyframe button at the top left of the Viewer. In the Timeline, you’ve opened the Video Animation Editor for the selected clip, and at the playhead position, you see two diamonds stacked on top of each other for the Transform effect. How many keyframes did you just set?
6. Can some effects parameters be animated without manually adding keyframes?
7. You want to animate a clip to fly onto the screen, stay still for five seconds, and then fly off the screen. What are the minimum number of position keyframes you need to set, and what keyframe interpolation must be chosen for the two keyframes that have the same value?
8. What blend mode, when applied to a connected clip that sits above the primary storyline, will mask the connected clip based on the transparency of the clip beneath it?
9. Connected clips must be part of a storyline in order to accept transitions. How can you create a storyline and add a transition in one operation?
Answers
1. You need at least two keyframes on the same parameter with different parameter values.
2. The Viewer, the Inspector, and the Video Animation Editor in the Timeline
3. When an initial keyframe is already set for a parameter, changing its value at another point in time will automatically create a keyframe.
4. In the Viewer, click the white keyframe indicator on the motion path. In the Inspector, click the arrows on either side of the Add Keyframe button. In the Timeline, move the playhead over the diamond in the Video Animation Editor.
5. You set four keyframes. When you click the Add Keyframe button in the Viewer, it sets keyframes for all the Transform parameters, including Position, Rotation, Scale, and Anchor. The two stacked diamonds in the Video Animation Editor indicate that two or more keyframes exist at the playhead for that effect.
6. Yes, certain effect parameters have fade handles in the Video Animation Editor you can drag to fade the effect on and off.
7. You need four keyframes. The two keyframes with the same value must have Linear interpolation (as opposed to Smooth interpolation) to keep the clip motionless.
8. Stencil Alpha
9. Drag a transition from the Transitions Browser to the start or end point of a connected clip to create a storyline and add the transition in one operation. Alternatively, if the edit point is selected, double-clicking the transition in the Transitions Browser will do the same thing.