
Chapter 3
Creating Items, Other Lists, and Your Beginning Balances
In this chapter:
• About items
• Creating items
• Using QuickBooks lists
• Class types and other lists
• Creating opening balances
This chapter introduces you to additional lists and items you may use in your transactions. QuickBooks uses items to list the things you sell in sales-related transactions. You can also use items on a bill to tell QuickBooks about the things you buy from a vendor. An item can be a product (that you may or may not be tracking as inventory), a service, or any necessary entry on a sales or purchase transaction. You’ll learn about many of the different items you can use in QuickBooks, except for payroll items (covered in Chapter 9) and inventory items (covered in Chapter 13).
In addition, in earlier chapters, you learned how to set up the chart of accounts and the Customers and Vendors lists used in nearly every QuickBooks transaction. In this chapter, you’ll learn about additional lists that don’t require extensive amounts of data or time to set up, but that can help make your work in QuickBooks more efficient and make it easier to generate more meaningful reports.
Understand How Items Are Used
What other items are used in a transaction besides products and services? Well, think about all the different elements you see on an invoice. If you charge sales tax, that’s an item. If you accept prepayments or give discounts, both are items. If you subtotal sections of your invoices to apply discounts or taxes, that subtotal is also an item. If you charge for shipping or restocking fees, these, too, are items.
Items are used in sales-related transactions, where each line in an invoice, for example, includes an item that represents a product or service that you sell. Every item you create is linked to an income account in your chart of accounts, so that when you’re creating a transaction you don’t have to worry about the account to which any individual line item on an invoice or sales receipt is posted—your item takes care of all that behind-the-scenes accounting for you.
Most items are linked to an income account, because items are often things you’re selling to the customer. You can link all of your items to one income account in your chart of accounts (called “Income” or “Sales”), or you can track different types of items by linking them to different income accounts. For example, you might want to link all product sales to an income account named Product Sales and link the services you sell to an income account named Service Sales. The advantage of linking certain types of items to certain income accounts is that when you look at a standard Profit & Loss report, you can tell at a glance what your sales totals are for each group of item types. QuickBooks also offers several item reports that give you insight into details such as your best sellers and your most profitable and least profitable items.
Some items are not linked to income accounts because they’re not considered income. For example, sales tax isn’t income to you; it’s money you collect for a government agency, and you have to turn that money over to them. Because these funds are someone else’s money, sales tax items link to a liability account.
Discounts you give your customers are items, and you should link them to accounts designed for that purpose to help you see in your reports the savings and incentives that you’ve passed on to your customers. Items are a bit more varied than you may have thought, but creating and configuring them is not complicated when you follow the steps outlined here.
![]()
Understand Item Types
QuickBooks needs to categorize the items that you add to your Item List, and it does this by using item types. Because it sometimes may not be obvious which type you should use, the following item examples may help you make the right choices:
• Service Service items can be charged by the job or by the hour and are performed by either employees or outside contractors.
• Inventory Part This item type is a product you buy to resell. Learn more in Chapter 13.
• Non-inventory Part This item type is a product you buy and sell but don’t track as inventory, such as merchandise drop-shipped to a customer or products you buy.
• Other Charge This is used for shipping charges or other line items that don’t fit as a Service or Inventory item.
• Subtotal This item type automatically adds up the line items that come immediately before it on a sales transaction. It provides a subtotal before you add other charges or subtract discounts.
• Group Group items save time, because you can enter a group of individual items that you typically sell together. Each item that you want to make a Group item must first exist separately in your Item List.
• Discount Discount items apply either a percentage or dollar discount to the item immediately preceding it. You can create more than one, such as a discount percentage for wholesale customers and a discount amount for a volume purchase.
• Payment This item type shows on an invoice when you receive either advance payments or deposits.
• Sales Tax item Create one of these item types for each sales tax authority for which you collect sales tax. This item type is available only if the sales tax preference is enabled.
• Sales Tax Group This item enables you to create one sales tax rate out of several sales tax items.
Build Your Item List
The information that QuickBooks needs to create an item depends on the type of item you create. Service items are relatively simple to create, but inventory items require a bit more planning, which is why Chapter 14 goes into more detail.
![]()
Create a Service Item
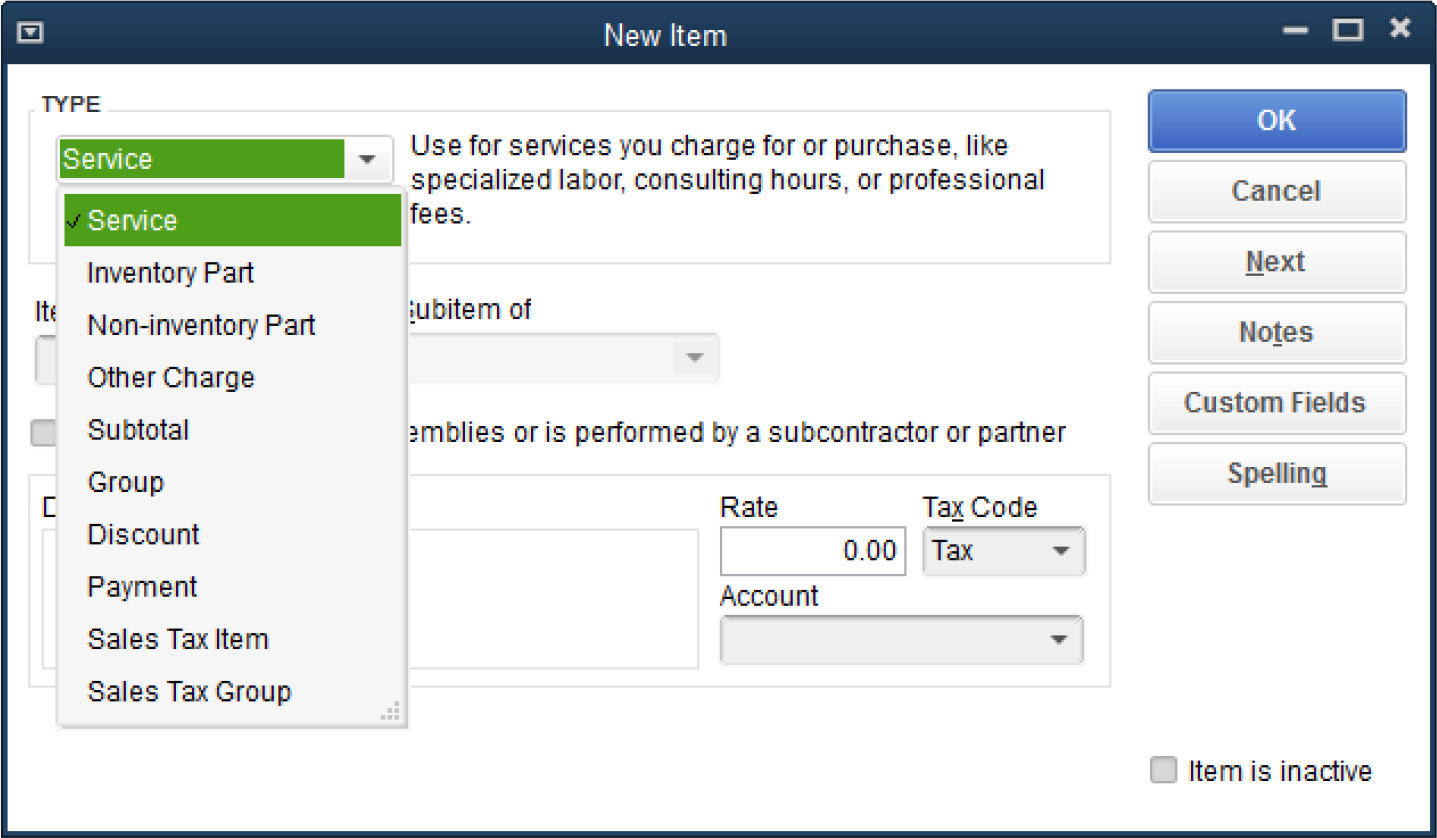
The process of building your item starts by choosing Lists | Item List from the menu bar. With the Item List open, press CTRL-N to open the New Item window. The Type field at the top has a drop-down menu that displays a list of available item types, as shown here. Select Service as the type.
Insert a unique identifying code in the Item Name/Number field. This Item Name/Number can simply be the service that’s being offered. When you fill out sales or purchase transactions, you see this name or number in the drop-down list.
If you want to make your item a subitem of another item, check the Subitem Of check box. Subitems enable you to track the sales and purchases of an item at either a summary or detail level. Use subitems to organize a complex Item List and to create lists in a way that makes sense to you and others in your company.
Next, you see the check box option to tell QuickBooks whether this service is used in assemblies (only QuickBooks Premier and Enterprise Editions offer the assembly feature) or is performed by a subcontractor or partner. When you check this box, the item record expands (as shown next) to include fields that allow you to link both the expense side of this item as well as the income side to different accounts in your chart of accounts. If you use this feature, use the drop-down arrow next to the Expense Account field to select an appropriate expense account from your chart of accounts. You can fill in the Cost field here or leave it at zero if you pay more than one rate for that service to different subcontractors. Later, when you pay the vendor you’ve hired as a subcontractor for this service, you’ll select this item (using the Items tab in either the Write Checks or Enter Bills window) and fill in a cost.

In the Sales Price field, enter the amount or hourly rate you charge for this service. You can leave this field at zero if you don’t have a standard rate for this service and you want to fill in the price when you create a sales transaction. Be sure to use the Tax Code drop-down arrow to indicate whether this service is taxable, and then choose the income account to which it is linked. Click the Notes button to open a notepad to record and store any special information that you want to keep track of about this item. When you’re done, click OK to return to the Item List or click Next to create another new item.
Create Custom Fields for Items
Using custom fields, you can record unique information about the products and services you sell, such as information about the size or color of an item you stock or noting the location in your warehouse where a particular part is stored. You can create up to five fields:
1. Open the Item List, select an item, and press CTRL-E to edit the item.
2. Click the Custom Fields button. (The first time you create a custom field, a message appears telling you that there are no custom fields yet defined; click OK.)
3. When the Custom Fields dialog appears, click Define Fields.
4. In the Set Up Custom Fields For Items dialog, enter a name for each field you want to add.
5. Place a check mark in the Use column to use the field and click OK.
As you create your fields, keep in mind that all fields are shared among all the items in your Item List (except for subtotals, sale tax items, and sales tax groups), including inventory, non-inventory, or service items. The maximum number of fields available is five. See Chapter 14 to learn how to add these fields to your invoice and other forms.
Creating the Other Items in Your Item List
Although many of the fields in the New Item window are similar, regardless of the type of item you’re creating, some fields are particular to the type of item you’re creating. The following section covers these other item types while also pointing out any unique fields you need to understand, as shown in the following list.
• Non-inventory items Make a Non-inventory item “two-sided” (that is, check the This Item Is Used In Assemblies Or Is Purchased For A Specific Customer:Job box) to designate both an income and expense account. If you purchase an item from a vendor that references this non-inventory part using their own unique number, use the unique number in the Manufacturer’s Part Number field so it is available when you make purchases from that vendor.
• Other Charge items Usethisitemtypeforshippingorotherchargesthatyou want to show on a sales transaction.
• Subtotal items This useful item type enables you to add and total groups of items within the body of an invoice or sales receipt. Simply list the subtotal item immediatelyafter thelistofitems forwhichyou want to show asubtotal.
• Discount items A Discount item affects the line item immediately before it. Indicate either a flat dollar rate or a percentage discount when you create this item type.
• Payment items Use a Payment item to record the receipt of a partial payment. When listed on an invoice, a Payment item reduces the balance due.
Group Items
Use a Group item to list items that you typically sell together on an invoice or sales receipt. Before you create a Group item, be sure that the individual items are entered into your Item List. Then follow these steps:
1. From the Item List, press CTRL-N to open the New Item window and select Group from the Type drop-down list.
2. Create a name for the new group in the Group Name/Number field.
3. Enter a description if you choose. Note that whether or not you select the Print Items In Group option (which ensures that individual items in the group will appear in the transaction), your entry in the Description field appears on the printed sales transaction unless you decide to change it.
4. Select each item that is to be part of this group and enter the quantity (if applicable) for each item. Click OK when you are finished.
![]()
Changing Item Prices
If you want to create a price increase (or decrease) for one or more of the services or products you sell, use the Change Item Prices window.
1. From the Customers menu, select Change Item Prices.
2. In the Change Item Prices window, use the Item Type filter to list only those items of a particular type (Service, Inventory Part, Inventory Assembly, Non-inventory Part, or Other Charge).
3. Place a check mark next to the items subject to a price change and tell QuickBooks if the price change should be calculated as an amount or as a percentage of the item’s cost or its current price.
4. If you’d like QuickBooks to round up the adjustment, use the Round Up To Nearest drop-down menu to choose a rounding option. Otherwise, you can leave this option at its default of No Rounding.
5. Click the Adjust button to effect the change, and then click OK.
![]()
Using Sales Tax Items
If you collect (and remit) sales tax, you need to configure your Sales Tax Preferences and set up tax codes to link to your customers so you know whether a customer is liable for sales tax. You also need to set up tax items for the sales tax to be collected and link the item(s) to the taxing authority to which you remit the collected sales tax.
Start your sales tax setup by choosing Edit | Preferences from the menu bar. Click the Sales Tax icon in the left pane and select the Company Preferences tab.
If you used Advanced Setup and you didn’t enable the sales tax feature, you can do it now by selecting Yes for the option Do You Charge Sales Tax? The following sections cover the other options in this dialog.
Sales Tax Items
A sales tax item is really just a collection of data about a sales tax, including the rate and the agency to which the sales tax is remitted. QuickBooks uses sales tax items to calculate the Tax field at the bottom of sales forms and to prepare reports you can send to your local taxing authority. You can create your first sales tax item in the Sales Tax Preferences or directly in your Item List.
The Sales Tax Company Preferences dialog includes a field named Your Most Common Sales Tax Item, and you must enter a sales tax item in that field. To do that, you must first create at least one sales tax item. This item becomes the default sales tax item for any customers you create hereafter, but you can change any customer’s default sales tax item at any time.
Creating Sales Tax Items in the Item List
Once you’ve set the Sales Tax Preference, follow these steps to create an item in your Item List:
1. Select Lists | Item List from the main menu to open the Item List.
2. Press CTRL-N to open the New Item dialog, and select Sales Tax Item as the item type.
3. Enter a name for the item. You can use the state’s code for the specific sales tax rate and taxing authority. You can also enter an optional description.
4. Enter the tax rate.
5. Select the tax agency (a vendor) to which you pay the tax from the drop-down list, or add a new vendor by choosing <Add New>.
6. Click OK.
Sales Tax Codes
QuickBooks uses sales tax codes to designate an item as taxable or nontaxable on a sales transaction. You can create codes to track sales tax status with more detail than taxable and nontaxable. To do so, just add new sales tax codes to fit your needs. To add a new sales tax code, follow these steps:
1. Select Lists | Sales Tax Code List.
2. Press CTRL-N to open the New Sales Tax Code window.
3. Enter the name of the new code (up to three characters in length).
4. Enter a description.
5. Select Taxable if you’re entering a code to track taxable sales, or Non-taxable if you’re entering a code to track nontaxable sales.
6. Click Next to set up another tax code.
7. Click OK when you’ve finished adding tax codes.
Although you can always use the default nontaxable code that QuickBooks provides, called “Non,” depending on your state sales tax agency, you may be required to provide further definition of your nontaxable sales such as nonprofit organizations, government agencies, and so on. The same logic may apply to taxable customers as well; some agencies require that you provide a breakdown of your company’s taxable sales.
![]()
Sales Tax Payments
There are two ways to remit sales tax to the taxing authorities, and they’re listed in the When Do You Owe Sales Tax section of the Sales Tax Preferences dialog:
• As Of Invoice Date, which is accrual-based tax reporting
• Upon Receipt Of Payment, which is cash-based tax reporting
Check with your accountant (and the local taxing authority) to determine the method you need to select. Each state has its own reporting rules. You must indicate the frequency of your remittance to the taxing authority in the When Do You Pay Sales Tax section of the Preferences dialog using the schedule set by your sales taxagency.
![]()
Create and Use Tax Groups
A tax group is a collection of two or more individual tax items that are displayed as one tax to a customer on a sales transaction. For example, you might be required to collect 6.25 percent state sales tax in addition to 5 percent county sales tax because of the county your business operates from or the location at which you perform your services or deliver your products. This is especially important in some states where city, county/parish, and state portions are paid to different tax entities.
When you use a sales tax group, QuickBooks keeps track, behind the scenes, of which taxing authority the tax collected is due to, but the customer sees only the total sales tax rate, as shown here.

To create a tax group, first create the individual tax items and then add those items to the group item. Follow these steps to create a tax group:
1. Open the Item List by choosing Lists | Item List, and press CTRL-N to open the New Item dialog.
2. Select Sales Tax Group as the Type and enter a name for the group.
3. Enter a Description that will appear on your sales forms.
4. In the Tax Item column, choose the individual tax code items you need to create this group. (QuickBooks fills in the rate, tax agency, and description of each tax you already selected.) Notice that the calculated total (the group rate) appears at the bottom of the dialog.
5. When all the required tax code items have been added, click OK.
![]()
Assigning Sales Tax Codes and Items to Customers
When you turn on the Sales Tax preference and create your first Sales Tax item, QuickBooks asks if you want to make all of your customers as well as your inventory and non-inventory parts taxable. If you do not deselect either of these options, QuickBooks will apply the “taxable” tax code to all customers and inventory parts. You can modify this setting at the customer level in the Sales Tax Settings tab of a customer’s record.
If your Customers list is large, opening each record to make this change to several records can be time consuming. Instead, use the Add/Edit Multiple List Entries window to edit the tax items or codes for multiple customers in a single view. From the Customer Center, point your mouse anywhere on the Customer:Job list and right-click. Select Add/Edit Multiple CustomersJobs to open the Add/Edit Multiple List Entries window. You may have to customize the columns in this window to bring these fields into view.
You can use the Add/Edit Multiple List Entries window to modify the tax code setting for your items as well. With your Item List open, right-click anywhere in the list and select Add/Edit Multiple Items to open the Add/Edit Multiple List Entries window.
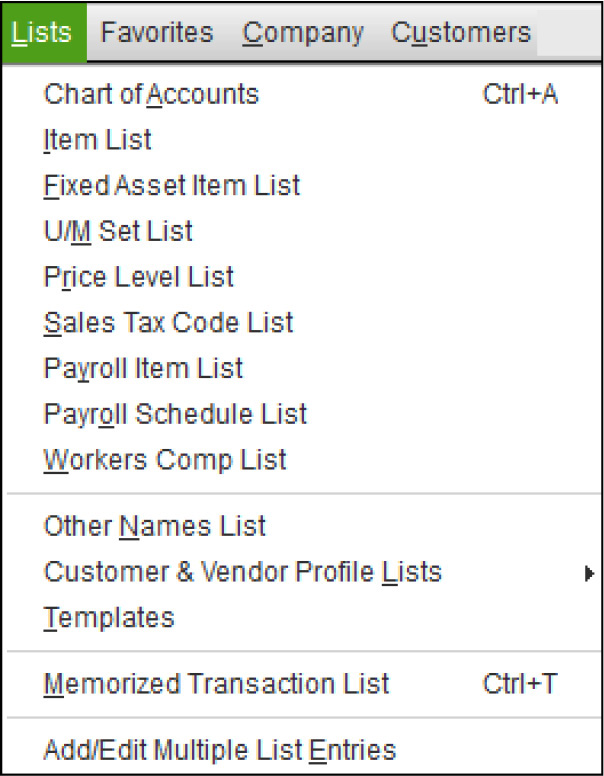
Use the Other QuickBooks Lists
Click Lists from your menu bar to see the other lists available to you, as shown here. Although you may not use all (or any) of these lists, review them to see if they might be of use to you and your company.
![]()
Fixed Asset Item List
Use the Fixed Asset Item list to store information about the fixed assets your business owns. Choose Lists | Fixed Asset Item List to open the list that provides a way to track data about the assets you purchase and depreciate. Remember that this is not like your Item List in that it doesn’t provide links to any financial data in your QuickBooks company file, nor does it interact with the chart of accounts, so any values you enter in this list have to be entered in your Fixed Asset accounts separately. This list is intended to be a way to use QuickBooks to catalog your fixed assets instead of the list you’re keeping elsewhere.
![]()
Price Level List
Use the Price Level list to apply special pricing to customers and jobs. This list is available after you enable price levels in the Sales & Customers section of your Preferences. Do the following to turn on this feature:
1. Choose Edit | Preferences and select the Sales & Customers category in the left pane.
2. Move to the Company Preferences tab and select the Enable Price Levels option.
3. Click OK.
Creating a Price Level
To create a price level, open the Price Level list from the Lists menu. Press CTRL-N to open the New Price Level dialog. Each price level has two components: a name and a formula. The name can be anything you wish, and the formula is a percentage of the price you entered for the items in your Item List (the formula increases or reduces the price by the percentage you specify). You can use price levels to set a price above the standard price, too.
Assigning Price Levels to Customers
After you create price levels, you can apply them to customers. Open the Customers & Jobs List in the Customer Center and double-click the customer’s listing. Select or create a new price level from the Price Level drop-down list on the Payment Settings tab. Once a price level is linked to a customer, sales transactions for that customer reflect the price level automatically.
![]()
Currency List
This option is available only when you enable the QuickBooks multicurrencies feature and specify the currencies you want to work with. Multiple currencies are enabled in the Company Preferences area. From the Edit menu, select Preferences | Multiple Currencies. By default, the majority of currencies are marked Inactive; open this list to activate the currencies you need so they appear in drop-down lists.
Work with Classes
Classes provide a method of organizing your company’s income and expense transactions by division or department, enabling you to filter many of the standard QuickBooks reports by class. You might choose to use classes, for example, to track expenses and profitability by location when you have more than one location, or you may need to organize financial reporting by business type, such as when your company has both retail and wholesale divisions.
The Class list appears in the Lists menu only when you enable the Use Class Tracking feature. From the Edit menu, select Preferences | Accounting | Company Preferences | Use Class Tracking For Transactions.
Use classes for a single purpose; otherwise, the feature does not work properly. For example, you can use classes to separate your business into locations or by type of business, but not both. If you need to define a class or narrow its definition further, you can use subclasses.
When you enable classes, QuickBooks adds a Class field to transaction forms so that you can associate a class with a particular transaction (classes are assigned only to a specific transaction, not a customer or vendor). Optionally, you can require that QuickBooks prompt you to assign a class when you enter transactions. For each transaction or each line of any transaction, you can assign one of the classes you created.
![]()
Create a Class
To create a class, choose Lists | Class List from the QuickBooks menu bar to display the Class List window. Press CTRL-N to open the New Class dialog. Fill in the name of the class, and then click Next to add another class, or click OK if you are finished.
If you decide to use classes, it’s a good idea to create a class for general overhead expenses. You can then allocate the amounts accumulated in this overhead class to other classes with a journal entry later if you wish. Learn to use journal entries in Chapter 17.
![]()
Creating a Subclass
Subclasses let you post transactions to specific subcategories of classes, and they work similarly to subaccounts in your chart of accounts. If you set up a subclass, you must post transactions only to the subclass, never to the parent class. However, unlike the chart of accounts, classes have no option to force the display of only the subclass when you’re working in a transaction window. As a result, when using subclasses, keep the name of the parent class short, to lessen the need to scroll through the field to see the entire class name.
Create a subclass using the same steps you use to create a class. After you enter a name for the subclass in the Class Name field, click the check box next to the option Subclass Of to insert a check mark. Then select the appropriate parent class from the drop-down list.
![]()
Other Names List
The Other Names list is a list of people whose names are used when you write checks, but who don’t fit the definition of vendor, because you don’t need to track payables and transactions as you do for a vendor. The names in the Other Names list appear in the drop-down list when you write checks but are unavailable when you’re entering vendor bills, vendor credits, bill payments, purchase orders, or sales transactions.
One of the most common reasons to add a name to the Other Names list is to write checks to owners and partners if they are not employees. To open the Other Names list, choose Lists | Other Names List. To create a new name for the list, press CTRL-N to open a New Name window. The New Name window provides fields for the address (handy for printing checks you’re going to place into window envelopes), telephone numbers, and other contact information.
Customer & Vendor Profile Lists
Profile lists appear in the submenu you see when you choose Customer & Vendor Profile Lists. Most of the lists in the submenu are designed to help you categorize and refine the information you keep about your customers and vendors. Other lists can contain data that is available when you create transactions.
Sales Rep List
By definition, a sales rep is a sales person connected to a customer, usually because he or she receives a commission on sales to that customer. However, it’s quite common to track sales reps who are not necessarily paid commissions as a way to determine who is the primary contact for a customer (some people call this a service rep).
To create a sales rep, the rep’s name has to exist in your QuickBooks system as a vendor, employee, or a member of the Other Names list.
To create a new sales rep from an existing name, open the Sales Rep list and press CTRL-N to open a New Sales Rep dialog, shown next. Select the person’s name from the drop-down list. QuickBooks automatically fills in the Sales Rep Initials field, which is used in reports and transaction windows with a Sales Rep field, and the Sales Rep Type. You can modify the Sales Rep Initials field if you wish.
Customer and Vendor Type Lists
When you create your Customers and Vendors lists, you may decide to use the type field as a way to categorize your customers, vendors, and suppliers. This gives you the opportunity to sort and select customers and vendors in reports.
Job Type List
Use the Job Type list to set up categories for jobs. For example, if you’re a plumber, you may want to separate new construction from repair work.
Terms List
QuickBooks keeps both customer and vendor payment terms in one list, so the terms you need are all available whether you’re creating an invoice, entering a vendor bill, or creating a purchase order. To create a terms listing, open the Terms List window and press CTRL-N to open the New Terms dialog. Use the Standard section to create terms that are due at some elapsed time after the invoice date:
• Net Due In is the number of days allowed for payment after the invoice date.
• To create a discount for early payment, enter the discount percentage and the number of days after the invoice date that the discount is in effect. For example, if 30 days are allowed for payment, enter a discount percentage that is in effect for 10 days after the invoice date (such terms are usually referred to as “X percent 10, net 30,” substituting the amount of the discount for X).
Use the Date Driven section to describe terms that are due on a particular date, regardless of the invoice date:
• Enter the day of the month the invoice payment is due.
• Enter the number of days before the due date that invoices are considered payable on the following month.
• To create a discount for early payment, enter the discount percentage and the day of the month at which the discount period ends. For example, if the standard due date is the 15th of the month, you may want to extend a discount to any customer who pays by the 8th of the month.
Customer Message List
Many companies write messages to customers when creating a sales transaction. If you choose, you can enter several appropriate messages ahead of time and then just select the one you want to use, such as “Thanks for your business” or “Happy Holidays!”
Press CTRL-N to enter a new message to add to the list. The text can be no longer than 101 characters, including spaces. Keep in mind that once a message is used in a transaction, you can’t delete it. However, if it becomes obsolete, you can make it inactive to remove it from your message choices.
Payment Method List
You can accept and track payments from customers in multiple ways. QuickBooks prepopulates the Payment Method list with the most common payment types (such as credit card, check, and cash). If you have a payment method that isn’t listed, you can add that method to the list. To do so, select Lists | Customer & Vendor Profile Lists | Payment Method List, and then press CTRL-N to open the New Payment Method window. Name the payment method and select the appropriate payment type.
This list provides some detail about the payments you receive but also allows you to print reports on payments that are subtotaled by the method of payment, such as credit card, check, cash, and so on. In addition, your bank may use the same subtotaling method on your monthly statement, which makes it easier to reconcile the bank account.
Ship Via List
Use the Ship Via list to add a description of your shipping method to your invoices (in the Via field). QuickBooks prepopulates the list with a variety of shipment methods, but you may need to add a shipping method. To do so, select Lists | Customer & Vendor Profile Lists | Ship Via List, and then press CTRL-N to add a new Shipping Method entry to the list. Then enter the name—for example, Our Truck or Sam’s Delivery Service.
If you use one shipping method more than any other, you can select a default Ship Via entry, which appears automatically on your invoices (you can change it on any invoice if the shipping method is different). The default entry is in the Sales & Customers category of the Preferences dialog, where you can select the Usual Shipping Method entry you want to appear by default on your sales transactions. You can also enter the FOB site you want to appear on invoices, if you want to display this information. FOB (Free or Freight On Board) is the site from which an order is shipped and is also the point at which transportation and other costs are the buyer’s responsibility.
Vehicle List
Use the Vehicle list to create vehicle records in which you track mileage for vehicles used in your business. You can use the mileage information for tax deductions for your vehicles and to bill customers for mileage expenses. However, even if you don’t bill customers for mileage or your accountant uses a formula for tax deductions, the Vehicle list is a handy way to track information about the vehicles you use for business purposes.
To add a vehicle to the list, select Lists | Customer & Vendor Profile Lists | Vehicle List, and then press CTRL-N to open the New Vehicle dialog. The record has two fields:
• Vehicle Enter a name or code for a specific vehicle. You could, for example, enter “BlueTruck” or any other recognizable name.
• Description Enter descriptive information about the vehicle. Take advantage of the field by entering information you really need, such as the vehicle identification number (VIN), the license plate number, the expiration date for the plate, the insurance policy number, or other “official” pieces of information. You can use 256 characters in the Description field.
![]()
Templates List
In this list, QuickBooks stores the many forms (QuickBooks calls them templates) you’ll use when creating transactions. Learn more about customizing templates in Chapter 14.
![]()
Memorized Transaction List
The Memorize Transaction feature in QuickBooks eliminates having to enter the same transaction multiple times. With few exceptions, QuickBooks can memorize the transactions you enter and post them automatically on the day and with the frequency you need. The memorized transactions are stored in the Memorized Transaction List.
To view or edit a memorized transaction, choose Lists | Memorized Transaction List to open the list. Highlight a transaction name, click the Memorized Transaction button at the bottom of the window, and then choose Edit Memorized Transaction.
Your Beginning Balances
After you’ve created your lists and all the other setup-related activities, you’ve built about 80 percent of your new QuickBooks file. The last 20 percent of the setup process involves entering your beginning balances and the historical transactions (if any) needed to ensure that your data file accurately reflects your business’s financial position on the day you start using your QuickBooks software. Entering accurate beginning balances and the detail behind these balances is perhaps the most important part of the setup process, because if you start with inaccurate or incomplete starting balances, you’ll compromise your ability to rely on the key reports that QuickBooks offers to manage your business.
![]()
What Is an Opening Trial Balance?
Your opening trial balance is simply a detailed listing of the value of your company’s assets, liabilities, and equity. If your QuickBooks start date is the beginning of the year (which is the most common start date), your opening trial balance for the first day of the year has no income or expenses to report. It will, however, contain the balances that have accumulated in your Asset, Liability, and Equity accounts since you’ve been in business. With the help of your accountant, prepare a “pre-QuickBooks opening trial balance.” Much of the information needed for the pre-QuickBooks trial balance comes directly from the balance sheet your accountant prepared for you the previous year end. The pre-QuickBooks opening trial balance doesn’t have to be fancy, just accurate. A typical pre-QuickBooks opening trial balance for a business with a QuickBooks start date of January 1, 2015, might look something like the one in Table 3-1. You then need to enter these beginning balances into your QuickBooks file.

TABLE 3-1 “Pre-QuickBooks” Balances as of December 31,2014
Steps to an Accurate Opening Trial Balance
Although there’s certainly more than one way to get your beginning balances into your new QuickBooks data file, many small businesses have had the least stress and most success when they follow these steps.
Gather All the Information You Need
In Chapter 1, you saw a detailed list of the information that you should have at your fingertips prior to entering your beginning balances. If you haven’t already organized these essential records and numbers, return to Chapter 1 to refresh your memory.
Enter Beginning Balances for Simple Balance Sheet Accounts
For this step, you use a journal entry to enter the beginning balances for accounts except bank accounts, accounts receivable, accounts payable, inventory, and sales tax payable. Those balances will be created later when you enter outstanding individual transactions and other adjustments. So what accounts are left to enter? Your fixed assets (including any accumulated depreciation) such as vehicles, furniture, and equipment, as well as any loans payable. You’ll want to check in with your accountant for other balances that should also be entered as part of this first step, such as prepaid expenses, unpaid payroll taxes, or employee advances. Your journal entry should be dated as of the closing date of the prior fiscal year. In this example, the fiscal and calendar year are the same.
From the Company menu, select Make General Journal Entries to open the Make General Journal Entries window. Using the trial balance figures in Table 3-1, your journal entry should look like the one shown in Figure 3-1.
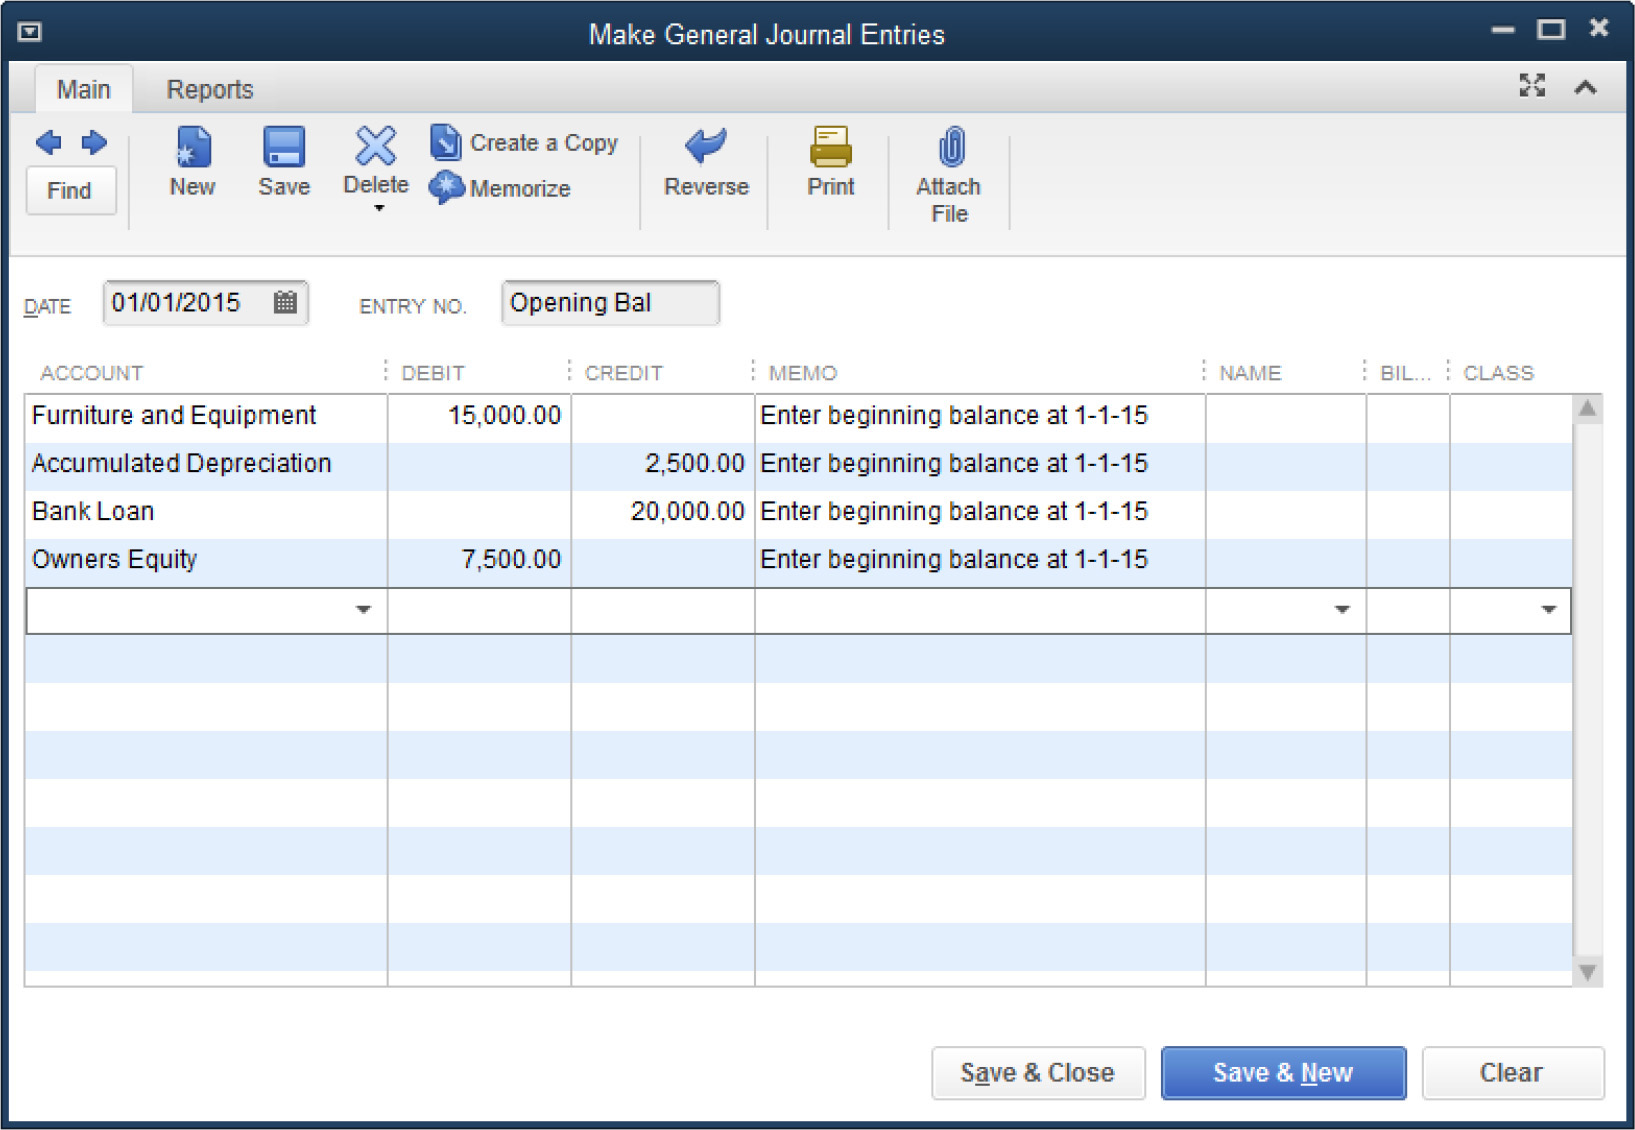
FIGURE 3-1 Use a journal entry to establish some of your beginning balances.
You’ll see that after the balances for Fixed Assets (in this case, Furniture and Equipment), Accumulated Depreciation, and the Bank Loan have been entered, there’s a debit balance of $7,500.00 that needs to be assigned to an account in order for the entry to be in balance. QuickBooks has a special account reserved for that purpose called Opening Balance Equity. Using this account to balance the entry will require that you (or your accountant) zero-out this balance (and any other balances posted to this account during the setup) to a retained earnings account in order to complete the setup. That adds another, often overlooked, journal entry requirement in the setup process. Alternatively, you can post this offsetting balance directly to a retained earnings or owner’s equity account (as shown in Figure 3-1). Check with your accountant on the method that works best in your situation.
If you choose this alternative method, QuickBooks may warn you that you’re posting to an account that’s intended to track profits from earlier periods. Clicking OK allows you to continue with the posting. Then click Save & Close to save this entry.
Enter Bank Account Balances
The next step is to establish the bank balance. Use the bank account register to do this. Select Banking | Use Register to open the register for your bank account. Enter the ending balance as it appears on the bank statement from the last month of the previous year in the Deposit side of the register. Be sure to put a note in the Memo field that will help remind you what this entry was for later on. Again, you can choose to post the offsetting balance to the Opening Balance Equity Account or directly to a retained earnings account. Click the Record button to save your entry.
Enter Outstanding Checks and Deposits
With your register still open, enter all outstanding transactions—checks and deposits—that occurred prior to the QuickBooks start date. This step ensures that these items will appear in the first bank reconciliation you perform in QuickBooks. Be sure to use the original transaction date to post these outstanding transactions.
Enter Unpaid Accounts Receivable and Accounts Payable Transactions
To establish your accounts receivable balance, create an invoice for each customer invoice that was still open as of the end of the previous fiscal year using the original transaction date and all other invoice details (customer name, item(s) purchased, terms, and so on). Don’t forget to enter any unused customer credits as well. In our example, the total Accounts Receivable balance (refer to Table 3-1) is made up of two outstanding customer invoices that together total $15,000.00. Learn how create an invoice in Chapter 4.
Likewise, to establish your accounts payable balance, create a bill for each unpaid vendor bill as well as any unused vendor credits. Use the original transaction date and all other bill details. In our example, the total Accounts Payable balance (refer to Table 3-1) is made up of just one unpaid bill for $7,500.00.
Enter Nonposting Transactions
You should record all open purchase orders and estimates, again with their original dates and details. Although this step is optional because these “nonposting” transactions have no effect on your opening balances, you’ll then be able to, in the case of a PO, for example, receive these items through QuickBooks or, in the case of an estimate, generate an invoice when you’re awarded the job. Estimates are covered in Chapter 4 and purchase orders in Chapter 13.
Adjust Sales Tax Payable
If you collect sales tax, you may need to adjust the Sales Tax Payable account to be sure that it is in sync with the amount (if any) listed on your pre-QuickBooks opening trial balance. Make this adjustment after all open invoices are entered, since recording open invoices can affect the Sales Tax Payable account in QuickBooks. Use the Sales Tax Adjustment window to do this: select Vendors | Sales Tax | Adjust Sales Tax Due. Learn more about this window in Chapter 6.
Establish Inventory Balances
If you have inventory, you have to tell QuickBooks about the on-hand quantities of each of your inventory items as of your QuickBooks start date. This step assumes that you’ve already entered your Item List (minus any on-hand quantity information) and that each item has a cost associated with it. If this is not the case, you’ll want to update your inventory list with that information prior to completing this step. Chapter 13 covers the details of how to set up an inventory item.
On-hand quantities are added using the Adjust Quantity/Value On Hand window. Select Vendors | Inventory Activities | Adjust Quantity/Value On Hand. Be sure that Quantity appears in the Adjustment Type drop-down menu field. Note that QuickBooks requires you to select an offsetting Adjustment Account to add the on-hand quantities to inventory. Like the other beginning balance entries, you can choose to post the offsetting balance that the software requires either to Opening Balance Equity or directly to a retained earnings/equity account. You may see a message telling you that QuickBooks is expecting you to use an expense account as the adjustment account.
This statement is true for most of your future adjustments—when you’ll be using the Adjust Quantity/Value On Hand window to record obsolescence and shrinkage, for example. But in this instance, go ahead and post to one of your equity accounts.
Zero-Out the Opening Balance Equity Account
If you chose to use the Opening Balance Equity account to establish your opening balances, you’ll need to zero-out this account to complete your setup. Use a journal entry dated with the QuickBooks start date and an offsetting entry to a retained earnings account (or another account chosen by your accountant).
Run Your QuickBooks Trial Balance Report as of Your Start Date
Run your QuickBooks Opening trial balance to be sure that it’s in sync with your pre-QuickBooks opening trial balance. If you follow the steps outlined in this chapter and work closely with your accountant, establishing accurate opening balances can be a surprisingly straightforward process.