
Chapter 17
Posting at Year’s End and Sending Year-End Accountant’s Copy
In this chapter:
• Making your year-end to-do list
• Running financial reports
• Printing 1099 forms
• Making year-end journal entries
• Getting ready for taxes
• Closing the books
• Creating a year-end backup
• Creating an Accountant’s Copy
Whether your company is a large corporation or a small business, the end of the year brings with it several inevitable tasks. There is so much to do, reports to run, corrections to make, entries to create, and adjustments to apply. However, you can relax. Everything doesn’t have to be accomplished on January 1. QuickBooks is date sensitive, so you can continue to work in the new year without affecting the totals of the previous year. As long as the dates of new transactions are after the last day of your fiscal year, new transactions do not affect your year-end calculations.
Many accountants specialize in supporting QuickBooks, which means they understand the software and know how to use it. At year-end, your accountant will want to examine your QuickBooks file to help you close your books and prepare your tax returns. This chapter explains how to prepare year-end forms and reports, close your year, and send an Accountant’s Copy to your accountant.
The Year-End To-Do List
Some of the tasks covered in this chapter, such as reconciling your bank account and running reports, may already be a part of your monthly routine. Others, however, can be done only at year-end. Consider creating a year-end to-do list based on the tasks covered in this chapter. You’ll not only be ready for your accountant at tax time, but you can feel confident that your books will be in good shape for the new year.
![]()
Reconciling All Bank, Cash, and Credit Card Accounts
In January, when your December statements arrive from your bank and credit card company, be sure to either set those aside or download and print extra copies. Your cash position at year-end is important when applying for credit and preparing your tax returns and for general business planning purposes. Reconciling all your bank and credit card accounts will ensure that you can rely on the accuracy of these essential balances. It’s also a good time to gather and enter all those petty cash receipts so you can reconcile that account, too. Review Chapter 7 if you don’t reconcile regularly.
![]()
Inventory Stock Status
Perform a physical inventory. While some businesses reserve the last day of the year to complete their physical inventory, others complete it in the days immediately following the end of the year. With the latter method, you need to adjust the physical count to account for changes (sales and receipt of goods) that occurred after the last day of the year, and then create an inventory adjustment dated the last day of the previous year. Refer to Chapter 13 to learn how to use inventory reports and the Adjust Quantity/Value On Hand window to ensure that QuickBooks accurately reflects your year-end inventory value.
![]()
Fixed Assets
Create a report on your fixed asset accounts to see purchases for the year. Your accountant will also need this report as the basis for calculating accumulated depreciation totals for fixed assets that were purchased in prior years.
The easy way to create this report is to select any fixed asset account in your chart of accounts and press CTRL-Q to open a QuickReport on that account. Click Customize Report, move to the Filters tab, and select Account in the Choose Filter list. Then select All Fixed Assets from the drop-down list in the Account field, and click OK. The resulting report displays detailed information about all your fixed assets, including purchases and accumulated depreciation.
![]()
Payroll
Payroll reports are always relevant as of the end of the calendar year, regardless of your company’s fiscal year setup. See Chapter 10 to learn more about year-end payroll processes, including preparing W-2 forms.
If you use QuickBooks to run your payroll, QuickBooks uses the paycheck date as the basis for calculating payroll totals. For example, if you pay employees on Tuesday for the pay period ending the previous Saturday, all payroll reports are based on the Tuesday paycheck date. That means for 2015, the last payroll figures are reported as of the last Tuesday in December. Paychecks issued in January 2016 for the period including the end of December 2015 are not part of your payroll totals.
Some businesses prefer to track gross salaries and wages as a liability based on the work period and pay off that liability with the paycheck, so they create journal entries to track accrued salaries and wages. Using the same example, in 2015, that accrued entry covers December 27 through January 2 and will be paid with the paycheck issued January 5, 2016.
If you accrue payroll entries and you file taxes on a cash basis, you need to make a journal entry for the accrued amounts that won’t be paid by the end of the year. A reversing journal entry dated December 31, 2015, and reversed on January 1, 2016, takes care of maintaining the figures you need. Check with your accountant to see if a year-end accrual for payroll is applicable to your situation.
This is also the time to review any employee benefits that should be reported on W-2 forms and to make sure that all employee names and mailing addresses are up-to-date. This is important information to verify and gather, whether you print your own year- end payroll forms or pass on that information to an outside payroll processor.
Run Year-End Financial Reports
In addition to giving you and your accountant the information required to prepare your tax returns, the standard financial reports you run at year-end provide some other benefits:
• They help you and your accountant assess the overall financial health of your business.
• They can provide you with the details behind every transaction you’ve made in QuickBooks for the year. This gives you one last opportunity to make sure everything is posted correctly before you finalize your financial information to determine what you owe in taxes.
Don’t forget that these reports have date ranges such as “current year” and “last fiscal year.” So if you’re working in QuickBooks after the last date of your fiscal year, which is quite common, be sure you adjust the report dates to reflect the activities of your last fiscal year.
![]()
Profit & Loss Reports
Start with a Profit & Loss Standard report by choosing Reports | Company & Financial | Profit & Loss Standard. By default, when the report opens, the date range is the current month to date. Be sure to change it to the fiscal year-end that you’re preparing.
The report displays the totals for all the income and expense accounts in your general ledger that had any activity for the year. Examine the report, and if anything seems out of the ordinary, double-click the line to see a list of the postings to that account. If the data you see doesn’t reassure you, double-click any of the individual posting lines to see the original transaction.
If a transaction seems to be in error, you can take corrective action. You should not delete or void a bill you paid or a customer invoice for which you received payment without consulting your accountant.
You may also find that you posted an expense or income transaction to the wrong general ledger account. If so, you can either change the posting account in the transaction or create a journal entry to correct it. (See Chapter 16 for information on creating journal entries.) Then run the year-end P&L report again and print it.
![]()
Year-End Balance Sheet
In many ways, your balance sheet best represents your financial position. It is a good idea to run this report at regular intervals throughout the year and not just at the end of your fiscal year. To run a year-end balance sheet, choose Reports | Company & Financial | Balance Sheet Standard. An analysis of your year-end balance sheet figures can lead to some important follow-up action items. Here are some examples:
• Perform a “reality check” with the balances that QuickBooks shows for your bank accounts with your bank’s records: Are they in sync? Make sure your accounts are reconciled to the latest bank statement.
• If you track inventory, is the number that QuickBooks shows an accurate reflection of what’s actually on your shelves?
• Try to pay your payroll withholding liabilities in the current year (the year in which they were accumulated) to clear them from the balance sheet. Do the same with any employer contributions you may owe.
• Check to see if your accounts payable and accounts receivable need some housekeeping: Is QuickBooks still showing some open customer invoices or vendor bills that you believe have been paid?
• If you have an A/P balance, pay as many bills as you can afford in the current year, even if this means you pay vendor bills earlier than their due dates. If your taxes are reported on a cash basis, you can gain the expense deduction for this year.
Issue 1099 Forms
If any vendors are eligible for 1099 forms (QuickBooks supports only the 1099-MISC form), you need to print and mail the forms to them by January 31. Some of the work involved in issuing 1099 forms is done during company setup, where you set up the conditions for 1099 tracking. Then, during the year, you need to make sure the transactions you enter are posted to the accounts you identified when you configured these settings. It’s also a very good idea to check the latest IRS rules and guidelines about which vendors should receive a 1099 from you. Ensure you have a current tax ID number, either an FEIN (Federal Employer Identification Number) or social security number for each 1099 vendor.
Checking the 1099 Setup
First, make sure your file is set up to track and process 1099 forms: choose Edit | Preferences, click the Tax: 1099 icon, and move to the Company Preferences tab to see your settings, shown next.
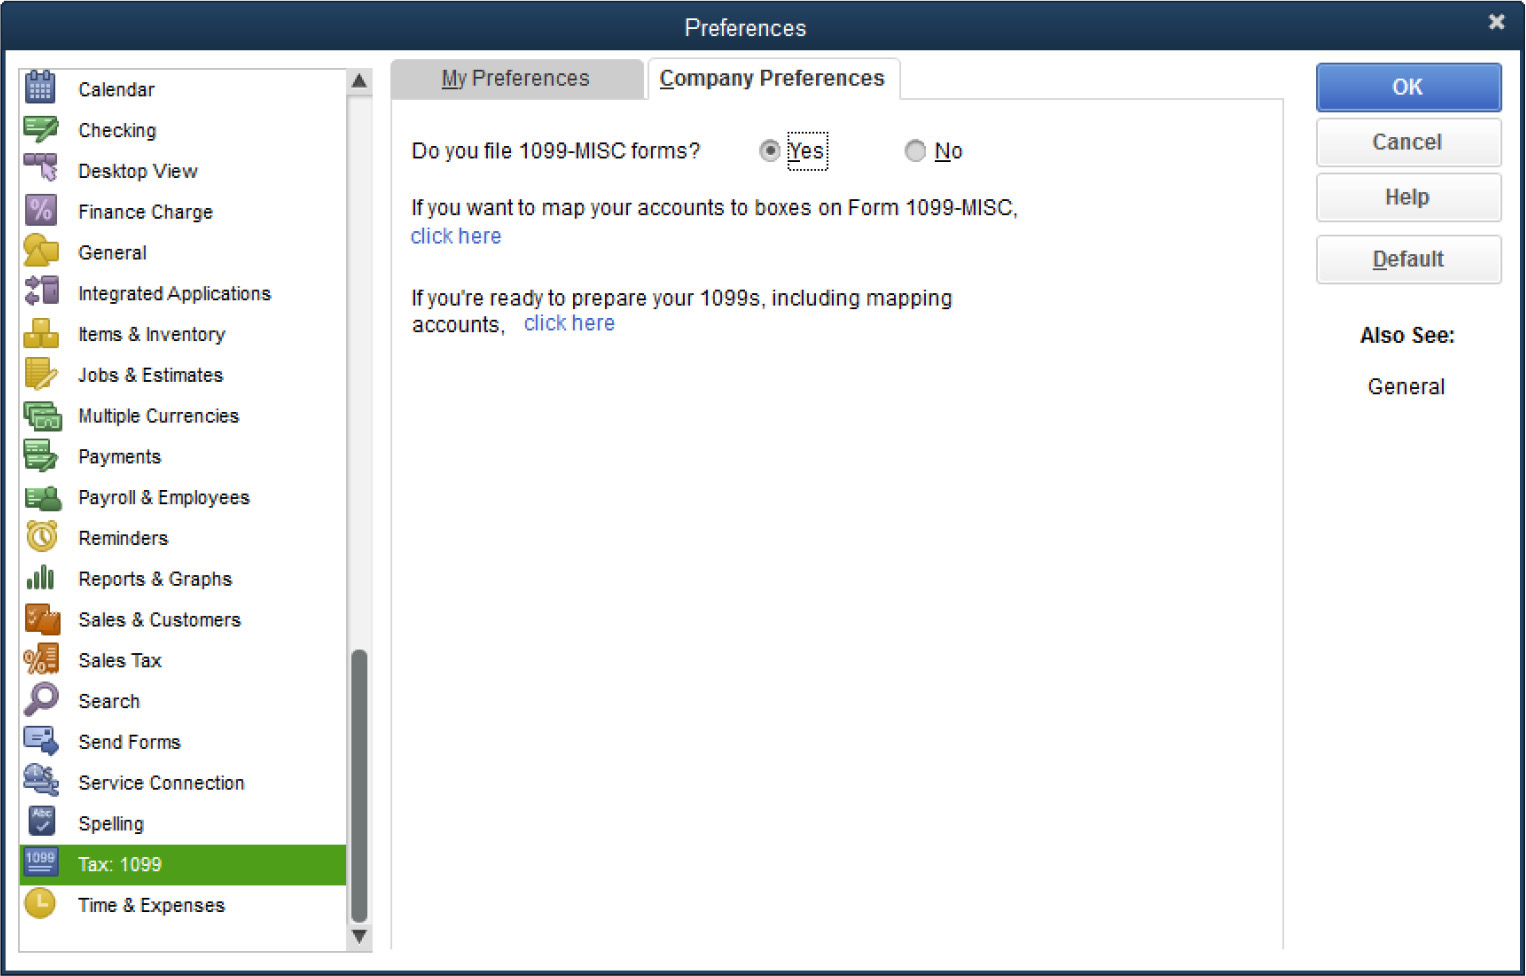
Be sure you’ve clicked Yes next to the Do You File 1099-MISC Forms? question. Optionally, you can click the first Click Here link (located near the top of the 1099 preference window), which opens the Map Vendor Payment Accounts window (see Figure 17-1).
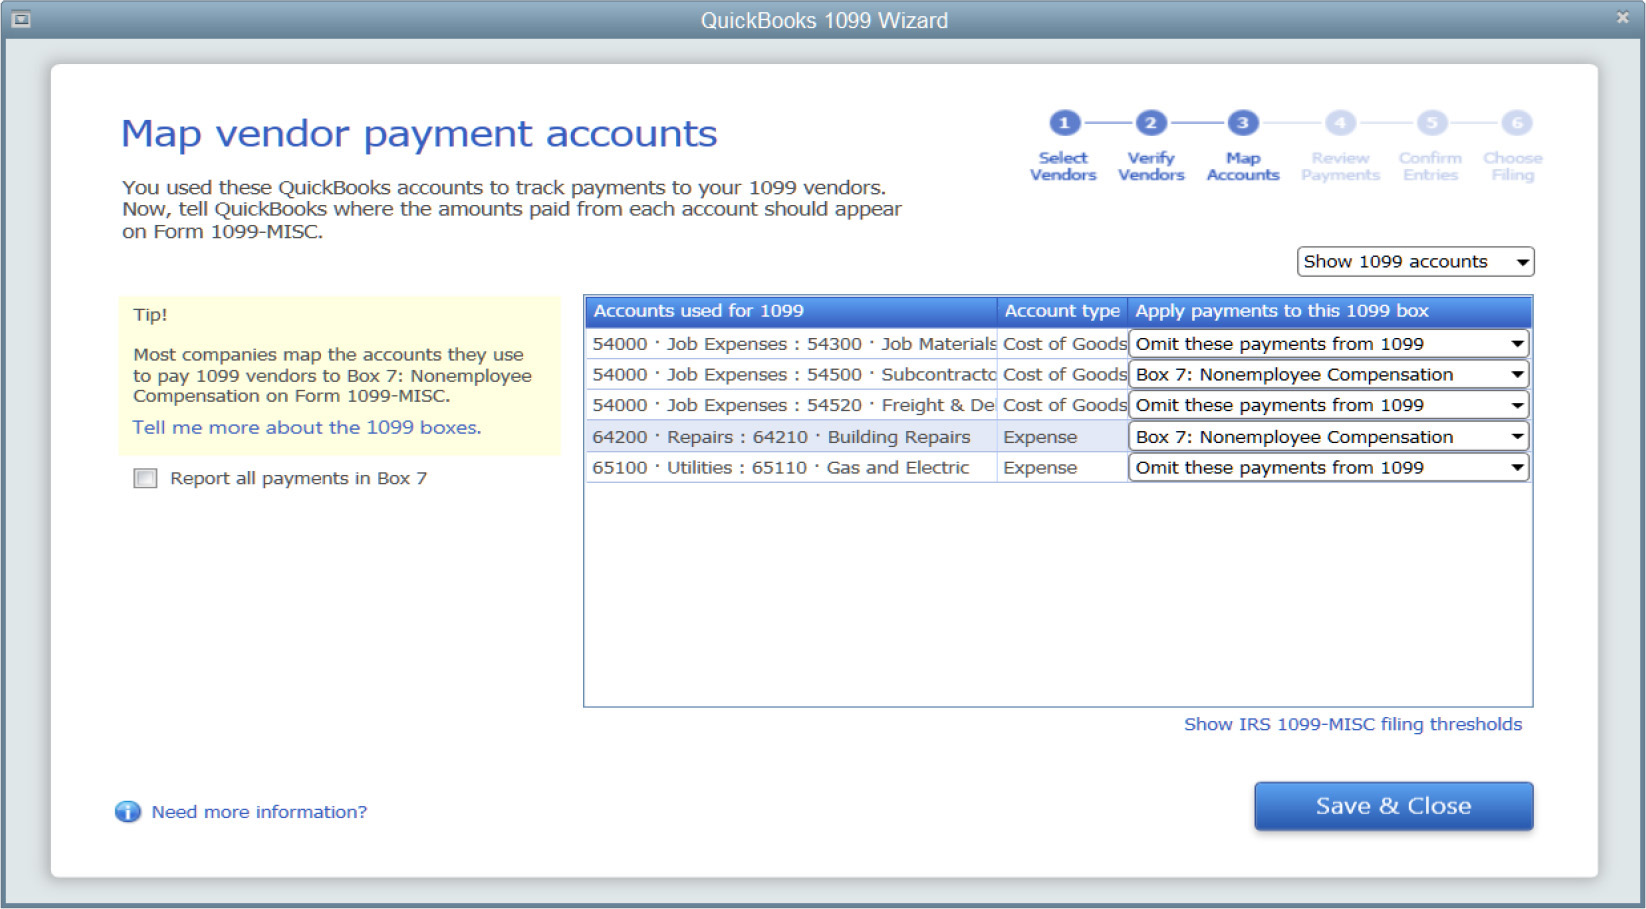
FIGURE 17-1 Tell QuickBooks in which boxes you want the totals from each account to appear using The Map Vendor Payment Accounts window.
QuickBooks lists the accounts that have payment transactions to 1099 vendors for the previous calendar year. From here, you tell QuickBooks which box (or category) on the 1099-MISC form you want the totals from each account to appear in, or you can simply have all amounts appear in Box 7 (Nonemployee Compensation). To assign an account to a 1099 category, select the category from the drop-down menu.
You also have the option of displaying your entire chart of accounts by selecting Show All Accounts in the drop-down menu at the top-right area of the window. This will give you the opportunity to map additional accounts for 1099 reporting. Click Save & Close to assign all the accounts you’ve mapped.
You can assign multiple accounts to a 1099 category, but you cannot assign any account to more than one 1099 category. For example, if you have an expense account Sales Commissions and an expense account Outside Services, both of the accounts can be linked to the same 1099 category (Box 7-Nonemployee Compensation). However, once you link those accounts to that category, you cannot use those same accounts in any other 1099 category. Note that you can also access this window via the 1099 wizard, which is covered in the following section.
![]()
Using the 1099 Wizard
Before you print the forms, you need to run a checkup. This step is essential to ensure everything is correct before you send forms to vendors and the government.
QuickBooks provides a wizard that walks you through the process to make sure every step is covered and every amount is correct. You can launch the QuickBooks 1099 wizard from 1099 Preferences (see the previous section) or by choosing Vendors | Print/E-File 1099s | 1099 Wizard (see Figure 17-2).

FIGURE 17-2 The QuickBooks 1099 wizard makes it easy to issue 1099 forms.
This wizard walks you through three important steps: verifying your 1099 vendor information, ensuring that the expense accounts that you associated with 1099 vendor payments are reported in the correct box on form 1099-MISC, and choosing a filing method.
Select Your 1099 Vendors
In this window, you’ll see a list of all of the vendors you’ve entered into your QuickBooks company file. A check mark next to a name indicates that it’s already been selected to receive a 1099. Add or remove a check mark in the Create Form 1099-MISC column to change the 1099 status of a vendor. Click Continue when you’re ready to advance to the Verify Your 1099 Vendors’ Information window.
Verify Your 1099 Vendors’ Information
If any of the selected 1099-MISC vendors are missing the required address and tax ID information (or have an invalid tax ID format), those missing fields are outlined in red. Enter the missing information directly in the appropriate field(s). Click Continue when you’re ready to advance to the Map Vendor Payment Accounts window.
Map Vendor Payment Accounts
This is the same window discussed in the previous section, “Checking the 1099 Setup,” but the steps are worth repeating here. QuickBooks lists the accounts that have payment transactions to 1099 vendors for the previous calendar year. From here, you tell QuickBooks which box(es) on the 1099-MISC form you want the totals from each account to appear in, or you can simply have all amounts appear in Box 7 (Nonemployee Compensation). To assign an account to a 1099 category, select the category from the drop-down menu.
You also have the option of displaying your entire chart of accounts by selecting Show All Accounts in the drop-down menu at the top-right area of the window. This will give you the opportunity to map additional accounts for 1099 reporting. Click Continue to assign all the accounts you’ve mapped and to move on to the Review Payments For Exclusions window.
Review Payments for Exclusions
The IRS requires that you exclude from reporting on Form 1099-MISC any vendor payments you made by credit card, debit card, gift card, or third-party payment providers such as PayPal, because these payments are already being reported to the IRS by these networks directly.
QuickBooks will automatically exclude any payments you made to a vendor using a credit card account that’s listed in your chart of accounts, but you’ll need to “code” the other payment types so that you can exclude them from your 1099-MISC reporting. Use the View Included Payments report to identify and code these vendor payments that fall into this category, if you didn’t do so when you originally entered the payment.
If you see a payment that needs to be coded for exclusion on this report, double-click that payment transaction, and in the check number field, enter one of the following codes that QuickBooks will recognize (be sure to save the updated transaction):
• Debit
• Debitcar
• DBT
• DBT card
• DCard
• Debit cd
• Visa
• Masterc
• MC
• MCard
• Chase
• Discover
• Diners
• PayPal
Once you’ve updated the information in the check number field for all of the necessary payment transactions, click the View Excluded Payments button to confirm that the transactions that you’ve modified will now be excluded from your 1099-MISC totals. Click Continue when you complete all of your updates.
Confirm Your 1099 Entries
The Confirm Your 1099 Entries page of the 1099 wizard shows all the vendors for which a form 1099-MISC will be created (see Figure 17-3). To the right of each vendor name, the following information appears:
• The tax ID number associated with that vendor
• The total of all payments included on the 1099
• The total payments to be included in Box 7 (Nonemployee Compensation)
• The total of all payments to that vendor posted to accounts not mapped to a 1099 category (box)
• The total of all payments made to the vendor

FIGURE 17-3 Make sure your vendor information is correct for 1099 forms.
To see the details behind the amounts being displayed for each vendor, double-click anywhere on the row that contains the vendor’s information. The 1099 Detail report for that vendor opens, listing all payment transactions that make up the 1099 reporting balance. If you want to investigate—or modify—an individual payment, double-click the transaction in question on the report. When you’re satisfied that the amounts you’ll be reporting are accurate, click Continue.
Choose a Filing Method
You have two options when choosing how to file your 1099-MISC information to your vendors, your state, and the IRS: e-file your federal and state forms, with a printed copy to send to your vendor, or print all copies.
Click the Go To Intuit 1099 E-File Service button to e-file or to learn more about it (additional fees may apply). Click the Print 1099s button if you prefer to file using this method.
![]()
Printing 1099s
The 1099 Print dialog asks you to confirm the year for which you’re printing. You’ll likely be performing this task in January of the next year. In this case, you’ll choose Last Calendar Year as the date range. Click OK to move to the Select 1099s To Print dialog. QuickBooks displays the vendors for whom you should be printing 1099s.
Click Preview 1099 to see what the form will look like when it prints. Zoom in to make sure your company name, address, and employer ID number (EIN) are correct, and also check the vendor’s information to make sure it’s up-to-date.
Click Close on the Print Preview window to return to the Select 1099s To Print dialog. Then load the 1099 forms into your printer and click Print 1099. If you’re using a laser or inkjet printer, set the number of copies at 3. Dot-matrix printers use three- part forms.
When the forms are printed, click Print 1096 in the Select 1099s To Print dialog. Enter the name of the contact person in your company who can answer questions about these forms (the name is printed on the 1096 form).
Print two copies of the 1096 so you have one for your files. Send each vendor a copy of the 1099 form by January 31. Send the government a copy of each 1099, along with a 1096 Transmittal Form. Repeat these procedures for each box number of the 1099- MISC form you are required to print (most small businesses need only Box 7).
Make Year-End Journal Entries
Your accountant may want you to make some journal entries before you close your books for the year, such as the following:
• Enter depreciation.
• Move retained earnings to an account created to hold prior retained earnings, or move retained earnings to owner or partner equity retained earnings accounts.
• Create adjustments needed for cash versus accrual reporting (these are usually reversed on the first day of the next fiscal year).
• Adjust prepaid expenses from asset accounts to expense accounts.
You can send the P&L and Balance Sheet reports to your accountant by exporting the reports to Excel.
You can also send your accountant the Accountant’s Copy of your company data and let him or her make the journal entries. You import the changes when the file is returned. (See Chapter 16 for detailed instructions on creating journal entries.) You will learn about using the Accountant’s Copy feature later in this chapter.
![]()
Getting Ready for Taxes
Most small businesses turn over the job of tax preparation to their accountants, but some business owners prepare their own taxes manually or use a tax software program such as TurboTax.
No matter which method you choose, you should run the reports that tell you whether your QuickBooks data files are ready for tax preparation. Is all the necessary data entered? Do the bottom-line numbers call for some special tax planning or special tax considerations? Even if your taxes are prepared by your accountant, the more organized your records are, the less time the accountant spends on your return, which, hopefully, makes your bill from the accountant smaller.
![]()
Checking Tax-Line Information
If you’re going to do your own taxes, every account in your chart of accounts that is tax related should have the correct tax form in the account’s tax-line assignment. To see if any tax-line assignments are missing, choose Reports | Accountant & Taxes | Income Tax Preparation. When the report appears, all your accounts are listed, along with the tax form assigned to each account. If you created your own chart of accounts instead of accepting a chart of accounts during company setup, the number of accounts that lack a tax form assignment is likely to be quite large.
Before you can prepare your own taxes, you should edit each account to add the tax information. To do so, double-click each account listed as <Unassigned> on the Income Tax Preparation report to open the Edit Account dialog, or open the chart of accounts and select an account. Press CTRL-E to edit the account and select a tax form from the Tax-Line Mapping drop-down list.
Your selections vary depending upon the organizational type of your company (proprietorship, partnership, S-Corp, C-Corp, and so on). Be sure the Income Tax Form Used field is filled out properly on the Company Information dialog in the Company menu. If it’s blank, you won’t see the tax information fields on any accounts.
![]()
Calculating Other Important Tax Information
Some taxable numbers aren’t available through the normal QuickBooks reports. One of the most common is the report on company officer compensation if your business is incorporated. If your business is a C-Corporation, you file Tax Form 1120, while a Subchapter S-corporation files Tax Form 1120S. Both of these forms require that you separate compensation for corporate officers from the other employee compensation. You will have to add those totals from payroll reports (either QuickBooks payroll or an outside payroll service).
You can avoid the need to calculate this by creating a separate Payroll item called Officer Compensation and assigning it to its own account (named something like Salaries & Wages—Officers), which you’ll also have to create. Then open the Employee record for each officer and change the Earnings item to the new item. Do this for next year; it’s probably too late for this year’s end-of-year process.
![]()
Using TurboTax
If you use TurboTax to do your taxes, you don’t have to do anything special in QuickBooks to transfer the information. Open TurboTax and tell it to import the data it needs from your QuickBooks company file.
Almost everything you need is transferred to TurboTax. You’ll have to enter some details directly (for example, home-office expenses for a Schedule C form). You can learn more about TurboTax at www.turbotax.com.
Close Your Books
After all the year-end reports have been run, any necessary journal entries have been entered, and your taxes have been filed, it’s customary to “close the books” so no user can add, remove, or change any transactions for that year. After taxes have been filed based on the information in in your QuickBooks file, nothing should ever be changed. Typically, closing the books occurs some time after the end of the fiscal year, usually within the first couple of months of the current fiscal year, as soon as your business tax forms have been filed.
QuickBooks does not require you to close the books in order to keep working in the software. You can work forever, year after year, without performing a closing process. However, many QuickBooks users prefer to lock the transactions for the previous year as a way to prevent any changes to the data except by users with the appropriate permissions who know the password you created when you closed the books.
![]()
Closing the Year by Setting a Closing Date
In QuickBooks, you close the year by entering a closing date. This very important action essentially locks users out of that year’s transactions. At the same time, you can configure user rights to enable or disable a user’s ability to see, or even manipulate, closed transactions. If you’ve set up users and passwords for access to your QuickBooks data file, only the QuickBooks users named Admin or a user set up as an External Accountant can set the closing date and password.
1. Choose Company | Set Closing Date. The Preferences window appears with the Accounting | Company Preferences tab selected.
2. At the bottom of this tab, click the Set Date/Password button in the Closing Date section.
3. In the Set Closing Date And Password dialog, enter the closing date (the last date of your fiscal year) and a password.

![]()
Create a Year-End Backup
After all the numbers are checked, all the journal entries are made, and the books have been closed by entering a closing date, do a separate backup in addition to your normal daily backup. Don’t put this backup on the same media you use for your normal backups—the best option is a CD, flash drive, or cloud-based backup service, which you can label “Year-End Backup 2015” and store off-site. See Chapter 15 to learn more about how to back up your QuickBooks files.
Understanding the Accountant’s Copy
Some accountants may ask for a copy of the company file, a backup of your company file (which they restore onto their computer), or a portable company file in order to review and make changes to your QuickBooks file.
If they use any of these methods, you shouldn’t work in your QuickBooks file at the same time. If you do continue to work on your local copy on your computer, the transactions you enter will be lost once you restore the copy your accountant returns to you. Why? Because restoring a regular backup overwrites the company file you continued to use. Not a good solution.
QuickBooks has a better solution. Give your accountant a specially designed copy of your company file called the Accountant’s Copy. Let your accountant do the work at her office while you continue to work in your copy. When the file comes back to you with the accountant’s changes, QuickBooks can merge the changes from the Accountant’s Copy into your copy of the company file, which means the work you do while the accountant is working isn’t replaced by the work your accountant does.
When you create an Accountant’s Copy, QuickBooks imposes restrictions on the type and extent of transactions you and your accountant can do to make sure you don’t work at cross purposes. Only the Admin or External Accountant user can create an Accountant’s Copy, and the company file must be operating in Single-User mode to accomplish this task.
![]()
Creating an Accountant’s Copy
QuickBooks has two methods for delivering your created Accountant’s Copy to your accountant:
• Save a file You can save an Accountant’s Copy on removable media (CD, DVD, or flash drive) and send or deliver it that way. You can also send it via e-mail, although sometimes people can’t e-mail the file because of the size limits set by their ISP (Internet service provider) and/or their accountant’s ISP.
• Send a file using a “cloud” secure storage system There are several free online storage systems into which you can upload your Accountant’s Copy at no charge. Your accountant can then download it to her computer. Do an Internet search for the most highly rated services, and let your accountant know when the file is available at that site.
• Send a file to your accountant using a QuickBooks secure server If your accountant has subscribed to this service, you can upload for free an Accountant’s Copy to a secure server provided by QuickBooks and have your accountant download the file. QuickBooks notifies the accountant of the existence of the file by e-mail and provides a link to the file in the e-mail message.
![]()
Saving the Accountant’s Copy
To create an Accountant’s Copy and save it to a location on your computer or on removable media, choose File | Accountant’s Copy | Save File. In the Save Accountant’s Copy dialog, be sure the Accountant’s Copy option is selected.
Click Next to move to the window to set the dividing date for this Accountant’s Copy. Your accountant will be able to work on transactions dated on or before that date in his copy while you can continue to work and create transactions that are dated after the dividing date in your company file. To learn more about this important date, be sure to read the section “Choosing the Dividing Date.” Click Next to save the file.
QuickBooks opens the Save Accountant’s Copy dialog and creates a filename that incorporates your company filename as well as the date and time of the file’s creation. That’s an excellent filename, and there’s no reason to change it. By default, QuickBooks saves the Accountant’s Copy to your desktop, but you can change the location if you wish.
If you’re sending the file on a flash drive, change the location by choosing the flash drive in the Save In field at the top of the dialog. If you’re planning to send the file on a CD or DVD, save the file to your hard drive and then transfer the file to the CD/DVD. After you save the file, QuickBooks displays a message reminding you of the dividing date and reminding you to send the file to your accountant.
If you’ve password-protected your QuickBooks data file, you must give your accountant the Admin password so he or she can open it.
![]()
Sending an Accountant’s Copy to an Online Server
To create an Accountant’s Copy that is uploaded to a secure server maintained by QuickBooks (or any other service) from which your accountant can download the file, choose File | Accountant’s Copy | Send To Accountant, which opens the Send Accountant’s Copy dialog that explains the process.
Click Next to establish a dividing date. Your accountant will be able to work on transactions dated on or before that date in his copy while you can continue to work and create transactions that are dated after the dividing date in your company file. To learn more about this important date, be sure to read the next section, “Choosing the Dividing Date.”
In the next window, enter your accountant’s e-mail address twice to confirm the data, your name, and your e-mail address. If an e-mail address exists in the e-mail field of the Company Info dialog (in the Company menu), that address is automatically entered as your e-mail address, but you can change it.
In the next window, enter a password your accountant needs to open the company file in the accountant’s version of QuickBooks. It must be a strong password, which means it contains at least seven characters, a mixture of letters and numbers, and at least one letter in a different case from the other letters (usually, this means one letter is uppercase).
If your Admin password is a strong password because you enabled credit card security, you can use the Admin password for the upload/download server access. You can also enter a message for your accountant that will appear in the body of the e-mail message, notifying your accountant that you’ve uploaded the file. E-mail text is not encrypted as it travels around the Internet, so don’t use this message to give your accountant the password.
Click Send to upload the file to the server. QuickBooks displays a message telling you it must close all windows to create an Accountant’s Copy; click OK to continue. When the Accountant’s Copy has been created and uploaded to the QuickBooks server, QuickBooks displays a success message.
QuickBooks then sends an e-mail to both you and your accountant.
![]()
Choosing the Dividing Date
The text in the Set The Dividing Date window (see Figure 17-4) explains that your accountant works on transactions dated on or before the dividing date, and you work on transactions dated after the dividing date. You and your accountant should discuss the dividing date you select.
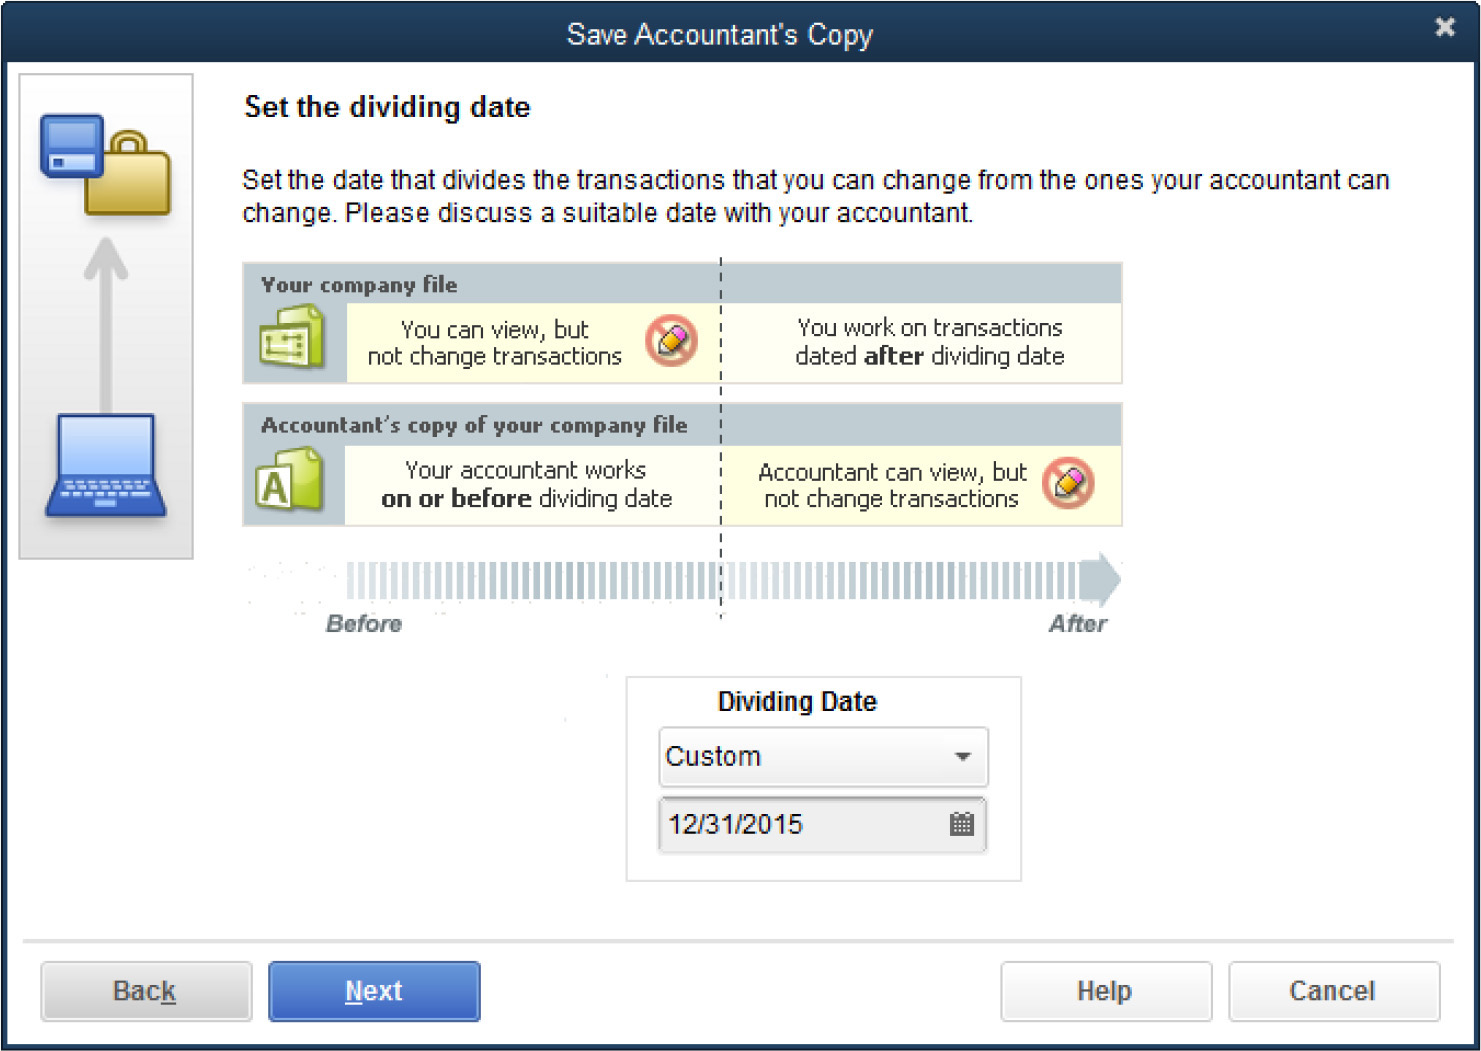
FIGURE 17-4 The dividing date establishes boundaries and limits for the type of work you and your accountant can perform.
While your accountant is working with the Accountant’s Copy, you can continue to work in your QuickBooks file, adding transactions dated after the dividing date. There are some limitations, however, in what you can change in your file while an Accountant’s Copy is outstanding:
• You can add a new account but not subaccounts. You can also make new accounts inactive. You cannot add a subaccount to an account that existed prior to creating the Accountant’s Copy.
• If you perform bank or credit card account reconciliation and clear transactions dated on or before the Accountant’s Copy dividing date, be sure to advise your accountant that you’re performing a reconciliation. Otherwise, if the accountant performs a reconciliation for the same month and/or clears the same transactions, the reconciliation will be undone in your QuickBooks file when you import the accountant’s changes.
The dividing date you select should be the period for which you need your accountant to examine your books and make needed changes, which may not be a year-end date.
Some people send an Accountant’s Copy with a dividing date matching the date of a report they need for a special reason—such as an income statement and/or balance sheet the bank wants to see because of an existing or potential line of credit. Other users may need an “accountant-approved” detailed report of transactions for the company’s partners or a nonprofit association’s board (usually a month-, quarter-, or year-end date).
To give your accountant a period in which to insert changes, such as adjusting journal entries or reversing journal entries, set the dividing date about two weeks after the end date you need. For example, if the report you need is as of the end of the last quarter, set the dividing date for two or three weeks after the last quarter-end date.
![]()
Merge the Accountant’s Changes into Your File
The file your accountant sends back is not a complete QuickBooks company file; it contains only the changes made by your accountant. In addition, the file is encrypted so it can be imported only into the company file you used to create it.
Follow these steps to open the file and import it into the original company file:
1. Be sure the company file from which you created the Accountant’s Copy is open.
2. Choose File | Accountant’s Copy | Import Accountant’s Changes From File (if the file is on removable media) or From Web (if your accountant is using Intuit’s file transfer service).
3. Navigate to the location where you saved the file your accountant sent, and doubleclick the file listing; the file has the naming format <CompanyName> (Acct Changes).qby.
4. The Incorporate Accountant’s Changes window opens so you can preview the changes that will be merged into your company data file and read any notes your accountant wrote. (Before you import the changes, you can save the report as a PDF file or print it.)
5. Click Incorporate Accountant’s Changes. QuickBooks walks you through the process of backing up your current file before importing the changes and then merges the changes into your company data file.
If any transactions failed to merge with your company file, a message appears informing you of this. The window includes buttons you can click to save (as PDF) or print the information. QuickBooks, however, will automatically create a PDF and save it in the same location as your QuickBooks data file.
Click Close. QuickBooks displays a message asking if you’d like to set a closing date and password-protect the closed period as of the dividing date you set. If the dividing date on this Accountant’s Copy was the last day of the previous fiscal year, this is a good idea, so click Yes; if not, use your own judgment. QuickBooks opens your company file, the text on the title bar changes back to its normal contents (instead of displaying a notice that an Accountant’s Copy is outstanding), and you can work in the file with no restrictions.
After you’re up and running again normally, you can delete the file your accountant sent you, and you can also delete the Accountant’s Copy file you created if you saved it instead of uploading it.
![]()
Cancel the Accountant’s Copy
Sometimes, accountants report that they have no changes to make; or they send you an e-mail to notify you of a small change and ask you to enter the transaction manually; or sometimes, you decide you made the Accountant’s Copy in error and don’t want to wait for a file to come back (don’t forget to tell the accountant about your decision). Whatever the reason, if you’re not going to get a file back from your accountant, you can cancel the Accountant’s Copy in order to work normally in your company file.
Another reason to cancel the Accountant’s Copy is because you simply don’t want to import the changes you saw in the Incorporate Accountant’s Changes window. Call your accountant and discuss the problem. If the end result is that you prefer not to import the changes, close the Incorporate Accountant’s Changes window without importing the changes and cancel the Accountant’s Copy.
To return everything to normal, choose File | Accountant’s Copy | Remove Restrictions. QuickBooks asks you to confirm your decision. Select the Yes, I Want To Remove The Accountant’s Copy Restrictions option, and click OK.
However, if you cancel the Accountant’s Copy and then later decide you want to import and accept the changes, you cannot import the copy you’ve just canceled. You’ll have to create a new Accountant’s Copy, send it to your accountant again, and he or she, in turn, will need to redo whatever changes were made in the Accountant’s Copy.