
Chapter 14
Customizing QuickBooks for Your Company
In this chapter:
• Setting your options in Preferences
• Attaching documents and working with the Doc Center
• Using e-mail in QuickBooks
The Preferences settings in QuickBooks allow you to control the way you complete tasks, how data is entered, and how it is reported. Many QuickBooks users change or tweak these preferences periodically. The templates that are included with QuickBooks can also be customized. The ability to customize templates also means that you can modify the way information displays in a transaction window, which makes it easier to fill in a form with just the information that you need. You can capture additional information about your transactions, and once captured, this information is available in reports.
QuickBooks offers several ways to connect with your customers, potential customers, and vendors. With QuickBooks, you can attach documents to invoices or vendor bills, and utilize the numerous e-mail features in QuickBooks to make your business grow.
Customize Settings and Options
Your settings and options for the available QuickBooks features are maintained in the Preferences dialog, which you open by choosing Edit | Preferences from the QuickBooks menu bar. Access each category in the Preferences dialog by clicking the appropriate icon in the left pane. While every category has the two tabs, My Preferences and Company Preferences, not every category has options available on each tab.
• The My Preferences tab is where you configure your preferences as a QuickBooks user. Each user you create in QuickBooks can set his or her own My Preferences. QuickBooks will apply the correct preferences as each user logs into the company file.
• The Company Preferences tab is the place to configure the way the QuickBooks features work for the current company, regardless of the logged-in user. Only the Admin or an External Accountant user can change settings in the Company Preferences tab.
As you configure options and move from one category of the Preferences window to another, you’re asked whether you want to save the changes in the section you just left.
This chapter covers all of the Preferences categories. However, you may also find some additional details about a specific preference category in a relevant chapter. Access all Preferences from the QuickBooks menu bar by choosing Edit | Preferences.
![]()
Accounting Preferences
Click the Accounting icon on the left pane of the Preferences dialog to open these preferences. No options display in the My Preferences tab, as there are only Company Preferences available for this section.
You can choose to use account numbers, and, if so, you should also select the option Show Lowest Subaccount Only. This is a useful option because when you see an account number in a drop-down list in a transaction window, you see only the subaccount. If the option is not selected, you see the parent account followed by the subaccount, and since the field display doesn’t show the entire text, it’s hard to determine which account has been selected.
The option to require accounts means that every item and transaction you create in QuickBooks has an assigned account. If you disable this option, transaction amounts not assigned to an account post to Uncategorized Income or Uncategorized Expense and show as such on reports. This information is not useful when you want to analyze your business.
You can also enable the Class feature, which lets you create Profit & Loss reports for divisions, departments, or other categories by which you’ve decided to analyze your business. The other options on this dialog are self-explanatory, except for the Closing Date section, which is discussed in detail in Chapter 17.
![]()
Bills Preferences
In the Bills category, you have the opportunity on the Company Preferences tab to set options for the way you enter and pay vendor bills:
• You can set default terms. While QuickBooks defaults to ten days, you can change this setting. When you create terms and link those terms to vendors, QuickBooks ignores the default for any vendor that has terms configured.
• You can tell QuickBooks to take discounts and credits automatically when you’re paying vendor bills. If you choose the discounts option, you’ll be asked to select a Default Discount Account to which QuickBooks will post your discounts.
![]()
Calendar Preferences
The My Preferences tab has all the settings available in this preference area. This means that the choices you make here apply when you log into QuickBooks. Other users will see the default settings unless they also make changes.
The Calendar Settings area on this tab gives you several alternatives on the view (daily, weekly, monthly) that should be set as your default. If you can’t decide, you can tell QuickBooks to open the view that you were using the last time you had your calendar window open. Other options in the Calendar Settings area include the number of days you want to appear for each week and the type of transactions your calendar should display. The Upcoming & Past Due Settings give you control over which future and past-due transactions show in your calendar.
![]()
Checking Preferences
This category has options in both the My Preferences and Company Preferences tabs. On the My Preferences tab, you can select default bank accounts for different types of transactions. Skip these options if you only have one bank account. The Company Preferences tab offers several options concerned with check printing, as shown in Table 14-1.

TABLE 14-1 Checking Preference Options
![]()
Desktop View Preferences
This is where you can modify the way the QuickBooks window looks and acts. The My Preferences tab, shown next, contains basic configuration options. In the View section, you can specify whether you always want to see one QuickBooks window at a time or view multiple windows.

• One Window Limits the QuickBooks screen to show one window at a time, even if you have multiple windows open. The windows are maximized and stacked atop each other, with only the top window visible.
• Multiple Windows Choose to make it possible to view multiple windows on your screen. Selecting this option activates the arrangement commands on the Window menu item, which allows you to stack or arrange windows so that more than one window is visible at a time.
In the Desktop section, you can also specify what QuickBooks should do when you open and exit the software; choose among the following options:
• Save When Closing Company This means that QuickBooks remembers the state of the desktop when you close the company file or exit QuickBooks. Whichever QuickBookswindows were open when you left will reappear when you return.
• Save Current Desktop When you choose this option, the next time you open QuickBooks, it displays the desktop as it was the last time you worked in your company file.
• Don’t Save The Desktop This tells QuickBooks to display an empty QuickBooks desktop (unless you enable the Show Home Page When Opening A Company File option) when you open this company file or when you start QuickBooks again after using this company file.
• Keep Previously Saved Desktop This is available only when you select Save Current Desktop. This option tells QuickBooks to display the desktop as it was the last time you used the Save Current Desktop option.
• Show Home Page When Opening A Company File This tells QuickBooks to display the Home page when you open the company file.
Buttons are available to configure Windows settings for display and sounds. Clicking either button opens the associated window in your Windows Control Panel. The display and sounds configuration options you change affect your computer and all your software, not just QuickBooks.
Use the drop-down menu under Company File Color Scheme to change the color associated with the QuickBooks file that you’re working in. Changing colors can be an effective way to quickly differentiate one QuickBooks company file from another—especially helpful if you find you’re often doing work in multiple company files.
In the Company Preferences tab, you can customize some of the contents of the Home page. If you want to add an icon on the Home page for a particular feature (such as Estimates), this tab also tells you whether that feature has been enabled in your company file. If the feature hasn’t been enabled, click the feature’s name to open its category in the Preferences dialog. Turn the feature on to add its icon to the Home page, and then click the Desktop View icon to return to this window.
![]()
Finance Charge Preferences
In the Company Preferences tab, you configure finance charges. Read the complete discussion about this topic in Chapter 5.
![]()
General Preferences
This dialog contains options for the way you work in QuickBooks. There are settings on both the My Preferences and Company Preferences tabs.
The My Preferences Tab
The My Preferences tab options, explained in Table 14-2, offer a number of ways to control the way QuickBooks behaves while you’re working in transaction windows.


TABLE 14-2 My Preferences Options in the General Preferences Tab
The Company Preferences Tab in General Preferences
The Company Preferences tab in the General section has the following options:
• Time Format Select a format for entering time, choosing between decimal (for example, 11.5 hours) or minutes (11:30).
• Always Show Years As 4 Digits If you prefer to display the year with four digits (01/01/2014 instead of 01/01/14), select this option.
• Never Update Name Information When Saving Transactions By default, QuickBooks asks if you want to update the original information for a name when you change it during a transaction entry. If you don’t want this opportunity and always want the record to remain as is, select this option.
• Save Transactions Before Printing The rule that a transaction must be saved before it’s printed is a security precaution. Keeping this option enabled will prevent anyone who has access to your QuickBooks file from printing an invoice or check without the transaction being recorded. It’s recommended that you keep this default setting.
![]()
Integrated Applications Preferences
You can let third-party software access and share the data in your QuickBooks files. Click the Integrated Applications icon and move to the Company Preferences tab to specify the way QuickBooks works with other software programs. The first time that other applications attempt to make a connection to the QuickBooks file you’re working in, you’re asked to approve the link. If you click Yes, basic information for that program is recorded and appears in this dialog so that you do not have to reapprove future connections.
![]()
Items & Inventory Preferences
Use this dialog to enable the inventory function and set options for processing inventory transactions. Only the Company Preferences tab has options, as shown here:
• Inventory And Purchase Orders Are Active Select this option to tell QuickBooks that you want to enable the inventory feature; the ability to create and track purchase orders is automatically enabled with that option.
• Warn About Duplicate Purchase Order Numbers When this option is enabled, any attempt to issue a purchase order with a PO number that already exists will generate a warning.
• Warn If Not Enough Inventory Quantity On Hand (QOH) To Sell This option turns on the warning feature that is useful during customer invoicing. If you sell ten widgets but your stock of widgets is fewer than ten, QuickBooks displays a message telling you there’s insufficient stock to fill the order. You can still complete the invoice; it’s just a message, not a limitation, but you should order more widgets immediately.
The Company Preferences tab of the Items & Inventory Preferences dialog also contains an Advanced Inventory Settings and a Unit Of Measure button. If you find that both of these buttons are not “live,” it’s because these features are only available in the QuickBooks Premier and Enterprise editions (Advanced Inventory is only available at the Enterprise level). Click the Learn More links to see if either of these features is a fit for your business and learn how to upgrade to either one of these versions of QuickBooks.
![]()
Jobs & Estimates Preferences
Use the Company Preferences tab of this dialog to configure the way your estimates work. The options are self-explanatory. If you use estimates, see Chapter 4 for more information about creating estimates and how to save time and increase accuracy by creating invoices from estimates.
![]()
Multiple Currencies Preferences
The Company Preferences tab has options enabling the ability to do business in multiple currencies. The available options are Yes and No, but if you select Yes, QuickBooks prompts you to make a backup of your company file before finalizing your decision, since this feature cannot be turned off once it’s been turned on. From this window, you’ll also tell QuickBooks what your home currency is.
Even if you’re sure you want to work in multiple currencies in QuickBooks, make a backup, and use a name for the backup file that indicates what you’re doing (such as <Company Name> PreMulticurrency.qbb). Then, if you decide you don’t want to use this feature, you can restore your backup file and proceed as before.
![]()
Payments Preferences
In the Payments Company Preferences tab, in the Receive Payments section, there are three options:
• Automatically Apply Payments This option tells QuickBooks to apply payments automatically to open invoices. If the payment amount is an exact match for an open invoice, it is applied to that invoice. If the payment amount is smaller than any open invoice, QuickBooks applies the payment to the oldest invoice. If the payment amount is larger than any open invoice, QuickBooks applies payments, starting with the oldest invoice, until the payment amount is used up.
• Automatically Calculate Payments When this option is enabled, you can begin selecting invoices to pay in the Receive Payments window before entering the amount of the customer’s payment check. When you’ve finished selecting invoices, either paying them entirely or applying a partial payment, the amounts you’ve applied should equal the amount of the check you received. This is efficient if a customer has many invoices (some of which may have credits or may have an amount in dispute) and has attached instructions about the way to apply the checks.
• Use Undeposited Funds As A Default Deposit To Account Selecting this option automates the process of depositing all cash received into the Undeposited Funds account. Otherwise, each customer payment and sales receipt offers the choice of depositing the cash into either a bank account or the Undeposited Funds account.
![]()
Payroll & Employees Preferences
Use the Company Preferences tab of this category to set all the configuration options for payroll. Refer to Chapter 10 for an explanation of the selections in this window.
![]()
Reminders Preferences
The Reminders category of the Preferences dialog has options on both tabs. The My Preferences tab has one option, which enables the display of the Reminders List when you open the company file.
The Company Preferences tab lists all the available reminders, and you can select the ones you want to use. Keep in mind that these selections won’t take effect unless you select the Show Reminders List When Opening A Company File check box on the My Preferences tab.
For each item, decide whether you want to see a summary (just a listing and the total amount of money involved), a complete detailed list, or nothing at all. You can also determine the amount of lead time you want for your reminders. If you notice that some of the options are grayed out, it’s because they’re only available in QuickBooks Premier or Enterprise edition.
![]()
Reports & Graphs Preferences
This section of the Preferences window also has choices on both tabs, so you can set your own user preferences and then set those options that affect the current company. Using the My Preferences tab, you can customize your experience when working with reports and graphs.
Prompt Me To Modify Report Options Before Opening A Report
If you find that almost every time you select a report you want to customize it, you can tell QuickBooks to open the Modify Report window whenever a report is brought to the screen by selecting this option.
Reports And Graphs Settings
While you’re viewing a report or a graph, you can make changes to the format, the filters, or the data behind it. Most of the time, QuickBooks automatically changes the report or graph to match the changes. Sometimes, however, if there is anything else going on (perhaps you’re also online, or you’re in a network environment and other users are manipulating data that’s in your report or graph), QuickBooks may not make changes automatically. The reason for the shutdown of automatic refreshing is to keep your computer running as quickly and efficiently as possible. At that point, QuickBooks has to make a decision about when and how to refresh the report or graph. You must give QuickBooks the parameters for making the decision to refresh:
• Prompt Me To Refresh Choose this option to see a message asking you whether you want to refresh the report or the graph after you’ve made changes to the data behind it. When the reminder appears, you can click Yes to refresh the data in the report.
• Refresh Automatically Choose this option if you want up-to-the-second data and don’t want to bother to click the Refresh button. If you work with QuickBooks across a network, this could slow down your work a bit because whenever any user makes a change to data that’s used in the report/graph, it will refresh itself.
• Don’t Refresh Choose this option if you want to decide for yourself when to click the Refresh button on the report window, without any reminder from QuickBooks.
Graphs Only
Give QuickBooks instructions about creating your graphs, as follows:
• Draw Graphs In 2D (Faster) Choose this to display graphs in two dimensions instead of three. This doesn’t limit your ability to see trends at a glance; it’s just not as high-tech. The main reason to consider this option is that the 2-D graph takes less time to draw on your screen.
• Use Patterns Choose this to draw the various elements in your graphs with black-and-white patterns instead of colors. For example, one pie wedge may be striped, another speckled. This option is handy if you print your graphs to a black-and-white printer.
Move to the Company Preferences tab of the Reports & Graphs category to set company preferences for reports, as shown next.
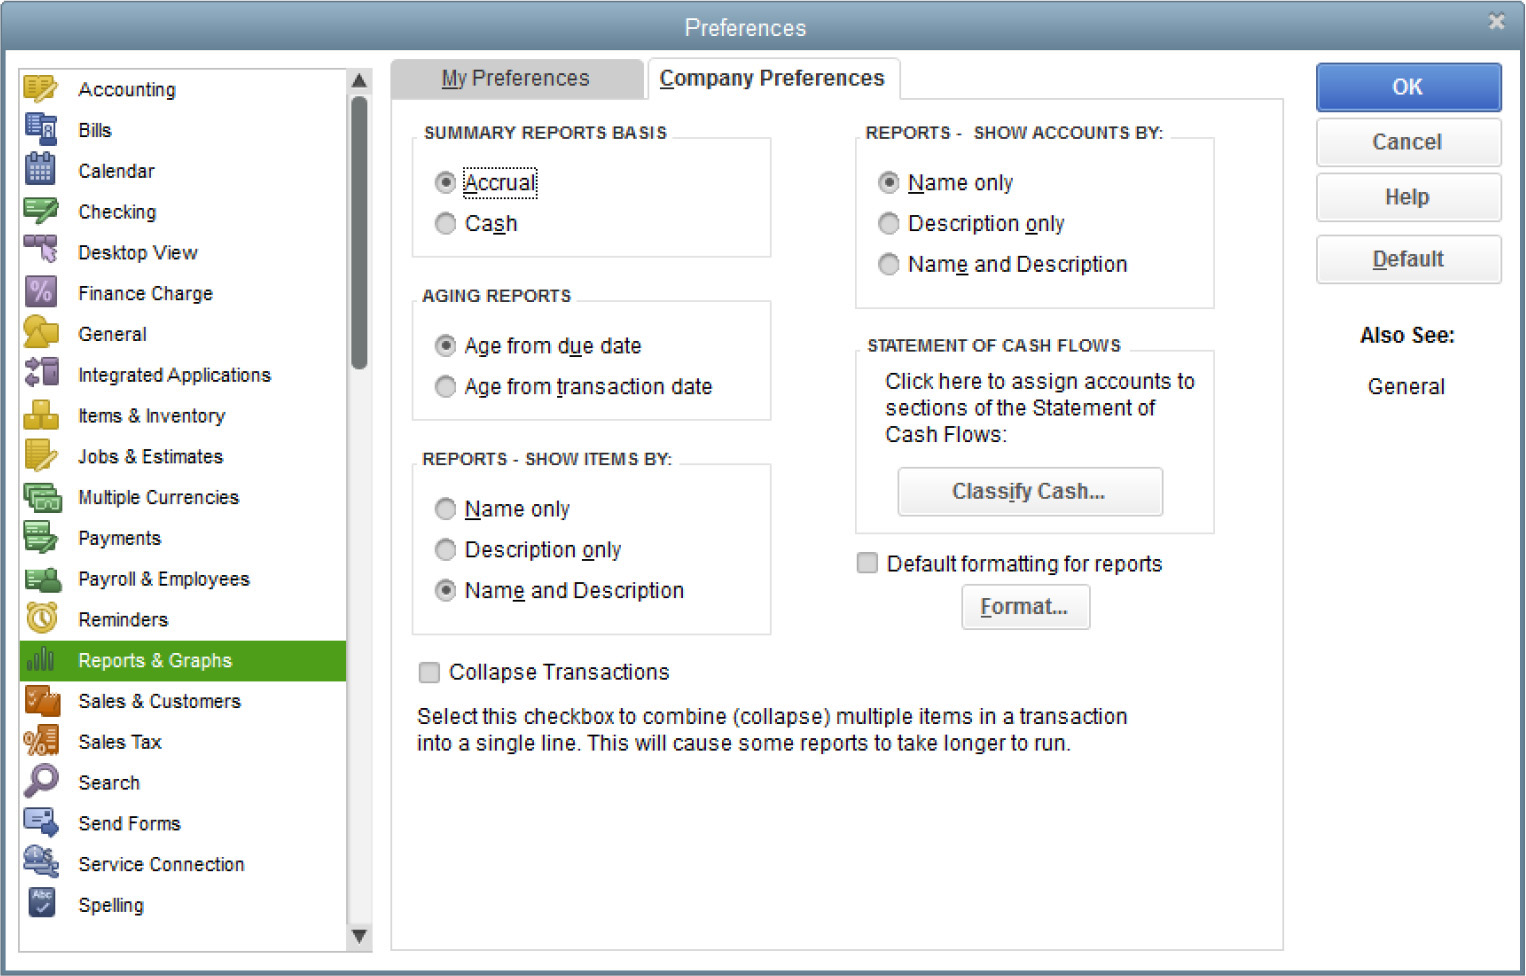
Summary Reports Basis
Specify whether you want to see summary reports as accrual based or cash based. You can always change the basis in the Modify Report dialog when you actually display the report.
Aging Reports
Specify whether you want to generate A/R and A/P aging reports using the due date or the transaction date.
Reports—Show Accounts By
Specify whether you want reports to display account names, account descriptions, or both. If you enabled account numbers, those numbers are part of the account names.
Reports—Show Items By
Specify whether you want reports that include items to display just the item name, the item description, or both.
Setting Report Format Defaults
Set the default formatting for reports by clicking the Format button and making changes to the default configuration options for parts of reports that aren’t data related but instead control the look of the reports.
Configuring the Statement Cash Flows Report
A cash flow report is really a complicated document, and before the days of accounting software, accountants spent many hours creating such a report (and charged a lot of money for doing so). QuickBooks has configured a cash flow report format that is used to produce the Statement Of Cash Flows, which is available in the list of Company & Financial reports.
You can view the format by clicking the Classify Cash button, but if you plan on using this report on a regular basis, it’s a good idea to check with your accountant before you reassign accounts. You can learn about cash flow reports in Chapter 12.
Collapse Transactions
Selecting this option will collapse (combine) a transaction that includes multiple items into one line on a report. When you run a report with this option, you can then use the Expand button at the top of the report window to display the details.
![]()
Sales & Customers Preferences
You can set options in the Sales & Customers category on both the My Preferences and Company Preferences tabs. On the My Preferences tab, set the options for invoicing customers for reimbursable expenses and billable time.
• Prompt For Time/Costs To Add Choose this option to tell QuickBooks to open a dialog that displays the current outstanding reimbursable expenses and time associated with a customer whenever you create an invoice or sales receipt for a customer. This is the option to select if you typically need to rebill your customers for out-of-pocket expenses or for time spent on a project.
• Don’t Add Any Selecting this option prevents the automatic display of any dialogs about reimbursable expenses when you create a sales transaction. Choose this option if you rarely (or never) seek reimbursement from your customers. If you decide that you do want to collect reimbursable expenses during invoice creation, you can click the Add Time/Costs button on the sales transaction form.
• Ask What To Do Select this option to tell QuickBooks to ask you what you want to do whenever you create a sales transaction for a customer with outstanding reimbursable costs. Depending on your selection in that dialog, you can either add the costs to the sales transaction or omit them.
On the Company Preferences tab, set the default options for sales transactions.
Usual Shipping Method
Use this to set the default shipping method if you use the same shipping method most of the time.
Usual FOB
Set the FOB language for invoices. FOB (Free On Board) is the location from which shipping is determined to be the customer’s responsibility. This means more than just paying for freight; it’s a statement that says, “At this point, you have become the owner of this product.” The side effects include assigning responsibility if goods are lost, damaged, or stolen. FOB settings have no impact on your financial records.
Warn About Duplicate Invoice Numbers
This option tells QuickBooks to warn you if you’re creating an invoice with an invoice number that’s already in use.
Choose Template For Invoice Packing Slip
Select a default packing slip to use when you print packing slips. If you’ve created customized packing slips, you can make one of them the default.
Enable Collections Center
Selecting the Enable Collections Center check box makes the Collections Center feature available. Once enabled, an icon with the same name is added to the Customer Center for easy access. Its purpose is to help you keep track of past due and almost past due customer balances while also giving you an easy way to send e-mail reminders to the customers that are listed there.
Custom Pricing
Choose one of two options: No Custom Pricing and Enable Price Levels. Price levels are a way for you to customize your prices by customer.
![]()
Sales Tax Preferences
If you collect sales tax, you must set your sales tax options. Most of the selections are predefined by state tax laws and state tax reporting rules. Check with your accountant and read the information that came with your state sales tax license. For more information about managing sales taxes in QuickBooks, see Chapter 6.
![]()
Search Preferences
The Search feature allows you to quickly search in all areas of your company file for things like transactions, names, amount, dates, QuickBooks features, and so on. By default, the Search field is included on the QuickBooks Icon Bar, whether you use the Top or Left Icon Bar. If you use the Top Icon Bar, you can remove the Search field on it by unchecking that option at the top of the My Preferences tab. You can also tell QuickBooks whether to search the Help files or your QuickBooks file when a search term is entered in this field.
The preferences listed on the Company Preferences tab give you the option of updating your search information either automatically (as often as every five minutes) or manually.
![]()
Send Forms Preferences
If you send transactions to customers via e-mail, the My Preferences tab offers the opportunity to automatically select the Email Later option on a sales transaction if the current customer is configured for e-mail as the preferred send method. You can choose whether to send this information via Outlook or a compatible web e-mail service like Yahoo! or Gmail. You can also use QuickBooks E-mail, which is a subscription-based offering. Click the Check For Valid Subscriptions button to learn more or to confirm your own subscription.
On the Company Preferences tab, you can use Email Templates to design multiple versions of the message that accompanies an e-mailed transaction.
![]()
Service Connection Preferences
If you use QuickBooks services on the Internet, use this category to specify the way you want to connect to the Internet for those services. The My Preferences tab contains options related to online banking if your bank uses the Web Connect method of online access:
• Give Me The Option Of Saving A File Whenever I Download Web Connect Data Select this option if you want QuickBooks to provide a choice to save Web Connect data for later processing instead of automatically processing the transactions. QuickBooks provides the choice by opening a dialog that lets you choose whether to import the data immediately or save it to a file so you can import it later (you have to supply a filename). The QuickBooks dialog also includes an option to reset this option. This option only works when you select Open on the File Download dialog. If you disable this option, the file is automatically opened and the data is imported into QuickBooks.
• If QuickBooks Is Run By My Browser, Don’t Close It After Web Connect Is Done Select this option if you want QuickBooks to remain open after you process the Web Connect data downloaded from your financial institution (after selecting Open on the Download dialog. If you deselect this option, QuickBooks closes automatically as soon as your data is processed.
The following connection options are available on the Company Preferences tab (these options don’t apply to payroll services or online banking):
• Automatically Connect Without Asking For A Password Lets all users log into the QuickBooks Business Services network automatically.
• Always Ask For A Password Before Connecting Forces users to enter a login name and password in order to access QuickBooks Business Services.
• Allow Background Downloading Of Service Messages Lets QuickBooks check the Intuit website for updates and information periodically when you’re connected to the Internet.
![]()
Spelling Preferences
The Spelling section presents options only on the My Preferences tab. This is where you control the way the spell checker in QuickBooks works. You can instruct QuickBooks to check spelling automatically before saving, sending, or printing any form. In addition, you can specify those words you want the spell checker to skip, such as Internet addresses, numbers, and all capital letters that probably indicate an abbreviation.
![]()
Tax:1099 Preferences
If you need to file 1099-Misc forms, select the Company Preferences tab of this window to access a wizard that will help you establish the 1099 form options you need. For each type of 1099 payment, you must assign an account from your chart of accounts. To make these assignments, use the Click Here link under If You Want To Map Your Accounts To Boxes On Form 1099-MISC. If you’re ready to prepare your 1099s, including mapping accounts, use the Click Here link to launch the 1099 wizard (see Figure 14-1).

FIGURE 14-1 Use the 1099 Preferences window to launch the wizard that will guide you through the process of configuring your QuickBooks file for 1099 reporting.
![]()
Time & Expenses Preferences
Use this section in the Company Preferences tab to turn on time tracking and to tell QuickBooks the first day of your work week (which becomes the first day listed on your timesheets). Configure invoicing options as explained in the following sections.
Mark All Time Entries As Billable
Selecting this option makes hours entered in a timesheet that are associated with a customer or job billable to that customer.
Track Reimbursed Expenses As Income
This option changes the way your general ledger handles customer payments for reimbursements. When the option is enabled, the reimbursement is assigned to an income account instead of posting back to the original expense account. As a result of enabling this option, QuickBooks adds a new field to the dialog you use when you create or edit an expense account so you can enter the associated income account.
Whenever you post a vendor expense to this account and also indicate that the expense is reimbursable, the amount you charge to the customer when you create an invoice for that customer is automatically posted to the income account that’s linked to this expense account.
QuickBooks requires a separate income account for each reimbursable expense. If you have multiple expense accounts for which you may receive reimbursement (a highly likely scenario), you must also create multiple income accounts for accepting reimbursed expenses.
Mark All Expenses As Billable
Selecting this option will automatically make expenses that are associated with a customer or job billable to that customer, whether recorded via check, bill, or credit card.
Default Markup Percentage
You can preset a markup for reimbursed expenses and for items that have both a cost and price. QuickBooks uses the percentage you enter here to automate the pricing of inventory items. When you’re creating an inventory item, as soon as you enter the cost, QuickBooks automatically adds this percentage and displays the result as the price. If you enter a default markup percentage, use the Default Markup Account field to select an account to which you want to post the resulting markup amounts.
Customize Transaction Templates
QuickBooks makes it easy to customize the forms you use to create transactions. Forms such as invoices, purchase orders, statements, and so on are called templates in QuickBooks, and there are two options available when customizing templates.
The first allows you to create brand-new template designs from an online template gallery. You can then save these templates to your template list. The second option gives you the ability to work with and modify the appearance of an existing template or to create a new template based on an existing one from within the program. This section focuses on the second option. You can use an existing template as the basis of a new template, copying what you like, changing what you don’t like, and eliminating what you don’t need. Existing templates can be customized in two ways:
• Basic customization Change the appearance by customizing the fonts, colors, and other output settings only. These are minor changes that can be made to your templates, including the built-in Intuit templates.
• Additional customization Customize the fields and columns that appear on the template. These are major changes and require you to create a new template with a new template name.
![]()
Basic Customization of Templates
To make minor changes to an existing template, locate and open the desired template in the Templates list by choosing Lists | Templates. Double-click the desired template to open the Basic Customization window. You can also open a template to the Basic Customization window while you’re creating a new transaction (like an invoice, for example). In this case, on the Formatting tab located on the ribbon bar at the top of the form window, select Manage Templates. Choose the template you want to modify and click OK to open the Basic Customization window (see Figure 14-2).

FIGURE 14-2 Change the appearance of a template in the Basic Customization dialog.
Managing Templates
Click Manage Templates to view, copy, or rename a template. The Preview pane (on the right) displays a layout of the template as it currently looks and displays the template name at the top. In the Template Name field at the top of the Preview pane, you can delete the current name (unless it’s an original Intuit template) and replace it with the name you want for the new template. Clicking OK returns you to the Basic Customization dialog.
Adding a Logo to a Template
You can add your company logo to a template by selecting the Use Logo check box. Navigate to the folder that has your logo graphic file, and select the file. Use the following guidelines to add a logo to a template:
• The logo should be a square shape to fit properly on the template.
• QuickBooks accepts all the common graphic formats for your logo. However, the graphic loads when you print the template, and graphic files saved with a BMP, TIFF, or PSD format tend to be larger than other formats and may take quite some time to load each time you print. The most efficient format in terms of size and resolution is JPG.
• Your logo appears in the upper-left corner of the form, unless you open the Layout Designer (covered later in this chapter) to reposition it.
• You won’t see the logo on the screen version of the template.
• If you can’t place the logo in the size and position you prefer, consider having stationery printed and using it as the paper source for the template.
Customizing Colors on a Template
You can change the color of the lines that appear on the template by selecting a color scheme from the drop-down list in the Select Color Scheme field. Click Apply Color Scheme to save the change and see its effect in the Preview pane on the right side of the dialog.
You can also change the color of any text that’s printed on the form by using the features for changing fonts (covered next) and selecting a color for the font.
Customizing Fonts on a Template
To change the fonts for any elements on the template, select the element in the Change Font For list and click Change Font. Select a font, size, style (such as bold or italic), effects, or color.
Customizing the Company Information on a Template
You can select and deselect the text that appears in the name and address block of your templates. The data comes from the Company Information dialog, which you can open by clicking Update Information to make sure that the data exists.
Printing Status Stamps on Templates
You can select or deselect the option to print the status stamp on a transaction template (PAID, RECEIVED, and so on). The status stamp prints at an angle across the center of the header section of the template. If you deselect the status stamp, you are only removing it from the printed copy of the form; the screen copy always shows the status.
The List of Templates
If you’ve just started using QuickBooks, you may be confused by the template names you see in the Templates list (Lists | Templates). The templates that appear in the list depend on the preferences you set and the transactions you’ve created.
By default, QuickBooks installs Invoice templates, a Statement template, and a Packing Slip template. You won’t see a Purchase Order template unless you enable Inventory & Purchase Orders and open the built-in Purchase Order template by choosing Vendors | Create Purchase Orders. As soon as the Create Purchase Orders transaction window opens, the Purchase Order template appears on the list (close the transaction window without creating a PO if your only purpose was to add the template to the list). The same convention applies to Sales Receipts, Estimates, and other QuickBooks templates.
![]()
Additional Customization of Templates
You can make major changes in templates to suit your needs as well as your taste. QuickBooks calls this the Additional Customization feature. Start your customization by selecting an existing template on which to base your new template. Select the Customize Data Layout button located on the Formatting tab, which is located on the ribbon bar at the top of the form’s window. If you are attempting to modify an Intuit template, the Locked Template dialog appears instructing you to make a copy of the template; otherwise, the Additional Customization window opens (see Figure 14-3).

FIGURE 14-3 The Additional Customization dialog lets you point and click to redesign a template.
Custom fields you create in a Names list appear in the Header section of transaction windows, while custom fields you create in the Item List appear in the Columns section of transaction windows.
Customizing the Template Header
The header section of the Additional Customization dialog includes all the fields that appear above the line items in a transaction form. You can add or remove fields on the screen form, the printed form, or both. The Preview pane on the right is a preview of the printed form, and as you add or remove fields from the printed form, you see the changes reflected there.
There are some changes to the header section that you may want to make based on the way you’ve set up your QuickBooks company file. For example
• If you assign account numbers to your customers, you may want to display the Account Number field (only available on the printed version).
• If you use reps, either as commissioned salespersons or as customer support contacts, you can add the Rep field to both the screen and printed versions.
• If you’re tracking jobs for the majority of your customers, add the job name to the form (only available in the printed version). QuickBooks uses the term “project” because that’s the commonly used term in most businesses (the exception is the construction trade, where “job” is a common term). If you refer to jobs as “jobs” with your customers, you can change the text.
Customizing the Template Columns
On the Columns tab of the Additional Customization dialog, you can add or remove columns that appear in the line item section of the transaction form. If you created custom fields for items, they’re available for any template you design.
If progress invoicing is turned on, another columns tab, called Prog Cols, is available for customizing the transaction form you use when you create a progress invoice against an estimate.
Customizing the Template Footer
The Footer tab contains the elements that appear at the bottom of the transaction form. If you want to add fields to this section of the printed transaction form, you’ll have to use the Layout Designer to maneuver the positioning because you don’t have a lot of space to work with.
Setting the Print Option
On the Print tab, you can configure the printer settings for just this template by selecting the option Use Specified Printer Settings Below For This Invoice. If you want to use the same invoice printer settings that you used in your printer setup (File | Printer Setup | Invoices), you can select that option as your default.
Using the Layout Designer
As you customize the printed forms, you can see the effects in the Preview pane. If you notice some overlapping fields, or you think the layout looks too crowded, you can use the Layout Designer to reposition the elements on the form. Click Layout Designer to open your template in the Layout Designer window, as shown in Figure 14-4.
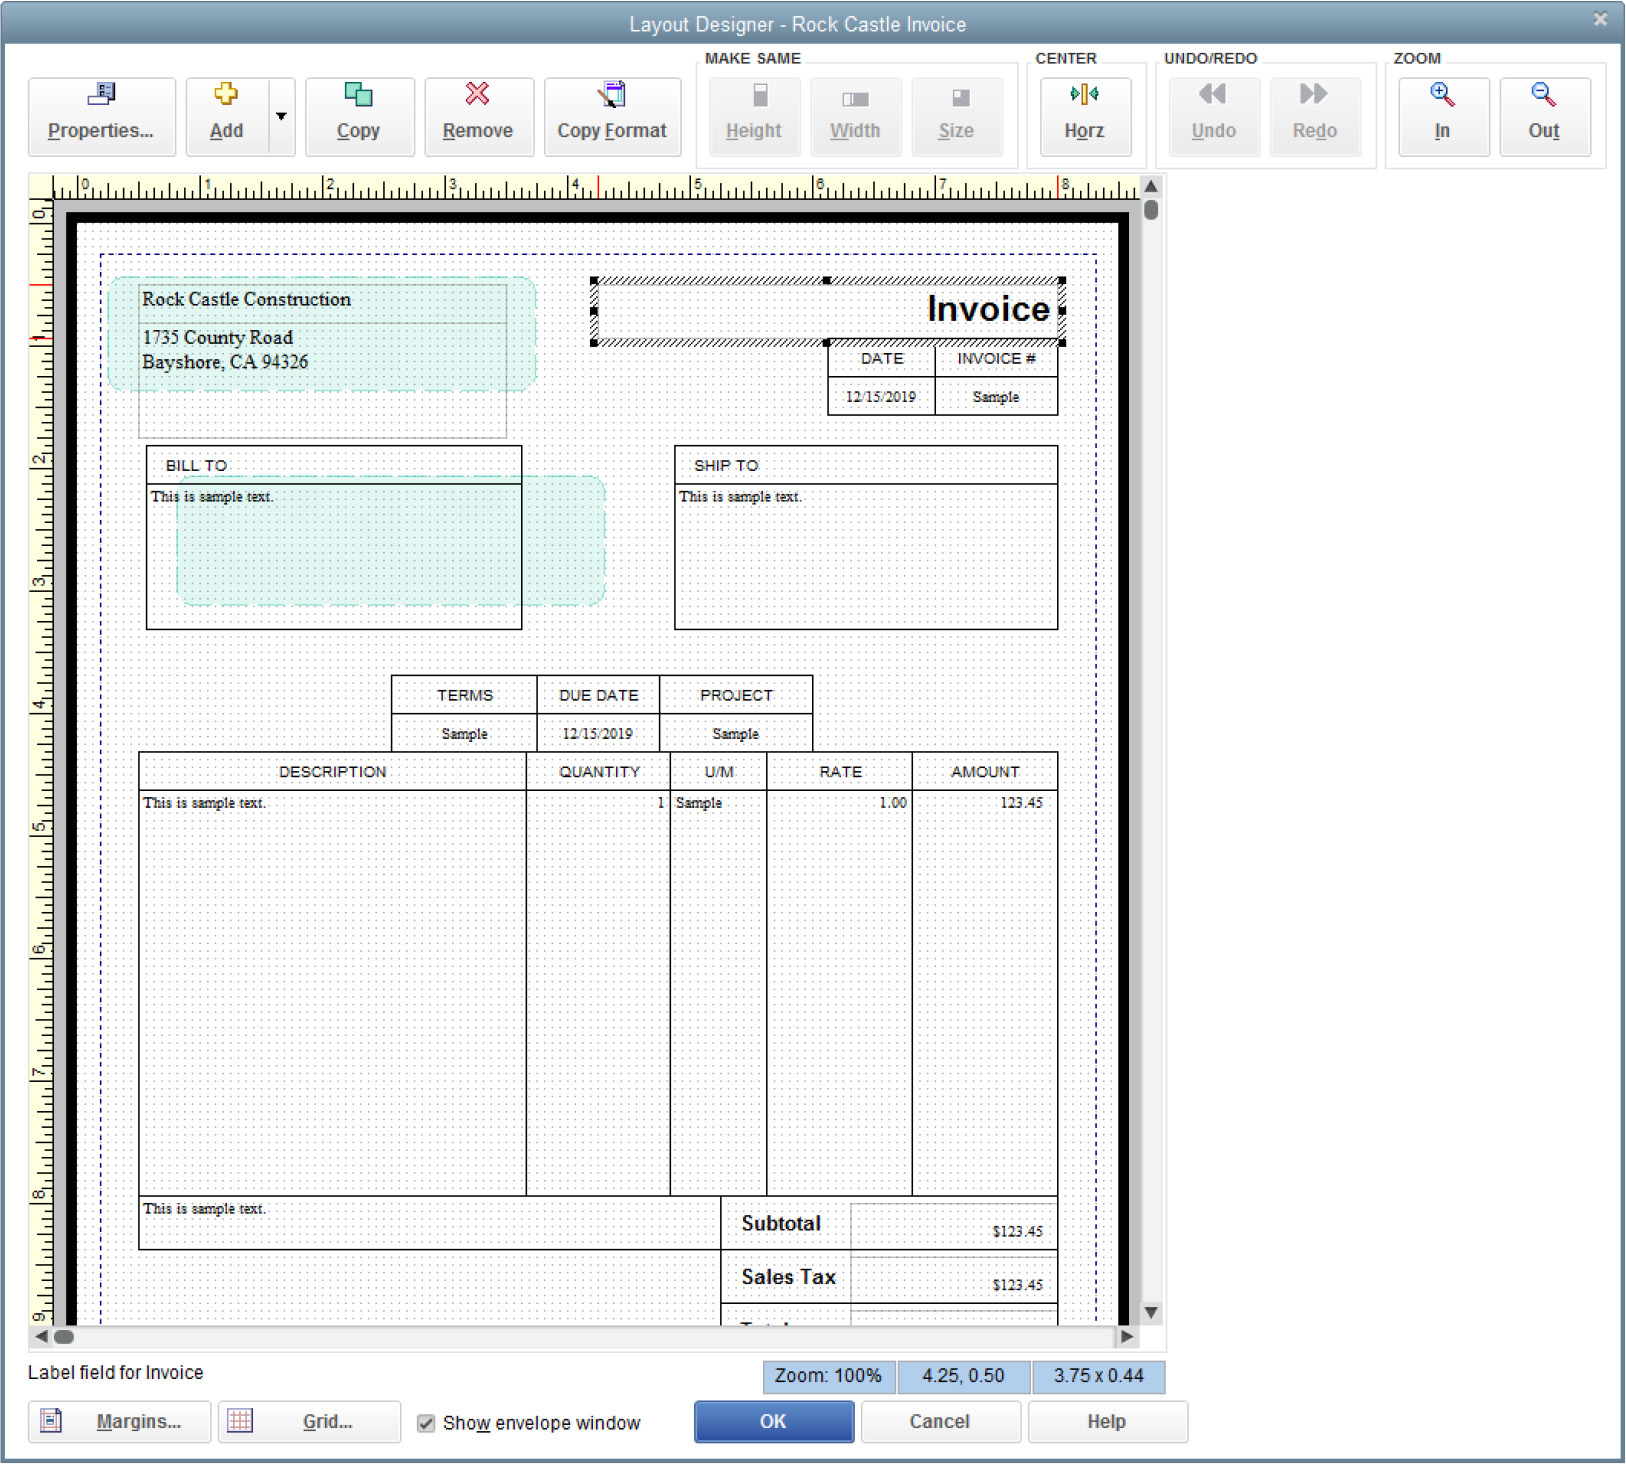
FIGURE 14-4 You can reposition the elements in the form to create your own design.
The Layout Designer is a powerful and complicated feature, and it’s beyond the scope of this book to go into deep detail about it. The more you work with it, however, the better you’ll get at making it work for you. It’s a good idea to make a copy of an existing invoice template and experiment on that copy before you make changes to your “live” template.
If you use window envelopes to mail your invoices, be sure the Show Envelope Window option at the bottom of the Layout Designer is selected before you start. The areas of the form that appear in envelope windows are highlighted in green. This helps you avoid moving any fields into that area.
Select any element to put a frame around it. Now you can perform an action on the frame, as follows:
• To change the size of the element, position your pointer on one of the sizing handles on the frame and then drag the handle to resize the element.
• To move an element, position your pointer inside the frame and, when your pointer turns into a four-headed arrow, drag the frame to a different location on the form.
• Double-click an element’s frame to see a Properties dialog that permits a variety of changes for the selected element.
• To change the margin measurements, click the Margins button at the bottom of the Layout Designer.
• Click the Grid button to open the Grid And Snap Settings dialog, where you can eliminate the dotted line grid, change the spacing between grid lines, or turn off the Snap To Grid option (which automatically aligns objects to the nearest point on the grid).
• Use the toolbar buttons to align, resize, and zoom into the selected elements. There are also Undo and Redo buttons, just in case.
When you finish with the Layout Designer, click OK to move back to the Additional Customization window. If everything is just the way you want it, save your new template by clicking OK. This new template name appears on the drop-down list when you create transaction forms.
Document Management
QuickBooks lets you store other documents with your QuickBooks transactions.
![]()
The Doc Center
The Doc Center holds documents and files on your computer that you can then “attach” to or associate with a specific transaction or record in QuickBooks. For example, a purchase order a customer sends to you via e-mail or snail mail can be saved or scanned into the Doc Center. Later, with the customer’s invoice open, click the Attach (paper clip) icon at the top of the Create Invoices window and browse to the document that you’ve saved on your computer through the Doc Center. A copy of the PO will then be easily retrievable right from their invoice. To open the Doc Center, click the Docs button on the Icon Bar.
![]()
Using the Attach File Feature
The Attach File feature allows you to attach files of any type to a QuickBooks list record or transaction. You’ll see an Attach File icon at the top of all transaction windows as well as in all QuickBooks centers.
Once you’ve attached a file or scanned image, it is easily accessible via the Doc Center (which you can open by clicking the Docs button on the Icon Bar). For example, you might want to attach a scanned copy of a customer’s purchase order to the invoice that you generate for them in QuickBooks, or maybe you’ll need to attach an e-mailed copy of a vendor’s bill when you enter the bill into QuickBooks. Or you might want to attach a file or image to a vendor record.
To attach a file or image to a transaction (such as an invoice or estimate), open the transaction and click the Attach File button. To attach a document to a customer or vendor record, highlight the record’s name in the appropriate center, and then click the Attach (paper clip) icon. The Attachments window opens, giving you the option of attaching a document directly from your computer, your scanner, or the Doc Center.
A QuickBooks transaction or record that has an attachment will display a blue icon (a paper clip attached to a piece of paper), indicating that an attached file or image exists. Click this icon to open the Doc Center to view this and other files and documents stored there.
E-mail Forms and Reports
You can e-mail documents and reports directly from QuickBooks as PDF attachments to e-mail messages. E-mailing works exactly the same as printing forms and reports. That is, you can e-mail each individual transaction as you create it or save the transactions and e-mail them in a batch.
If you’re using Outlook or a compatible web-based e-mail service, QuickBooks can send e-mail to your customers either directly through your e-mail software or your e-mail service. If you use e-mail software other than the supported software, you can use QuickBooks E-mail, which provides a server-based e-mail service. You have to sign up for this, and additional fees may apply.
You can e-mail any report (either as a PDF file or as an Excel file), and you can also e-mail all of the following QuickBooks transaction forms:
• Invoices
• Estimates
• Credit memos
• Statements
• Purchase orders
• Pay stubs (if you use QuickBooks payroll and have signed up for direct deposit)
![]()
Setting Up E-mail
Your e-mail setup options can be found by selecting Edit | Preferences | Send Forms. If QuickBooks finds a copy of one of the supported e-mail software applications (such as Outlook) on your computer with an active profile installed (an active profile is an e-mail account established in the software, and the software is the default e-mail software on your computer), the Send Forms category on the My Preferences tab shows this as the default e-mail method. If these options aren’t displayed, you must use the QuickBooks E-mail service to send transaction forms and reports.
The My Preferences tab also shows an option, Auto-check The “Email Later” Checkbox If Customer’s Preferred Delivery Method Is E-mail, to instruct QuickBooks to select Email Later automatically on every transaction linked to a customer that has e-mail set as their preferred delivery method (set on the Payment Settings tab of the customer record). If you configure a customer’s delivery method as e-mail, make sure you enter the customer’s e-mail address as well.
When creating purchase orders, you’ll also have the option to e-mail later if you want to send those transactions in a batch. This option works only if you’ve entered an e-mail address for the vendor on their Address Info tab in their record.
On the Company Preferences tab, you can use e-mail templates to design multiple versions of the message that accompanies an e-mailed form (such as invoices, purchase orders, and estimates, to name a few). Click the Add, Edit, or Delete buttons to create, modify, or delete an e-mail template.
![]()
Sending E-mail
To send a single transaction form by e-mail, click the Email button at the top of the transaction form. Or select Email Later (located next to the Email button) before saving the transaction to send the e-mail in a batch.
Using Your E-mail Software
If QuickBooks uses Outlook to send transaction forms or reports, the standard Create Message window appears:
• If the customer’s or vendor’s e-mail address is stored in QuickBooks, it’s automatically inserted into the To: field.
• If the customer’s or vendor’s e-mail address is not available, QuickBooks searches your e-mail software address book. If the name/e-mail is found, the entry in the To: field is underlined to indicate the name has been matched to an existing address book entry.
• If the customer’s or vendor’s e-mail address is not available in either place, you’ll need to add the customer’s e-mail address to your QuickBooks file.
The Subject field is prefilled with <Transaction Number> from <YourCompanyName>. The Attachment field is prefilled with the name of the PDF file of the transaction form. The text of the message is prefilled by QuickBooks, using the text in the Send Forms Preferences dialog, discussed in the previous section.
Using QuickBooks E-mail
If you’re not using one of the supported e-mail applications and you’ve activated the QuickBooks E-mail service, QuickBooks fills out the message and attaches the document in the same way it does when you’re using your own e-mail software.
When you click Send Now, QuickBooks opens a browser window and takes you to the QuickBooks Billing Solutions website. If this is the first time you’re e-mailing invoices, follow the prompts to complete the sign-up process, and then QuickBooks will send the e-mail. Thereafter, your e-mail is sent automatically. An additional feature of this Billing Solutions service is the ability to accept online payments from your customers that receive an invoice from you via this service (additional fees may apply).