
Chapter 5
Managing Accounts Receivable
In this chapter:
• Recording and depositing customer payments
• Entering and handling cash sales in QuickBooks
• Working with a cash drawer
• Banking Accounts Receivable payments
• Tracking the money you’re owed
• Using the Accounts Receivable reports
• Customer statements in QuickBooks
Once you have sent invoices to your customers, you expect money will eventually arrive to pay off those invoices. In fact, for most businesses, the most rewarding QuickBooks task is receiving a payment from a customer. QuickBooks gives you the tools you need to make sure that you apply customer payments the way your customer intended so that you both have the same information in your records.
Your Options for Receiving Customer Payments
In QuickBooks, payments are applied to specific invoices, not to a general balance forward. You can change how QuickBooks applies payments with just a mouse click or two, using the following steps:
1. Choose Edit | Preferences and click the Payments icon in the left pane.
2. Move to the Company Preferences tab.
3. In the Receive Payments section, select or deselect options to match your needs:
• Automatically Apply Payments means that when you enter the amount you’ve received from the customer, QuickBooks will automatically pay off matching invoices, first by amount, and then by the oldest due date.
• Automatically Calculate Payments tells QuickBooks to let you omit the amount of the customer’s payment in the transaction window and select invoices to pay off. QuickBooks adds up the invoice amounts and applies the total as the customer’s payment. (This assumes the customer has sent a payment that matches the total.)
• Use Undeposited Funds As A Default Deposit To Account automatically posts the payments you receive to the Undeposited Funds account, and from there you’ll deposit the funds into a bank account.
![]()
Recording the Payment
When a payment arrives from a customer, choose Customers | Receive Payments to open a blank Receive Payments window, as shown in Figure 5-1. Note the ribbon bar at the top of the window that contains three tabs: Main, Reports, and Payments. Each of these tabs contains buttons that give you easy access to important payment-related tasks (such as processing credit payments) as well as reports where you can find customer balance information.
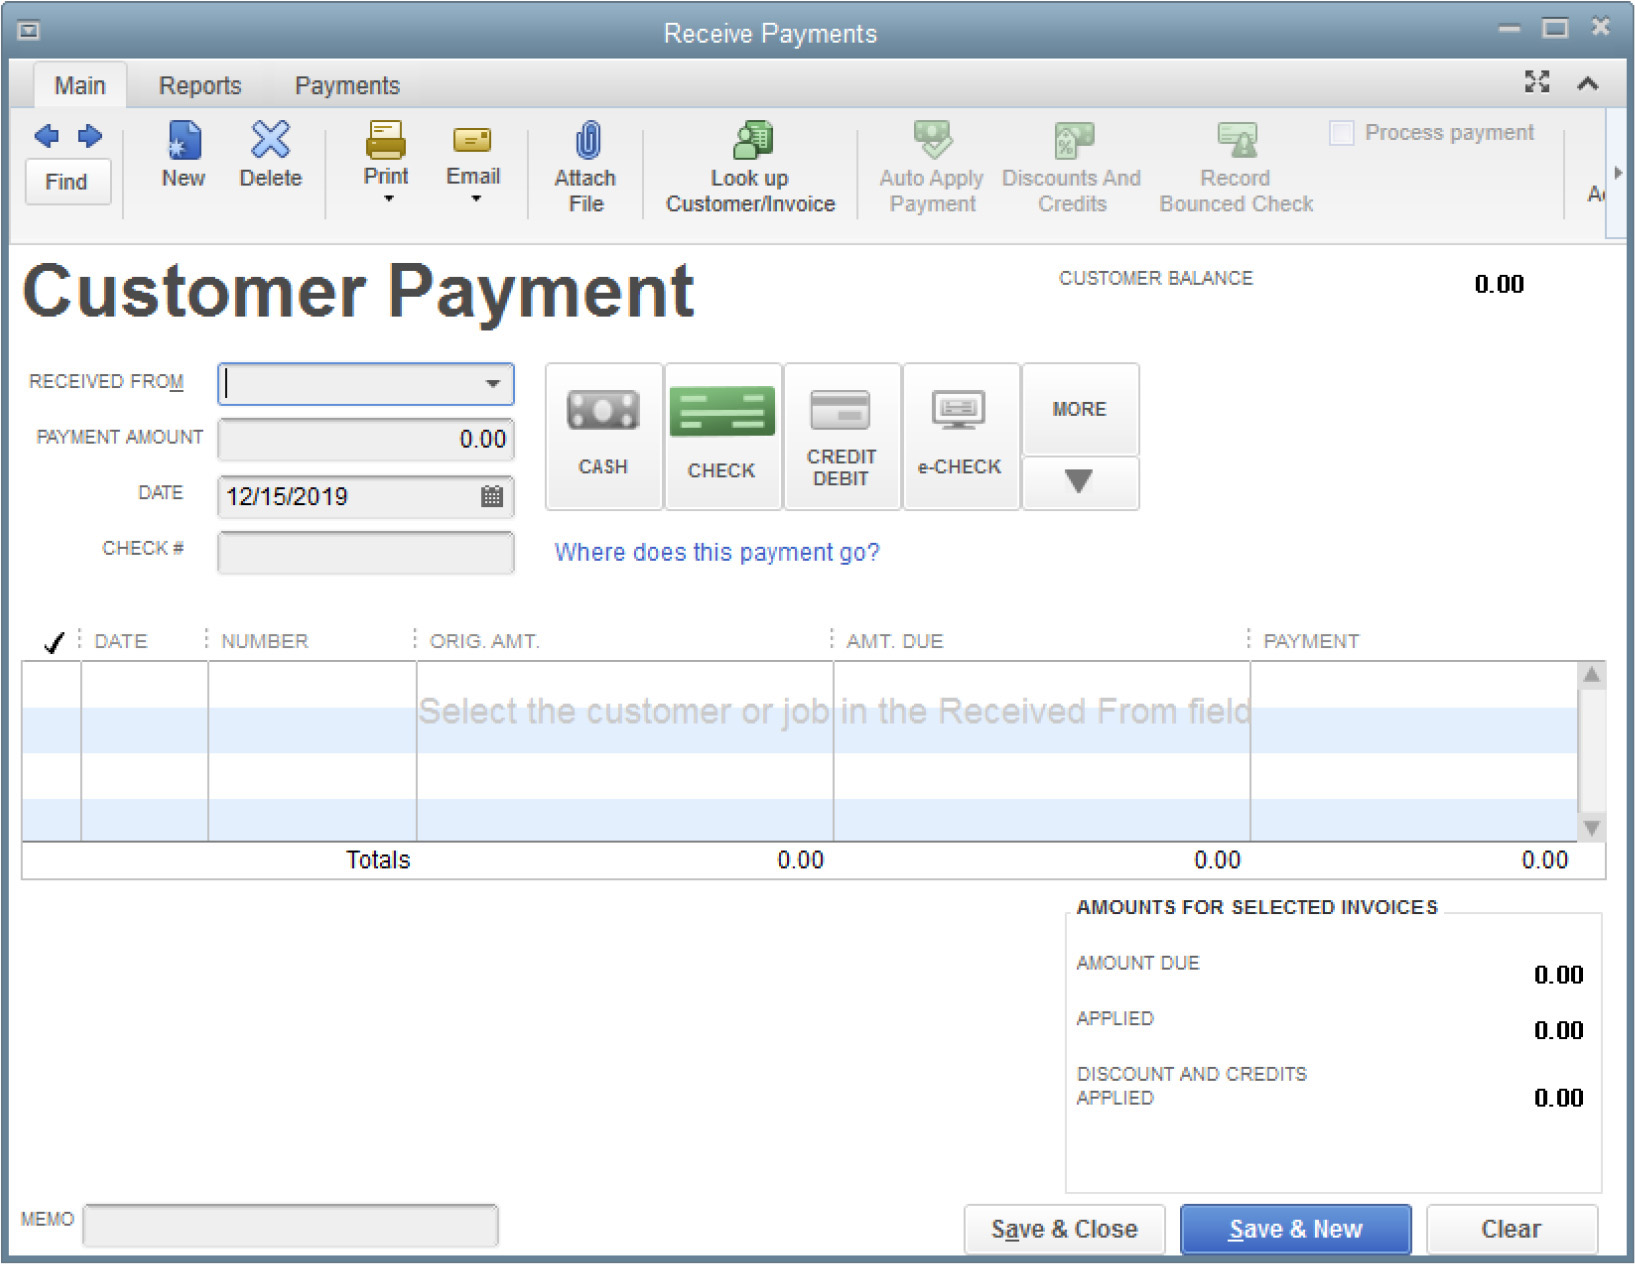
FIGURE 5-1 Enter customer payments in the Receive Payments window.
To record a payment, follow these steps:
1. Click the arrow to the right of the Received From field and select the customer or job from the drop-down list.
If you select a customer, the details for the open invoice balance(s) for this customer are displayed. If the payment is for a job, select the job. The details display for the open invoice balance(s) for this specific job. If the payment covers multiple jobs, select the main customer name to see all invoices for all jobs. The details for the open invoice balance(s) for this customer and jobs display.
2. In the Payment Amount field, enter the amount of this payment.
3. To select the payment method, click one of the payment method buttons to the right of the Payment Amount field. If the payment method is a check, enter the check number in the Check # field that appears. If the payment method is a credit card, complete the Card No. and Exp. Date fields for your records.
4. If you have a merchant account with the QuickBooks Merchant Account Service, check the Process Payment check box on the Main tab on the Icon Bar.
5. The Memo field at the bottom of the window is optional for any note you’d like attached to this payment.
6. If the Deposit To field is displayed, select the bank account for depositing the payment, or select Undeposited Funds if you’re using that account to receive payments. If the Deposit To field is not displayed, it means your Payments Preferences are configured to deposit payments to the Undeposited Funds account automatically, which is the most often used setting. See “Depositing Payments into Your Bank Account” later in this chapter to determine which setting works for you.
![]()
Calculating the Payment and Applying to Invoices
If you’ve enabled the (default) Automatically Calculate Payments option in the Payments category of the Preferences dialog, you can skip the Payment Amount field and move directly to the list of invoices in the Receive Payments window. As you select each invoice for payment, QuickBooks calculates the total and places it in the Applied [Amount] field.
If you haven’t enabled the option to calculate payments automatically and you select an invoice listing without entering the amount of the payment first, QuickBooks issues an error message, telling you that the amount of the payment you’re applying is higher than the amount you entered in the Payment Amount field. In that case, enter the amount of the payment in the Payment Amount field at the top of the Receive Payments window.
If the customer’s intention isn’t clear, the smart thing to do is to contact the customer to ask how the payment should be applied. You must apply the entire amount of the customer’s payment. If you are not tracking the customer balance by invoice and are instead using a balance forward system, just let QuickBooks continue to apply payments against the oldest invoices.
If the customer payment doesn’t match the amount of any invoice, check to see whether the customer indicated a specific invoice number for the payment. If a number is specified, apply the payment against that invoice; if it’s not, let the automatic selection of the oldest invoice stand.
![]()
Depositing Payments into Your Bank Account
If you don’t see the Deposit To field in the Receive Payments window when recording payments from customers, it means your Payments Preferences setting is set to post payments automatically to the Undeposited Funds account. To confirm this, select Edit | Preferences | Payments and look on the Company Preferences tab.
If you decide to change this setting, use the Deposit To field in the Receive Payments window to select an account for depositing the payments. You can select a bank account or select the Undeposited Funds account.
Depositing Cash Receipts into the Undeposited Funds Account
When you enable the automatic use of the Undeposited Funds account (or manually select that account in the transaction window), each payment you receive is entered into the account named Undeposited Funds that QuickBooks establishes automatically.
When you finish applying customer payments in QuickBooks, and you’re ready to make your bank deposit, you move the money from the Undeposited Funds account into a bank account by choosing Banking | Make Deposits from the menu bar. While the bank account shows only the total amount of each bank deposit (the payments you selected for transfer to the bank from the Undeposited Funds account), the Undeposited Funds account shows each individual payment you received. This matches the bank statement that shows up each month, making it easier for you to reconcile the account.
Depositing Each Payment Directly into a Bank Account
Depositing each payment directly to the bank means you don’t have to take the extra step of moving cash receipts from the Undeposited Funds account into the bank account. However, each payment you receive appears as a separate entry when you reconcile your bank account.
So, for instance, if you receive six payments totaling $10,450.25 and take the checks to the bank that day, your bank statement shows that amount as one deposit. When it’s time to reconcile your account and you compare your bank statement to your QuickBooks bank register, each individual payment is listed in the register. When added together, these payments should all equal that same amount of $10,450.25, but you’ll have to select each payment individually, mark it as cleared, and make sure it matches the bank statement. (See Chapter 7 for detailed instructions on reconciling bank accounts.)
![]()
Handling Underpayments
After you apply the customer’s payment, if it isn’t enough to pay off an existing invoice, the lower-left corner of the Receive Payments window displays a message that asks whether you want to leave the underpaid amount as an underpayment or write it off. To make it easy for you to contact the customer to ask about the reason for the underpayment, QuickBooks adds a button labeled View Customer Contact Information that opens to the customer record when clicked.
If you opt to retain the underpayment, the invoice you selected for payment remains as a receivable, with a new balance (the original balance less the payment you applied). When you click Save & Close (or Save & New), QuickBooks makes the appropriate postings.
If you select the option to write off the underpayment, when you click Save & Close or Save & New, QuickBooks opens the Write Off Amount dialog so you can choose the posting account, and, if applicable, apply a class to the transaction. Discuss the account to use for a write-off with your accountant. You can create an Income or Expense account for this purpose, depending on the way your accountant wants to track receivables you’ve decided to forgive.
![]()
Applying Credits to Invoices
You can apply any existing credits to an open invoice, in addition to applying the payment that arrived. If credits exist, customers usually let you know how they want credits applied, and it’s not unusual to find a note written on the copy of the invoice that the customer sent along with the check that probably represents the net due when the credit is applied.
When credits exist for the customer or job you select in the Receive Payments transaction window, QuickBooks displays the credit balance in the Available Credits field at the bottom of the window. To apply a credit balance to an invoice, click the Discount And Credits button at the top of the Receive Payments window, which opens the Discount And Credits dialog. Select the credit(s) you want to apply and click Done. Depending on the circumstances, QuickBooks handles the credits in several ways:
• The credit total is equal to or less than the unpaid amount of the oldest invoice This reduces the balance due on that invoice. If the customer sent a payment that reflects his net balance due (balance minus unused credits), the invoice has no remaining balance. If applying the existing credit along with the payment doesn’t pay off the invoice, the balance due on the invoice is reduced by the total of the payment and the credit. The amount of the credit is added to the postings for the invoice. This change affects only the invoice balance and the accounts receivable posting; it doesn’t change the amount of the payment that’s posted to your bank account.
• The credit total is larger than the amount required to pay off an invoice If the customer payment is smaller than the amount of the invoice, but the amount of credit is larger than the amount needed to pay off the invoice, the balance of the credit remains available for posting to another invoice. To apply the unapplied credit balance to another invoice, click Done and select the next invoice in the Receive Payments window. Then click the Discount And Credits button and apply the credit balance (or as much of it as you need) against the invoice. Any unused credits remain for the future.
You should send a statement to the customer to reflect the current, new invoice balances as a result of applying the payments and the credits to make sure your records and your customer’s records match.
Applying Credits to a Different Job
You may encounter a situation in which a customer has already paid the invoices for a job when the credit is created or has paid for part of the job, exceeding the amount of the credit. If the customer tells you to apply the entire credit balance to another job or to float the credit and apply it against the next job, open the credit transaction and change the job (because a credit can be applied to an invoice for that same job only). Then apply the credit to an invoice for the job you specified, or tell QuickBooks to retain it as an available credit that you’ll apply when payment arrives.
![]()
Applying Discounts for Payments
If you offer your customers terms that include a discount if they pay their bills promptly (for instance, 2%10 Net30), you should apply the discount to the payment if it’s applicable. QuickBooks doesn’t apply the discount automatically. Instead, you must select the invoice (unless QuickBooks automatically selected it in order to apply the payment) and click the Discount And Credits button to see the Discount And Credits dialog connected to this invoice.
If the payment arrived by the discount date, QuickBooks inserts the amount of the discount to use. Accept the amount of discount and enter a Discount Account. (See “Posting Discounts to a Sales Discount Account” later in this chapter.) If the payment did not arrive by the discount date, QuickBooks displays “0.00” as the discount amount, which can be changed at your discretion. Click Done to return to the Receive Payments window. You’ll see that QuickBooks has added a discount column and displayed the discount amount in that column. If the net amount and the customer payment amount are the same, the invoice is now paid.
Applying Discounts for Untimely Payments
Sometimes customers expect to take the discount even if the payment arrives after the discount date. You can apply the payment to the invoice and leave a balance due for the discount amount deducted by the customer, or you can give the customer the discount even though the payment is late. When you click the Discount And Credits button in that case, QuickBooks does not automatically fill in the discount amount, because the discount period has now passed. To preserve your goodwill with that customer, simply enter the amount of the discount manually, select the posting account, and then click Done to apply the discount to the invoice.
Posting Discounts to a Sales Discount Account
You should create a specific account in your chart of accounts to track the discount amounts you allow your customers to take. You could post the amounts taken to your regular sales account, which would have the effect of reducing the total sales reported in that account. A better approach would be to create a separate account, such as “Discounts on Sales” (account type should be Income), so you can easily track the discounts you’re allowing your customers to take over time.
Handling Cash Sales
In QuickBooks, a cash sale is handled via a transaction called a sales receipt. When entering a sale using a sales receipt, the payment you take can be in the form of cash, check, e-check, or credit/debit card. This means you have no accounts receivable as a result of the transaction. Most restaurants and retail businesses that use QuickBooks use sales receipts to record their sales.
There are two methods for handling cash sales in QuickBooks:
• Record each cash sale as a separate record. It provides a way to maintain historical records about those customers in addition to tracking income and inventory.
• Record sales in batches (usually one batch for each business day). This method tracks income and inventory when you have no desire to maintain historical information about each customer that pays cash.
To record a cash sale, choose Customers | Enter Sales Receipts from the menu bar, which opens the Enter Sales Receipts window.
Entering Cash Sale Data
If you want to track customer information, enter a name in the Customer:Job field or select the name from the drop-down list. If a customer record doesn’t exist, you can add a new customer by choosing <Add New>.
If you don’t want to track customers, create a customer for cash sales, such as “Cash Customer.” Even if you use a generic customer name, you can still type in the actual customer name and address in the Sold To field. (You’ll have to add this field to the default Sales Receipt template.) In the future, you can run the Sales by Ship To Address report (Reports | Sales | Sales By Ship To Address) to view a report that shows the transactions for this generic “cash sale” customer that includes the information you’ve entered in the Sold To field.
Use the payment buttons on the Sales Receipt form to indicate the type of payment being received. From there, the Enter Sales Receipts window works exactly the way it works for invoices and payments: just fill in the information. To save the record, click the Save button on the Main tab of the Enter Sales Receipts ribbon bar. You can also click Save & New to open a new blank record or click Save & Close if you’re finished.
Handling Batches of Cash Sales
If you operate a restaurant, you can batch and enter your cash transactions on a daily basis. This works only if you don’t care about maintaining information about the customers and no customer expects a printed receipt from QuickBooks. This technique also works if you have a business in which sales and service personnel return to the office each day with customer payments in hand. Create a customized template using the steps described in Chapter 14, with the following guidelines:
• Name the template, for example, “Batch Sales.”
• On the Header tab, keep only the Date and Sale Number fields in the header part of the template.
• On the Columns tab, deselect all the optional fields, leaving only the Item, Description, and Amount columns selected.
• On the Footer tab, remove the Message field.
To batch-process cash sales, use the new template just described with the following procedures:
• Use a customer named “Cash” or “Daily Sales.”
• Create a Service type or Other Charge type item called “Daily Sales.”
• In the line item section of the sales receipt, you can either use a separate line for each sale that day or enter the item once to capture the total for the day.
• Click the Save & Close button at the end of the day. If you need to close the window during the day, you can reopen the Sales Receipt window and click the Previous button to find that day’s receipt and add to it as needed.
Tracking Your Cash Drawer in QuickBooks
If you deal in real cash, have a cash register, and are not using QuickBooks Point of Sale, consider these suggested steps for keeping track of your cash drawer. There are two basic ways to track receipts from cash sales separate from customer payments; choose the one that best suits your needs:
• Post the cash receipts to the Undeposited Funds account but deposit those funds separately from noncash payments when you work in the QuickBooks Payments To Deposit window.
• Post the cash receipts directly to a new bank account called “Cash in Drawer” (or something similar). Then, when you empty the drawer and deposit the cash into your bank account, you can record it in QuickBooks by making a transfer (Banking | Transfer Funds) from the cash drawer account into the appropriate bank account.
The advantage of having a Cash in Drawer account is that you can match the contents of the physical till of your cash register to an account in QuickBooks. In a perfect world, you’ll open the register for the Cash in Drawer account in QuickBooks and see that it matches your actual drawer count. The world isn’t perfect, however, and sometimes the two amounts will not be equal. To resolve this, refer to the next section, “Handling the Over and Short Problem”
Handling the Over and Short Problem
If you literally take cash for cash sales, when you count the money in the till at the end of the day, you may find that the sales total recorded doesn’t match the cash you expected to find in the till. Or you may find that the money you posted to deposit to the bank doesn’t match the amount of money you put into the little brown bag you took to the bank. One of the problems you face is how to handle this in QuickBooks. If you post $100.00 in cash sales but have only $99.50 in cash to take to the bank, how do you handle the missing 50 cents? You can’t just post $100.00 to your bank account (well, you could, but your bank account won’t reconcile).
You can easily account for the over/short dilemma in your bookkeeping procedures. In many cases, by the way, the overs and shorts balance out, short one day, over another.
Creating Over and Short Accounts To track over/short, you need to have some place to post the discrepancies, which means you have to create some new accounts in your chart of accounts. Because many shortages one day become overages the next, you could create just one income account, “Over/Short,” to track this trend. Or you could create two income accounts, one called Over and the other called Short. Or you could make an over/short account a parent account with two subaccounts, Over and Short.
Creating Over and Short Items
If you track cash sales by tracking batches of sales in a sales receipt transaction, you need items for your overages and shortages (in QuickBooks, you need items for everything that’s connected with entering sales data in a transaction window). Create items for overages and shortages as follows:
• Create two Other Charge items, “Overage” and “Shortage”
• Don’t assign a price and make the items nontaxable.
• Link each item to the appropriate account (or subaccount) that you just created for Over/Short.
Now that you have the necessary accounts and items, use the Over and Short items right in the Enter Sales Receipts window to adjust the difference between the amount of money you’ve accumulated in the cash-sale transactions and the amount of money you’re actually depositing to the bank. It’s your last transaction of the day. Remember to use a minus sign before the figure when you use the Short item.
Recording Bank Deposits
When you receive a customer payment or save a sales receipt, by default, QuickBooks posts the offsetting total on that receipt to the Undeposited Funds account. As you’ve been completing the receive payments and cash sales information, QuickBooks has been keeping a list of these transactions in the Undeposited Funds account. These transactions remain in Undeposited Funds until you clear them by depositing them into your bank account.
![]()
The Payments to Deposit Window
To tell QuickBooks about the details of your bank deposit, choose Banking | Make Deposits from the menu bar, which opens the Payments To Deposit window. This window has several columns:
• Check Use this column to indicate the payments that will be deposited in this transaction.
• Date/Time These columns indicate the date and time you entered the payment or cash sale.
• Type PMT is for payment of an invoice while RCPT indicates a cash sale.
• No. If you received a check, the check number shows in this column.
• Payment Method The method you used to pay: cash, check, credit card, and so on.
• Name The name of the customer who paid you.
• Amount Total amount received.
When you create a deposit from this window, indicate which items are being deposited together. For example, if you have four checks and two cash receipts that add up to $567.22, each item will be part of your deposit, and $567.22 will be the total showing on your bank statement.
If you have only a few transactions to deposit, select the items you just deposited (when you went to the bank) by clicking their listings to place a check mark in the left column. Click Select All if you took all the payments to the bank for deposit.
Your bank probably lists credit card deposits separately from the deposit total for cash and checks, even if all the money was deposited the same day. That’s because your credit card deposits are usually made directly to your bank account by your merchant account bank.
• Separate deposits by bank account If you’re depositing money into multiple bank accounts, select only the transactions that go into the first account. After you complete the deposit, start this process again and deposit the remaining transactions into the other account(s).
• Credit card deposits Don’t “deposit” credit card payments until your merchant bank notifies you that the funds have been placed in your account or the transfer appears on your bank’s website or your paper statement.
![]()
Working in the Make Deposits Window
After you select the appropriate payments (or select all payments), click OK in the Payments To Deposit window to open the Make Deposits window, shown in Figure 5-2. Select the bank account you’re using for this deposit. Then make sure the date matches the day you physically deposit the money.

FIGURE 5-2 Create deposits in the QuickBooks Make Deposits window.
Adding Items to the Deposit
If you want to add deposited items that weren’t in the Payments To Deposit window, click anywhere in the Received From column to make it accessible and select an existing name by clicking the arrow, or click <Add New> to enter a name that isn’t in your system. If the source of the check is any entity that isn’t a customer or vendor, you can either skip the Received From column or add the name to the Other Names list. If you don’t need to track the entity as a customer or vendor, it’s fine to skip the name.
Press TAB to move to the From Account column and enter the account to which you’re posting this transaction. Table 5-1 shows how to handle some noncustomer deposits. Use the TAB key to move through the rest of the columns, which are self-explanatory.
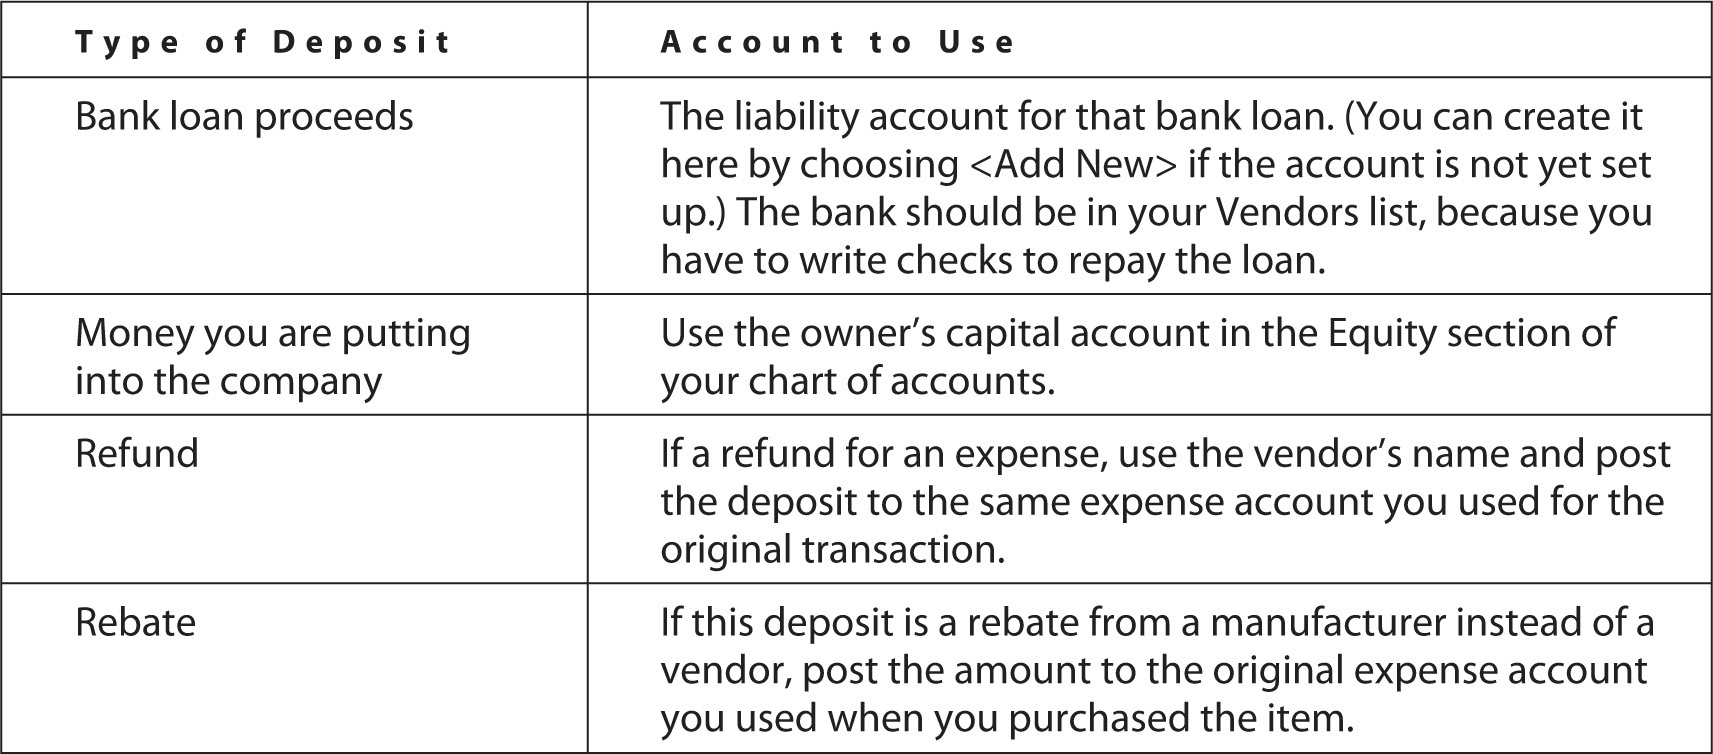
TABLE 5-1 Noncustomer Deposit Accounts
Calculating Merchant Card Fees
If your merchant card bank deposits the gross amount of each transaction and charges your bank account for the total fees due at the end of the month, you don’t have to do anything special to deposit credit card payments. You can deal with the fees when your bank statement arrives by entering the fee directly in the bank account register, posting the amount to the merchant card fee expense account.
If your merchant card bank deducts fees from transactions and deposits the net proceeds to your account, you’ll need to take a few extra steps to track credit card transactions and deposit the correct amount:
1. Select the credit card transactions in the Payments To Deposit window—these are gross amounts, representing the sales price you charged (and the customer paid). Then click OK to move the payments to the Make Deposits window.
2. In the first empty line below the transactions that were transferred to the Make Deposits window, click the From Account column and select the account to which you post merchant card fees.
3. Move to the Amount column and enter the fee as a negative number. Now the net matches the amount that the merchant card company deposited in your bank account, and your merchant card expense is posted to the general ledger.
Printing Deposit Slips
To print a deposit slip or a deposit summary, click the Print button at the top of the Make Deposits window. QuickBooks asks whether you want to print a deposit slip and summary or just a deposit summary.
If you want to print a deposit slip that your bank will accept, you must order printable deposit slips from QuickBooks. The QuickBooks deposit slips are guaranteed to be acceptable to your bank. You must have a laser printer or inkjet printer to use them. When you print the deposit slip, a tear-off section at the bottom of the page has a deposit summary. Keep that section for your own records and take the rest of the page to the bank along with your money.
If you don’t use QuickBooks deposit slips, select Deposit Summary Only and fill out your bank deposit slip manually. Be sure to fill out the payment method field (cash or check), or QuickBooks won’t print the deposit slip.
Keeping Track of Accounts Receivable
Collecting the money owed to you is likely one of your most important tasks when running a business. You have to track what’s owed and who owes it, and then devote time and effort to collect it. QuickBooks offers several tools and reports that give you what you need to manage your accounts receivable efficiently.
![]()
Getting the Most from the Customer Center
In addition to detailed customer information, the Customer Center contains links that give you quick access to accounts receivable reports and the Income Tracker, a tool that will help you keep your client balances in check.
The Income Tracker
The Income Tracker shows all the customer-related transactions in your QuickBooks file. From this list, shown in Figure 5-3, you can review the details of any transaction by double-clicking it. Use the Income Tracker to take follow-up action on past-due transactions or outstanding estimates, or just to send an e-mail to stay in touch with a valued customer.
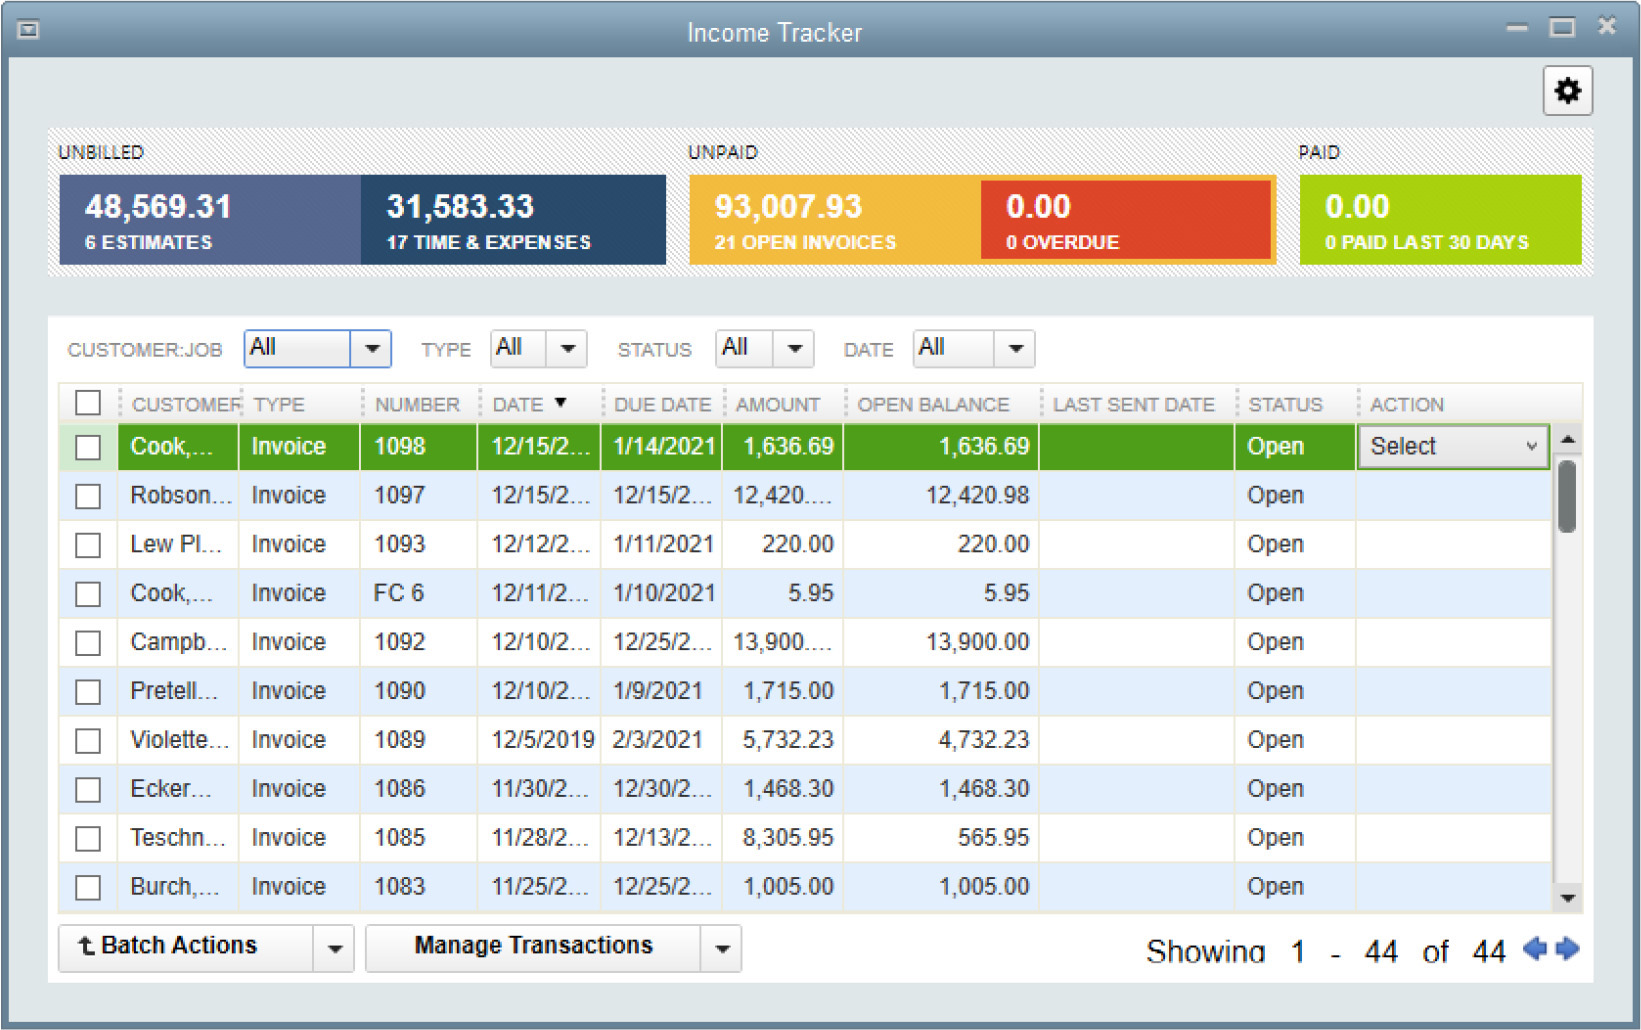
FIGURE 5-3 The Income Tracker shows the status of all open invoices.
To access the Income Tracker, follow these steps:
1. Choose Customers | Customer Center or click the Customers icon on the Icon Bar.
2. Click the Income Tracker button at the top of the window to open the Income Tracker.
At the top of the Income Tracker window are totals for unbilled (open) estimates, unpaid invoices, overdue invoices, and paid receipts received in the last 30 days. Clicking the boxes containing these totals quickly filters the list of transactions displayed below.
Control which transactions appear in the list by using one or all of the Customer:Job, Type, Status, or Date filters located at the top of the Income Tracker window. In addition, the list of transactions displayed can be re-sorted by clicking any one of the column headings.
Use the Select drop-down menu (in the Action column) to take an action on a specific transaction. To create a new sales-related transaction while working in the Income Tracker, click the Manage Transactions button at the bottom of the window.
The Collections Center
An optional feature you can activate is the Collections Center. Once enabled, it’s located within the Customer Center. It is designed to help you track past-due and almost past-due customer balances while giving you an easy way to send e-mail reminders to the customers listed there.
To enable the Collection Center feature, choose Edit | Preferences | Sales & Customers | Company Preferences | Enable Collections Center. A Collections Center button appears at the top of the Customer Center. When you click the Collections Center button, the Collections Center opens to the Overdue tab.
From this list, you can review the details of individual invoices in question by double-clicking an invoice. You can sort the list by balance or days overdue by clicking the appropriate column heading. If you’ve entered an e-mail address in the customer’s record, you can also send a reminder e-mail to one or all of the customers on this list. Just click Select And Send Email at the top of the Overdue tab window. You’ll see a yellow alert icon in the Notes/Warnings column if an e-mail address is missing. Clicking this icon allows you to add an e-mail address to a customer’s record if you choose.
The Notes icon next to the customer name lets you document your collections activities or view previous entries. To see a list of customers that have upcoming invoices due, select the Almost Due tab.
Running Accounts Receivable Reports
A/R reports are lists of the money owed you by your customers, and they’re available in quite a few formats. These reports are designed for you, not for your customers, and you can run them whenever you need to know the extent of your receivables. Many companies run an aging report every morning, just to keep an eye on the amount of money due them on a particular day.
You can run some key reports on individual customers directly from the Customer Center. Simply highlight the customer or job and click the Reports link located in the upper-right corner of the customer information pane.
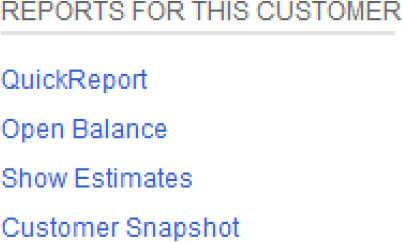
The following reports are available:
• QuickReport Displays all transactions related to the customer within a specified date range.
• Open Balance Displays the transactions (invoices, payments, and credit memos) that make up a customer’s current balance.
• Show Estimates Displays all estimates created for the customer within a specified date range.
• Customer Snapshot Displays a dashboard-like view of a customer’s relationship with you (including what they buy, how they pay, and how long they’ve been doing business with you).
![]()
A/R Aging Reports
QuickBooks has a couple of built-in A/R aging reports, and you can customize any built-in reports so they report data exactly the way you want. To see an aging report, choose Reports | Customers & Receivables, and then choose either A/R Aging Summary or A/R Aging Detail.
The quickest way to see how much of the money owed to you is current or past due is to run the A/R Aging Summary, which lists customer balances by aging period (such as 31-60 or 61-90 days), as shown here.
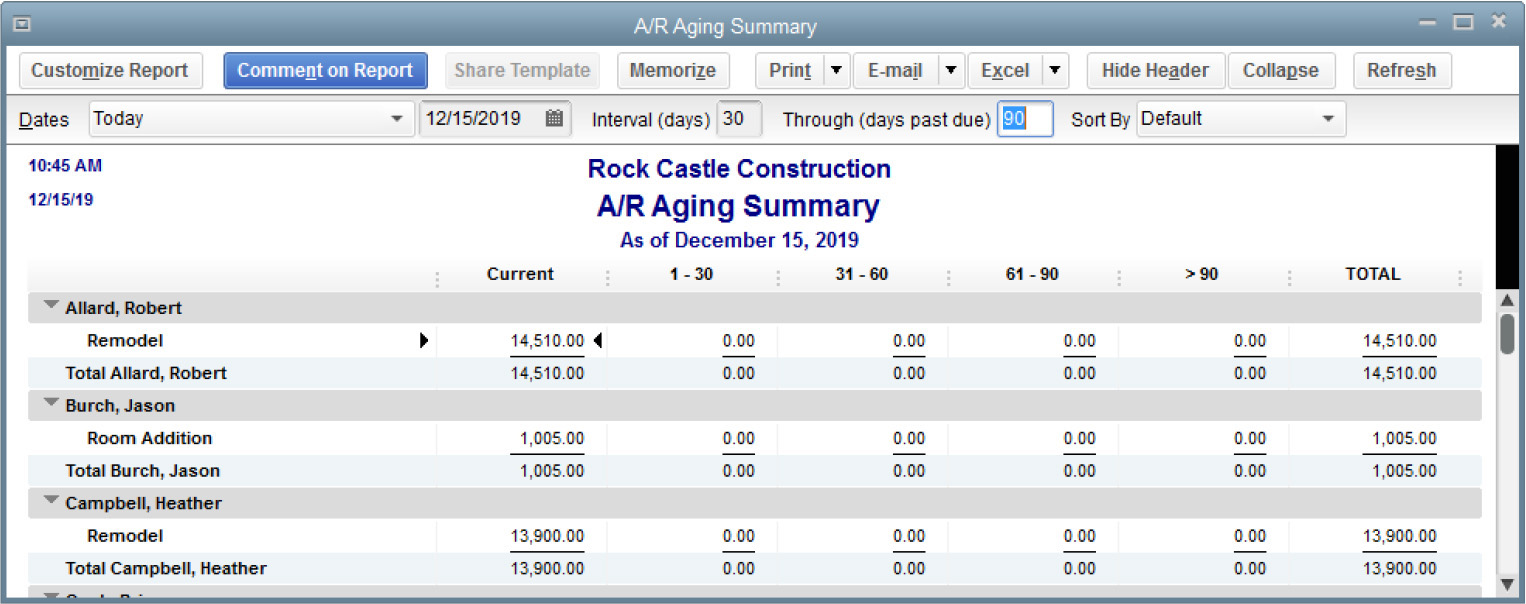
If you choose Aging Detail from the Customers & Receivables reports menu, you see a more comprehensive report that shows individual transactions for each aging period.
![]()
Customizing Aging Reports
If you don’t need to see all of the columns in the A/R Aging Detail report, or you’d prefer to see the information displayed in a different manner, you can customize the report. Start by clicking the Customize Report button at the top of the window to open the Modify Report window. Table 5-2 shows you how to make several customizations.

TABLE 5-2 A/R Aging Detail Report Customization Procedures
Memorizing Aging Reports
When you close a report window, QuickBooks may ask if you want to memorize the report with the changes you made (if you told QuickBooks to stop asking this, you won’t see the message). Click Yes so you don’t have to go through all the modifications again.
If you do not see the memorize report prompt, you can still memorize your redesigned report. Click the Memorize button in the report window. When the Memorize Report dialog appears, enter a new name for the report, optionally save it within a report group, and click OK. This report name appears on the list of memorized reports when you choose Reports | Memorized Reports from the menu bar. Only the criteria and formatting is memorized, so each time you open the report, the data QuickBooks generates is from current transaction records, so you get current, accurate information.
No matter what the format of your report, you’ll probably want to print it. While you’re in a report window, click the Print button at the top of the window and select Report to bring up the Print Reports dialog. If the report is wide, use the Margins tab to set new margins, and use the options on the Settings tab to customize other printing options. You can also use the Fit Report To options to fit all the columns or rows on your report to a page.
Customer and Job Reports
In addition to the accounts receivable reports, QuickBooks has reports designed to give you information about specific customers and jobs. Choose Reports | Customers & Receivables to see the list.
![]()
Finance Charges
Imposing finance charges can help offset the time and resources needed to collect past-due balances and can act as an incentive to get your customers to pay on time. You configure finance charges in the Preferences dialog: Choose Edit | Preferences. Then click the Finance Charge icon in the left pane and select the Company Preferences tab. Complete the fields, as described next. Click OK to save your settings when you’re done.
• Annual Interest Rate Replace the default data (0.00%) with any positive number to enable the finance charges feature. The rate you enter is annual: 18% = 1.5% per month.
• Minimum Finance Charge QuickBooks calculates the finance charge based on the rate you entered in the preceding field. If the charge is less than what you enter, the amount is rolled up to this minimum.
• Grace Period Enter the number of days “grace” you give before finance charges are assessed.
• Finance Charge Account If no account exists, create one here as an Income type.
• Assess Finance Charge On Overdue Finance Charges Not all states allow this, so check with the appropriate agency.
• Calculate Charges From Due Date/Invoice Date Select the appropriate action.
• Mark Finance Charge Invoices “To Be Printed” QuickBooks creates an invoice for each finance charge. You can print those invoices by selecting this option.
Assessing the Charges
Assess finance charges just before you create customer statements, which is commonly a monthly chore. Choose Customers | Assess Finance Charges from the menu bar. The Assess Finance Charges window opens with a list of all the customers with overdue balances. If you have any customers that have made payments that you haven’t yet applied to an invoice, or if any customers have credits that you haven’t yet applied to an invoice, an asterisk (*) appears to the left of the customer or job name. Close the Assess Finance Charges window, correct the situation, and then return to this window.
Change the Assessment Date field (which displays the current date) to the date on which you actually want to impose the charge. This date appears on customer statements. When you press TAB to move out of the date field, the finance charges are recalculated to reflect the new date.
If you don’t want to include a customer to be assessed a finance charge, click in the Assess column to remove the check mark from the customer name. All customers with overdue balances are included when you assess finance charges. If you reserve this process for only a few customers, choose Unmark All, and then reselect the customers you want to include.
You can change the calculated total if you wish. Click the amount displayed in the Finance Charge column to activate that column for that customer and enter a new amount. If you need to calculate the new figure, press the equal sign (=) on your keyboard to use the QuickBooks built-in calculator.
Once all the calculations and figures are correct, click Assess Charges in the Assess Finance Charges window. When you create your customer statements, the finance charges appear. If you’ve opted to skip printing the finance charge assessments as invoices, there’s nothing more to do. To print the finance charge invoices, be sure to select the Mark Invoices “To Be Printed” check box on the Assess Finance Charges window. Choose File | Print Forms | Invoices. The list of unprinted invoices appears, and unless you have regular invoices you didn’t print yet, the list includes only the finance charge invoices. If the list is correct, click OK to continue on to the printing process.
Sending Statements
Monthly statements remind customers of outstanding balances and provide detailed documentation of your records, which your customers can match against their own records.
Before creating statements, you create any transactions that should appear on the statements. Invoices and payments appear automatically, but you may want to add statement charges. A statement charge is a charge you want to pass on to a customer for which you don’t create an invoice. Some companies use statement charges instead of invoices for invoicing regular retainer payments.
You must add statement charges before you create the statements or the charges won’t show up on the statements. Statement charges use items from your Item List, but you cannot use taxable items, items that have percentage discounts, or items that represent a payment transaction. Statement charges are recorded directly in a customer’s register or in the register for a specific job.
To create a statement charge, choose Customers | Enter Statement Charges from the menu bar to open the customer register. By default, QuickBooks opens the register for the first customer in your Customers & Jobs List; use the drop-down list at the top of the window to select a different customer. Using your TAB key, move through the register’s fields. When all the fields you want to use are filled in, click Record to save the transaction. Continue to select customers and/or jobs to enter additional statement charges.
![]()
Creating Statements
Before you start creating your statements, ensure that all the transactions that should be included on the statements have been entered into the system. When all customer accounts are up-to-date, choose Customers | Create Statements to open the Create Statements dialog, shown next.
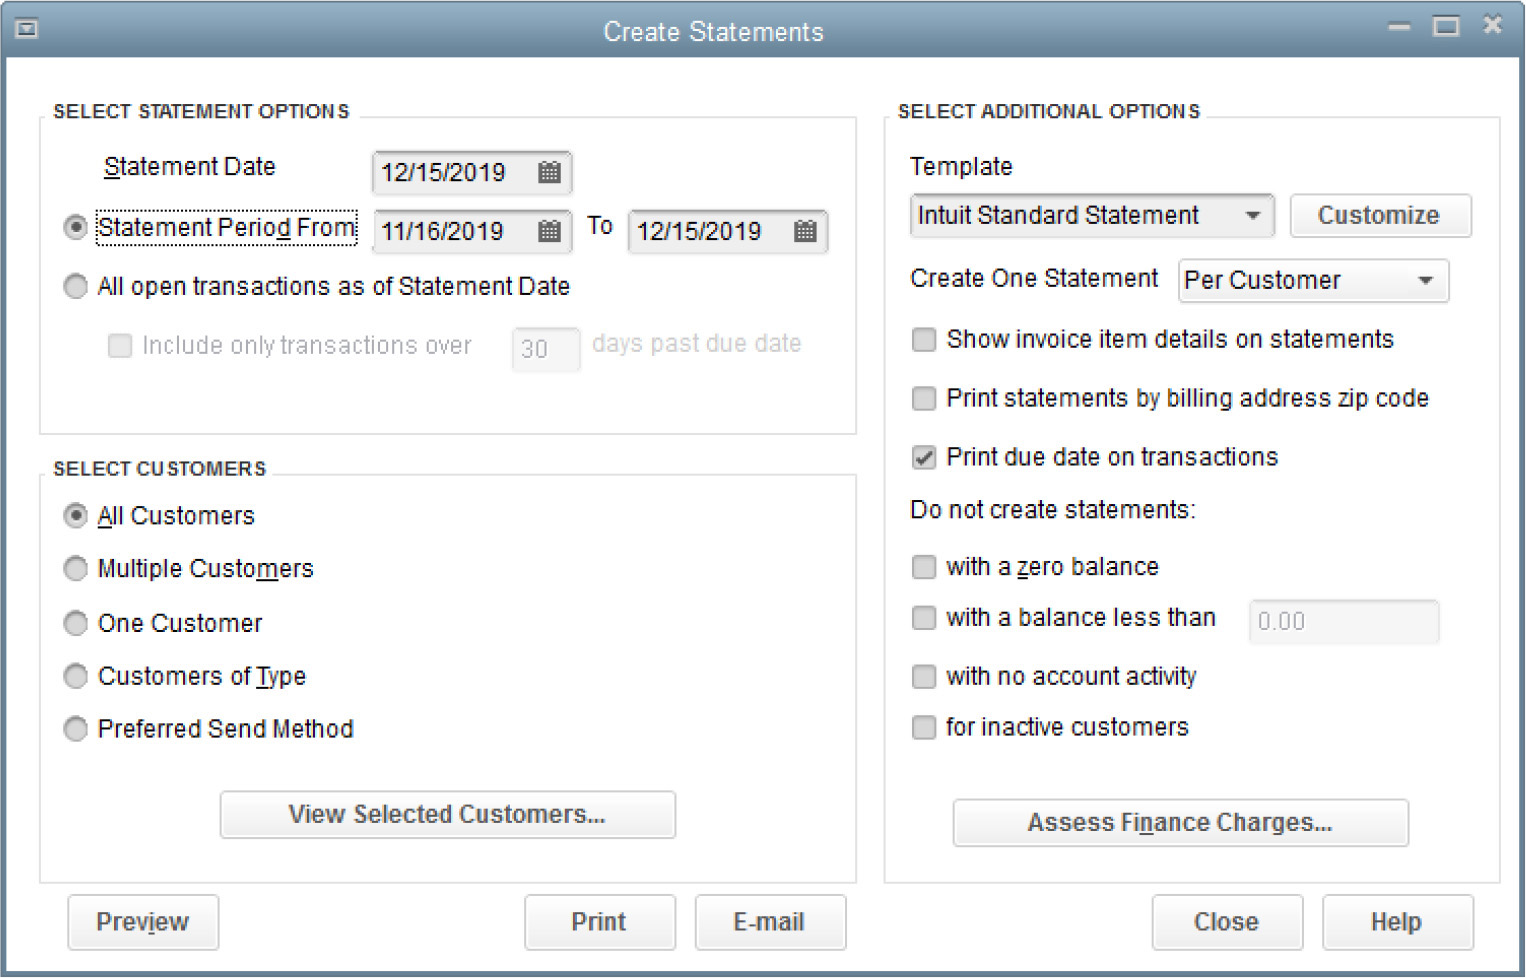
• Date range The Statement Period From and To fields determine which transactions appear on the statement. The printed statement displays the previous balance (the total due before the From date) and includes all transactions that were created within the date range specified for that statement period. The starting date should be the day after the last date of your last statement run.
• All Open Transactions As Of Statement Date check box The statement shows only unpaid invoices and charges and unapplied credits.
• Customers If you want to send statements only to a select group of customers, click the Multiple Customers option to display a Choose button next to the option. Click the Choose button to bring up a list of customers, and then select each customer you want to include. You can manually select each customer, or select Automatic and then enter text to tell QuickBooks to match that text against all customer names and select the matching customers. If you’re sending a statement to one customer only, select One Customer, and then click the arrow next to the text box to scroll through the list of your customers and select the one you want.
• Filtering for send methods Choose to send the statement via E-mail, Mail, or None (no statement will be sent).
• Print Specify how you want to print the statements.
You may skip statement creation for customers that meet the criteria you set in the Do Not Create Statements section of the dialog. Before you commit the statements to paper, you can click the Preview button to get an advance look. Use the Zoom In button to see the statement and its contents close up. Click the Next Page button to move through all the statements. Click Close to return to the Create Statements window.
When everything is just the way it should be, print the statements by clicking the Print button in the Create Statements window to open the Print Statements window. Designate the printer you want to use and adjust printer settings.
If you first want to take a look at what will be sent to the printer, click the Preview button. If you like what you see, you can select Print from this window.