
Chapter 4
Invoicing and Other Sales Transactions
In this chapter:
• Entering basic information in invoices
• Voiding, deleting, and pending invoicing
• Working with packing slips
• Memorizing and batching invoices
• Working with credit memos and estimates
• Understanding progress billing
• Reimbursable expenses in QuickBooks
• Printing forms with QuickBooks
Usually, you need to send an invoice to a customer and get paid before you can put money into your business account. Creating an invoice in QuickBooks is easy once you understand what all the parts of the invoice do and how to modify them to reflect the way you do business.
In addition to invoices, you may have to issue credits, print packing slips, and create estimates. These and other sales-related transactions are covered in this chapter.
Create Invoices
You can open the Create Invoices window in QuickBooks in several ways:
• Select Customers | Create Invoices from the menu bar.
• Press CTRL-I.
• Click the Create Invoices icon in the Customers section of the Home page.
A blank invoice form opens. At the top of the window are four tabs: Main, Formatting, Send/Ship, and Reports. If you take a moment to open each tab and review its contents, you’ll see that each shows a set of buttons on the Icon Bar that enable you to complete any task when you’re creating and working with an invoice. Clicking the Full Screen icon at the top right of the Create Invoices window hides these buttons (as well as the Icon Bar), making the Invoice template larger and easier to work with.

The Create Invoices window, shown in Figure 4-1, displays an informational panel that is blank at first. When you select a customer for invoicing, this panel shows information about the customer, such as open balance, recent transactions, or notes, if any exist. To close this panel, simply click the Hide History arrowhead to the immediate left of the customer’s name. Clicking the Full Screen icon will also close the panel.

FIGURE 4-1 Create an invoice using the tools in the Create Invoice screen in which the name and address are blank before you select a customer.
Several invoice templates are built in to QuickBooks. You must first decide whether any of the available templates suits your needs. Remember that the prebuilt templates available to you may vary depending on your version of QuickBooks and the industry you choose during the QuickBooks setup. Take the time to look at each of the templates in your version before settling on the one you want to use.
To do that, click the arrow next to the Template field at the top of the Invoice and select another invoice template from the drop-down list. These are the most common templates included in QuickBooks: 4
• Finance Charge This template appears the first time you use the Assess Finance Chargesfeature.Information aboutfinance chargesisinChapter 5.
• Intuit Packing Slip This is a basic packing slip template. See “Print Packing Slips,” later in this chapter for more information.
• Intuit Product This template is designed for product sales, including inventory items.
• Intuit Professional and Service These two templates are nearly identical, except for a difference in the order of the columns, and the Service template includes a purchase order number field.
• Progress Designed specifically for progress billing against a job estimate, this doesn’t appear in the Template list unless you have specified Progress Invoicing in the Company Preferences tab of the Jobs & Estimates category of the Preferences dialog.
This section uses the Intuit Product invoice template, but you’ll still be able to follow along even if your version’s invoice form lacks some of the fields related to products. The top portion of the invoice is called the invoice header, into which you enter basic information. The middle section, where you place the billing items, is called the line item section. The bottom section, called the footer, holds the totals and other details (such as customer messages). You enter data into the fields in each invoice section.
![]()
Entering Basic Information in the Invoice Header
To create an invoice, start with the customer or the job. Click the arrow to the right of the Customer:Job field to see a list of all your customers. If you’ve attached jobs to any customers, those jobs are listed under the customer name. Select the customer or job for this invoice. If the customer isn’t in the system, choose <Add New> to open a new customer window and enter all the data required for setting up a customer.
• Date field By default, today’s date shows in the Date field. To change it, either type in a new date or click the calendar icon at the right side of the field to select a date. When you change the date, the new date appears automatically in each invoice you create during this QuickBooks session. You can tell QuickBooks to use the current date as the default date when creating a new invoice by choosing Edit | Preferences, and in the General category of the Preferences window (in the My Preferences tab) select the option Use Today’s Date As Default instead of the default option, Use The Last Entered Date As Default. The first time you enter an invoice, fill in the invoice number you want to use as a starting point. Hereafter, QuickBooks will increment that number for each ensuing invoice.
• Bill To and Ship To addresses These are taken from the customer record. You can select another Ship To address from the drop-down list or add a new Ship To address by choosing <Add New> from the list. If you enter or change any information about a customer while creating an invoice, QuickBooks offers to add the information to the customer record when you save the invoice. If the change is permanent, click Yes to eliminate having to go to the customer record to make the changes. If the change is for this invoice only, click No. If you never make permanent changes, tell QuickBooks to turn off this feature by changing the option: Click Edit | Preferences | General | Company Preferences. Then select the option Never Update Name Information When Saving Transactions.
• P.O. Number Enter the customer’s purchase order number (if any) in this field. You can also click the Attach File icon, located at the top of the Invoice window, to scan and store an online copy of the customer’s PO.
• Terms This field fills in automatically with the terms you entered for this customer, but you can change the terms for this invoice. If terms don’t automatically appear, it means you didn’t enter that information in the customer record. If you enter it now, when you save the invoice, QuickBooks offers to make the entry the new default for this customer by adding it to the customer record.
• Rep The Rep field (available by default in the Product template, but it can be added to any template) will automatically fill in the salesperson attached to this customer. If you didn’t link a salesperson when you filled out the customer record, you can click the arrow next to the field and choose a name from the drop-down list. If the rep you want to use doesn’t exist in the list, you can select <Add New> to add the rep on the fly.
The following fields are available only in the Product and Packing Slip templates:
• Ship This is for the ship date, which defaults to the invoice date, but it can be changed if you’re not shipping until a later date.
• Via This is for the shipping method. Click the arrow next to the field to see the available shipping choices or select <Add New>.
• F.O.B. Some companies use this field to indicate the point at which the shipping costs are transferred to the buyer and the assumption of a completed sale takes place. If you use Free On Board (FOB), you can enter the applicable data in the field; it has no impact on your QuickBooks financial records and is there for your convenience only.
![]() Small Business Recommendation
Small Business Recommendation
![]()
Entering Line Items
Click in the first column of the line item section. If you’re using the Product invoice template, this column is Quantity. If you’re using the Professional or Service invoice template, the first column is Item. Enter the quantity of the first item you’re invoicing.
An arrow appears on the right edge of the Item Code column. Click it to see a list of your items and select the one you need. The description and price fill in automatically using the item information. If you didn’t include description and/or price information when you created the item, enter it manually now. QuickBooks does the math, and the Amount column displays the total of the quantity times the price. If the item and the customer are both liable for tax, the Tax column displays “Tax.” Repeat this process to add all the items that should appear on this invoice. You can add as many rows of items as you need; if you run out of room, QuickBooks automatically adds pages to your invoice.
QuickBooks checks the quantity on hand (QOH) for inventory line items and warns you if you don’t have enough inventory to fill the sale. It’s a warning only; QuickBooks lets you complete the sale anyway. It’s never a good idea to sell into negative QOH however, as doing so can affect the average cost of that item.
Applying Price Levels
If you’ve enabled price levels in Preferences and created entries in your Price Level list, you can change the amount of any line item by applying a price level. Most of the time, your price levels are a percentage by which to lower (discount) the price, but you may also have created price levels that increase the price. If you have already assigned a price level to this customer, the appropriate price shows up automatically.
If not, to assign a price level, click within the Price Each column to display an arrow. Click the arrow to see a drop-down list of price level items, and select the one you want to apply to this item. QuickBooks performs the math, so you not only see the name of your price level, but you also see the resulting item price for each price level. After you select a price level, QuickBooks changes the amount you’re charging the customer for the item and adjusts the amount of the total for this item. The customer sees only the price on the invoice; there’s no indication that you’ve adjusted the price. This is different from applying a discount to a price, where a line item exists to identify the discount.
Using Discounts
You can also adjust the invoice by applying discounts. Discounts are entered as line items, so the discount item has to first exist in your Item List. When you enter a discount, its amount (usually a percentage) is applied to the line item immediately preceding it. For example, suppose you have already entered the following line items: 5
• Line 1: Qty of 1 for an item with a price of $100.00 for a total line item price of $100.00
• Line 2: Qty of 2 for another item with a price of $40.00 for a total line item price of $80.00
Now you want to give the customer a 10-percent discount, so you’ve created a 10-percent discount item in your Item List. When you enter the discount item on the line immediately after line 2, QuickBooks will calculate the discount value as 10 percent of the last line you entered, in this case the $80.00, for an $8.00 discount.
![]()
Using Subtotals
You can apply a discount against multiple (or all) line items; however, you must first enter a line item that creates a subtotal of items you want to discount. To do this, use a Subtotal item type that you’ve created in your Item List. Then enter the discount item as the next line item after the subtotal, and the discount is then applied to the subtotal.
Subtotals work by adding up all the line items that have been entered after the last Subtotal item (the first Subtotal item adds up all line items starting at the first line item on the invoice). This gives you the added benefit of offering a discount to some line items but not others and the ability to apply a different discount rate to each group of subtotaled items. Because discounts display on the invoice, your “generosity” is communicated to the customer!
![]()
The Footer Section
When you’re finished entering all the line items and any discounts, you’ll see that QuickBooks keeps a running total of the invoice, including taxes, in the footer section of the invoice.
Adding a Message
To add a message to the invoice, click the arrow in the Customer Message field to see the messages you created in the Customer Message list. You can create a new message if you don’t want to use any of the existing text by choosing <Add New> from the message drop-down list and entering your text in the New Customer Message window. Click OK to enter the message in the invoice. QuickBooks saves the message in the Customer Message list so you can use it again. You can also type the message directly in the Customer Message field and press the TAB key, which opens a Customer Message Not Found dialog that offers you the chance to do a Quick Add to put your new message in the Customer Message list.
Adding a Memo
You can add text to the Memo field at the bottom of the invoice. This text does not print on the invoice. It appears only on the screen, but you’ll see it if you reopen this invoice to view or edit it. However, the memo text does appear on statements next to the listing for this invoice. Therefore, be careful about the text you use, and don’t enter anything you wouldn’t want the customer to see unless you never send statements.
Saving an Invoice
Click Save & New to save this invoice and move on to the next blank invoice form. If this is the last invoice you’re creating, click Save & Close to save this invoice and close the Create Invoices window.
Choosing the Method of Sending the Invoice
There are several ways to get an invoice into the hands of your customer, as shown in Table 4-1.
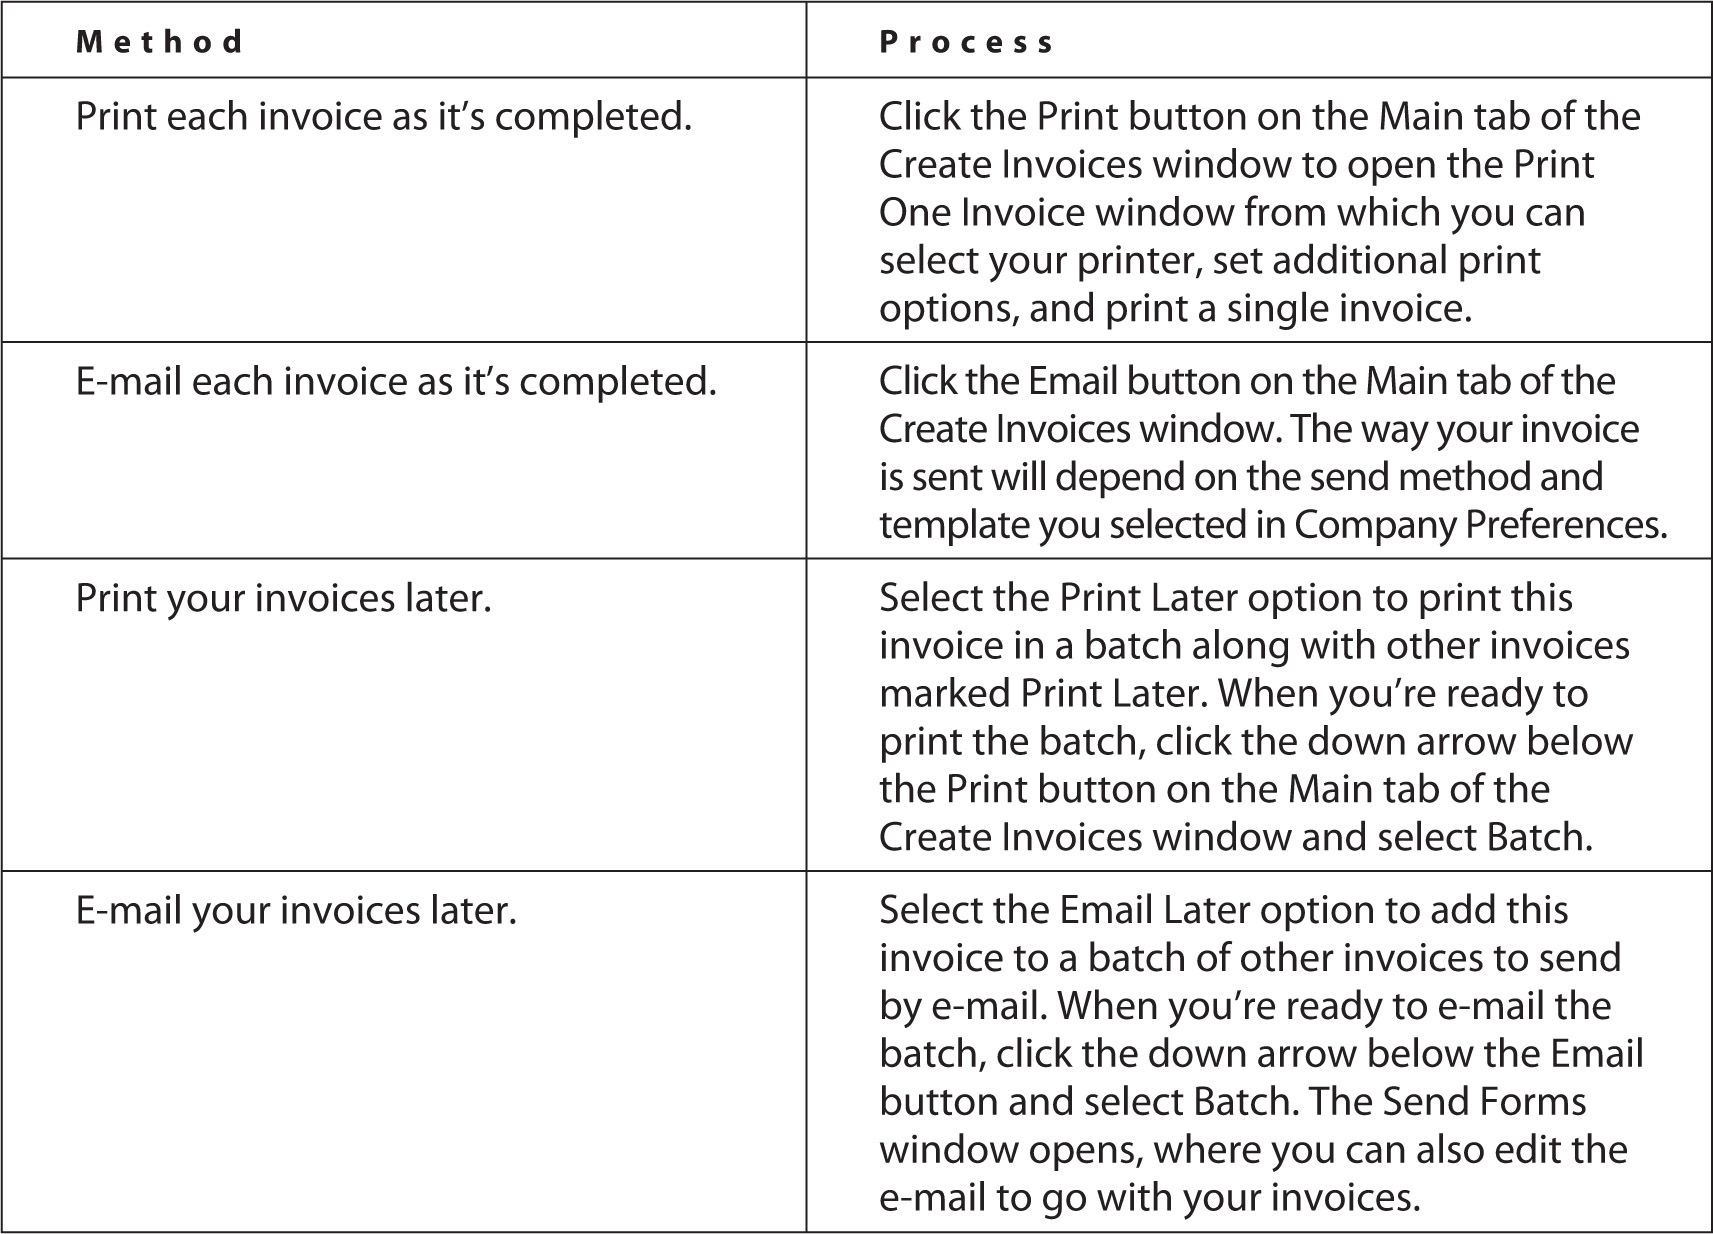
TABLE 4-1 Invoice Delivery Options
Edit an Invoice
To edit or correct an invoice, open the Create Invoices window and click the leftpointing blue arrow button located on the Main tab to move back through all the previous invoices in your file. If you have a large number of invoices to sort through, it’s faster to click the Find button located just below the blue arrows. In the Find Invoices window, you can search by the customer, date, invoice number, or amount. When you’re editing a previously entered invoice, keep the following in mind:
• Don’t change anything if an invoice has been paid or mailed, unless you want to edit the text in the Memo field.
• If the invoice has not yet been sent, you can make any changes you want.
When you click Save & Close, QuickBooks displays a message dialog asking whether you want to save the changes you made. Click Yes.
![]()
Mark an Invoice as Pending
Marking an invoice as “pending” makes it nonposting, which means that it does not affect your account balances or reports. Some companies require approval before invoices are sent to customers. If so, marking them as pending is a great way to make them available to the appropriate person for review, editing, and final approval.
To mark an invoice as pending, click the Mark As Pending button on the Main tab in the Create Invoices window. A watermark appears indicating that the invoice is now Pending/Non-Posting. Similarly, to mark an invoice as final, click the Mark As Final button. The Pending Sales report lists all invoices currently marked as pending as well as the accounts that will be affected once the pending status is removed and the invoice is considered final. To run this report from the Reports menu, choose Sales | Pending Sales.
![]()
Void and Delete Invoices
There’s an important difference between voiding and deleting an invoice. Voiding an invoice makes it nonexistent to your accounting and customer balances. However, the invoice number continues to exist (it’s marked “VOID” on reports) so you can account for it. To void an invoice, open it, and on the Main tab in the Create Invoices window, select the Void option from the drop-down arrow below the Delete button. Then click Save. When QuickBooks asks if you want to record your change, click Yes.
Deleting an invoice, on the other hand, removes all traces of it from your transaction registers and most reports (with the exception of the Audit Trail report). To delete an invoice, open it and click the Delete button on the Main tab in the Create Invoices window. Then click Save. When QuickBooks asks if you want to record your change, click Yes.
Print Packing Slips
QuickBooks provides a template for a packing slip, which is basically an invoice that doesn’t display prices. To print the default packing slip, complete the invoice. Then click the arrow below the Print icon at the top of the Create Invoices window and select Packing Slip from the drop-down list. The Print Packing Slip dialog opens so you can select your printing options.
![]()
Changing the Default Packing Slip
If you create your own customized packing slip template, you can select it each time you print a packing slip, or you can make that new form the default packing slip by choosing Edit | Preferences to open the Preferences dialog.
Go to the Sales & Customers category and click the Company Preferences tab. In the Choose Template For Invoice Packing Slip field, select your new packing slip form from the drop-down list and click OK. If you have multiple packing slips, you can choose any of them for printing. Instead of selecting Print Packing Slip from the Print button’s drop-down list in the Create Invoices window, select a packing slip template from the drop-down list in the Template field. The Create Invoices window changes to display the packing slip. To see what the printed version of the packing slip looks like, click the arrow below the Print icon on the Create Invoices window toolbar and choose Preview. Close the Preview window and return to the Create Invoices window to print the packing slip.
Batch and Memorize Invoices
If your company charges the same monthly fee to several of your customers, batch invoicing gives you an easy way to create and send the same invoice to these customers. You can also choose to create a billing group and add customer names to that group if those customers will need to be invoiced for a similar service in the future.
To batch invoices, follow these steps:
1. From the Main tab on the Create Invoices window, or from the Customers menu, click the Create A Batch button. You’ll see a reminder about updating your customer information. Review and click OK.
2. From the Batch Invoice window, select the names of customers for whom you want to create an invoice (you can also hold down the SHIFT key and select multiple, contiguous customer names), and then click the Add button to include them in this batch. Alternatively, you can create a billing group (by selecting <Add New> from the Billing Group drop-down list) to which you can add customers in the same manner. Click Next.
3. Select the items for your batch invoice, add a customer message, and update the invoice date and template if necessary. Click Next.
4. Review the list of batch invoices to be created. You can deselect a customer to prevent them from receiving an invoice in this batch by clicking the check mark next to their name in the Select column. Click the Create Invoices button.
5. Review the Batch Invoice Summary window to confirm and execute the send methods (either Print or Email) of the invoices in the batch. Click Close when finished or to send any unmarked (meaning there’s no send method in the customer record) invoices later.
![]()
Use Memorized Invoices
If you have a recurring invoice, such as rent from tenants, you can automate the process of creating it. Create the first invoice, filling out all the fields. If there are any fields that will change, leave those fields blank and fill them out each time you send the invoice. Then press CTRL-M to open the Memorize Transaction dialog.
Fill in the fields using the following guidelines:
• Name Change the title in the Name box to reflect what you’ve done. It’s easiest to add a word or phrase to the default title, such as “Retainer.” You can enter up to 31 characters, including spaces.
• Add To My Reminders List Choose this option, and then specify how and when you want to be reminded in the How Often and Next Date fields. The reminder appears in the QuickBooks Reminder window. Choose Do Not Remind Me if you have a great memory, or if you use this memorized invoice only for special occasions.
• Automate Transaction Entry Choose this option if you want QuickBooks to issue this invoice automatically. If you opt for automatic issuing of this invoice, you must fill in the fields so that QuickBooks performs the task accurately, as follows:
• How Often Specify the interval for this invoice. Click the arrow to see the dropdown list and choose the option you need.
• Next Date Note the next instance of this invoice.
• Number Remaining Start a countdown for a specified number of invoices.
• Days In Advance To Enter Specify the number of days in advance of the Next Date you want QuickBooks to create the invoice.
Click OK when you have finished filling out the dialog. Then click Save & Close in the Invoice window to save the transaction. If you want to view, edit, or remove the transaction, you can select it from the Memorized Transaction List, which you open by pressing CTRL-T.
Creating Memorized Invoice Groups
If you have several memorized invoices, but they need to be created and sent out on a particular day of the month, you can create a separate Memorized Transaction group and QuickBooks automatically takes action on every invoice in the list on the day that you specify. To use this feature, follow these steps:
1. Press CTRL-T to display the Memorized Transaction List. Right-click any blank spot in the Memorized Transaction window and choose New Group from the shortcut menu.
2. In the New Memorized Transaction Group window, give this group a name (such as 1st Of Month or 15th Of Month).
3. Fill out the fields to specify the way you want the invoices in this group to be handled and click OK to save this group.
After you create the group, you can add memorized transactions to it as follows:
1. In the Memorized Transaction List window, select the first memorized invoice transaction you want to add to the group.
2. Right-click and choose Edit Memorized Transaction from the shortcut menu.
3. When the Schedule Memorized Transaction window opens with this transaction displayed, select the option named Add To Group.
4. Select the group from the list that appears when you click the arrow next to the Group Name field and click OK.
Repeat this process for each invoice you want to add to the group. As you create future memorized invoices, just select the Add To Group option to add each invoice to the appropriate group.
Issue Credits and Refunds
You can return funds to a customer in the form of a credit against current or future balances, or you can write a check to refund money you received from the customer. Creating a credit memo is similar to creating an invoice. You can use the credit memo either to reduce a customer’s balance or issue a cash refund to them. What’s more, QuickBooks makes it easy for you to issue a credit against a particular invoice or retain it as an available credit to be used on a future date.
Creating a Credit Memo Against an Invoice
If you’ve sold merchandise to a customer on an invoice and later they return some or all of the items, you can issue a credit memo directly from the original invoice. This feature also saves you from having to re-enter the item information a second time on the credit memo.
To issue a credit memo, locate and open the original invoice. Click the Refund/Credit button on the Main tab to create a return receipt for this invoice. All items from the invoice are listed on the newly created credit memo. From here, you can edit the line items as needed. When you save the credit memo, QuickBooks asks you to specify the way you want to apply the credit amount.
![]()
Creating a Credit Memo Without a Previous Invoice
To create a credit memo (also referred to as a return receipt) that is not attached to a particular invoice, choose Customers | Create Credit Memos/Refunds from the menu bar to open a blank Create Credit Memos/Refunds window. Select the appropriate customer or job, and then fill out the rest of the heading. Move to the line item section and enter the item, the quantity, and the rate for each item in this credit memo. Do not use a minus sign as you have already indicated this is a credit.
On the Main tab, you can use one of two buttons to designate how to use this credit—Use Credit To Give Refund or Use Credit To Apply To Invoice. Alternatively, when you click Save & Close to save the credit memo, QuickBooks asks you to specify the way you want to apply the credit amount.
![]()
Applying Credit Memos
When you save the credit memo, QuickBooks displays an Available Credit dialog, where you can choose the way you want to apply this credit:
• Retaining the credit Choose Retain As An Available Credit to let the credit amount stay with the customer. You can apply the credit to a future invoice or apply it to a current open invoice later if the customer sends a payment that deducts the credit.
• Applying the credit to an invoice Choose Apply To An Invoice to apply the credit to a current invoice. When you click OK, QuickBooks displays a list of open invoices for this customer or job and automatically applies the credit against the oldest invoice. Click Done to save the transaction.
• Giving a refund for the credit Choose Give A Refund to give money back to the customer. When you click OK, the Issue A Refund window opens. Use the following guidelines to configure the Issue A Refund window:
• In the Issue This Refund Via field, select the method for the refund from the drop-down list (Cash, Check, or Credit Card). If you choose Cash or Check, be sure to select the appropriate bank account in the Account field.
• If you choose Check, the dialog adds an option labeled To Be Printed, which is selected by default. If you print checks, leave the check mark in the check box, and click OK. The check is added to the list of checks to be printed when you choose File | Print Forms | Checks. (The check also appears in the bank account register with the notation “To Print.”)
• If you write checks manually, deselect the check mark in the To Be Printed check box, enter the check number you’ll be using, and click OK. The check is added to your bank account register, using the next available check number.
• If you choose Credit Card, follow the usual procedure for creating a credit card transaction.
![]()
Using Estimates
If you create estimates for some of your customers, it can be used as the basis of an invoice (or multiple invoices if you choose to send invoices as the job progresses). Estimates are also a great way for you to create a “budget” for the job on which you’re bidding, since there are some comprehensive job reports in QuickBooks that help you keep track of actual job income and costs versus what was initially estimated. Estimates are available only if you enable them in the Jobs & Estimates section of the Preferences dialog (Edit | Preferences).
Creating an Estimate
The first and most important thing to understand is that creating an estimate doesn’t affect your financial records. No amounts in the estimate post to income, accounts receivable, or any other general ledger account.
To create an estimate, choose Customers | Create Estimates from the menu bar. The Create Estimates transaction window has nearly the same navigation and task buttons as the Create Invoices window, including an informational panel to the right. Clicking the Full Screen icon at the top-right of the window closes the panel. Fill out the fields the same way you would for invoices.
Some estimate templates permit you to invoice customers with a markup over cost (such as the built-in Custom Estimate template). This is often the approach used for time and materials on bids. Just enter the cost and indicate the markup in dollars or percentage. If you decide to change the total of the item, QuickBooks will change the markup to make sure the math is correct.
If the item you use has been set up with both a cost and price, the Custom Estimate template displays both the cost and the price and automatically calculates the markup percentage for you. You can change the markup (as either a percentage or dollar amount) if you wish and the new price will appear in the Total column. If the item you use has only a price associated with it, the estimate uses that price as the cost on which the markup is calculated.
The Markup field is displayed only on the screen version of the estimate; this column doesn’t appear on the printed version. And if you’ve created price levels, they’ll appear in the Markup field for easy selection.
Creating Multiple Estimates for a Job
You can create multiple estimates for a customer or a job. You can create an estimate for each phase of the job or create multiple estimates with different prices. Of course, that means each estimate has different contents. When you create multiple estimates for the same job, they remain active (or open) by default. If a customer rejects any estimates, you can either delete them or click the Mark As Inactive button on the Main tab of the Create Estimates window—effectively closing the estimate.
Copying and Memorizing Estimates
A quick way to create multiple estimates with slightly different contents is to make copies of the original. Click the Create A Copy button on the Main tab while the estimate you want to copy is displayed in your QuickBooks window. You can also right-click in the estimate header and choose Duplicate Estimate from the shortcut menu to accomplish the same thing. The Estimate # field changes to the next number, while everything else remains the same. Make the required changes, and then click Save & Close.
If you frequently present the same estimated items to multiple customers, you can use the Memorized Transaction feature to create boilerplate estimates for future use. QuickBooks removes the name when memorizing the document so you can easily use it for other jobs. First, create an estimate, filling in the items that belong in it. Don’t fill in amounts that usually change (such as quantities, or even prices). Then click the Memorize button on the Main tab (or press CTRL-M) to memorize the estimate. To fill out the Memorize Transaction dialog, give the estimate a name that reminds you of its contents, select the option Do Not Remind Me, and click OK to close the dialog.
To use this boilerplate estimate, press CTRL-T or choose Lists | Memorized Transaction List to open the Memorized Transaction List. Double-click the estimate, fill in the Customer:Job information and any pricing information that’s not automatically included, and then save it. The memorized estimate isn’t changed; only the new estimate is saved.
Create Progress Billing Invoices
If you’ve enabled estimates and progress billing in the Jobs & Estimates category of the Preferences dialog (reached by choosing Edit | Preferences), you can use the Progress Invoice template to invoice your customers as each invoicing milestone arrives.
![]()
Choosing the Estimated Job
Progress invoices are connected to an estimate for a customer or job. Open the Create Invoices window, select Progress Invoice from the Template drop-down list, and choose the customer or job for which you’re creating the progress invoice. Because you’ve enabled estimates in Preferences, the system checks the customer record to see if any estimates for this customer or job exist, and if so, presents them.
Select the estimate you’re invoicing against and click OK. QuickBooks then asks you to specify what to include on the invoice. Fill out the dialog using the following guidelines:
• You can create an invoice for the whole job, 100 percent of the estimate, or for a specific percentage. The percentage usually depends upon the agreement you have with your customer. When the line items appear, you can edit individual items.
• You can create an invoice that covers only certain items on the estimate, or you can create an invoice that has a different percentage for each item on the estimate. This is the approach to use if you’re billing for completed work on a job that involves a number of distinct tasks. Some of the work listed on the estimate may be finished and other work not started, and the various items listed on the estimate may be at different points of completion.
After you’ve created the first progress billing invoice for an estimate, a new option is available for subsequent invoices. That option is to bill for all remaining amounts in the estimate (it replaces the 100-percent option). This is generally reserved for your last invoice, and it saves you the trouble of figuring out which percentages of which items have already been invoiced.
The items and prices in the estimate can be changed as can any other amounts or quantities while you’re creating the invoice. Ultimately, however, your ability to invoice for amounts that differ from the estimate depends on your agreement with the customer.
![]()
Entering Progress Invoice Line Items
After you choose your progress billing method and click OK, QuickBooks automatically fills in the line item section of the invoice based on the method you selected. If you chose to invoice a percentage of the estimate’s total, the amount of every line item on the estimate reflects that percentage. This doesn’t work very well for lines that have products (it’s hard to sell a percentage of a physical product). You can leave the invoice as is, because the customer will probably understand that this is a progress invoice, or you can make changes to the invoice.
In addition, the line items for services rendered may not be totally accurate. For example, some of the line items may contain service categories that aren’t at the same percentage of completion as others.
To change the invoice and keep a history of the changes against the estimate, don’t just make changes to the line items on the invoice. Instead, click the Progress icon on the Main tab of the Create Invoices window. This opens a dialog in which you can change the line items. You can change the quantity, rate, or percentage of completion for any individual line item.
Click OK when you have finished making your adjustments. You return to the invoice form, where the amounts on the line items have changed to match the adjustments you made. Click Save & New to save this invoice and move on to the next invoice, or click Save & Close to save this invoice and close the Create Invoices window. Using this method to change a line item keeps the history of your estimate and invoices intact, as opposed to making changes in the amounts directly on the invoice form, which does not create a good audit trail.
Invoice Customers for Reimbursable Expenses
When you pay vendors, some purchases may be made on behalf of a customer, or they may be purchases needed to complete a job. When you create a vendor bill or write a check to a vendor, you can specify expenses as reimbursable and link those expenses to a specific customer or job. You can automatically invoice customers for those expenses. In addition, you can link mileage costs and time costs (for employees or subcontractors) to customers and automatically invoice customers for those expenses.
Any amounts you link to a customer are saved in the customer record, and you can collect the money by adding those amounts to the next invoice you create for that customer or create an invoice specifically to collect these reimbursable expenses.
Configuring Reimbursement Settings
In addition to enabling the option to track reimbursable costs when entering vendor transactions, QuickBooks gives you options for invoicing customers when you want to recover your reimbursable expenses. To set your own preference, choose Edit | Preferences and select the Sales & Customers category in the left pane. In the My Preferences tab, select one of the following options:
• Prompt For Time/Costs To Add Choose this option to open the Choose Billable Time And Costs dialog. Select this option if you always (or almost always) collect reimbursable costs from customers.
• Don’t Add Any This option prevents the automatic display of the Choose Billable Time And Costs dialog. Choose this option if you collect reimbursable expenses periodically on separate invoices.
• Ask What To Do Select this option to tell QuickBooks to ask you what you want to do whenever you create a sales transaction for a customer with outstanding reimbursable costs.
Creating a Transaction for Reimbursable Expenses
When you’re creating a sales transaction for a customer that has outstanding reimbursable costs, QuickBooks uses the preference you set to determine how to manage those costs. If you selected the preference Prompt For Time/Costs To Add, when you select the customer, QuickBooks displays the current reimbursable expenses so you can select those you want to include in the current transaction. If you selected the preference Don’t Add Any, the invoice or sales receipt transaction window opens as usual. If you want to check for reimbursable costs for this customer and then decide whether you want to recover any of them, click the Add Time/Costs button on the Main tab above the transaction form. When the Choose Billable Time And Costs dialog opens, you can see if there are any reimbursable expenses you want to collect from your customer.
If you selected the preference Ask What To Do, when you select a customer that has unpaid reimbursable costs in the transaction window, QuickBooks displays a dialog asking how you want to handle those amounts. Your response determines whether the Choose Billable Time And Costs dialog opens automatically.
Adding Expenses to the Sales Transaction
To collect expenses, also called reimbursable costs, from a customer, select those costs from the Choose Billable Time And Costs dialog. Each type of expense is displayed in its own tab, and you’ll need to review each tab to see if any amounts exist. Unfortunately, the amount displayed on each tab doesn’t help you head for the appropriate tab; all the amounts are set at $0.00 until you actually select amounts to add to the sales transaction. So start clicking each tab to find reimbursable expenses to transfer to the transaction. When you find a tab that has contents, click in the leftmost column to place a check mark next to the expense(s) you want to include.
Click OK to move the item(s) to the transaction window to join any other items you’re entering in that transaction. You may find reimbursable expenses on more than one tab, so you have to check each tab. QuickBooks automatically transfers the selected reimbursable costs to the invoice. The description of the reimbursable expenses that appears on the invoice is taken from the text you entered in the Memo column when you entered a bill or created a check for this vendor. If you didn’t use the Memo column on the Enter Bills or Write Check window, you’ll have to enter text manually in the Description column of the invoice. Otherwise, the customer sees only an amount and no explanation of what it’s for. (The description of mileage or item costs is taken from the Description field of the item you configured.)
Adding Taxes to Reimbursable Expenses If an expense is taxable and the customer is not tax exempt, choose the option Selected Expenses Are Taxable. When the expenses are passed to the invoice, the appropriate taxes are applied. If you select the taxable option and the customer is tax exempt, QuickBooks won’t add the sales tax to the invoice. If some expenses are taxable and others aren’t, you have to separate the process of moving items to the invoice. First, deselect each nontaxable expense by clicking its check mark to remove it (it’s a toggle). Click OK to put those expenses on the invoice. Then return to the Choose Billable Time And Costs window, put a check mark next to each nontaxable expense, deselect the Selected Expenses Are Taxable option, and click OK.
Omitting the Details on the Invoice Each of the tabs has the option Print Selected Time And Costs As One Invoice Item. When you click OK and view the results in the invoice, you still see each individual item. You’re not seeing things. The screen version of the invoice continues to display the individual items. However, when you print the invoice, you’ll see a single line item with the correct total in the Amount column. QuickBooks changes the format of the printed invoice to eliminate the details but doesn’t change the data in the onscreen version of the invoice. This means you can open the invoice later and see the detailed items, which is handy when the customer calls to ask, “What’s this reimbursable expense item on my bill?”
Excluding a Reimbursable Expense If you have some reason to exclude one or more expenses from the current invoice, just avoid putting a check mark in the column. The item remains in the system and shows up on the Choose Billable Time And Costs window the next time you open it. You can add the item to the customer’s invoice in the future.
Changing the Amount of a Reimbursable Expense To change the amount of a reimbursable expense, select the amount in the Amount column of the Choose Billable Time And Costs window on the Expenses tab, and enter the new figure. If you reduce the amount, QuickBooks does not keep the remaining amount on the Choose Billable Time And Costs window. You won’t see it again, because QuickBooks assumes that you’re not planning to pass the remaining amount to your customer in the future.
QuickBooks Printer Setup
The transactions that you create in QuickBooks need to be delivered to your customers, vendors, or employees. In some cases, the delivery method is in the form of a printed document; in other cases, transactions are sent electronically. This section covers your options for both sending and storing these business-critical forms and documents.
If you choose to send printed versions of your documents, you have to link each type of document you print to a specific printer and then configure the way the printer processes each document type. Choose File | Printer Setup to begin. The Printer Setup dialog opens with the drop-down list of the Form Name field displayed. Select the form you want to print.
The form type you select determines the contents of the Printer Setup dialog; the tabs, fields, and options vary depending on the form. Many of the forms you print come out of the printer perfectly with little or no adjustment; however, you’ll need to tweak some forms (such as checks) to make sure the output is what you want it to be. If you use multiple printers, you can assign specific printers to specific types of forms, and QuickBooks will always select the appropriate printer when you print those forms.
![]()
Choose Form Printing Settings
This section covers setting up forms for printing, with the exception of checks. See the section “Using QuickBooks to Print Checks” in Chapter 6 to learn how to set up check printing. You must assign a printer and assign settings for the forms you print. Start by selecting the appropriate form in the Form Name field at the top of the Printer Setup dialog; the fields in the dialog change to match the needs of the form you selected.
• Choosing a printer for a form The drop-down list in the Printer Name field displays the printers installed on your computer. Select the appropriate printer for this form.
• Selecting the paper for printing a form For transaction forms, the setup offers three types of paper: Intuit preprinted forms, blank paper, and letterhead.
• Intuit preprinted forms You can order these forms from Intuit or your favorite supplier that carries QuickBooks forms. All the fields are preprinted and aligned to match the way QuickBooks prints the form. When you print, only the data prints, not the field names.
• Blank paper If you use blank paper to print transaction forms, QuickBooks prints your company name and address at the top of the paper and prints the field names in addition to the data. Lines to separate fields and columns are also printed.
• Letterhead This setting is the same as the Blank Paper setting, except QuickBooks does not print the company name and address information at the top, and the top of the form begins printing 2 inches below the top of the paper to make sure the data doesn’t print over your preprinted letterhead text.
Fine-tuning the Alignment for Printing Forms
To make sure that everything prints in the right place or to change the position of the printed output, you can fine-tune the alignment of text. Although it’s important to do this if you’re using preprinted forms, it doesn’t hurt to check the way the printout looks on blank paper or letterhead.
Click Align to open the Align Printer dialog. Choose the template that you want to work with and click OK. This opens the Fine Alignment dialog, in which you can print a sample and then move text up, down, left, or right to make adjustments to the sample printout. Continue to print a sample and make adjustments until the printout looks the way you want it to. Adjustments affect all the text as a block. You cannot adjust individual fields, rows, or other elements in the printed form. So if you adjust the alignment by moving a field up 14/100th of an inch, for example, everything that prints on the form moves up 14/100th of an inch.
Printing Forms as PDF Files
QuickBooks automatically installs a PDF printer driver when you install the software. The printer driver is used by QuickBooks when, for example, you send an invoice or purchase order via e-mail to customers or vendors. If you want to print your forms as PDF documents, with the form open, choose File | Save As PDF.
![]()
Printer Settings vs. Printer Options
When you assign a printer to a specific form and customize the printing setup for that form, QuickBooks memorizes that selection. If you change printers when you’re ready to print, the next time you print the same form, QuickBooks returns to the original printer and printer settings linked to that form type, unless you reconfigure the setup to change printers.
Every printer has its own set of options to control the way printing occurs. And when you’re ready to print a document, such as an invoice, you can set the printing options when you print. On the Print dialog, shown in Figure 4-2, is an Options button that you can click to open an additional dialog for selecting options for the selected printer. You can change the tray (or select manual feed), change the resolution of the printing, and perform other tweaks.
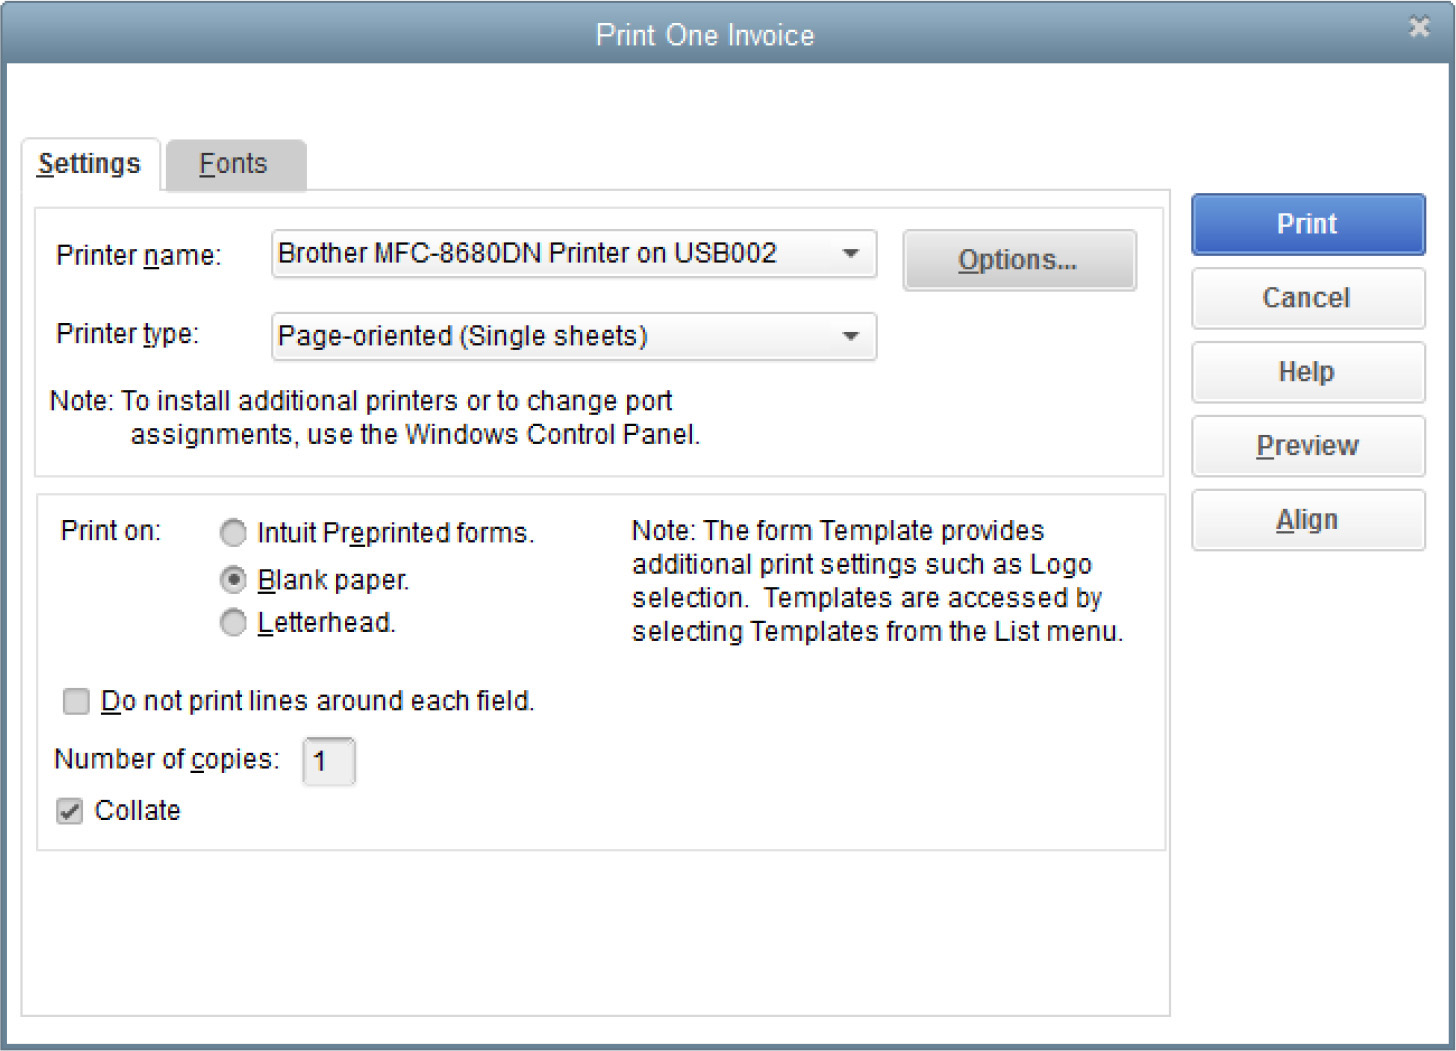
FIGURE 4-2 When you tell QuickBooks to print an invoice, it opens the Print dialog.
QuickBooks does not memorize these options; it uses the printer’s defaults the next time you print the form type. If you want to make printer options permanent, you must change the printer configuration in the Windows Printers folder.
![]()
Ways to Print Transaction Forms
All of the forms that you create in QuickBooks (such as invoices and checks, for example) can be printed one at a time, as you create them, or together in a batch. For your security and the integrity of your QuickBooks file, it’s best to save the transaction before printing; that way, you have a record of the transaction in your QuickBooks file. QuickBooks has a default Preference setting that will automatically save the transaction for you before printing. You can find this option by selecting Edit | Preferences | General. On the Company Preferences tab, select the Save Transactions Before Printing option. You can deselect this option setting if you want the ability to print the current transaction before saving it.
To print the current transaction, click the Print button at the top of the transaction window. QuickBooks opens the Print dialog. Click Print to send the transaction form to the selected printer.
Previewing Form Printouts
If you want to see what the printed document looks like, click the arrow below the Print icon at the top of the document window and select Preview; often, the printed form differs from the form shown onscreen.
![]()
Printing Transaction Forms in Batches
To print transactions in batches, make sure the Print Later check box is selected on each transaction you create. Then follow these steps to batch-print the documents:
1. Choose File | Print Forms | <Transaction Type> (substitute your transaction type).
2. In the Select <Transaction Type> To Print window, all your unprinted transaction forms are selected with a check mark. Click the check marks to remove them from any forms you don’t want to print at this time (it’s a toggle).
3. Click OK to print. A Print <Transaction Type> dialog appears, where you can change or select printing options. Click Print to begin printing. After sending the documents to the printer, QuickBooks asks you to confirm that all the documents printed properly.
4. If everything printed properly, click OK; if not, in the Confirmation dialog, select the forms that need to be reprinted and click OK. Then return to the Print Forms <Transaction Type> dialog, where the forms you selected for reprinting are listed, so you can continue printing your batch. Of course, before taking this step, you’ll need to unjam the printer, put in a new ink cartridge, or correct any other problem that caused the original print job to fail.