
Chapter 13
Manage Inventory in QuickBooks
In this chapter:
• Understanding what an inventory item is
• Learning to track inventory
• How to use subitems
• Doing an inventory count
Accurately keeping track of the inventory items that you sell is no easy task. In fact, for many businesses, the warehouse can be a source of frustration and erroneous information. (The term “warehouse” is used generically here to indicate the place where you store inventory, but it may be your basement or garage instead of a real warehouse.) This chapter covers how to set up and make adjustments to your inventory. You learned how to purchase, receive, and manage your inventory in Chapter 6.
What Is an Inventory Item?
An inventory item is a product you manufacture, assemble, or purchase for the purpose of selling to a customer. Inventory also includes items you store to use in the normal course of business that are resold to customers as part of other services. But if you’re a plumber and you store valves, pipes, and other plumbing parts to use when you perform a job, you may choose to track those items as non-inventory, especially if they are low-value items. If you’re a consultant who uses consumables or supplies in the course of your consulting work and you keep those products on hand to sell to customers, you can also choose not to track those supplies as inventory.
QuickBooks provides the item type “non-inventory part” that you can use to indicate products you used on a job when you invoice customers. You can create reports on those items to track quantity and revenue amounts. These item types don’t require the kind of details and tax reports that inventory items do. In general, the types of businesses that typically track inventory are manufacturers (who may use inventory parts to create other inventory parts), wholesale distributors, and retailers.
Set Up QuickBooks for Inventory Tracking
To track inventory, first enable the inventory feature. Choose Edit | Preferences and select the Items & Inventory category in the left pane. Move to the Company Preferences tab to see the inventory options. When you turn on the inventory feature, you also turn on the purchase order feature (although you don’t have to use purchase orders to use the inventory feature). The dialog offers two more options to keep your inventory records accurately:

• Warn About Duplicate Purchase Order Numbers When enabled, if you use a PO number that’s already in use, QuickBooks will display a message warning you of that fact. (The system doesn’t prevent you from using the duplicate number, but it’s a good idea to heed the warning to avoid problems.)
• Warn If Not Enough Inventory Quantity On Hand (QOH) To Sell When enabled, QuickBooks flashes a warning if you fill out a sales transaction that has a quantity greater than the current available units of that product. You can continue the sale if you wish and track the unfilled quantity as a backorder (covered later in this chapter).
Depending on your version of QuickBooks, the Company Preferences tab of the Items & Inventory Preferences dialog may show an Advanced Inventory Settings button and an Enable button for Unit of Measure. The Advanced Inventory feature, available only in QuickBooks Enterprise Solutions, allows you to track inventory across multiple locations. Click the Learn About Serial #/Lots, FIFO And Multi-Location Inventory link to see if it’s a fit for your business and learn how to upgrade to QuickBooks Enterprise Solutions. The Unit of Measure feature is available in most Premier editions and all Enterprise editions of QuickBooks.
![]()
Accounts Required for Inventory Are Automatically Created
After you’ve enabled inventory tracking and are ready to create your first inventory item, QuickBooks adds the following accounts to your chart of accounts:
• An Other Current Asset account named Inventory Asset
• A Cost Of Goods Sold account
![]()
Create Inventory Items
Now you’re ready to create your first inventory item. Open the Item List (choose Lists | Item List from the menu bar) to open the Item List window. Then press CTRL-N to open the New Item dialog, and select Inventory Part from the drop-down list as the item type. Fill in the information using these guidelines:
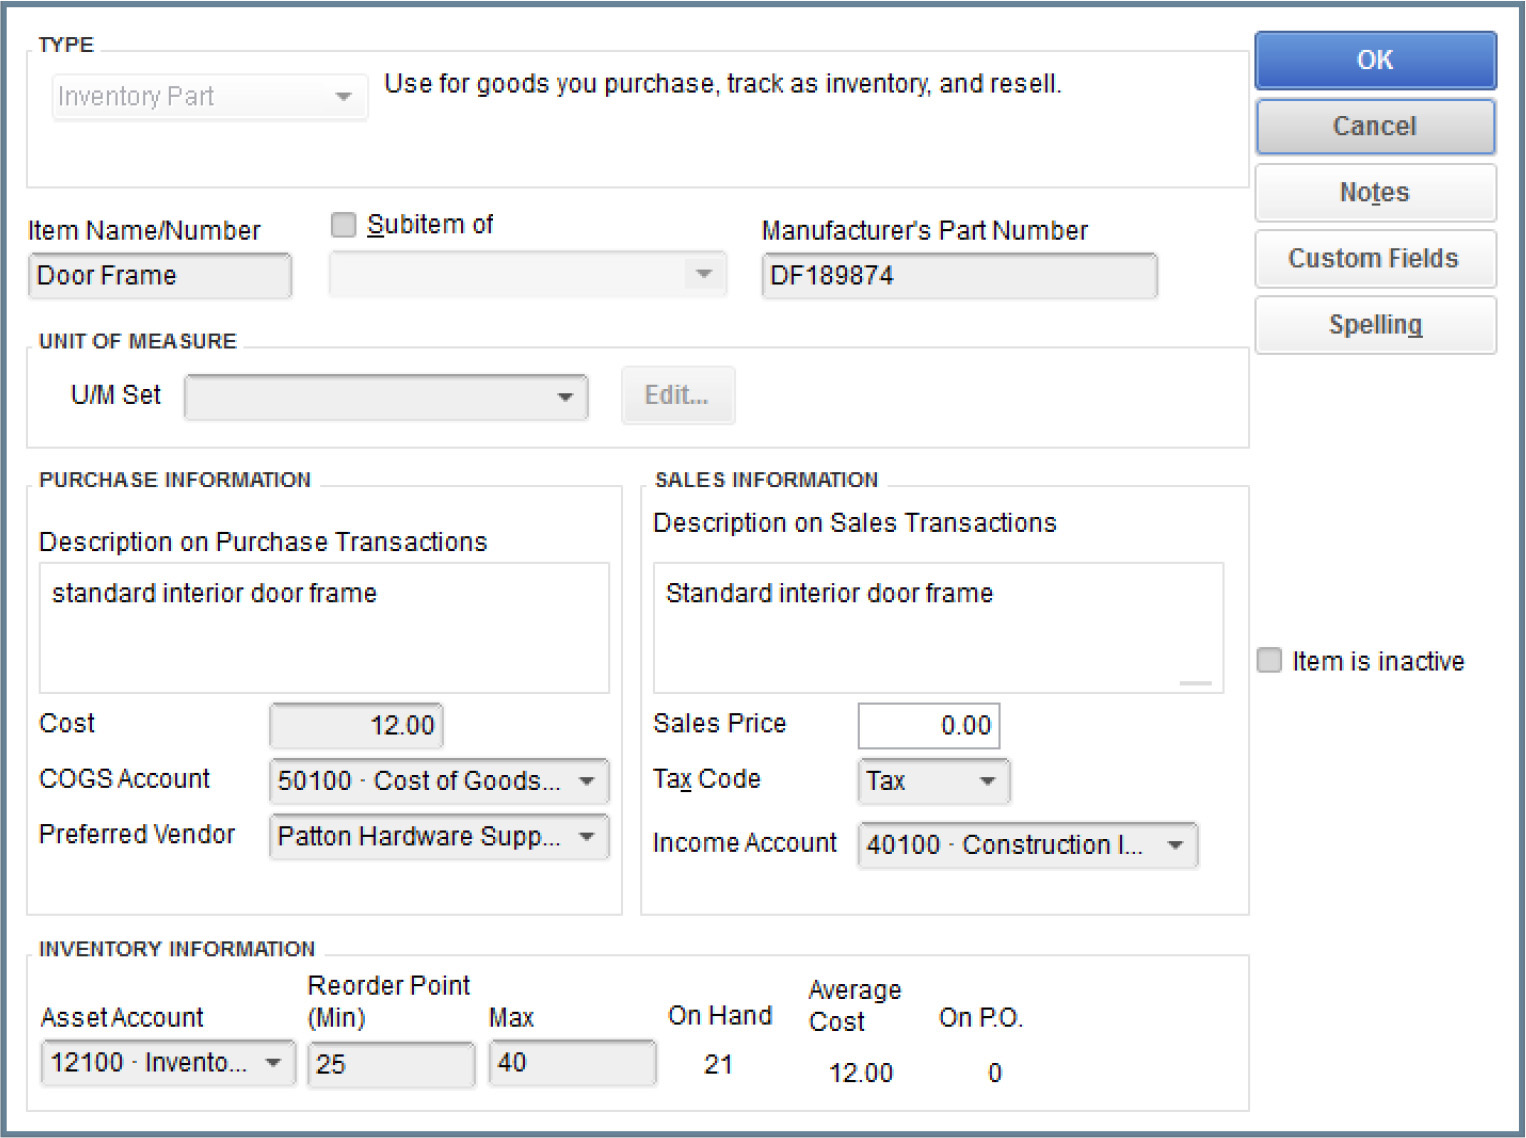
• The Item Name/Number is what you will use to reference the item in the software—which is not necessarily the same way you’d describe this item to your customers in sales transactions. This field must be unique in your Item List.
• The Manufacturer’s Part Number (useful if you’re a distributor or retailer) lets you include the manufacturer’s part number on your purchase orders. If you purchase from a distributor instead of a manufacturer, enter the distributor’s part number. This makes creating an accurate purchase order much easier. And, new in QuickBooks 2015, this number can be added as a column in all sales transaction forms, except credit memos!
• The text you enter in the Description On Purchase Transactions field appears when you create a purchase order. The text you enter in the Description On Sales Transactions field appears in sales transaction forms, such as invoices, estimates, and sales receipts.
• Enter a cost as this cost appears automatically in the PO. QuickBooks does not use this figure for posting cost of goods sold; instead, it uses the average cost of this item based on your item receipt and inventory adjustment transactions as covered later in this chapter.
• If you enter a Sales Price, that amount is entered when you create sales transactions. Many leave this blank and change it on individual sales transactions.
• Choose the Tax Code for this item, which indicates whether the item is taxable to customers.
• Select the appropriate posting accounts for Cost Of Goods Sold (COGS) and Income.
• Enter a number in the Reorder Point field that reflects the minimum quantity you want to have in stock. When this quantity is reached, QuickBooks will issue a reminder about reordering if you’ve enabled the Reminders feature. To turn on the Reminders feature, choose Edit | Preferences and click the Reminders category. On the My Preferences tab, select the Show Reminders List When Opening A Company File check box. On the Company Preferences tab, choose either Show Summary or Show List for the Inventory To Reorder option.
• Do not enter anything in the On Hand or Total Value fields. Instead, let QuickBooks track these values as you receive items into inventory and/or use the inventory adjustment feature, covered later in this chapter.
• The Notes and Custom Fields buttons are covered in Chapter 3, should you need to review them.
Use Subitems
Subitems are useful when items include choices and you want all the choices to be part of a larger hierarchy so you can sell them easily and track them efficiently Perhaps you sell shoes and want to separate them by type, such as sandals, sneakers, boots, and so on.
![]()
Creating the Parent Item for a Subitem
To have a subitem, you must first create a parent item. Here are some guidelines for creating an inventory item that’s designed to be a parent item:
• Use a generic name for the item; the details are in the subitem names.
• Use uppercase to make the item easier to see (especially in a long list of items).
• Do not enter a description, save that for the subitems, the cost or the price, or a reorder point or the quantity on hand.
• Enter the Inventory Asset, COG, and Income accounts because they are required fields for all inventory items.
![]()
Creating Subitems
Having created the parent item, subitems are easy to create. Open a blank New Item window (press CTRL-N) and follow these steps:

1. In the Item Name/Number field, enter the code for this item. It can be a color, a size, a manufacturer name, or any other code that makes this subitem unique when compared to other subitems under the same parent item.
2. Check the Subitem Of box, and then select the parent item from the drop-down list that appears when you click the arrow to the right of the field.
3. Enter the Manufacturer’s Part Number (for creating purchase orders).
4. Optionally, enter any descriptions you want to appear on purchase orders and sales transactions, the cost you expect to pay for this item and a preferred vendor, and the sales price.
5. Enter the general ledger account information (Inventory Asset, Cost Of Goods, and Income accounts).
6. Enter the reorder point if you use that feature.
7. Do not enter anything in the On Hand or Total Value fields. Instead, let QuickBooks track these values as you receive items into inventory and/or use the inventory adjustment feature.
8. Click Next to enter another inventory item, or click OK if you’re finished.
Count Inventory
Some business owners dread doing a physical inventory. However, no matter how careful you are with QuickBooks transactions, no matter how strict your internal controls are for making sure everything that comes and goes is accounted for, you may find, like most businesses, that your physical inventory does not match your QuickBooks figures and you will have to make adjustments.
![]()
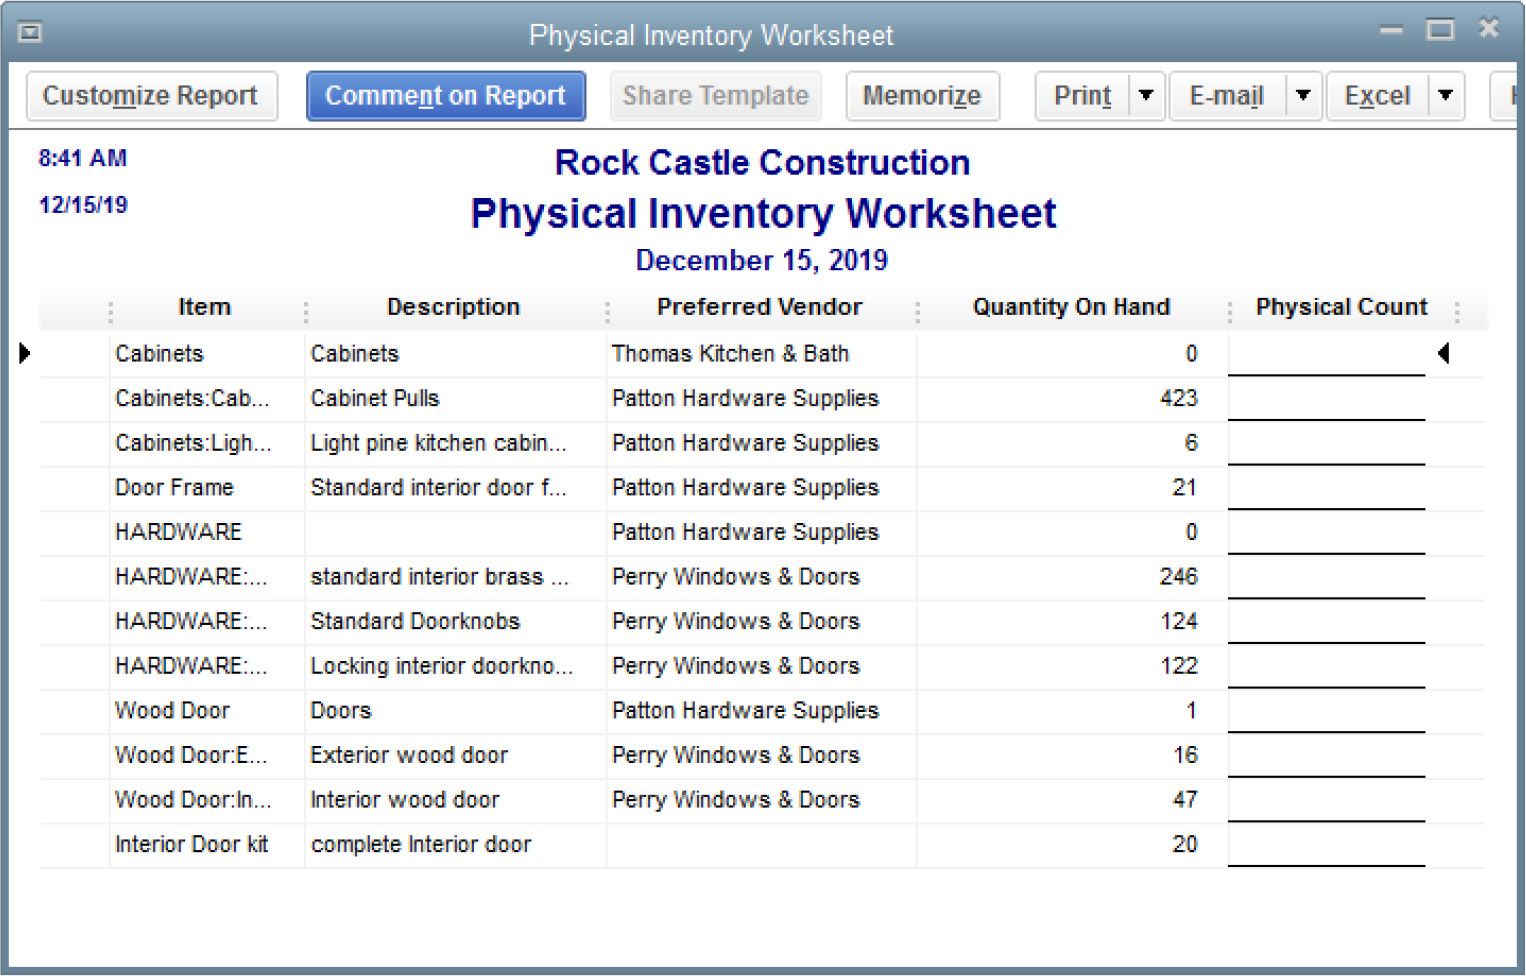
Printing the Physical Inventory Worksheet
When it’s time to count your inventory, start by printing a Physical Inventory Worksheet, shown next. To open the worksheet, select Reports | Inventory | Physical Inventory Worksheet. This report lists your inventory items and subitems in alphabetical order, along with the current quantity on hand, which is calculated from your QuickBooks transactions. In addition, a column is set up to record the actual count as you walk around your warehouse with this printout (and a pen) in hand. Click the Print button in the worksheet window to bring up the Print Reports window. In the Number Of Copies box, enter as many copies as you need.
Customize the Physical Inventory Worksheet
When first opened, the Physical Inventory Worksheet displays only basic information about the inventory that you carry. Depending on the way you plan on carrying out your physical inventory, you may find that you need more information. By default, only the inventory items that have an active status are displayed. So if you made any inventory items inactive and you think (or know) there are still units in stock of that item, consider filtering the report to show the inactive items so you can identify any on-hand quantities for these items. Also, if any items are obsolete or discontinued, be sure to adjust their quantities or value to zero. If you think they may have a resale value, consider making them active again.
You might want to print separate worksheets by vendor because you want to divide up and assign the counting process to your staff accordingly. In that case, filter the report by Preferred Vendor. If you want to start your physical inventory by targeting your highest-value items first, you could add a column for either Cost or Price and resort your report by that column, with the highest value items at the top. You could also filter the report to display items with a cost above a certain dollar amount.
You can find all customization options by clicking the Customize Report button at the top of the Physical Inventory Worksheet window. This action opens the Modify Report window that contains four tabs. Use the Display tab to add or remove columns and the Filters tab to set one of the multiple filters available that allow you to control the items’ display. Use the Header/Footer tab to customize the name of the report and the appearance of other titles that appear on the report. The Fonts & Numbers tab lets you change the font size and color.
Planning the Physical Count
Although QuickBooks doesn’t have a built-in automatic “freeze” feature, consider following these steps during your physical count to perform this process manually:
1. Print the Physical Inventory Worksheet only when you’re ready to start counting.
2. Enter and print invoices as usual, and then mark them as pending (by clicking the Mark As Pending button on the Create Invoice ribbon bar) until your physical inventory is complete. Don’t pick and pack the inventory for these invoices until after the count! Once you’re finished with your counting, mark these pending invoices as final by clicking the Mark As Final button on the Create Invoice ribbon bar.
3. Don’t receive inventory into QuickBooks until after the count.
4. If inventory arrives during the count, don’t unpack the boxes until after the count.
It is a good idea to have one person in charge who knows who is counting what. When each counter is finished, their sheet should be handed to the person in charge, who ideally will be the person who enters the counts into QuickBooks. After the count, bring in any inventory that’s arrived during the count. Then start picking and packing the orders that were placed during your physical inventory.
![]()
Making Inventory Adjustments
After you’ve finished counting the inventory, you may find that the numbers on the worksheet don’t match the physical count. In fact, it’s almost a sure bet that the numbers won’t match. In many cases, the physical count is lower than the QuickBooks figures. This is called shrinkage. Shrinkage is a way of describing unexplained missing inventory.
Adjusting the Count
Use the Adjust Quantity/Value On Hand window to tell QuickBooks about the results of your physical count. Choose Vendors | Inventory Activities | Adjust Quantity/Value On Hand to open the Adjust Quantity/Value On Hand window shown in Figure 13-1. Follow these steps to complete this form:
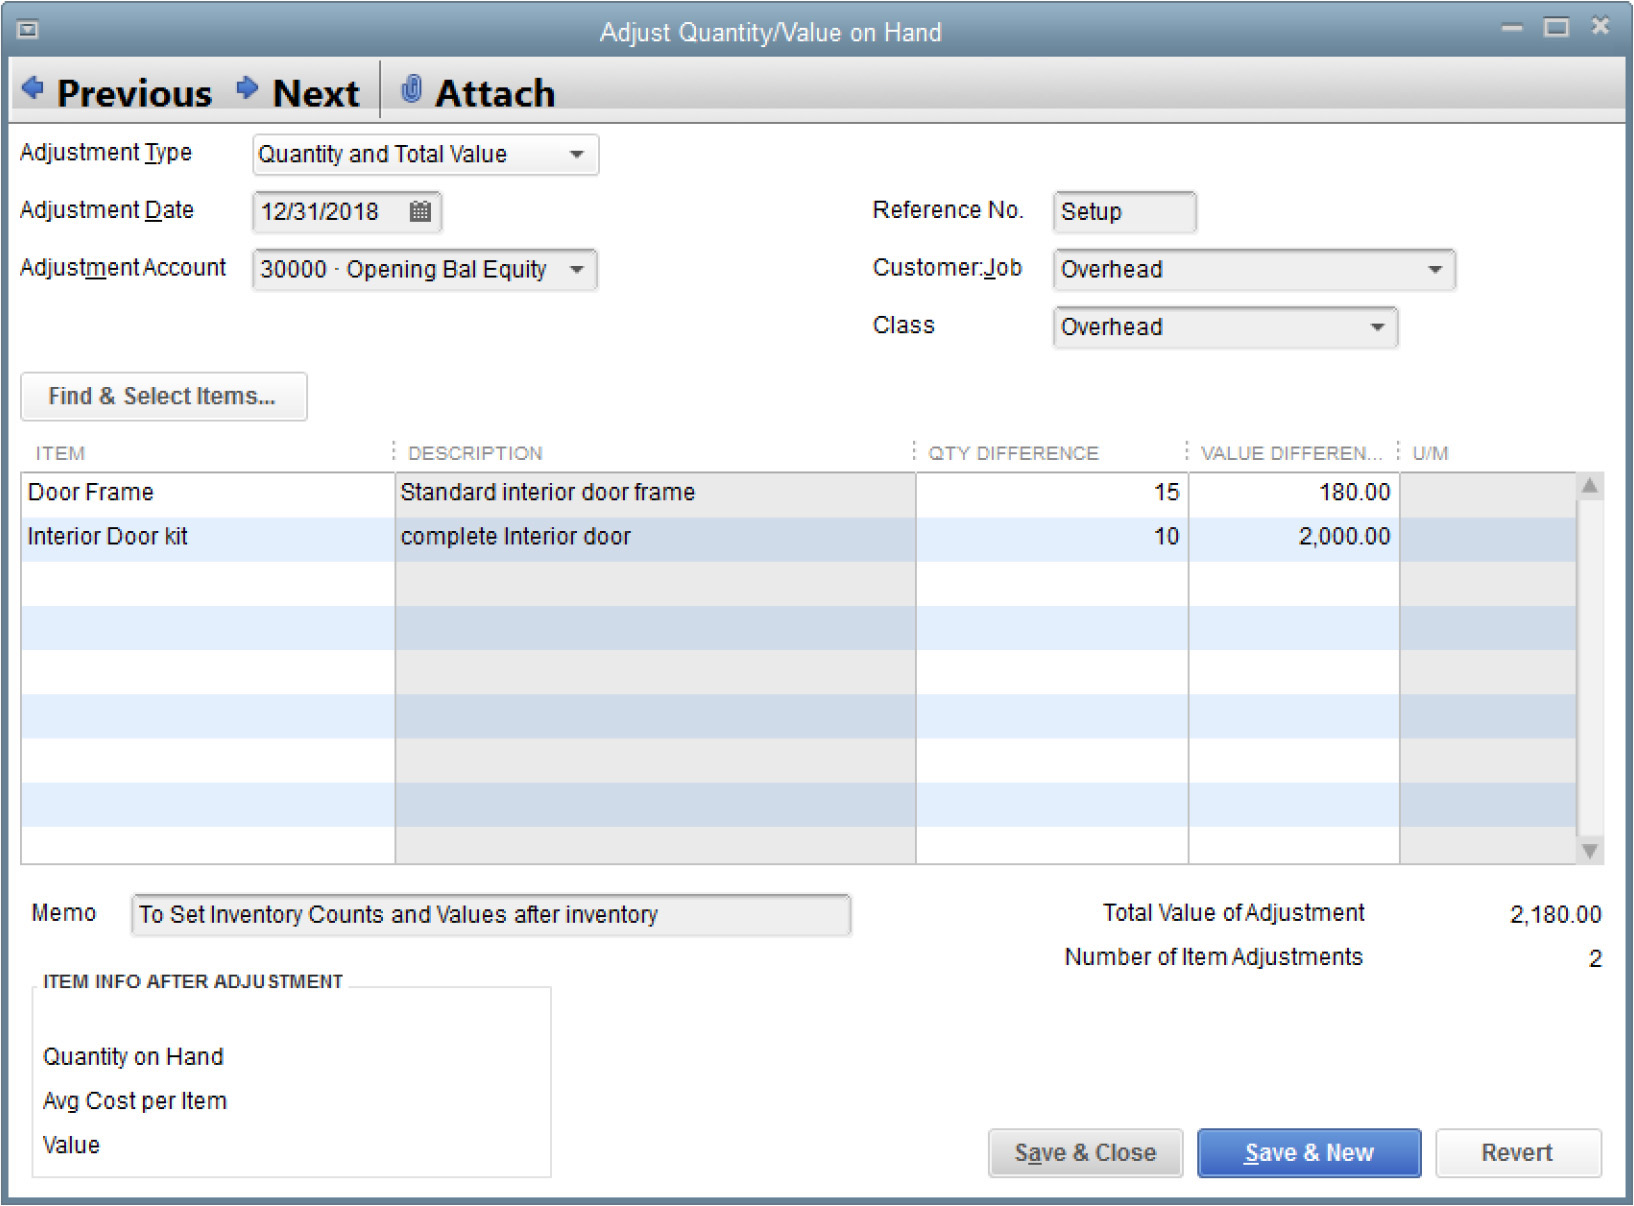
FIGURE 13-1 Adjust for shrinkage in the Adjust Quantity/Value On Hand window.
1. From the Adjustment Type drop-down menu, select Quantity.
2. Enter the date. Inventory adjustments are usually dated at the end of the month, quarter, or year.
3. In the Adjustment Account field, enter the inventory adjustment account in your chart of accounts. The section “About the Inventory Adjustment Account” tells which account you should use.
4. Use an optional reference number to track the adjustment.
5. Click the Find & Select Items button to open the Find & Select Items window. Here you tell QuickBooks which items you want to adjust.
6. Click the Add Selected Items button to add the items selected to the adjustment window. Notice the Include Inactive check box at the bottom of the Find & Select Items window.
7. In the Adjust Quantity/Value On Hand window, the Customer:Job field appears in case you’re sending items to a customer but didn’t include the items on any invoices for that customer or job. This is a way to affect a transfer of the inventory where the inventory count is changed and the cost posted to the customer or job.
8. If you use the class tracking feature, a Class field appears if the adjustment can be assigned to a class.
9. Use either the New Quantity column or the Qty Difference column to enter the count. Whichever column you use, QuickBooks fills in the other column automatically.
10. Anything you enter in the Memo field appears on your Profit & Loss Detail report, which prevents the question “What’s this figure?” from your accountant.
When you complete the entries, the total value of the adjustment you made is displayed below the Qty Difference column. That value is calculated by using the average cost of your inventory. For example, if you received ten widgets into inventory at a cost of $10.00 each and later received ten more at a cost of $12.00 each, your average cost for widgets is $11.00 each. If your adjustment is for minus one widget and you didn’t sell any of that item in the interim, your inventory asset value is decreased by $11.00.
Adjusting the Value
You can be more precise about your inventory valuation; in fact, you can override the average cost calculation and enter a true value when you fill out this transaction window. Select Total Value from the Adjustment Type drop-down menu. Two new columns named Total Value and New Value appear in the window.
The value of the total adjusted count for each item is displayed. You can change the current value of the item to eliminate the effects of averaging costs up to this point (although as you continue to receive inventory items, QuickBooks continues to use average costing). Return to the Adjust Quantity/Value On Hand window and enter the data. When you’ve finished making your changes, click Save & Close to save your new inventory numbers.
![]()
Understanding the Effects of an Adjustment
When you adjust the inventory count, you’re changing the value of your inventory asset. After you save the adjustment, the inventory asset account register reflects the differences for each item. Because QuickBooks is a double-entry bookkeeping system, there has to be an equal and opposite entry made to another account.
For example, when you sell items via customer invoices, your inventory asset decreases while at the same time your cost of goods sold increases. When you’re adjusting inventory, however, there is no sale or purchase involved. In most cases, the offsetting entry is to an Inventory Adjustment account created specifically for this purpose.
About the Inventory Adjustment Account
Before you can make adjustments to your inventory, you should first create an account to receive that adjustment. Most users name it the Inventory Adjustment account, and it can either be a Cost Of Goods Sold or an expense type of account. Check with your accountant on what account type works best for your situation.
If you use a COGS account when you use the Adjust Quantity/Value On Hand window, QuickBooks issues a warning message when you enter your adjustment account in the Adjustment Account field. If your accountant wants you to use a cost of goods account, be sure to select the option to stop showing this message before you click OK to continue working in this window.
Making Other Adjustments to Inventory
You can use the Adjust Quantity/Value On Hand window to make adjustments to inventory at any time and for a variety of reasons unconnected to the periodic physical count:
• Breakage or other damage
• Customer demo/sample units
• Gifts or bonuses for customers or employees
• Removal of inventory parts to create built or preassembled inventory items
The important thing to remember is that tracking and periodically adjusting inventory isn’t done just to make sure that you have sufficient items on hand to sell to customers. Equally important is the fact that your inventory is an asset, just like your cash, equipment, and other assets. As such, it affects your company’s worth in a substantial way.
![]()
Run Inventory Reports
You’ll probably find that you run reports on your inventory status since, for many inventory-based businesses, inventory status reports are the second most important set of reports, next to current accounts receivable balance reports. QuickBooks provides several useful inventory reports, which you can access by choosing Reports | Inventory.
Inventory Valuation Summary Report
This report gives you a quick assessment of the value of your inventory. By default, the date range is the current month to date, but you can change that to suit your needs. Each item is listed with the following information displayed in columns:
• Item Description The description of the item, if you entered a description for purchase transactions.
• On Hand The current quantity on hand, which is the net number of received items and sold items. Because QuickBooks permits you to sell items you don’t have in stock (a very bad idea, which can wreak havoc with your financials), it’s possible to have a negative number in this column.
• Avg Cost QuickBooks calculates the average cost of an item each time you record the purchase of more units of the item. It adds the cost of the new items to the cost of the old stock that’s left and then divides by the total number of new and old items.
• Asset Value The value posted to your Inventory account in the general ledger. The value is calculated by multiplying the number on hand by the average cost.
• % Of Tot Asset The percentage of your total inventory assets that this item represents.
• Sales Price The price you’ve set for this item. This figure is obtained by looking at the item’s configuration window. If you entered a price when you set up the item, that price is displayed. If you didn’t enter a price (because you chose to determine the price at the time of sale), $0.00 displays. QuickBooks does not check the sales records for this item to determine this number, so if you routinely change the price when you’re filling out a customer invoice, those changes aren’t reflected in this report.
• Retail Value The current retail value of the item, which is calculated by multiplying the number on hand by the sales price (if the sales price is set).
• % Of Tot Retail The percentage of the total retail value of your inventory that this item represents.
Inventory Valuation Detail Report
This report lists all the transactions that affect the on-hand value of each item in your inventory—including sales and purchases. The report shows no financial information about the price charged to customers, because your inventory value is based on cost. You can double-click any transaction line to see the details of that transaction.
Inventory Stock Status Report
There are two Stock Status reports: Inventory Stock Status By Item and Inventory Stock Status By Vendor. The information is the same in both reports, but the order in which information is arranged and subtotaled is different. You can use these Stock Status reports to get quick numbers about inventory items, including the following information:
• The preferred vendor
• The reorder point
• The number currently on hand
• A reminder (a check mark) for ordering items that are below the reorder point
• The number currently on order (a purchase order exists but the order has not yet been received)
• The next delivery date (according to the data in the purchase orders)
• The average number of units sold per week
Pending Builds Report
If you’re using the Premier or Enterprise edition of QuickBooks and you build and track assembly items, this report details the current state of items you assemble from existing inventory items (called builds). If you find that you need this feature, consider upgrading to either of these editions by going to www.quickbooks.intuit.com.
Inventory QuickReports
QuickBooks provides a reporting feature called QuickReports that provides detailed sales and purchase information about an individual item. QuickReports are available from the Item List window and are the fastest way to take a look at all the transactions for an item.
In the Item List window, select an item and click the Reports button (at the bottom of the list) to open a drop-down menu from which you can select the QuickReport for that item. You can change the date range for the report, and you can double-click any transaction line to drill down to the transaction details.