
Chapter 16
Understanding General Journal Entries and Other Special Tasks
In this chapter:
• Using journal entries for depreciation and outside payroll
• Working with multiple currencies
• Installing QuickBooks on a network
• Installing QuickBooks for multiple users
In this chapter, you’ll learn about QuickBooks transactions that are neither done every day, nor by every company. You’ll learn about using general journal entries as explained in the first section of this chapter. Moreover, in our ever-narrowing world, your company may possibly deal in currencies other than the U.S. dollar. If so, you can learn about using more than one currency here. In addition, if your company has a computer network and more than one user, you might choose to install QuickBooks on several computers. If so, the instructions are included in this chapter.
The QuickBooks Journal Entries Window
As you work in QuickBooks, the amounts involved in the financial transactions you complete, such as invoices and bills, post automatically to the appropriate accounts in your chart of accounts. However, if necessary, you or your accountant can make an adjustment to an account directly. QuickBooks refers to this type of transaction as a general journal entry (aka journal entry).
Journal entries should be used to enter only financial data that cannot be added to an account via a standard transaction. For example, your accountant may use a journal entry to adjust an account balance at year end to record annual depreciation of an asset and the associated depreciation expense.
The Make General Journal Entries window, shown in Figure 16-1, is accessed from the Company menu. The format of the transaction window is standardized and cannot be customized in the same way as an invoice template can. There are columns for account names and debit and credit amounts. In addition, QuickBooks provides columns you can use to link the data you enter to customers and classes and also enter a memo.
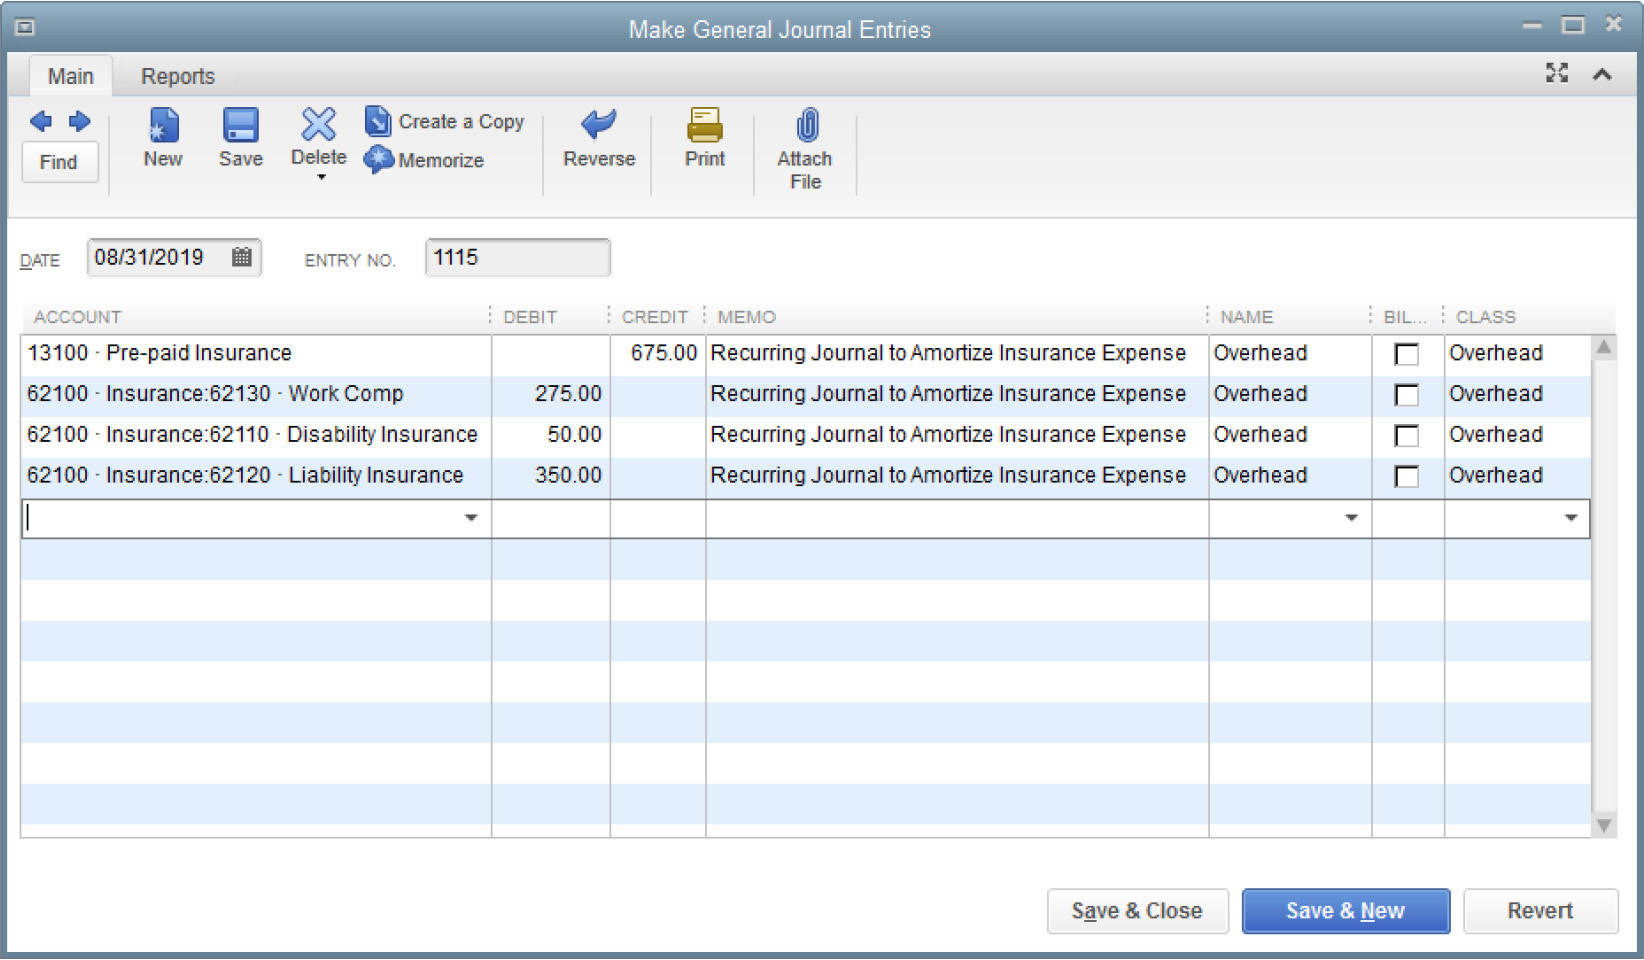
FIGURE 16-1 The Make General Journal Entries window has extra columns so you can track additional information about your entry.
To create a journal entry, follow these steps:
1. Choose Company | Make General Journal Entries. QuickBooks displays a message telling you that automatic numbers are now assigned to journal entries. (You can select the option Do Not Display This Message In The Future before you click OK.) Enable or disable the automatic numbering feature in the Accounting category of the Preferences dialog.
2. In the Account column, select the account you need.
3. Move to either the Debit or Credit column and enter an amount.
4. Optionally, make an entry in the Memo, Name, or Billable? columns.
5. Repeat Steps 2-4 for all the amounts in the journal entry.
As you enter each amount, QuickBooks presents the offsetting total in the next line. For example, if the line items you’ve entered so far have a higher total for the credit side than the debit side, the next entry presents the balancing offset.
Here are some guidelines to using the columns available in the Make General Journal Entries window:
• Use the Memo column towrite a comment about the reason for the journal entry. The memo text appears in the entry of the account’s register and on reports, so you should enter the text on every line of the entry in order to see the explanation, no matter which account register you’re viewing.
• Use the Name column to assign a customer, vendor, employee, or other name to the amount on this line of the entry, if you’re linking the entry to a name. If the account you’re posting to is an A/R (accounts receivable) or A/P (accounts payable) account, an entry in the Name column is required. Note, however, that you cannot use more than one A/R or A/P account in the same journal entry.
• The Billable? column indicates whether the amount is billable to the name in the Name column, if you are using an expense account and you enter a customer name in the Name column.
• If you are using the Class Tracking feature, you’ll see a Class column and you can link the entry to a class. This can be useful if, for example, you’d like to allocate certain overhead costs or assets to different classes.
![]()
Create Journal Entries for Depreciation
Depreciation is a way to track the current value of a fixed asset that loses value as it ages. The basis of an asset’s depreciation from an accounting point of view is determined by a complicated set of rules, including IRS rules, which can change frequently. Most small businesses enter the depreciation of their assets at the end of the year, but some companies perform depreciation tasks monthly or quarterly.
Depreciation is a special journal entry because the accounts involved are very specific. The account that is being depreciated must be a fixed asset, and the offset entry is to a Depreciation Expense account found in the expense section of your chart of accounts.
Creating Accounts for Tracking Depreciation
Having multiple fixed-asset accounts is not uncommon if you want to track different types of fixed assets separately. For instance, a chart of accounts could have three fixed-asset account categories: Equipment, Furniture & Fixtures, and Vehicles.
It’s useful to create a separate subaccount to capture the depreciation entries for each of your fixed assets as well as the purchase of an asset for that asset category. For example, the fixed-asset section of the chart of accounts for the three categories just described could look like the example in Table 16-1.
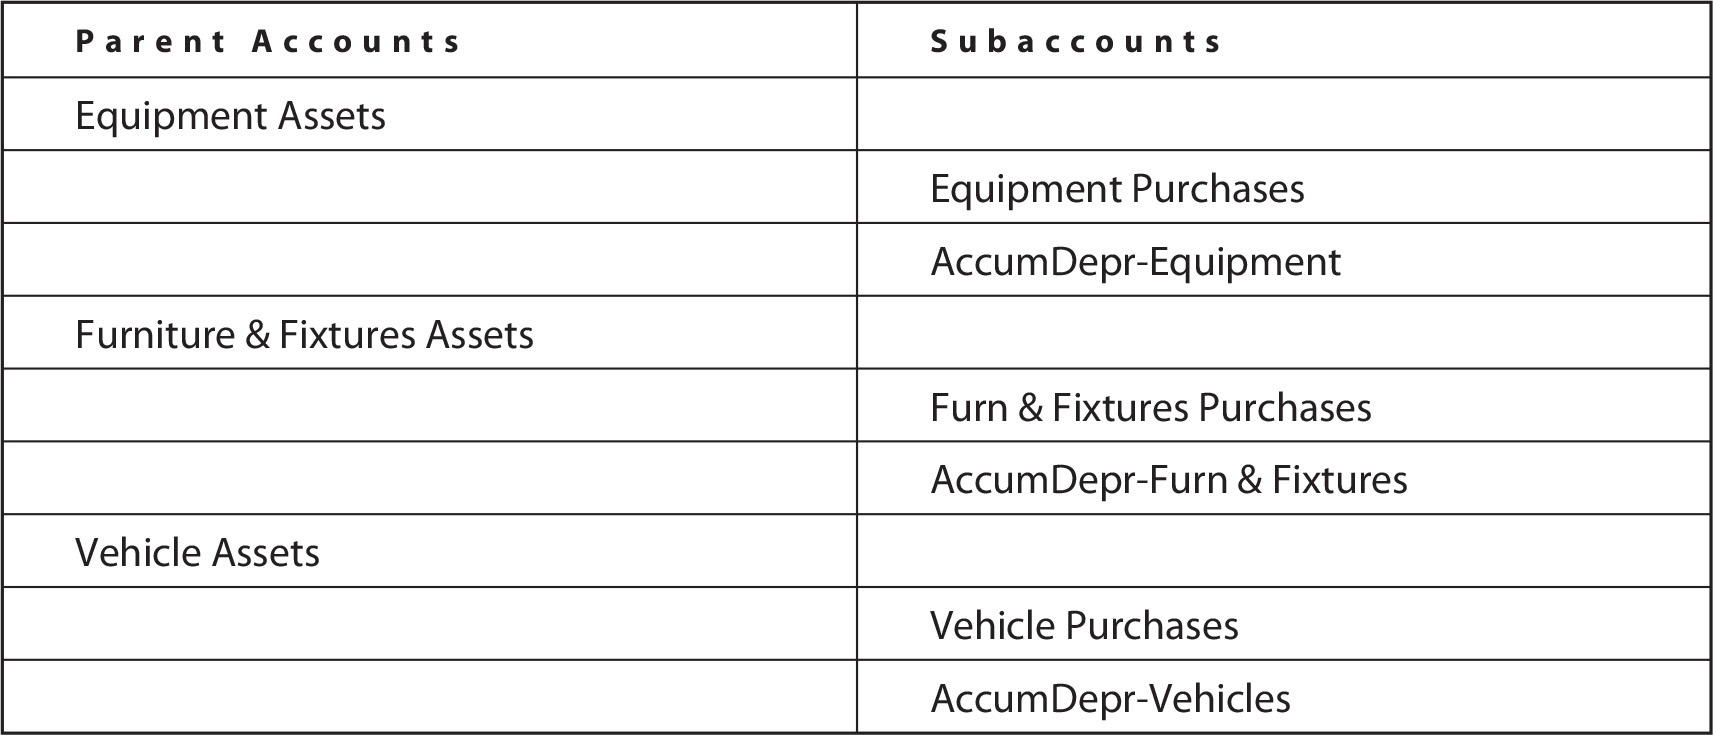
TABLE 16-1 Fixed-Asset Parent Accounts and Subaccounts
If you use numbers for your chart of accounts, create a numbering system that makes sense for this setup. For example, if Equipment is 16000, the subaccounts start with 16010; Furn & Fixtures starts with 16100 and the subaccounts start with 16110; and Vehicle starts with 16200, and so on.
Post asset purchases to the subaccount created for purchases, and make the journal entry for depreciation in the AccumDepr subaccount. Avoid using the “parent” accounts when tracking fixed assets. There are several reasons for this:
• The transactions posted to both the asset subaccount and the AccumDepr subaccount should be consistent so that you (or your accountant) can look at either one to see a running total instead of a calculated net total.
• Tracing the year-to-year depreciation is easier. Just open the AccumDepr subaccount register, and each line represents a year.
• The net value of the fixed assets is correct. A Balance Sheet report shows you the details in the subaccounts and automatically displays the total of the subaccounts in the parent account.
You can refine this example by creating subaccounts and classes for specific fixed assets. For instance, you may want to create a subaccount for each vehicle asset (or one that covers all cars and another that manages all trucks) and its accompanying accumulated depreciation. If your equipment falls under a variety of depreciation rules (for example, manufacturing equipment versus computer equipment), you may want to have a set of subaccounts for each type. You can then use classes to categorize these assets by location or division.
For further precision, you can create a different subaccount for each year of depreciation; for instance, under your AccumDepr-Vehicle subaccount, you could have Vehicle-Depr 2013, Vehicle-Depr 2014, Vehicle-Depr 2015, and so on. Then your balance sheet shows a complete year-by-year depreciation schedule instead of accumulated depreciation, and the math works.
Creating a Depreciation Entry
To depreciate fixed assets, you need a Depreciation Expense account in the expense section of your chart of accounts. Once that account exists, open the Make General Journal Entries window and choose the first asset depreciation subaccount. In the following example shown in Table 16-2, it’s the AccumDepr account under the fixed asset Equipment. Enter the depreciation amount in the Credit column. Notice the colon in the account names for the asset accounts. That’s how QuickBooks indicates a subaccount.

TABLE 16-2 Depreciation Journal Entry
To help ensure that important transactions such as this depreciation journal entry are posted to the correct subaccount, turn on a company preference that tells QuickBooks to display only the lowest subaccounts, not the parent accounts, when entering transactions. Select Edit | Preferences | Accounting | Company Preferences | Show Lowest Subaccount Only. Keep in mind that this option is available to you only if you use account numbers in your chart of accounts.
Choose the next asset depreciation subaccount and enter its depreciation amount in the Credit column as well. QuickBooks automatically puts the offsetting amount in the Debit column, but just keep moving to the Credit column as you work. Continue until all your depreciation figures are entered in the Credit column.
Now choose the Depreciation Expense account. The total amount of the credits you’ve entered is automatically placed in the Debit column. Click Save & Close.
![]()
Use Journal Entries to Post to Outside Payroll Services
If you use an outside payroll service, you have to tell QuickBooks about the payroll transactions. Your payroll service provider should be able to provide you with a report that gives the details of gross wages and any withholding or deductions so you can enter this information into QuickBooks.
Many businesses make this entry with a journal entry. Like all journal entries, this one is just a matter of entering debits and credits. There are three parts to recording payroll:
• Transferring money to the payroll account (if you use a separate bank account for your payroll)
• Entering the various payroll totals
• Entering the employer expense totals
Transferring Money to the Payroll Account
It’s a good idea to have a separate bank account for payroll if you have an outside payroll service, as this second account makes it easier to record, track, and reconcile payroll-related transactions. A separate payroll account can be useful even when you do your own payroll.
To transfer the money you need for payroll, choose Banking | Transfer Funds. Select the account that you want to take the funds from and complete the transfer to your payroll account. Be sure to transfer enough money for the gross payroll, plus the employer payroll expenses, which include the following:
• Employer-matching contributions to FICA and Medicare
• Employer-matching contributions to pension plans
• Employer-matching contributions to benefits
• Employer state unemployment assessments
• Employer FUTA (Federal Unemployment Taxing Authority)
• Any other government or benefit payments paid by the employer
Even though some of these aren’t transmitted every payday, you should transfer the amounts at this time anyway. Then, when it’s time to pay them, the correct amount of money will be in the payroll account.
Recording the Payroll
Running your payroll produces a detailed set of debits and credits. If your payroll service takes care of remitting your payroll liabilities for you, you can record a single journal entry for the payment side of a payroll run and another separate journal entry for the payment of the employer expenses when they’re transmitted. An example of the journal entries you’ll make to record this payroll processing scenario is shown in Table 16-3.
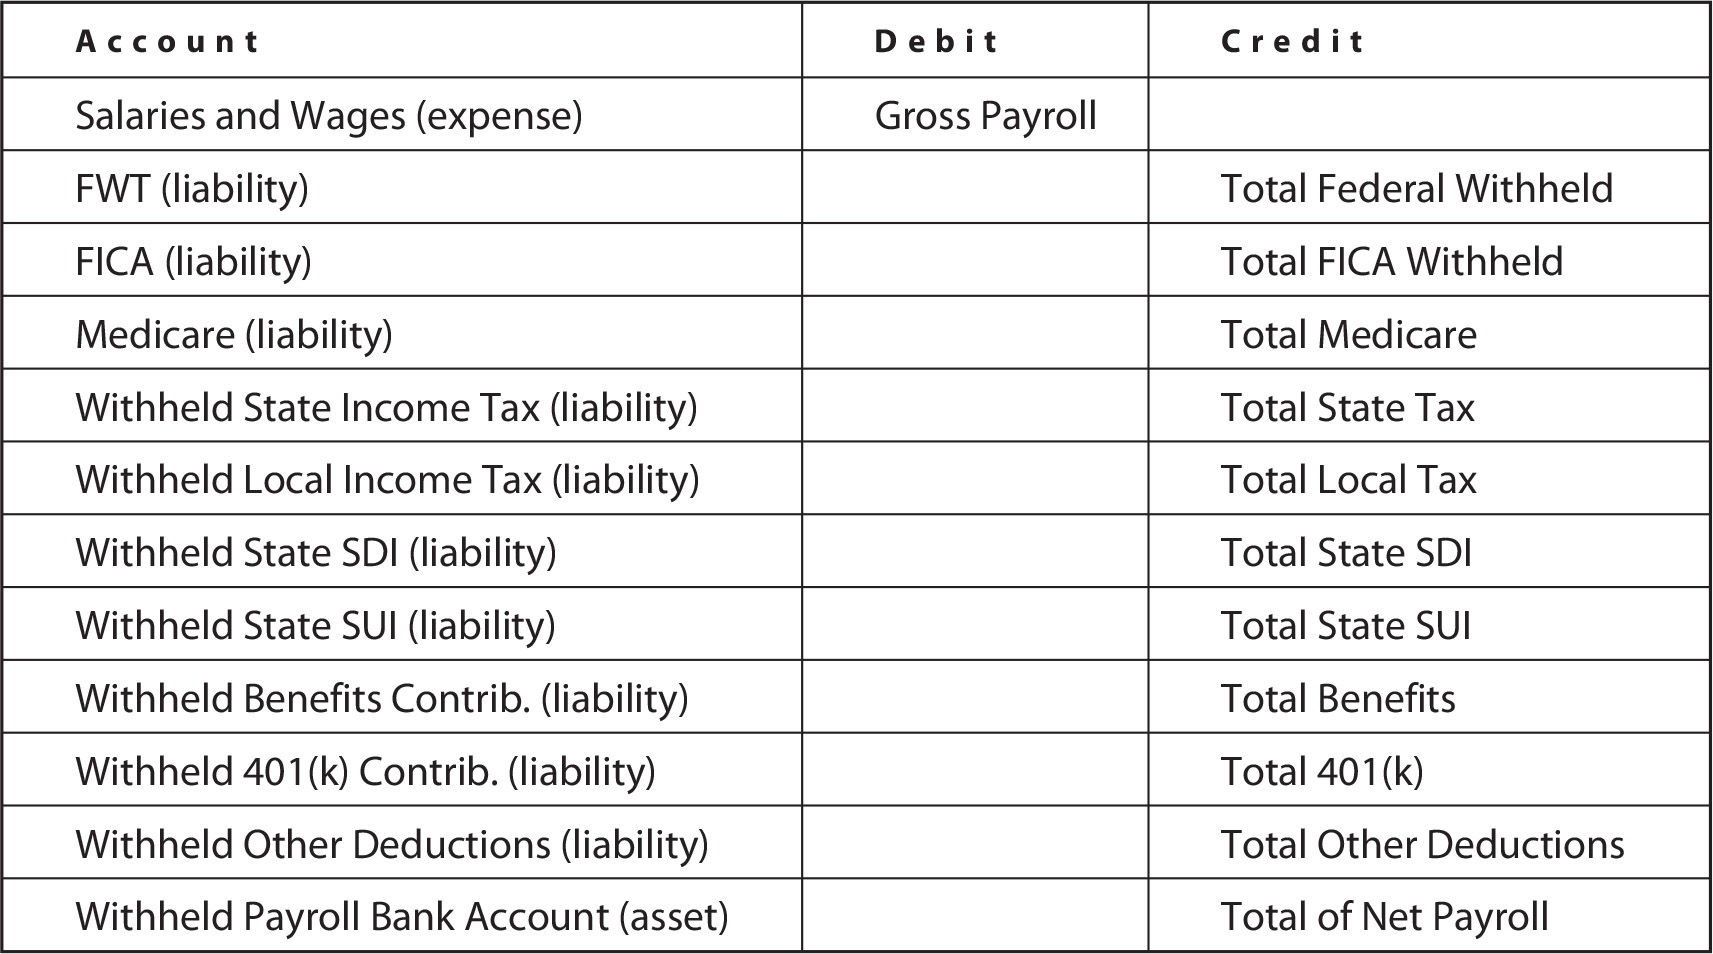
TABLE 16-3 Typical Journal Entry to Record Payroll from an Outside Service
If your payroll service doesn’t pay your liabilities, leaving you with that task, your check-writing activity will record the payments when you create those checks. So, in this instance, you don’t need a second journal entry.
Table 16-3 shows a typical template for recording the payment side of a payroll run as a journal entry. It’s possible that you don’t have all the expenses shown in this table. You may have additional withholding categories such as union dues, garnishments against wages, and so on. Be sure you’ve created a liability account in your chart of accounts for each withholding category you need and a vendor for each transmittal check.
Recording Liabilities
If your payroll service takes care of paying your payroll liabilities, you need to make a journal entry for that payment. If you do it yourself, just write the checks from the payroll account, and each item will post to the general ledger. Table 16-4 is a sample journal entry for recording payroll remittances.
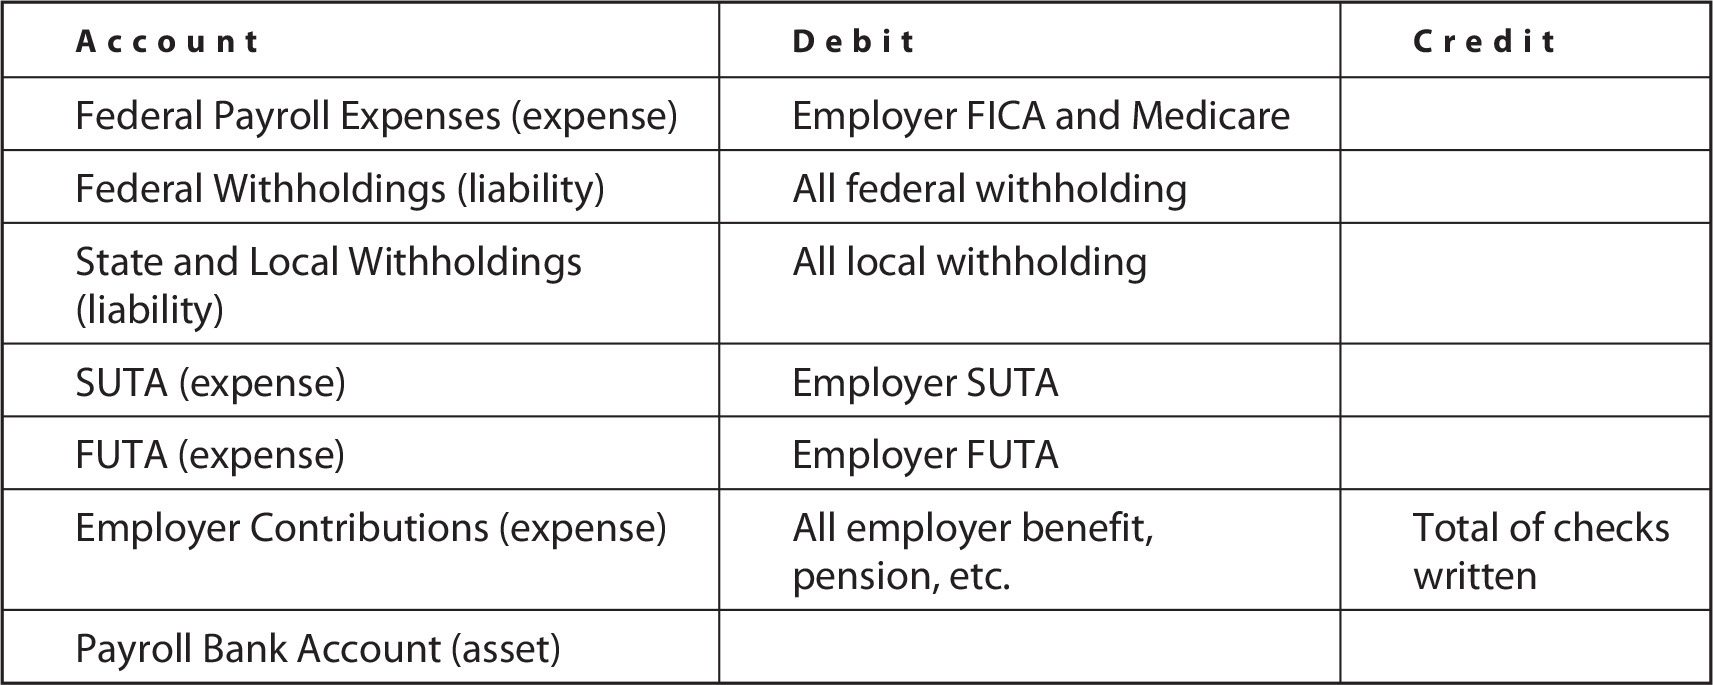
TABLE 16-4 Typical Journal Entry for Employer-side Transactions
The entry involving the transmittal of withholdings is posted to the same account you used when you withheld the amounts. In effect, you “wash” the liability accounts; you’re not really spending money—you’re remitting money you’ve withheld from employees.
You can have as many individual employer expense accounts as you need, or you can post all the employer expenses to one account named “Payroll Expenses.” However, if you choose to use individual liability and expense accounts, it is easier to determine the costs to your company for each item.
Creating Your Own Payroll Entry Template
You can save a lot of time and effort by creating a template for the payroll journal entries. Open a Make General Journal Entries window and fill out the Account column only. Enter the first account, and then press the DOWN ARROW key and enter the next account; keep going until all accounts are listed (see Tables 16-3 and 16-4).
Press CTRL-M to open the Memorize Transaction dialog. Name the memorized transaction “Payroll” (or something similar), and select the Do Not Remind Me option. You do not need to be reminded, as the reports from the payroll company are your reminder.
Close the Make General Journal Entries window. QuickBooks displays a message asking if you want to save the transaction you just created. Click No, as you don’t have to save a journal entry in order to memorize it. Do the same thing for the boilerplate journal entry you create to record employer remittances.
When you’re ready to record a payroll, open the memorized transaction by pressing CTRL-T to open the Memorized Transaction List. Double-click your payroll boilerplate journal entry, enter the appropriate date, and then enter the data.
Click Save & New if you have to create another journal entry for the employer expenses; otherwise, click Save & Close.
Reconciling the Payroll Account
When you use journal entries to enter your payroll, the reconciliation process is a bit different. You don’t have a record of the individual check numbers and payees. When you open the payroll account in the Reconcile window, you see the journal entry totals instead of the individual checks.
Entering Payroll Check Details for Your Bank Reconciliation
If you want to perform a complete reconciliation in QuickBooks, you can use a workaround to enter individual “dummy” payroll checks for the sole purpose of making your bank reconciliation easier and more accurate. You have a little bit of setup to do, but the good news is you can reuse what you set up every payday.
1. Create a name in the Other Names list and name the new entity Payroll. You can use this name for every check and put the employee’s name in the Memo field. If you prefer, you can create a name for each employee in the Other Names list using initials, last name only, or some other name that isn’t the same as the original employee name as it exists in your Employee list.
2. Open the Write Checks window. Using the bank account that you use for your payroll, enter the individual dummy payroll checks using these guidelines:
a. The Date is the date of the payroll check.
b. The No. field is the check number referenced in the report from the payroll service.
c. You can use “Payroll” as the Pay To The Order Of name (unless you’ve entered all of your employee names as Other Names, in which case enter the appropriate name, which you can match to the right check number too).
d. The amount that you enter in the $ field is for the net paycheck (not the gross payroll) amount.
e. The account is the same bank, meaning that the net effect on your bank account is zero and you’re not double-counting your payroll expenses either.
QuickBooks flashes a message warning you that you’re posting the payment to the source account. Click OK, because that’s exactly what you want to do. You can select the Do Not Display This Message In The Future check box if you don’t want to be reminded each time. You can also enter the checks the payroll service wrote to transmit your withholdings or pay your taxes.
You’ll still have to enter your regular payroll journal entry, described earlier, because the total of the checks written and posted to the bank account via the journal entry will need to be cleared as part of the reconciliation, as well as the individual dummy checks you’ve entered that have cleared the bank.
Creating Journal Entries for Changed Accounts
If, after using QuickBooks for a time, you decide you want to track income or expenses differently, you can use a journal entry to split out these amounts to separate income or expense accounts. For example, instead of using only one income account to keep track of all the products and services sold, you determine that having separate income accounts for service fees and for products sold might give more information.
To create an income journal entry, create the new account(s) and then take the appropriate amount of funds out of the original account and put it into the new account. Income, for example, is a credit-side item, which means you would do the following:
• Debit the original account to reduce the balance for the amount that belongs in the new account.
• Credit the new account to increase the balance for that amount.
Then go to the Item List and change the impacted items by linking them to the new income accounts so you don’t have to keep making journal entries.
On the expense side, you may decide your insurance accounts should be separated into car insurance, equipment insurance, building insurance, malpractice insurance, and so on. Since expense accounts are debit-side items, the journal entry in this case is created as follows:
• Credit the original expense account to reduce the balance for the amount you’re taking out of it and putting into the new account(s).
• Debit the new account(s) to increase the balance for the appropriate amount(s).
Set Up and Configure Multiple Currencies
If you do business with customers or vendors in other countries, the multicurrency feature allows you to create transactions in their currencies and track the exchange rates so you always know what the transactions mean to you in U.S. dollars. Before you can begin creating transactions in different currencies, you have to complete some configuration and setup tasks.
It’s important to be aware that, unlike most of the configuration preferences available in QuickBooks, once you enable multiple currencies, you cannot disable it. If you’re already using QuickBooks, either because you updated your company files from a previous version or because you began creating transactions before deciding to use multiple currencies, be sure to back up your company file before enabling this feature.
![]()
Creating a Special Backup
When you create your backup before turning on multiple currencies, don’t use your normal backup routine. Instead, name the backup file differently so you can identify it easily and avoid having the multicurrency backup file overwritten with “regular” backups. For example, when you save your backup file, you might change the name of the file from the usual <CompanyFileName>.qbb to <CompanyFileName>-B eforeMulticurrency.qbb.
If you decide not to use multiple currencies and don’t want to restore the backup (because you’d have to re-enter all the transactions you created while multiple currencies was enabled), it’s okay to keep using the company file with multiple currencies enabled as long as you use customers, vendors, and accounts that are not linked to another currency. Some windows and dialogs will continue to have an extra field for currency, but no financial information will be compromised.
![]()
Enabling Multiple Currencies
To enable the multicurrency feature, choose Edit | Preferences and click the Multiple Currencies category icon in the left pane. In the Company Preferences tab, select Yes, I Use More Than One Currency. When you select Yes, QuickBooks displays a warning message, as shown here.
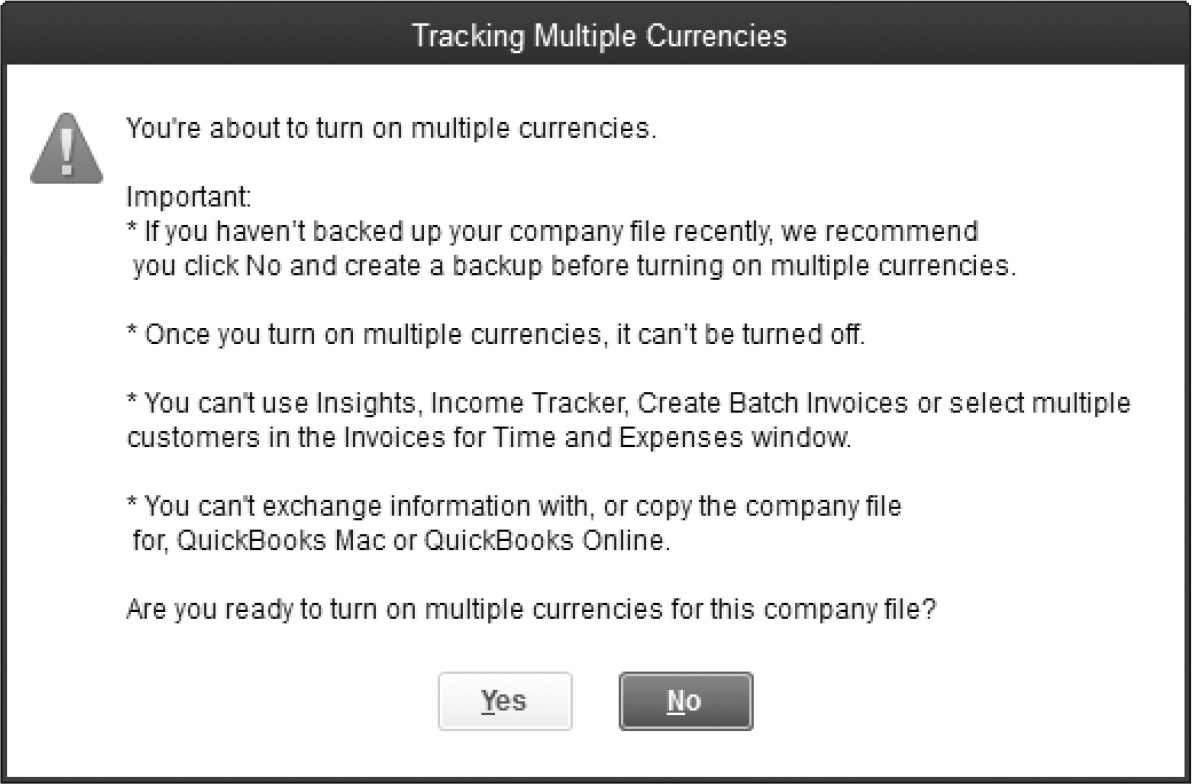
If you’ve already made a backup, as discussed in the previous section, you can continue. If not, stop the process and create your backup. Then enable multiple currencies.
The Preferences window offers the opportunity to change your home currency from U.S. dollars to another currency. Because QuickBooks tracks payroll, sales tax, online banking, and other basic data in U.S. dollars only, it is best to leave the home currency as the U.S. dollar.
![]()
Selecting Currencies
QuickBooks provides a long list of currencies you can use, but only the commonly used currencies are active. You can change the list of active currencies to suit your own needs. Remember that only active currencies appear in the drop-down list when you assign a currency to a customer or vendor.
Choose Company | Manage Currency | Currency List to open the Currency List window. If the list includes only active currencies, select the Include Inactive check box to see the entire list. To activate an inactive currency, click the X in the leftmost column to remove it; to make an active currency inactive, click the leftmost column to place an X in it.
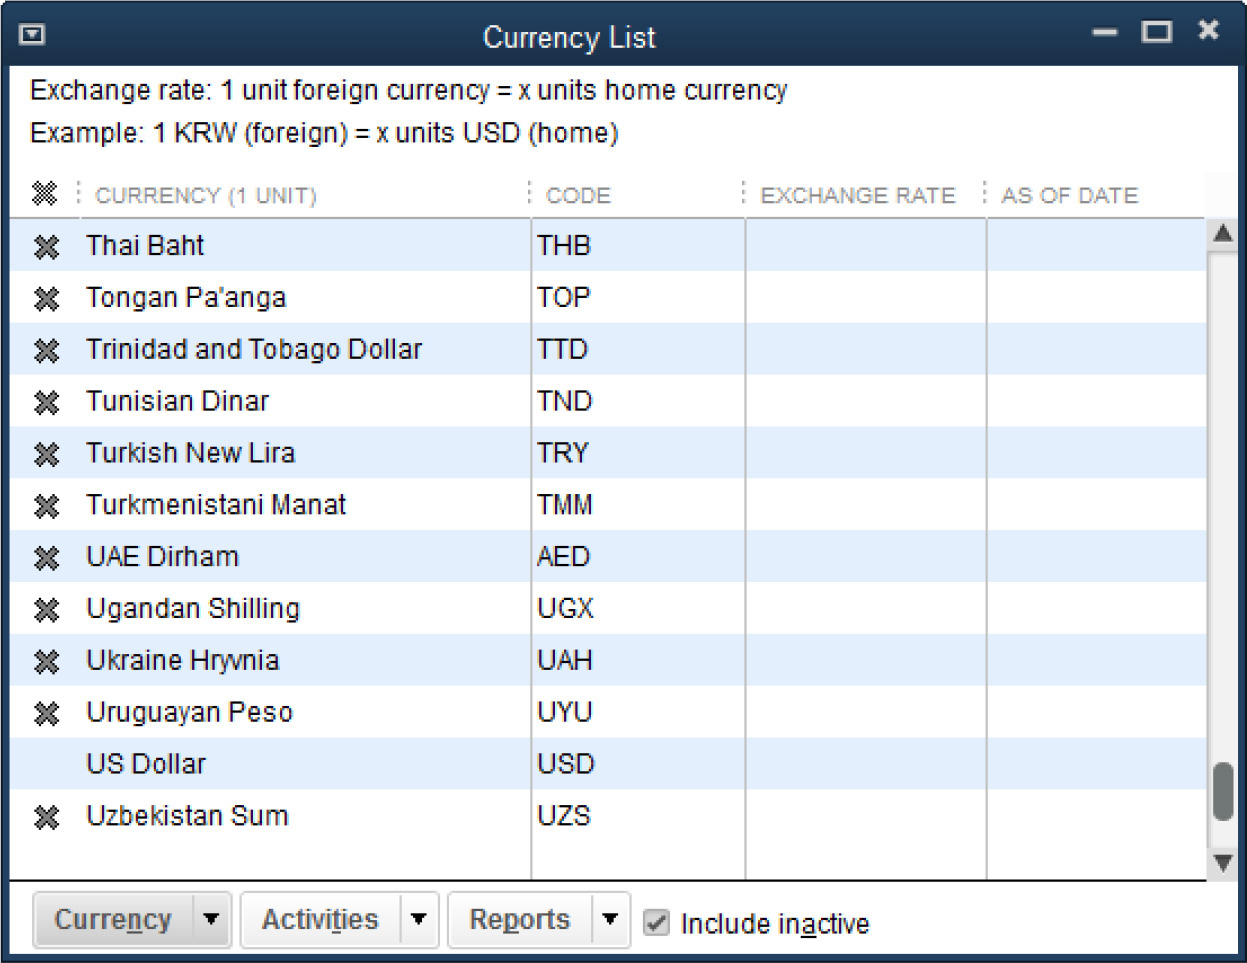
Notice that each currency has a three-letter abbreviation; for example, U.S. dollar is USD. You can, if necessary, create a currency if the one you need doesn’t appear on the list, but QuickBooks can’t download exchange rates for currencies you add manually. With the Currency List window open, press CTRL-N to open the New Currency dialog and configure the currency.
![]()
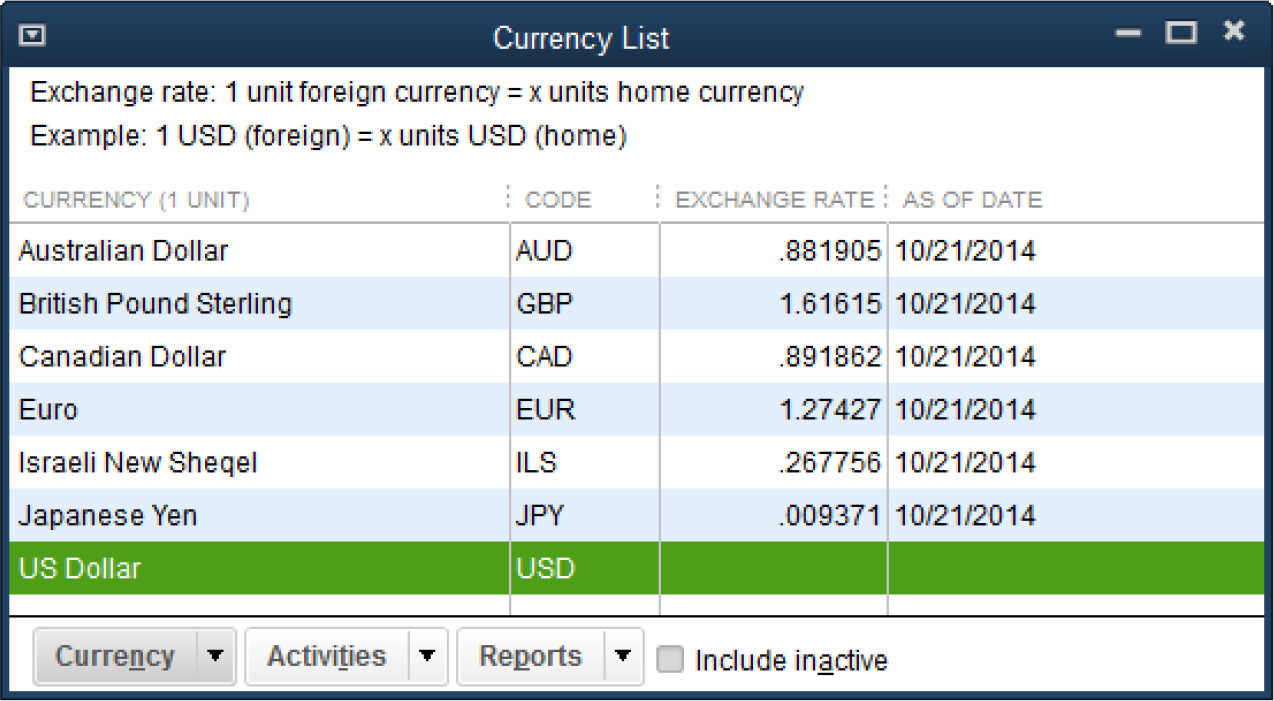
Tracking Exchange Rates
Because QuickBooks tracks both the customer/vendor currency and its worth in your home currency, you need to make sure the exchange rate is accurate. If the exchange rate isn’t accurate, your financial reports, which use U.S. dollars, won’t be accurate.
To update the exchange rate for all your active currencies, choose Company | Manage Currency | Download Latest Exchange Rates. QuickBooks goes online to get the current rates. All of this is done in the background so you don’t see an Internet page. When your active currencies have been updated, QuickBooks displays a success message, and you can now see the updated exchange rates in the Currency List.
![]()
Manage Customers and Vendors with Foreign Currencies
You need to identify the currency of every customer and vendor in your company file. QuickBooks automatically assigns your home currency (USD) to all customers and vendors, so you need to change only those that do business in a different currency.
When you create customers and vendors who do business in another currency, the basic steps are the same as creating any new customer or vendor in QuickBooks. The only differences are the existence of a Currency field in the New Customer or New Vendor dialog and the lack of an Opening Balance field when you select a currency other than USD. As you create a new customer or vendor and assign them a new currency, QuickBooks automatically adds an Accounts Receivable account and an Accounts Payable account for each currency.
By default, QuickBooks inserts US Dollar in the Currency field, but as shown in Figure 16-2, you can choose another currency from the drop-down list, which displays those currencies you’ve marked Active.

FIGURE 16-2 If new customers or vendors you create use a foreign currency, select their currency from the drop-down list.
Changing Currency for Existing Customers and Vendors
You can change the currency assignment for existing customers and vendors only if they have no transactions associated with their names. It doesn’t matter whether the current opening balance is $0.00; the existence of any transaction prevents you from changing the currency. For those customers and vendors, you must create a new entity with the new currency.
In addition, you cannot merge customers or vendors that use different currencies.
To edit the currency of an existing customer or vendor that has no existing transactions, open either the Customer or Vendor Center, select the name that you want to edit, and click the Edit icon in the upper-right of the Information pane. Select the currency from the drop-down list in the Currency field and click OK.
If you need to change the currency assignment for customers or vendors that have transactions associated with their name, or you need to do business with them in more than one currency, see the next section.
Creating New Customers and Vendors for Multiple Currencies
To create a new customer or vendor for existing accounts with a foreign currency specification, create the new entity using the following guidelines:
• In the Name field, use the same name as the existing entity, but add text tomake the name unique, as QuickBooks does not allow duplicates in the Name field.
• Add text after the name so the customer/vendor appears in the right place in dropdown lists in transaction windows. For example, a new customer is created to assign a new currency to an existing customer by adding a three-digit abbreviation for the customer’s currency to create a unique name. Remember, you still see the existing customer name in the Customers & Jobs List.
Remember, the data in the Name field doesn’t appear on transaction documents; instead, QuickBooks uses the data in the Company Name and Address fields (and, for vendors, there’s even a field labeled Print Name On Check As).
Managing Existing Open Transactions
When you create new customers and vendors, you have to manage existing open transactions using the original customer or vendor since you cannot accept or make a payment linked to the original entity using the new entity. When the opening balance for the original entity becomes zero, you can make the original customer or vendor inactive so the listing doesn’t appear in drop-down lists in transaction windows. Be sure to use the new entity you created for all new transactions.
![]()
Viewing Currency Data in Customer and Vendor Centers
After you’ve enabled multiple currencies, the Customer Center and Vendor Center display currency information in both panes.
In addition, QuickBooks makes the following changes automatically:
• In the List pane, the currency is noted for each customer/vendor and the current balance total displays using the customer/vendor currency, shown here.

• In the Transactions tab of the Details pane, theAmount and Open Balance columns display amounts in the currency of the customer or vendor.
You can change these default settings to make it easier to understand the data you see in the centers. In the List pane, you can add the current balance total in USD to save yourself the need to calculate the “real money,” as shown here.

You can either remove the Balance Total column for the foreign currency or display both Balance Total columns. If you frequently talk to vendors or customers about current balances, it’s handy to have the foreign currency balance in front of you, so having both amounts display makes sense. You can add (or remove) columns to the list by right-clicking anywhere in the list and choosing Customize Columns.
![]()
Create Transactions in Other Currencies
When you open a sales or payment transaction window, QuickBooks automatically takes care of the currency issues by adding fields to the transaction window. If the customer or vendor currency is USD, you won’t see much difference between the transaction window for multiple currencies and the same transaction window before you enabled multiple currencies. The only real difference is that the text “USD” appears for “Total” amounts.
If the customer or vendor is configured for another currency, the transaction window changes to provide the information you need. For example, Figure 16-3 shows an invoice for a customer in England.
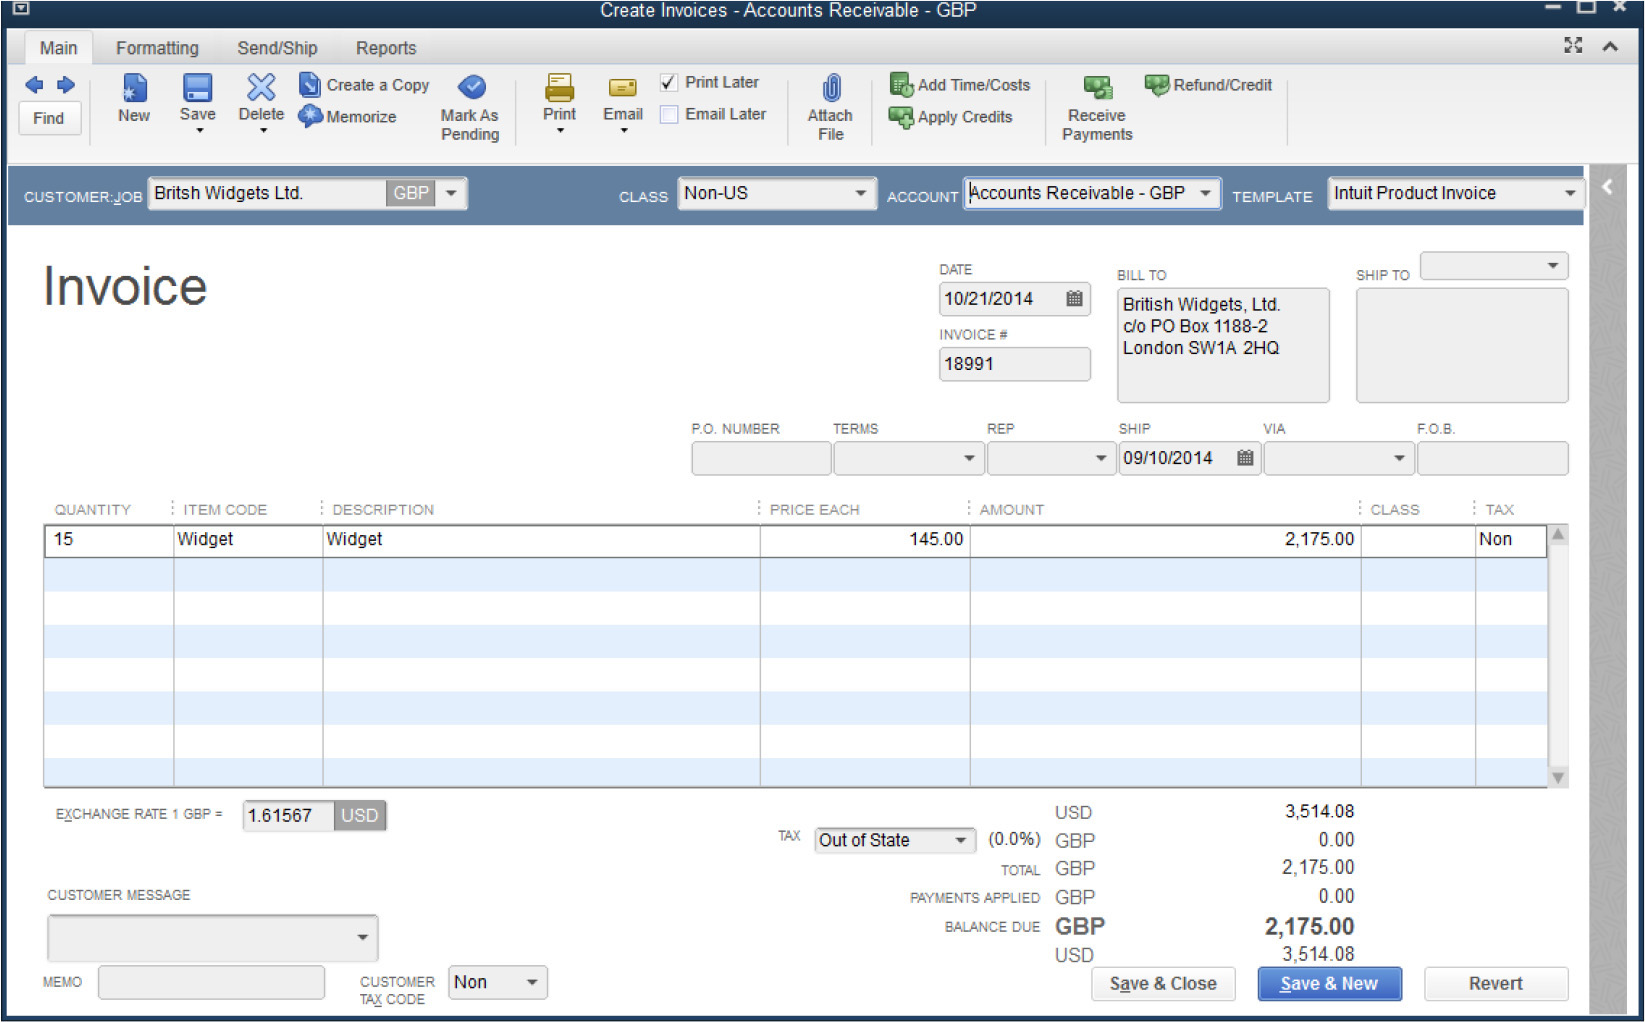
FIGURE 16-3 This invoice displays all the data needed to see the sales total for this invoice in both U.S. dollars and British pound sterling.
Notice the following about these transaction windows:
• The A/R account is specific to the currency. The same is true for vendor bills, which show A/P accounts for the appropriate currency.
• The amounts in the line items display in the customer/vendor currency.
• There are two totals: one for the transaction currency and one for USD.
• The Exchange Rate field displays the exchange rate used when this transaction was created.
The printed versions of transactions that are sent to customers (invoices, credits, and so on) and vendors (checks) do not display any fields or data related to USD; those fields appear on the screen only for your convenience.
Decide on an exchange rate update schedule that makes sense to you. Keep in mind that if the exchange rate changes between the day you enter an invoice or bill and the day you receive a payment or make a payment, QuickBooks automatically adds an Other Expense account named Exchange Gain or Exchange Loss to track the net amounts that accrue from adjustments in exchange rates for current open balances.
![]()
Create Reports on Multiple Currency Transactions
By default, all reports on customer and vendor transactions (such as Aging, Sales, Purchases, and so on) are displayed in your home currency (USD). You can modify the reports so they display the appropriate currencies:
• For Summary reports, click Customize Report, and in the Display Amounts In section, select The Transaction Currency.
• For Detail reports, click Customize Report and select Foreign Amount in the Columns list. You may also want to add the Currency column.
Memorize these reports, using a name that reflects the contents (such as Transaction Currency), so you don’t have to customize them each time you create them.
Installing QuickBooks on a Network
If your company has a computer network, there are several differences when you install QuickBooks. Soon after you launch the QuickBooks installer, you need to make some choices about how to install the program on your computer and other computers on your network. Although the choices are straightforward, during the installation, it may not be obvious which choice is right for you when more than one user needs simultaneous access to your QuickBooks file. This section provides you with the background information you need to know, along with some tips to help ensure your multi-user installation goes as smoothly as possible.
![]()
License Requirements for a Multi-user Installation
You’ll need to purchase a separate QuickBooks license for each computer that will have simultaneous access to your QuickBooks data file. In addition, all computers must use the same version, in this case, QuickBooks Pro 2015. QuickBooks Pro comes in one-, two-, or three-user license packs, allowing for up to three simultaneous users (with three unique user login names) to access a company file on a network. You can also purchase a two-user and a three-user pack that allows up to five simultaneous users accessing the company file. Again, each user is required to have a unique user login name.
![]()
Multi-user Installation Options
Multi-user installation options depend on the type of network configuration you plan to use. Specifically, the options you choose depend on whether you plan to use a peer- to-peer network, where one of the computers on the network runs QuickBooks and also stores the file, or a dedicated server to host your QuickBooks company file.
It’s beyond the scope of this section to provide instruction on which configuration is best in your situation and the steps required for setup. Contact your system administrator or a local IT expert for more information.
![]()
Installing QuickBooks on a Peer-to-Peer Network
First, ensure that all the computers that need access to the QuickBooks file are on a network running Windows 7, 8.1 (all editions except Starter and Basic), or Vista. Ensure your operating system is up to date with the latest release. Other important tasks to add to your preinstall checklist include these:
• Decide which computer on your network will hold the QuickBooks company file. It should be the fastest computer on your network, and it will be the first computer on which you install QuickBooks.
• Ensure that the other QuickBooks computers on the network have full read/write access to the folder in which you plan on storing your QuickBooks data file.
Insert the QuickBooks CD in your CD drive, or, if you downloaded the program, run the Download Manager to launch the Intuit QuickBooks Installer. A Welcome screen confirms the launch. Click Next and follow these steps:
1. Review and accept the terms of the Intuit Software End User License Agreement. Click Next.
2. In the Choose Your Installation Type window, select Custom And Network Options. Click Next.
3. The Custom And Network Options window opens, giving you three choices. Select the middle option, I’ll Be Using QuickBooks On This Computer, AND I’ll Be Storing Our Company File Here So It Can Be Shared Over Our Network. Click Next.
4. Enter your license and product information, found either on your CD or in the email received from Intuit that included your product download link. Click Next.
5. Enter your Intuit ID (which is likely the e-mail address you used when you purchased the software) and click the Validate button. If you don’t know your Intuit user name or password, or you don’t want to enter it at this time, click the “Skip this” link to advance to the next window.
6. If this is your first version of QuickBooks, you can accept the suggested folder that the installer recommends. If you’re upgrading from a previous version of QuickBooks, you’ll have the option of replacing your previous version with QuickBooks 2015 or changing the install location (which keeps the existing version of QuickBooks on your computer). Click Next, and then click the Install button.
For the next several minutes, you’ll see a series of informational windows about various QuickBooks features and additional services. Each window contains a status bar to keep you apprised of the progress of your installation.
When the installation is complete, you’ll receive a congratulations message and the option to open QuickBooks directly, get help getting started, or both. For the discussion that follows, select Open QuickBooks and click Finish.
File Hosting and the Database Server Manager
With your QuickBooks company file open, select File | Switch To Multi-User Mode. Click OK. When you turn on multi-user mode on the first computer on which you’ve installed QuickBooks, you automatically designate this computer as the host of your QuickBooks data file.
In addition, behind the scenes, QuickBooks installs a Database Server Manager program. Running this program along with QuickBooks ensures that other QuickBooks users will be able to access the company file even if the QuickBooks program is not open on this computer. However, the computer itself has to be turned on.
To open and run the Database Server Manager in Windows Vista and 7:
1. On the Windows Start menu, select All Programs | QuickBooks | QuickBooks Database Server Manager.
2. On the Scan Folders tab, click the Add Folder button to browse to the QuickBooks file you want to make available to other users. The default location that QuickBooks uses to save company files (which will have a .qbw extension) is C: UsersPublicDocumentsIntuitQuickBooksCompany Files.
3. When the folder where your QuickBooks file resides is listed in the Folders That Contain QuickBooks Company Files box, click the Scan button. Your file will be configured to ensure that others on the network can open your QuickBooks file.
To open and run the Database Server Manager in Windows 8.1:
1. Find QuickBooks in the Apps menu and select the QuickBooks Database Server Manager (see Figure 16-4).
2. On the Scan Folders tab, click the Add Folder button to browse to the QuickBooks file you want to make available to other users. The default location that QuickBooks uses to save company files (which will have a .qbw extension) is C: UsersPublicDocumentsIntuitQuickBooksCompany Files.
3. When the folder where your QuickBooks file resides is listed in the Folders That Contain QuickBooks Company Files box, click the Scan button. Your file will be configured to ensure that others on the network can open your QuickBooks file.
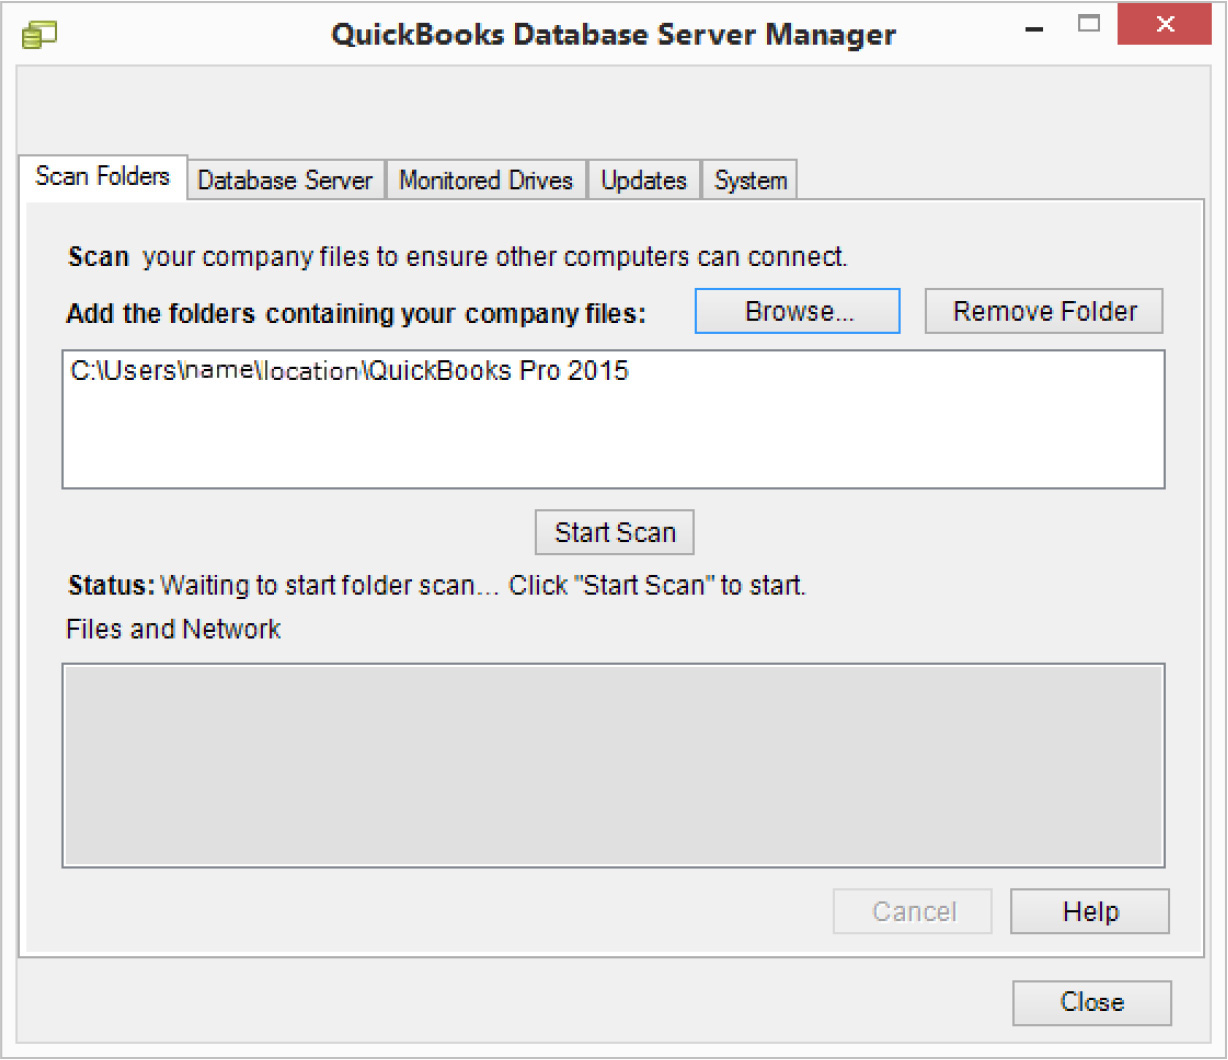
FIGURE 16-4 Use the QuickBooks Database Server Manager to make your company file available to other network users.
Installing QuickBooks on the Client Computers
With your QuickBooks host computer up and running, you’re ready to install the program on the other networked computers. Follow these steps:
1. Complete Steps 1 and 2 from the previous section.
2. In the Custom And Network Options window, select the first option, I’ll Be Using QuickBooks On This Computer. Click Next.
3. Enter your license and product information, found either on your CD or in the e-mail received from Intuit that included your product download link.
4. Enter your Intuit ID (which is likely the e-mail address you used when you purchased the software) and click the Validate button. If you don’t know your Intuit user name or password—or you don’t want to enter it at this time—click the “Skip this” link to advance to the next window.
5. If this is your first version of QuickBooks, you can accept the suggested folder that the installer recommends. If you’re upgrading from a previous version of QuickBooks, you’ll have the option of replacing your previous version with QuickBooks 2015 or changing the install location (which keeps the existing version of QuickBooks on your computer). I recommend you select the option Change The Install Location. Click Next, and then click the Install button.
For the next several minutes, you’ll see a series of informational windows about various QuickBooks features and additional services. Each of these windows contains a status bar to keep you apprised of the progress of your installation.
6. When the installation is complete, you’ll receive a congratulations message and the option to open QuickBooks directly, get help getting started, or both.
7. In the No Company Open window, click the Open Or Restore An Existing Company button.
8. In the Open Or Restore Company window, select the Open A Company File option. Click Next.
9. Browse to and open your QuickBooks company file located on the QuickBooks host computer.
After you click Finish, and before proceeding to the No Company Open window, QuickBooks may ask if you want to use this computer to host multi-user access. Answer No to ensure that the first computer that you installed QuickBooks on remains the host computer. If you answer Yes to this question, this computer will become the host, which means that not only will QuickBooks need to be open on this computer, but a user will need to be logged into the company file before any of the other users on the network can work in the file.
![]()
Installing QuickBooks on a Client-Server Network
To use QuickBooks on a network with a dedicated server, you must be running one of the following: Vista (with User Account Control [UAC] on), 7 or 8.1 (with UAC on), or Windows Server 2008 or 2012 editions. Once you’ve confirmed that your server operating system meets one of these requirements, follow these installation instructions:
1. On the server computer, insert the QuickBooks CD into the CD drive; if you downloaded the program, run the Download Manager to launch the Intuit QuickBooks Installer. A Welcome screen confirms the launch. Click Next.
2. Review and accept the terms of the Intuit Software End User License Agreement. Click Next.
3. In the Choose Installation Type window, select the Custom And Network option. Click Next.
4. The Custom And Network Options window opens giving you three choices. Select the last option, I Will NOT Be Using QuickBooks On This Computer. I Will Be Storing Our Company File Here So It Can Be Shared Over Our Network. Click Next.
5. QuickBooks suggests an installation location for the Database Server Manager. You can change the location if you wish by clicking Change The Install Location. Click Next, and then click the Install button.
6. For the next several minutes, you’ll see a series of informational windows about various QuickBooks features and additional services. Each of these windows contains a status bar to keep you apprised of the progress of your installation. When the installation of the Database Server Manager is complete, you’ll receive a congratulations message and the option to get help getting started.
Installing Both QuickBooks and the Database Server Manager on Your Server
Selecting the I Will NOT Be Using QuickBooks On This Computer option installs the QuickBooks Database Server Manager program and not the full version of QuickBooks. Although this is a perfectly acceptable installation option when installing in a client- server environment, it’s also acceptable to install both QuickBooks and the Database Server Manager on the server computer. This can be a good idea because two very important utilities are built into the full QuickBooks program: the verify and rebuild utilities. These utilities should only be run locally, meaning that the QuickBooks file being verified and rebuilt should reside on the same computer as the full QuickBooks program.
When both QuickBooks and the Database Server Manager are installed, the QuickBooks program will be “silent” and used only occasionally for maintenance purposes. As a result, it will not affect your licensing requirements, but it will give you peace of mind knowing that you can easily perform routine maintenance on your QuickBooks file when needed.