
Chapter 9
Establishing QuickBooks Payroll
In this chapter:
• Tracking time
• Formatting timesheets
• Running, editing, and printing timesheets
• Working with mileage
• Learning about payroll in QuickBooks
• Creating employee templates and setting them up
All the tools you need to track time and mileage and use this information to recover reimbursable costs from customers, develop an accurate job-costing system, analyze expenses, and pay employees are available in QuickBooks, and are covered in this chapter. QuickBooks includes built-in time tracking that lets you record the amount of time you and your staff spend completing a project or doing work for either a customer or for your company.
Set Up Time Tracking
QuickBooks may already have turned on the built-in time-tracking features for you, depending on your responses when setting up your company. To see if time tracking is enabled, choose Edit | Preferences from the QuickBooks menu bar. Select Time & Expenses by scrolling to the last category in the left pane, and click the Company Preferences tab. Make sure the Yes option is selected.
By default, QuickBooks assumes your work week starts on Monday. However, some businesses use a different work week such as a Sunday-to-Saturday pattern for tracking time. If you’re tracking time for employees and you plan to use the timesheets for payroll, ensure you have matched the work week to the week your pay period covers.
![]()
Adding Time Trackers
You can track time for your employees, outside contractors (vendors), or yourself. Everyone who must keep track of his or her time must first exist in QuickBooks and, of course, fill out a timesheet.
If you’re running the QuickBooks payroll feature, you already have employees in your QuickBooks system, and you can use timesheets to track their time. You can also use their timesheet data to create a paycheck, using the number of hours reported on the timesheet. For this to work, however, you must modify the employee record as follows:
1. Choose Employees | Employee Center to open the Employee Center, and click the Employees tab to display the list of employees.
2. Double-click the listing of the employee you want to link to time tracking and click the Payroll Info tab.
3. Select the Use Time Data To Create Paychecks check box on the bottom left. Click OK.
Your employees can track time without being linked to time tracking so you can create job-costing reports or invoice customers for their time. Even if you do not use QuickBooks for payroll, you can create employees in the Employee Center to track time and use the timesheet data for an outside payroll service.
Tracking Vendor Time
Any vendor in your system that you pay for his or her time can have that time tracked so you can bill your customers. Often, these vendors are outside contractors or subcontractors. To bill the customer, you just record the time in a timesheet and mark the hours as “billable.”
Tracking Other Workers’ Time
If you need to track the time of people who are neither employees nor vendors, use the Other Names list. For example, if you pay employees using QuickBooks payroll, but you take a draw instead of a paycheck, add your name to the Other Names list to track your own time. If your company is a proprietorship or a partnership and you have no employees, enter the owner or partner names in the Other Names list to track time.
![]()
Adding the Tasks
Many tasks you track in timesheets already exist in your system as service items and are the items you use when you invoice customers for services. However, because you can use time tracking to analyze the way people in your organization spend their time, you may want to add service items that are not connected to tasks performed for customers.
For example, if you want to track the time people spend performing administrative tasks, add a service item called Administrative to your Item List. You can even be more specific by naming the particular administrative tasks you want to track, such as bookkeeping, equipment repair, and so on. To enter new items, choose Lists | Item List from the menu bar. Press CTRL-N to open the New Item dialog. Select Service as the item type, as only service items are tracked in timesheets, and name the new item.
• If you’re specifying administrative tasks, create a service named Administration and then make each specific administrative task a subitem of Administration.
• Don’t put an amount in the Rate box. You can enter the amount when you make the payment (via payroll or vendor checks).
• Since QuickBooks requires that you assign an account to a service, choose or create a “dummy” (or placeholder) revenue account, such as Other Revenue or Time Tracking Revenue. No money is ever posted to the account, because you don’t ever sell these services directly to customers.
Working with Timesheets
QuickBooks has two methods for recording the time spent on tasks: Single Activity and Weekly Timesheet. Single Activity is a form you use to enter what you did when you performed a single task at a specific time on a specific date. For example, a Single Activity form may record the fact that you made a telephone call on behalf of a customer, you repaired some piece of equipment for a customer, or you performed some administrative task for the company.
The Weekly Timesheet is a form in which you indicate how much time and on which date you performed work in a given week. Each Weekly Timesheet entry can also include the name of the customer for whom the work was performed. You can also print a blank timesheet that can be filled out manually and entered into QuickBooks all at once at the end of a week.
After you fill out and save a Single Activity form, you can open a Weekly Timesheet to view all the single activities that have been entered within that week as they are inserted.
![]()
Setting the Format for Displaying Time
When you enter time in the timesheet forms, you can use either the minutes (hh:mm) format or a decimal format (6.5). To establish a default, choose Edit | Preferences and in the General category select the Company Preferences tab. Use the options in the Time Format section of the dialog to select the format you prefer. If you set the preference to decimal and then enter time as 1:30, when you press TAB to move to the next field, QuickBooks changes the entry to 1.50 (or the other way around when you choose Minutes).
![]()
Tracking a Single Activity
To track one event or task with a Single Activity form, choose Employees | Enter Time | Time/Enter Single Activity. Fill out the following fields:
• Date Default is the current date. While you can change the date to an earlier one, you cannot change the date if you’re using the stopwatch.
• Name Choose a name from the drop-down list of vendors, employees, and Other Names.
• Customer:Job Select the customer or job, even if the customer is not to be billed.
• Service Item Choose the item from the drop-down list, and enter the amount of time in the Duration box.
• Billable If this time is to be billed, check the Billable check box at the right of the timesheet.
• Payroll Item If available, select the payroll item that applies to this time. This only appears when you have linked the employee to time tracking.
• Class Select the class from the drop-down list. If you’ve linked the employee to the time-tracking system and also enabled class tracking, the class field does not appear unless you turn on the Earnings Item option in Payroll & Employees Preferences.
• Notes Enter any appropriate information. These notes can be transferred to both the invoice and job reports.
When the activity form is complete, click Save & New to fill out another Single Activity form or click Save & Close to finish.

To track the time on any single activity, click the Start button in the Duration box of the Time/Enter Single Activity window as you begin the task. To pause the counting when you’re interrupted, click Pause. Then click Start to pick up where you left off. To stop timing, click Stop. The elapsed time displays. The stopwatch always displays time in the hh:mm:ss format. If you set your format preference to decimal, QuickBooks converts the time when the stopwatch is stopped.
![]()
Using Weekly Timesheets
A Weekly Timesheet records the same information as the Single Activity form, except that the information is recorded in week-at-a-time blocks, and you have the option to enter the same timesheet information in batches for both employees and nonemployees.
To use the Weekly Timesheet form, choose Employees | Enter Time | Use Weekly Timesheet. Use the instructions that follow to fill out the timesheet.
1. Select either an individual employee or a vendor name from the drop-down list in the Name field. Optionally, choose either Multiple Names (Payroll) or Multiple Names (Non-Payroll) (these options are located at the top of the Name drop-down list) to create multiple timesheets with the same information for the names you’ve selected in your list. This latter option is useful if you’ve got a team of employees or contractors working on the same project and performing the same work for the week.
2. By default, the form opens to the current week; click the calendar icon if you need to select a different week.
3. In the Customer:Job column, select the customer or job connected to the activity.
4. In the Service Item column, select the appropriate service item.
5. For an employee whose paycheck is linked to timesheets, use the Payroll Item column to select the payroll item that fits the activity. (If the name selected in the Name field is not an employee whose paycheck is linked to timesheets, the Payroll Item column disappears.)
6. In the Notes column, enter any necessary notes or comments.
7. Click the column that represents the day in which an activity occurred and enter the number of hours worked on this task. Repeat across the week for each day that the same activity was performed for the same customer or job.
8. Move to the beginning of the next row to enter either a different activity or the same activity for a different customer, repeating this action until the timesheet is filled in for the week.
9. For each row, indicate whether the time is billable in the Billable column. Click the check box to remove the check mark in the Billable column if the time on this row is not billable. QuickBooks marks all time entries that are linked to a customer as billable.
10. Click Save & New to create a timesheet for a different week. Click Save & Close when you are finished entering time.
You can copy the previous week’s timesheet by clicking the Copy Last Sheet button after you enter the current date in the Timesheet window and select a name. This is useful for workers who have similar timesheet data every week. This description frequently applies to your office staff or to outside contractors who are performing large jobs that take multiple weeks. For some employees whose work is usually for the office and not charged to a customer, the timesheet may be identical from week to week.
Reporting Timesheet Information
Before you use the information on the timesheets to invoice customers or pay workers, you should go over the data on the timesheet reports. You can view and customize reports, edit information, and print the original timesheets.
![]()
Running Timesheet Reports
To run reports on timesheets, choose Reports | Jobs, Time & Mileage. The following reports provide information on time tracking:
• Time By Job Summary Reports the amount of time spent for each service on your customers and jobs.
• Time By Job Detail Reports the details of the time spent for each customer and job, including dates and whether or not the time was marked as billable. A billing status of Unbilled indicates the time is billable but hasn’t yet been used on a customer invoice.
• Time By Name Reports the amount of time each user tracked.
• Time By Item Shows an analysis of the amount of time spent on each service your company provides, including the customers for whom the services were performed.
![]()
Editing Entries in a Report
While you’re browsing the report, you can double-click an activity listing to navigate to the original entry. You can make changes in the original entry, such as selecting or deselecting the billable option, or change the Notes field by adding a note or editing the content of the existing note. Before you use the timesheets for customer billing or payroll, make sure you examine them and make any needed corrections. In fact, you may want to take this step before you view any of the Jobs, Time & Mileage reports.
The most common revision is the billable status. If outside contractors or employees are filling out timesheets, it’s not unusual to have some confusion about which customers receive direct-time billings. In fact, you may have customers to whom you send direct-time bills only for certain activities and provide the remaining activities as part of your basic services.
To check timesheets, open a new weekly timesheet and enter the name of the person connected to the timesheet you want to view. Use the Previous or Next arrows at the top of the Timesheet window or use the calendar icon to move to the timesheet you want to inspect. Then edit the information as necessary. If needed, change the number of hours for any activity item, change the billable status, and view (and edit if necessary) any notes. If you’ve already used the timesheet data to create an invoice for the customer or to pay the employee, the changes you make to the timesheet do not automatically update these documents.
![]()
Printing Weekly Timesheets
Employees often print their weekly timesheets and deliver them to the person responsible for monitoring and managing employee hours. Frequently, this is the same person who handles your payroll-related activities. To print timesheets, choose File | Print Forms | Timesheets from the QuickBooks menu bar to open the Select Timesheets To Print window. In this window, you can do the following:
• Change the date range to match the timesheets you want to print.
• By default, all timesheets are selected. To remove a timesheet, select its listing and click the column with the check mark to deselect that listing. You can click Select None to deselect all listings and then select and add check marks to one or more specific users.
• To print any notes in their entirety, select the Print Full Activity Notes option. Otherwise, the default selection to print only the first line of any note is enabled.
The Select Timesheets To Print dialog has a Preview button, and clicking it displays a print preview of the selected timesheets. If you click the Print button in the Preview window, the timesheets are sent to the printer immediately, giving you no opportunity to change the printer or any printing options. Clicking the Close button in the Preview window returns you to the Select Timesheets To Print dialog.
Click OK to open the Print Timesheets window, where you can change the printer or printing options. You should change the number of copies to print to match the number of people to whom you’re distributing the timesheets. Note the last column, which indicates the billing status. The entries are codes, as follows:
• B Billable but not yet invoiced to the customer
• N Not billable
• D Billable and already invoiced to the customer
![]()
Invoicing Customers for Time
Once you’ve entered time, marked it as billable, and reviewed it for accuracy, it’s easy to invoice your customer right from the Create Invoice window. From the Customers menu, select Create Invoices and then select a customer name from the Customer:
Job drop-down list. The first time you select a customer for which there is a timesheet entry, QuickBooks shows a message informing you that the customer or job you’ve selected has outstanding billable time. You are prompted to either select the outstanding billable time (as well as any costs) to add to the invoice or exclude time and costs now and leave them available for invoicing at a later date. You can also have QuickBooks save your choice by checking the Save This As A Preference check box.
If you choose the option to add the outstanding billable time to your invoice, QuickBooks displays the Choose Billable Time And Costs window. Select the Time tab to view all the unbilled time assigned to that customer or job. Click the Select All button to invoice your customer for all the time that appears in this window, or place a check mark next to only those hours that you’re ready to invoice.
By default, each time entry that has a different service item will appear as a separate line item on the invoice. To combine the hours for all items in this window as one line item on the printed copy of the invoice (the detailed view will still appear on your screen), place a check mark in the Print Selected Time And Costs As One Invoice Item check box at the bottom of the window. Clicking the Options button gives you additional ways to customize how information from timesheets is included in invoices.
Tracking Mileage
QuickBooks gives you a way to track your vehicles’ mileage, as shown next. You can use the mileage information to track the expenses connected to vehicle use, to use mileage as part of your job-costing efforts, to bill customers for mileage expenses, or to maintain records for your vehicle-use tax deduction. Your accountant may be able to use the vehicle mileage data on your income tax return. You can deduct either the actual mileage expense or your other vehicle expenses; you can’t deduct both. Your accountant, working with the figures you provide as a result of mileage tracking, will make the decision.
To track a vehicle, you first need to add that vehicle to your Vehicle list. Once the vehicle is in your QuickBooks system, you can begin tracking its mileage. Of course, you also need to make sure that everyone who uses the vehicle is tracking mileage properly, so you should create, print, and distribute a form for this purpose, with the following categories to fill in, such as the one shown in Table 9-1.

TABLE 9-1 Suggested Mileage Form
![]()
Entering Mileage Rates
To track the cost of mileage, make sure you have accurate mileage rates in your system. These change frequently, so you’ll have to keep up with the latest IRS figures. QuickBooks calculates the cost of mileage based on the information you enter. To get the current rate, check with the IRS (www.irs.gov) or ask your accountant. To enter mileage rates for your own use, use the following steps:
1. Choose Company | Enter Vehicle Mileage to open the Enter Vehicle Mileage dialog.
2. Click the Mileage Rates button on the toolbar to open the Mileage Rates dialog.
3. Select a date from the calendar as the Effective Date.
4. Enter the IRS rate for that date.
5. Click Close.
6. Close the Enter Vehicle Mileage dialog (unless you’re using it to enter mileage).
7. The Mileage Rates dialog accepts multiple dates and rates. When you track mileage, QuickBooks uses the appropriate rate, based on the date of your mileage entry, to calculate costs.
![]()
Creating a Mileage Item
If you plan to invoice customers for mileage expenses, you must create an item (call it Mileage, Travel, or something similar). The item you create can be either a Service or Other Charge type.
• If you want to charge your customers for mileage as a reimbursable expense and post your reimbursements as income, use an Other Charge item type and select the option This Item Is Used In Assemblies Or Is A Reimbursable Charge. Then enter the appropriate expense and income accounts.
• If you want to charge your customers for mileage and reduce your mileage expenses with reimbursed amounts, select the expense account to which you post your mileage expenses.
It’s important to understand that the mileage rate you entered in the Mileage Rates dialog is not automatically transferred to the item you create for mileage. Therefore, you must manually fill in the rate for the item and update it when the IRS rate changes.
You can use the same rate you used in the Mileage Rates dialog or enter a different rate to create a markup—or even a markdown, if you wish.
![]()
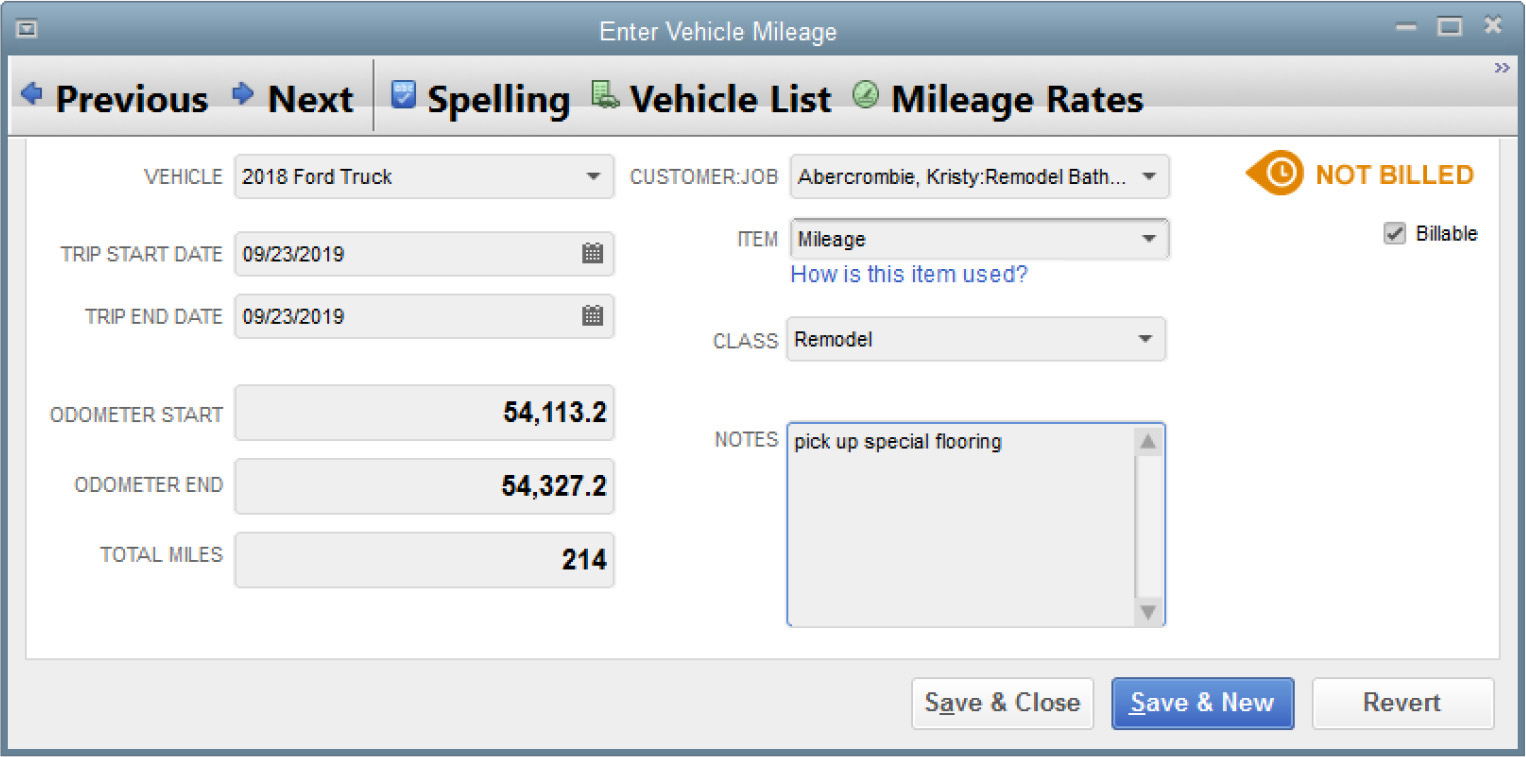
Entering Mileage
After you’ve configured your company file for mileage charges, you can track the mileage in the Enter Vehicle Mileage dialog as follows:
1. Choose Company | Enter Vehicle Mileage.
2. Select the appropriate vehicle from the drop-down list in the Vehicle field and enter the following data:
• The dates of the trip.
• The odometer readings (QuickBooks calculates the total miles for you). You can skip the odometer readings and enter the total mileage manually, but entering the odometer numbers creates a report entry that’s closer to what an IRS auditor wants to see (the IRS likes “logs” that include odometer readings).
• If you want to bill the customer for mileage, place a check mark in the Billable check box and select the Customer:Job, the item you created for mileage, and the class (if you’re tracking classes).
• If you don’t want to bill a customer but you want to track job costs, select the Customer:Job, but don’t place a check mark in the Billable check box.
You can add mileage charges to customer invoices in the same fashion as time charges.
![]()
Creating Mileage Reports
QuickBooks includes four vehicle mileage reports, found in Reports | Jobs, Time & Mileage. Select the report from the submenu. If you’re working in the Enter Vehicle Mileage dialog, the reports are available in the drop-down list when you click the arrow next to the Mileage Reports button at the top of the dialog. See Table 9-2 for more information.

TABLE 9-2 Vehicle Mileage Reports
Payroll Setup
Now that you understand how QuickBooks tracks hours, you can process your payroll through QuickBooks, as this section explains. If you have not yet set up payroll, consult with your accountant for advice on choosing the payroll option that fits your business needs and to ensure that your setup is fully compliant with your local and state taxing authorities.
![]()
QuickBooks Payroll Services
QuickBooks offers a variety of payroll services designed to work with your company data. Here’s a brief recap of what’s currently available:
• Basic Payroll Provides tax tables and automatic calculations of paycheck deductions and employer expenses for up to three employees. No tax forms are included, so you either need to work with your accountant on tax filings or prepare your tax forms manually. QuickBooks makes it easy to prepare tax forms manually by providing detailed reports in Excel.
• Enhanced Payroll Adds tax forms and e-filing for both federal and state reporting.
• Full Payroll Turns the job of running your payroll, depositing withholdings, paying employer contributions, and printing and filing government forms over to QuickBooks. All you have to do is enter your employees’ hours.
Additional plans are available, such as Intuit’s Online Payroll service, which does not require that you use QuickBooks for your accounting, and Enhanced Payroll for Accountants, which lets you prepare payroll for up to 50 companies (including preparing federal and state forms) and includes After The Fact payroll data entry capability. If you’re looking for a complete solution, consider the Intuit Full Service option—you enter your employees’ time, and Intuit handles the rest.
![]()
Enabling a QuickBooks Payroll Service
As you begin, be sure the Full Payroll feature preference is enabled in your QuickBooks company file by choosing Edit | Preferences | Payroll & Employees | Company Preferences | Full Payroll. Selecting this option enables payroll-related information fields for employees and adds a Turn On Payroll button in the Employee section of the QuickBooks Home page. Click the Turn On Payroll button to learn about and sign up for one of the QuickBooks payroll offerings.
When the sign-up process is completed, download the files you need to run payroll. The new files are automatically added to your QuickBooks system; you don’t have to do anything to install them. In addition to the payroll software, the current tax table is added to your system. After payroll is installed, your Employees menu has all the commands you need to run payroll.
![]()
Processing Your Payroll Manually in QuickBooks
If you have only one or two employees, you may choose to run a manual payroll in QuickBooks. Remember that when you process your payroll manually, no withholding or tax will automatically be calculated for any paycheck you create; you have to sign up for the QuickBooks payroll service for that. You can use your own printed tax table (Employer’s Circular E from the IRS), calculate the deductions, and enter them manually when you create paychecks.
However, you need to set up your file to allow you to enter these amounts manually, and the only way to tell QuickBooks you want to exercise this option is via the Help menu.
1. Select QuickBooks Help from the main Help menu to open the Have A Question? window.
2. In the Search field, type manual payroll, and then click the magnifying glass (search) icon. QuickBooks displays several Help articles. Click the article titled “Process Payroll Manually (Without A Subscription To QuickBooks Payroll).”
3. Follow the instructions as shown in the link “If You Prefer to Process Your Payroll Manually.” If you do elect to process your payroll manually, you’ll still need to set up Employees and Payroll items and track Payroll Liabilities.
The decision to run a manual payroll should be made only after careful consideration and consultation with your accountant and you have only one or two employees. It is up to you to ensure that the calculations are correct and that you have a workable system to remit withholdings to the appropriate agency in a timely manner.
![]()
Setting Up Your Payroll
To produce accurate paychecks, you need to add accounts to your chart of accounts; create payroll items (salary, wages, and so on); and identify the payroll taxes you have to withhold, the payroll taxes you have to pay as an employer, and company contributions or deductions. You also need to set up tax information for each employee, such as dependents and deductions.
You can set up these payroll elements either using the Payroll Setup wizard or manually. The following sections cover the steps in setting up payroll manually, and later you’ll learn to use the Payroll Setup wizard. Review both to decide which way you want to do the setup.
Add Payroll Accounts to the Chart of Accounts
You may need to create new accounts in your chart of accounts for payroll. QuickBooks automatically adds the Payroll Liabilities and Payroll Expenses accounts when you enable payroll. Use subaccounts for payroll liabilities and payroll expenses, because it makes it easier to keep track of individual liabilities and expenses. Be sure to link your payroll items to these subaccounts and not to the parent account. Then, when you create reports, any balances in the subaccounts are totaled in the parent account.
Add Vendors
Running payroll creates liabilities for payroll taxes and employee benefits withheld or deducted. In QuickBooks, the government agency or employee benefit provider to which you remit these withheld amounts needs to be a vendor. Then, when you set up the payroll item that tracks the withholding or deduction, you assign that item to the appropriate vendor.
For withholding of federal income taxes, Medicare, Federal Insurance Contributions Act (FICA), and the matching employer Medicare and FICA payments, you can assign the United States Treasury Department as the vendor. Since January 1, 2011, the IRS requires that all payroll tax deposits be made electronically using the Employer Federal Tax Payment System (EFTPS). EFTPS deposits can be made online or by telephone, from the convenience of your home or office. If you haven’t already done so, you’ll need to go to the EFTPS website (www.eftps.gov) to learn more and enroll.
For local and state income tax, unemployment, disability, workers comp, and deductions for benefits such as health insurance, set up a vendor for each agency you need to pay. Most states now offer electronic payments for payroll remittances on their websites, but if you use checks, you probably have forms or coupons that should accompany your payments.
![]()
Adding Payroll Items
QuickBooks uses payroll items to list compensation or deduction amounts on a payroll check. The number of individual payroll items that make up a paycheck may be more than you thought. Consider the items in Table 9-3, which are typical of many businesses.
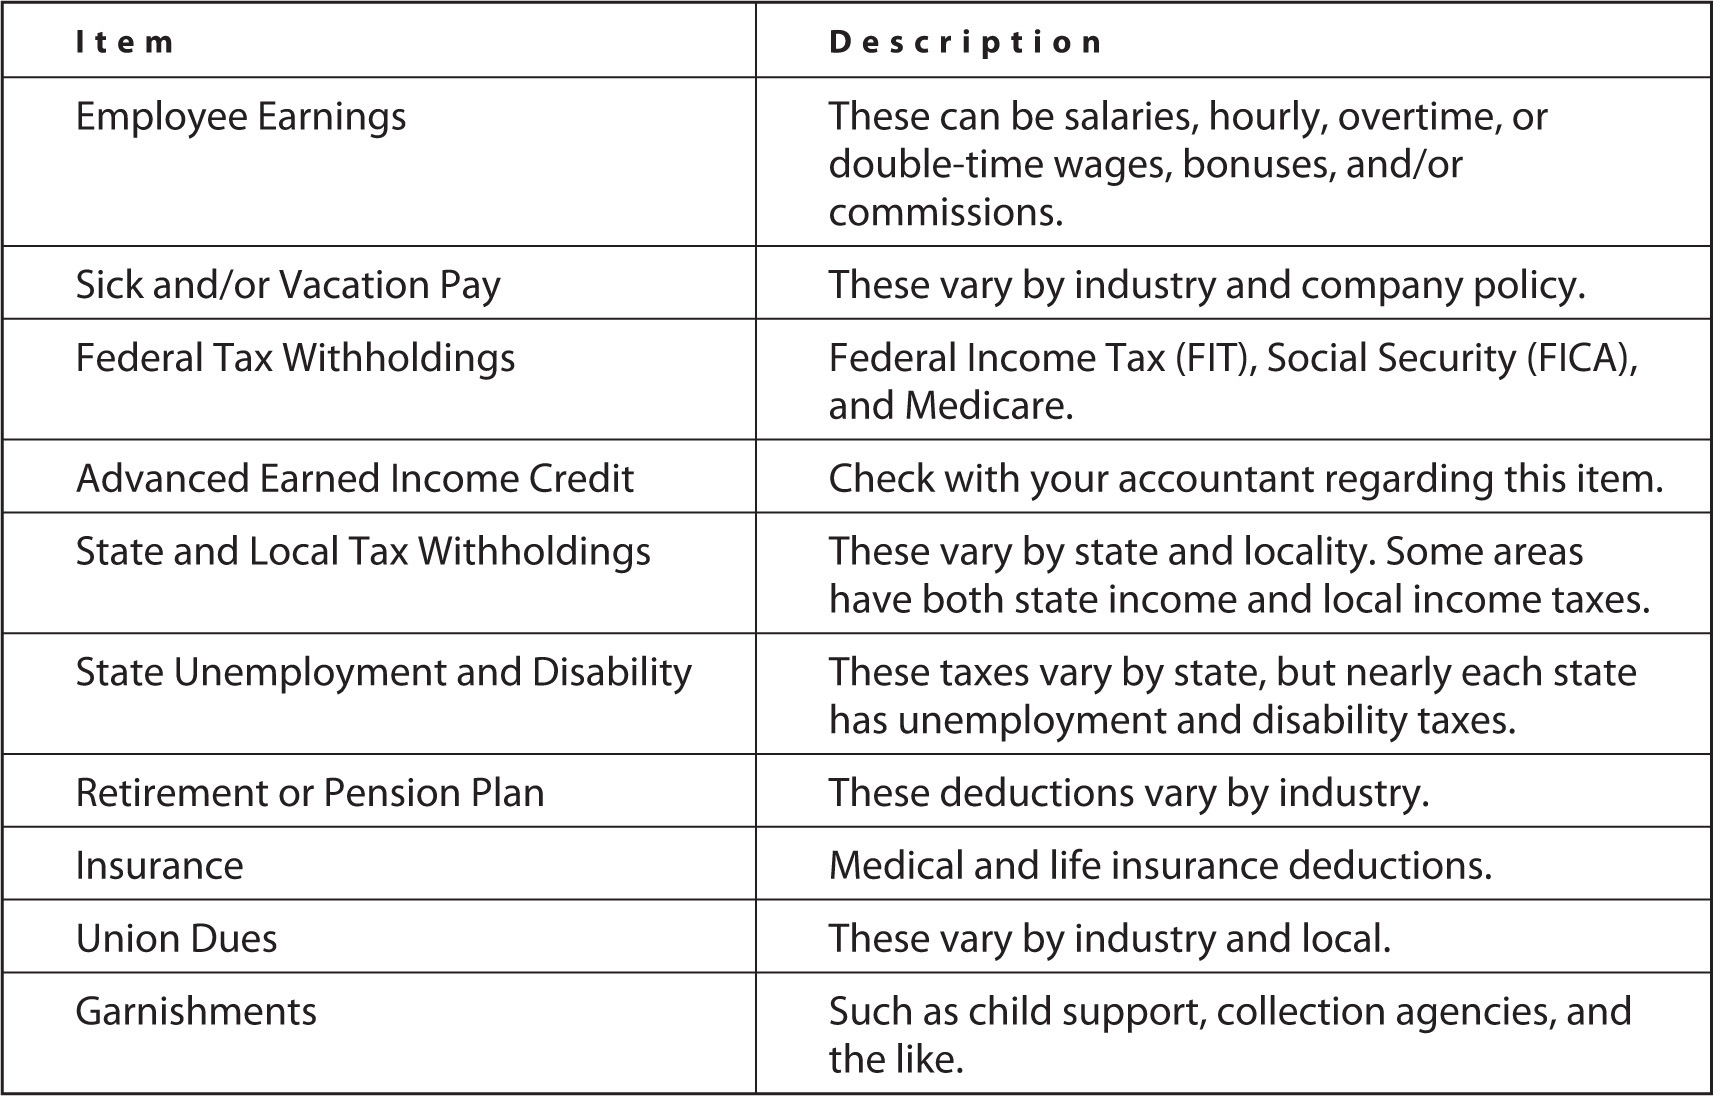
TABLE 9-3 Payroll Items
You can view your payroll items and create new payroll items by choosing Lists | Payroll Item List to open the Payroll Item List, as shown next. While QuickBooks adds some items to the list when you enable payroll services, you are usually missing local taxes, medical benefits deductions, and other payroll items. Also, the items that do exist may be missing information about the vendor, so you’ll have to edit them to add that information.
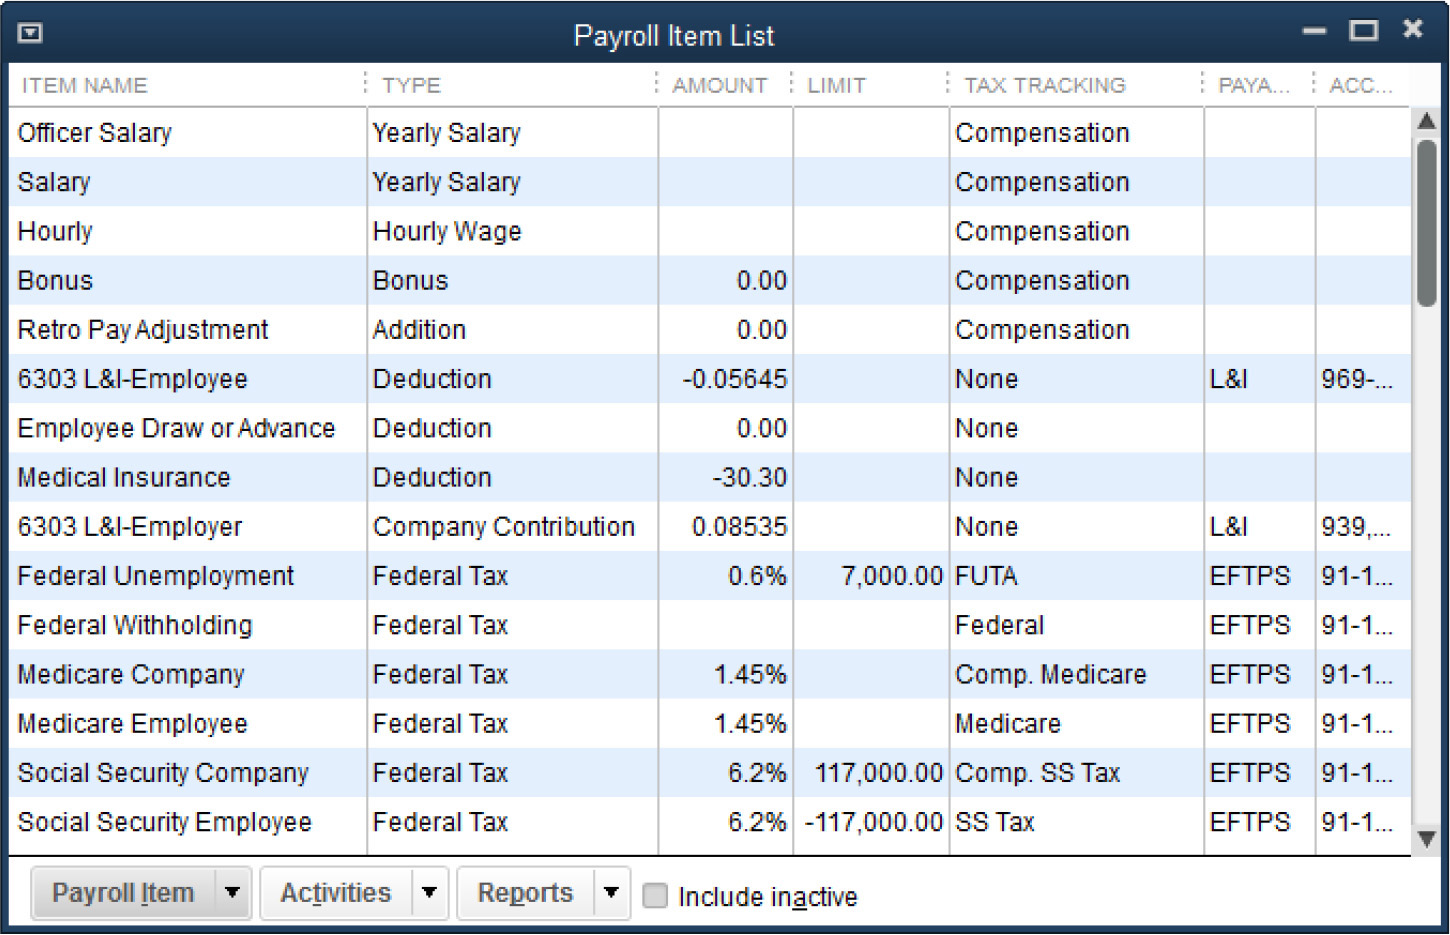
To add a new payroll item, from the Payroll Item List window, press CTRL-N (or right click) to open the Add New Payroll Item wizard. In this window, select one of two methods for setting up payroll items: EZ Setup or Custom Setup.
EZ Setup of Payroll Items
If you select the EZ Setup option, when you click Next, you see a list of payroll item types. The descriptions are brief, but you can create any type of pay, deduction, or company benefit, paid by the company, the employee, or both. The only types of payroll items you cannot create in EZ Setup are state and local payroll taxes, including state unemployment and/or disability taxes.
When you use the EZ Setup option, after you select the type of item, QuickBooks loads the Payroll Setup wizard and then displays the Add New dialog from that feature. The questions and explanations you see in the Payroll Setup wizard are more basic than the questions you’re asked if you select the Custom Setup option for setting up a payroll item. You need less knowledge of payroll processing to complete the setup, but you’ll spend more time moving through more wizard windows, because most of the data you provide is entered one wizard window at a time.
This does not mean you can set up a payroll item accurately if you know nothing about deductions, benefits, or the accounting and legal issues involved with payroll benefits and deductions. It’s always a good idea to consult with an accounting professional when payroll is involved. What it does mean, however, is that the explanations you see when you’re asked to provide information are easy to understand.
For example, if you’re setting up a benefit such as health insurance, pension benefit, or any form of a benefit in a cafeteria plan, the wizard asks you if the benefit cost is borne entirely by the company, entirely by the employee, or shared between both. Depending on your answer, the wizard moves through the subsequent windows to set up the necessary payroll item(s). In addition, if the employee contributes some or all of the cost, you have to know whether it’s a pre-tax or after-tax deduction, and you have to know how the deduction affects the employee’s W-2 form. This is yet another reason to discuss your payroll setup with your accountant first!
Custom Setup of Payroll Items
If you select the Custom Setup option, the list you see when you click Next is all inclusive. You can set up all the payroll item types offered in the EZ Setup list of payroll types, plus you can set up state and local payroll items. You’ll find that, unlike the EZ Setup wizard, each window in the Custom Setup wizard contains most of the fields for the required information, resulting in fewer steps needed to complete the setup of a payroll item.
Keep in mind, however, that if you have a health benefit with costs shared between the company and the employee, the Custom Setup wizard isn’t going to remind you that you have to set up two items: first one for the employee deduction and another for the company payment. In this instance, you have to start the wizard again to select Company Contribution in the second wizard window to set up the company side of the Health Benefits item.
Setting Up Employees
You have a great deal of information to fill out for each employee, and some of it is probably the same for all or most of your employees. The information about your employees must be accurate; otherwise, you may have to adjust payroll information inside QuickBooks and then report the changes to the IRS, both of which mean more work for you and potential confusion with the IRS about your payroll data. See the next illustration for an example.

To save yourself a lot of time, you can create a new employee default template. The information you put into the template is added automatically to the Payroll Info tab for each new employee you create.
Creating an Employee Template
To access the template, open the Employee Center by choosing Employees | Employee Center from the menu bar. In the Employee Center window, click the Manage Employee Information button at the top of the window and choose Change New Employee Default Settings from the submenu that appears. This opens the Employee Defaults window, where you can enter the data that applies to most or all of your employees.
1. Click in the Item Name column of the Earnings box, and then click the arrow to see a list of earnings types that you’ve defined as payroll items. Select the one that is common enough to be suitable for a template.
2. In the Hourly/Annual Rate column, enter a wage or salary figure if one applies to most of your employees. Otherwise, skip it and enter each rate in the employee record.
3. Click the arrow in the field to the right of the Payroll Schedule field and select a schedule. See Chapter 10 for more information.
4. Select a pay frequency (if you created schedules and selected one, QuickBooks automatically uses that schedule to fill in the Pay Frequency field).
5. Use the Class field if you’ve enabled classes to track data.
6. If you use QuickBooks time-tracking features to pay employees, you see a Use Time Data To Create Paychecks check box. Select the check box to enable that feature.
7. If all or most of your employees have the same adjustments, click in the Item Name column in the Additions, Deductions, And Company Contributions box, and then click the arrow to select the appropriate adjustments.
8. Click the Taxes button to open the Taxes Defaults dialog and select those taxes that are common and therefore suited for the template. The State tab and the Other tab (usually local payroll taxes) contain tax data that often applies to all or most of your employees.
9. Click the Sick/Vacation button to set the terms for accruing sick time and vacation time if your policy is similar enough among employees to include it in the template.
10. When you are finished filling out the template, click OK to save it.
![]()
Creating Employees
You’re ready to add your employees. Choose Employees | Employee Center. Click the New Employee button at the top of the window to add your first employee. The New Employee form opens on the Personal tab. Enter the new employees data, as described here:
• Personal Enter basic data about your new hire.
• Address & Contact Enter address, phone numbers, e-mail, and emergency contacts information. You must have at least the address to file W-2 forms.
• Additional Info Use this tab to enter an (optional) employee number or create custom fields using the Define Fields button to track additional information.
• Payroll Info Enter earnings, taxes, and deductions. (If you’ve chosen to enter payroll manually, this tab is named “Compensation” and does not include tax or deduction information.)
1. Click the Taxes button to open the Taxes dialog.
2. Enter the federal and state tax information. QuickBooks builds in a great deal of state information.
3. On the Other tab, apply any local payroll tax that applies to this employee.
4. Click the Sick/Vacation button and enter the hours and dates for this employee.
5. When you are finished, click OK to return to the Payroll Info tab.
• Employment Info Enter hiring date and other employment and job details here. See “Understanding Employment Types” next to determine the employee type.
• Workers Comp If you use either the Enhanced or Assisted Payroll service, the workers comp tracking feature appears. You can disable it in the Payroll & Employees Preferences. Assign the applicable workers comp code or select Exempt if this employee is exempt from workers comp.
Understanding Employment Types
There are four options in the Type field on the Employment Info tab of the New Employee form. What you select may have an impact on your tax returns, so check with your accountant if you have any questions. Table 9-4 explains the four types.

TABLE 9-4 Employee Types in QuickBooks