
Chapter 10
Paying Employees and Payroll Taxes and Creating Forms
In this chapter:
• Entering year-to-date payroll information
• How payroll is set up in QuickBooks
• Scheduling payroll
• Running and reviewing the payroll
• Understanding the Payroll Center
• Determining, remitting, and tracking payroll liabilities
• Preparing W-2 forms
• Using Excel for taxes
Handle Year-to-Date Payroll Data
To make historical data entry easier, consider going live with payroll at the beginning of a calendar year. However, if you start using QuickBooks mid-year, you must enter the historical information about paychecks that have been issued thus far. This way, QuickBooks can perform all of the required year-end tasks. For example, you cannot give your employees two W-2 forms: one from your “pre-QuickBooks” system and another from QuickBooks.
No matter what your fiscal year is, your payroll year is the calendar year. Even though you can start using QuickBooks payroll for the current period before you enter the historical data, remember that the absence of historical data may affect some tax calculations. Also, year-to-date payroll information on pay stubs for the employees will be incorrect until you enter historical payroll data. If there are withholding amounts that cease after a certain amount, you have to adjust the deductions on the current paychecks manually so that QuickBooks can calculate the maximum deduction properly and stop deducting these amounts.
![]()
Entering Year-to-Date Totals
You need to enter the year-to-date payroll totals from before the QuickBooks payroll start date into your QuickBooks company file. Consider the following:
• Historical payroll amounts need to be totaled and entered by quarter, because 941 reports are due quarterly.
• You can’t enter summarized data for the current quarter (the quarter your start date falls in). Instead, for the current quarter, you must enter data for each individual pay period (weekly, biweekly, semimonthly, or monthly). For previous quarters, you can enter quarterly totals.
![]()
Manually Entering Payroll History in Batches
If your employees are entered, you can use a shortcut that launches a wizard for entering year-to-date payroll information. The wizard replicates the historical balance entry windows that the QuickBooks Payroll Setup wizard offers, but some people find this method easier to use, especially if they’ve chosen to set up their payroll manually.
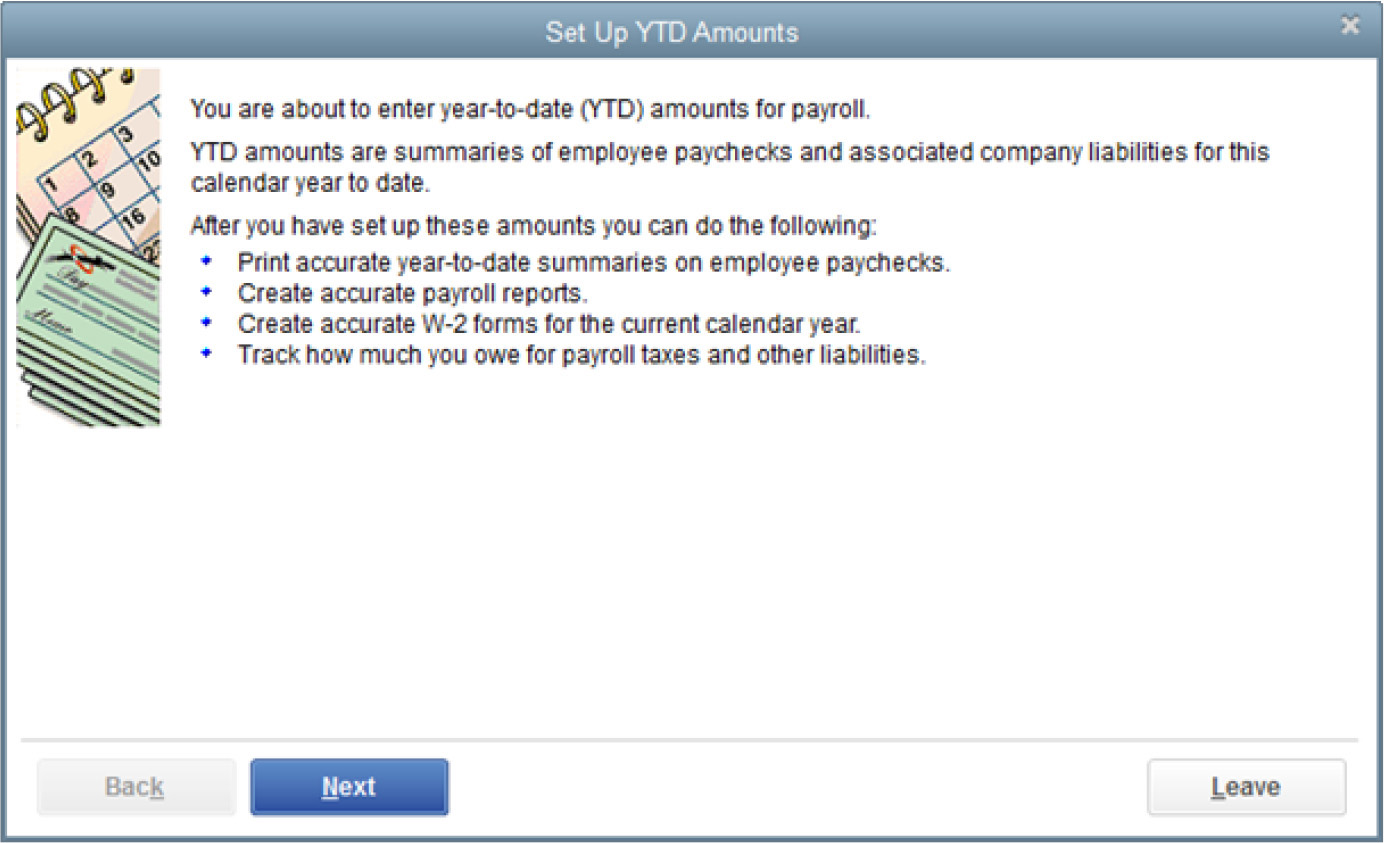
1. Choose Help | About QuickBooks to display the product information window. Then press CTRL-SHIFT-Y. The Set Up YTD Amounts wizard, shown next, opens to walk you through the steps of entering year-to-date summary information for each employee. Click Next to begin.
2. In the next two windows, the wizard asks you to specify three dates. It’s important to note that the dates you enter might not be the same for all three categories.
• The date your Payroll Liability and Payroll Expenses accounts are affected. When should the data you’re entering be posted to payroll item liability and expense accounts?
• The date your payroll bank accounts are affected. When should the net paycheck amounts be posted to your payroll bank account?
• The check date of the first paycheck you’ll create using QuickBooks payroll. This paycheck posts to all relevant accounts; there are no historical balances. Click Next when you’ve entered this third date.
3. On the Employee summary information page, you’ll see your list of employees. Highlight a name and then click the Enter Summary button to open the YTD Adjustment window for that employee.
4. Enter the YTD amounts for wages and withholdings for each payroll period. Click OK after you’ve completed the entries for each employee. You’ll be brought back to the Employee summary information page in the Set Up YTD Amounts wizard. Click the Leave button to close the Set Up YTD Amounts wizard.
![]()
Choosing the Correct Dates when Entering Year-to-Date Payroll
This example should help you understand how to enter the dates in these categories. For the purpose of these examples, let’s assume you’re entering historical information as of the end of April 2015, and your first QuickBooks-produced paychecks will be Friday, May 1, 2015.
• Your first posting of liabilities and expenses should be April 1, 2015, because you would have already remitted the withholdings and employer contributions for the quarter ending March 31, 2015.
• Your first posting of bank account amounts should be May 1, 2015, the date of the first QuickBooks-produced paycheck.
• Your “first paycheck using QuickBooks” date is your first payday in May. In this example, that day is May 1, 2015.
Use the QuickBooks Payroll Setup Wizard
When you use the QuickBooks Payroll Setup wizard, shown in Figure 10-1, to set up your payroll, the setup process can take more time than it takes to perform those tasks manually. The wizard does have some advantages: it’s user-friendly with explanations throughout, and you can use it to set up all the components required for payroll, including entering your historical data. It also has a Finish Later button so that when you open the wizard again, you can pick up where you left off.
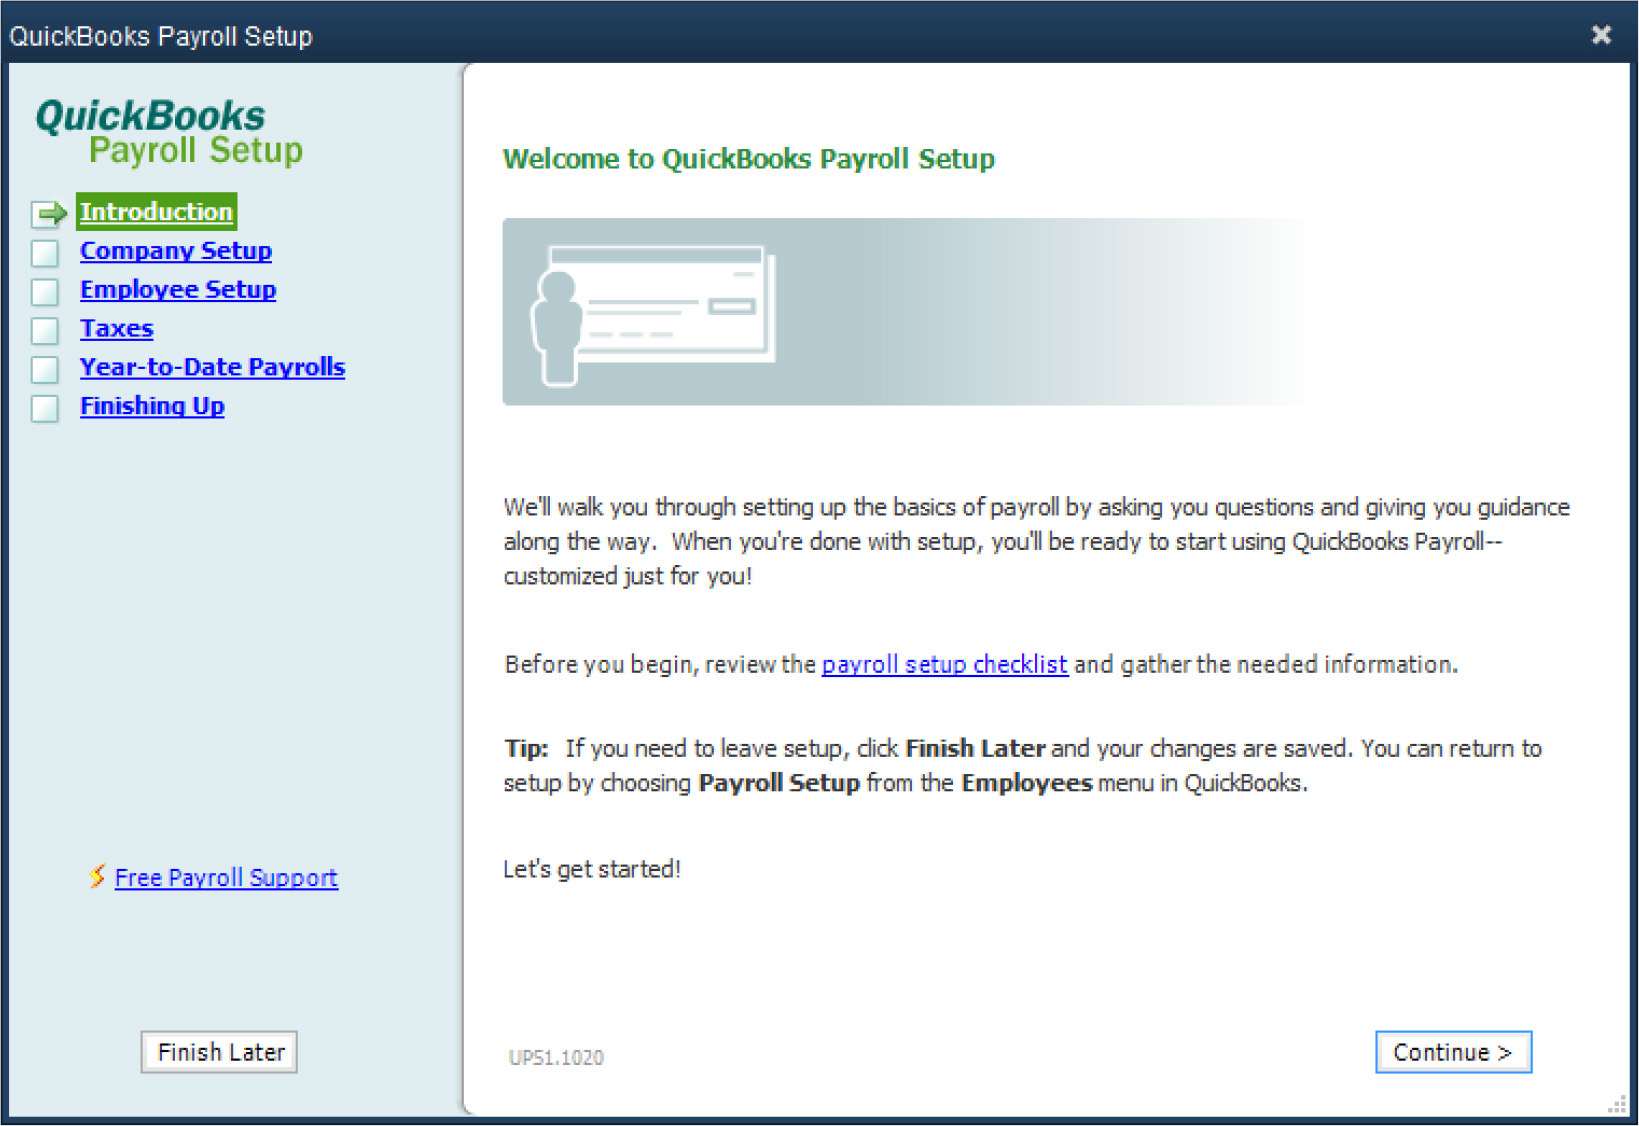
FIGURE 10-1 The QuickBooks Payroll Setup wizard is divided into logical sections.
Regardless of whether you use the Payroll Setup wizard to set up all your components or to enter historical data only, be sure to set up all the vendors and accounts you need to remit payroll withholding and employer payroll expenses first.
Start by choosing Employees | Payroll Setup from the QuickBooks menu bar. The wizard window opens with all the tasks listed in the left pane. The first few screens are informational, indicating the data you need to complete the wizard (the same information about employees, payroll items, deductions, and so on that were discussed in Chapter 9). The real work starts with the Company Setup pages, where the wizard begins to guide you through the necessary details of your payroll setup.
![]()
Company Setup Section
In the Company Setup section, the wizard starts with compensation, which means payroll items for salary, hourly wages, bonuses, and so on. If you’ve already created your payroll items, they appear in the wizard window, and you can click Edit to view or change the settings. If you haven’t yet set up payroll items, click Add New to open a mini-wizard that walks you through the process.
The types of payroll items the Company Setup section of the wizard helps to set up include types of compensation, benefits, paid time off, and other additions and deductions, such as workers comp, auto expense reimbursement, garnishments, union dues, and so on.
![]()
Setting Up Employees in the Wizard
After the Company Setup section, the wizard moves on to the Employee Setup section. You can add each employee in the wizard, moving through a series of windows in which you enter information about the employee’s personal information, pay structure, and tax status. For each employee, you designate the taxes and benefits that affect the employee.
When you finish entering employee information, the wizard displays the list of employees. If any employee is missing information, the wizard indicates the problem. If you entered your employees manually, the wizard automatically finds the employee records and displays the same list if problems exist.
Some missing information isn’t critical to issuing paychecks, but QuickBooks requires the information in the employee record. If any employee in the list has the notation Fix This Error Now, it means critical information is missing and the system either won’t be able to issue a paycheck or won’t be able to issue a W-2 form at the end of the year. Select the employee and click Edit to move through the wizard and fix the problem.
Setting Up Payroll Taxes in the Wizard
In the Taxes section, you tell the wizard about the federal, state, and local taxes you’re responsible for. These are payroll items, so if you haven’t set up all these items beforehand, you can use the wizard. As you finish each section, the wizard displays a list of all the taxes for that section. If you set up your taxes as payroll items manually, the wizard finds those entries and uses them to populate the list. If the wizard finds anything amiss in your setup of any tax, the problem is displayed in the Description column. Choose Edit to make the needed changes.
Entering Payroll History in the Wizard
You enter historical payroll data in the Year-to-Date Payroll section. The wizard presents a set of windows, starting with a window that asks if you’ve issued paychecks this year outside of QuickBooks. If you answer Yes, the next window displayed is the Payroll Summary window, where you have access to three preformatted tables. Click the Edit button next to each of these payroll categories to open the associated worksheet and enter the information.
Running Data Review
Next is the Data Review section, which is optional. QuickBooks asks if you’d like to go over your payroll settings. If you select Yes, the wizard runs a payroll checkup routine. At this point, your setup is complete, and from here you can click Finish or go straight to the Payroll Center, where you’ll have access to essentially everything that relates to managing your payroll.
Running a Payroll Checkup
You can run a Payroll Checkup whenever you make changes to your payroll components (employees, taxes, and so on) by choosing Employees | My Payroll Service | Run Payroll Checkup. The QuickBooks Payroll Setup wizard walks you through a task list of payroll items and each section of the wizard’s task list is checked for errors. The errors the checkup may find include missing information, invalid information, or any other data that doesn’t match QuickBooks’ built-in payroll standards.
Payroll Schedules
If your company pays salaried employees and officers on a weekly basis and pays hourly workers on a biweekly basis, using a payroll schedule makes it easy to ensure you’re paying the proper employees at the proper time. When you create a payroll schedule, you define how often you pay your employees and define the pay period (the workdays covered by the paycheck), the date on the paycheck, and the date you prepare the payroll. (However, the date you prepare the payroll differs from the paycheck date if you’re using direct deposit, which requires you to transfer payroll information two days before the paycheck date.)
![]()
Creating a Payroll Schedule
To create a payroll schedule, choose Employees | Add Or Edit Payroll Schedules. When the Payroll Schedule List window opens, press CTRL-N to create a new payroll schedule. In the New Payroll Schedule dialog, fill out the following:
• A name for this schedule. Use descriptive text if you’re setting up multiple schedules, such as “Weekly-Hourly” “Commissions Only” and so on.
• The pay period frequency for this schedule.
• The next pay period end date. This is the time period covered by the paycheck, which often is not the same as the paycheck date, such as paychecks issued on Thursday for the period ending the previous Friday.
• The next paycheck date.
The dialog includes additional fields for monthly or semimonthly payrolls. For example, if you issue paychecks semimonthly, you can select specific dates, such as the 10th and the 25th, or you can select one midmonth date and then select Last Day Of Month for the second check in that month. After you create the schedule, QuickBooks offers to assign the schedule automatically to any employees who are configured for the same pay frequency as the new schedule. Each employee record has a field for the applicable payroll schedule in the Payroll Info tab. When you link the payroll schedule to the appropriate employees, those employees appear when you select the schedule on the day you’re preparing paychecks.
![]()
Special Payroll Runs
You can create payroll checks at other times as well. When you choose Employees | Pay Employees, in addition to the subcommand Scheduled Payroll, you see two commands for special payroll runs:
• Unscheduled Payroll Select this special payroll category if you need to create bonus checks, commission checks, or any other type of paycheck that differs from a regularly scheduled payroll run.
• Termination Check To use this option, you must first enter a release date in the Employment Info tab of the employee’s record. Be sure this release date is after the check date, because QuickBooks removes the name from the Enter Payroll Information window as of that date, which means that you can’t create a final paycheck for them.
When you’re ready to create the check, select the terminated employee by placing a check mark in the column to the left of the employee name. Next, fill in the pay period ending date, the check date, the termination date, and the hours (or amount the employee is salaried). Click Continue; approve or change the paycheck details; and then print the check, assign a check number for a manual check, or issue a direct-deposit check.
Run Payroll
When you are ready to run your first payroll, begin creating payroll checks as follows:
• If you don’t use payroll schedules, choose Employees | Pay Employees | Unscheduled Payroll to open the Enter Payroll Information dialog.
• If you have payroll schedules, choose Employees | Pay Employees | Scheduled Payroll to open the Employee Center with the Payroll tab selected (the Pay Employees function appears in the right pane). Select the appropriate schedule and click Start Scheduled Payroll to open the Enter Payroll Information dialog.
Select the employees to pay. If all the employees are receiving paychecks (the usual scenario), click Check All. For hourly employees configured for automatic payroll amounts using timesheets, the number of hours is prefilled. For hourly employees not paid from timesheets, you must fill in the number of hours for this paycheck.
![]()
Changing Paycheck Data
If you want to make changes to a paycheck, click the employee’s name to open the Preview Paycheck dialog. You can add a payroll item such as a bonus, assign the paycheck to a customer or job, or add a deduction such as a repayment of a loan or garnishment. Click Save & Next to move to the next employee, click Save & Previous to go back to a previous check, or click Save & Close to return to the Enter Payroll Information dialog.
![]()
Reviewing the Payroll Run
Click Continue in the Enter Payroll Information dialog to display the Review And Create Paychecks window, shown next, which displays all the financial information for this payroll run. If anything looks incorrect, click Back to reconfigure the paychecks or make other needed corrections.
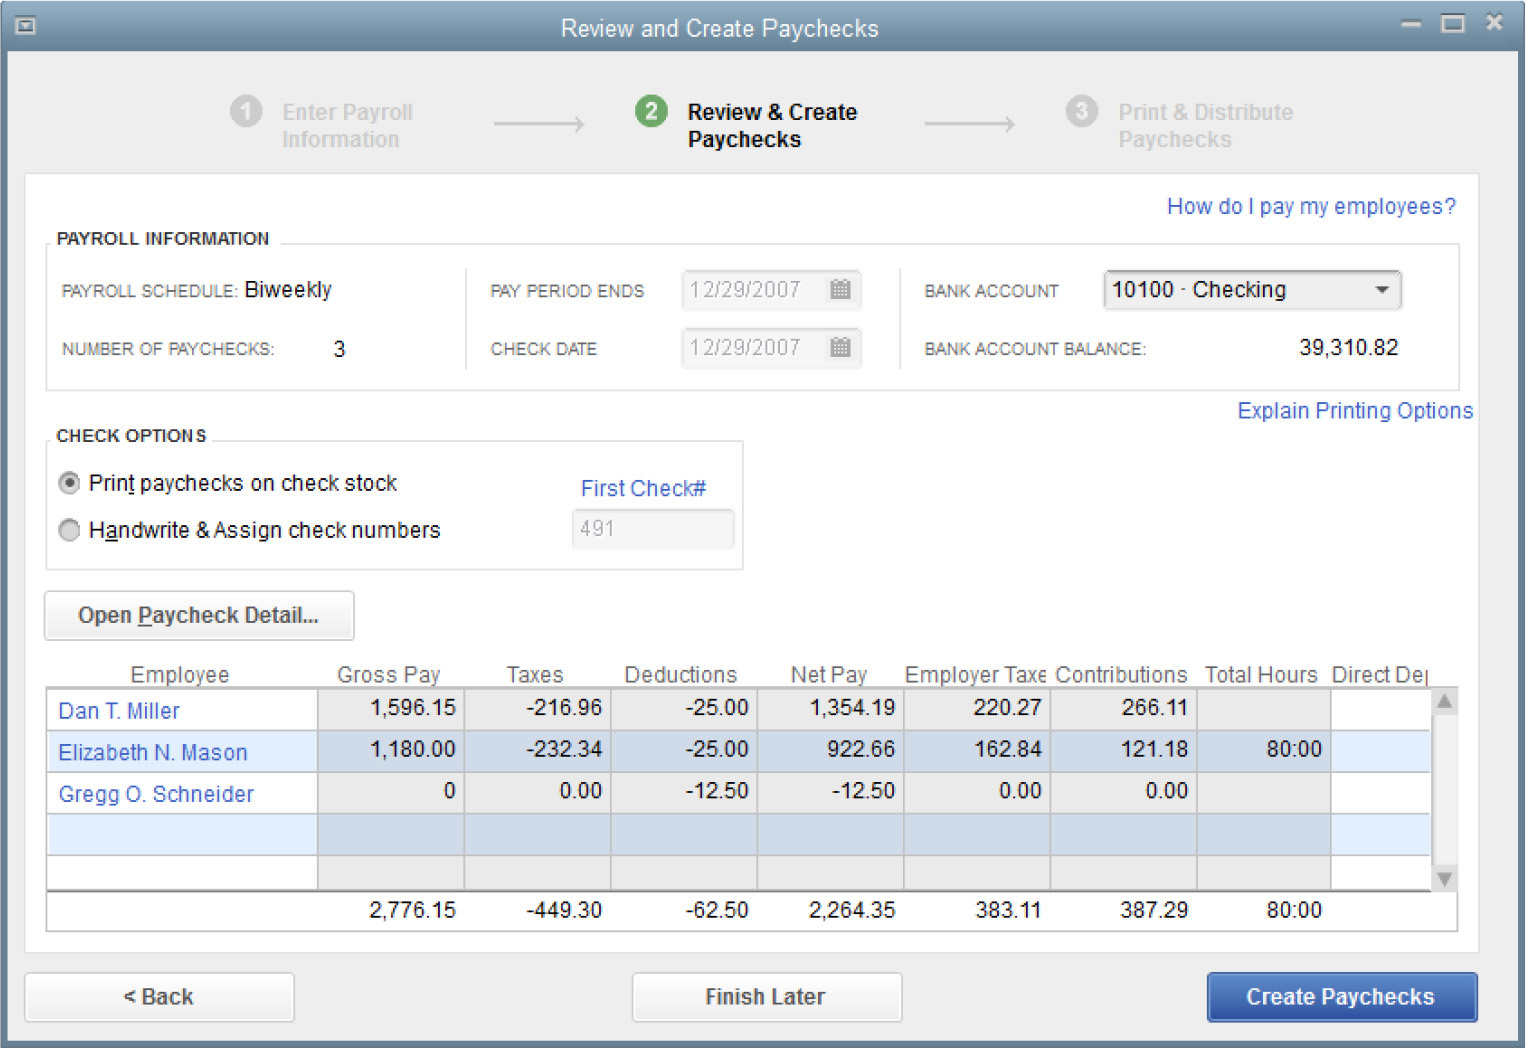
Fill out the options for producing the paychecks (print the checks or automatically assign check numbers in the bank account register for manual checks), and then click Create Paychecks. QuickBooks creates the checks and displays the Confirmation And Next Steps dialog.
If you’re printing paychecks, you can click Print Paychecks, or you can wait and print them by choosing File | Print Forms. If you have direct-deposit employees, click Print Pay Stubs. When the pay stubs are printed, click the Send Payroll Data button on the Confirmation And Next Steps dialog. This opens the Send Center window, and you can upload the direct-deposit data to Intuit for processing. You can e-mail the pay stubs using the security standards built into the process (see the Help files for details).
If you have another payroll schedule to run today (perhaps both weekly and biweekly employees are paid today), repeat all the processes as outlined here.
Net to Gross Calculations for Enhanced Payroll Subscribers
If you subscribe to the Enhanced Payroll service, you can enter the net amount of a check and let QuickBooks calculate the gross amount. This is useful for bonus checks or another special payroll check for which you need to make sure the employee receives a net check of a certain amount.
During the payroll run (either a regular payroll or a special payroll for this individual paycheck), select the relevant employee. In the Preview Paycheck window, select the option Enter Net/Calculate Gross, located in the lower-right corner, and then enter the net amount for this paycheck. QuickBooks automatically calculates the gross amount and the deductions to arrive at the net amount you entered.
The Employee Center
All the employee information you’ve entered and the payroll schedules and paychecks you’ve created are easily accessed via the Employee Center, shown in Figure 10-2. The Employee Center contains reporting information about your payroll and provides links to all the functions in the payroll system. It’s a central location for everything you need to do or need to know.
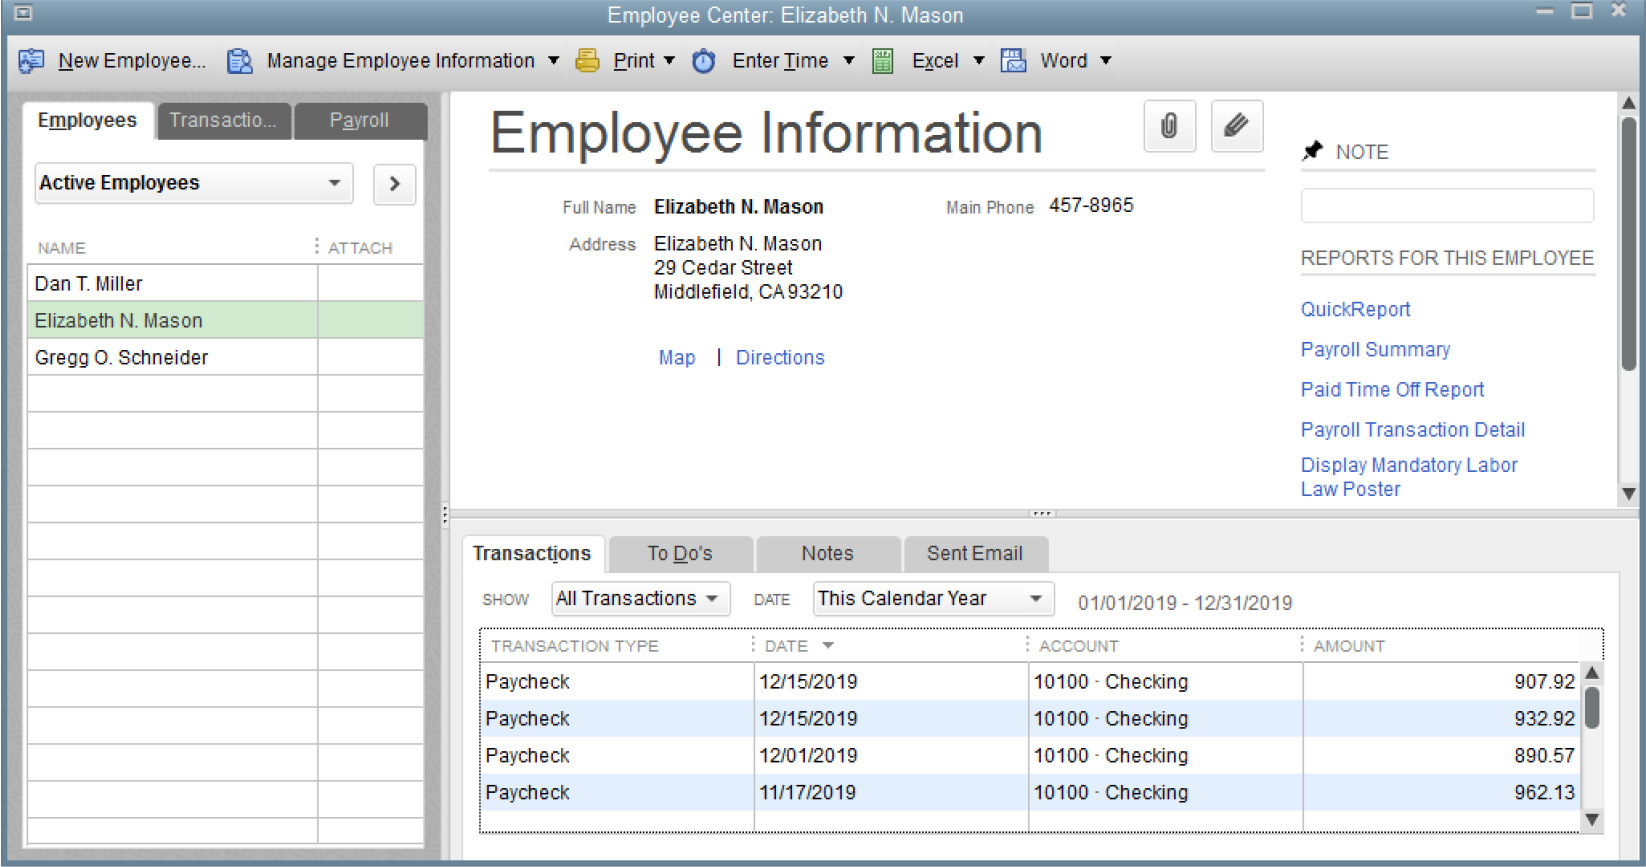
FIGURE 10-2 Your employee’s information is stored in the Employee Center.
To open this window, choose Employees | Employee Center from the menu bar. If you subscribe to a QuickBooks payroll service, the left pane of the Employee Center contains three tabs: Employees, Transactions, and Payroll. If you don’t have a payroll plan subscription, the pane lacks a Payroll tab.
![]()
Employees Tab
When you select an employee on the Employees tab, QuickBooks displays information from the employee’s record on the top part of the right pane and displays transaction information for that employee on the bottom part of the right pane. You can change the choices in the Show and Date fields to filter the transaction information. Notice the three additional tabs located just above the employee transaction information. They allow you to add and manage To Do’s, Notes, and e-mails sent to an employee.
You can open any listed transaction by double-clicking its listing. For example, if you open a paycheck, you can see the original check along with a summary of the financial information. If you need to check any of the details, click Paycheck Detail to see all the calculated amounts.
![]()
Transactions Tab
The Transactions tab lists all payroll-related transaction types. Select a type to display the transactions you’ve created. You can use the Date field to narrow the range of the information displayed.
![]()
Payroll Tab
In the Payroll tab, you can view upcoming liability payments (and those that may be overdue), create transactions, and generate the payroll forms you need. Visit this tab periodically to make sure you don’t miss any deadlines.
![]()
Customizing the Employee Center
You can tailor the way the Employee Center displays information. Resize the panes by moving your mouse pointer over the edge of any pane; when the pointer changes to a vertical bar with right and left arrows, drag the pane in either direction. In addition, you can expand the pane to show the full List view by clicking the arrow button located at the top of the Employees tab. Use the same button to collapse the pane to show both the list and the detail panes.
You can customize the columns that QuickBooks displays in the left pane of the Employees tab by right-clicking anywhere on the list and choosing Customize Columns. You can also customize the information displayed in the right pane when you select an employee’s name in the Employees tab or when you select a transaction type on the Transactions tab. Right-click anywhere in the right (Transaction) pane and select Customize Columns.
Tracking and Remitting Payroll Liabilities
All of the tasks involved in reporting on and paying your payroll liabilities using QuickBooks have a logical order, although the steps may differ depending on the state and municipality you’re in.
![]()
Confirm Payroll Payment Schedules
When you run payroll, QuickBooks maintains a payment schedule behind the scenes that keeps track of the amounts and due dates for all the payroll liabilities and employer expenses that accumulate. Use this payment schedule to make sure you remit your payroll obligations on time. Most of the information required for scheduling payments is probably already in your system from when you set up payroll items. To view the schedule and correct any problems, choose Employees | Payroll Taxes And Liabilities | Edit Payment Due Dates/Methods.
This opens the Payroll Setup wizard’s Tax Payments window. As you move through each page, if any data is missing or does not match the content or format the payroll system expects, the wizard highlights the listing with a problem icon. Double-click the problem listing so you can edit it and fix the problem. QuickBooks usually provides a hint about the problem in the window that opens.
![]()
Report and Remit Payroll Tax Liabilities
When you create payroll checks, QuickBooks tracks the taxes that are due as liabilities. To see your scheduled liabilities, choose Employees | Payroll Taxes And Liabilities | Pay Scheduled Liabilities. The Pay Liabilities tab shows the list of taxes and other liabilities currently owed, as shown here.

Select the liability you want to pay and click the View/Pay button. The first time you pay liabilities, QuickBooks asks you to select the appropriate bank account (if you have more than one). The Liability Payment transaction window opens. Continue to view and pay until all the current liabilities are remitted.
Federal Tax Liabilities
Payments to the federal government involve two payroll taxes:
• 941/944/943 taxes, which cover withholding, Social Security, and Medicare
• 940 taxes, which are the federal unemployment taxes
941/943 Payments The federal government requires you to report and remit the withheld amounts, along with the matching employer contributions, at a specified time. That time period is dependent upon the size of the total withholding amount you’ve accumulated. You may be required to remit monthly, semimonthly, weekly, or within three days of the payroll. Check the current limits with the IRS or your accountant.
There’s a formula for determining the size of the 941/943 payment. It is the sum of these amounts for the period: federal withholding, plus FICA (Social Security) withholding, plus Medicare withholding, plus the matching employer contributions for FICA and Medicare.
You don’t have to do the math—QuickBooks does it for you. But it’s a good idea to know what the formula is so you can check the numbers yourself and make sure you have sufficient funds in your bank account to cover the next payment.
In addition, the IRS requires that you remit your payments electronically, either through QuickBooks Enhanced Payroll or by using the Electronic Federal Tax Payment System (EFTPS) operated by the IRS; the payee is the U.S. Treasury. If you haven’t already done so, you’ll need to go to the EFTPS website (www.eftps.gov) to learn more and enroll. However, if your employment taxes for a quarterly period are less than $2,500, you can remit the taxes with your quarterly (Form 941) return in lieu of depositing them.
Creating a 941/943 Form Unless you’ve been notified that you’re a Form 944 filer (where your annual payroll withholding liability is less than $1,000/year), you must file a 941 or 943 form every quarter to report the total amount you owe the federal government for withheld taxes, FICA, and Medicare. If you have been making your deposits regularly and on time, no amount is due with the 941/943.
• If you underpaid, you can use the EFTPS system to remit your payment for the underpaid amount or remit the underpayment with your form with a check payable to the United States Treasury.
• If you overpaid, you can select the option to take a credit toward the next 941/943, or you can select the option for a refund.
QuickBooks will prepare your 941/943 report using the information in your QuickBooks payroll registers. If QuickBooks isn’t preparing your federal forms (either because you’re doing payroll manually or you subscribed to the QuickBooks Basic Payroll service), you can prepare your forms manually with the use of Excel worksheets that QuickBooks provides. See the section “Tax Form Worksheets in Excel” at the end of this chapter. Creating the form is quite easy. To create a 941/943 form:
1. Choose Employees | Payroll Tax Forms & W-2s | Process Payroll Forms. The Payroll tab in the Employee Center opens to show the list of tax forms available for filing.
2. Select Federal Quarterly Form 941/Sch B - Employer’s Quarterly Federal Tax Return (or Federal Quarterly Form 943A - Employer’s Annual Federal Tax Return for Agricultural Employees) and click the File Form button. The File Form window opens.
3. Select the filing period. You can also click the Auto-Fill Contact Info button to have QuickBooks automatically copy the contact information you provide in this window to future tax forms you need to complete. Click OK.
4. The Payroll Tax Form window opens to the selected form. The first window is an interview; enter the appropriate data, and click Next to continue.
5. Use the guidelines presented in the following sections to move through the wizard.
To enter information in a blank field, click your cursor in the field to activate it, and then type the data. The typed text appears in blue, but that’s just a signal to you that the data was entered manually; QuickBooks doesn’t print the form in color.
Editing Prefilled Data
Follow these steps to edit data:
1. Right-click the field and choose Override from the menu that appears.
2. Enter the replacement data in the override box and press the TAB key.
3. The new data replaces the original data in the field and the text is green to remind you that you manually replaced the data that was exported from QuickBooks.
If you change your mind and decide that the data automatically supplied by QuickBooks should remain in the form, right-click in the field and choose Cancel Override.
Data You Cannot Change
Do not edit the following types of data on the Form 941 or on any payroll tax form:
• Federal Employer Identification Number (EIN)
• Filing period (if you’re trying to change the filing period, start the process again and select the appropriate date range)
• Totals (these are calculated by QuickBooks; if a total is wrong, edit the erroneous number and QuickBooks will recalculate the total)
Checking for Errors
Before you finalize the contents of Form 941/943, click the Check For Errors button. QuickBooks examines the content and displays any errors in the Errors box that opens at the top of the form. If there aren’t any problems, the Errors box reports this too.
Click any error to move automatically to the field that’s causing the problem, and then correct the information:
• If the problem is in a field you filled out, correct the data and press the TAB key.
• If the problem is in a field that was prefilled but you changed the content by overriding the data, right-click the field and select Cancel Override.
When you press TAB to replace the data in the field, the error listing should disappear from the Errors box. If it doesn’t, you have to figure out what’s wrong with the data and correct it. When the error is fixed, you can close the Errors box by clicking the Close Errors button.
Saving and Reopening an Unfinished Form
If you get interrupted while you’re preparing your 941, 943, or 940 form, you can save the form with the data you already filled in, so you don’t have to start from scratch when you resume your work. Click Save And Close to save the form with its current contents. To return to work on the saved form, you’ll need to open the form again, following the steps from the previous section, again selecting the form and a date range. QuickBooks asks if you want to use the saved draft. If you made changes, you’ll have to start a new form instead of opening a saved draft. Changes could include an additional paycheck being issued within the date range for some reason or a payment you made the IRS as a remittance for this report period.
Printing or Submitting Form 941/943
You can print the form from QuickBooks, save it as a PDF, or submit the form electronically. If you choose to print, be sure to use these printing criteria:
• The form must be printed with black ink on white or cream-colored paper.
• The paper size must be 8.5 by 11 inches.
• The paper must be 20-pound weight or heavier.
The printed report doesn’t look exactly like the blank form you received, but it’s perfectly acceptable to the government. Print two copies: one to mail and one for your files.
If you’ve set up for e-filing with your QuickBooks Payroll subscription, click the Submit Form button to file your 941/943 electronically. If you have not set up this form for e-filing, open the Employee Center and click the Payroll tab to open the Payroll Center. Then click the File Forms tab and click Start Filing Electronically in the Other Activities area. (If you’ve already chosen e-file for any form filing, click Manage Filing Methods instead.)
940 Payments
The Federal Unemployment Tax Act (FUTA) provides unemployment compensation to workers who have lost their jobs, usually after the workers’ state benefits have been exhausted. The FUTA tax is paid by employers; no deductions are taken from employee wages. Companies must make FUTA payments if either of the following scenarios exists:
• During this year or last year, you paid wages of at least $1,500 in any calendar quarter.
• During this year or last year, you had one or more employees for at least part of a day for a period of 20 weeks (the weeks do not have to be contiguous).
You don’t have to make the deposit until you owe the entire amount, but you can make deposits until you reach that amount if you wish.
Currently, the FUTA tax is 6 percent of gross wages up to $7,000 per employee, but the federal government gives employers up to a 5.4 percent credit for paying their state unemployment taxes. So if you’re entitled to the maximum 5.4 percent credit, the FUTA tax rate after the credit is 0.6 percent. QuickBooks assumes you’re paying your state unemployment taxes and calculates your FUTA liability accordingly.
Preparing the 940 Form The 940 form (FUTA) is filed annually. To create your Form 940:
1. Choose Employees | Payroll Tax Forms & W-2s | Process Payroll Forms. The Payroll tab in the Employee Center opens to show the list of tax forms available for filing.
2. Select Annual Form 940/Sch A - Employer’s Annual Federal Unemployment (FUTA) Tax Return. Click the File Form button to open the File Form window.
3. Select the filing period. You can also click the Auto-Fill Contact Info button to have QuickBooks automatically copy the contact information you provide in this window to future tax forms you need to complete. Click OK.
4. The Payroll Tax Form window (it’s the first window of a wizard) opens with the Form 940 Interview displayed. The top section of the interview window asks about your state and federal unemployment payments. Below that section is a series of questions aimed at determining whether any of your payroll expenses covered exempt payment types. Exempt payments are wages you paid that are exempt from FUTA taxes. QuickBooks checks your payroll items to track several categories of exempt payments, and if you’ve used these payroll items, QuickBooks fills in the amounts. If you had any exempt payments that are not in the payroll items that QuickBooks automatically checks, fill in the amount directly on the appropriate field. Check the IRS rules for preparing Form 940, or check with your accountant. You can also get more information about this form by clicking the link “View details about this form” located at the bottom of the Payroll Tax Form window.
5. Click Next to see the form itself. Fill out any fields that aren’t automatically prefilled by QuickBooks from your payroll records. Continue to click Next and follow the instructions that appear on the screen.
State and Local Income Taxes
Your state and local payroll liabilities vary depending upon where your business is located and where your employees live (and pay taxes). Besides income taxes, you may be liable for unemployment insurance and disability insurance. Most states have some form of an income tax, which might be calculated as a flat or sliding percentage of gross income or a percentage based on the federal tax for the employee.
Local (municipal or county) taxes are also widely varied in their approach:
• Some cities have different rates for employees of companies that operate in the city. There may be one rate for employees who live in the same city and a different rate for nonresidents.
• Your business might operate in a city or town that has a payroll head tax (a once-a-year payment that is a flat amount per employee).
QuickBooks Enhanced Payroll supports most state forms. State and local taxing authorities also provide coupons, forms, or an online service for remitting income tax withholding. The frequency with which you must pay might depend on the size of your payroll, or it might be quarterly, semiannual, or annual, regardless of the amount. Some municipal authorities have e-pay available.
It’s a good idea to create different vendor names for state unemployment insurance (SUI), state disability insurance (SDI), and state income tax withholding to make sure you don’t accidentally send checks for the wrong component and to prevent QuickBooks from issuing a single check for the grand total. The vendor record for each vendor name may have the same payee (State Department of Revenue), but the vendor names are different.
Other State Liabilities
If your state has SUI or SDI or both, you have to pay those liabilities when they’re due. Commonly, these are quarterly payments. Not all states have SUI or SDI, and some have one but not the other. Some states collect SUI and SDI from the employee and the company; some collect only from the company. Check the rules for your state.
![]()
Nontax Payroll Liabilities
The rules for remitting the paycheck deductions and employer contributions for other reasons, such as health benefits, pension, and workers compensation, are specific to your arrangements with those vendors.
There are many ways to handle how these payments are posted, and you have to decide what makes sense to you and to your accountant. For example, if you pay a monthly amount to a medical insurer, you may want to post the employee deductions back to the same expense account you use to pay the bill. That way, only the net amount is reported as an expense on your taxes.
To remit liabilities that are not a scheduled liability in QuickBooks, you can use the Unscheduled Liabilities window. Choose Employees | Payroll Taxes And Liabilities | Create Custom Liability Payments. Select the paycheck date range you need, and then select the liability you want to remit.
![]()
Workers Comp
QuickBooks Enhanced and Assisted Payroll offerings include workers comp, and the setup options are available in the Payroll & Employees category of the Preferences dialog. Click the Workers Compensation button on the Company Preferences tab to open the Workers Comp Preferences dialog. Select Track Workers Comp to enable the feature.
When Workers Comp is enabled, you can also opt to see reminder messages to assign workers comp codes when you create paychecks or timesheets. In addition, you can select the option to exclude an overtime premium from your workers comp calculations (check your workers comp insurance policy to see if you can calculate overtime amounts as regular pay).
Prepare W-2 Forms
On or before January 31, you must print and send W-2 forms to your employees for the previous calendar year. By February 28, you need to send or e-file copies to the appropriate government agencies as well. When you run your payroll in QuickBooks, this process is very straightforward. You start by selecting the form and the employees, and then move to the process of creating and printing or electronically sending the forms. To do so:
1. Choose Employees | Payroll Tax Forms & W-2s | Process Payroll Forms. The Payroll tab in the Employee Center opens to show the list of tax forms available for filing.
2. Select Annual Form W-2/W-3 -Wage And Tax Statement/Transmittal. Click the File Form button. The File Form dialog opens.
3. Select the filing period and the employees for which you want to process W-2 forms. You can also click the Auto-Fill Contact Info button to have QuickBooks automatically copy the contact information you provide in this window to future tax forms you need to complete. Click OK.
4. The Select Employees For Form W-2/W-3 window opens, listing all your employees that have received a paycheck during the year, as shown here. By default, all employees are selected and the current status of the W-2 printing process is noted.

5. Click Review/Edit to display the first page of the Payroll Tax Form window, which explains the steps you’ll go through as you step through the wizard. Click Next to move through the wizard.
6. In the screens that follow, each employee’s W-2 form is presented. If any nonfinancial data is missing (such as an address or ZIP code), you must fill it in. If prefilled information is incorrect, right-click the appropriate field and select Override. Enter the correct information, and press TAB to add that information into the field. Changes you make to nonfinancial information are not written back to the employee record. You must make the same changes there.
7. Click the Check For Errors button to see if anything is amiss on any employee’s form. If errors appear in the Errors box at the top of the form, click the error’s listing. QuickBooks automatically takes you to the appropriate field to correct the information.
8. When everything is correct, load your W-2 forms in the printer (even if you’re e-filing, you’ll likely be printing the copy that goes to the employee) and click Submit Form to open the Print/E-file Form dialog.
9. If you enrolled in an agency’s e-filing program, have an active Enhanced Payroll subscription, and there are no errors on the form, the option to e-file these forms will be available to you. Otherwise, only the Print button will be active. Select the option to open the Print W-2 And W-3 Forms window.
10. Click Print when all of these settings are just the way you want them. You must also print or e-file the W-3 form, which is a summary of your W-2 forms.
You can make your employees’ W-2 forms available online at no extra charge if you have a QuickBooks payroll subscription. Using this service eliminates the need to print and mail W-2 forms to your employees since they can view and print their own W-2 information directly from an Intuit website called ViewMyPaycheck.com. Also, if your employees use TurboTax to prepare their own personal tax returns, they can view and download their W-2 forms directly into TurboTax. To learn more about this service, click the “Tell me more” link at the bottom of the Print W-2 And W-3 Forms window.
Tax Form Worksheets in Excel
If Quick Books isn’t preparing your payroll forms (either because you’re doing payroll manually or you subscribed to the QuickBooks Basic Payroll service), you can prepare your forms manually with the use of Excel worksheets that are available from QuickBooks.
To access the worksheets, choose Reports | Employees & Payroll | More Payroll Reports In Excel | Tax Form Worksheets. Because this Excel file has macros, depending on how you’ve configured Excel’s security options, you might have to tell Excel to let the macros run.
When the QuickBooks Tax Worksheets dialog appears, select the form and filing period you need. Next, click the Options/Settings button to open the QuickBooks Tax Forms Workbook Options/Settings dialog, where you’ll configure the report.
By default, the option to update worksheet headers is checked. This means the header of a printout of the worksheet contains the company name and address information, as well as the date range of the report (the date range you selected in the previous dialog). If you are planning to print the report, you need to know the date range, so make sure this option is selected. By default, the Hide Detailed Data Returned From QuickBooks option is selected, which means the workbook displays only the information connected to the report you selected.
If you deselect the option to hide detailed data, QuickBooks adds a second worksheet named Data to the workbook. This worksheet contains detailed information about the employees, the payroll items, and the job-costing links (if you use timesheets to do job costing for payroll) on separate rows.
Microsoft Office 2010 and 2013 products are available in both 32-bit and 64-bit versions. If you’re using a 64-bit version of Excel, check the Force Alternate Connection Method Provided For Excel 64-bit option (located on the QuickBooks Tax Forms Workbook - Options/Settings dialog) to complete the export.