
Chapter Topics
• Web Surfing with Python: Simple Web Clients
• urlparse and urllib Modules
• Crawler/Spider/Robot
This introductory chapter on Web programming will give you a quick and high-level overview of the kinds of things you can do with Python on the Internet, from Web surfing to creating user feedback forms, from recognizing Uniform Resource Locators to generating dynamic Web page output.
Web surfing falls under the same client/server architecture umbrella that we have seen repeatedly. This time, Web clients are browsers, applications that allow users to seek documents on the World Wide Web. On the other side are Web servers, processes that run on an information provider’s host computers. These servers wait for clients and their document requests, process them, and return the requested data. As with most servers in a client/server system, Web servers are designed to run “forever.” The Web surfing experience is best illustrated by Figure 20-1. Here, a user runs a Web client program such as a browser and makes a connection to a Web server elsewhere on the Internet to obtain information.
Figure 20-1. Web client and Web server on the Internet. A client sends a request out over the Internet to the server, which then responds with the requested data back to the client.

Clients may issue a variety of requests to Web servers. Such requests may include obtaining a Web page for viewing or submitting a form with data for processing. The request is then serviced by the Web server, and the reply comes back to the client in a special format for display purposes.
The “language” that is spoken by Web clients and servers, the standard protocol used for Web communication, is called HTTP, which stands for HyperText Transfer Protocol. HTTP is written “on top of” the TCP and IP protocol suite, meaning that it relies on TCP and IP to carry out its lower-level communication functionality. Its responsibility is not to route or deliver messages—TCP and IP handle that—but to respond to client requests (by sending and receiving HTTP messages).
HTTP is known as a “stateless” protocol because it does not keep track of information from one client request to the next, similar to the client/server architecture we have seen so far. The server stays running, but client interactions are singular events structured in such a way that once a client request is serviced, it quits. New requests can always be sent, but they are considered separate service requests. Because of the lack of context per request, you may notice that some URLs have a long set of variables and values chained as part of the request to provide some sort of state information. Another alternative is the use of “cookies”—static data stored on the client side which generally contain state information as well. In later parts of this chapter, we will look at how to use both long URLs and cookies to maintain state information.
The Internet is a moving and fluctuating “cloud” or “pond” of interconnected clients and servers scattered around the globe. Communication between client and server consists of a series of connections from one lily pad on the pond to another, with the last step connecting to the server. As a client user, all this detail is kept hidden from your view. The abstraction is to have a direct connection between you the client and the server you are “visiting,” but the underlying HTTP, TCP, and IP protocols are hidden underneath, doing all of the dirty work. Information regarding the intermediate “nodes” is of no concern or consequence to the general user anyway, so it’s good that the implementation is hidden. Figure 20-2 shows an expanded view of the Internet.
Figure 20-2. A grand view of the Internet. The left side illustrates where you would find Web clients while the right side hints as to where Web servers are typically located.

As you can see from the figure, the Internet is made up of multiply-interconnected networks, all working with some sense of (perhaps disjointed) harmony. The left half of the diagram is focused on the Web clients, users who are either at home dialed-in to their ISP (Internet Service Provider) or at work on their company’s LAN (Local Area Network).
The right-hand side of the diagram concentrates more on Web servers and where they can be found. Corporations with larger Web sites will typically have an entire “Web server farm” located at their ISPs. Such physical placement is called colocation, meaning that a company’s servers are “co-located” at an ISP along with machines from other corporate customers. These servers are either all providing different data to clients or are part of a redundant system with duplicated information designed for heavy demand (high number of clients). Smaller corporate Web sites may not require as much hardware and networking gear, and hence, may only have one or several colocated servers at their ISP.
In either case, most colocated servers are stored with a larger ISP sitting on a network backbone, meaning that they have a “fatter” (meaning wider) and presumably faster connection to the Internet—closer to the “core” of the Internet, if you will. This permits clients to access the servers quickly—being on a backbone means clients do not have to hop across as many networks to access a server, thus allowing more clients to be serviced within a given time period.
One should also keep in mind that although Web surfing is the most common Internet application, it is not the only one and is certainly not the oldest. The Internet predates the Web by almost three decades. Before the Web, the Internet was mainly used for educational and research purposes. Most of the systems on the Internet run Unix, a multi-user operating system, and many of the original Internet protocols are still around today.
Such protocols include telnet (allows users to log in to a remote host on the Internet and still in use today), FTP (the File Transfer Protocol that enables users to share files and data via uploading or downloading and also still in use today), Gopher (the precursor to the Web search engine—a “gopher”-like piece of software that “tunneled the Internet” looking for the data that you were interested in), SMTP or Simple Mail Transfer Protocol (the protocol used for one of the oldest and most widely used Internet applications: electronic mail), and NNTP (News-to-News Transfer Protocol).
Since one of Python’s initial strengths was Internet programming, you will find support for all of the protocols discussed above in addition to many others. We differentiate between “Internet programming” and “Web programming” by stating that the latter pertains only to applications developed specifically for Web applications, i.e., Web clients and servers, our focus for this chapter. Internet programming covers a wider range of applications, including some of the Internet protocols we previously mentioned, such as FTP, SMTP, etc., as well as network and socket programming in general, as we discussed in a previous chapter.
One thing to keep in mind is that a browser is only one type of Web client. Any application that makes a request for data from a Web server is considered a “client.” Yes, it is possible to create other clients that retrieve documents or data off the Internet. One important reason to do this is that a browser provides only limited capacity, i.e., it is used primarily for viewing and interacting with Web sites. A client program, on the other hand, has the ability to do more—it can not only download data, but it can also store it, manipulate it, or perhaps even transmit it to another location or application.
Applications that use the urllib module to download or access information on the Web [using either urllib.urlopen() or urllib.urlretrieve()] can be considered a simple Web client. All you need to do is provide a valid Web address.
Simple Web surfing involves using Web addresses called URLs (Uniform Resource Locators). Such addresses are used to locate a document on the Web or to call a CGI program to generate a document for your client. URLs are part of a larger set of identifiers known as URIs (Uniform Resource Identifiers). This superset was created in anticipation of other naming conventions that have yet to be developed. A URL is simply a URI which uses an existing protocol or scheme (i.e., http, ftp, etc.) as part of its addressing. To complete this picture, we’ll add that non-URL URIs are sometimes known as URNs (Uniform Resource Names), but because URLs are the only URIs in use today, you really don’t hear much about URIs or URNs, save perhaps as XML identifiers.
Like street addresses, Web addresses have some structure. An American street address usually is of the form “number street designation,” i.e., 123 Main Street. It differs from other countries, which have their own rules. A URL uses the format:
prot_sch://net_loc/path;params?query#frag
Table 20.1 describes each of the components.

net_loc can be broken down into several more components, some required, others optional. The net_loc string looks like this:
user:passwd@host:port
These individual components are described in Table 20.2.

Of the four, the host name is the most important. The port number is necessary only if the Web server is running on a different port number from the default. (If you aren’t sure what a port number is, go back to Chapter 16.)
User names and perhaps passwords are used only when making FTP connections, and even then they usually aren’t necessary because the majority of such connections are “anonymous.”
Python supplies two different modules, each dealing with URLs in completely different functionality and capacities. One is urlparse, and the other is urllib. We will briefly introduce some of their functions here.
The urlparse module provides basic functionality with which to manipulate URL strings. These functions include urlparse(), urlunparse(), and urljoin().
urlparse() breaks up a URL string into some of the major components described above. It has the following syntax:
urlparse(urlstr, defProtSch=None, allowFrag=None)
urlparse() parses urlstr into a 6-tuple (prot_sch, net_loc, path, params, query, frag). Each of these components has been described above. defProtSch indicates a default network protocol or download scheme in case one is not provided in urlstr.allowFrag is a flag that signals whether or not a fragment part of a URL is allowed. Here is what urlparse() outputs when given a URL:
![]()
urlunparse() does the exact opposite of urlparse()—it merges a 6-tuple (prot_sch, net_loc, path, params, query, frag)—urltup, which could be the output of urlparse(), into a single URL string and returns it. Accordingly, we state the following equivalence:
urlunparse(urlparse(urlstr)) ≡ urlstr
You may have already surmised that the syntax of urlunparse() is as follows:
urlunparse(urltup)
The urljoin() function is useful in cases where many related URLs are needed, for example, the URLs for a set of pages to be generated for a Web site. The syntax for urljoin() is:
urljoin(baseurl, newurl, allowFrag=None)
urljoin() takes baseurl and joins its base path (net_loc plus the full path up to, but not including, a file at the end) with newurl. For example:

A summary of the functions in urlparse can be found in Table 20.3.

Core Module: urllib
Unless you are planning on writing a more lower-level network client, the urllib module provides all the functionality you need. urllib provides a high-level Web communication library, supporting the basic Web protocols, HTTP, FTP, and Gopher, as well as providing access to local files. Specifically, the functions of the urllib module are designed to download data (from the Internet, local network, or local host) using the aforementioned protocols. Use of this module generally obviates the need for using the httplib, ftplib, and gopherlib modules unless you desire their lower-level functionality. In those cases, such modules can be considered as alternatives. (Note: Most modules named *lib are generally for developing clients of the corresponding protocols. This is not always the case, however, as perhaps urllib should then be renamed “internetlib” or something similar!)
The urllib module provides functions to download data from given URLs as well as encoding and decoding strings to make them suitable for including as part of valid URL strings. The functions we will be looking at in this upcoming section include: urlopen(), urlretrieve(), quote(), unquote(), quote_plus(), unquote_plus(), and urlencode(). We will also look at some of the methods available to the file-like object returned by urlopen(). They will be familiar to you because you have already learned to work with files back in Chapter 9.
urlopen() opens a Web connection to the given URL string and returns a file-like object. It has the following syntax:
urlopen(urlstr, postQueryData=None)
urlopen() opens the URL pointed to by urlstr. If no protocol or download scheme is given, or if a “file” scheme is passed in, urlopen() will open a local file.
For all HTTP requests, the normal request type is “GET.” In these cases, the query string provided to the Web server (key-value pairs encoded or “quoted,” such as the string output of the urlencode() function [see below]), should be given as part of urlstr.
If the “POST” request method is desired, then the query string (again encoded) should be placed in the postQueryData variable. (For more information regarding the GET and POST request methods, refer to any general documentation or texts on programming CGI applications—which we will also discuss below. GET and POST requests are the two ways to “upload” data to a Web server.
When a successful connection is made, urlopen() returns a file-like object as if the destination was a file opened in read mode. If our file object is f, for example, then our “handle” would support the expected read methods such as f.read(), f.readline(), f.readlines(), f.close(), and f.fileno().
In addition, a f.info() method is available which returns the MIME (Multipurpose Internet Mail Extension) headers. Such headers give the browser information regarding which application can view returned file types. For example, the browser itself can view HTML (HyperText Markup Language), plain text files, and render PNG (Portable Network Graphics) and JPEG (Joint Photographic Experts Group) or the old GIF (Graphics Interchange Format) graphics files. Other files such as multimedia or specific document types require external applications in order to view.
Finally, a geturl() method exists to obtain the true URL of the final opened destination, taking into consideration any redirection that may have occurred. A summary of these file-like object methods is given in Table 20.4.

If you expect to be accessing more complex URLs or want to be able to handle more complex situations such as basic and digest authentication, redirections, cookies, etc., then we suggest using the urllib2 module, introduced back in the 1.6 days (mostly as an experimental module). It too, has a urlopen() function, but also provides other functions and classes for opening a variety of URLs. For more on urllib2, see the next section of this chapter.
urlretrieve() will do some quick and dirty work for you if you are interested in working with a URL document as a whole. Here is the syntax for urlretrieve():
urlretrieve(urlstr, localfile=None, downloadStatusHook=None)
Rather than reading from the URL like urlopen() does, urlretrieve() will simply download the entire HTML file located at urlstr to your local disk. It will store the downloaded data into localfile if given or a temporary file if not. If the file has already been copied from the Internet or if the file is local, no subsequent downloading will occur.
The downloadStatusHook, if provided, is a function that is called after each block of data has been downloaded and delivered. It is called with the following three arguments: number of blocks read so far, the block size in bytes, and the total (byte) size of the file. This is very useful if you are implementing “download status” information to the user in a text-based or graphical display.
urlretrieve() returns a 2-tuple, (filename, mime_hdrs). filename is the name of the local file containing the downloaded data. mime_hdrs is the set of MIME headers returned by the responding Web server. For more information, see the Message class of the mimetools module. mime_hdrs is None for local files.
For a simple example using urlretrieve(), take a look at Example 11.4 (grabweb.py). A larger piece of code using urlretrieve() can be found later in this chapter in Example 20.2.
The quote*() functions take URL data and “encodes” them so that they are “fit” for inclusion as part of a URL string. In particular, certain special characters that are unprintable or cannot be part of valid URLs acceptable to a Web server must be converted. This is what the quote*() functions do for you. Both quote*() functions have the following syntax:
quote(urldata, safe='/')
Characters that are never converted include commas, underscores, periods, and dashes, as well as alphanumerics. All others are subject to conversion. In particular, the disallowed characters are changed to their hexadecimal ordinal equivalents prepended with a percent sign (%), i.e., “%xx” where “xx” is the hexadecimal representation of a character’s ASCII value. When calling quote*(), the urldata string is converted to an equivalent string that can be part of a URL string. The safe string should contain a set of characters which should also not be converted. The default is the slash ( / ).
quote_plus() is similar to quote() except that it also encodes spaces to plus signs ( + ). Here is an example using quote() vs. quote_plus():

As you have probably guessed, the unquote*() functions do the exact opposite of the quote*() functions—they convert all characters encoded in the “%xx” fashion to their ASCII equivalents. The syntax of unquote*() is as follows:
unquote*(urldata)
Calling unquote() will decode all URL-encoded characters in urldata and return the resulting string. unquote_plus() will also convert plus signs back to space characters.
urlencode(), added to Python back in 1.5.2, takes a dictionary of key-value pairs and encodes them to be included as part of a query in a CGI request URL string. The pairs are in “key=value” format and are delimited by ampersands ( & ). Furthermore, the keys and their values are sent to quote_plus() for proper encoding. Here is an example output from urlencode():

There are other functions in urllib and urlparse which we did not have the opportunity to cover here. Refer to the documentation for more information.
The urllib module was given support for opening HTTP connections using the Secure Socket Layer (SSL) in 1.6. The core change to add SSL is implemented in the socket module. Consequently, the urllib and httplib modules were updated to support URLs using the “https” connection scheme. In addition to those two modules, other protocol client modules with SSL support include: imaplib, poplib, and smtplib.
A summary of the urllib functions discussed in this section can be found in Table 20.5.

As mentioned in the previous section, urllib2 can handle more complex URL opening. One example is for Web sites with basic authentication (login and password) requirements. The most straightforward solution to “getting past security” is to use the extended net_loc URL component as described earlier in this chapter, i.e., http://user:[email protected]. The problem with this solution is that it is not programmatic. Using urllib2, however, we can tackle this problem in two different ways.
We can create a basic authentication handler (urllib2.HTTPBasicAuthHandler) and “register” a login password given the base URL and perhaps a realm, meaning a string defining the secure area of the Web site. (For more on realms, see RFC 2617 [HTTP Authentication: Basic and Digest Access Authentication]). Once this is done, you can “install” a URL-opener with this handler so that all URLs opened will use our handler.
The other alternative is to simulate typing the username and password when prompted by a browser and that is to send an HTTP client request with the appropriate authorization headers. In Example 20.1 we can easily identify each of these two methods.
Example 20.1. HTTP Auth Client (urlopen-auth.py)
This script uses both techniques described above for basic authentication.

The “handler” version of the code allocates a basic handler class as described earlier, then adds the authentication information. The handler is then used to create a URL-opener that is then installed so that all URLs opened will use the given authentication. This code was adapted from the official Python documentation for the urllib2 module.
The “request” version of our code just builds a Request object and adds the simple base64-encoded authentication header into our HTTP request. This request is then used to substitute the URL string when calling urlopen() upon returning back to “main.” Note that the original URL was built into the Request object, hence the reason why it was not a problem to replace it in the subsequent call to urllib2.urlopen(). This code was inspired by Mike Foord’s and Lee Harr’s recipes in the Python Cookbook located at:
http://aspn.activestate.com/ASPN/Cookbook/Python/Recipe/305288
http://aspn.activestate.com/ASPN/Cookbook/Python/Recipe/267197
It would have been great to have been able to use Harr’s HTTPRealmFinder class so that we do not need to hardcode it in our example.
The rest of this script just opens the given URL using both techniques and displays the first line (dumping the others) of the resulting HTML page returned by the server once authentication has been validated. Note that an HTTP error (and no HTML) would be returned if the authentication information is invalid.
The output should look something like this:

In addition to the official Python documentation for urllib2, you may find this companion piece useful: http://www.voidspace.org.uk/python/articles/urllib2.shtml.
Web browsers are basic Web clients. They are used primarily for searching and downloading documents from the Web. Advanced clients of the Web are those applications that do more than download single documents from the Internet.
One example of an advanced Web client is a crawler (aka spider, robot). These are programs that explore and download pages from the Internet for different reasons, some of which include:
• Indexing into a large search engine such as Google or Yahoo!
• Offline browsing—downloading documents onto a local hard disk and rearranging hyperlinks to create almost a mirror image for local browsing
• Downloading and storing for historical or archival purposes, or
• Web page caching to save superfluous downloading time on Web site revisits.
The crawler we present below, crawl.py, takes a starting Web address (URL), downloads that page and all other pages whose links appear in succeeding pages, but only those that are in the same domain as the starting page. Without such limitations, you will run out of disk space! The source for crawl.py appears in Example 20.2.


The top part of the script consists of the standard Python Unix start-up line and the importation of various module attributes that are employed in this application.
The Retriever class has the responsibility of downloading pages from the Web and parsing the links located within each document, adding them to the “to-do” queue if necessary. A Retriever instance object is created for each page that is downloaded from the net. Retriever consists of several methods to aid in its functionality: a constructor (__init__()), filename(), download(), and parseAndGetLinks().
The filename() method takes the given URL and comes up with a safe and sane corresponding filename to store locally. Basically, it removes the “http://” prefix from the URL and uses the remaining part as the filename, creating any directory paths necessary. URLs without trailing file-names will be given a default filename of “index.htm”. (This name can be overridden in the call to filename()).
The constructor instantiates a Retriever object and stores both the URL string and the corresponding file name returned by filename() as local attributes.
The download() method, as you may imagine, actually goes out to the net to download the page with the given link. It calls urllib.urlretrieve() with the URL and saves it to the filename (the one returned by filename()). If the download was successful, the parse() method is called to parse the page just copied from the network; otherwise an error string is returned.
If the Crawler determines that no error has occurred, it will invoke the parseAndGetLinks() method to parse the newly downloaded page and determine the course of action for each link located on that page.
The Crawler class is the “star” of the show, managing the entire crawling process for one Web site. If we added threading to our application, we would create separate instances for each site crawled. The Crawler consists of three items stored by the constructor during the instantiation phase, the first of which is q, a queue of links to download. Such a list will fluctuate during execution, shrinking as each page is processed and grown as new links are discovered within each downloaded page.
The other two data values for the Crawler include seen, a list of all the links that “we have seen” (downloaded) already. And finally, we store the domain name for the main link, dom, and use that value to determine whether any succeeding links are part of the same domain.
Crawler also has a static data item named count. The purpose of this counter is just to keep track of the number of objects we have downloaded from the net. It is incremented for every page successfully download.
Crawler has a pair of other methods in addition to its constructor, getPage() and go(). go() is simply the method that is used to start the Crawler and is called from the main body of code. go() consists of a loop that will continue to execute as long as there are new links in the queue that need to be downloaded. The workhorse of this class, though, is the getPage() method.
getPage() instantiates a Retriever object with the first link and lets it go off to the races. If the page was downloaded successfully, the counter is incremented and the link added to the “already seen” list. It looks recursively at all the links featured inside each downloaded page and determines whether any more links should be added to the queue. The main loop in go() will continue to process links until the queue is empty, at which time victory is declared.
Links that are part of another domain, have already been downloaded, are already in the queue waiting to be processed, or are “mailto:” links are ignored and not added to the queue.
main() is executed if this script is invoked directly and is the starting point of execution. Other modules that import crawl.py will need to invoke main() to begin processing. main() needs a URL to begin processing. If one is given on the command line (for example, when this script is invoked directly), it will just go with the one given. Otherwise, the script enters interactive mode, prompting the user for a starting URL. With a starting link in hand, the Crawler is instantiated and away we go.
One sample invocation of crawl.py may look like this:
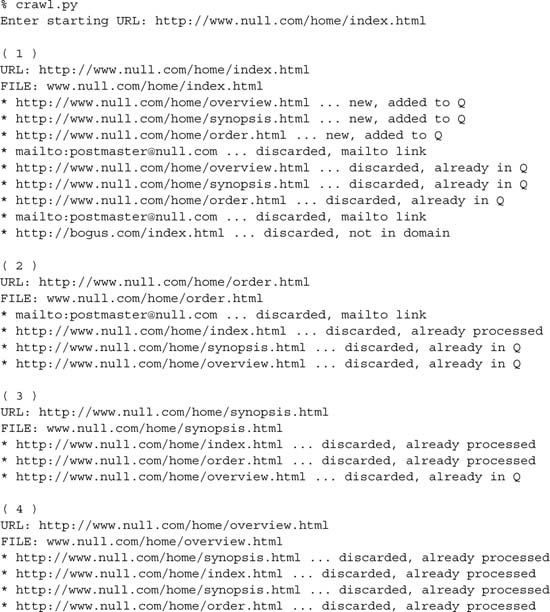
After execution, a www.null.com directory would be created in the local file system, with a home subdirectory. Within home, all the HTML files processed will be found.
The Web was initially developed to be a global online repository or archive of (mostly educational and research-oriented) documents. Such pieces of information generally come in the form of static text and usually in HTML.
HTML is not as much a language as it is a text formatter, indicating changes in font types, sizes, and styles. The main feature of HTML is in its hypertext capability, text that is in one way or another highlighted to point to another document in a related context to the original. Such a document can be accessed by a mouse click or other user selection mechanism. These (static) HTML documents live on the Web server and are sent to clients when and if requested.
As the Internet and Web services evolved, there grew a need to process user input. Online retailers needed to be able to take individual orders, and online banks and search engine portals needed to create accounts for individual users. Thus fill-out forms were invented, and became the only way a Web site can get specific information from users (until Java applets came along). This, in turn, required the HTML now be generated on the fly, for each client submitting user-specific data.
Now, Web servers are only really good at one thing, getting a user request for a file and returning that file (i.e., an HTML file) to the client. They do not have the “brains” to be able to deal with user-specific data such as those which come from fields. Not being their responsibility, Web servers farm out such requests to external applications which create the dynamically generated HTML that is returned to the client.
The entire process begins when the Web server receives a client request (i.e., GET or POST) and calls the appropriate application. It then waits for the resulting HTML—meanwhile, the client also waits. Once the application has completed, it passes the dynamically generated HTML back to the server, who then (finally) forwards it back to the user. This process of the server receiving a form, contacting an external application, and receiving and returning the newly-generated HTML takes place through what is called the Web server’s CGI (Common Gateway Interface). An overview of how CGI works is illustrated in Figure 20-3, which shows you the execution and data flow, step-by-step, from when a user submits a form until the resulting Web page is returned.
Figure 20-3. Overview of how CGI works. CGI represents the interaction between a Web server and the application that is required to process a user’s form and generate the dynamic HTML that is eventually returned.

Forms input from the client sent to a Web server may include processing and perhaps some form of storage in a backend database. Just keep in mind that any time there are any user-filled fields and/or a Submit button or image, it most likely involves some sort of CGI activity.
CGI applications that create the HTML are usually written in one of many higher-level programming languages that have the ability to accept user data, process it, and return HTML back to the server. Currently used programming languages include Perl, PHP, C/C++, or Python, to name a few. Before we take a look at CGI, we have to provide the caveat that the typical production Web application is no longer being done in CGI anymore.
Because of its significant limitations and limited ability to allow Web servers to process an abundant number of simultaneous clients, CGI is a dinosaur. Mission-critical Web services rely on compiled languages like C/C++ to scale. A modern-day Web server is typically composed of Apache and integrated components for database access (MySQL or PostgreSQL), Java (Tomcat), PHP, and various modules for Perl, Python, and SSL/security. However, if you are working on small personal Web sites or ones for small organizations and do not need the power and complexity required by mission critical Web services, CGI is the perfect tool for your simple Web sites.
Furthermore, there are a good number of Web application development frameworks out there as well as content management systems, all of which make building CGI a relic of past. However, beneath all the fluff and abstraction, they must still, in the end, follow the same model that CGI originally provided, and that is being able to take user input, execute code based on that input, and provide valid HTML as its final output for the client. Therefore, the exercise in learning CGI is well worth it in terms of understanding the fundamentals in order to develop effective Web services.
In this next section, we will look at how to create CGI applications in Python, with the help of the cgi module.
A CGI application is slightly different from a typical program. The primary differences are in the input, output, and user interaction aspects of a computer program. When a CGI script starts, it needs to retrieve the user-supplied form data, but it has to obtain this data from the Web client, not a user on the server machine nor a disk file.
The output differs in that any data sent to standard output will be sent back to the connected Web client rather than to the screen, GUI window, or disk file. The data sent back must be a set of valid headers followed by HTML. If it is not and the Web client is a browser, an error (specifically, an Internal Server Error) will occur because Web clients such as browsers understand only valid HTTP data (i.e., MIME headers and HTML).
Finally, as you can probably guess, there is no user interaction with the script. All communication occurs among the Web client (on behalf of a user), the Web server, and the CGI application.
There is one primary class in the cgi module that does all the work: the FieldStorage class. This class should be instantiated when a Python CGI script begins, as it will read in all the pertinent user information from the Web client (via the Web server). Once this object has been instantiated, it will consist of a dictionary-like object that has a set of key-value pairs. The keys are the names of the form items that were passed in through the form while the values contain the corresponding data.
These values themselves can be one of three objects. They can be FieldStorage objects (instances) as well as instances of a similar class called MiniFieldStorage, which is used in cases where no file uploads or multiple-part form data is involved. MiniFieldStorage instances contain only the key-value pair of the name and the data. Lastly, they can be a list of such objects. This occurs when a form contains more than one input item with the same field name.
For simple Web forms, you will usually find all MiniFieldStorage instances. All of our examples below pertain only to this general case.
In order to play around with CGI development in Python, you need to first install a Web server, configure it for handling Python CGI requests, and then give the Web server access to your CGI scripts. Some of these tasks may require assistance from your system administrator.
If you want a real Web server, you will likely download and install Apache. There are Apache plug-ins or modules for handling Python CGI, but they are not required for our examples. You may wish to install those if you are planning on “going live” to the world with your service. Even this may be overkill.
For learning purposes or for simple Web sites, it may suffice to just use the Web servers that come with Python. In Section 20.8, you will actually learn how to build and configure simple Python-based Web servers. You may read ahead now if you wish to find out more about it at this stage. However, that is not what this section is about.
If you want to just start up the most basic Web server, just execute it directly with Python:
$ python -m CGIHTTPServer
The -m option is new in 2.4, so if you are using an older version of Python or want to see alternative ways of running it, see section 14.4.3. Anyway, if you eventually get it working. ...
This will start a Web server on port 8000 on your current machine from the current directory. Then you can just create a cgi-bin right underneath the directory from which you started the server and put your Python CGI scripts in there. Put some HTML files in that directory and perhaps some .py CGI scripts in cgi-bin, and you are ready to “surf” directly to this Web site with addresses looking something like these:
http://localhost:8000/friends.htm
http://localhost:8000/cgi-bin/friends2.py
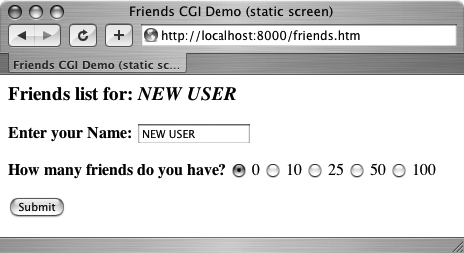
In Example 20.3, we present the code for a simple Web form, friends.htm.
Example 20.3. Static Form Web Page (friends.htm)
This HTML file presents a form to the user with an empty field for the user’s name and a set of radio buttons for the user to choose from.

As you can see in the code, the form contains two input variables: person and howmany. The values of these two fields will be passed to our CGI script, friends1.py.
You will notice in our example that we install our CGI script into the default cgi-bin directory (see the “Action” link) on the local host. (If this information does not correspond with your development environment, update the form action before attempting to test the Web page and CGI script.) Also, because a METHOD subtag is missing from the form action all requests will be of the default type, GET. We choose the GET method because we do not have very many form fields, and also, we want our query string to show up in the “Location” (aka “Address”, “Go To”) bar so that you can see what URL is sent to the server.
Let us take a look at the screen that is rendered by friends.htm in a client (see Figure 20-4 for Safari on MacOS and Figure 20-5 for IE6). Throughout this chapter, we will feature screenshots from various Web browsers and operating systems over the past few years.

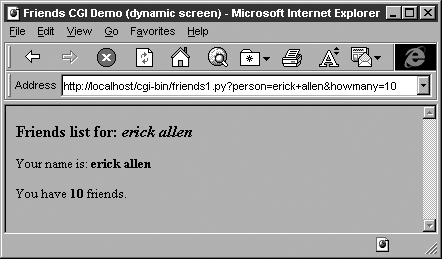
The input is entered by the user and the “Submit” button is pressed. (Alternatively, the user can also press the RETURN or Enter key within the text field to cause a similar effect.) When this occurs, the script in Example 20.4, friends1.py, is executed via CGI.
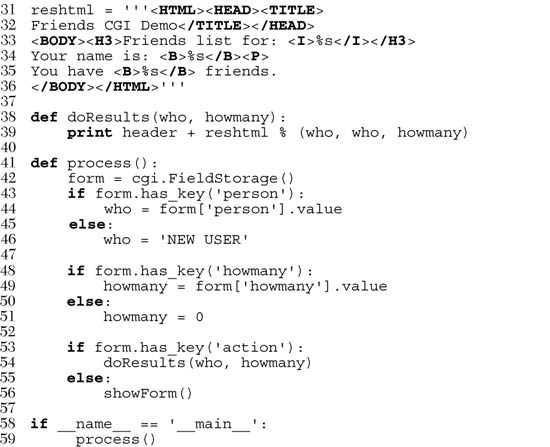
Example 20.4. Results Screen CGI code (friends1.py)
This CGI script grabs the person and howmany fields from the form and uses that data to create the dynamically generated results screen.

This script contains all the programming power to read the form input and process it, as well as return the resulting HTML page back to the user. All the “real” work in this script takes place in only four lines of Python code (lines 14–17).
The form variable is our FieldStorage instance, containing the values of the person and howmany fields. We read these into the Python who and howmany variables, respectively. The reshtml variable contains the general body of HTML text to return, with a few fields filled in dynamically, the data just read in from the form.
Core Tip: HTTP headers separate from HTML
One thing that always nails CGI beginners is that when sending results back to a CGI script, it must return the appropriate HTTP headers first before any HTML. Furthermore, to distinguish between these headers and the resulting HTML, several NEWLINE characters must be inserted between both sets of data, as in line 5 of our friends1.py example, as well as for the code in the remaining part of the chapter.
One possible resulting screen appears in Figure 20-6, assuming the user typed in “erick allen” as the name and clicked on the “10 friends” radio button. The screen snapshot this time is represented by the older IE3 browser in a Windows environment.
If you are a Web site producer, you may be thinking, “Gee, wouldn’t it be nice if I could automatically capitalize this person’s name, especially if they forgot?” This can easily be accomplished using Python CGI. (And we shall do so soon!)
Notice how on a GET request that our form variables and their values are added to the form action URL in the “Address” bar. Also, did you observe that the title for the friends.htm page has the word “static” in it while the output screen from friends.py has the work “dynamic” in its title? We did that for a reason: to indicate that the friends.htm file is a static text file while the results page is dynamically generated. In other words, the HTML for the results page did not exist on disk as a text file; rather, it was generated by our CGI script, which returned it as if it was a local file.
In our next example, we will bypass static files altogether by updating our CGI script to be somewhat more multifaceted.
We obsolete friends.html and merge it into friends2.py. The script will now generate both the form page as well as the results page. But how can we tell which page to generate? Well, if there is form data being sent to us, that means that we should be creating a results page. If we do not get any information at all, that tells us that we should generate a form page for the user to enter his or her data.
Our new friends2.py script is shown in Example 20.5.
Example 20.5. Generating Form and Results Pages (friends2.py)
Both friends.html and friends1.py are merged together as friends2.py. The resulting script can now output both form and results pages as dynamically generated HTML and has the smarts to know which page to output.

So what did we change in our script? Let’s take a look at some of the blocks of code in this script.
In addition to the usual startup and module import lines, we separate the HTTP MIME header from the rest of the HTML body because we will use it for both types of pages (form page and results page) returned and we don’t want to duplicate the text. We will add this header string to the corresponding HTML body when it comes time for output to occur.
All of this code is related to the now-integrated friends.htm form page in our CGI script. We have a variable for the form page text, formhtml, and we also have a string to build the list of radio buttons, fradio. We could have duplicated this radio button HTML text as it is in friends.htm, but we wanted to show how we could use Python to generate more dynamic output—see the for-loop on lines 22–27.
The showForm() function has the responsibility of generating a form for user input. It builds a set of text for the radio buttons, merges those lines of HTML into the main body of formhtml, prepends the header to the form, and then returns the entire wad of data back to the client by sending the entire string to standard output.
There are a couple of interesting things to note about this code. The first is the “hidden” variable in the form called action, containing the value “edit” on line 12. This field is the only way we can tell which screen to display (i.e., the form page or the results page). We will see this field come into play in lines 53–56.
Also, observe that we set the 0 radio button as the default by “checking” it within the loop that generates all the buttons. This will also allow us to update the layout of the radio buttons and/or their values on a single line of code (line 18) rather than over multiple lines of text. It will also offer some more flexibility in letting the logic determine which radio button is checked—see the next update to our script, friends3.py coming up.
Now you may be thinking, “Why do we need an action variable when I could just as well be checking for the presence of person or howmany?” That is a valid question because yes, you could have just used person or howmany in this situation.
However, the action variable is a more conspicuous presence, insofar as its name as well as what it does—the code is easier to understand. The person and howmany variables are used for their values while the action variable is used as a flag.
The other reason for creating action is that we will be using it again to help us determine which page to generate. In particular, we will need to display a form with the presence of a person variable (rather than a results page)—this will break your code if you are solely relying on there being a person variable.
Since there are different pages that can result from this one script, we created an overall process() function to get the form data and decide which action to take. The main portion of process() will also look familiar to the main body of code in friends1.py. There are two major differences, however.
Since the script may or may not be getting the expected fields (invoking the script the first time to generate a form page, for example, will not pass any fields to the server), we need to “bracket” our retrieval of the form fields with if statements to check if they are even there. Also, we mentioned the action field above, which helps us decide which page to bring up. The code that performs this determination is in lines 53–56.
In Figures 20-7 and 20-8, you will see first the form screen generated by our script (with a name entered and radio button chosen), followed by the results page, also generated by our script.


If you look at the location or “Go to” bar, you will not see a URL referring to a static friends.htm file as you did in Figure 20-4 or Figure 20-5.
Our final example will complete the circle. As in the past, a user enters his or her information from the form page. We then process the data and output a results page. Now we will add a link to the results page that will allow the user to go back to the form page, but rather than presenting a blank form, we will fill in the data that the user has already provided. We will also add some error processing to give you an example of how it can be accomplished.
We now present our final update, friends3.py in Example 20.6.


friends3.py is not too unlike friends2.py. We invite the reader to compare the differences; we present a brief summary of the major changes for you here.
We take the URL out of the form because we now need it in two places, the results page being the new customer.
All of these lines deal with the new feature of having an error screen. If the user does not select a radio button indicating the number of friends, the howmany field is not passed to the server. In such a case, the show-Error() function returns the error page to the user.
The error page also features a JavaScript “Back” button. Because buttons are input types, we need a form, but no action is needed because we are simply just going back one page in the browsing history. Although our script currently supports (aka detects, tests for) only one type of error, we still use a generic error variable in case we wanted to continue development of this script to add more error detection in the future.
One goal for this script is to create a meaningful link back to the form page from the results page. This is implemented as a link to give the user the ability to return to a form page to update the data he or she entered, in case it was erroneous. The new form page makes sense only if it contains information pertaining to the data that have already been entered by the user. (It is frustrating for users to reenter their information from scratch!)
To accomplish this, we need to embed the current values into the updated form. In line 27, we add a value for the name. This value will be inserted into the name field, if given. Obviously, it will be blank on the initial form page. In Lines 38–41, we set the radio box corresponding to the number of friends currently chosen. Finally, on lines 49 and the updated doResults() function on lines 52–55, we create the link with all the existing information, which “returns” the user to our modified form page.
Finally, we added a simple feature that we thought would be a nice aesthetic touch. In the screens for friends1.py and friends2.py, the text entered by the user as his or her name is taken verbatim. You will notice in the screens above that if the user does not capitalize his or her names, that is reflected in the results page. We added a call to the string.capwords() function to automatically capitalize a user’s name. The capwords() function will capitalize the first letter of each word in the string that is passed in. This may or may not be a desired feature, but we thought that we would share it with you so that you know that such functionality exists.
We will now present four screens that show the progression of user interaction with this CGI form and script.
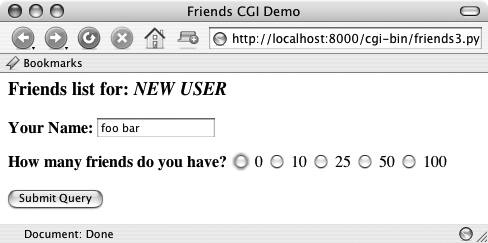
In the first screen, shown in Figure 20-9, we invoke friends3.py to bring up the now-familiar form page. We enter a name “foo bar,” but deliberately avoid checking any of the radio buttons. The resulting error after submitting the form can be seen in the second screen (Figure 20-10).

We click on the “Back” button, check the “50” radio button, and resubmit our form. The results page, shown in Figure 20-11, is also familiar, but now has an extra link at the bottom. This link will take us back to the form page. The only difference between the new form page and our original is that all the data filled in by the user are now set as the “default” settings, meaning that the values are already available in the form. We can see this in Figure 20-12.


Now the user is able to make changes to either of the fields and resubmit his or her form.
You will no doubt begin to notice that as our forms and data get more complicated, so does the generated HTML, especially for complex results pages. If you ever get to a point where generating the HTML text is interfering with your application, you may consider connecting with a Python module such as HTMLgen, an external Python module which specializes in HTML generation.
In Chapter 6, “Sequences,” we introduced the use of Unicode strings. In Section 6.8.5, we gave a simple example of a script that takes a Unicode string, writing it out to a file and reading it back in. In this section, we will demonstrate a simple CGI script that has Unicode output and how to give your browser enough clues to be able to render the characters properly. The one requirement is that you must have East Asian fonts installed on your computer so that the browser can display them.
To see Unicode in action we will build a CGI script to generate a multilingual Web page. First of all we define the message in a Unicode string. We assume your text editor can only enter ASCII. Therefore the non-ASCII characters are input using the u escape. In practice the message can also be read from a file or from database.

The first output the CGI generates is the content-type HTTP header. It is very important to declare here that the content is transmitted in the UTF-8 encoding so that the browser can correctly interpret it.
print 'Content-type: text/html; charset=UTF-8
'
print '
'
Then output the actual message. Use the string’s encode() method to translate the string into UTF-8 sequences first.
print UNICODE_HELLO.encode('UTF-8')
Example 20.7 shows the complete program.
Example 20.7. Simple Unicode CGI Example (uniCGI.py)
This script outputs Unicode strings to your Web browser.

If you run the CGI code from your browser, you will get output like that shown in Figure 20-13.

We will now take a look at some of the more advanced aspects of CGI programming. These include the use of cookies—cached data saved on the client side—multiple values for the same CGI field and file upload using multipart form submissions. To save space, we will show you all three of these features with a single application. Let’s take a look at multipart submissions first.
Currently, the CGI specifications only allow two types of form encodings, “application/x-www-form-urlencoded” and “multipart/form-data.” Because the former is the default, there is never a need to state the encoding in the FORM tag like this:
<FORM enctype="application/x-www-form-urlencoded" ...>
But for multipart forms, you must explicitly give the encoding as:
<FORM enctype="multipart/form-data" ...>
You can use either type of encoding for form submissions, but at this time, file uploads can only be performed with the multipart encoding. Multipart encoding was invented by Netscape in the early days but has since been adopted by Microsoft (starting with version 4 of Internet Explorer) as well as other browsers.
File uploads are accomplished using the file input type:
<INPUT type=file name=...>
This directive presents an empty text field with a button on the side which allows you to browse your file directory structure for a file to upload. When using multipart, your Web client’s form submission to the server will look amazingly like (multipart) e-mail messages with attachments. A separate encoding was needed because it just would not be necessarily wise to “urlencode” a file, especially a binary file. The information still gets to the server, but it is just “packaged” in a different way.
Regardless of whether you use the default encoding or the multipart, the cgi module will process them in the same manner, providing keys and corresponding values in the form submission. You will simply access the data through your FieldStorage instance as before.
In addition to file uploads, we are going to show you how to process fields with multiple values. The most common case is when you have a set of checkboxes allowing a user to select from various choices. Each of the checkboxes is labeled with the same field name, but to differentiate them, each will have a different value associated with a particular checkbox.
As you know, the data from the user are sent to the server in key-value pairs during form submission. When more than one checkbox is submitted, you will have multiple values associated with the same key. In these cases, rather than being given a single MiniFieldStorage instance for your data, the cgi module will create a list of such instances that you will iterate over to obtain the different values. Not too painful at all.
Finally, we will use cookies in our example. If you are not familiar with cookies, they are just bits of data information which a server at a Web site will request to be saved on the client side, e.g., the browser.
Because HTTP is a “stateless” protocol, information that has to be carried from one page to another can be accomplished by using key-value pairs in the request as you have seen in the GET requests and screens earlier in this chapter. Another way of doing it, as we have also seen before, is using hidden form fields, such as the action variable in some of the later friends*.py scripts. These variables and their values are managed by the server because the pages they return to the client must embed these in generated pages.
One alternative to maintaining persistency in state across multiple page views is to save the data on the client side instead. This is where cookies come in. Rather than embedding data to be saved in the returned Web pages, a server will make a request to the client to save a cookie. The cookie is linked to the domain of the originating server (so a server cannot set or override cookies from other Web sites) and has an expiration date (so your browser doesn’t become cluttered with cookies).
These two characteristics are tied to a cookie along with the key-value pair representing the data item of interest. There are other attributes of cookies such as a domain subpath or a request that a cookie should only be delivered in a secure environment.
By using cookies, we no longer have to pass the data from page to page to track a user. Although they have been subject to a good amount of controversy over the privacy issue, most Web sites use cookies responsibly. To prepare you for the code, a Web server requests a client store a cookie by sending the “Set-Cookie” header immediately before the requested file.
Once cookies are set on the client side, requests to the server will automatically have those cookies sent to the server using the HTTP_COOKIE environment variable. The cookies are delimited by semicolons and come in “key=value” pairs. All your application needs to do to access the data values is to split the string several times (i.e., using str.split() or manual parsing). The cookies are delimited by semicolons ( ; ), and each key-value pair is separated by equal signs ( = ).
Like multipart encoding, cookies originated from Netscape, which implemented cookies and wrote up the first specification, which is still valid today. You can access this document at the following Web site:
Once cookies are standardized and this document finally obsoleted, you will be able to get more current information from Request for Comment documents (RFCs). The most current one for cookies at the time of publication is RFC 2109.
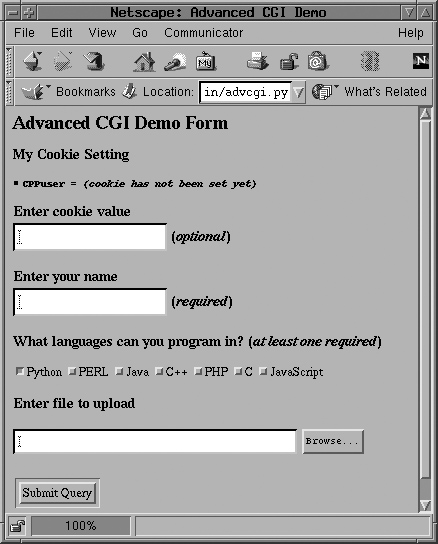
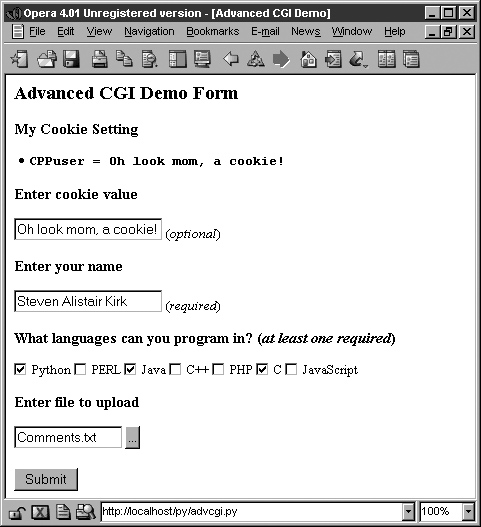
We now present our CGI application, advcgi.py, which has code and functionality not too unlike the friends3.py script seen earlier in this chapter. The default first page is a user fill-out form consisting of four main parts: user-set cookie string, name field, checkbox list of programming languages, and file submission box. An image of this screen can be seen in Figure 20-14.

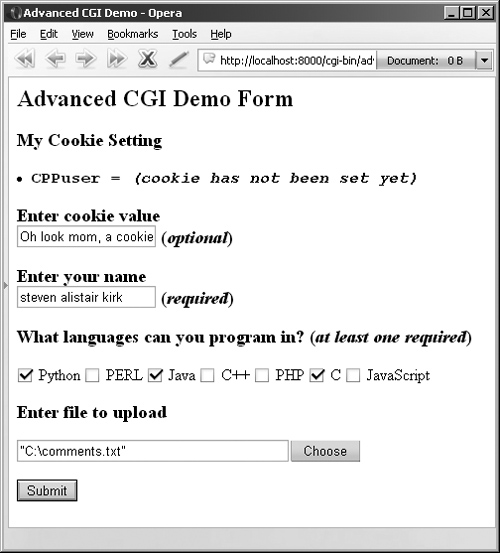
Figure 20-15 shows another look at the form from another browser. From this form, we can enter our information, such as the sample data given in Figure 20-16. Notice how the text in the button to search for files differs between browsers, i.e., “Browse ...”, “Choose”, “...”, etc.
The data are submitted to the server using multipart encoding and retrieved in the same manner on the server side using the FieldStorage instance. The only tricky part is in retrieving the uploaded file. In our application, we choose to iterate over the file, reading it line by line. It is also possible to read in the entire contents of the file if you are not wary of its size.
Since this is the first occasion data are received by the server, it is at this time, when returning the results page back to the client, that we use the “Set-Cookie:” header to cache our data in browser cookies.
In Figure 20-17, you will see the results after submitting our form data. All the fields the user entered are shown on the page. The given file in the final dialog box was uploaded to the server and displayed as well.
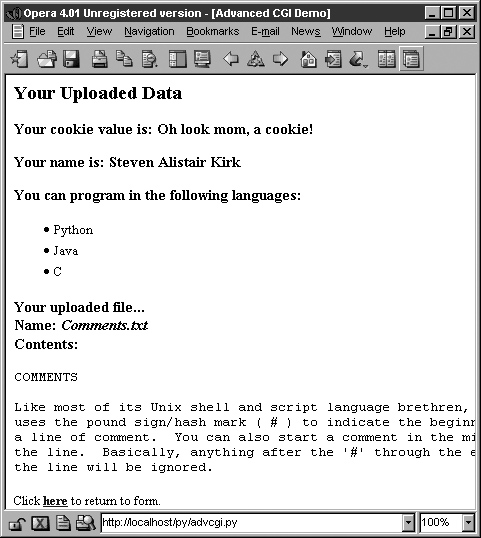
You will also notice the link at the bottom of the results page, which returns us to the form page, again using the same CGI script.
If we click on that link at the bottom, no form data is submitted to our script, causing a form page to be displayed. Yet, as you can see from Figure 20-17, what shows up is anything but an empty form! Information previously entered by the user shows up! How did we accomplish this with no form data (either hidden or as query arguments in the URL)? The secret is that the data are stored on the client side in cookies, two in fact.
The user cookie holds the string of data typed in by the user in the “Enter cookie value” form field, and the user’s name, languages they are familiar with, and uploaded files are stored in the info cookie.
When the script detects no form data, it shows the form page, but before the form page has been created, it grabs the cookies from the client (which are automatically transmitted by the client when the user clicks on the link) and fills out the form accordingly. So when the form is finally displayed, all the previously entered information appears to the user like magic (see Figure 20-18).
We are certain you are eager to take a look at this application, so here it is, in Example 20.8.
Example 20.8. Advanced CGI Application (advcgi.py)
This script has one main class that does everything, AdvCGI. It has methods to show either form, error, or results pages as well as those that read or write cookies from/to the client (a Web browser).


advcgi.py looks strikingly similar to our friends3.py CGI scripts seen earlier in this chapter. It has a form, results, and error pages to return. In addition to all of the advanced CGI features that are part of our new script, we are also using more of an object-oriented feel to our script by using a class with methods instead of just a set of functions. The HTML text for our pages is now static data for our class, meaning that they will remain constant across all instances—even though there is actually only one instance in our case.
The usual startup and import lines appear here. The only module you may not be familiar with is cStringIO, which we briefly introduced at the end of Chapter 10 and also used in Example 20.1. cStringIO.StringIO() creates a file-like object out of a string so that access to the string is similar to opening a file and using the handle to access the data.
After the AdvCGI class is declared, the header and url (static class) variables are created for use by the methods displaying all the different pages.
All the code in this block is used to generate and display the form page. The data attributes speak for themselves. getCPPCookies() obtains cookie information sent by the Web client, and showForm() collates all the information and sends the form page back to the client.
The results page is created using this block of code. The setCPPCookies() method requests that a client store the cookies for our application, and the doResults() method puts together all the data and sends the output back to the client.
The script begins by instantiating an AdvCGI page object, then calls its go() method to start the ball rolling, in contrast to a strictly procedural programming process. The go() method contains the logic that reads all incoming data and decides which page to show.
The error page will be displayed if no name was given or if no languages were checked. The showForm() method is called to output the form if no input data were received, and the doResults() method is invoked otherwise to display the results page. Error situations are created by setting the self.error variable, which serves two purposes. It lets you set an error reason as a string and also serves as a flag to indicate that an error has occurred. If this value is not blank, the user will be forwarded to the error page.
Handling the person field (lines 154–159) is the same as we have seen in the past, a single key-value pair; however, collecting the language information is a bit trickier since we must check for either a (Mini)FieldStorage instance or a list of such instances. We will employ the familiar type() built-in function for this purpose. In the end, we will have a list of a single language name or many, depending on the user’s selections.
The use of cookies (lines 161–165) to contain data illustrates how they can be used to avoid using any kind of CGI field pass-through. You will notice in the code that obtains such data that no CGI processing is invoked, meaning that the data do not come from the FieldStorage object. The data are passed to us by the Web client with each request and the values (user’s chosen data as well as information to fill in a succeeding form with pre-existing information) are obtained from cookies.
Because the showResults() method receives the new input from the user, it has the responsibility of setting the cookies, i.e., by calling setCPPCookies(). showForm(), however, must read in the cookies’ values in order to display a form page with the current user selections. This is done by its invocation of the getCPPCookies() method.
Finally, we get to the file upload processing (lines 178–187). Regardless of whether a file was actually uploaded, FieldStorage is given a file handle in the file attribute. On line 180, if there was no filename given, then we just set it to a blank string. If the value attribute is accessed, the entire contents of the file will be placed into value. As a better alternative, you can access the file pointer—the file attribute—and perhaps read only one line at a time or other kind of slower processing.
In our case, file uploads are only part of user submissions, so we simply pass on the file pointer to the doResults() function to extract the data from the file. doResults() will display only the first 1K of the file for space reasons and to show you that it is not necessary (or necessarily productive/useful) to display a four-megabyte binary file.
Until now, we have been discussing the use of Python in creating Web clients and performing tasks to aid Web servers in CGI request processing. We know (and saw earlier in Sections 20.2 and 20.3) that Python can be used to create both simple and complex Web clients. Complexity of CGI requests goes without saying.
However, we have yet to explore the creation of Web servers, and that is the focus of this section. If the Firefox, Mozilla, IE, Opera, Netscape, AOL, Safari, Camino, Epiphany, Galeon, and Lynx browsers are among the most popular Web clients, then what are the most common Web servers? They are Apache, Netscape, IIS, thttpd, Zeus, and Zope. In situations where these servers may be overkill for your desired application, Python can be used to create simple yet useful Web servers.
Since you have decided on building such an application, you will naturally be creating all the custom stuff, but all the base code you will need is already available in the Python Standard Library. To create a Web server, a base server and a “handler” are required.
The base (Web) server is a boilerplate item, a must have. Its role is to perform the necessary HTTP communication between client and server. The base server class is (appropriately) named HTTPServer and is found in the BaseHTTPServer module.
The handler is the piece of software that does the majority of the “Web serving.” It processes the client request and returns the appropriate file, whether static or dynamically generated by CGI. The complexity of the handler determines the complexity of your Web server. The Python standard library provides three different handlers.
The most basic, plain, vanilla handler, named BaseHTTPRequestHandler, is found in the BaseHTTPServer module, along with the base Web server. Other than taking a client request, no other handling is implemented at all, so you have to do it all yourself, such as in our myhttpd.py server coming up.
The SimpleHTTPRequestHandler, available in the SimpleHTTP-Server module, builds on BaseHTTPRequestHandler by implementing the standard GET and HEAD requests in a fairly straightforward manner. Still nothing sexy, but it gets the simple jobs done.
Finally, we have the CGIHTTPRequestHandler, available in the CGIHTTPServer module, which takes the SimpleHTTPRequestHandler and adds support for POST requests. It has the ability to call CGI scripts to perform the requested processing and can send the generated HTML back to the client.
The three modules and their classes are summarized in Table 20.6.

To be able to understand how the more advanced handlers found in the SimpleHTTPServer and CGIHTTPServer modules work, we will implement simple GET processing for a BaseHTTPRequestHandler. In Example 20.9, we present the code for a fully working Web server, myhttpd.py.
Example 20.9. Simple Web Server (myhttpd.py)
This simple Web server can read GET requests, fetch a Web page (.html file) and return it to the calling client. It uses the BaseHTTPRequestHandler found in BaseHTTPServer and implements the do_GET() method to enable processing of GET requests.

This server subclasses BaseHTTPRequestHandler and consists of a single do_GET() method, which is called when the base server receives a GET request. We attempt to open the path passed in by the client and if present, return an “OK” status (200) and forward the downloaded Web page. If the file was not found, it returns a 404 status.
The main() function simply instantiates our Web server class and invokes it to run our familiar infinite server loop, shutting it down if interrupted by ^C or similar keystroke. If you have appropriate access and can run this server, you will notice that it displays loggable output, which will look something like this:

Of course, our simple little Web server is so simple, it cannot even process plain text files. We leave that as an exercise for the reader, which can be found at the end of the chapter.
As you can see, it doesn’t take much to have a Web server up and running in pure Python. There is plenty more you can do to enhance the handlers to customize it to your specific application. Please review the Library Reference for more information on the modules (and their classes) discussed in this section.
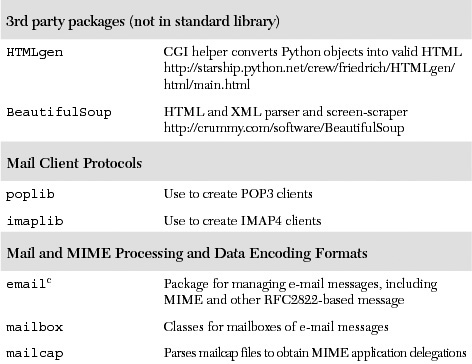
In Table 20.7, we present a list of modules which you may find useful for Web development. You may also wish to look at the Internet Client Programming in Chapter 17, as well as the Web services section of Chapter 23 for other modules that may be useful for Web applications.


20-1. urllib Module and Files. Update the friends3.py script so that it stores names and corresponding number of friends into a two-column text file on disk and continues to add names each time the script is run.
Extra Credit: Add code to dump the contents of such a file to the Web browser (in HTML format). Additional Extra Credit: Create a link that clears all the names in this file.
20-2. urllib Module. Write a program that takes a user-input URL (either a Web page or an FTP file, i.e., http://python.org or ftp://ftp.python.org/pub/python/README), and downloads it to your machine with the same filename (or modified name similar to the original if it is invalid on your system). Web pages (HTTP) should be saved as .htm or .html files, and FTP’d files should retain their extension.
20-3. urllib Module. Rewrite the grabWeb.py script of Example 11.4, which downloads a Web page and displays the first and last non-blank lines of the resulting HTML file so that you use urlopen() instead of urlretrieve() to process the data directly (as opposed to downloading the entire file first before processing it).
20-4. URLs and Regular Expressions. Your browser may save your favorite Web site URLs as a “bookmarks” HTML file (Mozilla-flavored browsers do this) or as a set of .URL files in a “favorites” directory (IE does this). Find your browser’s method of recording your “hot links” and the location of where and how they stored. Without altering any of the files, strip the URLs and names of the corresponding Web sites (if given) and produce a two-column list of names and links as output, and storing this data into a disk file. Truncate site names or URLs to keep each line of output within 80 columns in size.
20-5. URLs, urllib Module, Exceptions, and REs. As a follow-up problem to the previous one, add code to your script to test each of your favorite links. Report back a list of dead links (and their names), i.e., Web sites that are no longer active or a Web page that has been removed. Only output and save to disk the still-valid links.
20-6. Error Checking. The friends3.py script reports an error if no radio button was selected to indicate the number of friends. Update the CGI script to also report an error if no name (e.g., blank or whitespace) is entered.
Extra Credit: We have so far explored only server-side error checking. Explore JavaScript programming and implement client-side error checking by creating JavaScript code to check for both error situations so that these errors are stopped before they reach the server.
Problems 20-7 to 20-10 below pertain to Web server access log files and regular expressions. Web servers (and their administrators) generally have to maintain an access log file (usually logs/access_log from the main Web, server directory) which tracks requests file. Over a period of time, such files get large and either need to be stored or truncated. Why not save only the pertinent information and delete the files to conserve disk space? The exercises below are designed to give you some exercise with REs and how they can be used to help archive and analyze Web server data.
20-7. Count how many of each type of request (GET versus POST) exist in the log file.
20-8. Count the successful page/data downloads: Display all links that resulted in a return code of 200 (OK [no error]) and how many times each link was accessed.
20-9. Count the errors: Show all links that resulted in errors (return codes in the 400s or 500s) and how many times each link was accessed.
20-10. Track IP addresses: For each IP address, output a list of each page/data downloaded and how many times that link was accessed.
20-11. Simple CGI. Create a “Comments” or “Feedback” page for a Web site. Take user feedback via a form, process the data in your script, and return a “thank you” screen.
20-12. Simple CGI. Create a Web guestbook. Accept a name, an e-mail address, and a journal entry from a user and log it to a file (format of your choice). Like the previous problem, return a “thanks for filling out a guestbook entry” page. Also provide a link that allows users to view guestbooks.
20-13. Web Browser Cookies and Web site Registration. Update your solution to Exercise 20-4. So your user-password information should now pertain to Web site registration instead of a simple text-based menu system.
Extra Credit: familiarize yourself with setting Web browser cookies and maintain a login session for 4 hours from the last successful login.
20-14. Web Clients. Port Example 20.1, crawl.py, the Web crawler, to using the HTMLParser module or the BeautifulSoup parsing system.
20-15. Errors. What happens when a CGI script crashses? How can the cgitb module be helpful?
20-16. CGI, File Updates, and Zip Files. Create a CGI application that not only saves files to the server’s disk, but also intelligently unpacks Zip files (or other archive) into a subdirectory named after the archive file.
20-17. Zope, Plone, TurboGears, Django. Investigate each of these complex Web development platforms and create one simple application in each.
20-18. Web Database Application. Think of a database schema you want to provide as part of a Web database application. For this multi-user application, you want to provide everyone read access to the entire contents of the database, but perhaps only write access to each individual. One example may be an “address book” for your family and relatives. Each family member, once successfully logged in, is presented with a Web page with several options, add an entry, view my entry, update my entry, remove or delete my entry, and view all entries (entire database).
Design a UserEntry class and create a database entry for each instance of this class. You may use any solution created for any previous problem to implement the registration framework. Finally, you may use any type of storage mechanism for your database, either a relational database such as MySQL or some of the simpler Python persistent storage modules such as anydbm or shelve.
20-19. Electronic Commerce Engine. Use the classes created for your solution to Exercise 13-11 and add some product inventory to create a potential electronic commerce Web site. Be sure your Web application also supports multiple customers and provides registration for each user.
20-20. Dictionaries and cgi module. As you know, the cgi.FieldStorage() method returns a dictionary-like object containing the key-value pairs of the submitted CGI variables. You can use methods such as keys() and has_key() for such objects. In Python 1.5, a get() method was added to dictionaries which returned the value of the requested key, or the default value for a non-existent key. FieldStorage objects do not have such a method. Let’s say we grab the form in the usual manner of:
form = cgi.FieldStorage()
Add a similar get() method to class definition in cgi.py (you can rename it to mycgi.py or something like that) such that code that looks like this:
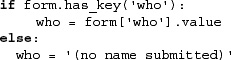
... can be replaced by a single line which makes forms even more like a dictionary:
howmany = form.get('who', '(no name submitted)')
20-21. Creating Web Servers. Our code for myhttpd.py in Section 20.7 is only able to read HTML files and return them to the calling client. Add support for plain text files with the “.txt” ending. Be sure that you return the correct MIME type of “text/plain.”
Extra credit: add support for JPEG files ending with either “.jpg” or “.jpeg” and having a MIME type of “image/jpeg.”
20-22. Advanced Web Clients. URLs given as input to crawl.py must have the leading “http://” protocol indicator and top-level URLs must contain a trailing slash, i.e., http://www.prenhallprofessional.com/. Make crawl.py more robust by allowing the user to input just the hostname (without the protocol part [make it assume HTTP]) and also make the trailing slash optional. For example, www.prenhallprofessional.com should now be acceptable input.
20-23. Advanced Web Clients. Update the crawl.py script in Section 20.3 to also download links that use the “ftp:” scheme. All “mailto:” links are ignored by crawl.py. Add support to ensure that it also ignores “telnet:”, “news:”, “gopher:”, and “about:” links.
20-24. Advanced Web Clients. The crawl.py script in Section 20.3 only downloads .html files via links found in Web pages at the same site and does not handle/save images that are also valid “files” for those pages. It also does not handle servers that are susceptible to URLs that are missing the trailing slash ( / ). Add a pair of classes to crawl.py to deal with these problems.
A My404UrlOpener class should subclass urllib.FancyURLOpener and consist of a single method, http_error_404() which determines if a 404 error was reached using a URL without a trailing slash. If so, it adds the slash and retries the request again (and only once). If it still fails, return a real 404 error. You must set urllib._urlopener with an instance of this class so that urllib uses it.
Create another class called LinkImageParser, which derives from htmllib.HTMLParser. This class should contain a constructor to call the base class constructor as well as initialize a list for the image files parsed from Web pages. The handle_image() method should be overridden to add image filenames to the image list (instead of discarding them like the current base class method does).