
Chapter Topics
In this section, we will explore the different ways you can achieve more parallelism in your code by using the multithreaded (MT) programming features found in Python. We will begin by differentiating between processes and threads in the first few of sections of this chapter. We will then introduce the notion of multithreaded programming. (Those of you already familiar with MT programming can skip directly to Section 18.3.5.) The final sections of this chapter present some examples of how to use the threading and Queue modules to accomplish MT programming with Python.
Before the advent of multithreaded (MT) programming, running of computer programs consisted of a single sequence of steps that were executed in synchronous order by the host’s central processing unit (CPU). This style of execution was the norm whether the task itself required the sequential ordering of steps or if the entire program was actually an aggregation of multiple subtasks. What if these subtasks were independent, having no causal relationship (meaning that results of subtasks do not affect other subtask outcomes)? Is it not logical, then, to want to run these independent tasks all at the same time? Such parallel processing could significantly improve the performance of the overall task. This is what MT programming is all about.
MT programming is ideal for programming tasks that are asynchronous in nature, require multiple concurrent activities, and where the processing of each activity may be nondeterministic, i.e., random and unpredictable. Such programming tasks can be organized or partitioned into multiple streams of execution where each has a specific task to accomplish. Depending on the application, these subtasks may calculate intermediate results that could be merged into a final piece of output.
While CPU-bound tasks may be fairly straightforward to divide into subtasks and executed sequentially or in a multithreaded manner, the task of managing a single-threaded process with multiple external sources of input is not as trivial. To achieve such a programming task without multithreading, a sequential program must use one or more timers and implement a multiplexing scheme.
A sequential program will need to sample each I/O (input/output) terminal channel to check for user input; however, it is important that the program does not block when reading the I/O terminal channel because the arrival of user input is nondeterministic, and blocking would prevent processing of other I/O channels. The sequential program must use non-blocked I/O or blocked I/O with a timer (so that blocking is only temporary).
Because the sequential program is a single thread of execution, it must juggle the multiple tasks that it needs to perform, making sure that it does not spend too much time on any one task, and it must ensure that user response time is appropriately distributed. The use of a sequential program for this type of task often results in a complicated flow of control that is difficult to understand and maintain.
Using an MT program with a shared data structure such as a Queue (a multithreaded queue data structure discussed later in this chapter), this programming task can be organized with a few threads that have specific functions to perform:
• UserRequestThread: Responsible for reading client input, perhaps from an I/O channel. A number of threads would be created by the program, one for each current client, with requests being entered into the queue.
• RequestProcessor: A thread that is responsible for retrieving requests from the queue and processing them, providing output for yet a third thread.
• ReplyThread: Responsible for taking output destined for the user and either sending it back, if in a networked application, or writing data to the local file system or database.
Organizing this programming task with multiple threads reduces the complexity of the program and enables an implementation that is clean, efficient, and well organized. The logic in each thread is typically less complex because it has a specific job to do. For example, the UserRequestThread simply reads input from a user and places the data into a queue for further processing by another thread, etc. Each thread has its own job to do; you merely have to design each type of thread to do one thing and do it well. Use of threads for specific tasks is not unlike Henry Ford’s assembly line model for manufacturing automobiles.
Computer programs are merely executables, binary (or otherwise), which reside on disk. They do not take on a life of their own until loaded into memory and invoked by the operating system. A process (sometimes called a heavyweight process) is a program in execution. Each process has its own address space, memory, a data stack, and other auxiliary data to keep track of execution. The operating system manages the execution of all processes on the system, dividing the time fairly between all processes. Processes can also fork or spawn new processes to perform other tasks, but each new process has its own memory, data stack, etc., and cannot generally share information unless interprocess communication (IPC) is employed.
Threads (sometimes called lightweight processes) are similar to processes except that they all execute within the same process, and thus all share the same context. They can be thought of as “mini-processes” running in parallel within a main process or “main thread.”
A thread has a beginning, an execution sequence, and a conclusion. It has an instruction pointer that keeps track of where within its context it is currently running. It can be preempted (interrupted) and temporarily put on hold (also known as sleeping) while other threads are running—this is called yielding.
Multiple threads within a process share the same data space with the main thread and can therefore share information or communicate with one another more easily than if they were separate processes. Threads are generally executed in a concurrent fashion, and it is this parallelism and data sharing that enable the coordination of multiple tasks. Naturally, it is impossible to run truly in a concurrent manner in a single CPU system, so threads are scheduled in such a way that they run for a little bit, then yield to other threads (going to the proverbial “back of the line” to await more CPU time again). Throughout the execution of the entire process, each thread performs its own, separate tasks, and communicates the results with other threads as necessary.
Of course, such sharing is not without its dangers. If two or more threads access the same piece of data, inconsistent results may arise because of the ordering of data access. This is commonly known as a race condition. Fortunately, most thread libraries come with some sort of synchronization primitives that allow the thread manager to control execution and access.
Another caveat is that threads may not be given equal and fair execution time. This is because some functions block until they have completed. If not written specifically to take threads into account, this skews the amount of CPU time in favor of such greedy functions.
Execution of Python code is controlled by the Python Virtual Machine (aka the interpreter main loop). Python was designed in such a way that only one thread of control may be executing in this main loop, similar to how multiple processes in a system share a single CPU. Many programs may be in memory, but only one is live on the CPU at any given moment. Likewise, although multiple threads may be “running” within the Python interpreter, only one thread is being executed by the interpreter at any given time.
Access to the Python Virtual Machine is controlled by the global interpreter lock (GIL). This lock is what ensures that exactly one thread is running. The Python Virtual Machine executes in the following manner in an MT environment:
- Set the GIL
- Switch in a thread to run
- Execute either ...
a. For a specified number of bytecode instructions, or
b. If the thread voluntarily yields control (can be accomplished
time.sleep(0)) - Put the thread back to sleep (switch out thread)
- Unlock the GIL, and ...
- Do it all over again (lather, rinse, repeat)
When a call is made to external code, i.e., any C/C++ extension built-in function, the GIL will be locked until it has completed (since there are no Python bytecodes to count as the interval). Extension programmers do have the ability to unlock the GIL, however, so you being the Python developer shouldn’t have to worry about your Python code locking up in those situations.
As an example, for any Python I/O-oriented routines (which invoke built-in operating system C code), the GIL is released before the I/O call is made, allowing other threads to run while the I/O is being performed. Code that doesn’t have much I/O will tend to keep the processor (and GIL) for the full interval a thread is allowed before it yields. In other words, I/O-bound Python programs stand a much better chance of being able to take advantage of a multithreaded environment than CPU-bound code.
Those of you interested in the source code, the interpreter main loop, and the GIL can take a look at the Python/ceval.c file.
When a thread completes execution of the function it was created for, it exits. Threads may also quit by calling an exit function such as thread. exit(), or any of the standard ways of exiting a Python process, i.e., sys.exit() or raising the SystemExit exception. You cannot, however, go and “kill” a thread.
We will discuss in detail the two Python modules related to threads in the next section, but of the two, the thread module is the one we do not recommend. There are many reasons for this, but an obvious one is that when the main thread exits, all other threads die without cleanup. The other module, threading, ensures that the whole process stays alive until all “important” child threads have exited. (We will clarify what “important” means soon. Look for the daemon threads Core Tip sidebar.)
Main threads should always be good managers, though, and perform the task of knowing what needs to be executed by individual threads, what data or arguments each of the spawned threads requires, when they complete execution, and what results they provide. In so doing, those main threads can collate the individual results into a final, meaningful conclusion.
Python supports multithreaded programming, depending on the operating system that it is running on. It is supported on most Unix-based platforms, i.e., Linux, Solaris, MacOS X, *BSD, as well as Win32 systems. Python uses POSIX-compliant threads, or “pthreads,” as they are commonly known.
By default, threads are enabled when building Python from source (since Python 2.0) or the Win32 installed binary. To tell whether threads are available for your interpreter, simply attempt to import the thread module from the interactive interpreter. No errors occur when threads are available:
>>> import thread
>>>
If your Python interpreter was not compiled with threads enabled, the module import fails:
>>> import thread
Traceback (innermost last):
File "<stdin>", line 1, in ?
ImportError: No module named thread
In such cases, you may have to recompile your Python interpreter to get access to threads. This usually involves invoking the configure script with the “--with-thread” option. Check the README file for your distribution to obtain specific instructions on how to compile Python with threads for your system.
For our first set of examples, we are going to use the time.sleep() function to show how threads work. time.sleep() takes a floating point argument and “sleeps” for the given number of seconds, meaning that execution is temporarily halted for the amount of time specified.
Let us create two “time loops,” one that sleeps for 4 seconds and one that sleeps for 2 seconds, loop0() and loop1(), respectively. (We use the names “loop0” and “loop1” as a hint that we will eventually have a sequence of loops.) If we were to execute loop0() and loop1() sequentially in a one-process or single-threaded program, as onethr.py does in Example 18.1, the total execution time would be at least 6 seconds. There may or may not be a 1-second gap between the starting of loop0() and loop1(), and other execution overhead which may cause the overall time to be bumped to 7 seconds.
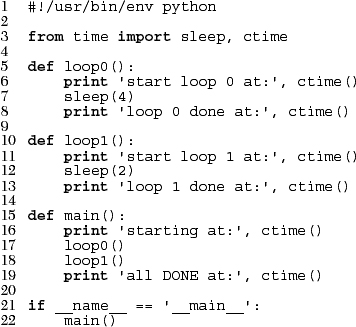
Example 18.1. Loops Executed by a Single Thread (onethr.py)
Executes two loops consecutively in a single-threaded program. One loop must complete before the other can begin. The total elapsed time is the sum of times taken by each loop.
We can verify this by executing onethr.py, which gives the following output:

Now, pretend that rather than sleeping, loop0() and loop1() were separate functions that performed individual and independent computations, all working to arrive at a common solution. Wouldn’t it be useful to have them run in parallel to cut down on the overall running time? That is the premise behind MT that we now introduce to you.
Python provides several modules to support MT programming, including the thread, threading, and Queue modules. The thread and threading modules allow the programmer to create and manage threads. The thread module provides basic thread and locking support, while threading provides higher-level, fully featured thread management. The Queue module allows the user to create a queue data structure that can be shared across multiple threads. We will take a look at these modules individually and present examples and intermediate-sized applications.
Core Tip: Avoid use of thread module
We recommend avoiding the thread module for many reasons. The first is that the high-level threading module is more contemporary, not to mention the fact that thread support in the threading module is much improved and the use of attributes of the thread module may conflict with using the threading module. Another reason is that the lower-level thread module has few synchronization primitives (actually only one) while threading has many.
However, in the interest of learning Python and threading in general, we do present some code that uses the thread module. These pieces of code should be used for learning purposes only and will give you a much better insight as to why you would want to avoid using the thread module. These examples also show how our applications and thread programming improve as we migrate to using more appropriate tools such as those available in the threading and Queue modules.
Another reason to avoid using thread is because there is no control of when your process exits. When the main thread finishes, all threads will also die, without warning or proper cleanup. As mentioned earlier, at least threading allows the important child threads to finish first before exiting.
Use of the thread module is recommended only for experts desiring lower-level thread access. Those of you new to threads should look at the code samples to see how we can overlay threads onto our time loop application and to gain a better understanding as to how these first examples evolve to the main code samples of this chapter. Your first multithreaded application should utilize threading and perhaps other high-level thread modules, if applicable.
Let’s take a look at what the thread module has to offer. In addition to being able to spawn threads, the thread module also provides a basic synchronization data structure called a lock object (aka primitive lock, simple lock, mutual exclusion lock, mutex, binary semaphore). As we mentioned earlier, such synchronization primitives go hand in hand with thread management.
Listed in Table 18.1 are the more commonly used thread functions and LockType lock object methods.
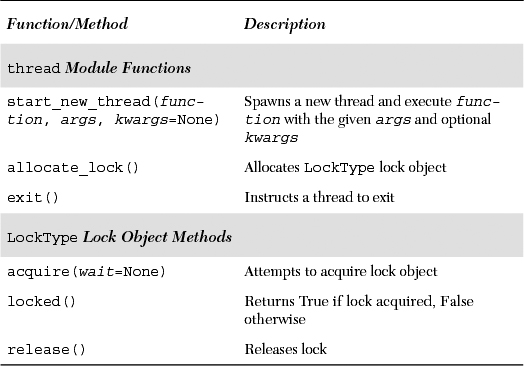
The key function of the thread module is start_new_thread(). Its syntax is exactly that of the apply() built-in function, taking a function along with arguments and optional keyword arguments. The difference is that instead of the main thread executing the function, a new thread is spawned to invoke the function.
Let’s take our onethr.py example and integrate threading into it. By slightly changing the call to the loop*() functions, we now present mtsleep1.py in Example 18.2.
Example 18.2. Using the thread Module (mtsleep1.py)
The same loops from onethr.py are executed, but this time using the simple multithreaded mechanism provided by the thread module. The two loops are executed concurrently (with the shorter one finishing first, obviously), and the total elapsed time is only as long as the slowest thread rather than the total time for each separately.

start_new_thread() requires the first two arguments, so that is the reason for passing in an empty tuple even if the executing function requires no arguments.
Upon execution of this program, our output changes drastically. Rather than taking a full 6 or 7 seconds, our script now runs in 4, the length of time of our longest loop, plus any overhead.

The pieces of code that sleep for 4 and 2 seconds now occur concurrently, contributing to the lower overall runtime. You can even see how loop 1 finishes before loop 0.
The only other major change to our application is the addition of the “sleep(6)” call. Why is this necessary? The reason is that if we did not stop the main thread from continuing, it would proceed to the next statement, displaying “all done” and exit, killing both threads running loop0() and loop1().
We did not have any code that told the main thread to wait for the child threads to complete before continuing. This is what we mean by threads requiring some sort of synchronization. In our case, we used another sleep() call as our synchronization mechanism. We used a value of 6 seconds because we know that both threads (which take 4 and 2 seconds, as you know) should have completed by the time the main thread has counted to 6.
You are probably thinking that there should be a better way of managing threads than creating that extra delay of 6 seconds in the main thread. Because of this delay, the overall runtime is no better than in our single-threaded version. Using sleep() for thread synchronization as we did is not reliable. What if our loops had independent and varying execution times? We may be exiting the main thread too early or too late. This is where locks come in.
Making yet another update to our code to include locks as well as getting rid of separate loop functions, we get mtsleep2.py, presented in Example 18.3. Running it, we see that the output is similar to mtsleep1.py. The only difference is that we did not have to wait the extra time for mtsleep1.py to conclude. By using locks, we were able to exit as soon as both threads had completed execution.

Example 18.3. Using thread and Locks (mtsleep2.py)
Rather than using a call to sleep() to hold up the main thread as in mtsleep1.py, the use of locks makes more sense.

So how did we accomplish our task with locks? Let us take a look at the source code.
After the Unix startup line, we import the thread module and a few familiar attributes of the time module. Rather than hardcoding separate functions to count to 4 and 2 seconds, we will use a single loop() function and place these constants in a list, loops.
The loop() function will proxy for the now-removed loop*() functions from our earlier examples. We had to make some cosmetic changes to loop() so that it can now perform its duties using locks. The obvious changes are that we need to be told which loop number we are as well as how long to sleep for. The last piece of new information is the lock itself. Each thread will be allocated an acquired lock. When the sleep() time has concluded, we will release the corresponding lock, indicating to the main thread that this thread has completed.
The bulk of the work is done here in main() using three separate for loops. We first create a list of locks, which we obtain using the thread.allocate_lock() function and acquire (each lock) with the acquire() method. Acquiring a lock has the effect of “locking the lock.” Once it is locked, we add the lock to the lock list, locks. The next loop actually spawns the threads, invoking the loop() function per thread, and for each thread, provides it with the loop number, the time to sleep for, and the acquired lock for that thread. So why didn’t we start the threads in the lock acquisition loop? There are several reasons: (1) we wanted to synchronize the threads, so that “all the horses started out the gate” around the same time, and (2) locks take a little bit of time to be acquired. If your thread executes “too fast,” it is possible that it completes before the lock has a chance to be acquired.
It is up to each thread to unlock its lock object when it has completed execution. The final loop just sits and spins (pausing the main thread) until both locks have been released before continuing execution. Since we are checking each lock sequentially, we may be at the mercy of all the slower loops if they are more toward the beginning of the set of loops. In such cases, the majority of the wait time may be for the first loop(s). When that lock is released, remaining locks may have already been unlocked (meaning that corresponding threads have completed execution). The result is that the main thread will fly through those lock checks without pause. Finally, you should be well aware that the final pair of lines will execute main() only if we are invoking this script directly.
As hinted in the earlier Core Note, we presented the thread module only to introduce the reader to threaded programming. Your MT application should use higher-level modules such as the threading module, which we will now discuss.
We will now introduce the higher-level threading module, which gives you not only a Thread class but also a wide variety of synchronization mechanisms to use to your heart’s content. Table 18.2 represents a list of all the objects available in the threading module.

In this section, we will examine how to use the Thread class to implement threading. Since we have already covered the basics of locking, we will not cover the locking primitives here. The Thread() class also contains a form of synchronization, so explicit use of locking primitives is not necessary.
Core Tip: Daemon threads
Another reason to avoid using the thread module is that it does not support the concept of daemon (or daemonic) threads. When the main thread exits, all child threads will be killed regardless of whether they are doing work. The concept of daemon threads comes into play here if you do not want this behavior.
Support for daemon threads is available in the threading module, and here is how they work: a daemon is typically a server that waits for client requests to service. If there is no client work to be done, the daemon just sits around idle. If you set the daemon flag for a thread, you are basically saying that it is noncritical, and it is okay for the process to exit without waiting for it to “finish.” As you have seen in Chapter 16, “Network Programming” server threads run in an infinite loop and do not exit in normal situations.
If your main thread is ready to exit and you do not care to wait for the child threads to finish, then set their daemon flag. Think of setting this flag as denoting a thread to be “not important.” You do this by calling each thread’s setDaemon() method, e.g., thread.setDae-mon(True), before it begins running (thread.start().)
If you want to wait for child threads to finish, just leave them as-is, or ensure that their daemon flags are off by explicitly calling thread.setDaemon (False) before starting them. You can check a thread’s daemonic status with thread.isDaemon(). A new child thread inherits its daemonic flag from its parent. The entire Python program will stay alive until all non-daemonic threads have exited, in other words, when no active non-daemonic threads are left).
The Thread class of the threading is your primary executive object. It has a variety of functions not available to the thread module, and are outlined in Table 18.3.

There are a variety of ways you can create threads using the Thread class. We cover three of them here, all quite similar. Pick the one you feel most comfortable with, not to mention the most appropriate for your application and future scalability (we like the final choice the best):
• Create Thread instance, passing in function
• Create Thread instance, passing in callable class instance
• Subclass Thread and create subclass instance
In our first example, we will just instantiate Thread, passing in our function (and its arguments) in a manner similar to our previous examples. This function is what will be executed when we direct the thread to begin execution. Taking our mtsleep2.py script and tweaking it, adding the use of Thread objects, we have mtsleep3.py, shown in Example 18.4.
Example 18.4. Using the threading Module (mtsleep3.py)
The Thread class from the threading module has a join() method that lets the main thread wait for thread completion.

When we run it, we see output similar to its predecessors’ output:

So what did change? Gone are the locks that we had to implement when using the thread module. Instead, we create a set of Thread objects. When each Thread is instantiated, we dutifully pass in the function (target) and arguments (args) and receive a Thread instance in return. The biggest difference between instantiating Thread [calling Thread()] and invoking thread.start_new_thread() is that the new thread does not begin execution right away. This is a useful synchronization feature, especially when you don’t want the threads to start immediately.
Once all the threads have been allocated, we let them go off to the races by invoking each thread’s start() method, but not a moment before that. And rather than having to manage a set of locks (allocating, acquiring, releasing, checking lock state, etc.), we simply call the join() method for each thread. join() will wait until a thread terminates, or, if provided, a timeout occurs. Use of join() appears much cleaner than an infinite loop waiting for locks to be released (causing these locks to sometimes be known as “spin locks”).
One other important aspect of join() is that it does not need to be called at all. Once threads are started, they will execute until their given function completes, whereby they will exit. If your main thread has things to do other than wait for threads to complete (such as other processing or waiting for new client requests), it should by all means do so. join() is useful only when you want to wait for thread completion.
A similar offshoot to passing in a function when creating a thread is to have a callable class and passing in an instance for execution—this is the more OO approach to MT programming. Such a callable class embodies an execution environment that is much more flexible than a function or choosing from a set of functions. You now have the power of a class object behind you, as opposed to a single function or a list/tuple of functions.
Adding our new class ThreadFunc to the code and making other slight modifications to mtsleep3.py, we get mtsleep4.py, given in Example 18.5.

If we run mtsleep4.py, we get the expected output:

So what are the changes this time? The addition of the ThreadFunc class and a minor change to instantiate the Thread object, which also instantiates ThreadFunc, our callable class. In effect, we have a double instantiation going on here. Let’s take a closer look at our ThreadFunc class.
We want to make this class general enough to use with functions other than our loop() function, so we added some new infrastructure, such as having this class hold the arguments for the function, the function itself, and also a function name string. The constructor __init__() just sets all the values.
When the Thread code calls our ThreadFunc object when a new thread is created, it will invoke the __call__() special method. Because we already have our set of arguments, we do not need to pass it to the Thread() constructor, but do have to use apply() in our code now because we have an argument tuple. Those of you who have Python 1.6 and higher can use the new function invocation syntax described in Section 11.6.3 instead of using apply() on line 16:
self.res = self.func(*self.args)
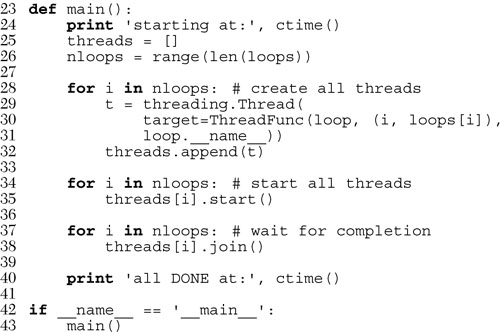
The final introductory example involves subclassing Thread(), which turns out to be extremely similar to creating a callable class as in the previous example. Subclassing is a bit easier to read when you are creating your threads (lines 29-30). We will present the code for mtsleep5.py in Example 18.6 as well as the output obtained from its execution, and leave it as an exercise for the reader to compare mtsleep5.py to mtsleep4.py.


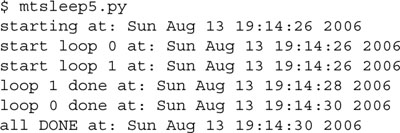
Here is the output for mtsleep5.py, again, just what we expected:
While the reader compares the source between the mtsleep4 and mtsleep5 modules, we want to point out the most significant changes: (1) our MyThread subclass constructor must first invoke the base class constructor (line 9), and (2) the former special method __call__() must be called run() in the subclass.
We now modify our MyThread class with some diagnostic output and store it in a separate module called myThread (see Example 18.7) and import this class for the upcoming examples. Rather than simply calling apply() to run our functions, we also save the result to instance attribute self.res, and create a new method to retrieve that value, getResult().

The mtfacfib.py script, given in Example 18.8, compares execution of the recursive Fibonacci, factorial, and summation functions. This script runs all three functions in a single-threaded manner, then performs the same task using threads to illustrate one of the advantages of having a threading environment.

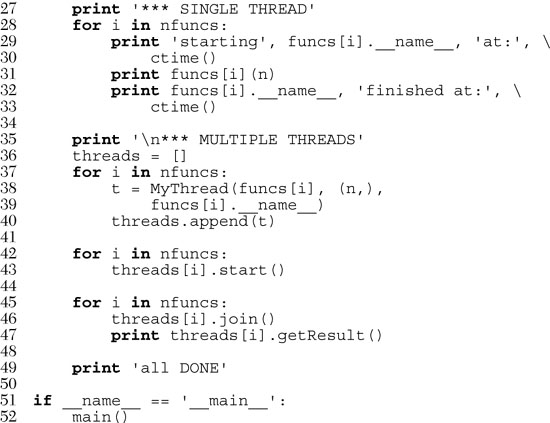
Running in single-threaded mode simply involves calling the functions one at a time and displaying the corresponding results right after the function call.
When running in multithreaded mode, we do not display the result right away. Because we want to keep our MyThread class as general as possible (being able to execute callables that do and do not produce output), we wait until the end to call the getResult() method to finally show you the return values of each function call.
Because these functions execute so quickly (well, maybe except for the Fibonacci function), you will notice that we had to add calls to sleep() to each function to slow things down so that we can see how threading may improve performance, if indeed the actual work had varying execution times— you certainly wouldn’t pad your work with calls to sleep(). Anyway, here is the output:


In addition to the various synchronization and threading objects, the Threading module also has some supporting functions, detailed in Table 18.4.

The final example illustrates the producer-consumer scenario where a producer of goods or services creates goods and places it in a data structure such as a queue. The amount of time between producing goods is non-deterministic, as is the consumer consuming the goods produced by the producer.
We use the Queue module to provide an interthread communication mechanism that allows threads to share data with each other. In particular, we create a queue into which the producer (thread) places new goods and the consumer (thread) consumes them. To do this, we will use the following attributes from the Queue module (see Table 18.5).

Without further ado, we present the code for prodcons.py, shown in Example 18.9.
Example 18.9. Producer-Consumer Problem (prodcons.py)
We feature an implementation of the Producer-Consumer problem using Queue objects and a random number of goods produced (and consumed). The producer and consumer are individually—and concurrently—executing threads.


Here is the output from one execution of this script:

As you can see, the producer and consumer do not necessarily alternate in execution. (Thank goodness for random numbers!) Seriously, though, real life is generally random and nondeterministic.
In this module, we will use the Queue.Queue object as well as our thread class myThread.MyThread, which we gave in Example 18.7. We will use random.randint() to make production and consumption somewhat varied, and also grab the usual suspects from the time module.
The writeQ() and readQ() functions each have a specific purpose, to place an object in the queue—we are using the string 'xxx', for example—and to consume a queued object, respectively. Notice that we are producing one object and reading one object each time.
The writer() is going to run as a single thread whose sole purpose is to produce an item for the queue, wait for a bit, then do it again, up to the specified number of times, chosen randomly per script execution. The reader() will do likewise, with the exception of consuming an item, of course.
You will notice that the random number of seconds that the writer sleeps is in general shorter than the amount of time the reader sleeps. This is to discourage the reader from trying to take items from an empty queue. By giving the writer a shorter time period of waiting, it is more likely that there will already be an object for the reader to consume by the time their turn rolls around again.
These are just setup lines to set the total number of threads that are to be spawned and executed.
Finally, we have our main() function, which should look quite similar to the main() in all of the other scripts in this chapter. We create the appropriate threads and send them on their way, finishing up when both threads have concluded execution.
We infer from this example that a program that has multiple tasks to perform can be organized to use separate threads for each of the tasks. This can result in a much cleaner program design than a single threaded program that attempts to do all of the tasks.
In this chapter, we illustrated how a single-threaded process may limit an application’s performance. In particular, programs with independent, non-deterministic, and non-causal tasks that execute sequentially can be improved by division into separate tasks executed by individual threads. Not all applications may benefit from multithreading due to overhead and the fact that the Python interpreter is a single-threaded application, but now you are more cognizant of Python’s threading capabilities and can use this tool to your advantage when appropriate.

18-1. Processes versus Threads. What are the differences between processes and threads?
18-2. Python Threads. Which type of multithreaded application will tend to fare better in Python, I/O-bound or CPU-bound?
18-3. Threads. Do you think anything significant happens if you have multiple threads on a multiple CPU system? How do you think multiple threads run on these systems?
18-4. Threads and Files. Update your solution to Exercise 9-19, which obtains a byte value and a file name, displaying the number of times that byte appears in the file. Let’s suppose this is a really big file. Multiple readers in a file is acceptable, so create multiple threads that count in different parts of the file so that each thread is responsible for a certain part of the file. Collate the data from each thread and provide the summed-up result. Use your timeit() code to time both the single threaded version and your new multithreaded version and say something about the performance improvement.
18-5. Threads, Files, and Regular Expressions. You have a very large mailbox file—if you don’t have one, put all of your e-mail messages together into a single text file. Your job is to take the regular expressions you designed in Chapter 15 that recognize e-mail addresses and Web site URLs, and use them to convert all e-mail addresses and URLs in this large file into live links so that when the new file is saved as an .html (or .htm) file, will show up in a Web browser as live and clickable. Use threads to segregate the conversion process across the large text file and collate the results into a single new .html file. Test the results on your Web browser to ensure the links are indeed working.
18-6. Threads and Networking. Your solution to the chat service application in the previous chapter (Exercises 16-7 to 16-10) may have required you to use heavyweight threads or processes as part of your solution. Convert that to be multithreaded code.
18-7. *Threads and Web Programming. The Crawler up ahead in Example 19.1 is a single-threaded application that downloads Web pages that would benefit from MT programming. Update crawl.py (you could call it mtcrawl.py) such that independent threads are used to download pages. Be sure to use some kind of locking mechanism to prevent conflicting access to the links queue.
18-8. Thread Pools. Instead of a producer thread and a consumer thread, change the code in Example 18.9, prodcons.py, so that you have any number of consumer threads (a thread pool) which can process or consume more than one item from the Queue at any given moment.
18-9. Files. Create a set of threads to count how many lines there are in a set of (presumably large) text files. You may choose the number of threads to use. Compare the performance against a single-threaded version of this code. Hint: Review Chapter 9 (Files and I/O) exercises.
18-10. Take your solution to the previous exercise and adopt it to a task of your selection, i.e., processing a set of e-mail messages, downloading Web pages, processing RSS or Atom feeds, enhancing message processing as part of a chat server, solving a puzzle, etc.