
Chapter Topics
Classes finally introduce the notion of object-oriented programming (OOP) to our picture. We will first present a high-level overview, covering all the main aspects of using classes and OOP in Python. The remainder of the chapter examines details on classes, class instances, and methods. We will also describe derivation or subclassing in Python and what its inheritance model is. Finally, Python gives programmers the ability to customize classes with special functionality, including those that overload operators and emulate Python types. We will show you how to implement some of these special methods to customize your classes so that they behave more like Python’s built-in types.
With this said, however, we would like to add that there have been some exciting changes with regard to Python OOP. In version 2.2, the Python community finally saw the unification of types and classes, and with the new-style classes come much more advanced OOP features. New-style classes represent a superset of features from classic (or old-style) classes, the original class objects since Python was born.
We will first present the core features common to both types of classes, and then introduce those more advanced features found only in Python’s new-style classes.
Before we get into the nitty-gritty of OOP and classes, we begin with a high-level overview, then present some simple examples to get you warmed up. If you are new to object-oriented programming, you may wish to skim this section first, then begin the formal reading in Section 13.2. If you are already familiar with object-oriented programming and want to see how it is done in Python, finish this section and go straight to Section 13.3 for more details.
The main two entities in Python object-oriented programming are classes and class instances (see Figure 13-1).
Figure 13-1. The factory manufacturing machines on the left are analogous to classes, while the toys produced are instances of their respective classes. Although each instance has the basic underlying structure, individual attributes like color or feet can be changed—these are similar to instance attributes.

Classes and instances are related to each other: classes provide the definition of an object, and instances are “the real McCoy,” the objects specified in the class definition brought to life.
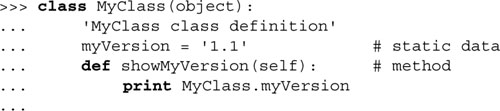
Here is an example of how to create a class:

The keyword is class, followed by the class name. What follows is the suite of code that defines the class. This usually consists of various definitions and declarations. The biggest difference between declaring new-style classes and classic classes is that all new-style classes must inherit from at least one parent class. The bases argument is one (single inheritance) or more (multiple inheritance) parent classes to derive from.
The “mother of all classes” is object. If you do not have any ancestor classes to inherit from, use object as your default. It must exist at the top of every class hierarchy. If you do not subclass object or a class that subclasses object, then you have defined a classic class:

Conversely, if you do not specify a parent class, or if you subclass a base class without a parent class, you have created a classic class. Many Python classes are still classic classes. In Python 3, they no longer exist, and either syntax create a new-style class. While using Python 2, we recommend that you use only new-style classes whenever possible, but for learning purposes, either type will suffice.
The process of creating an instance is called instantiation, and it is carried out like this (note the conspicuous absence of a new keyword):
myFirstObject = MyNewObjectType()
The class name is given as an “invocation,” using the familiar function operators ( ( ) ). You then typically assign that newly created instance to a variable. The assignment is not required syntactically, but if you do not save your instance to a variable, it will be of no use and will be automatically garbage-collected because there would be no references to that instance. What you would be doing is allocating memory, then immediately deallocating it.
Classes can be as simple or as complicated as you wish them to be. At a very minimum, classes can be used as namespaces (see Chapter 11 for more on these). By this, we mean that you can store data into variables and group them in such a way that they all share the same relationship—a named relationship using the standard Python dotted-attribute notation. For example, you may have a class without any inherent attributes and merely use such a class to provide a namespace for data, giving your class characteristics similar to records in Pascal or structures in C, or, in other words, use the class simply as a container object with shared naming.
Here is an example:
![]()
Recall that the pass statement is used where code is required syntactically, but no operation is desired. In this case, the required code is the class suite, but we do not wish to provide one. The class we just defined has no methods or any other attributes. We will now create an instance to use the class simply as a namespace container.

We could have used variables “x” and “y” to accomplish the same thing, but in our case, mathObj.x and mathObj.y are related by the instance name, mathObj. This is what we mean by using classes as namespace containers. mathObj.x and mathObj.y are known as instance attributes because they are only attributes of their instance object (mathObj), not of the class (MyData). As we will see later on in this chapter, these attributes really are dynamic in nature: you do not need to pre-declare or pre-assign them in the constructor or anywhere else.
One way we can improve our use of classes is to add functions to them. These class functions are known by their more common name, methods. In Python, methods are defined as part of the class definition, but can be invoked only on an instance. In other words, the path one must take to finally be able to call a method goes like this: (1) define the class (and the methods), (2) create an instance, and finally, (3) invoke the method on that instance. Here is an example class with a method:

You will notice the self argument, which must be present in all method declarations. That argument, representing the instance object, is passed to the method implicitly by the interpreter when you invoke a method on an instance, so you, yourself, do not have to worry about passing anything in (specifically self, which is automatically passed in for you).
For example, if you have a method that takes two arguments, all of your calls should only pass in the second argument. Python passes in self for you as the first. If you make a mistake, do not worry about it. When an error occurs, Python will tell you that you have passed in the wrong number of arguments. You may make this mistake only once anyway... you’ll certainly remember each time after that!
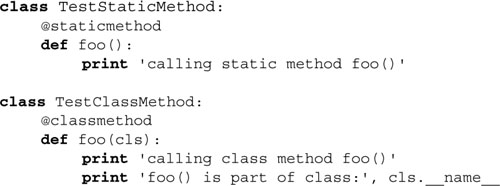
The requirement of the instance (self) in each method’s signature will be something new to those of you coming from C++ or Java, so be aware of that. It is all part of Python’s philosophy of being explicitly clear. In those other languages, self is called “this.” You can find out more about self in the Core Note in Section 13.7 on page 541. Requiring the instance only applies to regular methods and not static or class methods, although the latter requires the class rather than the instance. You can find out more about static and class methods in Section 13.8 on page 542.
Now we will instantiate the class and invoke the method once we have an instance:

We conclude this introductory section by giving you a slightly more complex example of what you can do with classes (and instances) and also introducing you to the special method __init__() as well as subclassing and inheritance.
For those of you who are already familiar with object-oriented programming, __init__() is similar to the class constructor. If you are new to the world of OOP, a constructor is simply a special method that is typically called to create a new object. In Python, __init__() is not really the constructor. You do not call “new” to create a new object. (Python does not even have a keyword called “new” anyway.) Instead, Python creates the instance for you and then calls __init__() during instantiation to define additional behavior that should occur when a class is instantiated, i.e., setting up initial values or running some preliminary diagnostic code—basically performing any special tasks or setup after the instance is created but before the new instance is returned from the instantiation call.
(We will add print statements to our methods to better illustrate when certain methods are called. It is generally not typical to have input or output statements in functions unless output is a predetermined characteristic of the body of code.)

In the definition for the AddrBookEntry class, we define two methods: __init__() and updatePhone(). __init__() is called when instantiation occurs, that is, when AddrBookEntry() is invoked. You can think of instantiation as an implicit call to __init__() because the arguments given to AddrBookEntry() are exactly the same as those that are received by __init__() (except for self, which is passed automatically for you).
Recall that the self (instance object) argument is passed in automatically by the interpreter when the method is invoked on an instance, so in our __init__() above, the only required arguments are nm and ph, representing the name and telephone number, respectively. __init__() sets these two instance attributes on instantiation so that they are available to the programmer by the time the instance is returned from the instantiation call.
As you may have surmised, the purpose of the updatePhone() method is to replace an address book entry’s telephone number attribute.

These are our instantiation calls, which, in turn, invoke __init__(). Recall that an instance object is passed in automatically as self. So, in your head, you can replace self in methods with the name of the instance. In the first case, when object john is instantiated, it is john.name that is set, as you can confirm below.
Also, without the presence of default arguments, both parameters to __init__() are required as part of the instantiation.
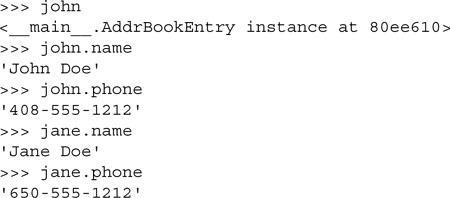
Once our instance was created, we can confirm that our instance attributes were indeed set by __init__() during instantiation. “Dumping” the instance within the interpreter tells us what kind of object it is. (We will discover later how we can customize our class so that rather than seeing the default <...> Python object string, a more desired output can be customized.)

The updatePhone() method requires one argument (in addition to self): the new phone number. We check our instance attribute right after the call to updatePhone(), making sure that it did what was advertised.
Subclassing with inheritance is a way to create and customize a new class type with all the features of an existing class but without modifying the original class definition. The new subclass can be customized with special functionality unique only to that new class type. Aside from its relationship to its parent or base class, a subclass has all the same features as any regular class and is instantiated in the same way as all other classes. Note below that a parent class is part of the subclass declaration:

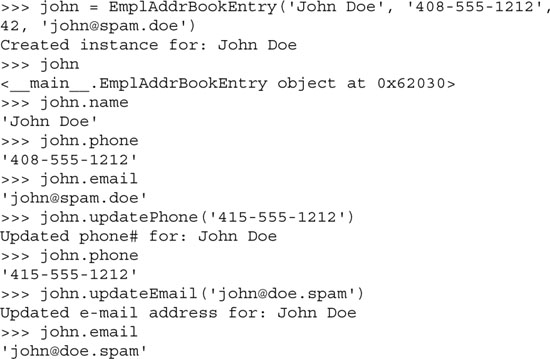
We will now create our first subclass, EmplAddrBookEntry. In Python, when classes are derived, subclasses inherit the base class attributes, so in our case, we will not only define the methods __init__() and updateEmail(), but EmplAddrBookEntry will also inherit the updatePhone() method from AddrBookEntry.
Each subclass must define its own constructor if desired, otherwise the base class constructor will be called. However, if a subclass overrides a base class constructor, the base class constructor will not be called automatically—such a request must be made explicitly as we have above. For our subclass, we make an initial call to the base class constructor before performing any “local” tasks, hence the call to AddrBookEntry.__init__() to set the name and phone number. Our subclass sets two additional instance attributes, the employee ID and e-mail address, which are set by the remaining lines of our constructor.
Note how we have to explicitly pass the self instance object to the base class constructor because we are not invoking that method on an instance. We are invoking that method on an instance of a subclass. Because we are not invoking it via an instance, this unbound method call requires us to pass an acceptable instance (self) to the method.
We close this section with examples of how to create an instance of the subclass, accessing its attributes and invoking its methods, including those inherited from the parent class.
Core Style: Naming classes, attributes, and methods
Class names traditionally begin with a capital letter. This is the standard convention that will help you identify classes, especially during instantiation (which would look like a function call otherwise). In particular, data attributes should sound like data value names, and method names should indicate action toward a specific object or value. Another way to phrase this is: Use nouns for data value names and predicates (verbs plus direct objects) for methods. The data items are the objects acted upon, and the methods should indicate what action the programmer wants to perform on the object.
In the classes we defined above, we attempted to follow this guideline, with data values such as “name,” “phone,” and “email,” and actions such as “updatePhone” and “updateEmail.” This is known as “mixedCase” or “camelCase.” The Python Style Guide favors using underscores over camelCase, i.e,. “update_phone,” “update_email.” Classes should also be well named; some of those good names include “AddrBookEntry,” “RepairShop,” etc.
We hope that you now have some understanding of how object-oriented programming is accomplished using Python. The remaining sections of this chapter will take you deeper into all the facets of object-oriented programming and Python classes and instances.
The evolution of programming has taken us from a sequence of step-by-step instructions in a single flow of control to a more organized approach whereby blocks of code could be cordoned off into named subroutines and defined functionality. Structured or procedural programming lets us organize our programs into logical blocks, often repeated or reused. Creating applications becomes a more logical process; actions are chosen which meet the specifications, then data are created to be subjected to those actions. Deitel and Deitel refer to structured programming as “action-oriented” due to the fact that logic must be “enacted” on data that have no associated behaviors.
However, what if we could impose behavior on data? What if we were able to create or program a piece of data modeled after real-life entities that embody both data characteristics along with behaviors? If we were then able to access the data attributes via a set of defined interfaces (aka a set of accessor functions), such as an automated teller machine (ATM) card or a personal check to access your bank account, then we would have a system of “objects” where each could interact not only with itself, but also with other objects in a larger picture.
Object-oriented programming takes this evolutionary step by enhancing structured programming to enable a data/behavior relationship: data and logic are now described by a single abstraction with which to create these objects. Real-world problems and entities are stripped down to their bare essentials, providing an abstraction from which they can be coded similarly or into objects that can interact with objects in the system. Classes provide the definitions of such objects, and instances are realizations of such definitions. Both are vital components for object-oriented design (OOD), which simply means to build your system architected in an object-oriented fashion.
Object-oriented design does not specifically require an object-oriented programming language. Indeed, OOD can be performed in purely structural languages such as C, but this requires more effort on the part of the programmer who must build data types with object qualities and characteristics. Naturally, OOP is simplified when a language has built-in OO properties that enable smoother and more rapid development of OO programs.
Conversely, an object-oriented language may not necessarily force one to write OO programs. C++ can be used simply as a “better C.” Java, on the other hand, requires everything to be a class, and further dictates only one class definition per source file. In Python, however, neither classes nor OOP are required for everyday programming. Even though it is a language that is object-oriented by design and that has constructs to support OOP, Python does not restrict or require you to write OO code for your application. Rather, OOP is a powerful tool that is at your disposal when you are ready to evolve, learn, transition, or otherwise move toward OOD. The creator of Python often refers to this phenomenon as being able to “see the forest through the trees.”
One of the most important reasons to consider working in OOD is that it provides a direct approach to modeling and solving real-world problems and situations. For example, let us attempt to model an automobile mechanic shop where you would take your car in for repair. There are two general entities we would have to create: humans who interact with and in such a “system,” and a physical location for the activities that define a mechanic shop. Since there are more and different types of the former, we will describe them first, then conclude with the latter.
A class called Person would be created to represent all humans involved in such an activity. Instances of Person would include the Customer, the Mechanic, and perhaps the Cashier. Each of these instances would have similar as well as unique behaviors. For example, all would have the talk() method as a means of vocal communication as well as a drive_car() method. Only the Mechanic would have the repair_car() method and only the Cashier would have a ring_sale() method. The Mechanic will have a repair_certification attribute while all Person would have a drivers_license attribute.
Finally, all of these instances would be participants in one overseeing class, called the RepairShop, which would have operating_hours, a data attribute that accesses time functionality to determine when Customers can bring in their vehicles and when Employees such as Mechanics and Cashiers show up for work. The RepairShop might also have a AutoBay class that would have instances such as SmogZone, TireBrakeZone, and perhaps one called GeneralRepair.
The point of our fictitious RepairShop is to show one example of how classes and instances plus their behaviors can be used to model a true-to-life scenario. You can probably also imagine classes such as an Airport, a Restaurant, a ChipFabPlant, a Hospital, or even a MailOrderMusic business, all complete with their own participants and functionality.
For those of you who are already familiar with all the lingo associated with OOP, here is how Python stacks up:
Abstraction refers to the modeling of essential aspects, behavior, and characteristics of real-world problems and entities, providing a relevant subset as the definition of a programmatic structure that can realize such models. Abstractions not only contain the data attributes of such a model, but also define interfaces with that data. An implementation of such an abstraction is the realization of that data and the interfaces that go along with it. Such a realization should remain hidden from and irrelevant to the client programmer.
Encapsulation describes the concept of data/information hiding and providing interfaces or accessor functions to the data attributes. Direct access to data by any client, bypassing the interfaces, goes against the principles of encapsulation, but the programmer is free to allow such access. As part of the implementation, the client should not even know how the data attributes are architected within the abstraction. In Python, all class attributes are public, but names may be “mangled” to discourage unauthorized access, but otherwise not prevented. It is up to the designer to provide the appropriate interfaces to the data so that the client programmer does not have to resort to manipulating the encapsulated data attributes.
Composition extends our description of classes, enabling multiple yet distinct classes to be combined into a larger entity to solve a real-world problem. Composition describes a singular, complex system such as a class made up of other, smaller components such as other classes, data attributes, and behaviors, all of which are combined, embodying “has-a” relationships. For example, the RepairShop “has a” Mechanic (hopefully at least one) and also “has a” Customer (again, hopefully at least one).
These components are composed either via association, meaning that access to subcomponents is granted (for the RepairShop, a customer may enter and request a SmogCheck, the client programmer interfacing with components of the RepairShop), or aggregation, encapsulating components that are then accessed only via defined interfaces, and again, hidden from the client programmer. Continuing our example, the client programmer may be able to make a SmogCheck request on behalf of the Customer, but has no ability to interact with the SmogZone part of the RepairShop, which is accessed only via internal controls of the RepairShop when the smogCheckCar() method is called. Both forms of composition are supported in Python.
Derivation describes the creation of subclasses, new classes that retain all desired data and behavior of the existing class type but permit modification or other customization, all without having to modify the original class definition. Inheritance describes the means by which attributes of a subclass are “bequeathed from” an ancestor class. From our earlier example, a Mechanic may have more car skill attributes than a Customer, but individually, each “is a” Person, so it is valid to invoke the talk() method, which is common to all instances of Person, for either of them. Hierarchy describes multiple “generations” of derivation which can be depicted graphically as a “family tree,” with successive subclasses having relationships with ancestor classes.
Generalization describes all the traits a subclass has with its parent and ancestor classes, so subclasses are considered to have an “is-a” relationship with ancestor classes because a derived object (instance) is an “example” of an ancestor class. For example, a Mechanic “is a” Person, a Car “is a” Vehicle, etc. In the family tree diagram we alluded to above, we can draw lines from subclasses to ancestors indicating “is-a” relationships. Specialization is the term that describes all the customization of a subclass, i.e., what attributes make it differ from its ancestor classes.
The concept of polymorphism describes how objects can be manipulated and accessed using attributes and behaviors they have in common without regard to their specific class. Polymorphism indicates the presence of dynamic (aka late, runtime) binding, allowing for overriding and runtime type determination and verification.
Introspection is what gives you, the programmer, the ability to perform an activity such as “manual type checking.” Also called reflection, this property describes how information about a particular object can be accessed by itself during runtime. Would it not be great to have the ability to take an object passed to you and be able to find out what it is capable of? This is a powerful feature that you will encounter frequently in this chapter. The dir() and type() built-in functions would have a very difficult time working if Python did not support some sort of introspection capability. Keep an eye out for these calls as well as for special attributes like __dict__, __name__, and __doc__. You may even be familiar with some of them already!
Recall that a class is a data structure that we can use to define objects that hold together data values and behavioral characteristics. Classes are entities that are the programmatic form of an abstraction for a real-world problem, and instances are realizations of such objects. One analogy is to liken classes to blueprints or molds with which to make real objects (instances). So why the term “class”? The term most likely originates from using classes to identify and categorize biological families of species to which specific creatures belong and can be derived into similar yet distinct subclasses. Many of these features apply to the concept of classes in programming.
In Python, class declarations are very similar to function declarations, a header line with the appropriate keyword followed by a suite as its definition, as indicated below:

Both allow you to create functions within their declaration, closures or inner functions for functions within functions, and methods for functions defined in classes. The biggest difference is that you run functions but create objects with classes. A class is like a Python container type on steroids. In this section, we will take a close look at classes and what types of attributes they have. Just remember to keep in mind that even though classes are objects (everything in Python is an object), they are not realizations of the objects they are defining. We will look at instances in the next section, so stay tuned for that. For now, the limelight is beamed strictly on class objects.
When you create a class, you are practically creating your own kind of data type. All instances of that class are similar, but classes differ from one another (and so will instances of different classes by nature). Rather than playing with toys that came from the manufacturer and were bestowed upon you as gifts, why not design and build your own toys to play with?
Classes also allow for derivation. You can create subclasses that are classes but inherit all of the features and attributes of the “parent” class. Starting in Python 2.2, you can subclass built-in types instead of just other classes.
Python classes are created using the class keyword. In the simple form of class declarations, the name of the class immediately follows the keyword:

As outlined briefly earlier in this chapter, bases is the set of one or more parent classes from which to derive; and class_suite consists of all the component statements, defining class members, data attributes, and functions. Classes are generally defined at the top-level of a module so that instances of a class can be created anywhere in a piece of source code where the class is defined.
As with Python functions, there is no distinction between declaring and defining classes because they occur simultaneously, i.e., the definition (the class suite) immediately follows the declaration (header line with the class keyword) and the always recommended, but optional, documentation string. Likewise, all methods must also be defined at this time. If you are familiar with the OOP terms, Python does not support pure virtual functions (à la C++) or abstract methods (as in Java), which coerce the programmer to define a method in a subclass. As a proxy, you can simply raise the NotImplementedError exception in the base class method to get the same effect.
What is an attribute? An attribute is a data or functional element that belongs to another object and is accessed via the familiar dotted-attribute notation. Some Python types such as complex numbers have data attributes (real and imag), while others such as lists and dictionaries have methods (functional attributes).
One interesting side note about attributes is that when you are accessing an attribute, it is also an object and may have attributes of its own which you can then access, leading to a chain of attributes, i.e., myThing.subThing.subSubThing, etc. Some familiar examples are:
• sys.stdout.write('foo')
• print myModule.myClass.__doc__
• myList.extend(map(upper, open('x').readlines()))
Class attributes are tied only to the classes in which they are defined, and since instance objects are the most commonly used objects in everyday OOP, instance data attributes are the primary data attributes you will be using. Class data attributes are useful only when a more “static” data type is required which is independent of any instances, hence the reason we are making the next section advanced, optional reading. (If you are unfamiliar with static, it just means a value that hangs around a function for each call, or a piece of data in a class that is the same across all instances. More about static data in the next subsection.)
In the succeeding subsection, we will briefly describe how methods in Python are implemented and invoked. In general, all methods in Python have the same restriction: they require an instance before they can be called.
Data attributes are simply variables of the class we are defining. They can be used like any other variable in that they are set when the class is created and can be updated either by methods within the class or elsewhere in the main part of the program.
Such attributes are better known to OO programmers as static members, class variables, or static data. They represent data that is tied to the class object they belong to and are independent of any class instances. If you are a Java or C++ programmer, this type of data is the same as placing the static keyword in front of a variable declaration.
Static members are generally used only to track values associated with classes. In most circumstances, you would be using instance attributes rather than class attributes. We will compare the differences between class and instance attributes when we formally introduce instances.
Here is an example of using a class data attribute (foo):
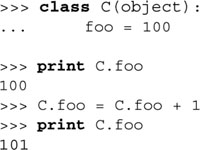
Note that nowhere in the code above do you see any references to class instances.
A method, such as the myNoActionMethod method of the MyClass class in the example below, is simply a function defined as part of a class definition (thus making methods class attributes). This means that myNoActionMethod applies only to objects (instances) of MyClass type. Note how myNoActionMethod is tied to its instance because invocation requires both names in the dotted attribute notation:
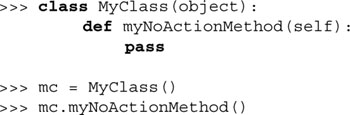
Any call to myNoActionMethod by itself as a function fails:

A NameError exception is raised because there is no such function in the global namespace. The point is to show you that myNoActionMethod is a method, meaning that it belongs to the class and is not a name in the global namespace. If myNoActionMethod was defined as a function at the top-level, then our call would have succeeded.
We show you below that even calling the method with the class object fails.
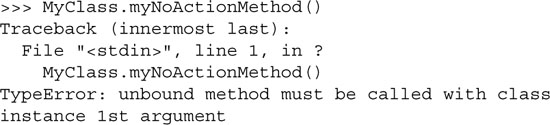
This TypeError exception may seem perplexing at first because you know that the method is an attribute of the class and so are wondering why there is a failure. We will explain this next.
In keeping with OOP tradition, Python imposes the restriction that methods cannot be invoked without instances. An instance must be used to perform method calls. This restriction describes Python’s concept of binding, where methods must be bound (to an instance) in order to be invoked directly. Unbound methods may also be called, but an instance object must be provided explicitly in order for the invocation to succeed. However, regardless of binding, methods are inherently attributes of the class they are defined in, even if they are almost always invoked via an instance. We will further explore bound and unbound methods later in Section 13.7.
There are two ways to determine what attributes a class has. The simplest way is to use the dir() built-in function. An alternative is to access the class dictionary attribute __dict__, one of a number of special attributes that is common to all classes. Let us take a look at an example:
Using the class defined above, let us use dir() and the special class attribute __dict__ to see this class’s attributes:

There are a few more attributes added for new-style classes as well as a more robust dir() function. Just for comparison, here is what you would see for classic classes:

As you can tell, dir() returns a list of (just the) names of an object’s attributes while __dict__ is a dictionary whose attribute names are the keys and whose values are the data values of the corresponding attribute objects.
The output also reveals two familiar attributes of our class MyClass, showMyVersion and myVersion, as well as a couple of new ones. These attributes, __doc__ and __module__, are special class attributes that all classes have (in addition to __dict__). The vars() built-in function returns the contents of a class’s __dict__ attribute when passed the class object as its argument.
For any class C, Table 13.1 represents a list of all the special attributes of C:

In addition to the __dict__ attribute of the class MyClass we just defined above, we have the following:

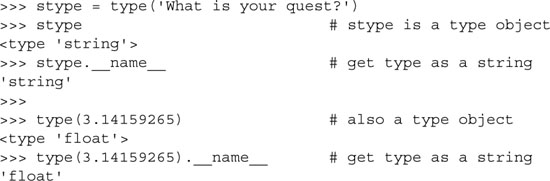
__name__ is the string name for a given class. This may come in handy in cases where a string is desired rather than a class object. Even some built-in types have this attribute, and we will use one of them to showcase the usefulness of the __name__ string.
The type object is an example of one built-in type that has a __name__ attribute. Recall that type() returns a type object when invoked. There may be cases where we just want the string indicating the type rather than an object. We can use the __name__ attribute of the type object to obtain the string name. Here is an example:
__doc__ is the documentation string for the class, similar to the documentation string for functions and modules, and must be the first unassigned string succeeding the header line. The documentation string is not inherited by derived classes, an indication that they must contain their own documentation strings.
__bases__ deals with inheritance, which we will cover later in this chapter; it contains a tuple that consists of a class’s parent classes.
The aforementioned __dict__ attribute consists of a dictionary containing the data attributes of a class. When accessing a class attribute, this dictionary is searched for the attribute in question. If it is not found in __dict__, the hunt continues in the dictionary of base classes, in “depth-first search” order. The set of base classes is searched in sequential order, left-to-right in the same order as they are defined as parent classes in a class declaration. Modification of a class attribute affects only the current class’s dictionary; no base class __dict__ attributes are ever modified.
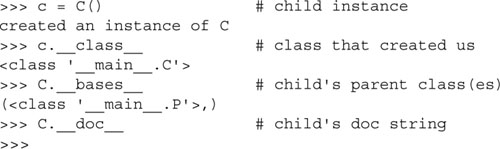
Python supports class inheritance across modules. To better clarify a class’s description, the __module__ was introduced in version 1.5 so that a class name is fully qualified with its module. We present the following example:

The fully qualified name of class C is “__main__.C”, i.e., source_ module.class_name. If class C was located in an imported module, such as mymod, we would see the following:

In previous versions of Python without the special attribute __module__, it was much more difficult to ascertain the location of a class simply because classes did not use their fully qualified names.
Finally, because of the unification of types and classes, when you access the __class__ attribute of any class, you will find that it is indeed an instance of a type object. In other words, a class is a type now! Because classic classes do not share in this equality (a classic class is a class object, and a type is a type object), this attribute is undefined for those objects.
Whereas a class is a data structure definition type, an instance is a declaration of a variable of that type. In other words, instances are classes brought to life. Once a blueprint is provided, the next step to bring them to fruition. Instances are the objects that are used primarily during execution, and the types of all instances are the class from which they were instantiated. Prior to Python 2.2, instances were “instance types,” regardless of which class they came from.
Many other OO languages provide a new keyword with which to create an instance of a class. Python’s approach is much simpler. Once a class has been defined, creating an instance is no more difficult than calling a function—literally. Instantiation is realized with use of the function operator, as in the following example:

As you can see, creating instance mc of class MyClass consists of “calling” the class: MyClass(). The returned object is an instance of the class you called. When you “call” a class using the functional notation, the interpreter instantiates the object, and calls the closest thing Python has to a constructor (if you have written one [see the next section]) to perform any final customization such as setting instance attributes, and finally returns the instance to you.
Core Note: Classes and instances before and after

Classes and types were unified in 2.2, making Python behave more like other object-oriented languages. Instances of any class or type are objects of those types. For example, if you ask Python to tell you, it will say that an instance mc of the MyClass class is an instance of the MyClass class. Redundant yes, but the interpreter will not lie. Likewise, it will tell you that 0 is an instance of the integer type:

But if you look carefully and compare MyClass with int, you will find that both are indeed types:

In contrast for those of you using classic classes and Python versions earlier than 2.2, classes are class objects and instances are instance objects. There is no further relationship between the two object types other than an instance’s __class__ attribute refers to the class from which it was instantiated. Redefining MyClass as a classic class and running the same calls in Python 2.1 (note that int() has not been turned into a factory function yet... it was still only a regular built-in function):

To avoid any confusion, just keep in mind that when you define a class, you are not creating a new type, just a new class object; and for 2.2 and after, when you define a (new-style) class you are creating a new type.
When the class is invoked, the first step in the instantiation process is to create the instance object. Once the object is available, Python checks if an __init__() method has been implemented. By default, no special actions are enacted on the instance without the definition of (or the overriding) of the special method __init__(). Any special action desired requires the programmer to implement __init__(), overriding its default behavior. If __init__() has not been implemented, the object is then returned and the instantiation process is complete.
However, if __init__() has been implemented, then that special method is invoked and the instance object passed in as the first argument (self), just like a standard method call. Any arguments passed to the class invocation call are passed on to __init__(). You can practically envision the call to create the instance as a call to the constructor.
In summary, (a) you do not call new to create an instance, and you do not define a constructor: Python creates the object for you; and (b) __init__(), is simply the first method that is called after the interpreter creates an instance for you in case you want to prep the object a little bit more before putting it to use.
__init__() is one of many special methods that can be defined for classes. Some of these special methods are predefined with inaction as their default behavior, such as __init__(), and must be overridden for customization while others should be implemented on an as-needed basis. We will cover many more of these special methods throughout this chapter. You will find use of __init__() everywhere, so we will not present an example here.
The __new__() special method bears a much closer resemblance to a real constructor than __init__(). With the unification of types and classes in 2.2, Python users now have the ability to subclass built-in types, and so there needed to be a way to instantiate immutable objects, e.g., subclassing strings, numbers, etc.
In such cases, the interpreter calls __new__(), a static method, with the class and passing in the arguments made in the class instantiation call. It is the responsibility of __new__() to call a superclass __new__() to create the object (delegating upward).
The reason why we say that __new__() is more like a constructor than __init__() is that it has to return a valid instance so that the interpreter can then call __init__() with that instance as self. Calling a superclass __new__() to create the object is just like using a new keyword to create an object in other languages.
__new__() and __init__() are both passed the (same) arguments as in the class creation call. For an example of using __new__(), see Section 13.11.3.
Likewise, there is an equivalent destructor special method called __del__(). However, due to the way Python manages garbage collection of objects (by reference counting), this function is not executed until all references to an instance object have been removed. Destructors in Python are methods that provide special processing before instances are deallocated and are not commonly implemented since instances are seldom deallocated explicitly. If you do override __del__(), be sure to call any parent class __del__() first so those pieces can be adequately deallocated.
In the following example, we create (and override) both the __init__() and __del__() constructor and destructor functions, respectively, then instantiate the class and assign more aliases to the same object. The id() built-in function is then used to confirm that all three aliases reference the same object. The final step is to remove all the aliases by using the del statement and discovering when and how many times the destructor is called.
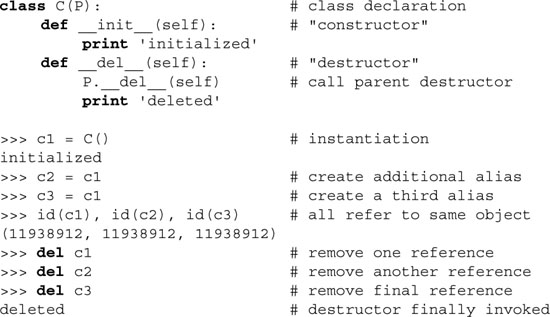
Notice how, in the above example, the destructor was not called until all references to the instance of class C were removed, e.g., when the reference count has decreased to zero. If for some reason your __del__() method is not being called when you are expecting it to be invoked, this means that somehow your instance object’s reference count is not zero, and there may be some other reference to it that you are not aware of that is keeping your object around.
Also note that the destructor is called exactly once, the first time the reference count goes to zero and the object deallocated. This makes sense because any object in the system is allocated and deallocated only once. Summary:
• Do not forget to call a superclass __del__() first.
• Invoking del x does not call x.__del__()—as you saw above, it just decrements the reference count of x.
• If you have a cycle or some other cause of lingering references to an instance, an object’s __del__() may never be called.
• Uncaught exceptions in __del__() are ignored (because some variables used in __del__() may have already been deleted). Try not to do anything in __del__() not related to an instance.
• Implementing __del__() is not a common occurrence—only do it if you really know what you are doing.
• If you define __del__, and instance is part of a cycle, the garbage collector will not break the cycle—you have to do it yourself by explicitly using del.
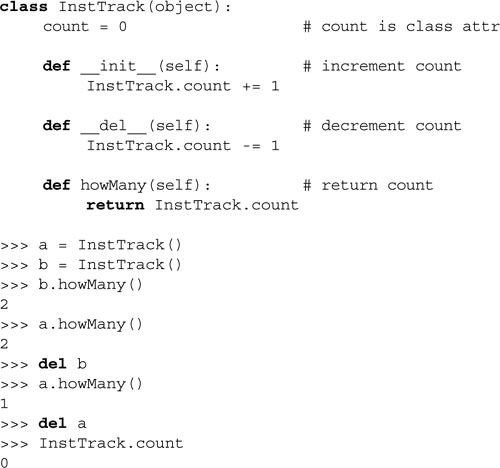
Core Note: Keeping track of instances
Python does not provide any internal mechanism to track how many instances of a class have been created or to keep tabs on what they are. You can explicitly add some code to the class definition and perhaps __init__() and __del__() if such functionality is desired. The best way is to keep track of the number of instances using a static member. It would be dangerous to keep track of instance objects by saving references to them, because you must manage these references properly or else your instances will never be deallocated (because of your extra reference to them)! An example follows:
Instances have only data attributes (methods are strictly class attributes) and are simply data values that you want to be associated with a particular instance of any class and are accessible via the familiar dotted-attribute notation. These values are independent of any other instance or of the class it was instantiated from. When an instance is deallocated, so are its attributes.
Instance attributes can be set any time after an instance has been created, in any piece of code that has access to the instance. However, one of the key places where such attributes are set is in the constructor, __init__().
Core Note: Instance attributes
Being able to create an instance attribute “on-the-fly” is one of the great features of Python classes, initially (but gently) shocking those coming from C++ or Java in which all attributes must be explicitly defined/ declared first.
Python is not only dynamically typed but also allows for such dynamic creation of object attributes during run-time. It is a feature that once used may be difficult to live without. Of course, we should mention to the reader that one must be cautious when creating such attributes.
One pitfall is when such attributes are created in conditional clauses: if you attempt to access such an attribute later on in your code, that attribute may not exist if the flow had not entered that conditional suite. The moral of the story is that Python gives you a new feature you were not used to before, but if you use it, you need to be more careful, too.
The constructor is the earliest place that instance attributes can be set because __init__() is the first method called after instance objects have been created. There is no earlier opportunity to set instance attributes. Once __init__() has finished execution, the instance object is returned, completing the instantiation process.
One can also use __init__() along with default arguments to provide an effective way of preparing an instance for use in the real world. In many situations, the default values represent the most common cases for setting up instance attributes, and such use of default values precludes them from having to be given explicitly to the constructor. We also outlined some of the general benefits of default arguments in Section 11.5.2. One caveat is that default arguments should be immutable objects; mutable objects like lists and dictionaries act like static data, maintaining their contents with each method call.
Example 13.1 shows how we can use the default constructor behavior to help us calculate some sample total room costs for lodging at hotels in some of America’s large metropolitan areas.
Example 13.1. Using Default Arguments with Instantiation (hotel.py)
Class definition for a fictitious hotel room rate calculator. The __init__() constructor method initializes several instance attributes. A calcTotal() method is used to determine either a total daily room rate or the total room cost for an entire stay.
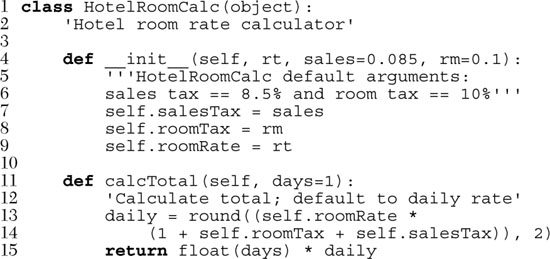
The main purpose of our code is to help someone figure out the daily hotel room rate, including any state sales and room taxes. The default is for the general area around San Francisco, which has an 8.5% sales tax and a 10% room tax. The daily room rate has no default value, thus it is required for any instance to be created.
The setup work is done after instantiation by __init__() in lines 4-8, and the other core part of our code is the calcTotal() method, lines 10-14. The job of __init__() is to set the values needed to determine the total base room rate of a hotel room (not counting room service, phone calls, or other incidental items). calcTotal() is then used to either determine the total daily rate or the cost of an entire stay if the number of days is provided. The round() built-in function is used to round the calculation to the closest penny (two decimal places). Here is some sample usage of this class:

The first two hypothetical examples were San Francisco, which used the defaults, and then Seattle, where we provided different sales tax and room tax rates. The final example, Washington, D.C., extended the general usage by calculating a hypothetical longer stay: a five-day weekday stay plus a special rate for one weekend day, assuming a Sunday departure to return home.
Do not forget that all the flexibility you get with functions, such as default arguments, applies to methods as well. The use of variable-length arguments is another good feature to use with instantiation (based on an application’s needs, of course).
As you are now aware, invoking a class object with the function operator creates a class instance, which is the object returned on such an invocation, as in the following example:

If a constructor is defined, it should not return any object because the instance object is automatically returned after the instantiation call. Correspondingly, __init__() should not return any object (or return None); otherwise, there is a conflict of interest because only the instance should be returned. Attempting to return any object other than None will result in a TypeError exception:

The dir() built-in function can be used to show all instance attributes in the same manner that it can reveal class attributes:
Similar to classes, instances also have a __dict__ special attribute (also accessible by calling vars() and passing it an instance), which is a dictionary representing its attributes:
![]()
Instances have only two special attributes (see Table 13.2). For any instance I:

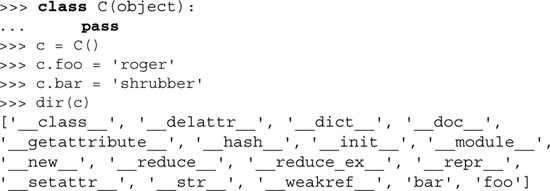
We will now take a look at these special instance attributes using the class C and its instance c:

As you can see, c currently has no data attributes, but we can add some and recheck the __dict__ attribute to make sure they have been added properly:

The __dict__ attribute consists of a dictionary containing the attributes of an instance. The keys are the attribute names, and the values are the attributes’ corresponding data values. You will only find instance attributes in this dictionary—no class attributes or special attributes.
Core Style: Modifying __dict__
Although the __dict__ attributes for both classes and instances are mutable, it is recommended that you not modify these dictionaries unless or until you know exactly what you are doing. Such modification contaminates your OOP and may have unexpected side effects. It is more acceptable to access and manipulate attributes using the familiar dotted-attribute notation. One of the few cases where you would modify the __dict__ attribute directly is when you are overriding the __setattr__ special method. Implementing __setattr__() is another adventure story on its own, full of traps and pitfalls such as infinite recursion and corrupted instance objects—but that is another tale for another time.
Built-in types are classes, too... do they have the same attributes as classes? (The same goes for instances.) We can use dir() on built-in types just like for any other object to get a list of their attribute names:
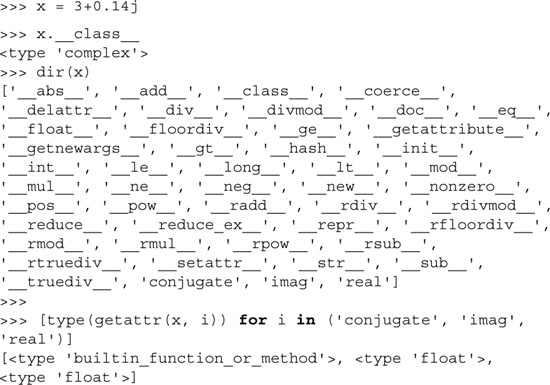
Now that we know what kind of attributes a complex number has, we can access the data attributes and call its methods:
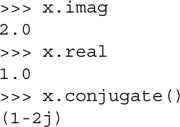
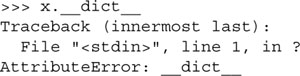
Attempting to access __dict__ will fail because that attribute does not exist for built-in types:
We first described class data attributes in Section 13.4.1. As a brief reminder, class attributes are simply data values associated with a class and not any particular instances like instance attributes are. Such values are also referred to as static members because their values stay constant, even if a class is invoked due to instantiation multiple times. No matter what, static members maintain their values independent of instances unless explicitly changed. (Comparing instance attributes to class attributes is barely like that of automatic vs. static variables, but this is just a vague analogy . . . do not read too much into it, especially if you are not familiar with auto and static variables.)
Classes and instances are both namespaces. Classes are namespaces for class attributes. Instances are namespaces for instance attributes.
There are a few aspects of class attributes and instance attributes that should be brought to light. The first is that you can access a class attribute with either the class or an instance, provided that the instance does not have an attribute with the same name.
Class attributes can be accessed via a class or an instance. In the example below, when class C is created with the version class attribute, naturally access is allowed using the class object, i.e., C.version. When instance c is created, access to c.version fails for the instance, and then Python initiates a search for the name version first in the instance, then the class, and then the base classes in the inheritance tree. In this case, it is found in the class:

However, we can only update the value when referring to it using the class, as in the C.version increment statement above. Attempting to set or update the class attribute using the instance name will create an instance attribute that “shadows” access to the class attribute, effectively hiding it from scope until or unless that shadow is removed.
Any type of assignment of a local attribute will result in the creation and assignment of an instance attribute, just like a regular Python variable. If a class attribute exists with the same name, interesting side effects can occur. (This is true for both classic and new-style classes.)
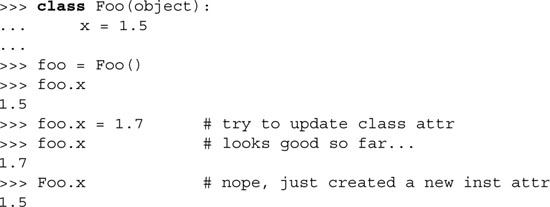
In the above code snippet, a new instance attribute named version is created, overriding the reference to the class attribute. However, the class attribute itself is unscathed and still exists in the class domain and can still be accessed as a class attribute, as we can see above. What would happen if we delete this new reference? To find out, we will use the del statement on foo.x.

So by assigning an instance attribute with the same name as a class attribute, we effectively “hide” the class attribute, but once we remove the instance attribute, we can “see” the class one again. Now let us try to update the class attribute again, but this time, we will just try an innocent increment:

It is still a “no go.” We again created a new instance attribute while leaving the original class attribute intact. (For those who have or want a deeper understanding of Python: the attribute was already in the class’s dictionary [__dict__]. With the assignment, one is now added to the instance’s __dict__.) The expression on the right-hand side of the assignment evaluates the original class variable, adds 0.2 to it, and assigns it to a newly created instance attribute. Note that the following is an equivalent assignment, but it may provide more clarification:
foo.x = Foo.x + 0.2
But... all of this changes if the class attribute is mutable:
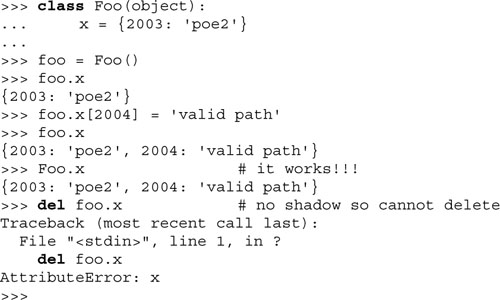
Static members, true to their name, hang around while instances (and their attributes) come and go (hence independent of instances). Also, if a new instance is created after a class attribute has been modified, the updated value will be reflected. Class attribute changes are reflected across all instances:

Core Tip: Use a class attribute to modify itself (not an instance attribute)
As we have seen above, it is perilous to try and modify a class attribute by using an instance attribute. The reason is because instances have their own set of attributes, and there is no clear way in Python to indicate that you want to modify the class attribute of the same name, e.g., there is no global keyword like there is when setting a global inside a function (instead of a local variable of the same name). Always modify a class attribute with the class name, not an instance.
Now we need to readdress the Python concept of binding, which is associated primarily with method invocation. We will first review some facts regarding methods. First, a method is simply a function defined as part of a class. (This means that methods are class attributes and not instance attributes).
Second, methods can be called only when there is an instance of the class upon which the method was invoked. When there is an instance present, the method is considered bound (to that instance). Without an instance, a method is considered unbound.
And finally, the first argument in any method definition is the variable self, which represents the instance object invoking the method.
Core Note: What is self?
The variable self is used in class instance methods to reference the instance to which the method is bound. Because a method’s instance is always passed as the first argument in any method call, self is the name that was chosen to represent the instance. You are required to put self in the method declaration (you may have noticed this already) but do not need to actually use the instance (self) within the method.
If you do not use self in your method, you might consider creating a regular function instead, unless you have a particular reason not to. After all, your code, because it does not use the instance object in any way, “unlinks” its functionality from the class, making it seem more like a general function.
In other object-oriented languages, self may be named this.
Methods, whether bound or not, are made up of the same code. The only difference is whether there is an instance present so that the method can be invoked. In most cases, you the programmer will be calling a bound method. Let us say that you have a class MyClass and an instance of it called mc, and you want to call the MyClass.foo() method. Since you already have an instance, you can just call the method with mc.foo(). Recall that self is required to be declared as the first argument in every method declaration. Well, when you call a bound method, self never needs to be passed explicitly when you invoke it with an instance. That is your bonus for being “required” to declare self as the first argument. The only time when you have to pass it in is when you do not have an instance and need to call a method unbound.
Calling an unbound method happens less frequently. The main use case for calling a method belonging to a class that you do not have an instance for is the case where you are deriving a child class and override a parent method where you need to call the parent’s constructor you are overriding. Let us look at an example back in the chapter introduction:

EmplAddrBookEntry is a subclass of AddrBookEntry, and we are overriding the constructor __init__(). Rather than cutting and pasting code from the parent constructor, we want to have as much code reuse as possible. This will also prevent bugs from being propagated because any fixes made would be propagated to us here in the child. This is exactly what we want—there is no need to copy lines of code. This all hinges on somehow being able to call the parent constructor, but how?
We would not have an instance of AddrBookEntry at runtime. What do we have? Well, we will have an instance of EmplAddrBookEntry, and it is so similar to AddrBookEntry, can’t we somehow use it instead? The answer is yes!
When an EmplAddrBookEntry is instantiated and __init__() called, there is very little difference between it and an instance of AddrBookEntry, mainly because we have not yet had a chance to customize our EmplAddrBookEntry instance to really make it different from AddrBookEntry.
This is the perfect place to call an unbound method. We will call the parent class constructor from the child class constructor and explicitly pass in the self argument as required by the (parent class) constructor (since we are without a parent class instance). The first line of __init__() in the child consists of a call to __init__() of the parent. We call it via the parent class name and pass in self plus its required arguments. Once that call returns, we can perform the (instance) customization that is unique to our (child) class.
Static methods and class methods were introduced in Python 2.2. They can be used with both classic classes and new-style classes. A pair of built-in functions were added to “tag,” “cast,” or “convert” methods declared as part of class definitions as either one of these two types of methods.
Static methods are exactly what they are if you are coming from C++ or Java. They are simply functions (no instance required) that are part of class definitions. In fact, before static methods were added to Python, users just created functions in the global namespace as a proxy for this missing feature—sometimes using a class object inside such functions to manipulate the class (or rather, class attributes). Using module functions is still far more common than using static class methods.
Recall that regular methods require an instance (self) as the first argument, and upon (bound) method invocation, self is automagically passed to the method. Well, for class methods, instead of the instance, the class is required as the first argument, and it is passed in to the method by the interpreter. The class does not need to be specifically named like self, but most people use cls as the variable name.
Now let us look at some examples of these types of methods using classic classes (you can also use new-style classes if you want to):

The corresponding built-in functions are converted into their respective types and are reassigned back to the same variable name. Without the function calls, both would generate errors from the Python compiler, which is expecting regular method declarations with self. We can then call these functions from either the class or an instance... it makes no difference:

Now, seeing code like foo = staticmethod(foo) can irritate some programmers. There is something unsettling about it, and many folks were upset with such a flimsy syntax, although van Rossum had pointed out that it was to be temporary until the semantics were worked out with the community. In Section 11.3.6 of Chapter 11, “Functions,” we looked at decorators, a new feature introduced in Python 2.4. They are used in places where you want to apply a function to a function object but want to rebind the new function object to the original variable. This is a perfect place to use them to partially clean up the syntax. By using decorators, we can avoid the reassignment above:
Once a class is defined, the goal is to use it as a model programmatically, embedding this object throughout your code, intermixing use with other data types and the logical flow of execution. There are two ways of utilizing classes in your code. The first is composition. This is where different classes are mingled with and into other classes for added functionality and code reusability. You may create instances of your class inside a larger class, containing other attributes and methods enhancing the use of the original class object. The other way is with derivation, discussed in the next section.
For example, let us imagine an enhanced design of the address book class we created at the beginning of the chapter. If, during the course of our design, we created separate classes for names, addresses, etc., we would want to integrate that work into our AddrBookEntry class, rather than have to redesign each of those supporting classes. We have the added advantages of time and effort saved, as well as more consistent code—when bugs are fixed in that same piece of code, that change is reflected in all the applications that reuse that code.
Such a class would perhaps contain a Name instance, not to mention others like StreetAddress, Phone (home, work, telefacsimile, pager, mobile, etc.), Email (home, work, etc.), and possibly a few Date instances (birthday, wedding, anniversary, etc.). Here is a simple example with some of the classes mentioned above:

The NewAddrBookEntry class is a composition of itself and other classes. This defines a “has-a” relationship between a class and other classes it is composed of. For example, our NewAddrBookEntry class “has a” Name class instance and a Phone instance, too.
Creating composite objects enables such additional functionality and makes sense because the classes have nothing in common. Each class manages its own namespace and behavior. When there are more intimate relationships between objects, the concept of derivation may make more sense in your application, especially if you require like objects, with slightly different functionality.
Composition works fine when classes are distinct and are a required component of larger classes, but when you desire “the same class but with some tweaking,” derivation is a more logical option.
One of the more powerful aspects of OOP is the ability to take an already defined class and extend it or make modifications to it without affecting other pieces of code in the system that use the currently existing classes. OOD allows for class features to be inherited by descendant classes or subclasses. These subclasses derive the core of their attributes from base (aka ancestor, super) classes. In addition, this derivation may be extended for multiple generations. Classes involved in a one-level derivation (or that are adjacent vertically in a class tree diagram) have a parent and child class relationship. Those classes that derive from the same parent (or that are adjacent horizontally in a class tree diagram) have a sibling relationship. Parent and all higher-level classes are considered ancestors.
Using our example from the previous section, let us imagine having to create different types of address books. We are talking about more than just creating multiple instances of address books—in this case, all objects have everything in common. What if we wanted a EmplAddrBookEntry class whose entries would contain more work-related attributes such as employee ID and e-mail address? This would differ from a PersonalAddrBookEntry class, which would contain more family-oriented information such as home address, relationship, birthday, etc.
For both of these cases, we do not want to design these classes from scratch, because it would duplicate the work already accomplished to create the generic AddressBook class. Wouldn’t it be nice to subsume all the features and characteristics of the AddressBook class and add specialized customization for your new, yet related, classes? This is the entire motivation and desire for class derivation.
The syntax for creating a subclass looks just like that for a regular (new-style) class, a class name followed by one or more parent classes to inherit from:
![]()
If your class does not derive from any ancestor class, use object as the name of the parent class. The only example that differs is the declaration of a classic class that does not derive from ancestor classes—in this case, there are no parentheses:
![]()
We have already seen some examples of classes and subclasses so far, but here is another simple example:
Inheritance describes how the attributes of base classes are “bequeathed” to a derived class. A subclass inherits attributes of any of its base classes whether they be data attributes or methods.
We present an example below. P is a simple class with no attributes. C is a class with no attributes that derives from (and therefore is a subclass of) P:
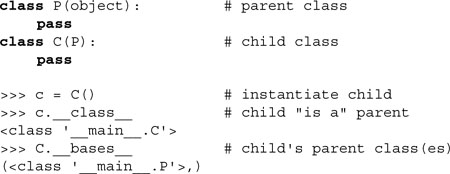
Because P has no attributes, nothing was inherited by C. Let us make our example more useful by giving P some attributes:

We now create P with a documentation string (__doc__) and a constructor that will execute when we instantiate P, as in this interactive session:
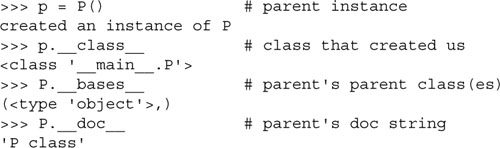
The “created an instance” output comes directly from __init__(). We also display some more about the parent class P for your information. We will now instantiate C, showing you how the __init__() (constructor) method is inherited with its execution:
C has no declared method __init__(), yet there is still output when instance c of class C is created. The reason is that C inherits __init__() from P. The __bases__ tuple now lists P as its parent class. Note that documentation strings are unique to classes, functions/methods, and modules, so a special attribute like __doc__ is not inherited by its derived classes.
In Section 13.4.4, we briefly introduced the __bases__ class attribute, which is a tuple containing the set of parent classes for any (sub)class. Note that we specifically state “parents” as opposed to all base classes (which includes all ancestor classes). Classes that are not derived will have an empty __bases__ attribute. Let us look at an example of how to make use of __bases__.
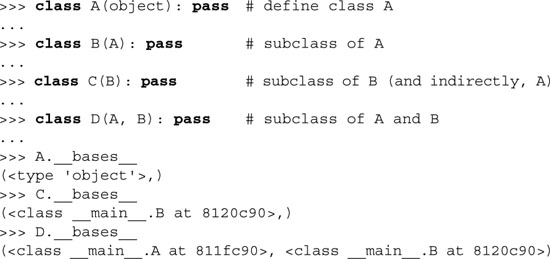
In the example above, although C is a derived class of both A (through B) and B, C’s parent is B, as indicated in its declaration, so only B will show up in C.__bases__. On the other hand, D inherits from two classes, A and B. (Multiple inheritance is covered in Section 13.11.4.)
Let us create another function in P that we will override in its child class:

Now let us create the child class C, subclassed from parent P:

Although C inherits P’s foo() method, it is overridden because C defines its own foo() method. One reason for overriding methods is because you may want special or different functionality in your subclass. Your next obvious question then must be, “Can I call a base class method that I overrode in my subclass?”
The answer is yes, but this is where you will have to invoke an unbound base class method, explicitly providing the instance of the subclass, as we do here:
>>> P.foo(c)
Hi, I am P-foo()
Notice that we already had an instance of P called p from above, but that is nowhere to be found in this example. We do not need an instance of P to call a method of P because we have an instance of a subclass of P which we can use, c. You would not typically call the parent class method this way. Instead, you would do it in the overridden method and call the base class method explicitly:

Note how we pass in self explicitly in this (unbound) method call. A better way to make this call would be to use the super() built-in method:

super() will not only find the base class method, but pass in self for us so we do not have to as in the previous example. Now when we call the child class method, it does exactly what you think it should do:

Core Note: Overriding __init__ does not invoke base class __init__
Similar to overriding non-special methods above, when deriving a class with a constructor __init__(), if you do not override __init__(), it will be inherited and automatically invoked. But if you do override __init__() in a subclass, the base class __init__() method is not invoked automatically when the subclass is instantiated. This may be surprising to those of you who know Java.

If you want the base class __init__() invoked, you need to do that explicitly in the same manner as we just described, calling the base class (unbound) method with an instance of the subclass. Updating our class C appropriately results in the following desired execution:

In the above example, we call the base class __init__() method before the rest of the code in our own __init__() method. It is fairly common practice (if not mandatory) to initialize base classes for setup purposes, then proceed with any local setup. This rule makes sense because you want the inherited object properly initialized and “ready” by the time the code for the derived class constructor runs because it may require or set inherited attributes.
Those of you familiar with C++ would call base class constructors in a derived class constructor declaration by appending a colon to the declaration followed by calls to any base class constructors. Whether the programmer does it or not, in Java, the base class constructor always gets called (first) in derived class constructors.
Python’s use of the base class name to invoke a base class method is directly comparable to Java’s when using the keyword super, and that is why the super() built-in function was eventually added to Python, so you could “do the correct thing” functionally:

The nice thing about using super() is that you do not need to give any base class name explicitly... it does all the legwork for you! The importance of using super() is that you are not explicitly specifying the parent class. This means that if you change the class hierarchy, you only need to change one line (the class statement itself) rather than tracking through what could be a large amount of code in a class to find all mentions of what is now the old class name.
Not being able to subclass a standard data type was one of the most significant problems of classic classes. Fortunately that was remedied back in 2.2 with the unification of types and classes and the introduction of new-style classes. Below we present two examples of subclassing a Python type, one mutable and the other not.
Let us assume you wanted to work on a subclass of floating point numbers to be used for financial applications. Any time you get a monetary value (as a float), you always want to round evenly to two decimal places. (Yes, the Decimal class is a better solution than standard floats to accurately store floating point values, but you still need to round them [occasionally] to two digits!) The beginnings of your class can look like this:

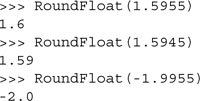
We override the __new__() special method, which customizes our object to be just a little bit different from the standard Python float: we round the original floating point number using the round() built-in function and then instantiate our float, RoundFloat. We create the actual object by calling our parent class constructor, float.__new__(). Note that all __new__() methods are class methods, and we have to explicitly pass in the class as the first argument, similar to how self is required for regular methods like __init__().
While our example is simple enough, i.e., we know we have a float, we are only subclassing from one type, etc., for general cases, it is better to use the super() built-in function to go and hunt down the appropriate superclass __new__() method to call. Below, we have modified our example with this change:

This example is far from complete, so keep an eye out for getting it in better shape as we progress through this chapter. Here is some sample output:
Subclassing a mutable type is similar, and you probably do not need to use __new__() (or even __init__()) because there is typically not as much setup required. Usually the default behavior of the type you are deriving is what you want. In this simple example, we create a new dictionary type where its keys are returned sorted by the keys() method:

Recall that a dictionary can be created with dict(), dict(mapping), dict(sequence_of_2_tuples), or dict(**kwargs). Below is an example of using our new class:

If we put all the code in a script and run it, we get the following output:
![]()
For our example, the iterator progresses through the keys in the hashed order while using our (overridden) keys() method gives the keys in lexicographically sorted order.
Always be cautious and conscious of what you are doing. What if, you say, “Your method is overly complicated with the call to super(),” and instead, you prefer keys() to be simpler (and easier to understand)... like this:
![]()
This is Exercise 13-19 at the end of the chapter.
Like C++, Python allows for subclassing from multiple base classes. This feature is commonly known as multiple inheritance. The concept is easy, but the hard work is in how to find the correct attribute when it is not defined in the current (sub)class. There are two different aspects to remember when using multiple inheritance. The first is, again, being able to find the correct attribute. Another is when you have overridden methods, all of which call parent class methods to “take care of their responsibilities” while the child class takes care of its own obligations. We will discuss both simultaneously but focus on the latter as we describe the method resolution order.
In Python versions before 2.2, the algorithm was simple enough: a depth-first left-to-right search to obtain the attribute to use with the derived class. Unlike other Python algorithms that override names as they are found, multiple inheritance takes the first name that is found.
Because of the entirely new structure of classes and types and the subclassing of built-in types, this algorithm was no longer feasible, so a new MRO algorithm had to be developed. The initial one debuting in 2.2 was a good attempt but had a flaw (see Core Note below). It was immediately replaced in 2.3, which is the current one that is in use today.
The exact resolution order is complex and is beyond the scope of this text, but you can read about it in the references given later on in this section. We can say that the new resolution method is more breadth-first than it is depth-first.
Core Note: uses a unique yet faulty MRO
Python 2.2 was the first release using a new-style MRO that had to replace the algorithm from classic classes due to the reasons outlined above.
For 2.2, the algorithm had the basic idea of following the hierarchy of each ancestor class and building a list of classes encountered, strategically removing duplicates. However, it was pointed out on the core Python developers mailing list that it fails to maintain monotonicity (order preservation), and had to be replaced by the new C3 algorithm that has been in place since 2.3.
Let us give you an example to see how the method resolution order differs between classic and new-style classes.
The simple example below will highlight the differences between the old and new styles of resolution. The script consists of a pair of parent classes, a pair of child classes, and one grandchild class.

In Figure 13-2, we see the class relationships between the parent, children, and grandchildren classes. P1 defines foo(), P2 defines foo() and bar(), and C2 defines bar(). Let us now demonstrate the behavior of both classic and new-style classes.
Figure 13-2. Relationships between parent, children, and grandchild classes as well as the methods they define.

We are going to use classic classes first. Upon executing the above declarations in the interactive interpreter, we can confirm the resolution order that classic classes use, depth-first, left to right:

When calling foo(), it looks in the current class (GC) first. If it cannot be found, it goes up to its immediate parent, C1. The search fails there so it continues up the tree to its parent, P1, which is where foo() is found.
Likewise for bar(), it searches through GC, C1, and P1 before then finding it in P2. C2.bar() is never found because of the resolution order used. Now, you may be thinking, “I would prefer to call C2’s bar() because it is closer to me in the inheritance tree, thus more relevant.” In this case, you can still use it, but you have to do it in the typical unbound fashion by invoking its fully qualified name and providing a valid instance:
>>> C2.bar(gc)
called C2-bar()
Now uncomment the (object) next to the class declarations for P1 and P2 and reexecute. The new-style method resolution gives us something different:
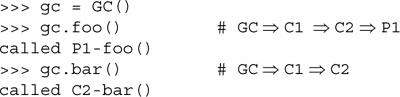
Instead of following the tree up each step, it looks at the siblings first, giving it more of a breadth-first flavor. When looking for foo(), it checks GC, followed by C1 and C2, and then finds it in P1. If P1 did not have it, it would have gone to P2. The bottom line for foo() is that both classic and new-style classes would have found it in P1, but they took different paths to get there.
The result for bar() is different, though. It searches GC and C1, and finds it next in C2 and uses it there. It does not continue up to the grandparents P1 and P2. In this case, the new-style resolution fit into the scheme better if you did prefer to call the “closest” bar() from GC. And of course, if you still need to call one higher up, just do it in an unbound manner as before:
>>> P2.bar(gc)
called P2-bar()
New-style classes also have an __mro__ attribute that tells you what the search order is:

The classic class method resolution never gave folks too many problems. It was simple to explain and easy to understand. Most classes were single inheritance, and multiple inheritance was usually limited to mixing two completely discrete classes together. This is where the term mix-in classes (or “mix-ins”) comes from.
The unification of types and classes in 2.2 brought about a new “problem,” and that is related to all (root) classes inheriting from object, the mother of all types. The diagram of a simple multiple inheritance hierarchy now formed a diamond. Taking some inspiration from Guido van Rossum’s essay, let us say that you have classic classes B and C, as defined below where C overrides its constructor but B does not, and D inherits from both B and C:
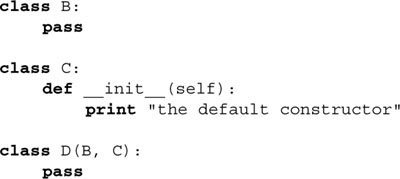
When we instantiate D, we get:
>>> d = D()
the default constructor
Figure 13.3 illustrates the class hierarchy for B, C, and D, as well as the problem introduced when we change the code to use new-style classes:
Figure 13-3. Inheritance problems are caused by the appearance of the base class required by new-style classes, forming a diamond shape in the inheritance hierarchy. An instance of D should not miss an upcall to C nor should it upcall to A twice (since both B and C derive from A). Be sure to read the “Cooperative Methods” section of Guido van Rossum’s essay for further clarification.

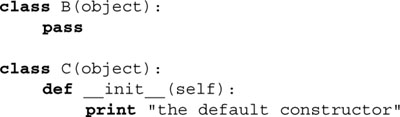
Not much change here other than adding (object) to both class declarations, right? That is true, but as you can see in the diagram, the hierarchy is now a diamond; the real problem is in the MRO now. If we used the classic class MRO, when instantiating D, we no longer get C.__init__()... we get object.__init__()! This is the exact reason why the MRO needed to be changed.
Although we saw that it does change the way attributes are looked up in our example above with the GC class, you do not have to worry about lots of code breaking. Classic classes will still use the old MRO while new-style classes will use its MRO. Again, if you do not need all of the features of the new-style classes, there is nothing wrong with continuing to develop using classic classes.
Classic classes have a depth-first MRO algorithm. Because new-style classes inherit from object, a new MRO had to be created because of problems ensuing from the now-diamond-shaped class hierarchy.
You can read more about new-style classes, the MROs, and more in:
• Guido van Rossum’s essay on the unification of types and classes: http://www.python.org/download/releases/2.2.3/descrintro
• PEP 252: Making Types Look More Like Classes http://www.python.org/doc/peps/pep-0252
• “What’s New in Python 2.2” document http://www.python.org/doc/2.2.3/whatsnew
• Python 2.3 Method Resolution order paper http://python.org/download/releases/2.3/mro/
The issubclass() Boolean function determines if one class is a subclass or descendant of another class. It has the following syntax:
issubclass(sub, sup)
issubclass() returns True if the given subclass sub is indeed a subclass of the superclass sup (and False otherwise). This function allows for an “improper” subclass, meaning that a class is viewed as a subclass of itself, so the function returns True if sub is either the same class as sup or derived from sup. (A “proper” subclass is strictly a derived subclass of a class.)
Beginning with Python 2.3, the second argument of issubclass() can be tuple of possible parent classes for which it will return True if the first argument is a subclass of any of the candidate classes in the given tuple.
The isinstance() Boolean function is useful for determining if an object is an instance of a given class. It has the following syntax:
isinstance(obj1, obj2)
isinstance() returns True if obj1 is an instance of class obj2 or is an instance of a subclass of obj2 (and False otherwise), as indicated in the following examples:

Note that the second argument should be a class; otherwise, you get a TypeError. The only exception is if the second argument is a type object. This is allowed because you can also use isinstance() to check if an object obj1 is of the type obj2, i.e.,
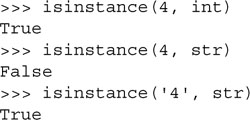
If you are coming from Java, you may be aware of the warning against using its equivalent, instanceof(), due to performance reasons. A call to Python’s isinstance() will not have the same performance hit primarily because it only needs it to perform a quick search up the class hierarchy to determine what classes it is an instance of, and even more importantly, it is written in C!
Like issubclass(), isinstance() can also take a tuple as its second argument. This feature was added in Python 2.2. It will return True if the first argument is an instance of any of the candidate types and classes in the given tuple. Also be sure to read more about isinstance() in Section 13.16.1 on page 595.
The *attr() functions can work with all kinds of objects, not just classes and instances. However, since they are most often used with those objects, we present them here. One thing that might throw you off is that when using these functions, you pass in the object you are working on as the first argument, but the attribute name, the second argument to these functions, is the string name of the attribute. In other words, when operating with obj.attr, the function call will be like *attr(obj, 'attr'...)—this will be clear in the examples that follow.
The hasattr() function is Boolean and its only purpose is to determine whether or not an object has a particular attribute, presumably used as a check before actually trying to access that attribute. The getattr() and setattr() functions retrieve and assign values to object attributes, respectively. getattr() will raise an AttributeError exception if you attempt to read an object that does not have the requested attribute, unless a third, optional default argument is given. setattr() will either add a new attribute to the object or replace a pre-existing one. The delattr() function removes an attribute from an object.
Here are some examples using all the *attr() BIFs:

We first experienced dir() in Exercises 2-12, 2-13, and 4-7. In those exercises, we used dir() to give us information about all the attributes of a module. We now know that dir() can be applied to objects as well.
In Python 2.2, dir() received a significant upgrade. Because of these changes, the voluntarily implemented __members__ and __methods__ data attributes have been deprecated. dir() provides more details than the old one. According to the documentation, “In addition to the names of instance variables and regular methods, it also shows the methods that are normally invoked through special notations, like __iadd__ (+=), __len__ (len()), __ne__ (!=).” Here are more specifics from the Python documentation:
• dir() on an instance (classic or new-style) shows the instance variables as well as the methods and class attributes defined by the instance’s class and all its base classes.
• dir() on a class (classic or new-style) shows the contents of the __dict__ of the class and all its base classes. It does not show class attributes that are defined by a metaclass.
• dir() on a module shows the contents of the module’s __dict__. (This is unchanged.)
• dir() without arguments shows the caller’s local variables. (Again, unchanged.)
• There are more details; in particular, for objects that override __dict__ or __class__, these are honored, and for backwards compatibility, __members__ and __methods__ are honored if they are defined.
The super() function was added in 2.2 for new-style classes. The purpose of this function is to help the programmer chase down the appropriate superclass with which the proper method can be invoked. In simple cases, the programmer will likely just call the ancestor class method in an unbound fashion. Using super() simplifies the task of search for a suitable ancestor and passes in the instance or type object on your behalf when you call it.
In Section 13.11.4, we described the method resolution order (MRO) that is used to chase down attributes in ancestor classes. For each class defined, an attribute named __mro__ is created as a tuple that lists the classes that need to be searched, in the order they are searched. Here is its syntax:
super(type[, obj])
Given type, super() “returns the superclass” of type. You may also pass in obj, which should be of the type type if you want the superclass to be bound, otherwise it will be unbound. The obj argument can also be a type, but it needs to be a subclass of type. In summary, when obj is given:
• If obj is an instance, then isinstance(obj, type) must be True
• If obj is a class or type, then issubclass(obj, type) must be True
Actually, super() is a factory function that makes a super object that uses the __mro__ attribute for a given class to find the appropriate superclass. Most notably, it searches that MRO starting from the point where the current class is found. For more details, again please see Guido van Rossum’s essay on type and class unification, where he even gives a pure Python implementation of super() so you can get a better idea of how it works!
Final thought... super()’s primary use is in the lookup of a superclass attribute, e.g., super(MyClass, self).__init__(). If you are not performing such a lookup, you probably do not need to be using super().
There are various examples how to use super() scattered throughout this chapter. Also be sure to read the important notes about super() in Section 13.11.2, especially the Core Note in that section.
The vars() built-in function is similar to dir() except that any object given as the argument must have a __dict__ attribute. vars() will return a dictionary of the attributes (keys) and values of the given object based on the values in its __dict__ attribute. If the object provided does not have such an attribute, an TypeError exception is raised. If no object is provided as an argument to vars(), it will display the dictionary of attributes (keys) and the values of the local namespace, i.e., locals(). We present an example of calling vars() with a class instance:

Table 13.3 summarizes the built-in functions for classes and class instances.

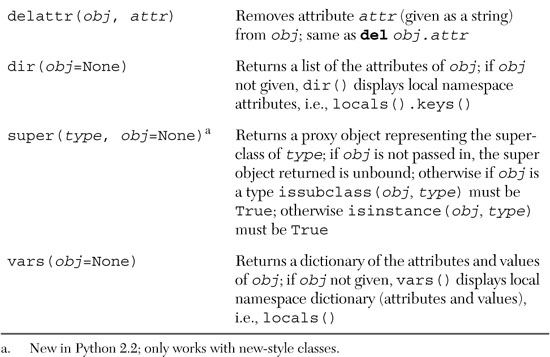
We covered two important aspects of methods in preceding sections of this chapter: first, that methods must be bound (to an instance of their corresponding class) before they can be invoked; and second, that there are two special methods which provide the functionality of constructors and destructors, namely __init__() and __del__() respectively.
In fact, __init__() and __del__() are part of a set of special methods which can be implemented. Some have the predefined default behavior of inaction while others do not and should be implemented where needed. These special methods allow for a powerful form of extending classes in Python. In particular, they allow for:
• Emulating standard types
• Overloading operators
Special methods enable classes to emulate standard types by overloading standard operators such as +, *, and even the slicing subscript and mapping operator [ ]. As with most other special reserved identifiers, these methods begin and end with a double underscore ( __ ). Table 13.4 presents a list of all special methods and their descriptions.


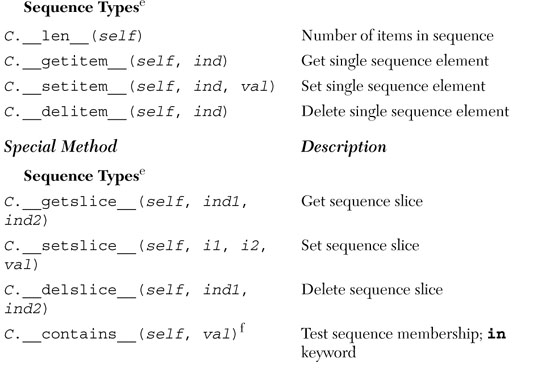
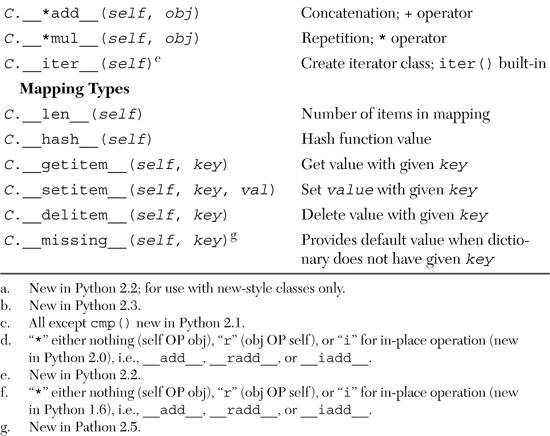
The Basic Customization and Object (Value) Comparison special methods can be implemented for most classes and are not tied to emulation of any specific types. The latter set, also known as Rich Comparisons, was added in Python 2.1.
The Attributes group helps manage instance attributes of your class. This is also independent of emulation. There is also one more, __getattribute__(), which applies to new-style classes only, so we will describe it in an upcoming section.
The Numeric Types set of special methods can be used to emulate various numeric operations, including those of the standard (unary and binary) operators, conversion, base representation, and coercion. There are also special methods to emulate sequence and mapping types. Implementation of some of these special methods will overload operators so that they work with instances of your class type.
The additional division operators __*truediv__() and __*floordiv__() were added in Python 2.2 to support the pending change to the Python division operator—also see Section 5.5.3. Basically, if the interpreter has the new division enabled, either via a switch when starting up Python or via the import of division from __future__, the single slash division operator ( / ) will represent true division, meaning that it will always return a floating point value, regardless of whether floats or integers make up the operands (complex division stays the same). The double slash division operator ( // ) will provide the familiar floor division with which most engineers who come from the standard compiled languages like C/C++ and Java are familiar. Similarly, these methods will only work with these symbols applied to classes that implement these methods and when new division is enabled.
Numeric binary operators in the table annotated with a wildcard asterisk in their names are so denoted to indicate that there are multiple versions of those methods with slight differences in their name. The asterisk either symbolizes no additional character in the string, or a single “r” to indicate a right-hand operation. Without the “r,” the operation occurs for cases that are of the format self OP obj; the presence of the “r” indicates the format obj OP self. For example, __add__(self, obj) is called for self + obj, and __radd__(self, obj) would be invoked for obj + self.
Augmented assignment, new in Python 2.0, introduces the notion of “in-place” operations. An “i” in place of the asterisk implies a combination left-hand operation plus an assignment, as in self = self OP obj. For example, __iadd__(self, obj) is called for self = self + obj.
With the arrival of new-style classes in Python 2.2, several more special methods have been added for overriding. However, as we mentioned at the beginning of the chapter, we are now focusing only on the core portion of material applicable to both classic classes as well as new-style classes, and then later on in the chapter, we address the advanced features of new-style classes.
Our first example is totally trivial. It is based to some extent on the RoundFloat class we saw earlier in the section on subclassing Python types. This example is simpler. In fact, we are not even going to subclass anything (except object of course)... we do not want to “take advantage” of all the “goodies” that come with floats. No, this time, we want to create a barebones example so that you have a better idea of how class customization works. The premise of this class is still the same as the other one: we just want a class to save a floating point number rounded to two decimal places.

This class takes a single floating point value—it asserts that the type must be a float as it is passed to the constructor—and saves it as the instance attribute value. Let us try to execute it and create an instance of this class:

As you can see, it chokes on invalid input, but provides no output if input was valid. But look what happens when we try to dump the object in the interactive interpreter. We get some information, but this is not what we were looking for. (We wanted to see the numeric value, right?) And calling print does not apparently help, either.
Unfortunately, neither print (using str()) nor the actual object’s string representation (using repr()) reveals much about our object. One good idea would be to implement either __str__() or __repr__(), or both so that we can “see” what our object looks like. In other words, when you want to display your object, you actually want to see something meaningful rather than the generic Python object string (<object object at id>). Let us add a __str__() method, overriding the default behavior:
![]()
Now we get the following:

We still have a few problems ... one is that just dumping the object in the interpreter still shows the default object notation, but that is not so bad. If we wanted to fix it, we would just override __repr__(). Since our string representation is also a Python object, we can make the output of __repr__() the same as __str__().
To accomplish this, we can just copy the code from __str__() to __repr__(). This is a simple example, so it cannot really hurt us, but as a programmer, you know that is not the best thing to do. If a bug existed in __str__(), then we will copy that bug to __repr__().
The best solution is to recall that the code represented by __str__() is an object too, and like all objects, references can be made to them, so let us just make __repr__() an alias to __str__():
__repr__ = __str__
In the second example with 5.5964, we see that it rounds the value correctly to 5.6, but we still wanted two decimal places to be displayed. One more tweak, and we should be done. Here is the fix:
![]()
And here is the resulting output with both str() and repr() output:

In our original RoundFloat example at the beginning of this chapter, we did not have to worry about all the fine-grained object display stuff; the reason is that __str__() and __repr__() have already been defined for us as part of the float class. All we did was inherit them. Our more “manual” version required additional work from us. Do you see how useful derivation is? You do not even need to know how far up the inheritance tree the interpreter needs to go to find a declared method that you are using without guilt. We present the full code of this class in Example 13.2.

Now let us try a slightly more complex example.
For our first realistic example, let us say we wanted to create a simple application that manipulated time as measured in hours and minutes. The class we are going to create can be used to track the time worked by an employee, the amount of time spent online by an ISP (Internet service provider) subscriber, the amount of total uptime for a database (not inclusive of downtime for backups and upgrades), the total amount of time played in a poker tournament, etc.
For our Time60 class, we will take integers as hours and minutes as input to our constructor.

Also, as seen in the previous example, we want meaningful output if we display our instances, so we need to override __str__() (and __repr__() if so desired). As humans, we are used to seeing hours and minutes in colon-delimited format, e.g. “4:30,” representing four and a half hours (four hours and thirty minutes):
![]()
Using this class, we can instantiate some objects. In the example below, we are starting a timesheet to track the number of billable hours for a contractor:

The output is very nice, exactly what we wanted to see. What is the next step? Let us say we want our objects to interact. In particular, for our timesheet application, it is a necessity to be able to add Time60 instances together and have our objects do all meaningful operations. We would love to see something like this:
>>> mon + tue
21:45
With Python, overloading operators is simple. For the plus sign ( + ), we need to overload the __add__() special method, and perhaps __radd__() and __iadd__(), if applicable. More on those in a little while. Implementing __add__() does not sound too difficult—we just add the hours together followed by the minutes. Most of the complexity lies in what we do with the new totals. If we want to see “21:45,” we have to realize that that is another Time60 object. We are not modifying mon or tue, so our method would have to create another object and fill it in with the sums we calculated.
We implement the __add__() special method in such a way that we calculate the individual sums first, then call the class constructor to return a new object:

The new object is created by invoking the class as in any normal situation. The only difference is that from within the class, you typically would not invoke the class name directly. Rather, you take the __class__ attribute of self, which is the class from which self was instantiated, and invoke that. Because self.__class__ is the same as Time60, calling self.__class__() is the same as calling Time60().
This is the more object-oriented approach anyway. The other reason is that if we used the real class name everywhere we create a new object and later on decided to change the class name to something else, we would have to perform very careful global search-and-replace. By using self.__class__, we do not have to do anything other than change the name in the class directive.
With our plus sign overloading, we can now “add” Time60 objects:
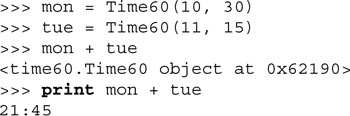
Oops, we forgot to add an __repr__alias to __str__, which is easily fixable.
One question you may have is, “What happens when I try to use an operator in an overload situation where I do not have the appropriate special methods defined?” The answer is a TypeError exception:

With augmented assignment (introduced back in Python 2.0), we may also wish to override the “in-place” operators, for example, __iadd__(). This is for supporting an operation like mon += tue and having the correct result placed in mon. The only trick with overriding an __i*__() method is that it has to return self. Let us add the following bits of code to our example, fixing our repr() issue above as well as supporting augmented assignment:
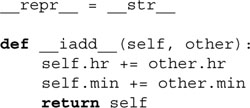

Note the use of the id() built-in function to confirm that before and after the in-place addition we are indeed modifying the same object and not creating a new one. This is a great start at a class that has a lot of potential. The complete class definition for Time60 is given in Example 13.3.


We will leave it here, but there is plenty of optimization and significant improvements that can be made to this class. For example, wouldn’t it be nice if we could just feed a 2-tuple (10, 30) into our constructor rather than having to pass in two separate arguments? What about a string like “10:30”?
The answer is yes, you can, and it is easy to do in Python but not by overloading the constructor as the case may be with other object-oriented programming languages. Python does not allow overloading callables with multiple signatures, so the only way to make it happen is with a single constructor and performing self-introspection with the isinstance() and (perhaps) type() built-in functions.
Supporting multiple forms of input makes our application more robust and flexible. The same is true for the ability to perform other operations like subtraction. Of course these are optional and serve as icing on the cake, but what we should be worried about first are two moderate flaws: undesired formatting when there are fewer than ten minutes and the lack of support of sexagesimal1 (base 60) operations:
1Latin-originated name for base 60; sometimes hexagesimal is used, a hybrid combining the Greek root “hexe” with the Latin “gesimal.”

Displaying wed should have resulted in “12:05,” and summing thu and fri should have given an output of “19:15.” The fixes for these flaws and the improvements suggested just above are great practice building your class customization skills. You can get a more complete description of these upgrades in Exercise 13-20 at the end of the chapter.
Hopefully, you now have a better understanding of operator overloading, why you would want to do it, and how you can implement special methods to accomplish that task. Let’s look at more complex customizations, continuing with the optional section that follows.
We were introduced to iterators formally in Chapter 8 but we have been using them throughout this text. They are simply a mechanism to go through items of a sequence (or sequence-like object) one at a time. In Chapter 8 we described how implementing the __iter__() and next() methods of a class can be used to create an iterator. We will demonstrate that with two examples here.
The first example is a RandSeq (short for RANDom SEQuence). We feed an initial sequence to our class, then let the user iterate (infinitely) through it via next().
The __init__() method does the aforementioned assignment. The __iter__() just returns self, which is how you declare an object is an iterator, and finally, next() is called to get successive values of iteration. The only catch with this iterator is that it never ends.
This example demonstrates some unusual things we can do with custom class iterations. One is infinite iteration. Because we read the sequence nondestructively, we never run out of elements. Each time the user calls next(), it gets the next value, but our object never raises StopIteration. If we run it, we will get output similar to the following:

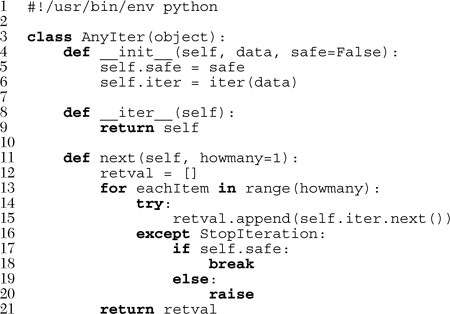
In the second example, we do create an iterator object, but rather than iterating through one item at a time, we give the next() method an argument telling how many items to return. Here is the code for our (ANY number of items ITERator):
Like RandSeq, the AnyIter class should be fairly simple to figure out. We described the basic operation above... it works just like any other iterator except that users can request the next N items of the iterable instead of only one.
We create the object by being given an iterable and a safe flag. If the flag is True, we will return any items retrieved before exhausting the iterable, but if the flag is False, we will reraise the exception if the user asked for too many items. The core of any complexity lies in next(), specifically how it quits (lines 14-21).
In the last part of next(), we create a list of items to return and call the object’s next() for each item. If we exhaust the list and get a StopIteration exception, we check the safe flag. If unsafe, we throw the exception back to the caller (raise); otherwise, we return whatever items we have saved up (break and return).

The execution above ran fine because the iteration fit the number of items perfectly. What happens when things go awry? Let us try “unsafe” mode first, which is how we created our iterator to begin with from above:

The StopIteration exception was raised because we exceeded our supply of items, and that exception was reraised back to the caller (line 20). If we were to recreate the iterator in “safe” mode and run it with the same example, we get back whatever the iterator could get us before running out of items:
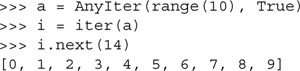
Let us create another new class, NumStr, consisting of a number-string ordered pair, called n and s, respectively, using integers as our number type. Although the “proper” notation of an ordered pair is (n, s), we choose to represent our pair as [n :: s] just to be different. Regardless of the notation, these two data elements are inseparable as far as our model is concerned. We want to set up our new class, called NumStr, with the following characteristics:
The class should be initialized with both the number and string; if either (or both) is missing, then 0 and the empty string should be used, i.e., n=0 and s='', as defaults.
We define the addition operator functionality as adding the numbers together and concatenating the strings; the tricky part is that the strings must be concatenated in the correct order. For example, let NumStr1 = [n1 :: s1] and NumStr2 = [n2 :: s2]. Then NumStr1 + NumStr2 is performed as [n1 + n2 :: s1 + s2] where + represents addition for numbers and concatenation for strings.
Similarly, we define the multiplication operator functionality as multiplying the numbers together and repeating or concatenating the strings, i.e., NumStr1 * NumStr2 = [n1 * n :: s1 * n].
This entity has a false value when the number has a numeric value of zero and the string is empty, i.e., when NumStr = [0 :: ''].
Comparing a pair of NumStr objects, i.e., [n1 :: s1] vs. [n2 :: s2], we find nine different combinations (i.e., n1 > n2 and s1 < s2, n1 == n2 and s1 > s2, etc.). We use the normal numeric and lexicographic compares for numbers and strings, respectively, i.e., the ordinary comparison of cmp(obj1, obj2) will return an integer less than zero if obj1 < obj2, greater than zero if obj1 > obj2, or equal to zero if the objects have the same value.
The solution for our class is to add both of these values and return the result. The interesting thing is that cmp() does not always return -1, 0, or 1 for us. It is, as described above, an integer less than, equal to, or greater than zero.
In order to correctly compare our objects, we need __cmp__() to return a value of 1 if (n1 > n2) and (s1 > s2), -1 if (n1 < n2) and (s1 < s2), and 0 if both sets of numbers and strings are the same, or if the comparisons offset each other, i.e., (n1 < n2) and (s1 > s2), or vice versa.

Given the above criteria, we present the code below for numstr.py, with some sample execution:
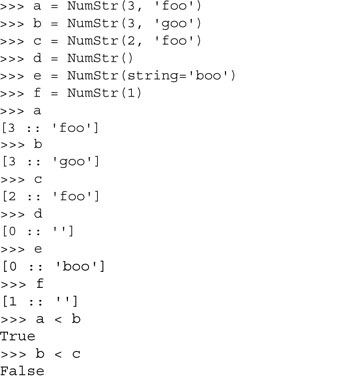

The top of our script features the constructor __init__() setting up our instance initializing itself with the values passed via the class instantiator call NumStr(). If either value is missing, the attribute takes on the default false value of either zero or the empty string, depending on the argument.
One significant oddity is the use of double underscores to name our attributes. As we will find out in the next section, this is used to enforce a level, albeit elementary, of privacy. Programmers importing our module will not have straightforward access to our data elements. We are attempting to enforce one of the encapsulation properties of OO design by permitting access only through accessor functionality. If this syntax appears odd or uncomfortable to you, you can remove all double underscores from the instance attributes, and the examples will still work in the exact same manner.
All attributes that begin with a double underscore ( __ ) are “mangled” so that these names are not as easily accessible during runtime. They are not, however, mangled in such a way so that it cannot be easily reverse-engineered. In fact, the mangling pattern is fairly well known and easy to spot. The main point is to prevent the name from being accidentally used when it is imported by an external module where conflicts may arise. The name is changed to a new identifier name containing the class name to ensure that it does not get “stepped on” unintentionally. For more information, check out Section 13.14 on privacy.
We choose the string representation of our ordered pair to be “[num :: 'str']” so it is up to __str__() to provide that representation whenever str() is applied to our instance and when the instance appears in a print statement. Because we want to emphasize that the second element is a string, it is more visually convincing if the users view the string surrounded by quotation marks. To that end, we use the “repr()” representation format conversion code “%r” instead of “%s.” It is equivalent to calling repr() or using the single back quotation marks to give the evaluatable version of a string, which does have quotation marks:
>>> print a
[3 :: 'foo']
Not calling repr() on self.__string (leaving the backquotes off or using “%s”) would result in the string quotations being absent:
return '[%d :: %s]' % (self.__num, self.__string)
Now calling print again on an instance results in:
>>> print a
[3 :: foo]
How does that look without the quotations? Not as convincing that “foo” is a string, is it? It looks more like a variable. The author is not as convinced either. (We quickly and quietly back out of that change and pretend we never even touched it.)
The first line of code after the __str__() function is the assignment of that function to another special method name, __repr__. We made a decision that an evaluatable string representation of our instance should be the same as the printable string representation. Rather than defining an entirely new function that is a duplicate of __str__(), we just create an alias, copying the reference.
When you implement __str__(), it is the code that is called by the interpreter if you ever apply the str() built-in function using that object as an argument. The same goes for __repr__() and repr().
How would our execution differ if we chose not to implement __repr__()? If the assignment is removed, only the print statement that calls str() will show us the contents of our object. The evaluatable string representation defaults to the Python standard of <...some_object_ information...>.

One feature we would like to add to our class is the addition operation, which we described earlier. One of Python’s features for customizing classes is that we can overload operators to make these types of customizations more “realistic.” Invoking a function such as “add(obj1, obj2)” to “add” objects obj1 and obj2 may seem like addition, but is it not more compelling to be able to invoke that same operation using the plus sign ( + ) like this? ⇒ obj1 + obj2
Overloading the plus sign requires the implementation of __add__() for self (SELF) and the other operand (OTHER). The __add__() function takes care of the Self + Other case, but we do not need to define __radd__() to handle the Other + Self because that is taken care of by the __add__() for Other. The numeric addition is not affected as much as the string concatenation because order matters.
The addition operation adds each of the two components, with the pair of results forming a new object—created as the results are passed to a call for instantiation as calling self.__class__() (again, also previously explained above). Any object other than a like type should result in a TypeError exception, which we raise in such cases.
We also overload the asterisk [by implementing __mul__()] so that both numeric multiplication and string repetition are performed, resulting in a new object, again created via instantiation. Since repetition allows only an integer to the right of the operator, we must enforce this restriction as well. We also do not define __rmul__() for the same reason.
Python objects have a Boolean value at any time. For the standard types, objects have a false value when they are either a numeric equivalent of zero or an empty sequence or mapping. For our class, we have chosen both that its numeric value must be zero and that the string be empty in order for any such instance to have a false value. We override the __nonzero__() method for this purpose. Other objects such as those that strictly emulate sequence or mapping types use a length of zero as a false value. In those cases, you would implement the __len__() method to effect that functionality.
__norm_cval() (short for “normalize cmp() value”) is not a special method. Rather, it is a helper function to our overriding of __cmp__(); its sole purpose is to convert all positive return values of cmp() to 1, and all negative values to -1. cmp() normally returns arbitrary positive or negative values (or zero) based on the result of the comparison, but for our purposes, we need to restrict the return values to only -1, 0, and 1. Calling cmp() with integers and comparing to zero will give us the result we need, being equivalent to the following snippet of code:

The actual comparison of two like objects consists of comparing the numbers and the strings, and returning the sum of the comparisons.
Attributes in Python are, by default, “public” all the time, accessible by both code within the module and modules that import the module containing the class.
Many OO languages provide some level of privacy for the data and provide only accessor functions to provide access to the values. This is known as implementation hiding and is a key component to the encapsulation of the object. Most OO languages provide “access specifiers” to restrict access to member functions.
Python provides an elementary form of privacy for class elements (attributes or methods). Attributes that begin with a double underscore (__) are mangled during runtime so direct access is thwarted. In actuality, the name is prepended with an underscore followed by the class name. For example, let us take the self.__num attribute found in Example 13.6 (numstr.py). After the mangling process, the identifier used to access that data value is now self._NumStr__num. Adding the class name to the newly mangled result will prevent it from clashing with the same name in either ancestor or descendant classes.
Although this provides some level of privacy, the algorithm is also in the public domain and can be defeated easily. It is more of a protective mechanism for importing modules that do not have direct access to the source code or for other code within the same module.
The other purpose of this type of name-mangling is to protect __XXX variables from conflicting with derived class namespaces. If you have an __XXX attribute in a class, it will not be overridden by a child class’s ___XXX attribute. (Recall that if a parent has just an XXX attribute and a child defines one, then the child’s XXX overrides the parents, and the reason why you have to do PARENT.XXX to call the base class method of the same name.) By using __XXX, the code for the child class can safely use __XXX without worrying that it will use or affect __XXX in the parent.
As we discovered in Chapter 12, simple module-level privacy is provided by using a single underscore ( _ ) character prefixing an attribute name. This prevents a module attribute from being imported with “from mymodule import *”. This is strictly scope-based, so it will work with functions too.
With Python’s new-style classes introduced in 2.2, a whole new set of features was added to give programmers a significant amount of control over how much protection is offered class and instance attributes. Although Python does not have syntax built into the language that has the flavors of private, protected, friend, or protected friend, you can customize access in the exact way that fits your needs. We cannot cover all of those possibilities but will give you an idea of the new-style attribute access later in this chapter.
“Wrapping” is a term you will hear often in the Python programming world. It is a generic moniker to describe the packaging of an existing object, whether it be a data type or a piece of code, adding new, removing undesired, or otherwise modifying existing functionality to the existing object.
Before Python 2.2, the subclassing or derivation of a standard type in Python was not allowed. Even though you can do that now with the new-style classes, there is a concept that is still popular. You can always wrap any type as the core member of a class so that the new object’s behavior mimics all existing behavior of the data type that you want and does not do what you do not want it to do; and perhaps it will do something a little extra. This is called “wrapping a type.” In the Appendix, we will discuss how to extend Python, another form of wrapping.
Wrapping consists of defining a class whose instances have the core behavior of a standard type. In other words, it not only sings and dances now, but also walks and talks like our original type. Figure 15-4 illustrates what a type wrapped in a class looks like. The core behavior of a standard type is in the center of the figure, but it is also enhanced by new or updated functionality, and perhaps even by different methods of accessing the actual data.
You may also wrap classes, but this does not make as much sense because there is already a mechanism for taking an object and wrapping it in a manner as described above for a standard type. How would you take an existing class, mimic the behavior you desire, remove what you do not like, and perhaps tweak something to make the class perform differently from the original class? That process, as we discussed recently, is derivation.

Delegation is a characteristic of wrapping that simplifies the process with regard to dictating functionality by taking advantage of pre-existing functionality to maximize code reuse.
Wrapping a type generally consists of some sort of customization to the existing type. As we mentioned before, this tweaking comes in the form of new, modified, or removed functionality compared to the original product. Everything else should remain the same, or keep its existing functionality and behavior. Delegation is the process whereby all the updated functionality is handled as part of the new class, but the existing functionality is delegated to the default attributes of the object.
The key to implementing delegation is to override the __getattr__() method with code containing a call to the built-in getattr() function. Specifically, getattr() is invoked to obtain the default object attribute (data attribute or method) and return it for access or invocation. The way the special method __getattr__() works is that when an attribute is searched for, any local ones are found first (the customized ones). If the search fails, then __getattr__() is invoked, which then calls getattr() to obtain an object’s default behavior.
In other words, when an attribute is referenced, the Python interpreter will attempt to find that name in the local namespace, such as a customized method or local instance attribute. If it is not found in the local dictionary, then the class namespace is searched, just in case a class attribute was accessed. Finally, if both searches fail, the hunt begins to delegate the request to the original object, and that is when __getattr__() is invoked.
Let us take a look at an example. Here we present a class that wraps nearly any object, providing such basic functionality as string representations with repr() and str(). Additional customization comes in the form of the get() method, which removes the wrapping and returns the raw object. All remaining functionality is delegated to the object’s native attributes as retrieved by __getattr__() when necessary.
Here is an example of a wrapping class:

In our first example, we will use complex numbers, because of all Python’s numeric types, complex numbers are the only one with attributes: data attributes as well as its conjugate() built-in method. Remember that attributes can be both data attributes as well as functions or methods:

Once we create our wrapped object type, we obtain a string representation, silently using the call to repr() by the interactive interpreter. We then proceed to access all three complex number attributes, none of which is defined for our class. Confirm this by looking for real, imag, and conjugate in our class definition ... they are not there!
The accessing of these attributes is delegated to the object via the getattr() method. The final call to get() is not delegated because it is defined for our object—it returns the actual data object that we wrapped.
Our next example using our wrapping class uses a list. We will create the object, then perform multiple operations, delegating each time to list methods.

Notice that although we are using a class instance for our examples, they exhibit behavior extremely similar to the data types they wrap. Be aware, however, that only existing attributes are delegated in this code.
Special behaviors that are not in a type’s method list will not be accessible since they are not attributes. One example is the slicing operations of lists which are built-in to the type and not available as an attribute like the append() method, for example. Another way of putting it is that the slice operator ( [ ] ) is part of the sequence type and is not implemented through the __getitem__() special method.
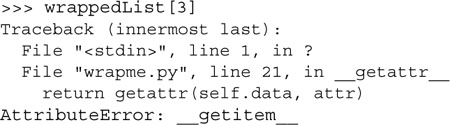
The AttributeError exception results from the fact that the slice operator invokes the __getitem__() method, and __getitem__() is not defined as a class instance method nor is it a method of list objects. Recall that getattr() is called only when an exhaustive search through an instance’s or class’s dictionaries fails to find a successful match. As you can see above, the call to getattr() is the one that fails, triggering the exception.
However, we can always cheat by accessing the real object [with our get() method] and its slicing ability instead:

You probably have a good idea now why we implemented the get() method—just for cases like this where we need to obtain access to the original object. We can bypass assigning local variable (realList) by accessing the attribute of the object directly from the access call:
>>> wrappedList.get()[3]
'bar'
The get() method returns the object, which is then immediately indexed to obtain the sliced subset.

Once you become familiar with an object’s attributes, you begin to understand where certain pieces of information originate and are able to duplicate functionality with your newfound knowledge:

This concludes the sampling of our simple wrapping class. We have only just begun to touch on class customization with type emulation. You will discover that you can an infinite number of enhancements make to further increase the usefulness of your code. One such enhancement is to add timestamps to objects. In the next subsection, we will add another dimension to our wrapping class: time.
Creation time, modification time, and access time are familiar attributes of files, but nothing says that you cannot add this type of information to objects. After all, certain applications may benefit from these additional pieces of information.
If you are unfamiliar with using these three pieces of chronological data, we will attempt to clarify them. The creation time (or “ctime”) is the time of instantiation, the modification time (or “mtime”) refers to the time that the core data was updated [accomplished by calling the new set() method], and the access time (or “atime”) is the timestamp of when the data value of the object was last retrieved or an attribute was accessed.
Proceeding to updating the class we defined earlier, we create the module twrapme.py, given in Example 13.7.

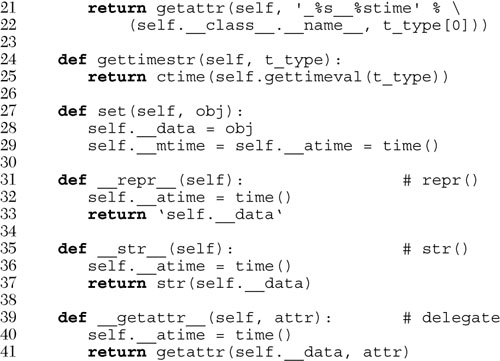
How did we update the code? Well, first, you will notice the addition of three new methods: gettimeval(), gettimestr(), and set(). We also added lines of code throughout which update the appropriate timestamps based on the type of access performed.
The gettimeval() method takes a single character argument, either “c,” “m,” or “a,” for create, modify, or access time, respectively, and returns the corresponding time that is stored as a float value. gettimestr() simply returns a pretty-printable string version of the time as formatted by the time.ctime() function.
Let us take a test drive of our new module. We have already seen how delegation works, so we are going to wrap objects without attributes to highlight the new functionality we just added. In our example, we will wrap an integer, then change it to a string.
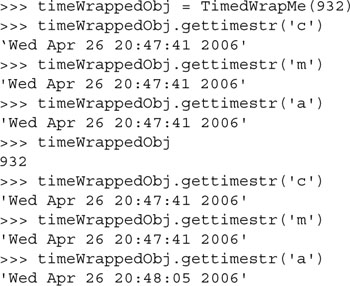
You will notice that when an object is first wrapped, the creation, modification, and last access times are all the same. Once we access the object, the access time is updated, but not the others. If we use set() to replace the object, the modification and last access times are updated. One final read access to our object concludes our example.

The next example represents a class that wraps a file object. Our class will behave in the exact same manner as a regular file object with one exception: in write mode, only strings in all capital letters are written to the file.
The problem we are trying to solve here is for a case where you are writing text files whose data is to be read by an old mainframe computer. Many older style machines are restricted to uppercase letters for processing, so we want to implement a file object where all text written to the file is automatically converted to uppercase without the programmer’s having to worry about it. In fact, the only noticeable difference is that rather than using the open() built-in function, a call is made to instantiate the CapOpen class. Even the parameters are exactly the same as for open().
Example 13.8 represents that code, written as capOpen.py. Let us take a look at an example of how to use this class:

Example 13.8. Wrapping a File Object (capOpen.py)
This class extends on the example from one of the Python FAQs, providing a file like object that customizes the write () method while delegating the rest of the functionality to the file object.
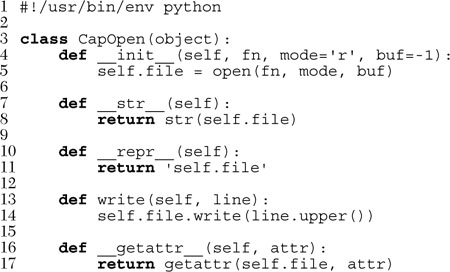
As you can see, the only call out of the ordinary is the first one to CapOpen() rather than open(). All other code is identical to what you would do if you were interacting with a real file object rather than a class instance that behaves like a file object. All attributes other than write() have been delegated to the file object. To confirm the success of our code, we load up the file and display its contents. (Note that we can use either open() or CapOpen(), but chose only CapOpen() because we have been working with it here in this example.)

13.16 Advanced Features of New-Style Classes (Python 2.2+)
We have already discussed some of the features tied to new-style classes. With the unification of types and classes, the most significant of these features is the ability to subclass Python data types. One side effect of this is that all of the Python “casting” or conversion built-in functions are now factory functions. When you call them, you are really instantiating an instance of the corresponding type.
The following built-in function, which have been around Python for a while, have been quietly (or perhaps not) converted to factory functions:
• int(), long(), float(), complex()
• str(), unicode()
• list(), tuple()
• type()
In addition, several new ones have been added to round out the posse:
• basestring()1
1New in Python 2.3.
• dict()
• bool()
2New in Python 2.4.
• object()
• classmethod()
• staticmethod()
• super()
• property()
• file()
These class names and factory functions have flexible usage. In addition to creating new objects of those types, they can be used as base classes when subclassing types, and they can now be used with the isinstance() built-in function. Using isinstance() can help replace tired old idioms with one that requires fewer functions calls resulting in cleaner code. For example, to test if an object is an integer, we had to call type() twice or import the types module and use its attributes; but now we can just use isinstance() and even gain in performance:
OLD (not as good):
• if type(obj) == type(0)...
• if type(obj) == types.IntType...
BETTER:
• if type(obj) is type(0)...
EVEN BETTER:
• if isinstance(obj, int)...
• if isinstance(obj, (int, long))...
• if type(obj) is int...
Keep in mind that although isinstance() is flexible, it does not perform an “exact match” comparison—it will also return True if obj is an instance of the given type or an instance of a subclass of the given type. You will still need to use the is operator if you want an exact class match.
Please review Section 13.12.2 above for a deeper explanation of isinstance() as well as its introduction in Chapter 4 and how these calls evolved along with Python.
A dictionary is at the heart of all instances. The __dict__ attribute keeps track of all instance attributes. For example, when you have an instance inst with an attribute foo, recognize that accessing it with inst.foo is the same as doing it with inst.__dict__['foo'].
This dictionary takes up a good amount of memory, and if you have a class with very few attributes but a significant number of instances of this object, then you are taking a substantial hit. To combat this, users are now able to use the __slots__ attribute to substitute for __dict__.
Basically, __slots__ is a class variable consisting of a sequence-like object representing the set of valid identifiers that make up all of an instance’s attributes. This can be a list, tuple, or iterable. It can also be a single string identifying the single attribute that an instance can have. Any attempt to create an instance attribute with a name not in __slots__ will result in an AttributeError exception:
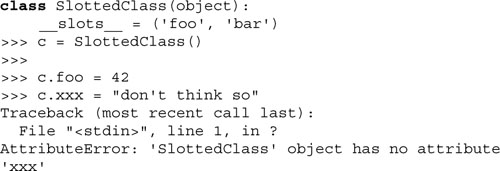
The primary reason for this feature is the conservation of memory. A side effect is a type of security preventing users from adding instances attributes dynamically in an ad hoc manner. A class defined with a __slots__ attribute will not have a __dict__ (unless you add '__dict__' as an element of __slots__). For more information on __slots__, see the Data Model chapter of the Python (Language) Reference Manual.
Python classes have a special method named __getattr__(), which is called only when an attribute cannot be found in an instance’s __dict__ or its class (class’s __dict__), or ancestor class (its __dict__). One place where we saw __getattr__() used was for implementing delegation.
The problem that many users encountered was that they wanted a certain function to execute for every attribute access, not just when one cannot be found. This is where __getattribute__() comes in. It works just like __getattr__() except that it is always called when an attribute is accessed, not just when it cannot be found.
If a class has both __getattribute__() and __getattr__() defined, the latter will not be called unless explicitly called from __getattribute__() or if __getattribute__() raises AttributeError.
Be very careful if you are going to access attributes in here... attributes of this class or an ancestor. If you cause __getattribute__() to somehow call __getattribute__()again, you will have infinite recursion. To avoid infinite recursion using this method, you should always call an ancestor class method that shares the same name in order to access any attributes it needs safely; for example, super(obj, self).__getattribute__(attr). This special method is only valid with new-style classes. As with __slots__, you can get more information on __getattribute__() by referring to the Data Model chapter of the Python (Language) Reference Manual.
Descriptors are one of the keys behind Python’s new-style classes. They provide a powerful API to object attributes. You can think of a descriptor as an agent that presents object attributes. Depending on which situation you encounter when you need an attribute, you can get to it via its descriptor (if there is one for it) or in the normal way (dotted attribute notation).
If there is an agent for your object and it has a “get” attribute (really spelled __get__), it is invoked, and you get back all you need to access the object in question. The same thing applies if you are attempting to assign a value to an object with a descriptor (set) or removing an attribute (delete).
Strictly speaking, a descriptor is really any (new-style) class that implements at least one of three special methods that serve as the descriptor protocol: __get__(), __set__(), and __delete__(). As mentioned just above, __get__() is used to get the value of an attribute, __set__() is used to assign a value to an attribute, and __delete__() is called when an attribute is explicitly removed using the del statement (or rather, its reference count decremented). Of the three, the latter is rarely implemented.
Also, not all descriptors implement the __set__() method either. These are referred to as method descriptors, or more accurately, non-data descriptors. Those that override both __get__() and __set__() are called data descriptors, and they are more powerful than non-data descriptors.
The signatures for __get__(), __set__(), and __delete__() look like this:
• def __get__(self, obj, typ=None) ⇒ value
• def __set__(self, obj, val) ⇒ None
• def __delete__(self, obj) ⇒ None
When you want to use an agent for an attribute, you install it as a class attribute, and let the agent handle all the dirty work. Anytime you try to do something to an attribute with that name, you will get the descriptor that proxies all functionality. We covered wrapping in the previous section. This is just more wrapping going on. Instead of just delegating everything to objects in your class, we are delegating slightly more complex attribute access here.
Ordering matters when using descriptors, and certain aspects have precedence over others. The heart of the entire system is __getattribute__() since that special method is called for every attribute instance. It is the one that finds a class attribute or an agent to call on your behalf to access an attribute, etc.
Reviewing the signatures just above, if __get__() is called for an instance, the object is passed in and perhaps a type or class. For example, given a class X and an instance x, x.foo is translated by __getattribute__() to:
type(x).__dict__['foo'].__get__(x, type(x))
If __get__() is called for a class, then None is passed in as the object (which would be self for an instance):
X.__dict__['foo'].__get__(None, X)
Finally, if super() is called, for example given Y as a subclass of X, then super(Y, obj).foo looks in obj.__class__.__mro__ for the class right next to Y going up the tree to find class X, and then calls:
X.__dict__['foo'].__get__(obj, X)
Then it is up to that descriptor to return the desired object.
The way __getattribute__() works needs to be covered, as it was implemented to behave in a very specific way. Thus it is very important to recognize this ordering:
• Class attributes
• Data descriptors
• Instance attributes
• Non-data descriptors
• Defaulting to __getattr__()
A descriptor is a class attribute, so all class attributes have the highest priority. You can even replace a descriptor by simply reassigning its original reference to other objects. They are followed closely behind by descriptors with __get__() and __set__() implemented. If you have an agent, it will do all your work for you!
Otherwise, it should just default to the local object’s __dict__, meaning that it will be an instance attribute. The non-data descriptors come next. This may sound surprising because on first glance, one would think that these should be higher up in the food chain than instance attributes, but that is not the case. The purpose of non-data descriptors is only to provide a value if one is not already part of an instance, sort of how __getattr__() is only called if an attribute cannot be found in an instance’s __dict__!
Speaking of __getattr__(), if no non-data descriptor is found, then __getattribute__() raises an AttributeError, and that in turn causes __getattr__() to be invoked as the last stand before AttributeError is raised to the user.
Let us start with a very boring example... a descriptor that just discards any attempt to retrieve or set a value from and to an attribute, respectively. Actually, all of the examples here just ignore all requests, but they are incremental, and we hope that you can figure out a little more about descriptors for each one:

We create a class that uses this descriptor and try to assign something to it as well as display its value:
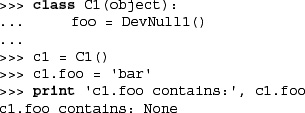
That was not too terribly exciting... how about one where the descriptor methods at least give some output to show what is going on?

Now let us see this one in action:

For our final example, let us add a placeholder in our descriptor class that holds some useful information about the descriptor:
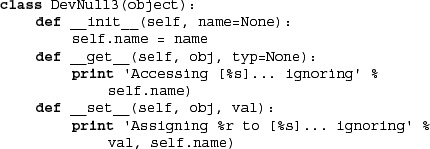
In the output below, we show you the importance of the hierarchy mentioned above, especially where we state that a full data descriptor has precedence over an instance attribute:

Notice how we were able to sneak in an attribute to our instance. We were able to assign the string “bar” to c3.foo, but because the data descriptor is more important, it overrides or effectively hides our assignment.
Likewise, because instance attributes have a higher precedence than non-data attributes, you can also hide such a descriptor, just as you can hide a class attribute, by assigning an instance attribute with the same name:

This was a pretty transparent example because we called it as a function, then accessed it as a string, but we could have used another function and kept the same calling mechanism, too:
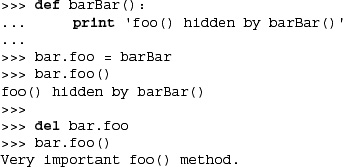
The point was to emphasize that because functions are non-data descriptors, instance attributes are ranked higher, and we can shadow any non-data descriptor simply by assigning an object to the instance (of the same name).
Our final example, Example 13.9, does a little bit more. It is a crude attempt at using the filesystem as a means of storing the contents of an attribute.
After the usual setup, we create our descriptor class with a class attribute (saved) that keeps track of all attributes with descriptor access. When a descriptor is created, it registers and saves the name of the attribute (passed in from the user).
When fetching an attribute, we need to ensure that users do not use it before they have even assigned a value to it. If it passes that test, then we attempt to open the pickle file to read in the saved value. An exception is raised if somehow the file cannot be opened, either because it was erased (or never created), or if it was corrupted or somehow cannot be unserialized by the pickle module.
Saving the attribute takes several steps: open the pickle file for write (either creating it for the first time or wiping out one that was already there), serializing the object to disk, and registering the name so users can retrieve the value. An exception is thrown if the object cannot be pickled. Note that if you are using Python older than 2.5 you can never merge the try-except and try finally statements together (lines 30-38).

Finally, if the attribute is explicitly deleted, the file is removed, and the name unregistered.
Here is some sample usage of this class:

Attribute access appears normal, and the programmer cannot really tell that an object is pickled and stored to the filesystem (except in the last example where we tried to pickle a module, a no-no). We also put in a handler for cases when the pickle file gets corrupted. This is also the first descriptor where we have implemented __delete__().
One thing to keep in mind with all of our examples is that we did not use the instance obj at all. Do not confuse obj with self as the latter is the instance of the descriptor, not the instance of the original class.
Believe it or not, you have already seen descriptors at work. Static methods, class methods, properties (see next section below), and even functions themselves are all descriptors. Think about this: functions are very generic objects in Python. There are built-in ones, user-defined ones, methods defined in classes, static methods, and class methods. Those are all examples of functions. The only difference between them is how they are called.
Functions are normally unbound. So are static methods, even though they are defined in classes. But methods need to be bound to an instance, and class methods need to be bound to a class, right? The descriptor for a function object knows all this, so depending on what type of function it is, a descriptor can “wrap up” a function object along with whatever it needs to be bound to, if applicable, and then returns that back to the caller. The way it works is that the function itself is a descriptor, and its __get__() method is what puts together the callable that it returns for you. It is quite an amazing generality, which does not break the way Python has been working all this time!
Properties are a very useful and specific type of descriptor. They were meant to handle all accesses to instance attributes in a similar manner that we described for descriptors, above. When you access an instance attribute “normally,” you use the dotted-attribute notation. You were updating an instance’s __dict__ attribute.
With properties, although your usage resembles normal attribute access, the actual implementation of such access uses function (or method) calls. In earlier versions of Python, as seen earlier this chapter, you could use __getattr__() and __setattr__() to play with attributes in general. The problem is that all attribute access goes through those special methods (and __getattribute__()), but with properties, you can give a property specific functions to execute for getting, setting, and deleting instance attributes, so you no longer have to use those other special methods (which became quite large actually if you had many instance attributes you were trying to manage).
The property() built-in function can take up to four arguments. Its signature is:
property(fget=None, fset=None, fdel=None, doc=None)
Keep in mind that although normal usage of property() is within a class definition where the functions passed in are actually methods, property() can accept functions. In fact, at the time that property() is called when a class is declared, those methods are unbound and thus really are functions!
Here is a simple example that creates a read-only integer attribute but hides it within the class by barely encrypting it by using the bitwise complement operator:

If we try it out, we see that it saves the first value we give it but does not allow us to set it again:

Here is another example, but with a setter:
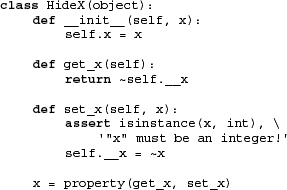
Here is the output of this example:
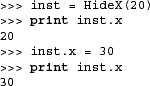
This property works because by the time the constructor is called to set the initial value of x, the getter already saves it as ~x to self.__x.
You can even stick in a documentation string for your attribute, as shown here in this next example:

Here we are using a function instead of a method for our property, just to show it can be done. When it is called, however, we have to keep in mind that self is going to be passed in as the first (and only) argument, so we still need to have a dummy variable to discard it. Here is the corresponding output:
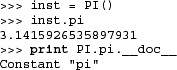
Can you see how properties take your functions (fget, fset, and fdel) and map them as descriptor methods __get__(), __set__(), and __delete__()? You did not have to create a descriptor class and define these callables as methods of your descriptor class. You just created functions (or methods) and gave them all to property().
One drawback to creating your descriptor methods inside your class definition is that it clutters up the class namespace. Not only that, but isn’t the point of having a property to control access to an attribute? But this control does not exist if they are not forced to use the property. Our second example does not enforce this because it allows access to our property methods (since they are part of the class definition):
![]()
A clever idiom in a recipe in the ActiveState Programmer Network Python Cookbook (http://aspn.activestate.com/ASPN/Cookbook/Python/Recipe/205183) solves both of these problems by:
• “Borrowing” a function’s namespace,
• Creating the methods as inner functions intentionally named as (keyword) arguments to property(),
• Returning all the (function/method) names and corresponding objects in a dictionary (via locals()),
• Feeding it directly to property(), and
• Blowing away that temporary namespace
There is no method clutter in the class’s namespace because the methods were defined as inner functions in someone else’s namespace. The user has no access to the methods because the namespace in which they were defined was destroyed (by going out-of-scope), thus they are compelled to use the property as that is now the one and only way for them to access the attribute. Here is our modified class inspired by the recipe:

Our code works exactly as before, but there two big differences: (1) the namespace for the class is much smaller and consists (only) of ['__doc__', '__init__', '__module__', 'x'], and (2), the user can no longer use inst.set_x(40) to set the attribute ... they have to use init.x = 40.
Metaclasses are probably the most mind-bending feature that was added with new-style classes. Metaclasses are classes that let you define how certain classes can be constructed, basically giving you a level of control over how classes are created. (You do not even need to think at the instance level.) They have been talked about since before the days of Python 1.5 (when many minds were bent), but they are finally a reality.
Basically, you can think of a metaclass as the class of a class, or rather, a class whose instances are other classes. Believe it or not, whenever you create a class now, you are actually employing the default metaclass, which is a (or rather, the) type object. (If classic classes are used, the metaclasses for those are types.ClassType.) Take any class and call type() on it, and you will see what it is an instance of:

Metaclasses are always used when creating classes. When executing a class definition, the interpreter has to know the correct metaclass to use. It will look for a class attribute named __metaclass__ first, and if it is there, it will use the class that is assigned to that attribute as the metaclass.
If that attribute has not been defined, it will go up and search an ancestor class for __metaclass__. All new-style classes must inherit from object or type if there are no other base classes (type (object) is type anyway). If that is not found, it checks for a global variable named __metaclass__ and uses it if it exists. Otherwise, the class is a classic class, and types.ClassType is used as the metaclass. (Note you can do some trickery here... if you define a classic class and set __metaclass__ = type, you have parlayed it into a new-style class!)
Any time a class declaration is executed, the correct (and usually default) metaclass is determined, and that metaclass (always) passes three arguments (to its constructor): the class name, the tuple of base classes to inherit from, and the (class) attribute dictionary.
To many, the subject of metaclasses belongs in the realm of the theoretical or pure object-oriented thinking and has no place in everyday programming. To some extent that is true; however, the most important thing to keep in mind is that the end consumers of metaclasses are programmers themselves, not application users. You can define metaclasses that “force” programmers to implement solution classes in specific ways, which can either simplify their work or make them program to a target specification.
Metaclasses are created for the situations described just above, when you want to change the default behavior of how classes can and are created. Most Python users will not be creating or explicitly using metaclasses. The standard behavior in creating new-style or classic classes is to just take the default behavior by using the system-supplied metaclasses.
In most cases, users will not even be aware that metaclasses are providing the templated default behavior of class creation (or metaclass instantiation). Although metaclasses will not be created on a regular basis, let us take a look at a simple example below. (More examples can be found in the documents listed at the end of this subsection.)
The first example of metaclasses we are presenting here is (hopefully) very simple. It does not do anything at all except timestamp when a class is created using the metaclass. (As you know now, it happens when the class is created.)
Take a look at the following script. It contains print statements scattered throughout so that you can track the events as they occur:

If we run this script, we get the following output:

Once you are comfortable with the fact that a class declaration actually causes some work to be done, then you are well under way.
In this second example, we are going to create a metaclass that forces programmers to supply a __str__() method in their classes so that their users can see something more useful than the generic Python object string (< object object at id>) we saw earlier in this chapter.
Our metaclass will also (strongly) suggest users override __repr__() if they have not done that either, but it is only a warning. Not implementing __str__() will result in a TypeError exception being thrown, forcing users to create a special method with that name. Here is the code for the metaclass:
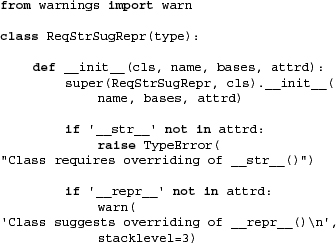
We will create three example classes that use our metaclass, one that overrides both __str__() and __repr__() special methods (Foo), one that only implements the __str__() special method (Bar), and one that implements neither (FooBar), an error situation. The full application is presented here as Example 13.10.
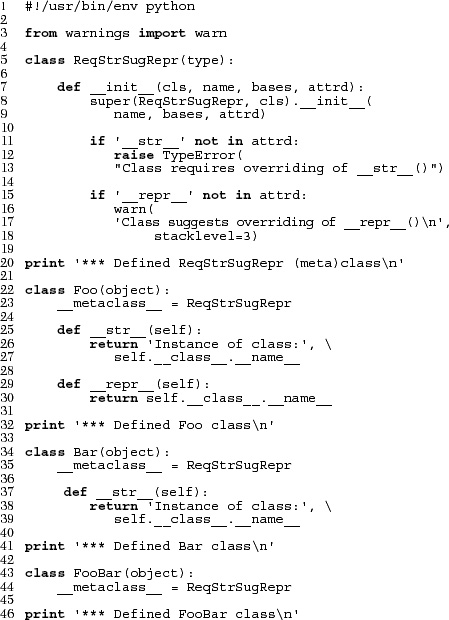
Running this script, we get the following output:

Note how we got past declaring Foo without incident. With Bar, we received the warning for not implementing __repr__(), and FooBar did not pass the security check, hence the reason why the application failed to make it to the (final) print statement. Another important thing to note is that we did not even create any instances of the test classes... they are not even part of our picture. However, keep in mind that those classes themselves are instances of our metaclass. This is but one example of the power of metaclasses.
There are many more examples online and in the Python documentation, PEPs 252 and 253, the What’s New in Python 2.2 document, and Guido van Rossum’s essay entitled, “Unifying Types and Classes in Python 2.2.” You can find a link to that document from the main Python release page for 2.2.3.
Python has several classic classes that extend the existing functionality of the core language that we have described in this chapter. These classes were provided as a convenience before it was possible to subclass Python data types.
The User* modules are like precooked meals, ready to eat. We mentioned how classes have special methods that, if implemented, can customize classes so that when wrapped around a standard type, they can give instances type-like qualities.
UserList and UserDict, along with the new UserString (introduced in Python 1.6), represent modules that define classes that act as wrappers around list, dictionary, and string objects, respectively. The primary objective of these modules is to provide the desired functionality for you so that you do not have to implement them yourself, and to serve as base classes that are appropriate for subclassing and further customization. Python already provides an abundance of useful built-in types, but the added ability to perform “build it yourself” typing makes it an even more powerful language.
In Chapter 4, we introduced Python’s standard as well as other built-in types. The types module is a great place to learn more about Python’s types as well as those that are beyond the scope of this text. The types module also defines type objects that can be used to make comparisons. (Such comparisons are popular in Python because they do not support method overloading—this keeps the language simple, yet there are tools that add functionality to a part of the language where it had appeared to be lacking.)
The following piece of code checks to see if the object data is passed into the foo function as an integer or string, and does not allow any other type (raises an exception):

The last related module is the operator module. This module provides functional versions of most of Python’s standard operators. There may be occasions where this type of interface proves more versatile than hard-coding use of the standard operators.
Given below is one example. As you look through the code, imagine the extra lines of code that would have been required if individual operators had been part of the implementation:

The code snippet above defines three vectors, two containing operands and the last representing the set of operations the programmer wants to perform on each pair of available operands. The outermost loop iterates through each operation while the inner pair of loops creates every possible combination of ordered pairs from elements of each operand vector. Finally, the print statement simply applies the current operator with the given arguments.
Python 3.0 features Abstract Base Classes (ABCs), which are introduced in Python 2.6 as part of the collections module. To create your own ABCs, you need to import the abc module. For more information, please see the “What’s New in Python 2.6” document as well as the defining PEP 3119.
There are plenty of class, and object-oriented, programming-related questions in the Python FAQ. It makes excellent supplementary material to the Python Library and Language Reference manual. For new-style classes, see PEPs 252 and 253, and the related documents from the Python 2.2 release. A list of the modules we described above is given in Table 13.5.
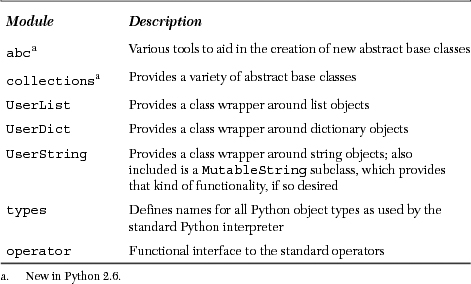
13-1. Programming. Name some benefits of object-oriented programming over older forms of programming.
13-2. Functions versus Methods. What are the differences between functions and methods?
13-3. Customizing Classes. Create a class to format floating point values to monetary amounts. In this exercise, we will use United States currency, but feel free to implement your own.
Preliminary work: Create a function called dollarize() which takes a floating point value and returns that value as a string properly formatted with symbols and rounded to obtain a financial amount. For example: dollarize(1234567.8901) ⇒ '$1,234,567.89'. The dollarize() function should allow for commas, such as 1,000,000, and dollar signs. Any negative sign should appear to the left of the dollar sign. Once you have completed this task, then you are ready to convert it into a useful class called MoneyFmt.
The MoneyFmt class contains a single data value, the monetary amount, and has five methods (feel free to create your own outside of this exercise). The __init__() constructor method initializes the data value, the update() method replaces the data value with a new one, the __nonzero__() method is Boolean, returning True if the data value is non-zero, the __repr__() method returns the amount as a float, and the __str__() method displays the value in the string-formatted manner that dollarize() does.
(a) Fill in the code to the update() method so that it will update the data value.
(b) Use the work you completed for dollarize() to fill in the code for the __str__() method.
(c) Fix the bug in the __nonzero__() method, which currently thinks that any value less than one, i.e., fifty cents ($0.50), has a false value.
(d) Extra credit: Allow the user to optionally specify an argument indicating the desire to see less-than and greater-than pairs for negative values rather than the negative sign. The default argument should use the standard negative sign.
You will find the code skeleton for moneyfmt.py presented as Example 13.11. You will find a fully documented (yet incomplete) version of moneyfmt.py on the Web site. If we were to import the completed class within the interpreter, execution should behave similar to the following:
Example 13.11. Money Formatter (moneyFmt.py)
String format class designed to “wrap” floating point values to appear as monetary amounts with the appropriate symbols.

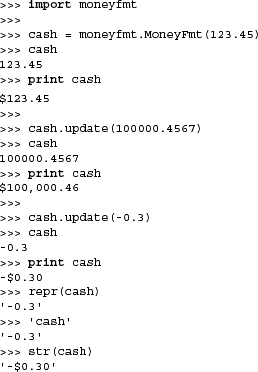
13-4. User Registration. Create a user database (login, password, and last login timestamp) class (see problems 7-5 and 9-12) that manages a system requiring users to log in before access to resources is allowed. This database class manages its users, loading any previously saved user information on instantiation and providing accessor functions to add or update database information. If updated, the database will save the new information to disk as part of its deallocation (see __del__()).
13-5. Geometry. Create a Point class that consists of an ordered pair (x, y) representing a point’s location on the X and Y axes. X and Y coordinates are passed to the constructor on instantiation and default to the origin for any missing coordinate.
13-6. Geometry. Create a line/line segment class that has length and slope behaviors in addition to the main data attributes: a pair of points (see previous problem). You should override the __repr__() method (and __str__(), if you want) so that the string representing a line (or line segment) is a pair of tuples, ((x1, y1), (x2, y2)). Summary:
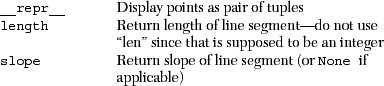
13-7. Date Class. Provide an interface to a time module where users can request dates in a few (given) date formats such as “MM/DD/YY,” “MM/DD/YYYY,” “DD/MM/YY,” “DD/MM/ YYYY,” “Mon DD, YYYY,” or the standard Unix date of “Day Mon DD, HH:MM:SS YYYY.” Your class should maintain a single value of date and create an instance with the given time. If not given, default to the current time at execution. Additional methods:

If no format is given, default to system/ctime() format. Extra Credit: Merge the use of this class into Exercise 6-15.
13-8. Stack Class. A stack is a data structure with last-in-first-out (LIFO) characteristics. Think of a stack of cafeteria trays. The first one in the spring-loaded device is the last one out, and the last one in is the first one out. Your class will have the expected push() (add an item to the stack) and pop() (remove an item from the stack) methods. Add an isempty() Boolean method that returns True if the stack is empty and False otherwise, and a peek() method that returns the item at the top of the stack without popping it off.
You should probably use a list object; if you do, do not worry about implementing any list functionality (i.e., slicing). Just make sure that your Stack class can perform both of the operations above correctly. You may subclass a real list object or come up with your own list-like object, as in Example 6.3.
13-9. Queue Class. A queue is a data structure that has first-in-first-out (FIFO) characteristics. A queue is like a line where items are removed from the front and added to the rear. The class should support the following methods:

See the previous problem and Example 6.4 for motivation.
13-10. Stacks and Queues. Write a class which defines a data structure that can behave as both a queue (FIFO) or a stack (LIFO), somewhat similar in nature to arrays in PERL. There are four methods that should be implemented:
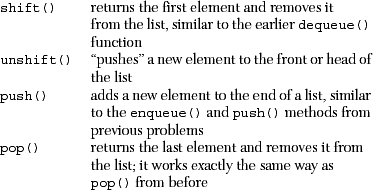
See also Exercises 13-8 and 13-9.
13-11. Electronic Commerce. You need to create the foundations of an e-commerce engine for a B2C (business-to-consumer) retailer. You need to have a class for a customer called User, a class for items in inventory called Item, and a shopping cart class called Cart. Items go in Carts, and Users can have multiple Carts. Also, multiple items can go into Carts, including more than one of any single item.
13-12. Chat Rooms. You have been pretty disappointed at the current quality of chat room applications and vow to create your own, start up a new Internet company, obtain venture capital funding, integrate advertisement into your chat program, quintuple revenues in a six-month period, go public, and retire. However, none of this will happen if you do not have a pretty cool chat application.
There are three classes you will need: a Message class containing a message string and any additional information such as broadcast or single recipient, and a User class that contains all the information for a person entering your chat rooms. To really wow the VCs to get your start-up capital, you add a class Room that represents a more sophisticated chat system where users can create separate “rooms” within the chat area and invite others to join. Extra credit: Develop graphical user interface (GUI) applications for the users.
13-13. Stock Portfolio Class. For each company, your database tracks the name, ticker symbol, purchase date, purchase price, and number of shares. Methods include: add new symbol (new purchase), remove symbol (all shares sold), and YTD or Annual Return performance for any or all symbols given a current price (and date). See also Exercise 7-6.
13-14. DOS. Write a Unix interface shell for DOS machines. You present the user a command line where he or she can type in Unix commands, and you interpret them and output accordingly, i.e., the “ls” command calls “dir” to give a list of filenames in a directory, “more” uses the same command (paginating through a text file), “cat” calls “type,” “cp” calls “copy,” “mv” calls “ren,” and “rm” invokes “del,” etc.
13-15. Delegation. In our final comments regarding the CapOpen class of Example 13.8 where we proved that our class wrote out the data successfully, we noted that we could use either CapOpen() or open() to read the file text. Why? Would anything change if we used one or the other?
13-16. Delegation and Functional Programming.
(a) Implement a writelines() method for the CapOpen class of Example 13.8. Your new function will take a list of lines and write them out converted to uppercase, similar to the way the regular writelines() method differs from write(). Note that once you are done, writelines() is no longer “delegated” to the file object.
(b) Add an argument to the writelines() method that determines whether a NEWLINE should be added to every line of the list. This argument should default to a value of False for no NEWLINEs.
13-17. Subclassing Numeric Types. Take your final moneyfmt.py script as seen in Example 13.3 as Example 13.8 and recast it so that it extends Python’s float type. Be sure all operations are supported, but that it is still immutable.
13-18. Subclassing Sequence Types. Create a subclass similar to your solution of the previous problem to your user registration class as seen earlier in Exercise 13-4. Allow users to change their passwords, but do not allow them to reuse the same password within a 12-month period. Extra credit: Add support for determining “similar passwords” (any algorithm is fine) and do not even allow passwords similar to any used within the last 12 months.
13-19. Subclassing Mapping Types. As speculated for the dictionary subclass in Section 13.11.3, what if the keys() method were (re)written as:
def keys(self):
return sorted(self.keys())
(a) What happens when keys() is called for a method?
(b) Why is this, and what makes our original solution work?
13-20. Class Customization. Improve on the time60.py script as seen in Section 13.13.2, Example 13.3.
(a) Allow “empty” instantiation: If hours and minutes are not passed in, then default to zero hours and zero minutes.
(b) Zero-fill values to two digits because the current formatting is undesirable. In the case below, displaying wed should output “12:05.”
>>> wed = Time60(12, 5)
>>> wed
12:5
(c) In addition to instantiating with hours (hr) and minutes (min), also support time entered as:
• A tuple of hours and minutes (10, 30)
• A dictionary of hours and minutes ({'hr' : 10, 'min': 30})
• A string representing hours and minutes ("10:30") Extra Credit: Allow for improperly formatted strings like “12:5” as well.
• A pair of keyword arguments (hr=10, min=30)
(d) Do we need to implement __radd__()? Why or why not? If not, when would or should we override it?
(e) The implementation of __repr__() is flawed and misguided. We only overrode this function so that it displays nicely in the interactive interpreter without having to use the print statement. However, this breaks the charter that repr() should always give a (valid) string representation of an evaluatable Python expression. 12:05 is not a valid Python expression, but Time60('12:05') is.
(f) Add support for sexagesimal (base 60) operations. The output for the following example should be 19:15 not 18:75:
(g) Can we move the math-oriented code out of __add__() and into one of the other methods of this class? If so, which one and why would it make sense to do so?
(h) Add new code to support the “subtraction” of Time60 objects. Extra Credit: also support in-place subtraction.
(i) Implement an __int__() method that returns an int representing the total number of minutes expressed by a Time60 object.
13-21. Decorators and Function Call Syntax. Toward the end of Section 13.16.4, we used the syntax “x = property(**x())” to create a property for the x attribute. How does this idiom, including the enclosed call to x(), actually create the property?