
You are now in a good position to start investigating how to the use the Views module to create carefully filtered and organized listings of content that are organized just as you want.
To create a new View, visit the Manage | Structure | Views page:

You will see a list of all the existing views, some of which are active and some disabled:

The view wizard will help you create new views more quickly by guiding you through the common setup steps.
Next, click on the +Add new view button and you will be taken into the Views wizard. We'll keep this explanation simple to start with by concentrating only on the elements of this screen that are essential to build the News page view.
Later in this chapter, we will go into more detail about the finer points of the Views wizard. Name the new View News and filter the content to the Article type.

Note
At this point, you may be forgiven for thinking that you can also set the Tagged with field to narrow down the News page to only those Articles that are really News items because they are marked with the News term from the Article type taxonomy list and you'd be quite right. However, while the wizard is a simple starting point within this wizard, the only taxonomy vocabulary that Views is aware of at this stage is the core Tags vocabulary, and that won't do in our case.
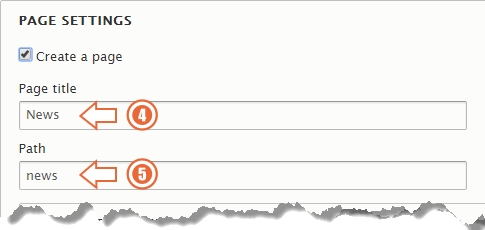
We want to create a full page that is accessible via a unique URL path, so check the Create a page checkbox and check and adjust the Page title and a Path if you need to:
We want the News page to be accessible from the Main navigation menu, so also check the Create a menu link item and direct the link to the Main navigation menu:

Click on the Save and edit button:

You will be taken into the Views editing page showing the view with one display entitled Page.
It's worth noting at this point that Views can actually contain any number of different types of Displays, but more about that later in this chapter when we add a block display.
For now, though let's specifically rename the display that we have just created so that it is more descriptive. Click on the current Display name and rename it to News list as a Page so that it's very clear what it does.

The newly revised display name will replace the original one in the list:

Scroll down the editing page and you'll find a live preview currently listing out all the published Article nodes. We have not yet filtered the list down to only those marked as News items, so this is correct.
Before adding the finishing touches, let's take a look at some key Format, Filtering, and Sort settings that have been set up by the View wizard.
- Firstly, scroll back up and look at the Format settings and note that we are displaying items in their currently defined Teaser view mode.
- There are two Filter criteria currently applied limiting the listed items to only Articles that are published.
- The listed items are sorted in reverse order of Authored on (creation) date.

It's worth noting at this point that if you made an error or an omission when in the wizard, you can re-adjust the path settings and, therefore, change the actual URL through which your site visitors will view the News page.
You can also adjust the PAGE SETTINGS for the menu item used to provide access to page and to change the actual Drupal menu in which that item is contained.

There are other useful and interesting settings here too such as the ability to control precisely who can see the results of the View based on permission(s) or role(s), and we'll cover those later.
The only thing we need to add now is to further filter down the list of Articles to only those that have their Article type field (a Taxonomy reference) to News. The following are the steps to achieve this.
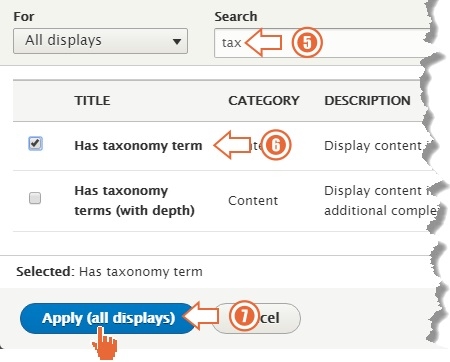
- Add a new Filter criterion to the view:

- Enter tax in the Search input in order to filter down the list of possible criteria to only those relating to taxonomy.
- Select Has taxonomy term.
- Click on Apply (all displays).
- Next, in order to target the specific vocabulary that contains the News term, choose the Article type vocabulary, opting for a Dropdown widget for convenience. Click on Apply and continue.

- From the list of terms within the Article type vocabulary, choose News in order to filter out only those Article nodes that are marked as news items. Click on Apply to all displays once more and then click on Save (between the main editing area and the preview) to finalize the whole view.

- Finally, after you have been returned back to the underlying Views edit page, hit the Save button at the bottom left.

- Return to the Home page and you should see two News pages accessible from the Main navigation menu: the first being the original Basic page that you added back in Chapter 5, Basic Content, and the new Views-powered News page that you have just created.

- Click on the second News tab to see the Views-powered page in action. You should see a list of all Article nodes that have been categorized as "News".
Don't be tempted to remove the original Basic page from the menu right now because you are going to use it later to help illustrate the usefulness of creating Blocks using the Views module.
In this exercise you will create a page that lists blog posts out as teasers.
The steps to achieve this are straightforward and exactly as per the Creating a Views-powered News page section, but let's just recap on them as revision.
We already have some posts categorized as Blog posts.
Create a new page view entitled Blog that lists only Articles with the list filtered down those which are marked as Blog post.
If you are unsure at this point, then please look back at the section for a step-by-step recap on building the News page.