
This section provides access to the all the key administrative screens for site building:

You'll be covering each section of this page more comprehensively in later chapters so we won't worry about fine detail here.
As a Drupal site builder, you'll be spending a lot of time in here and so it is well worth a quick look around the various pages to get an idea of what this section contains.
You'll recall from Chapter 3, Basic Concepts, that most Drupal pages are actually made up of collections of blocks with each block being placed in a one or more theme regions.
The administration page Manage | Structure | Block layout provides you with a single screen to manage all the available blocks on your site. The list in the left-hand side shows you which blocks are currently active and into which regions they are placed.
You will see a list of region names and their current block content. For example, you'll see the Site branding block placed in the Header region.
You can click the Place blocks button to add a new block into a region and then, when (on which pages) they should appear according to visibility rules.
Note that the Place blocks pane is filterable and that the blocks are grouped according to whether they are: forms, lists (views), menus, system blocks, or user related:

Note that the secondary tabs at the top left of the window provides access to the separate block placement pages for each of the currently enabled themes: Bartik, and Seven.

It's worth just a quick browse around the various tabs (primary and secondary) to see what is where, but as always, rest assured that guided exercises will follow later in Chapter 6, Structure.
The ability for your site visitors to attach their own comments to content is a key social-publishing feature, and so in Drupal 8, you are afforded a high degree of control over when, where, and how such comments appear.
By default, in a standard installation, only the Article content type is comment enabled.
Use this structure page to dictate exactly how comment entry forms should be customized on a per-content-type basis and also how posted comments appear when browsing that content.
Comment forms can be customized in that you can add extra fields to capture different data and opt to show all or just some of these fields when the comments are later viewed attached to some actual content.
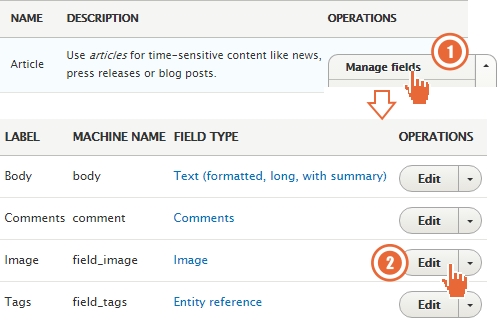
We will be covering the idea of customizing fields in detail in Chapter 5, Basic Content, and how to add new ones in detail in Chapter 7, Advanced Content, but for now, it's worth clicking on the Manage fields button so as to glance at the field-editing options here:

The Contact module provides a very useful site-wide contact form and can be configured and added to.
The Manage | Structure | Contact Forms link takes you to the configuration page for the Contact module.
Try editing the existing Website feedback category by adding in a Recipient address:

Save your changes and then visit http://drupal-8.dd:8083/contact (or click Back to site and then click on the existing Contact link in the footer menu).
Click the Add contact form button to add another new contact form, called Bug report, with its own unique URL:

As we have seen, Drupal 8 ships with just two very basic content types: Article and Basic page. These are reasonably simple out of the box with only a few fields present but you can use the Content type administrative page at /admin/structure/types to significantly customize them by adding and configuring fields.
Visit /admin/structure/types by clicking on the Content types link, then use the drop-down menu to choose Edit.

For each content types, you can:
- Provide a human-readable name and description and also the underlying machine name.
- Provide a description of the purpose of the content type that appears on the Manage | Structure | Content types page.
- Set the label for Title field; the default is 'Title' but if, for example, it was a News item content type then you might want to set this to 'Headline'.
- Disable previewing of content before submission, make it mandatory to do so or make it optional.
- Specify whether content of this type, published by default, is automatically promoted to the front page and whether or not it should be marked as sticky at the top of any listings.
- Opt to display author and date information on every post of this type—ideal for news.
- Specify which, if any, Drupal menus are available for adding links to content of this type.
As a Drupal site builder, you'll spend a lot of time in this administrative screen customizing your content types' fields and display settings.
We will be covering this in fine detail later in Chapter 7, Advanced Content but for now, it's worth a quick look at the contents of this section as a brief preview of what's to come:
- Click on Content types to visit the
/admin/structure/typespage - Click on Manage fields button on the Article content type
- Click on the Edit button for Image field in the column label Operations.
Access this page directly at /admin/structure/types/manage/article/form-display or via the primary tabs across the top of your screen:
You can use this admin area to edit order and behavior of the various fields when your site user is in the content-editing screen. This is referred to in Drupal as the form display:

Probably, the main point of interest to you right now is the choice of widgets via which content editors can interact with the fields. As a quick exercise as to what is here, try clicking on the gear icons to the right of each field to see the configuration options that are available to you.
Full details and guided exercises are in Chapter 7, Advanced Content, but for now, have a quick look to see what's here.
By default, the Article and Basic page content types ship with two view modes configured to control the display of those types. The Default is used when viewed as a whole and a shortened Teaser mode when the content is viewed in a listing.
In this administrative section, you are granted a lot of control over how content is displayed within these two view modes.
Click on Manage display and look at the Default view mode settings.
Note also that when you view an Article, the setting on the right-hand side controlled by the cog-wheel icon is such that any included image is automatically scaled to a predefined Large (480 x 480 pixel) image style:

Now, click on the Teaser secondary tab and you should probably be able to make good sense of the settings here too.

Note that when you view a Teaser of an Article, any included image is automatically scaled to a predefined Medium (220 x 220 pixels) image style and that clicking on the image is set to take you to the full piece of the content.
By default, the main Body copy of the article is trimmed down to 600 characters when viewed as a teaser. A default length, that in our experience, you will almost always want to reduce.
To reiterate, this section of the module only aims at giving you a basic feel for what's available here. You'll be covering the topics of customizing fields and their displays in detail in Chapter 7, Advanced Content.
The term display modes refers to a wider grouping of how form elements are displayed in different scenarios.
There are two types of display modes: view modes (already mentioned) and form modes.
In the previous section, Customizing the display, you learned that we have two pre-defined view modes: Default and Teaser available for use.
We looked briefly at the differences comparing field settings and field visibility between these two, but there are actually several other inactive view modes available for content types making the full list:
- Full content
- RSS
- Search index
- Search result highlighting input
- Teaser
Likewise, there are also two view modes for users as follows:
- Compact
- User account
There are others too for different entity types such as comment, but more about these later. In Chapter 7, Advanced Content, you'll see how you can activate/customize these and how you can set up your own custom view modes.
Form modes are aptly named because they refer to collections of layout and configuration settings of the various relevant fields when users are filling in forms.
For example, the standard user profile edit page uses the default form display for users, but you can customize the existing Register Form mode so that registering a user sees a different layout when registering on the site or routinely updating their own profile.
Likewise, you can set any number of other form modes for users and employ them in different contexts throughout the site. In summary, you have a high degree of control over the default presentation of content when it is being viewed or edited. You can create any number of new view modes and form modes to suit your site's needs.
Once again, we'll cover Display modes in more detail and with practical exercises in Chapter 7, Advanced Content.
Drupal 8 ships with five standard menus:
- Administration
- Footer
- Main navigation
- Tools
- User account menu
Access this page directly at admin/structure/menu or click on the Menus link from the structure page:

This will take you to a page where you can edit any of the existing menus and component links, as well as create new custom menus:

Try clicking on the Edit menu button next for the Main navigation menu and then edit the existing Home item.
Note that this is a special item and you can cannot actually edit it—it simply points to the default Drupal front page which, you may remember, is a list of Teasers of all items that have been Promoted to the front page.
Try the same exercise for the Contact entry in the Footer menu. Again, you will find that this item is similarly protected.
Detailed exercises with menus are in Chapter 6, Structure.
You may recall from Chapter 3, Basic Concepts, that Drupal ships with a single taxonomy in place, the Tags vocabulary.
You'll also recall that in the earlier section, Quick content creation, you created two Article nodes and tagged the first with two tags: tag1 and tag2, and the second with two additional ones: tag3 and tag4.
These four taxonomy terms are written into the vocabulary as you entered them.
Thus, if you click on the list terms button, you should see those terms in place.
The administrative page at Manage | Structure | Taxonomy lists out all the available vocabularies and provides links for you to edit terms associated with them:

Clicking on any of the terms listed here will take you through to a page that lists out all the content that is tagged with that term:

You'll recall from Chapter 3, Basic Concepts, that we pointed out that almost every Drupal site uses the Views module to provide filtered, grouped, and sorted lists.
The administrative page at Manage | Structure | Views lists out all the currently defined Views split into two distinct groups: those that are enabled and active and those are not:

You'll be dealing with Views in detail in Chapter 6, Structure, so no need for you to dig too deep now, but what is interesting though is that one of the listed Views is entitled Content (see the preceding screenshot).
This View actually defines what you saw on the Content administration page back in the Listing Content section. Try clicking on the link.