
When we were going through the site-building scenario in Chapter 5, Basic Content, we defined four more content types that we need on the website: Services, Clients, Testimonials, and Frequently Asked Questions (FAQs).
We'll now work through building each of these content types and add extra fields of various types as we go.
To create the Client content type first visit: Manage | Structure.
Click on Content types and then +Add content type.

Name your new content type and optionally include a brief HTML-formatted administrative description which will appear on the Add content page.

In the additional settings area at the bottom of the screen, under Submission form settings, change the label for the Title field to Client name so as to prompt your content editors to supply just that.
Note that you can provide an optional set of further guidelines and disable the Preview before submitting setting if you so wish.

In the Publishing options section, untick the Promoted to front page option as you probably won't want Clients promoted.

Likewise, we are not interested in displaying who created Client content items so un-tick Display author and date information in the Display settings section.

Lastly, you probably wouldn't want content editors putting individual clients into a menu and certainly not into the Main navigation menu, so un-tick all menus in the Menu settings section.

You have now created and configured the Client content type as a whole; the next step is to add some new fields, so do so now by clicking on the Save and manage fields button.

When you are taken to the Manage fields page, you might be surprised to find that you have inherited an instance of the Body field.

Add a new Image type field to hold the client logo.

You may also notice a section here entitled Re-use an existing field. More about that will be given later. Click on the Save and continue button.
On the first page of options, you can leave all the default settings as they are and simply click on the Save field settings button.

Since the field is designated to hold logos, it might be a good idea to limit the types of images to only PNG and GIF, thereby eliminating the potential for someone uploading a low-quality JPEG.
In the following settings page, adjust the Allowed file extensions to be png, gif, as shown in (1) in the following screenshot:

Drupal stores images and other asset-based fields' contents as actual physical files, then references them from within the database. The Files directory input in the previous screenshot enables you to be specific about exactly where you want these stored on a field-by-field basis.
Notice the default use of [date:custom:Y] and [date:custom:m] in this input.
These are examples of tokens that get replaced in real time when used throughout Drupal. Thus, if you uploaded files on a particular day for example, 18 December 2015, these tokens will result in the uploaded logos be stored physically in the path:
/sites/default/files/2015-12
For good accessibility, notice that the Alt field is enabled and required by default, thereby enabling content editors to attach Alt text to their uploaded logos so that, for example, users with a screen reader can interpret what an image is displaying.
Click on Save settings to complete this field.

It will be useful to be able to reference a client's website URL when viewing their details; you can use the core Link field type to achieve this. The Link field (provided by the Link module) allows you to create fields that contain internal or external URLs and optional link text.
Add a new field labeled Website and set the field type to Link, and then click on Save and continue.

In the next screenshot, you get the opportunity to say just how many URLs you might want to add to each Client. The default of a single value seems the right choice here.

For this example, we'll set the Allowed link type to External links only, and we'll set the Allow link text to Required. Finally, we'll make the default title be Client website.

Configure your Website field as shown in the preceding screenshot and click on Save settings.
Using exactly the same procedure as in the Website field, now add a new Email field so that you can also provide a contact (mailto:) link for the client. In this case, the optional help text aside, you can leave all the field settings at their defaults.

Again, using the same procedure as before, now add a new Telephone field with a field label of Telephone so that you can also provide a contact number.
Again, you can leave all the field settings at their defaults.

Finally, in order to illustrate the use of the
Boolean field type, add a High profile (yes/no) field to your Client content type, which you can later use to filter your list of clients down to those you wish to promote most prominently.

Leave the Allowed number of values to the default of 1.

Initialize with the following settings: "On" label as High profile and "Off" label as Not high profile.

By default, the Boolean field only shows the "On" label value as a single checkbox.
However, it's worth noting here that you have other options as to how the field is represented within the input form. You can, for example, show it as two checkboxes, which, while not really right here, might be useful in other scenarios.
To see the options, visit the Manage form display page again for the High profile field.

Adjust the Widget to be Check boxes/radio buttons.

Now when you create a Client node, you will see that the input for the High profile is a little more verbose.

Note that the N/A entry is there because we did not insist on the field being mandatory.
Having tried this out, it's probably best to put the setting back to the original Single on/off checkbox version.
In Chapter 5, Basic Content, we said that we want to be able to categorize Clients into one or more Work areas.
The easiest way to achieve this is to enable content editors to apply terms from within the Category taxonomy vocabulary by reusing the field that we created earlier.
Visit the Manage fields page again and choose to Re-use the existing Category field but relabeled as Work area as follows:

Tip
Detailed discussion of the idea of reusing fields is beyond the scope of this module save to say that reusing existing fields is a good recommendation when you become a more advanced site builder. See drupal.org/node/1577260 for more.
Once you've added the field, you can optionally make it mandatory and/or choose a default value but neither of these are required for now.
Also, make sure you select only the Category vocabulary in the REFRENCE TYPE section.

Adjust the widget on the Manage form display as you wish. In the following example, we have opted for Check boxes/radio buttons because there are only currently six terms in the Category vocabulary.

Finally, in this field-adding exercise, adjust the fields order on the Manage form display page so that you have the following in this order with these widget settings:

Do not concern yourself with the presence and/or relative positions of the other fields right now as these all get placed neatly into the Secondary editing region anyway.

Create at least three Clients now and classify them with a mixture of Work areas.

You'll notice that the logo and contact details display at the bottom of the Full content view clearly need attention!

The contact details collection is easily cleaned up on the Full content view by visiting the Manage display tab and editing the Default fields and labels' visibilities as follows:

Note which fields we have chosen to disable here so that we only see the fields that we should and without unnecessary labeling:

Similarly, when viewed as a Teaser:

This is further revision of what you covered in Chapter 6, Structure, when you created a block using the Views module, this time without quite so many step-by-step illustrations.
Start by visiting Manage | Structure | Views then…
- Create a new View called Clients that provides a block listing.
- Set the Show setting set to Content and the of type: set to Client.
- Under BLOCK DISPLAY SETTINGS, set Display format to unformatted list of teasers.
- Visit Manage | Structure | Block layout and place the block, untitled, in the Content region but only visible on the Our Clients page (in our case, that's
/node/4).
You should end up with the Our Clients page looking something like this:

This time we'll add a little more functionality to the View as to list the clients with the high profile setting at the top.
You can edit the view directly from within the Our Clients page by using the contextual links. You'll see three sets of contextual links as you hover: one for the editing the page, another for editing the first Client, and below that, a third one for editing the View.

Edit the view and locate the SORT CRITERIA section at the bottom left of the screen.
Click on Add to add another criterion:

At first sight, the field popup dialog might seem a little overwhelming, but it is in fact a highly usable field-section/filtering tool. The idea here is to make the primary sort criteria work off the value of the High profile and thereby promote those clients to the top of the list.
Click in the Search input and type a few letters from the field name and you will see the list of fields, and so on, automatically narrow down so that you can locate the High profile field.
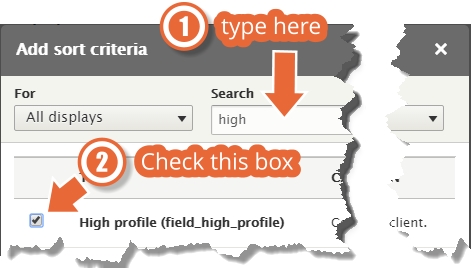
Click on the Apply (all displays) button to add the field as a new sort criterion.

In the following dialog, choose Sort descending because we want to ensure that those clients with the High profile field checked are listed first, and so sorting on that field in descending order will work.

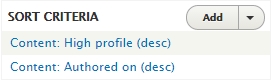
You will see the new field added as a second sort criterion, but we need to rearrange the criteria to make the newly added one the first in the list. Click on the menu icon to the right of the list and drag to rearrange before applying the changes to all displays.

In the modal popup window, reorder the fields so that the High profile field is the first sort criteria and hit Apply (all displays).

If all is well, the two sort criteria are now in the right order to do the job.
Save the view; the high profile clients should be listed first.
Assuming that you have quite a few clients, you won't want all of them listed all at once on the Our Clients page since that may have a performance effect in terms of page load time. Fortunately, the Views module is equipped with a pager facility that enables you break up your lists into sensibly sized chunks.
We'll create a pager for Our Clients view now.
Locate the central region in the View edit dialog, specifically the PAGER section. Note that your list is currently limited to only five items because the current setting is to Display a specified number of items.

In the following dialog, pick the option to use a Page output, full pager and apply this to all displays.

You can change the number of items on each page, but the default value of five items per page is probably a good choice. Since we only have three Client nodes right now, let's set it to just two.
Don't concern yourself with the other two options here for now.

Further down the same popup window, you can also override any of the default text labels on the controls for moving forward and backward through the various pages.

Apply the settings to all displays, save the View and you should see the pager in action.

Creating the basic Service content type and adding in the Taxonomy reference field is exactly the same as for the Client covered step by step earlier in this chapter.
To create the Service content type first visit: Manage | Structure, click on Content types and then +Add content type.
Repeat what you did before to create yourself a Service content type with the following basic settings:
- Title field label: Service
- Preview before submitting: Disabled
- Published: YES
- Promoted to front page: NO
- Display author and date information: NO
- Available menus: NONE
Add/adjust fields:
- Re-label the Body field to Description.
- Add a
Work areafield linking up the terms from the Category taxonomy vocab—hint: you can again reuse the existing Category field.
Click the Save and manage fields button.
When you're done, the Manage fields page should look like the following:

On the Manage form display page, set the widget to Checkboxes / radio buttons just as you did last time when you re-used this field. Adjust the order of the fields in the Manage display screen so that, in the Teaser view mode, the Body field is truncated to 140 characters and the Link field is moved to the bottom.
It may be very useful to be able to make references to one or more Clients from within a Service so as to show the capacity in which you have worked with them.
In order to make one or more direct references from a Service node entity to a Client node entity, you'll need to use a Reference | Content type field.
Add a Reference field now labeled 'Clients'.

In the field settings page, set the Allowed number of values to Unlimited and make sure that the type of item (actually the type of entity) is set to Content.

Finally, in the REFERENCE TYPE section, set the content type so that editors can only make references to Client entities.

Note that when creating a new Service from now on, as you type a character or so into the Clients field, Drupal will search through the database and offer suggestions.

Also, since you made the field a multi-value (unlimited) one, you can add as many other clients as you like.

Create at least four Service nodes, each linked to at least one company.

As yet another revision of what you covered in Chapter 6, Structure, create another block view now that provides a block listing of teasers of all services in a two-column grid format. As a reminder, the quickest and easiest way to set the grid format is to choose it from within the basic Views wizard when you first opt to create the block.

When you click on Save and edit to go into the Views editing screen, you can then adjust the grid setting to two columns.

Place that block on the Services page (in our case /node/3).
Once you have adjusted the various fields display settings teaser, the finished Services page should look something like the following (shown here in a mobile view):

Next, create another content type to hold client testimonials, each of which holds the details (name, job role etc.) of the person providing the reference.
To create the Testimonial content type first visit: Manage | Structure, click on Content types and then +Add content type.
Set up the content type with the following basic settings:
- Title field label: Testimonial title
- Preview before submitting: Disabled
- Published: YES
- Promoted to front page: NO
- Display author and date information: NO
- Available menus: NONE
Add/adjust fields:
- Re-label the Body field to Testimonial statement
- Add an Individual plain text field to hold the testimonial writer's name.
- Add a Role field (Text plain) to describe the writer's role.
- Add a Work area field linking up the terms to a single term from the. Category taxonomy vocab'—hint: you can again reuse the Category field.
When you're done, visit the Manage fields page, which should look like the following:

Based on all the exercises you have already done with regard to form management, the suggested field order for the (editing) form page with the Work area (Category taxonomy) widget set to Checkboxes/radio buttons might be as follows:

Adjust the Manage display (Default) settings so as to hide the unnecessary labels on the Individual and Job description fields and disable the visibility of the Work area field.

For the Teaser display, let's just have the Title (will always show anyway), the Individual, and the Role fields on display plus the Links for the Read more:

Once you have set up the new content type and added the various fields, create several testimonials, all marked as relevant to different Work areas (Category terms) and with an individual's name, role, and company name.

If all is well, the Default and Teaser views of a Testimonial should look like those shown below. Note you can view the teaser version on the front page if you selected Promoted to front page in the publishing options:

Create at least three more Testimonials now so that you have something to work within the next section.