
Drupal 8 introduced comments as a fieldable entity that can now be referenced by any other entity using the new comment field. So what exactly does that mean? This means you no longer manage comments as a configuration option from a content type. The benefit of moving comments into a fieldable entity is that it provides a wide range of flexibility. We can add additional fields if needed along with additional display modes to output comments.
In the case of our Post content type, we already created a relationship to comments to expedite our theming, but we should take a moment to review how that was done and then move on to printing comments in our Blog detail page.
Comment types can be located by navigating to /admin/structure/comment and, as we can see by the interface in the following image, Comment types look very similar to Content types:

For our website, we are using the Default comments that Drupal creates as part of the default installation profile. It is just as simple to create additional Comment types the same way you would create any Content type. This comes in handy for providing multiple feedback mechanisms and provides us with various ways to display comments.
If we navigate to the Manage fields configuration by clicking on the Manage fields button, we will see that there is only a single text area field called Comment. This field allows the user to input the specific comment. We could easily add additional fields to capture more data, but this single field will suffice for our use.

While this appears to be the only field, there are actually two additional default fields for author and subject that we may not be aware of until we navigate to the Manage form display screen by clicking on the Manage form display tab at the top of the page:

One thing to note is that the Manage form display interface handles the display of the comment form and any of its fields that are displayed when a user looks to add a comment to a Post. These fields can be reordered, disabled, or modified as needed.
This differs from the Manage display interface, which controls the display of the comments thread that users see when viewing a post. We can navigate to the Manage display screen by clicking on its tab:

A very important field to point out on the Manage display screen is the Links field. If this field is disabled for any Comment type, we will have no links attached to each comment thread that allow for replying, editing, or deleting a thread, based on a user's permissions. Now that we have oriented ourselves with the new Comment type, we will need to enable it for our Post type.
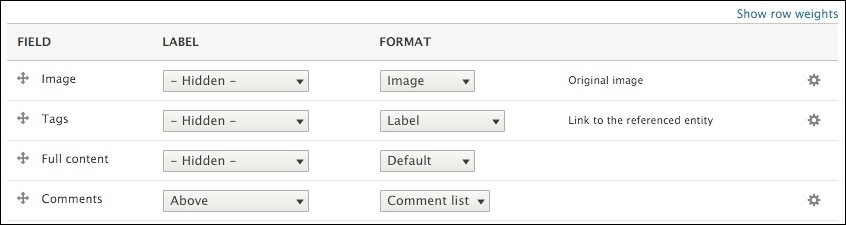
Currently our Blog detail page is not displaying a comment form and therefore no way to display comment threads. If we navigate to /admin/structure/types/manage/post/display, we will be taken to the Manage display screen for out Post type. If we take a closer look, we can see that the Comment field is disabled for our Default display mode:

We can remedy that by dragging the Comments field out of the Disabled section and placing it directly under the Full content field:
Once complete, click the Save button. If we navigate back to /blog/post-one, we will see the default appearance of our Comment form:

One thing still missing is some actual comment threads, so let's take a moment and add a few comments by filling in the comment form for Post one. Make sure to fill in both the Subject and Comment fields. Once we hit the Save button, you should now see a new comment thread displayed directly above the comment form, as shown in the following screenshot:

A general rule of theming comments is that when someone replies to an existing comment, the reply is displayed directly below the original comment and indented so that you have a visual clue as to the thread developing. So that we can see what an actual thread looks like, let's reply to our first comment by clicking on the Reply link, filling in the required fields, and hitting the Save button. Our Comments section should now contain a comment thread:

Perfect, we now have almost everything we need in place to theme the Comment section of our Blog detail page. We have a Comments thread, nested comments, and an Add new comment form. We will address each of these components individually in order to implement our required markup to match our mockup.
Just like any other field attached to a content type, this has a corresponding field template that Twig uses to output the content. If we inspect the markup of our Comment section, we can determine which template is being used and where it is located:

Using FILE NAME SUGGESTIONS, we can navigate to the core/modules/comment/templates folder and copy the field--comment.html.twig template to our themes/octo/templates folder. Next, we will need to replace the markup within our template with the following new markup:
New markup
<section id="id2385comments" class="post-block post-comments">

  {% if comments and not label_hidden %}
    {{ title_prefix }}
    <h3{{ title_attributes }}>
      <i class="fa fa-comments"></i>{{ label }}
    </h3>
    {{ title_suffix }}
  {% endif %}

  {{ comments }}

  {% if comment_form %}
    <div class="post-block post-leave-comment">
      <h3{{ content_attributes }}>{{ 'Leave a comment'|t }}</h3>
      {{ comment_form }}
    </div>
  {% endif %}

</section>
Make sure to save the template, clear Drupal's cache, and refresh the Blog detail page for Post One. The formatting we just applied adds a few classes to our comments wrapper, as well as adding a Font Awesome icon to the Comments heading. We should also notice that the field--comment.html.twig template really breaks the entire comment block into three distinct regions:
- The Comment heading, indicated by the
{{ label }}variable - The Comment thread, indicated by the
{{ comments }}variable - The Comment form, indicated by the
{{ comment_form }}variable
Now that we have identified the three key pieces of a comment block, we need to focus on the {{ comments }} variable itself as it contains our comment thread. Currently, our thread is not displaying as we would like. Each thread is hard to differentiate where it begins and ends, and we are missing the styling that would help it match our mockup. To remedy this, we can take advantage of another Twig template.
Drupal only provides two Twig templates for outputting the Comment section of our page. We have already addressed the Comment field template, so all that is left for us to target is the comment.html.twig template. It is this template that contains the markup for the thread that displays, and we can modify the markup to display the content exactly how we need it by following these steps.
Using the FILE NAME SUGGESTIONS, we can navigate to the core/modules/comment/templates folder and copy the comment.html.twig template to our themes/octo/templates folder. Next, we will need to replace the markup with our own, making sure to print the existing variables:
New markup
<article{{ attributes }}>

  <div class="comment">
    {{ user_picture }}

    <div class="comment-block">
      <div class="comment-arrow"></div>

      <div class="comment-by">
        <strong><span>{{ author }}</span></strong>
        <span class="pull-right">
          {{ content.links }}
        </span>
      </div>

      <div class="comment-content">
        {{ content.comment_body }}
      </div>

      <div class="comment-date">
        <span class="date pull-right">{{ created }}</span>
      </div>
    </div>

  </div>

  {% if parent %}
    <p class="visually-hidden">{{ parent }}</p>
  {% endif %}

</article>
Make sure to save the template, clear Drupal's cache, and then reload the Blog detail page in the browser. Our Comments thread should now be styled and indented as shown in the following image:

Obviously there is something still missing. The user image associated with the author of each comment is not being displayed. Also, our comment date is formatted using military time, which the majority of our users may not be familiar with. We can address both of these items fairly easily.
Right now, we have comment threads lacking a photo to identify the user that posted the comment. In most cases, this is due to a user not having uploaded a photo to their Drupal profile. In order for us to have an image for the {{ user_picture }} variable to print, we will need to upload our own photo.
Navigate to /user/1/edit, which will take us to our current profile page, keeping in mind that the user ID may be different, depending on how many users are in Drupal:
- Locate the Picture field.
- Click on the Choose File button.
- Locate a photo or any image we want to represent ourselves, select it and then click on the Open button in the File dialog window.
- We should now see a thumbnail image:

- Click the Save button to complete this.
If we navigate back to the Blog detail page located at /blog/post-one, we will see the user photo displayed next to each comment:

Now that we have the user image being displayed, we still need to clean up the markup by formatting the field template.
If we inspect the markup for the user picture field, we will notice an <article> element wrapped around each image. Currently, the <article> element is respecting the block display and causing the user image to display on a separate line. While we could easily adjust the CSS to resolve this, we want to respect the HTML provided in the mockup.
To bring our User Picture back in line with how it displays in our mockup, we will need to first modify the user.html.twig template.
Begin by navigating to the core/modules/user/templates folder and copying the user.html.twig template to our themes/octo/templates folder. Next, we will replace the current markup with the following:
New markup
{% if content %}
  {{- content -}}
{% endif %}
Make sure to save the template, clear Drupal's cache, and then refresh the page in the browser. You will not see a visual change just yet, but the surrounding article element is now removed.
We will need to modify an additional Twig template that outputs the image itself. We will be borrowing the markup and styling from an earlier template so that our user picture is framed similar to our Post image.
- Begin by navigating to the
core/modules/system/templatesfolder and copying thefield.html.twigtemplate to ourthemes/octo/templatesfolder. - Next, we will rename
field.html.twigtofield--user-picture.html.twig, based on the recommended file name suggestions. - Finally, we will replace the markup with the following:
New markup
{% for item in items %}
  <div class="img-thumbnail">
    <div class="user-picture">
      {{ item.content }}
    </div>
  </div>
{% endfor %}
Make sure to save the template, clear Drupal's cache, and then refresh the page in the browser. Our comment threads are perfectly styled, with the user image for each thread aligned next to each other.

At this point, we only have one more item to adjust for our comment thread. Currently, the default date for each comment is displayed in a 24-hour format, often referred to as military time.
There are multiple ways to address date and time formats within Drupal. In Chapter 8, Theming Our Blog Listing Page, we worked with Twig filters and field variables to format the date. However, the comment thread date is already formatted for us using the default medium date format. So where would we need to configure this to display a non-24-hour format?
If we navigate to /admin/configuration/region/date-time, we will get a glimpse of the date and time formats that Drupal configures for us:

Each of the date and time formats that are shown can be used within Drupal by either managing a Content types field format or referencing the name with a Twig template or preprocessing function. As we can see, some of the formats can be edited, while others cannot. We can also add additional formats.
In the case of our comment thread created date, we can assume by reviewing the PATTERN of Default medium date that this is the format being used. Luckily for us, we can easily modify the pattern to change the time from 24-hour to 12-hour format by following these steps:
- Click on the Edit button for the Default medium date format.
- Replace Format string with the following pattern:
D, m/d/Y - h:ia
- Click on the Save format button.
We have successfully changed the default medium date format. One thing to note is that the date and time formats in Drupal take advantage of the Date object in PHP. We can get additional information regarding various formats by reviewing the parameters available in the manual at http://php.net/manual/en/function.date.php.
If we now navigate back to our Blog detail page for Post One, we will see that our comment threads now use the modified default medium date format:

Our Blog detail page is just about complete. While users can now read our Posts and comment on them, we are still missing the ability for users to share a post on their favorite social networks.