
In Chapter 3, Basic Concepts, we briefly discussed Drupal's Taxonomy feature.
In Chapter 4, Getting Started with the UI, you created Article nodes tagged with the terms: tag1, tag2, tag3, and tag4, and in Chapter 5, Basic Content, you created more Article nodes tagged with the terms pet and dog.
The Tags vocabulary is a tag-based vocabulary, which means that content editors can make up as many terms (words or phrases) as they like and will be prompted to re-use any existing terms as they type. Tag-based vocabularies are great when you need your content-editing team to use their expert subject knowledge to build up a collection of terms, but the downside of them is that the collections can fill up with duplication owing to misspellings.
We'll create the following collection of seven terms that we can use to categorize all content:
CharitiesConsultancyDocumentationE-CommerceGovernmentFunTraining
We'll refer to this as the Category vocabulary.
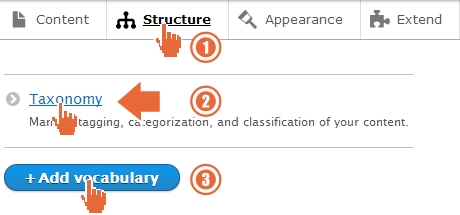
To create a brand new taxonomy vocabulary for our new list of terms, visit Structure | Taxonomy | Add vocabulary.
Enter a name and description for the new vocabulary and save it.

Click on the Add term link and start entering all the terms in the list.
Note that whilst we have done so in the screenshot below to illustrate the feature, you do not need to enter an administrative Description for each and every term.

Enter the full list of terms as follows:
- Charities
- Consultancy
- Documentation
- E-Commerce
- Fun
- Government
- Training
Since you have only just populated the vocabulary from scratch, you will find that the terms in it are already arranged in alphabetical order.
It is a common requirement to list out taxonomy terms in a precise curated order, and so you can simply drag and drop the various terms until you have what you want.
Visit the Manage | Structure | Taxonomy page and click on the List tab.

Now that you have defined the new list of terms with which to classify the website content, the next step is to associate the vocabulary to your existing content types: Basic page and Article. To do this, we need to add a field to each of those content types. Let's first attach the vocabulary to the Article content type.
Go to Manage | Structure | Content types then click on the Manage Fields button in the operations dropdown for the Article content type:

Add a new
Reference | Taxonomy term field called Category and Save and continue:

You will then be taken to the first of two field configuration pages.
Let's say that we want to allow the content editors to have the option to apply multiple terms, so select Unlimited as the first option, and then make sure that the field is linked up to the correct (Category) taxonomy vocabulary:

Finally, you'll be taken to the second field configuration screen where you can optionally make the field mandatory, set any default value(s), and finalize the settings such as whether to limit the vocabularies you wish to use or to set any default terms.
At the bottom of the configuration screen, use the Default reference method and make sure that only the Category vocabulary is selected:

Leave Create references entities if they don't already exist unticked, otherwise new terms will be created in this vocabulary and it will essentially become a tag type vocabulary when this is selected.
When creating and editing articles, your content-editing team will now be able to categorize their content.
Before we test this out, let's first use the opportunity to visit another field configuration page again—that of Manage form display.
We touched on this in Chapter 4, Getting Started with the UI; now let's look at it in a bit more detail. As a reminder, when we use the word Form in Drupal in relation to editing content, we are referring to the Edit form, that is, the actual screen which the content editors use to edit content.
Visit the Manage form display screen for the Article content type. Click on Manage form display from the operations dropdown:

The most intuitive widget that we can use would be a Select list, so let's configure the field to use that when in the edit form.

You should leave the Tags field widget set to the default Autocomplete since that is the only really sensible open for a tags vocabulary.
It is often a good idea to bring Taxonomy term fields to the top of the list just underneath the Title to encourage content editors to think about classification early on when they are creating new content.
Thus, re-order the fields, as shown in the following, so that the two Taxonomy fields are positioned just below the Title.

Now that we have set up a link between the Article content type and the Category taxonomy, we can set about categorizing Articles.
To categorize your four existing articles, simply edit them and choose one or more terms using Ctrl within Windows or Command on OS X, and then save.

Categorize all four existing articles now for example, The company pet and Dog fish(er) articles might reasonably be categorized as Fun and so on.
Create five new articles now in a variety of categories.
You may find it useful to copy the list of titles that we have used in this tutorial guide:
- An article classified with Charities
- An article classified with Consultancy
- An article classified with Charities and Documentation
- An article classified with Consultancy and E-Commerce
- An article classified with Consultancy, Government, and Training
Note that we have not added any images to the example articles created in this guide, but you, of course, can.
Visit one of your articles now in full and you will see that any Category terms that you have applied appear as links at the bottom of the page:

Clicking on one of these links will again take you to a listing of all content with that term applied. Not bad at all, but now let's see how we can use taxonomy to provide further improved listing.
So far we have used taxonomy to group together articles whose actual content is concerned with key terms such as Charities, government, and Training. Now let's investigate how we can use exactly the same methods to distinguish between three different types of Article: Articles, News, and Blog posts.
We are now going to subdivide Article nodes into three distinct types: Articles, Blog posts, and News. To do this, we first need to create a new Taxonomy vocabulary.
Visit Manage | Structure | Taxonomy.
Create a new vocabulary called Article type containing the following terms: Articles, Blog posts, and News:

Next, in order to enable you to classify Article nodes with these terms, add another Taxonomy term field entitled Article type to your Article content type so as to attach this new vocabulary. As you do, set the DEFAULT VALUE of the field to Articles so as to classify all newly created articles as Articles by default:

Leave the Limit set to 1 since an Article should only be of a single type:

Adjust the default value to be Articles:

Lastly, limit the choice of terms to the Article type vocabulary and save the settings a final time:

Set the widget to Select list and adjust the order of the fields in the Manage form display page to bring the new Taxonomy field close to the top of the page.

Now go through each of your existing articles further classifying with an Article type.
You may find it useful to copy the classification that we have used in this tutorial guide:
- An article classified with Charities
[News] - An article classified with Consultancy
[News] - An article classified with Charities and Documentation
[News] - An article classified with Consultancy and E-Commerce
[Articles] - An article classified with Consultancy, Government, and Training
[Articles] - The company pet, Dog fish(er), Article no. 1, and Article no. 2
[Blog posts]
Test your new classification by clicking on one of the three terms to see a nicely segregated listing showing only Articles, News, or Blog posts.
In the next section, you will see how you can improve significantly on this listing by controlling the order, grouping, and presentation of the articles using the Views module.