
CHAPTER 8
Protecting the Inner Perimeter
In general, after you get past the outer perimeter defenses, you can think of the inner perimeter as part of the three-level structure illustrated in Figure 8.1. Consider this perimeter as consisting of the operating system and its application programs that form the gateway to the data stored in the interior zone (folders and files).

FIGURE 8.1 The Inner Perimeter
- Describe Local Login and User Configuration Options for Host Devices.
- Compare and Contrast the Security Features of Common Operating Systems.
- Identify Common Logging and Auditing Options for Windows and Linux Based Systems
- Explain Options for Encrypting Data at Rest in Different OS Environments
The Inner Perimeter
The valuable information we’re trying to protect is generally the digital data stored in the computer hardware in the form of different types of files. These files are created and interpreted by application programs. Without the application to interpret the data, it is very difficult to determine what the data actually means. See Figure 8.1.
The operation of the application program and access to the files are controlled by the operating system (OS). The operating system coordinates the operation of the hardware system and devices with the software applications. Applications are designed to run on specific operating systems, so they are dependent on those operating systems. They will not run on another operating system without some sort of translator being involved.
The operating system is also responsible for keeping track of where data is stored in the system and how it can be located and accessed. Without the operating system’s file management system (FMS), there is no way to know how to find the data to steal, damage, or destroy it. Each major OS supplier uses a different FMS.
Therefore, to access data on a computer, you must gain access to the running system, which is controlled by its operating system. Then you need to be able to locate the file, which requires the ability to navigate the OS file system. Finally, you will need to open the file, which requires the application software or software designed to examine data at the digital-code level.
There is not much actual value in the operating system or common application programs for thieves to steal. These types of software are commonly available, relatively inexpensive, and hard to transfer and use between systems. These programs are basically just tools for creating and manipulating information. However, they are interesting to would-be hackers because they can be accessed and repurposed for malicious and illegal operations.
On the other hand, the data files stored on the computer can be very interesting to thieves. As you are no doubt aware, quite a bit of digital information exists about most people and it is all stored on computers somewhere. If someone can locate and gain access to those data files, they can find a way to extract the information from them.
Once they have access to the file (or a copy of it), they can either open it on their system using the same application originally used to create the file, or they can extract the information from the digital code. The latter tends to be somewhat more involved and difficult to accomplish and typically requires someone with hacker skills and tools to operate at that level.
However, not every malicious operator wants to steal information. Some people, organizations, and governments just want to damage or destroy data for one reason or another. This type of activity could arise from many different motives, as described in the Introduction to this book
So how do you keep unwanted persons from gaining access to these programs? Let’s first look at typical operating systems from different suppliers and see what security options they offer. As you will see in the following sections, operating systems tend to have many security tools and options built into them.
Operating Systems
Operating systems are programs designed to control and coordinate the operation of the computer system. As a group, they are easily some of the most complex programs ever devised.
In all microprocessor-based environments, the operating system accepts commands from a program or an input source (such as a computer user) and carries them out to perform some desired operation. Likewise, the operating system acts as an intermediary between nearly as complex software applications and the computer hardware they run on.
A disk operating system (DOS) is a collection of programs used to control overall computer operation in a disk-based system. These programs work in the background to allow the user of the computer to input characters from the keyboard, to define a file structure for storing records, or to output data to a monitor or printer. The disk operating system is responsible for finding and organizing your data and applications on the disk.
As illustrated in Figure 8.2, the disk operating system can be organized according to four distinct sections:
- Boot files take over control of the system hardware from the ROM BIOS during start-up. They bring the OS kernel files into RAM memory so they can be used to control the operation of the system.
- Kernel files are the fundamental logic files of the operating system responsible for interpreting commands obtained from software programs for the central processing unit. These files are created to work with specific hardware architectures (microprocessors and chipsets).
- File management files enable the system to manage information within itself. These files are responsible for storing, tracking, and retrieving data into RAM memory where the microprocessor can access it.
- Utility files are programs that permit the user to manage system resources, troubleshoot the system, and configure the system.
FIGURE 8.2 Basic OS File Structure
The operating system acts as a bridge between application programs and the computer hardware, as described in Figure 8.3.

FIGURE 8.3 The Position of the OS in the Computer System
These application programs enable the user to create files of data pertaining to certain applications such as word processing, multimedia delivery, remote data communications, business processing, and user programming languages.
Because the operating system is a major part of the electronic gateway to the computer’s applications and data, you must be aware of the different general types of OS available and what tools and techniques are available to protect them. For this discussion, let’s divide computer operating systems used with computing and intelligent control devices into three general classes by the roles they fill:
- Standalone operating systems – These are operating systems that can be operated independently without external communications or management. This class of operating system includes different Windows, Mac, and Android-based versions found on consumer computers. However, this designation can also apply to the operating systems used in many intelligent control devices employed in industrial and manufacturing applications.
While these OS versions may be operated in a standalone manner, most modern versions possess some networking abilities that allow them to communicate with other intelligent devices or the Internet.
- Client operating systems – Client operating systems are designed to work in a network environment. In particular, they are designed to take advantage of the services provided by a master computer called a server. While server computers are responsible for providing oversight and control of the client computers through their various networking services, users do not commonly work at these computers. Instead, the client computers and devices serve as workstations, or autonomous nodes. Network clients are divided into three general subcategories:
- Thick clients – These are fully functioning PCs and devices that could work locally but rely on the services delivered by the network server(s). Data is typically stored locally on a thick client.
- Thin clients – These are fully functioning PCs and devices that don’t possess hard drives for storage. The operating system is simply used to start the system up and then hand the operation off to a server. All data and programs are stored and executed on the server.
- Terminal clients – These are server-dependent PCs and devices where the operating system does not exist on the client. Instead, the client actually boots up to a remote server and all programs and data are located and executed on the server.
- Server operating systems – These operating systems are designed to run on specialized server computers that function as the center of a client/server network environment. Server operating system versions are typically responsible for:
- Data and resource security for the network and its devices
- Centralized network administration
- Cost benefits to the business or enterprise
- Server operating systems provide security for the network and its clients by controlling access to:
- Resources (disk drives, printers, directories, and files)
- Services (email, Internet connectivity, messenger services, databases, and so on)
- Administrative tools (user accounts, local and network utilities, computer management tools)
Server operating systems are some of the primary tools responsible for security in a network environment. These operating systems and their security tools are explored in depth in Chapter 14. The remaining sections of this chapter deal with security tools that are available and can be implemented at the local standalone or client computer level.
Notable standalone, or client disk operating systems, include: Microsoft Windows versions, Apple Computer’s MAC OS X, a variety of Linux operating system distributions, and the Android operating system from Google.
Operating systems and the programs and data they control are attacked from two common areas:
- By manipulating the operation of the OS kernel
- By attacking its file management system
The following sections address these two common areas of attack.
OS Kernel Security
Figure 8.4 illustrates the position of the OS kernel between the system’s hardware and applications. Due to this positioning, it should be apparent that if you can get to the programming code in the OS kernel and disable it, you have disabled the operation of the entire computer system. However, if you can access the kernel and manipulate the code, you have taken over operation of the computer.

FIGURE 8.4 The Position of the Kernel
Attackers who possess enough knowledge of a given operating system’s memory-handling strategy can exploit the OS kernel in a number of different ways:
- They can change the value of a variable in the kernel programming to change its behavior.
- They can change the return address of some standard OS function so that when the OS tries to return to its basic pipeline of instructions, it is rerouted into code supplied by the attacker.
- They can change a pointer in the program that directs the execution of the instruction code to an exception handler supplied by the attacker.
- They can insert malicious code into an application’s code that has been loaded into RAM memory for execution. The inserted code is designed to overwrite kernel components that interact with the application.
All of these attacks rely on gaining access to specific areas of the computer’s memory where the OS kernel operates.
Most operating systems utilize a feature built into microprocessing hardware to protect certain areas of memory that contain specific blocks of instruction code. This feature is referred to as the No eXecution (NX) bit, or the eXecute Disable (XD) bit. NX bit technology is used to flag certain areas of memory as storage-only.
Any section of memory marked with the NX attribute means it’s only for storing data. Therefore, processor instructions cannot be stored there. This is a popular technique for preventing malicious software from taking over computers by inserting their code into another program’s data storage area and then running that code from within this section, as they would with a buffer overflow attack.
Some operating systems ship with built-in executable-space-protection features, referred to as Data Execution Prevention (DEP) modes, to defeat these types of attacks. The operating system accomplishes this by creating unique, isolated memory regions for each application running on the machine. Each isolated memory region becomes a virtual environment managed by the microprocessor’s virtual memory management module.
In Unix, Unix-like, and Linux operating systems, this function is provided as an advanced implementation of its standard chroot operations (its system for creating and managing multiple virtualized copies of the operating system).
File System Security
The file management system is extremely important in protecting the existence and integrity of data stored on a hard drive or removable storage device. If the file system is destroyed or becomes corrupted, the data becomes inaccessible and is lost. In addition, if unauthorized users are given access to the file system and its stored data, they have been given the opportunity to damage, destroy, or steal it.
One of the main tools for protecting the file system and its data is the use of access control lists (ACLs) to provide Resources Access Control. The file management system uses ACLs to grant or deny specific users access to its different files, as well as to control what types of activities the individual can perform once access has been granted. For example, you may be given the capability to run a file, read it, write it, or perform other actions on it under the control of the file management system.
The operating system’s ACLs are also used to control access to other objects such as TCP/UDP ports as well as I/O devices. Their ACL tables maintain records that identify which access rights each user has to a particular system object.
Depending on the operating system, resource access control can be implemented in the form of Mandatory Access Control (MAC) or Role-Based Access Control (RBAC). Unix and Linux systems typically offer MAC approaches, while Microsoft’s Windows platforms provide RBAC control.
In MAC versions, the operating system takes action based on the administrator’s policy configuration settings to determine who can do what and to what extent they can do it. Under RBAC, the system restricts or permits access to objects based on the user’s role within the organization. The RBAC structure is typically the access control method employed in large enterprises.
In Microsoft Windows environments, these capabilities are assigned to folders and files in the form of permissions. Permissions can also be defined as privileges to perform an action. In Unix and Linux-based systems, users are assigned access rights to files.
Another tool for protecting data is to encrypt it so that becomes unusable without a key to decrypt it. The encryption/decryption process can be performed on data when it’s stored and retrieved from a device (PR.DS-1, data at rest) or when it is being moved from one location to another (PR.DS-2, data in motion).
Most of the major disk operating systems available offer some type of data encryption capabilities through their file management systems. Depending on the design of the operating system, encryption may be applied at the device level, the disk (or volume) level, or the file and folder level. Third-party encryption applications are available for use with many of these operating systems as well.
The data encryption services available with different operating systems are discussed in the following sections. Data encryption techniques are covered in detail later in this chapter.
The following section compares and summarizes the key structural and security features of the most widely used operating systems. This comparison involves the operating system’s versions, kernel architecture, file management systems, and native data-encryption capabilities.
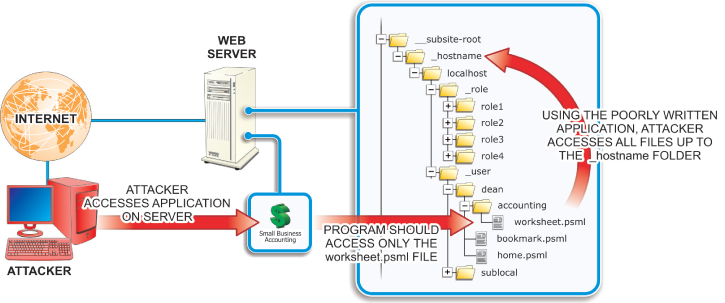
File System Attacks
Typical attacks mounted on OS files systems include:
- Using race condition attacks
- Using data streams to hide files
- Performing directory traversals
A race condition exists when an attacker exploits the timing of consecutive events in a multiuser/multitasking environment to insert malicious code into the system between the events. For example, a time of check-time of use (TOCTOU) condition exists when an operating system creates a temporary file. During the time between when the OS checks to see if a file by that filename exists and when it actually writes the file, the attacker executes a program to save a malicious code package using the filename of the temp file. The malicious code could contain higher access permissions so the attacker can read or manipulate the file, or it could contain a link to a script file that grants access to the password file where the administrative password is stored. Advanced hackers use this NTFS OS compatibility feature to hide root kits or other hacker tools to establish an anonymous base to launch attacks on the system. The ADS feature was originally built into NTFS to provide support for Apple’s Hierarchical File System (HFS) file system, which sometimes “forks” data into different files. However, this technique has been adopted for storing file metadata and to provide temporary storage. As mentioned earlier, hackers use the ADS feature to hide their tools from the system as it is virtually impossible to detect with native user interfaces. After the hidden ADS files have been embedded in some standard OS file, they can be executed without being detected as an illegitimate operation. The only sign of an ADS operation is an illegitimate timestamp on the file where the hidden tools have been injected. These attacks exploit poorly secured software applications to access files that should not be accessible in order to “traverse” to a higher level folder or directory, as shown in Figure 8.5. Such attacks are also referred to as backtracking, directory climbing attacks, or canonicalization attacks. FIGURE 8.5 Directory Traversal Hackers use this form of HTTP exploitation to access a web server’s directory tree. After the hacker has gained access, they can navigate the tree to view restricted files or execute commands on the server. Such attacks are launched using common web browsers against poorly configured web servers. These attacks can be minimized through careful web server configuration, filtering web browser input, and using vulnerability scanner software. The following section compares and summarizes the key structural and security features of the most widely used operating systems. This comparison involves the operating system’s versions, kernel architecture, file management systems, and native data-encryption capabilities.Using Race Condition Attacks
Using Alternative Data Streams to Hide Files
Performing Directory Traversals
Microsoft Windows
The Windows line of operating systems from Microsoft offers the most widely used disk operating systems with personal computers. Windows is a graphical user interface (GUI)-based operating system that enables users to navigate through the system using a series of pop-up windows and menus.
- Windows Client versions – Windows XP, Windows Vista, Windows 7, Windows 8, and Windows 10
- Windows Server versions – Windows Business and Small Business Server (SBS) versions 2003, 2008, 2012, and 2016
All Windows operating systems are designed to work with x86 32-bit and x86 64-bit processor types from Intel, AMD, and VIA. Windows operating systems after Windows XP SP2 and Windows Server 2003 support XD-bit operations on some 32-bit x86 processors, as well as on 64-bit x86 processors that offer NX-bit support.
Windows operating systems support the following basic file system formats:
- FAT/FAT16/FAT32 – The File Allocation Table series of FMS are cluster-based versions of an older file management system that was developed to manage data storage on floppy disks. Because of its widespread use in Microsoft DOS and early Windows versions, it has evolved and remained in use until the present.
The number in the FAT title represents the number of bits in the table entry that tracks the location of the data cluster on the disk. The original FAT standard employed a 12-bit table entry and could track the locations of 4096 (1 × 212) table entries. The FAT file system is still commonly found on USB storage devices, SD cards, and other flash memory devices, as well as many other portable and embedded devices. FAT file system versions offer relatively little in the way of security tools for the data stored in their structures.
- NTFS – The New Technology File System is Microsoft’s proprietary and default file management system for its operating systems. NTFS brought with it enhanced security features including access control lists (ACLs) and the encrypting file system (EFS).
- ISO 9660 (CDFS) – The Compact Disc File System is the standard file management system for optical disc storage.
- UDF – Universal Disk Format is the successor of the CDFS file management system. In particular, it is widely used in DVD and advanced optical storage devices.
The Windows operating systems include file- and folder-level encryption through its encrypting file system (EFS) feature. Full disk-level encryption is provided on some high-end Windows OS versions through a native utility called BitLocker. These utilities are discussed in detail later in this chapter.
Microsoft Windows operating systems provide an integrated Windows Firewall feature that enables the local administrator (or owner) to establish and configure a local firewall to control the flow of information into and out of the local host computer from an external network connection through a process called packet filtering.
Unix
The Unix line of operating systems provides modular, multitasking, multiuser OS environments originally developed to run on mainframe and minicomputers. Proprietary versions of the Unix OS include several BSD (Berkley Software Distribution) variations, along with Apple’s OSX and iOS operating systems. Several notable Unix-like operating systems have been derived from the basic Unix operating system, including multiple Linux distributions.
Different Unix OS versions have been designed to work with a number of different microprocessors. Likewise, different Unix OS versions provide support for number of different file systems formats:
- UFS – The UNIX File System was the first structure designed for the original UNIX operating system and continues in use with UNIX and its derivatives. The structure of this file system standard presents a unified tree structure beginning at a main directory known as root (/).
- NFS – The Network File System was developed by Sun Microsystems to enable client computers to access files across a network. Because NFS was developed as an open protocol standard any company can (and have) incorporate it into their own suite of supported protocols. It is used primarily in UNIX OS versions, but is also supported in Microsoft Windows and Apple’s MAC OSs.
Some Unix operating systems include built-in encrypted file system capabilities. The original encryption tool included as a standard part of the Unix operating system is crypt. However, this tool is considered to be a very low-powered encryption tool that is relatively easy to crack. For that reason, it is not widely used. The Data Encryption Standard (DES) is a stronger encryption tool used with many Unix distributions. Pretty Good Privacy (PGP) is another widely used Unix encryption tool. This tool does both private and public key encryption/decryption and offers a very strong method to secure data.
Unix distributions based on the Free BSD kernel offer encryption services through PEFS, GELI, and GBDE utilities. Private Encrypted File System (PEFS) is a file-based encryption system. GELI and GEOM Based Disk Encryption (GBDE) are disk-level encryption utilities. Another notable encryption tool for other Unix or Unix-like operating systems is EncFS.
FreeBSD and OpenBSD distributions also offer multiple built-in firewall utilities to control the flow of data into the local computer. These options include ipfirewall (ipfw), IPFilter, and Packet Filter (PF). As with the integrated Windows Firewall mentioned earlier, these applications enable the local computer to control the flow of incoming and outgoing data through a process called packet filtering. Local firewalls and packet filtering are covered in detail later in the chapter.
Linux OS Distributions
Many personal computer users run versions of a freely distributed, open-source operating system called Linux. Linux is a very powerful, command-line operating system that can be used on a wide variety of hardware platforms including Windows PC and Apple Mac systems.
A community of programmers works with the Linux oversight committee to continually upgrade and enhance the basic Linux structure to keep it current and competitive. In addition, several companies have developed proprietary additions to the basic Linux structure to produce their own distributions (Linux-speak for versions) of the operating system:
- Major Linux client distributions – Ubuntu, Red Hat, SUSE, Slackware, Mandrake, Fedora, FreeBSD, Debian, and others
- Linux Server distributions – Red Hat Linux Server, Ubuntu Server, SUSE Server, and others
Different Linux OS distributions have been designed to work with x86 and x86 64-bit microprocessor types from Intel, AMD, and VIA, as well as Motorola/IBM-PowerPC processors and Sun Microsystem’s SPARC processors. The Linux kernel supports the NX-bit on some x86 processors, as well as on x86-64, PowerPC microprocessors, and other 64-bit processors that offer NX-bit support.
Linux OS distributions commonly provide support for several different file system types:
- ext/ext2/ext3/ext4 – The ext series of Extended File Systems are the primary file management systems designed for the Linux kernel. Ext2/3 is widely used in SD cards and other flash-based storage devices.
- ReiserFS – The Linux kernel provides support for the Reiser file system which is the default system on some Linux distributions. It is a journaling file system (one that keeps track of changes in a circular log file, referred to as a journal, before committing them to the file system). ReiserFS includes UNIX permissions, ACLs, and attribute security features, but does not include any data encryption services.
- Linux OS – Linux OS distributions also commonly provide support for the ISO9660, FAT, and UDF file system formats described for Windows files systems.
The major Linux operating systems provide built-in file-system-level encryption services through a package called eCryptfs. This level of encryption enables the encryption service to be applied at the individual file or directory without significant disk management overhead.
Linux distributions offer built-in local firewall functions through a kernel utility called Netfilter. In addition to providing packet filtering for local firewall implementation, this utility offers additional protection through processes called network address translation (NAT) and port address translation (PAT) for directing packets through a network in addition to masking the private IP address from hosts outsider the network.
Apple OS Versions
Apple Inc. produces personal computers that are not intrinsically compatible with PCs. They have distinctly different hardware designs and do not directly run software packages developed for the Win/PC environment.
All newer Apple Mac computers run on a proprietary version of Unix called Apple OS X. While the structure of OS X is Unix-based, the user interaction portions of the system employ Apple’s trademark GUI-based desktop. This gives the Mac a very powerful and stable engine with very user-friendly interfaces with which to work:
- Apple client versions: macOS, OS X, and Mac OS X
- Apple Server versions: macOS Server, Mac OS X Server, and OS X Server
MacOS was designed to work with x86 and x86 64-bit microprocessor types from Intel, Cyrix, VIA, and AMD, as well as PowerPC processors from IBM and Motorola. These microprocessors all support NX-bit functions to protect certain areas of memory from virus manipulation.
MacOS supports the ISO9660, FAT, NFS, UFS, and UDF file system formats described earlier. In addition, support for the following FMS standards is provided in different macOS versions:
- HFS/HFS+ – The Hierarchical File Systems are proprietary Apple file systems developed as the primary file system for their Mac line of computers using macOS. It is also used in Apple’s line of iPod music devices. Support for the updated HFS+ version has been included in non-Apple operating systems including the Linux kernel and Windows (including support in Microsoft’s Xbox360 gaming console).
- SMBFS/CIFS – The Server Message Block File System, also known as the Common Internet File System, was developed to provide shared access to files and devices, along with network communications. This FMS is mostly used with computers running Windows prior to the advent of Active Directory. However, support for newer SMB releases has continued through all current Microsoft OS versions in addition to making its way into several non-Microsoft operating systems.
Apple macOS operating systems include disk-level-based data encryption through a service called FileVault; FileVault2 macOS users can also use the built-in disk utility to encrypt their disk and store subsets of their home directory.
iOS
iOS is a proprietary Apple mobile operating system designed to support Apple’s line of iPhones and iPads. While iOS shares many structures with macOS, it is not compatible with macOS applications.
iOS is designed to work with reduced instruction set computing (RISC) processor types from the Acorn RISC Machines (ARM) Ltd company. These devices use significantly less energy and produce much less heat than their x86 complex instruction set computing (CISC) rivals. This makes RISC processors a natural for use in small, battery-powered devices such as phones, tablets, and pads. From the ARMv6 version forward, this architecture has supported an Execute Never (XN) page protection feature.
The iOS system includes integrated device-level file encryption to protect the data if the device running is lost or stolen. It also offers protection from unauthorized users using or modifying the data. In addition to its hardware encrypting feature, iOS offers a class-based tool called Data Protection. With this protection tool, file-based encryption keys are created each time data is written to the device’s flash memory structure.
Android OS
The Android operating system was developed for use with tablet and smart phone devices that primarily use touchscreen gestures for operation and control. It is currently the most popular mobile operating system in use due to the number of smart phone and tablet devices it is used in, as shown by the graph in Figure 8.6.

FIGURE 8.6 2014 Smartphone OS Graph
Android is based on the Linux OS kernel but typically includes a wrapper of proprietary user interfaces, utilities, and applications. Because of its open-source availability, Android has been embraced by a development community and made its way into a number of devices in consumer, military, business, and educational applications.
The Android OS is designed to run on 32- and 64-bit ARMv7/8 processors. This includes proprietary I.MX5/i.MX6 ARM processors from Freescale Semiconductors (a former division of Motorola). These microprocessors support the XN page-protection feature. There is also a version of the Android OS kernel designed to support x86 architectures. Of course, these processors support the XD-bit or NX-bit feature.
The kernel configuration of different Android devices supports different file systems that are specific to that device. However, there are some flash memory file systems that are common to Android systems:
- exFAT – Microsoft’s extended File Allocation Table file system for flash memory devices.
- F2FS – Samsung’s Flash-Friendly File System (version 2) is an open-source Linux file system for flash storage devices.
- JFFS2 – The Android default Journal Flash File System (version 2). This FS version replaced the YAFFS2 (Yet Another Flash File System) as the default Android flash file system used in earlier kernel versions.
- Ext2/Ext3/Ext4 – Versions of the Linux Extended File System that replaces F2FS and JFFS2 as the file system for internal Android flash devices.
In addition to these flash-memory file systems, Android devices also commonly support the Microsoft File Allocation Table (FAT) file systems (FAT12, FAT16, and FAT32), along with their VFAT extension.
The Android OS offers disk encryption based on a utility called dm-crypt to store data on the device’s flash memory device. This utility is an integral feature of the Android’s Linux kernel.
Operating System Security Choices
Because of its popularity, Microsoft Windows presents the biggest target for both mischievous and malicious malware and grayware (annoying unwanted software) writers. Therefore, Windows receives an unrivaled percentage of all the attacks associated with viruses and spyware.
This fact has led some Windows customers to adopt other operating system platforms such as Linux or macOS, which are much less of a malware target. Table 8.1 summarizes some common security features associated with various operating systems.
TABLE 8.1 Operating System Security Comparisons
| Name | Resource Access Control | Subsystem Isolation Mechanisms | Integrated Firewall | Encrypted File Systems | No Execute(NX) |
| Linux | POSIX, ACLs, MAC | chroot
, capability-based security, seccomp, SELinux, AppArmor |
Netfilter, varied by distribution | Yes | Hardware/Emulation |
| macOS | POSIX, ACLs | chroot
, BSD file flags set using chflags |
PF | Yes | Hardware/Emulation |
| Windows Server | ACLs, privileges, RBAC | Win32 WindowStation, desktop, job objects | Windows Firewall | Yes | Hardware/Emulation |
| Windows | ACLs, privileges, RBAC | Win32 WindowStation, desktop, job objects | Windows Firewall | Yes | Hardware/Emulation |
Common Operating System Security Tools
After the system has booted up, steps can be taken to prevent unauthorized personnel from accessing the operating system and its applications. These steps include:
- Implementing local login requirements
- Establishing user and group accounts
- Setting up password policies
- Establishing lockout policies
- Implementing additional authentication options
- Using biometric authentication devices
- Using physical authentication devices
- Using Local Administrative Tools
- Enabling system auditing and event logging
- Implementing data encryption tools
- Overseeing application software security
- Providing remote access protection
- Establishing firewall settings
- Configuring browser security options
- Establishing and implementing malicious software protection
- Applying security updates and patches
Figure 8.7 shows the Local Security Policy/Security Settings options available in a Microsoft Windows control panel. The first set of options includes password and account lockout policy choices to locally control access to the system. You can also implement local admin policies for system auditing, users rights, and security policies.

FIGURE 8.7 Local Security Policy/Security Settings
The Windows Firewall and Advanced Security tools enable the local administrator (or owner) to establish and configure a local firewall as described earlier.
The remaining tools shown in Figure 8.7 are security tools that enable local policies to be established to control the local computer’s interactions with an external network. In the following sections, you will learn how to implement them for best local-host security practices.
Implementing Local Login Requirements
The main user authentication tool used with personal computing devices is the username and password login. In general, there are three types of user-related logons with which to contend:
- A logon to the local machine
- A logon to a specific software application
- A network logon
At the local computer level, the local logon is typically required. This level of logon validates the user for using the local computer’s resources (files and devices). However, in a shared computer environment where multiple users may be enabled to use the same computer, local user and group credentials are created and configured through a user accounts database that is stored on the local computer.
These credentials are used to gain initial access to the computer, control access to its local resources, and control access to network resources. In a Windows environment, these accounts are created and managed through the Local Users and Groups utility under Computer Management, as depicted in Figure 8.8.

FIGURE 8.8 Microsoft Local User and Group Accounts
The first time a standalone system is started an administrator’s account is automatically created in the operating system’s local accounts database. The administrator has rights and permissions to all of the system’s hardware and software resources. The administrator, in turn, creates other users and then grants rights to them and permissions to system resources as necessary.
The administrator can deal with users on an individual basis or may gather users into groups that can be administered uniformly. In doing so, the administrator can assign permissions or restrictions on an individual or an entire group. The value of using groups lies in the time saved by being able to apply common rights to several users instead of applying them one by one.
The other default group created when the operating system first starts is a type of account known as a Guests group. This default group typically has minimized access to the system, and all of its members share the same user profile. The Guest user account is automatically a member of this group.
Each user and group in the local environment has a profile that describes the resources and desktop configurations created for them. Settings in the profile can be used to limit the actions users can perform, such as installing, removing, configuring, adjusting, or copying resources.
When users log into the system, it checks their profiles and adjusts the system according to their information. These credentials are used to gain initial access to the computer and control what access each user has to its local resources. In addition, access to certain software applications and other resources may be controlled by additional application-level passwords.
Passwords
For a password to be effective it must possess a certain amount of complexity. Its length, width, and depth must be such as to thwart the efforts of the previously mentioned password-cracking techniques.
The length of a password directly affects the ease with which it can be cracked. The longer the password is, the more difficult it will be to crack. It is generally recommended that passwords should consist of at least eight characters. If permitted by the OS, longer passwords can be used, provided the employees or clients can remember them.
The width of a password relates to the number of different types of characters that can be incorporated, including those not belonging to the alphabet. Combinations of numbers, special characters, and uppercase and lowercase letters make passwords stronger, especially when an operating system considers uppercase and lowercase letters as completely different characters.
Passwords can contain control characters, alternative characters, and even spaces in some operating systems. Ideally, all the following character sets should be drawn from when users are required to create strong passwords.
- Uppercase letters such as A, B, C
- Lowercase letters such as a, b, c
- Numerals such as 1, 2, 3
- Special characters such as $, ?, &
- Alternative characters such as @, %
The depth of a password involves how difficult it is to guess its meaning. Although a good password should be easy to remember, it should nevertheless be difficult to guess. For a number of years, the top two passwords overall have been “123456” and “password.” Attackers know common terms and techniques used in creating passwords as well, such as appending and replacing.
Appending is the act of adding a set of characters to the end of another set of characters (example123). Replacing is using a set of characters to replace another set of predictable characters (ex@mp1e). The meaning of a password should not be something that could be easily guessed or deduced through simple reasoning. One approach that seems to work well is to think in terms of phrases rather than simply words.
Mnemonic phrases are often incorporated, allowing the creation of passwords that cannot be easily guessed, but yet do not need to be written down to be remembered. Mnemonic phrases can be spelled phonetically, using, for example, “UraTygr!” instead of “You’re a tiger!” Alternatively, the first letters in each word of a memorable phrase can be incorporated, such as “Ihnybtf,” which is abbreviated from “I have not yet begun to fight!”
Another effective method is to choose a meaningful phrase that can be easily recalled. Then, the initials of some words in the phrase can be converted into alternative characters. For example, the number “4” could be substituted wherever the letter “f” is used.
Additional Password Security
The need for additional password security has become more recognized with the increased ease with which scam artists continue to steal them. Passwords have ultimately been gathered as easily as simply asking for them. Personnel should simply never talk about passwords with anyone, no matter how harmless or legitimate such conversations might seem.
Although standard password-protection practices may be adequate to keep some would-be intruders at bay, certain situations require a more sophisticated approach. In these cases, extra protection can be afforded through the use of encryption techniques and one-time passwords (OTP).
Password encryption is the process of taking a standard password and applying an algorithm to it in such a way as to make it meaningless to sniffers, crackers, or other eavesdroppers. Two-factor authentication, such as one-time passwords, are good only for one transaction but add another valuable layer of security.
Best password practices include the following:
- Use a consistent naming convention across the organization so that users can understand theirs and not resort to recording them so they can be found by others.
- Always supply a password to an account and make the user change it upon first login.
- Protect passwords (don’t write them down in open spaces).
- Do not use default passwords.
- Educate users to create strong passwords.
- Enforce password policies at all levels of an organization.
Account Lockout Policies
Operating systems provide password lockout policy settings that enable administrators to enact password policies that prevent attackers from repeatedly trying to access the system. This prevents the attackers from using brute force attacks to guess the account password so they can break into the system.
Brute force attacks involve the repeated use of login attempts to try to guess the password. As shown in Figure 8.9, typical lockout policy settings include:
- Account Lockout Duration – How long (in minutes) the account will be locked out before it automatically unlocks. Setting this value to 0 will prevent the account from unlocking until the administrator manually resets it.
- Account Lockout Threshold/Max Failures – How many times account access can be attempted before the account is locked out. The default value for this setting is 0, which disables the account lockout function.
- Reset Account Lockout Counter After/Lockout Duration – The amount of time that can pass before the account lockout value is returned to 0.
FIGURE 8.9 Windows Lockout Options
Computer Locking
Users should never leave their computer unattended after they have logged on. Doing so opens the door for others to access and manipulate their computer, data, and network. All users should be trained to either log off or lock their computers when they are away from them, even if only for a few minutes.
Locking the computer protects it from intruders and preserves the current system state. When the computer is unlocked, the applications and data that were active in the system are still open, making it much easier for the user to pick up where they left off.
Users should also be instructed to make sure they log off at the end of the day. This closes all applications and ensures that data files are saved.
Implementing Additional Authentication Options
Recall from Chapter 2 that authentication is defined as the process of determining that someone is who they say they are. At the local computing or control device level, authentication can be implemented in terms of physical or biometric authentication systems to replace or augment password authentication methods.
Physical Authentication Devices
There are hardware devices that can be used to make personal computer systems unusable by people other than authorized users. These devices include items such as smart cards and biometric devices similar to the ones described in the preceding chapter. However, unlike the devices designed to protect access to physical infrastructure, these devices are designed specifically to be used with personal computing systems.
The card system combines the users’ secret PINs (i.e., something the users alone know) with tokens generated by the network’s Certificate Authority authentication system to generate a unique pass code. The pass code validates the user and their access to different resources.
Biometric Scanners for Personal Computing Devices
As discussed in Chapter 2, biometric scanners are becoming significantly more sophisticated, including facial scanning devices, searchable databases, and supporting application programs.
In addition to serving as authentication devices for facility access, many biometric scanning devices have evolved for use with personal computers. However, the biometric authentication device most widely used with personal computers is the fingerprint scanner. Figure 8.10 shows different fingerprint scanner devices designed for use with PCs.

FIGURE 8.10 Fingerprint Scanners
Some fingerprint scanner manufacturers offer miniature touchpad versions that sit on the desk and connect to the system through a cable and USB connector. Other fingerprint scanners are built into key fobs that simply plug directly into the USB port. Some manufacturers even build these devices into the top of the mouse.
Some models actually store the scanned images and account access information on the device. This allows the identification file to travel with the user if they work with different computers at different locations.
After the fingerprint scanner software has been installed and configured, the password manager will prompt you to scan in your fingerprint rather than type a password on future log-in attempts.
Using Local Administrative Tools
All of the different operating systems discussed previously offer management tools to control who, when, and how the local computer is used. Collectively, these tools are referred to as administrative tools (in Microsoft Windows OS versions, the Control Panel applet where these tools are configured and launched is titled “Administrative Tools”).
These tools typically include programs designed to control the usage of the computer’s memory, administer and optimize hard-disk-drive usage, configure OS services running on the computer, control the hardware/OS handoff during startup, and troubleshoot operating system problems. However, in each case there is a subset of these management tools dedicated to security-related functions. In the following sections, we will investigate common security-related OS tools and their implementations.
Event Logging and Auditing
Auditing is a security function of the operating system that enables the user and operating system activities performed on a computer to be monitored and tracked. This information can then be used to detect intruders and other undesirable activities.
These entries provide a fundamental tool for unauthorized-intrusion-detection efforts. There are two common types of audit records to consider:
- Native audit records – Event records generated by most modern multiuser operating systems. Because these records are already being generated by the operating system, they are always available, but they may not contain the desired events or be in a readily usable form.
- Detection-specific audit records – Records generated to provide specific information about desired actions or events. These actions or events can be based on operating system activities, application events, or security events.
The auditing systems available with most operating systems consists of two major components:
- Audit policy (or audit rules), which defines the types of events that will be monitored and added to the system’s security logs
- Audit entries (or audit records), which consist of the individual entries added to the security log when an audited event occurs
In a Microsoft Windows environment, audit entries are maintained in the security log file. Figure 8.11 shows a typical security log displayed in the Windows Event Viewer utility. For auditing to be an effective security tool, the security log should be reviewed and archived regularly. FIGURE 8.11 Viewing Security Audit Logs In Windows, auditing is configured through the Local Security Policy option located under the Administrative Tools menu, as shown in Figure 8.12. FIGURE 8.12 Configuring Auditing in Windows Selecting a policy to be configured in the right pane will produce the Local Security Setting window, depicted in Figure 8.13. Place check marks beside the option or options that should be tracked and audited. You can check Success, Failure, or both. FIGURE 8.13 Establishing a Local Security Policy Setting In Windows, auditing must be configured both as a general system policy setting and on each object (file, folder, and printer) that requires auditing. With this in mind, when you are configuring an audit policy, you must consider what effect the policy will have on the system and its performance. If you were to set up auditing on every file, folder, and printer in a system, the auditing process would place so much extra work on the system that the system could literally slow to a halt. Linux systems also feature security auditing capabilities for tracking specified security events. Figure 8.14 provides a generic representation of a Linux security auditing framework. As with other auditing systems, the Linux modules map computer processes to user IDs so that administrators can trace exploits to the specific user who owns the process and is performing potentially malicious activities in the system. FIGURE 8.14 Linux Auditing At the heart of the system is the audit daemon that works with the Linux kernel’s audit module to record relevant events and write them to a log file on the disk. Audit rules are configured in a file that is executed when the system boots up. The audit controller utility employs the parameters in these rules to determine which system events are tracked and how they are written to the audit log file. When an application encounters a situation that triggers a preconfigured audit event, a message is presented to the kernel’s audit interface and passed to the audit controller. Under the direction of the audit controller, the audit daemon writes the event away to the audit event log. Linux auditing systems also include a report generation tool that the administrator can use to generate custom security reports. It may also include a search utility to provide quick/specific examination of log entries for specific events. As with Windows Group Policy configurations, you must consider the level of auditing you want the Linux audit system to perform on the computer and its operational consequences.Windows Auditing Tools


Linux Auditing

Implementing Data Encryption
The term cryptography is used to define the art of protecting communications from unintended viewers. One of the oldest methods of hiding data in plain sight is to develop a code (algorithm) for altering the message so that unauthorized people cannot read it. The process for doing this is referred to as encryption. Encrypting data involves taking the data and processing it with a key code (or encryption key) that defines how the original (plaintext) version of the data has been manipulated. This concept is illustrated in Figure 8.15.

FIGURE 8.15 Data Encryption
Anyone who is given the encryption key can use it to decode the message through a decryption process. Symmetric encryption uses the same key to encrypt and decrypt data. Asymmetric encryption, described in the following paragraph, uses two different keys to encrypt and decrypt information.
A particularly effective asymmetric key system is Public Key Encryption (PKE). This technique employs two keys to ensure the security of the encrypted data: a public key and a private key. The public key (known to everyone) is used to encrypt the data, and the private or secret key (known only to the specified recipient) is used to decrypt it. The public and private keys are related in such a way that the private key cannot be decoded simply by possessing the public key.
Data encryption in a digital device or network can occur at many levels:
- As file-system level (file and folder level) encryption
- As disk-level encryption
- As transport-level encryptions
Disk-level encryption involves using technology to encrypt the entire disk structure. This technique offers value in that it protects everything on the disk from unauthorized access including the operating system files and structure. Disk encryption in a personal computer system may be performed at the software or hardware level. At the software level, disk encryption technology is available through most major disk operating system versions as well as through third-party suppliers.
The disk encryption software runs at a level between the operating system’s device drivers and the higher-level applications. For the most part, computer programs and designated users are not aware that the encryption/decryption process is occurring. Figure 8.16, illustrates a simplified version of the encryption/decryption process.

FIGURE 8.16 The Encryption/Decryption Process
During the initial disk encryption process an encryption key is generated and stored on the system. This key is stored in an encrypted format that requires a password or passphrase to decrypt. When a user supplies the password or passphrase, the system applies the decryption key to the data, unlocking it for the computer’s applications to use. When new data is generated, it is encrypted before it is stored on the disk drive.
Hardware-Level Disk Encryption
Many computer motherboard designs include a built-in microchip called a Trusted Platform Module (TPM) that is used to store cryptographic information, such as encryption keys. Information stored on the TPM is more secure from external software attacks and physical theft.
This technology protects the operating system and user data to ensure that a computer is not tampered with, even if it is left unattended, lost, or stolen. The encryption managers in these operating systems prevent access to a hard drive by encrypting the entire drive.
If the computer motherboard is equipped with a compatible TPM chip, disk operating systems use the TPM to lock the encryption key that protects the data stored on the hard drive. The key cannot be accessed until the TPM has verified the state of the computer during startup.
During the computer startup process, the TPM compares a hash code derived from important operating system configuration values with a snapshot of the system taken earlier. If the codes match, the operating system will release the decryption key that unlocks the encrypted disk drive. In doing so, this process verifies the integrity of the operating system’s startup process, as shown in Figure 8.17. The key will not be released if the TPM detects that the operating system installation has been altered.

FIGURE 8.17 Using the TPM
The theory is that the data on a hard drive would be safe if the computer were stolen because the operating system would not allow the hard drive to be accessed. One problem associated with this method is, if the motherboard fails and is replaced, a backup copy of that startup key will be needed to access the data on the hard drive.
This drive must be present to unlock the data stored on a volume. In such cases, it is recommended that you make backups of the startup key. The most secure option is to require that a PIN or password be used any time the computer is started along with the automated TPM process.
Operating System TPM Tools
In selected Microsoft Windows operating systems, a utility called BitLocker is available to engage the motherboard’s TPM module. It works with Windows to encrypt the entire hard drive or hard drives (this includes all the volumes in the system).
There are four ways to employ the BitLocker utility:
- BitLocker works with the TPM chip to store the BitLocker encryption key. This secures the hard drive data even if the drive is removed. As noted, one problem associated with this method is, if the system board fails and is replaced, a backup copy of that BitLocker encryption key will be needed to access the data on the hard drive.
- If the computer is not equipped with a TPM chip, the startup key on a USB flash drive must be inserted in the system prior to bootup.
- Startup keys can also be used on computers that do possess TPM chips. One problem associated with this method is the tendency of users to leave the flash drive installed in the computer.
- The most secure option is to require that a PIN be used along with the automated TPM process any time the computer is started.
Linux operating systems also possess tools to engage the TPM encryption capabilities of compatible motherboards. In these systems, it is necessary to confirm that the Linux kernel involved supports the TPM version on the motherboard. The three kernel modules involved in TPM configuration are tpm_bios, tpm, and tpm_tis. The generic tpm_bios and tpm modules are loaded first and then the tpm_tis module is loaded with specific parameters.
Several Linux software tools are available to manage TPM on Linux-based machines. Trousers is an open-source daemon that controls all of the communications with the TPM through a single module. Likewise, the TrustedGrub module is capable of detecting and supporting TPM functionality in Linux systems. It is a downloadable extension of the Grub bootloader that has been modified for this purpose.
When you initialize the TPM, the module will request an owner password and a Storage Root Key (SRK) password that it can use to generate the cryptographic key. The owner password is required to perform administrative tasks on the system, while the SRK is required to load a key into the TPM. These keys must be maintained and can never be lost because continued access to the system would be nearly impossible without them.
File- and-Folder-Level Encryption
As the title implies, file-and-folder-level encryption is applied to individual files and folders. File- and-folder-level encryption tools enable users to encrypt files stored on their drives using keys that only the designated user (or an authorized recovery agent) can decode. This prevents data theft by those who do not have the password or a decoding tool. It greatly enhances the security of files on portable computers by enabling users to designate files and folders so that they can only be accessed using the proper encryption key.
This type of encryption is typically implemented as an attribute setting that can be established for specified files or folders and is linked to the authorized users in the system. These users can open these files and folders just as they would any ordinary files or folders. However, if someone gains unauthorized access to the computer, they will not be able to open the encrypted files or folders.
Microsoft File Encryption Tools
Windows provides effective local hard-drive security through its encrypting file system (EFS) feature, as shown in Figure 8.18.

FIGURE 8.18 Windows Drive Encryption Options
The EFS feature enables the user to encrypt files stored on the drive using keys that only the designated user (or an authorized recovery agent) can decode. This prevents data theft by those who do not have the password or a decoding tool.
Windows users can implement the EFS option to encrypt their files and folders on NTFS drives. To do so, they simply click the Encrypt Contents To Secure Data check box in the file or folder’s Advanced Attributes windows. Users can open these files and folders just as they would any ordinary files or folders. However, if someone gains unauthorized access to the computer, they will not be able to open the encrypted files or folders. EFS is simple to use because it is actually an attribute that can be established for files or folders.
The EFS feature further enhances the security of files on portable computers by enabling users to designate files and folders so that they can only be accessed using the proper encryption key.
Hands-On Exercises
Objectives
- Describe permissions available for NTFS.
- Set and test file and folder permissions.
- Verify permissions set up on user accounts.
- Set and test file/folder level encryption.
Resources
- PC-compatible desktop/tower computer system
- Windows 10 Professional installed
- TestUser accounts setup on your PC/workstation
- User: TestUser1 with Password: testuser1
- User: TestUser2 with Password: testuser2
- Both accounts should be set as standard users.
- AxCrypt installed (
https://www.axcrypt.net/download/)
Discussion
The New Technology File System is Microsoft’s proprietary and default file management system for its operating systems. NTFS brought with it enhanced security features including access control lists (ACLs) and the encrypting file system (EFS).
NTFS permissions can be configured as Allow or Deny options within the associated access control list. This is an example of a discretionary access control list, in which the user who is considered the owner of a file or folder chooses the permissions of said information. Figure 8.19 illustrates an ACL.

FIGURE 8.19 Access Control List
In this lab, you will manage and test permissions, and you will explore encryption at a file level with AxCrypt. Keep in mind that these procedures provide an introduction to permissions. This lab will explore permissions management on a local host computer. This lab will not feature share permissions, server permissions, inheritance, or Linux file permission management. You will manage file and folder permissions for a select set of users. Finally, you will test various permission settings to gather a better understanding of the importance and power of ACLs.
Procedures
Setting Up and Creating Files and Folders
To be able to test the NTFS permissions you will put into place, you must first become the owner of files and folders. The owner of a file has the discretion to allow or deny access to other users.
- Power on the computer, and if necessary choose Windows 10 Professional to log into.
- Select TestUser1 to log in, with a password of testuser1.
- Once logged in, right-click the Windows icon and select File Explorer.
- Along the left side of the File Explorer window, locate and click on the C: drive.
- Right-click in any white space located in the middle pane and then hover the cursor over New to expand the options. Click the Folder option. You will be prompted to name the folder. Enter Permissions Test as the name and press Enter.
- Double-click the Permissions Test folder to access its contents. Here you will create another folder, specific to you.
- Right-click the white space and select New ➣ Folder. Name this file
Perm_Test_(add your initials here). Example: John Doe would name his folderPerm_Test_JD. Figure 8.20 shows the new folder prepared in the Permissions Test folder.
FIGURE 8.20
Perm_TestFolder Created - This folder should be empty. Right-click in any white space and move the cursor to hover over New. Here you will select Text Document. Name the file
test1and press Enter. - Repeat Step 8 three times to create files
test2,test3, andtest4. - There is no information in these files, so open each
.txtdocument by double-clicking and typing This is a test. This is only a test. into each file. Save and close each text file.
Creating File Permissions
In this section, you will explore the options available to restrict certain users’ access to the files and folder you just created. You can prevent specific users or groups from executing, reading, writing, and modifying files that you have deemed important. This is accomplished through the ACL as part of each individual file.
- Verify that you are within the
Perm_Testfolder you created in the previous steps. Right-clicktest1and click Properties. This will launch thetest1Properties window, as shown in Figure 8.21.
FIGURE 8.21 File 
test1 Properties window
The Properties window may not have all of the tabs listed in the example. At this point, the only necessary tab you will be working with is the Security tab.
- Click the Security tab. Note the types of permissions available and record them in Table 8.2. This window is the file’s associated access control list.
TABLE 8.2 Permissions Available in test1 ACL
Currently, the only permissions granted or denied on this object are those associated with the group the user became a member of at its creation. To limit specific users’ access to this file, you must add them to the ACL and select the permission level you want them to have.
- Click Edit to open the
test1Permissions window. - Click Add to navigate to the Select Users Or Groups window.
- Under Enter The Object Names To Select (Example):, enter TestUser2. Click Check Names to confirm the user account. Click OK to continue.
This is the same window in which you can add groups to grant or deny access to anyone associated with a known group. Groups are better utilized within a networked environment; therefore, you will not set or test group permissions in this lab.
Notice that the user TestUser2 is now included in the ACL. Here you can fine-tune the permissions for this user on the file you created. The default permissions given are to allow Read and Read & Execute.
- Under the Deny column head, click the Write check box. Figure 8.22 shows the Permissions allocated to TestUser2.

FIGURE 8.22 Permissions for
Test1Given to TestUser2 - Click the Apply button. Read the Windows Security prompt, and then click Yes. You are directed back to the
test1Properties window. Click OK to exit this window.
In regard to permissions, there are a number of rules that apply:
- Deny permissions take precedence over allow permissions in most scenarios. When a deny permission is applied to an object, in this case a
.txtdocument, it is called an explicit deny. - Explicit permissions are those applied directly to an object, and they take precedence over permissions that have been inherited. This will be discussed in later labs.
- Permissions are cumulative among users and groups. Permissions will be combined to achieve what is called the effective permissions for that object.
- Right-click
test2and click Properties. - Click the Security tab and click Edit.
- As done previously, add TestUser2 to the ACL of
test2. - For
test2, under the Allow column heading, click the check boxes for Read and Read & Execute to remove all listed permissions. No check boxes should be marked. - Click OK twice. You should be returned to the folder with your test files.
- Access the ACL for
test3. Review the previous steps if you need help navigating to this location. - Under the Deny column heading, click the Full Control check box. Notice that all the check boxes, other than Special Permissions, were automatically marked, while under the Allow column heading, the Read and Read & Execute permissions were removed.
- Click OK and view the Windows Security prompt. Click Yes, and then click OK again. You should be returned to the folder that contains your test files.
Applying File-Level Encryption
In this procedure, you will be using freeware by the name of AxCrypt. AxCrypt is an open-source file-encryption program that can be integrated with Windows Explorer. This feature makes it easy to use and convenient. It also password-protects the encrypted files, giving another layer of security.
- Right-click on the file
test4. Locate and hover the mouse cursor over AxCrypt. There are a few options, but for now you will just click the bold Encrypt. - To encrypt the file, you must passphrase-protect it as well. Enter the passphrase marcraft and verify the passphrase by entering it again.
- Click on both check boxes to mark Remember This For Decryption and Use As Default For Encryption. The window should look the same as Figure 8.23.

FIGURE 8.23 Using AxCrypt to Encrypt the
test4File - Click OK. You will notice the icon next to
test4has changed, as well as the name and extension of the file. If you double-click it though, the file will open as normal in Notepad, with the same data inside.
Setting Folder Permissions
Folder permissions provide the same basic permission choices as file permissions. This can be deceiving, as the meaning of each Allow or Deny is slightly different. For instance, the Allow – Read option on a file permits the opening and viewing of its contents. On the other hand, the Allow – Read option on a folder will only let the specified user list the contents of the folder. The latter can be used when a user needs to be able to access a folder, but not all of the files within the folder.
- Click the Back button, or Permissions Test in the address bar, to see the folder you created named
Perm_Test_(your initials here). - Right-click the folder and click Properties.
Notice the options for permissions. They are the same as file permissions, with the inclusion of one more option: List Folder Contents.
- Click Edit.
- Click Add and add TestUser2 to the folder’s ACL. This process is the same as you performed before with individual files. Return to the “Creating File Permissions” section if you need to review how this is done.
- The default permissions for the folder are Allow – Read & Execute, List Folder Contents, and Read. Under the Deny column heading, click the Read & Execute check box. You will notice that all of the Allow permissions have been removed, and the subsequent Deny permissions replace all three.
- Click the check box to select Allow – Write.
- Click OK, acknowledge the Windows Security prompt, and click Yes. Click OK to close the Properties window.
Testing Folder Permissions
Now it is time to test all of the options you have put into place. You will need to close all open windows and log onto TestUser2. Choose to Switch User, rather than the Log Off option.
- Close all open windows and select Switch Users. (Logging off completely would serve the same function; however, it would take much longer.)
- After selecting the Switch User option, type in the username TestUser2. Enter the password testuser2.
- Navigate to the location of the folder you created at the beginning of this lab: Permissions Test. Your personal testing folder will be there.
- Double-click your folder. Were you able to access the contents?
Input your findings into Table 8.3.
TABLE 8.3 TestUser2 Access Levels
File/Folder Permissions for Testuser2 Access? Perm_Test_folder accesstest1test2test3test4 - Right-click the folder and click Properties to try to access the ACL. Click the Security tab. What are the results?
The Deny – Read & Execute, List Folder Contents, and Read permissions override any group permissions that may have previously allowed this. This is an easy way to keep certain users out of important information that they should not access.
- Leave the Permissions Test window open and switch users. You will need to access TestUser1 again.
- After entering the username and password, you should be back to the desktop. Once again, navigate to the Permissions Test folder.
- Right-click the
Perm_Test_(your initials here)folder and click Properties. In order to grant access to TestUser2, you will need to remove the Deny options. - Click the Security tab. Click TestUser2 under Group Or User Names.
When you click on the username, you will notice the check marks for permissions are black. If you click on another user or group, you will notice the check marks for permissions are gray. This means you are unable to change them. Only those check marks that are black can be modified.
In this lab, you are dealing with the DACL (Discretionary Access Control List). This means when a user creates a file, they are considered the owner and have the right to grant or deny permissions as they so choose. However, users with administrative privileges have the right to change the ownership and permissions of a file or folder.
- Click Edit. The Permissions window loads. Click TestUser2 in the top panel. Change the permissions by clicking the Allow – Read & Execute permissions. This will remove all Deny permissions previously in place and fill in the three Allow permissions as they were originally.
- Click the OK button to save the permissions.
- Close all windows and switch users. Log into TestUser2 by supplying the username and password.
- The desktop will load with the window of the Permissions Test folder still open. Attempt to read the contents by double-clicking the
Perm_Test_(your initials here)folder. Were you able to access it this time?
Testing File Permissions
- Within this folder, you should see the four text documents that you created as TestUser1. Double-click
test1to attempt opening it. Were you allowed?
If you recall from earlier, test1 was given a Deny – Write permission.
- Adjust the text in the file by deleting it all and typing This is no longer a test. Click File and then click Save. You are asked to confirm the name; click Save. You are asked to Confirm the Save As to replace the file; click Yes.
- A prompt appears. Was this the expected outcome? List your findings in Table 8.3. Click OK to accept the Access Is Denied prompt.
- Click the X in the upper-right corner of the file window to close the window. You are asked if you want to save changes, but you already know that you do not have the proper permissions to accomplish this. Click Don’t Save. You are now back to the contents of the folder.
- Double-click
test2to attempt to open it. Were you allowed? - Adjust the text in the file by deleting it all and typing This is no longer a test. Click File, and then click Save. Were you prompted for any reason? Record your results in Table 8.3.
You previously removed all permissions for TestUser2 on test2. No permissions were granted or denied; however, you are still able to read, modify, and write to this file. Why is that?
TestUser2 is also part of the group Users, which is granted Read & Execute, Read, and Write permissions by default. As mentioned earlier, permissions are cumulative, and the result is the Effective Permissions. Only in the case of a Deny, will an Allow be overridden.
- Close the
test2file by clicking the X in the upper-right corner. - Double-click
test3to attempt to open it. Were you allowed? Note the results in Table 8.3.
Deny – Full Control was issued for this particular file. Therefore, TestUser2 is not allowed to access it in any way.
Testing File Encryption
You no doubt have noticed that test4 has a green shield next to it. The filename and extension are still in their changed format. All indications are that this file is encrypted. You will now try to access the information.
- Double-click
test4to attempt to open. Were you allowed?
As a different user, you must supply a password to decrypt the file for access. Assuming the password is not known to another user, this is a good preventative measure.
- Click Cancel.
- You will now attempt to view the encrypted text. Right-click
test4. Hover the cursor over Open With. - Click Choose Default Program. The window suggests you open the file with AxCrypt; however, you are unable to access it in this way. Under Other Programs, find and select Notepad.
- Before clicking OK, look to be sure Always Use The Selected Program To Open This Kind Of File is unchecked. Now click OK.
- The test document opens. Can you read it? It should look something like Figure 8.24.

FIGURE 8.24 Encrypted Data in
.txtDocument - Adjust the text by deleting and adding random characters to it. Click File, and then click Save. Were you able to save? Record your results in Table 8.3.
- If you haven’t received an error yet, try to access
test4by double-clicking the file. An error has occurred.
Although encrypting safeguards the information from TestUser2, the permissions were unchanged. This allowed TestUser2 to open the file, change its contents, and finally save it. The result is a corrupted file, which can no longer be read. So even though encryption can hide the contents, permissions still need to be set in order to truly protect the data.
- Close all the windows and log off as user TestUser2.
- Log onto TestUser1.
- Navigate to the Permissions Test folder and access your
Perm_Test_(your initials here)folder. Attempt to open thetest4AxCrypt file. Were you able to open it?
Unfortunately, this information is lost.
- Close all the windows and shut down the computer.
Tables
| Full Control | Modify | Read & Execute |
| Read | Write | Special Permissions |
| File/Folder | Permissions for TestUser2 | Access? |
Perm_Test_
folder access |
Allow – Write Deny – Read & Execute, List Folder Contents, Read |
No access to contents of folder or the ACL |
test1 |
Allow – Read & Execute, Read Deny – Write |
Can access file but cannot change/save file |
test2 |
No explicit permissions given | Can access, change, and save file |
test3 |
Deny – Full Control | Denied any access |
test4 |
Allow – Read & Execute, Read, Write. | Can access, change, and save file |
Lab Questions
- Which permission do folders have that files do not?
Answer: Folder permissions include List folder contents. File permissions only have Read and Read & Execute.
- What are effective permissions?
Answer: Effective permissions are the cumulative permissions granted by all sources. Individual and group sources are combined to give an overall permission within an ACL.
- Does encryption alone make your data safe?
Answer: No. As shown in the lab, the information may be protected, but it is not untouchable. Without setting proper permissions, a malicious person might choose to corrupt your information. Even worse, another person might not know exactly what they are doing and accidentally affect the data in an irreversible way.
- If a User tries to access a file that has an Allow – Read & Execute permission, and a Deny – Read & Execute permission assigned to them from different sources, will they be able to access the file?
Answer: No. In most cases, a Deny permission overrides the Allow permission. The Allow permission granted is voided, and the User will not have access.
- If you remove all permissions, Allow and Deny, from a specific user will they be able to access the file or folder?
Answer: Depending on the group or groups they are associated with, yes. Users are generally added to the Users groups, and as such they are given the default Allow – Read & Execute, Read, and Write on most files.
- As a basic user, can you change the permissions on any file or object?
Answer: No. A user without administrative properties cannot change any file or folders permissions. A user is allowed to change only the permissions of files to which they are considered the owner.