
Chapter Topics
Our next goal is to go through the basic Python syntax, describe some general style guidelines, then brief you on identifiers, variables, and keywords. We will also discuss how memory space for variables is allocated and deallocated. Finally, we will be exposed to a much larger example Python program—taking the plunge, as it were. No need to worry, there are plenty of life preservers around that allow for swimming rather than the alternative.
Some rules and certain symbols are used with regard to statements in Python:
• Hash mark ( # ) indicates Python comments
• NEWLINE ( ) is the standard line separator (one statement per line)
• Backslash ( ) continues a line
• Semicolon ( ; ) joins two statements on a line
• Colon ( : ) separates a header line from its suite
• Statements (code blocks) grouped as suites
• Suites delimited via indentation
• Python files organized as modules
First things first: Although Python is one of the easiest languages to read, it does not preclude the programmer from proper and adequate usage and placement of comments in the code. Like many of its Unix scripting brethren, Python comment statements begin with the pound sign or hash symbol (#). A comment can begin anywhere on a line. All characters following the # to the end of the line are ignored by the interpreter. Use them wisely and judiciously.
Python statements are, in general, delimited by NEWLINEs, meaning one statement per line. Single statements can be broken up into multiple lines by use of the backslash. The backslash symbol ( ) can be placed before a NEWLINE to continue the current statement onto the next line.

There are two exceptions where lines can be continued without backslashes. A single statement can take up more than one line when enclosing operators are used, i.e., parentheses, square brackets, or braces, and when NEWLINEs are contained in strings enclosed in triple quotes.

Given a choice between using the backslash and grouping components you can break up with a NEWLINE, i.e., with parentheses, we recommend the latter as it is more readable.
Groups of individual statements making up a single code block are called “suites” in Python (as we introduced in Chapter 2). Compound or complex statements, such as if, while, def, and class, are those that require a header line and a suite. Header lines begin the statement (with the keyword) and terminate with a colon ( : ) and are followed by one or more lines that make up the suite. We will refer to the combination of a header line and a suite as a clause.
As we introduced in Section 2.10, Python employs indentation as a means of delimiting blocks of code. Code at inner levels are indented via spaces or tabs. Indentation requires exact indentation; in other words, all the lines of code in a suite must be indented at the exact same level (e.g., same number of spaces). Indented lines starting at different positions or column numbers are not allowed; each line would be considered part of another suite and would more than likely result in syntax errors.
Core Style: Indent with four spaces and avoid using tabs
As someone who is perhaps new to block delimitation using whitespace, a first obvious question might be: How many spaces should I use? We think that two is too short, and six to eight is too many, so we suggest four spaces for everyone. Also, because tabs vary in the number of spaces depending on your system, we recommend not using tabs if there is any hint of cross-platform development. Both of these style guidelines are also supported by Guido van Rossum, the creator of Python, and documented in the Python Style Guide. You will find the same suggestions in our style guide in Section 3.4.
A new code block is recognized when the amount of indentation has increased, and its termination is signaled by a “dedentation,” or a reduction of indentation matching a previous level’s. Code that is not indented, i.e., the highest level of code, is considered the “main” portion of the script.
The decision to create code blocks in Python using indentation was based on the belief that grouping code in this manner is more elegant and contributes to the goal of making the code easier to read. It also helps avoid “dangling-else”-type problems, including ungrouped single statement clauses (those where a C if statement does not use braces at all, but has two indented statements following). The second statement will execute regardless of the conditional, leading to more programmer confusion until the light bulb finally blinks on.
Finally, no “holy brace wars” can occur when using indentation. In C (also C++ and Java), starting braces may be placed on the same line as the header statement, or may start the very next line, or may be indented on the next line. Some like it one way, some prefer the other, etc. You get the picture.
The semicolon ( ; ) allows multiple statements on a single line given that neither statement starts a new code block. Here is a sample snip using the semicolon:
import sys; x = 'foo'; sys.stdout.write(x + ' ')
We caution the reader to be wary of chaining multiple statements on individual lines as it makes code much less readable, thus less “Pythonic.”
Each Python script is considered a module. Modules have a physical presence as disk files. When a module gets large enough or has diverse enough functionality, it may make sense to move some of the code out to another module. Code that resides in modules may belong to an application (i.e., a script that is directly executed), or may be executable code in a library-type module that may be “imported” from another module for invocation. As we mentioned in the last chapter, modules can contain blocks of code to run, class declarations, function declarations, or any combination of all of those.
This section focuses on variable assignment. We will discuss which identifiers make valid variables in Section 3.3.
The equal sign ( = ) is the main Python assignment operator. (The others are augmented assignment operator [see next section].)

Be aware now that assignment does not explicitly assign a value to a variable, although it may appear that way from your experience with other programming languages. In Python, objects are referenced, so on assignment, a reference (not a value) to an object is what is being assigned, whether the object was just created or was a pre-existing object. If this is not 100 percent clear now, do not worry about it. We will revisit this topic later on in the chapter, but just keep it in mind for now.
Also, if you are familiar with C, you know that assignments are treated as expressions. This is not the case in Python, where assignments do not have inherent values. Statements such as the following are invalid in Python:

Chaining together assignments is okay, though (more on this later):
![]()
Beginning in Python 2.0, the equal sign can be combined with an arithmetic operation and the resulting value reassigned to the existing variable. Known as augmented assignment, statements such as ...
x = x + 1
... can now be written as ...
x += 1
Augmented assignment refers to the use of operators, which imply both an arithmetic operation as well as an assignment. You will recognize the following symbols if you come from a C/C++ or Java background:
![]()
Other than the obvious syntactical change, the most significant difference is that the first object (A in our example) is examined only once. Mutable objects will be modified in place, whereas immutable objects will have the same effect as A = A + B (with a new object allocated) except that A is only evaluated once, as we have mentioned before.

Python does not support pre-/post-increment nor pre-/post-decrement operators such as x++ or --x.

In the above example, an integer object (with the value 1) is created, and x, y, and z are all assigned the same reference to that object. This is the process of assigning a single object to multiple variables. It is also possible in Python to assign multiple objects to multiple variables.
Another way of assigning multiple variables is using what we shall call the “multuple” assignment. This is not an official Python term, but we use “multuple” here because when assigning variables this way, the objects on both sides of the equal sign are tuples, a Python standard type we introduced in Section 2.8.
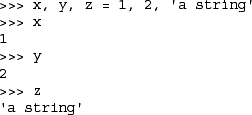
In the above example, two integer objects (with values 1 and 2) and one string object are assigned to x, y, and z respectively. Parentheses are normally used to denote tuples, and although they are optional, we recommend them anywhere they make the code easier to read:
>>> (x, y, z) = (1, 2, 'a string')
If you have ever needed to swap values in other languages like C, you will be reminded that a temporary variable, i.e., tmp, is required to hold one value while the other is being exchanged:
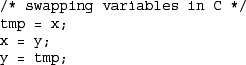
In the above C code fragment, the values of the variables x and y are being exchanged. The tmp variable is needed to hold the value of one of the variables while the other is being copied into it. After that step, the original value kept in the temporary variable can be assigned to the second variable.
One interesting side effect of Python’s “multuple” assignment is that we no longer need a temporary variable to swap the values of two variables.

Obviously, Python performs evaluation before making assignments.
Identifiers are the set of valid strings that are allowed as names in a computer language. From this all-encompassing list, we segregate out those that are keywords, names that form a construct of the language. Such identifiers are reserved words that may not be used for any other purpose, or else a syntax error (SyntaxError exception) will occur.
Python also has an additional set of identifiers known as built-ins, and although they are not reserved words, use of these special names is not recommended. (Also see Section 3.3.3.)
The rules for Python identifier strings are like most other high-level programming languages that come from the C world:
• First character must be a letter or underscore ( _ )
• Any additional characters can be alphanumeric or underscore
• Case-sensitive
No identifiers can begin with a number, and no symbols other than the underscore are ever allowed. The easiest way to deal with underscores is to consider them as alphabetic characters. Case-sensitivity means that identifier foo is different from Foo, and both of those are different from FOO.
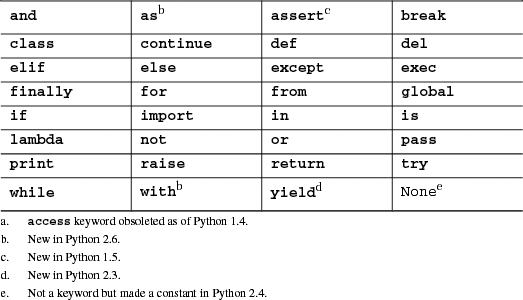
Python’s keywords are listed in Table 3.1. Generally, the keywords in any language should remain relatively stable, but should things ever change (as Python is a growing and evolving language), a list of keywords as well as an iskeyword() function are available in the keyword module.
In addition to keywords, Python has a set of “built-in” names available at any level of Python code that are either set and/or used by the interpreter. Although not keywords, built-ins should be treated as “reserved for the system” and not used for any other purpose. However, some circumstances may call for overriding (aka redefining, replacing) them. Python does not support overloading of identifiers, so only one name “binding” may exist at any given time.
We can also tell advanced readers that built-ins are members of the __builtins__ module, which is automatically imported by the interpreter before your program begins or before you are given the >>> prompt in the interactive interpreter. Treat them like global variables that are available at any level of Python code. Also see the Core Tip on p. 258 in Chapter 7.
Python designates (even more) special variables with underscores both prefixed and suffixed. We will also discover later that some are quite useful to the programmer while others are unknown or useless. Here is a summary of the special underscore usage in Python:

Core Style: Avoid using underscores to begin variable names
Because of the underscore usage for special interpreter and built-in identifiers, we recommend that the programmer avoid beginning variable names with the underscore. Generally, a variable named _xxx is considered “private” and should not be used outside that module or class. It is good practice to use _xxx to denote when a variable is private. Since variables named __xxx__ often mean special things to Python, you should avoid naming normal variables this way.
Comments
You do not need to be reminded that comments are useful both to you and those who come after you. This is especially true for code that has been untouched by man (or woman) for a time (that means several months in software development time). Comments should not be absent, nor should there be novellas. Keep the comments explanatory, clear, short, and concise, but get them in there. In the end, it saves time and energy for everyone. Above all, make sure they stay accurate!
Documentation
Python also provides a mechanism whereby documentation strings can be retrieved dynamically through the __doc__ special variable. The first unassigned string in a module, class declaration, or function declaration can be accessed using the attribute obj.__doc__ where obj is the module, class, or function name. This works during runtime too!
Indentation
Since indentation plays a major role, you will have to decide on a spacing style that is easy to read as well as the least confusing. Common sense also plays a role in choosing how many spaces or columns to indent.

Four spaces is very popular, not to mention being the preferred choice of Python’s creator. Five and six are not bad, but text editors usually do not use these settings, so they are not as commonly used. Three and seven are borderline cases.
As far as tabs go, bear in mind that different text editors have different concepts of what tabs are. It is advised not to use tabs if your code will live and run on different systems or be accessed with different text editors.
Choosing Identifier Names
The concept of good judgment also applies in choosing logical identifier names. Decide on short yet meaningful identifiers for variables. Although variable length is no longer an issue with programming languages of today, it is still a good idea to keep name sizes reasonable length. The same applies for naming your modules (Python files).
Guido van Rossum wrote up a Python Style Guide ages ago. It has since been replaced by no fewer than three PEPs: 7 (Style Guide for C Code), 8 (Style Guide for Python Code), and 257 (DocString Conventions). These PEPs are archived, maintained, and updated regularly.
Over time, you will hear the term “Pythonic,” which describes the Python way of writing code, organizing logic, and object behavior. Over more time, you will come to understand what that means. There is also another PEP, PEP 20, which lists the Zen of Python, starting you on your journey to discover what Pythonic really means. If you are not online and need to see this list, then use import this from your interpreter. Here are some links:
www.python.org/doc/essays/styleguide.html
www.python.org/dev/peps/pep-0007/
www.python.org/dev/peps/pep-0008/
Modules are simply physical ways of logically organizing all your Python code. Within each file, you should set up a consistent and easy-to-read structure. One such layout is the following:

Figure 3-1 illustrates the internal structure of a typical module.

(1) Startup line
Generally used only in Unix environments, the startup line allows for script execution by name only (invoking the interpreter is not required).
(2) Module documentation
Summary of a module’s functionality and significant global variables; accessible externally as
module.__doc__.
Import all the modules necessary for all the code in current module; modules are imported once (when this module is loaded); imports within functions are not invoked until those functions are called.
(4) Variable declarations
Declare here (global) variables that are used by multiple functions in this module. We favor the use of local variables over globals, for good programming style mostly, and to a lesser extent, for improved performance and less memory usage.
(5) Class declarations
Any classes should be declared here. A class is defined when this module is imported and the
classstatement executed. Documentation variable isclass.__doc__.
Functions that are declared here are accessible externally as
module.function(); function is defined when this module is imported and thedefstatement executed. Documentation variable isfunction.__doc__.
(7) “main” body
All code at this level is executed, whether this module is imported or started as a script; generally does not include much functional code, but rather gives direction depending on mode of execution.
Core Style: “main” calls main( )
The main body of code tends to contain lines such as the ones you see above, which check the __name__ variable and take appropriate action (see Core Note on the following page). Code in the main body typically executes the class, function, and variable declarations, then checks __name__ to see whether it should invoke another function (often called main()), which performs the primary duties of this module. The main body usually does no more than that. (Our example above uses test() rather than main() to avoid confusion until you read this Core Style sidebar.)
Regardless of the name, we want to emphasize that this is a great place to put a test suite in your code. As we explain in Section 3.4.2, most Python modules are created for import use only, and calling such a module directly should invoke a regression test of the code in such a module.
Most projects tend to consist of a single application and import any required modules. Thus it is important to bear in mind that most modules are created solely to be imported rather than to execute as scripts. We are more likely to create a Python library-style module whose sole purpose is to be imported by another module. After all, only one of the modules—the one that houses the main application—will be executed, either by a user from the command line, by a batch or timed mechanism such as a Unix cron job, via a Web server call, or through a GUI callback.
With that fact in hand, we should also remember that all modules have the ability to execute code. All Python statements in the highest level of code—that is, the lines that are not indented—will be executed on import, whether desired or not. Because of this “feature,” safer code is written such that everything is in a function except for the code that should be executed on an import of a module. Again, usually only the main application module has the bulk of the executable code at its highest level. All other imported modules will have very little on the outside, and everything in functions or classes. (See Core Note that follows for more information.)
Core Note: __name__ indicates how module was loaded

Because the “main” code is executed whether a module is imported or executed directly, we often need to know how this module was loaded to guide the execution path. An application may wish to import the module of another application, perhaps to access useful code which will otherwise have to be duplicated (not the OO thing to do). However, in this case, you only want access to this other application’s code, not necessarily to run it. So the big question is, “Is there a way for Python to detect at runtime whether this module was imported or executed directly?” The answer is ... (drum roll ... ) yes! The __name__ system variable is the ticket.
![]()
For good programmers and engineers, providing a test suite or harness for our entire application is the goal. Python simplifies this task particularly well for modules created solely for import. For these modules, you know that they would never be executed directly. Wouldn’t it be nice if they were invoked to run code that puts that module through the test grinder? Would this be difficult to set up? Not really.
The test software should run only when this file is executed directly, i.e., not when it is imported from another module, which is the usual case. Above and in the Core Note, we described how we can determine whether a module was imported or executed directly. We can take advantage of this mechanism by using the __name__ variable. If this module was called as a script, plug the test code right in there, perhaps as part of main() or test() (or whatever you decide to call your “second-level” piece of code) function, which is called only if this module is executed directly.
The “tester” application for our code should be kept current along with any new test criteria and results, and it should run as often as the code is updated. These steps will help improve the robustness of our code, not to mention validating and verifying any new features or updates.
Tests in the main body are an easy way to provide quick coverage of your code. The Python standard library also provides the unittest module, sometimes referred to as PyUnit, as a testing framework. Use of unittest is beyond the scope of this book, but it is something to consider when you need serious regression testing of a large system of components.
So far you have seen a large number of Python code samples. We are going to cover a few more details about variables and memory management in this section, including:
• Variables not declared ahead of time
• Variable types not declared
• No memory management on programmers’ part
• Variable names can be “recycled”
• del statement allows for explicit “deallocation”
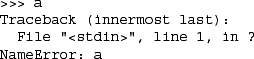
In most compiled languages, variables must be declared before they are used. In fact, C is even more restrictive: variables have to be declared at the beginning of a code block and before any statements are given. Other languages, like C++ and Java, allow “on-the-fly” declarations, i.e., those which occur in the middle of a body of code—but these name and type declarations are still required before the variables can be used. In Python, there are no explicit variable declarations. Variables are “declared” on first assignment. Like most languages, however, variables cannot be accessed until they are (created and) assigned:
Once a variable has been assigned, you can access it by using its name:

Another observation, in addition to lack of variable declaration, is the lack of type specification. In Python, the type and memory space for an object are determined and allocated at runtime. Although code is byte-compiled, Python is still an interpreted language. On creation—that is, on assignment—the interpreter creates an object whose type is dictated by the syntax that is used for the operand on the right-hand side of an assignment. After the object is created, a reference to that object is assigned to the variable on the left-hand side of the assignment.
As responsible programmers, we are aware that when allocating memory space for variables, we are borrowing system resources, and eventually, we will have to return that which we borrowed back to the system. Python simplifies application writing because the complexities of memory management have been pushed down to the interpreter. The belief is that you should be using Python to solve problems with and not have to worry about lower-level issues that are not directly related to your solution.
To keep track of objects in memory, Python uses the simple technique of reference counting. This means that internally, Python keeps track of all objects in use and how many interested parties there are for any particular object. You can think of it as simple as card-counting while playing the card game blackjack or 21. An internal tracking variable, called a reference counter, keeps track of how many references are being made to each object, called a refcount for short.
When an object is created, a reference is made to that object, and when it is no longer needed, i.e., when an object’s refcount goes down to zero, it is garbage-collected. (This is not 100 percent true, but pretend it is for now.)
The refcount for an object is initially set to 1 when an object is created and (its reference) assigned.
New references to objects, also called aliases, occur when additional variables are assigned to the same object, passed as arguments to invoke other bodies of code such as functions, methods, or class instantiation, or assigned as members of a sequence or mapping.
Let us say we make the following declarations:
x = 3.14
y = x
The statement x = 3.14 allocates a floating point number (float) object and assigns a reference x to it. x is the first reference, hence setting that object’s refcount to one. The statement y = x creates an alias y, which “points to” the same integer object as x (see Figure 3-2). A new object is not created for y.

Instead, the only thing that happens is that the reference count for this object is incremented by one (to 2). This is one way in which an object’s refcount goes up. Other ways it can increment include the object being passed into a function call, and when the object is added to a container object such as a list.
In summary, an object’s refcount is increased when
• It (the object) is created
x = 3.14
• Additional aliases for it are created
y = x
• It is passed to a function (new local reference)
foobar(x)
• It becomes part of a container object
myList = [123, x, 'xyz']
Now let us look at how reference counts go down.
When references to an object “go away,” the refcount is decreased. The most obvious case is when a reference goes out of scope. This occurs most often when the function in which a reference is made completes. The local (automatic) variable is gone, and an object’s reference counter is decremented.
A reference also goes away when a variable is reassigned to another object. For example:

The reference count for string object “xyz” is one when it is created and assigned to foo. It is then incremented when bar is added as an alias. However, when foo is reassigned to the integer 123, the reference count to “xyz” is decremented by one.
Other ways in which an object’s reference count goes down include explicit removal of a reference using the del statement (see next section), when an object is removed from a container (or if the reference count to that container itself goes to zero).
In summary, an object’s refcount is decreased when:
• A local reference goes out of scope, i.e., when foobar() (see previous example) terminates
• Aliases for that object are explicitly destroyed
![]()
• An alias is reassigned to another object (taking on a new reference)
x = 123
• It is explicitly removed from a container object
myList.remove(x)
• The container itself is deallocated
![]()
See Section 11.8 for more information on variable scope.
The del statement removes a single reference to an object. Its syntax is:
del obj1[, obj2[,... objN]]
For example, executing del y in the example above has two results:
• Removes name y from current namespace
• Lowers reference count to object x (by one)
Further still, executing del x will remove the final reference to the object, decrementing the reference counter to zero and causing the object to become “inaccessible” or “unreachable.” It is at this point that the object becomes a candidate for garbage collection. Note that any tracing or debugging facility may keep additional references to an object, delaying or postponing that object from being garbage-collected.
Memory that is no longer being used is reclaimed by the system using a mechanism known as garbage collection. The interpreter keeps track of reference counts as above, but it is up to the garbage collector to deallocate the memory. The garbage collector is a separate piece of code that looks for objects with reference counts of zero. It is also responsible to check for objects with a reference count greater than zero that need to be deallocated. Certain situations lead to cycles.
A cyclic reference is where you have (at least two) objects that refer to each other, and even if all other references fall by the wayside, these references still exist, meaning that reference counting alone is not good enough.
Python’s garbage collector is actually a combination of reference counting and the periodic invocation of a cyclic garbage collector. When an object’s refcount reaches zero, the interpreter pauses to deallocate it and all objects that were reachable only from that object. In addition to this reference counting, the garbage collector also notices if a large number of objects have been allocated (and not deallocated though reference counting). In such cases, the interpreter will pause to try to clear out any unreferenced cycles.
Now that we are familiar with the syntax, style, variable assignment, and memory allocation, it is time to look at slightly more complex code. You may or may not be familiar with all of the constructs of Python that we’re going to show, but we believe that Python is so simple and elegant that you should be able to figure out what each piece of code does.
We are going to introduce two related scripts that manipulate text files. The first, makeTextFile.py, creates text files. It prompts the user for each line of text and writes the results to a file. The other, readTextFile.py, reads and displays the contents of a text file to the screen.
Take a look at both now, and see if you can figure out how each works.
Example 3.1. File Create (makeTextFile.py)
This application prompts the user for a (nonexistent) filename, then has the user enter each line of that file (one at a time). Finally, it writes the entire text file to disk.
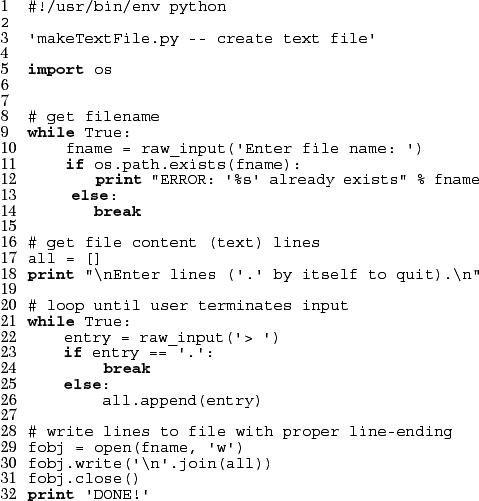
The Unix startup line is followed by the module documentation string. Keep your documentation string simple yet descriptive enough to be useful. Ours is a bit short, but so is this script. (We invite the reader to take a look at the documentation string at the commencement of the cgi module in the standard library for a seriously lengthy example of module documentation.)
We import the operating system (os) module next, and in line 6, we create a new local alias for the linesep attribute of that module. By doing this, we can shorten the name of the variable and also speed up access to it.
Core Tip: Use local variables to substitute for module attributes
Names like os.linesep require the interpreter to do two lookups: (1) lookup os to find that it is a module, and (2) look up the linesep attribute of that module. Because modules are also global variables, we pay another penalty. If you use an attribute like this often in a function, we recommend you alias it to a single local variable. Lookups are much faster—local variables are always searched first before globals, and we don’t have attribute lookups either. This is one of the tricks in making your programs faster: replace often-used (and name-lengthy) module attributes with local references. Your code runs faster and has less clutter with a shorter name.
In our code snippet, we do not have a function to show you an example of using a local alias. Instead, we have a global alias, which is halfway there. At least we do not have to perform two lookups to get to the object.
If it is not apparent already, this is an “infinite loop,” meaning we are presented with a body of code that will repeat and run forever unless we exit the loop—look for a break statement somewhere! The while True conditional causes this to happen because while statements execute whenever its conditional expression evaluates to Boolean true, and True is Boolean true.
Lines 10–14 prompt the user for an unused filename, meaning that the filename entered should not be the name of an already existing file. The raw_input() built-in function takes an argument to use as the prompt to the user. The resulting string entered by the user is the return value of raw_input(), which in this case gets assigned to fname.
If the user is unlucky enough to pick a name already in use, we notify the user and return the user to the prompt to enter another (file)name. Note that os.path.exists() is a helper function in the os.path (sub)module, which helps us make this determination. Only when a file with such a name does not exist, meaning that os.path.exists() returns False, do we break out of this loop and continue.
This is the part of our application that gives the user some instruction and prompts them for the contents of our text file, one line at a time. The all list will hold each line—we initialize it on line 17. Line 21 begins another infinite loop, which prompts the user for each line of the text file and only terminates when they enter a period ‘.’ on a line by itself. The if-else statement on lines 23–26 look for that sentinel and break out of the loop if it is seen (line 24); otherwise it adds another line to our total (line 26).
Now that we have the entire contents in memory, we need to dump it to the text file. Line 29 opens the file for write, and line 30 writes each line to the file. Every file requires a line terminator (or termination character[s]). Every file requires a line terminator (or termination character[s]). The '
'.join(all) takes each line of all (list of input strings), and join()s them together into one large string delimited by the NEWLINE character. That single string is then written out to disk with the file object’s write() method.
Not too bad, right? Now let us look at how to view the file we just created! For this, we have your second Python program, readTextFile.py. As you will see, it is much shorter than makeTextfile.py. The complexity of file creation is almost always greater than the reading of it. The only new and interesting part for you is the appearance of an exception handler.
Unlike makeTextFile.py where we kept pegging the user for names until they he or she chooses an unused filename, we don’t care in this example. In other words, we are performing the validation elsewhere (if at all). Line 7 just displays a new line to separate the prompting of the filename and the contents of the file.
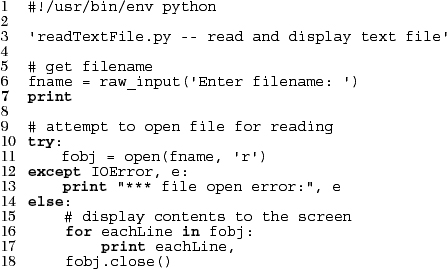
This next Python construct (other than the comment) represents the rest of the script. This is a try-except-else statement. The try clause is a block of code that we want to monitor for errors. In our code (lines 10–11), we are attempting to open the file with the name the user entered.
The except clause is where we decide what type of errors we’re looking out for and what to do if such errors occur. In this case (lines 12–13), we are checking to see if the file open() failed—this is usually an IOError type of error.
Finally, lines 14–18 represent the else clause of a try-except—the code that is executed if no errors occurred in the try block. In our case, we display each line of the file to the screen. Note that because we are not removing the trailing whitespace (line termination) characters from each line, we have to suppress the NEWLINE that the print statement automatically generates—this is done by adding a trailing comma to the end of the print statement. We then close the file (line 18), which ends the program.
One final note regarding the use of os.path.exists() and an exception handler: The author is generally in favor of the former, when there is an existing function that can be used to detect error conditions—and even more simply, where the function is Boolean and gives you a “yes” or “no” answer. (Note that there is probably already an exception handler in such a function.) Why do you have to reinvent the wheel when there’s already code just for that purpose?
An exception handler is best applied when there isn’t such a convenient function, where you the programmer must recognize an “out of the ordinary” error condition and respond appropriately. In our case, we were able to dodge an exception because we check to see if a file exists, but there are many other situations that may cause a file open to fail, such as improper permissions, the connection to a network drive is out, etc. For safety’s sake, you may end up with “checker” functions like os.path.exists() in addition to an exception handler, which may be able to take care of a situation where no such function is available.
You will find more examples of file system functions in Chapter 9 and more about exception handling in Chapter 10.
The Python Style Guide (PEP 8), Python Quick Reference Guide, and the Python FAQ make for great reading as developer “tools.” In addition, there are some modules that may help you become a more proficient Python programmer:
• Debugger: pdb
• Logger: logging
• Profilers: profile, hotshot, cProfile
The debugging module pdb allows you to set (conditional) breakpoints, single-step through lines of code, and check out stack frames. It also lets you perform post-mortem debugging.
The logging module, which was added in Python 2.3, defines functions and classes that help you implement a flexible logging system for your application. There are five levels of logging you can use: critical, error, warning, info, and debug.
Python has had a history of profilers, mostly because they were implemented at different times by different people with different needs. The original Python profile module was written in pure Python and measured the time spent in functions, the total time as well as the time spent per call, either only the time spent in particular functions or including subsequent (sub)functions calls from there. It is the oldest and the slowest of the three profilers but still gives useful profiling information.
The hotshot module was added in Python 2.2 and was intended to replace profile because it fixes various errors that profile was prone to and has improved performance due to being implemented in C. Note that hotshot focuses on reducing profiling overhead during execution but could take longer to deliver results. A critical bug in the timing code was fixed in Python 2.5.
The cProfile module, which was added in Python 2.5, was meant to replace the hotshot and profile modules. The one significant flaw identified by the authors of cProfile is that it takes a long time to load results from the log file, does not support detailed child function statistics, and some results appear inaccurate. It is also implemented in C.
3-1. Identifiers. Why are variable name and type declarations not used in Python?
3-2. Identifiers. Why are function type declarations not used in Python?
3-3. Identifiers. Why should we avoid beginning and ending variable names with double underscores?
3-4. Statements. Can multiple Python statements be written on a single line?
3-5. Statements. Can a single Python statement be written over multiple lines?
3-6. Variable Assignment.
(a) Given the assignment x, y, z = 1, 2, 3, what do x, y, and z contain?
(b) What do each contain after executing: z, x, y = y, z, x?
3-7. Identifiers. Which of the following are valid Python identifiers? If not, why not? Of the invalid ones, which are keywords?

The remaining problems deal with the makeTextFile.py and readTextFile.py programs.
3-8. Python Code. Copy the scripts to your file system and customize (tweak, improve) them. Modifications can include adding your own comments, changing the prompts (‘>’ is pretty boring), etc. Get comfortable looking at and editing Python code.
3-9. Porting. If you have Python installed on different types of computers, check to see if there are any differences in the os.linesep characters. Write down the type/OS and what linesep is.
3-10. Exceptions. Replace the call to os.path.exists() in makeTextFile.py with an exception handler as seen in readTextFile.py. On the flip side, replace the exception handler in readTextFile.py with a call to os.path.exists().
3-11. String Formatting. Rather than suppressing the NEWLINE character generated by the print statement in readTextFile.py, change your code so that you strip each line of its whitespace before displaying it. In this case, you can remove the trailing comma from the print statement. Hint: Use the string strip() method.
3-12. Merging Source Files. Combine both programs into one—call it anything you like, perhaps readNwriteTextFiles.py. Let the user choose whether to create or display a text file.
3-13. *Adding Features. Take your readNwriteTextFiles.py solution from the previous problem and add a major feature to it: Allow the user to edit an existing text file. You can do this any way you wish, whether you let the user edit line by line or the entire document at once. Note that the latter is much more difficult as you may need help from a GUI toolkit or a screen-based text editing module such as curses. Give users the option to apply the changes (saving the file) or discard them (leaving the original file intact), and also ensure the original file is preserved in case the program exits abnormally during operation.