
Chapter Topics
This “quick start” section is intended to “flash” Python to you so that any constructs recognized from previous programming experience can be used for your immediate needs. The details will be spelled out in succeeding chapters, but a high-level tour is one fast and easy way to get you into Python and show you what it has to offer. The best way to follow along is to bring up the Python interpreter in front of you and try some of these examples, and at the same time you can experiment on your own.
We introduced how to start up the Python interpreter in Chapter 1 as well as in the exercises (Problems 1-4). In all interactive examples, you will see the Python primary ( >>> ) and secondary ( ... ) prompts. The primary prompt is a way for the interpreter to let you know that it is expecting the next Python statement, while the secondary prompt indicates that the interpreter is waiting for additional input to complete the current statement.
You will notice two primary ways that Python “does things” for you: statements and expressions (functions, equations, etc.). Most of you already know the difference between the two, but in case you need to review, a statement is a body of control which involves using keywords. It is similar to issuing a command to the interpreter. You ask Python to do something for you, and it will do it. Statements may or may not lead to a result or output. Let us use the print statement for the programmer’s perennial first example, Hello World:
![]()
Expressions, on the other hand, do not use keywords. They can be simple equations that you use with mathematical operators, or can be functions which are called with parentheses. They may or may not take input, and they may or may not return a (meaningful) value. (Functions that do not explicitly return a value by the programmer automatically return None, Python’s equivalent to NULL.) An example of a function that takes input and has a return value is the abs() function, which takes a number and returns its absolute value is:

We will introduce both statements and expressions in this chapter. Let us continue with more about the print statement.
Python’s print statement (2.x) or function (3.x) is the tool for displaying program output to your users, similar to C’s printf() and echo for shell scripts. In fact, it even supports printf()-style string substitution (using the % string format operator):
![]()
Core Note: Dumping variable contents in interactive interpreter

Usually when you want to see the contents of a variable, you use the print statement in your code. However, from within the interactive interpreter, you can use the print statement to give you the string representation of a variable, or just dump the variable raw—this is accomplished by simply giving the name of the variable.
In the following example, we assign a string variable, then use print to display its contents. Following that, we issue just the variable name.

Notice how just giving only the name reveals quotation marks around the string. The reason for this is to allow objects other than strings to be displayed in the same manner as this string—being able to display a printable string representation of any object, not just strings. The quotes are there to indicate that the object whose value you just dumped to the display is a string. Once you become more familiar with Python, you will recognize that str() is used for print statements, while repr() is what the interactive interpreter calls to display your objects.
The underscore (_) also has special meaning in the interactive interpreter: the last evaluated expression. So after the code above has executed, _ will contain the string:
>>>_
'Hello World!'
%s means to substitute a string while %d indicates an integer should be substituted. See Section 6.4.1 for more information on the string format operator. Also see the str.format() method added in 2.6.
The print statement can also redirect output to a file. Debugging in 2.0, the >> symbols precede a valid file, such as these 2 examples, one to standard error and the other to a log file:

print is changing to a function [print()] in Python 3.0—also see Python Enhancement Proposal (PEP) 3105 (more in PEPs coming up in the Core Note on p. 54). This is a significant change, so starting in Python 2.6, you can start coding against the new function by adding this special import statement:
from __future__ import print_function
The syntax of the new function is:
print(*args, sep=' ', end=' ', file=None)
For example:
print('Fatal error: invalid input!', file=sys.stderr)
The easiest way to obtain user input from the command line is with the raw_input() built-in function. It reads from standard input and assigns the string value to the variable you designate. You can use the int() built-in function to convert any numeric input string to an integer representation.

The earlier example was strictly for text input. A numeric string input (with conversion to a real integer) example follows below:

The int() function converts the string num to an integer so that the mathematical operation can be performed. See Section 6.5.3 for more information in the raw_input() built-in function.
Core Note: Ask for help in the interactive interpreter
If you are learning Python and need help on a new function you are not familiar with, it is easy to get that help just by calling the help() built-in function and passing in the name of the function you want help with:

Read a string from standard input. The trailing newline is stripped. If the user hits EOF (Unix: Ctl-D, Windows: Ctl-Z+Return), raise EOFError. On Unix, GNU readline is used if enabled. The prompt string, if given, is printed without a trailing newline before reading.’
Core Style: Keep user interaction outside of functions
It’s very tempting for beginners to put print statements and raw_input() functions wherever they need to display information to or get information from a user. However, we would like to suggest that functions should be kept “clean,” meaning they should silently be used purely to take parameters and provide return values. Get all the values needed from the user, send them all to the function, retrieve the return value, and then display the results to the user. This will enable you to use the same function elsewhere without having to worry about customized output. The exception to this rule is if you create functions specifically to obtain input from the user or display output. More importantly, it is good practice to separate functions into two categories: those that do things (i.e., interact with the user or set variables) and those that calculate things (usually returning results). It is surely not bad practice to put a print statement in a function if that was its purpose.
As with most scripting and Unix-shell languages, the hash or pound ( # ) sign signals that a comment begins from the # and continues until the end of the line.
![]()
There are special comments called documentation strings, or “doc strings” for short. You can add a “comment” at the beginning of a module, class, or function string that serves as a doc string, a feature familiar to Java programmers:
![]()
Unlike regular comments, however, doc strings can be accessed at runtime and be used to automatically generate documentation.
The standard mathematical operators that you are familiar with work the same way in Python as in most other languages.
![]()
Addition, subtraction, multiplication, division, and modulus (remainder) are all part of the standard set of operators. Python has two division operators, a single slash character for classic division and a double-slash for “floor” division (rounds down to nearest whole number). Classic division means that if the operands are both integers, it will perform floor division, while for floating point numbers, it represents true division. If true division is enabled, then the division operator will always perform that operation, regardless of operand types. You can read more about classic, true, and floor division in Chapter 5, “Numbers.”
There is also an exponentiation operator, the double star/asterisk ( ** ). Although we are emphasizing the mathematical nature of these operators, please note that some of these operators are overloaded for use with other data types as well, for example, strings and lists. Let us look at an example:
>>> print -2 * 4 + 3 ** 2
1
As you can see, the operator precedence is what you expect: + and - are at the bottom, followed by *, /, //, and %; then comes the unary + and -, and finally, we have ** at the top. ((3 ** 2) is calculated first, followed by (-2 * 4), then both results are summed together.)
Python also provides the standard comparison operators, which return a Boolean value indicating the truthfulness of the expression:
![]()
Trying out some of the comparison operators we get:

Python currently supports two “not equal” comparison operators, != and <>. These are the C-style and ABC/Pascal-style notations. The latter is slowly being phased out, so we recommend against its use.
Python also provides the expression conjunction operators:
and or not
We can use these operations to chain together arbitrary expressions and logically combine the Boolean results:

The last example is an expression that may be invalid in other languages, but in Python it is really a short way of saying:
>>> 3 < 4 and 4 < 5
You can find out more about Python operators in Section 4.5 of the text.
Core Style: Use parentheses for clarification
Parentheses are a good idea in many cases, such as when the outcome is altered if they are not there, if the code is difficult to read without them, or in situations that might be confusing without them. They are typically not required in Python, but remember that readability counts. Anyone maintaining your code will thank you, and you will thank you later.
Rules for variables in Python are the same as they are in most other high-level languages inspired by (or more likely, written in) C. They are simply identifier names with an alphabetic first character— “alphabetic” meaning upper- or lowercase letters, including the underscore ( _ ). Any additional characters may be alphanumeric or underscore. Python is case-sensitive, meaning that the identifier “cAsE” is different from “CaSe.”
Python is dynamically typed, meaning that no pre-declaration of a variable or its type is necessary. The type (and value) are initialized on assignment. Assignments are performed using the equal sign.

We have presented five examples of variable assignment. The first is an integer assignment followed by one each for floating point numbers, one for strings, an increment statement for integers, and finally, a floating point operation and assignment.
Python also supports augmented assignment, statements that both refer to and assign values to variables. You can take the following expression ...
n = n * 10
...and use this shortcut instead:
n *= 10
Python does not support increment and decrement operators like the ones in C: n++ or --n. Because + and - are also unary operators, Python will interpret --n as -(-n) == n, and the same is true for ++n.
Python supports five basic numerical types, three of which are integer types.
• int (signed integers)
• long (long integers)
• bool (Boolean values)
• float (floating point real numbers)
• complex (complex numbers)
Here are some examples:

Numeric types of interest are the Python long and complex types. Python long integers should not be confused with C longs. Python longs have a capacity that surpasses any C long. You are limited only by the amount of (virtual) memory in your system as far as range is concerned. If you are familiar with Java, a Python long is similar to numbers of the BigInteger class type.
Moving forward, ints and longs are in the process of becoming unified into a single integer type. Beginning in version 2.3, overflow errors are no longer reported—the result is automagically converted to a long. In Python 3, there is no distinction as both int and long have been unified into a single integer type, and the “L” will no longer be valid Python syntax.
Boolean values are a special case of integer. Although represented by the constants True and False, if put in a numeric context such as addition with other numbers, True is treated as the integer with value 1, and False has a value of 0.
Complex numbers (numbers that involve the square root of -1, so-called “imaginary” numbers) are not supported in many languages and perhaps are implemented only as classes in others.
There is also a sixth numeric type, decimal, for decimal floating numbers, but it is not a built-in type. You must import the decimal module to use these types of numbers. They were added to Python (version 2.4) because of a need for more accuracy. For example, the number 1.1 cannot be accurately representing with binary floating point numbers (floats) because it has a repeating fraction in binary. Because of this, numbers like 1.1 look like this as a float:

All numeric types are covered in Chapter 5.
Strings in Python are identified as a contiguous set of characters in between quotation marks. Python allows for either pairs of single or double quotes. Triple quotes (three consecutive single or double quotes) can be used to escape special characters. Subsets of strings can be taken using the index ( [ ] ) and slice ( [ : ] ) operators, which work with indexes starting at 0 in the beginning of the string and working their way from -1 at the end. The plus ( + ) sign is the string concatenation operator, and the asterisk ( * ) is the repetition operator. Here are some examples of strings and string usage:
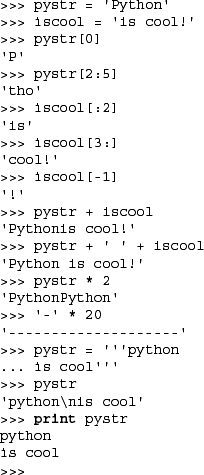
You can learn more about strings in Chapter 6.
Lists and tuples can be thought of as generic “arrays” with which to hold an arbitrary number of arbitrary Python objects. The items are ordered and accessed via index offsets, similar to arrays, except that lists and tuples can store different types of objects.
There are a few main differences between lists and tuples. Lists are enclosed in brackets ( [ ] ) and their elements and size can be changed. Tuples are enclosed in parentheses ( ( ) ) and cannot be updated (although their contents may be). Tuples can be thought of for now as “read-only” lists. Subsets can be taken with the slice operator ( [] and [ : ] ) in the same manner as strings.

Slice access to a tuple is similar, except it cannot be modified:

You can find out a lot more about lists and tuples along with strings in Chapter 6.
Dictionaries (or “dicts” for short) are Python’s mapping type and work like associative arrays or hashes found in Perl; they are made up of key-value pairs. Keys can be almost any Python type, but are usually numbers or strings. Values, on the other hand, can be any arbitrary Python object. Dicts are enclosed by curly braces ( { } ).

Dictionaries are covered in Chapter 7.
Code blocks are identified by indentation rather than using symbols like curly braces. Without extra symbols, programs are easier to read. Also, indentation clearly identifies which block of code a statement belongs to. Of course, code blocks can consist of single statements, too.
When one is new to Python, indentation may comes as a surprise. Humans generally prefer to avoid change, so perhaps after many years of coding with brace delimitation, the first impression of using pure indentation may not be completely positive. However, recall that two of Python’s features are that it is simplistic in nature and easy to read. If you have a strong dislike of indentation as a delimitation device, we invite you to revisit this notion half a year from now. More than likely, you will have discovered that life without braces is not as bad as you had originally thought.
The standard if conditional statement follows this syntax:
![]()
If the expression is non-zero or True, the if_suite is executed; then execution continues on the first statement after. Suite is the term used in Python to refer to a sub-block of code and can consist of single or multiple statements. You will notice that parentheses are not required in if statements as they are in other languages.
![]()
Python supports an else statement that is used with if in the following manner:

Python has an “else-if” spelled as elif with the following syntax:

At the time of this writing, there has been some discussion pertaining to a switch or case statement, but nothing concrete. It is possible that we will see such an animal in a future version of the language. This may also seem strange and/or distracting at first, but a set of if-elif-else statements are not as “ugly” because of Python’s clean syntax. If you really want to circumvent a set of chained if-elif-else statements, another elegant workaround is using a for loop (see Section 2.13) to iterate through your list of possible “cases.”
You can learn more about if, elif, and else statements in the conditional section of Chapter 8.
The standard while conditional loop statement is similar to the if. Again, as with every code sub-block, indentation (and dedentation) are used to delimit blocks of code as well as to indicate which block of code statements belong to:
![]()
The statement while_suite is executed continuously in a loop until the expression becomes zero or false; execution then continues on the first succeeding statement. Like if statements, parentheses are not required with Python while statements.

Loops such as while and for (see below) are covered in the loops section of Chapter 8.
The for loop in Python is more like a foreach iterative-type loop in a shell scripting language than a traditional for conditional loop that works like a counter. Python’s for takes an iterable (such as a sequence or iterator) and traverses each element once.

Our output in the previous example may look more presentable if we display the items on the same line rather than on separate lines. print statements by default automatically add a NEWLINE character at the end of every line. This can be suppressed by terminating the print statement with a comma ( , ).

The code required further modification to include an additional print statement with no arguments to flush our line of output with a terminating NEWLINE; otherwise, the prompt will show up on the same line immediately after the last piece of data output. Here is the output with the modified code:
I like to use the Internet for:
e-mail net-surfing homework chat
Elements in print statements separated by commas will automatically include a delimiting space between them as they are displayed.
Providing a string format gives the programmer the most control because it dictates the exact output layout, without having to worry about the spaces generated by commas. It also allows all the data to be grouped together in one place—the tuple or dictionary on the right-hand side of the format operator.

Using the string format operator also allows us to do some quick string manipulation before the output, as you can see in the previous example.
We conclude our introduction to loops by showing you how we can make Python’s for statement act more like a traditional loop, in other words, a numerical counting loop. Because we cannot change the behavior of a for loop (iterates over a sequence), we can manipulate our sequence so that it is a list of numbers. That way, even though we are still iterating over a sequence, it will at least appear to perform the number counting and incrementing that we envisioned.

Within our loop, eachNum contains the integer value that we are displaying and can use it in any numerical calculation we wish. Because our range of numbers may differ, Python provides the range() built-in function to generate such a list for us. It does exactly what we want, taking a range of numbers and generating a list.

For strings, it is easy to iterate over each character:

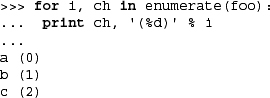
The range() function has been often seen with len() for indexing into a string. Here, we can display both elements and their corresponding index value:

However, these loops were seen as restrictive—you either index by each element or by its index, but never both. This led to the enumerate() function (introduced in Python 2.3) that does give both:
These are just fancy terms to indicate how you can programmatically use a for loop to put together an entire list on a single line:

List comprehensions can do even fancier things like being selective of what to include in the new list:

File access is one of the more important aspects of a language once you are comfortable with the syntax; there is nothing like the power of persistent storage to get some real work done.
handle = open(file_name, access_mode = 'r')
The file_name variable contains the string name of the file we wish to open, and access_mode is either ‘r’ for read, ‘w’ for write, or ‘a’ for append. Other flags that can be used in the access_mode string include the ‘+’ for dual read-write access and the ‘b’ for binary access. If the mode is not provided, a default of read-only (‘r’) is used to open the file.
If open() is successful, a file object will be returned as the handle (handle). All succeeding access to this file must go through its file handle. Once a file object is returned, we then have access to the other functionality through its methods such as readlines() and close(). Methods are attributes of file objects and must be accessed via the dotted attribute notation (see the following Core Note).
Core Note: What are attributes?
Attributes are items associated with a piece of data. Attributes can be simple data values or executable objects such as functions and methods. What kind of objects have attributes? Many. Classes, modules, files, and complex numbers just some of the Python objects that have attributes.
How do I access object attributes? With the dotted attribute notation, that is, by putting together the object and attribute names, separated by a dot or period: object.attribute.
Here is some code that prompts the user for the name of a text file, then opens the file and displays its contents to the screen:

Rather than looping to read and display one line at a time, our code does something a little different. We read all lines in one fell swoop, close the file, and then iterate through the lines of the file. One advantage to coding this way is that it permits the file access to complete more quickly. The output and file access do not have to alternate back and forth between reading a line and printing a line. It is cleaner and separates two somewhat unrelated tasks. The caveat here is the file size. The code above is reasonable for files with reasonable sizes. Very large data files may take up too much memory, in which case you would have to revert back to reading one line at a time. (A good example can be found in the next section.)
The other interesting statement in our code is that we are again using the comma at the end of the print statement to suppress the printing of the NEWLINE character. Why? Because each text line of the file already contains NEWLINEs at the end of every line. If we did not suppress the NEWLINE from being added by print, our display would be double-spaced.
The file() built-in function was recently added to Python. It is identical to open(), but is named in such a way to indicate that is a factory function (producing file objects), similar to how int() produces integers and dict() results in dictionary objects. In Chapter 9, we cover file objects, their built-in methods attributes, and how to access your local file system. Please refer to Chapter 9 for all the details.
Syntax errors are detected on compilation, but Python also allows for the detection of errors during program execution. When an error is detected, the Python interpreter raises (aka throws, generates, triggers) an exception. Armed with the information that Python’s exception reporting can generate at runtime, programmers can quickly debug their applications as well as fine-tune their software to take a specific course of action if an anticipated error occurs.
To add error detection or exception handling to your code, just “wrap” it with a try-except statement. The suite following the try statement will be the code you want to manage. The code that comes after the except will be the code that executes if the exception you are anticipating occurs:

Programmers can explicitly raise an exception with the raise command. You can learn more about exceptions as well as see a complete list of Python exceptions in Chapter 10.
Like many other languages, functions in Python are called using the functional operator ( ( ) ), functions must be declared before they can be called. You do not need to declare function (return) types or explicitly return values (None, Python’s NULL object is returned by default if one is not given.)
Python can be considered “call by reference.” This means that any changes to these parameters within the function affect the original objects in the calling function. However, the caveat is that in Python, it is really dependent on the object type being passed. If that object allows updating, then it behaves as you would expect from “call by reference,” but if that object’s value cannot be changed, then it will behave like “call by value.”
![]()
The syntax for declaring a function consists of the def keyword followed by the function name and any arguments that the function may take. Function arguments such as arguments above are optional, which is why they are enclosed in brackets above. (Do not physically put brackets in your code!) The statement terminates with a colon (the same way that an if or while statement is terminated), and a code suite representing the function body follows. Here is one short example:
![]()
This function, presumably meaning “add me to me” takes an object, adds its current value to itself and returns the sum. While the results are fairly obvious with numerical arguments, we point out that the plus sign works for almost all types. In other words, most of the standard types support the + operator, whether it be numeric addition or sequence concatenation.

Calling functions in Python is similar to function invocations in many other high-level languages, by giving the name of the function followed by the functional operator, a pair of parentheses. Any optional parameters go between the parentheses, which are required even if there are no arguments. Observe how the + operator works with non-numeric types.
Functions may have arguments that have default values. If present, arguments will take on the appearance of assignment in the function declaration, but in actuality, it is just the syntax for default arguments and indicates that if a value is not provided for the parameter, it will take on the assigned value as a default.

In the example above, the debug parameter has a default value of True. When we do not pass in an argument to the function foo(), debug automatically takes on a value of True. On our second call to foo(), we deliberately send an argument of False, so that the default argument is not used.
Functions have many more features than we could describe in this introductory section. Please refer to Chapter 11 for more details.
Classes are a core part of object-oriented programming and serve as a “container” for related data and logic. They provide a “blueprint” for creating “real” objects, called instances. Because Python does not require you to program in an object-oriented way (like Java does), classes are not required learning at this time. However, we will present some examples here for those who are interested in getting a sneak peek.

Classes are declared using the class keyword. A base or parent class is optional; if you do not have one, just use object as the base class. This header line is followed by an optional documentation string, static member declarations, and any method declarations.

In the above class, we declared one static data type variable version shared among all instances and four methods, __init__(), showname(), showver(), and the familiar addMe2Me(). The show*() methods do not really do much but output the data they were created to output. The __init__() method has a special name, as do all those whose names begin and end with a double underscore ( __ ).
The __init__() method is a function provided by default that is called when a class instance is created, similar to a constructor and called after the object has been instantiated. __init__() can be thought of as a constructor, but unlike constructors in other languages, it does not create an instance—it is really just the first method that is called after your object has been created.
Its purpose is to perform any other type of “start up” necessary for the instance to take on a life of its own. By creating our own __init__() method, we override the default method (which does not do anything) so that we can do customization and other “extra things” when our instance is created. In our case, we initialize a class instance attribute or member called name. This variable is associated only with class instances and is not part of the actual class itself. __init__() also features a default argument, introduced in the previous section. You will no doubt also notice the one argument which is part of every method, self.
What is self? It is basically an instance’s handle to itself, the instance on which a method was called. Other OO languages often use an identifier called this.
![]()
The string that is displayed is a result of a call to the __init__() method which we did not explicitly have to make. When an instance is created, __init__() is automatically called, whether we provided our own or the interpreter used the default one.
Creating instances looks just like calling a function and has the exact same syntax. They are both known as “callables.” Class instantiation uses the same functional operator as invoking a function or method.
Now that we have successfully created our first class instance, we can make some method calls, too:
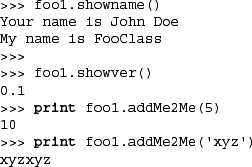
The result of each function call is as we expected. One interesting piece of data is the class name. In the showname() method, we displayed the self.__class__.__name__ variable which, for an instance, represents the name of the class from which it has been instantiated. (self.__class__ refers to the actual class.) In our example, we did not pass in a name to create our instance, so the ‘John Doe’ default argument was used. In our next example, we do not use it.

There is plenty more on Python classes and instances in Chapter 13.
A module is a logical way to physically organize and distinguish related pieces of Python code into individual files. A module can contain executable code, functions, classes, or any and all of the above.
When you create a Python source file, the name of the module is the same as the file except without the trailing .py extension. Once a module is created, you may import that module for use from another module using the import statement.
Once imported, a module’s attributes (functions and variables) can be accessed using the familiar dotted attribute notation:
module.function()
module.variable
We will now present our Hello World! example again, but using the output functions inside the sys module.

This code behaves just like our original Hello World! using the print statement. The only difference is that the standard output write() method is called, and the NEWLINE character needs to be stated explicitly because, unlike the print statement, write() does not do that for you.
You can find out more information on modules and importing in Chapter 12.
We will cover all of the above topics in much greater detail throughout the text, but hopefully we have provided enough of a “quick dip in the pool” to facilitate your needs if your primary goal is to get started working with Python as quickly as possible without too much serious reading.
Core Note: What is a “PEP”?
You will find references throughout the book to PEP. A PEP is a Python Enhancement Proposal, and this is the way new features are introduced to future versions of Python. They are usually advanced reading from the beginner’s point of view, but they provide a full description of a new feature, the rationale or motivation behind it, a new syntax if that is necessary, technical implementation details, backwards-compatibility information, etc. Agreement has to be made between the Python development community, the PEP authors and implementors, and finally, the creator of Python itself, Guido van Rossum, adoringly referred to as the BDFL (Benevolent Dictator for Life), before any new feature is integrated. PEP 1 introduces the PEP, its purpose and guidelines. You can find all of the PEPs in PEP 0, the PEP index, at: http://python.org/dev/peps.
In this chapter, we have seen some useful built-in functions. We summarize them in Table 2.1 and present a few other useful ones (note that these may not be the full syntax, only what we feel would be useful for you now).

2-1. Variables, print, and the String Format Operator. Start the interactive interpreter. Assign values to some variables (strings, numbers, etc.) and display them within the interpreter by typing their names. Also try doing the same thing with the print statement. What is the difference between giving just a variable name versus using it in conjunction with print? Also try using the string format operator ( % ) to become familiar with it.
2-2. Program Output. Take a look at the following Python script:
#!/usr/bin/env python
1 + 2 * 4
(a) What do you think this script does?
(b) What do you think this script will output?
(c) Type the code in as a script program and execute it. Did it do what you expected? Why or why not?
(d) How does execution differ if you are running this code from within the interactive interpreter? Try it and write down the results.
(e) How can you improve the output of the script version so that it does what you expect/want?
2-3. Numbers and Operators. Enter the interpreter. Use Python to add, subtract, multiply, and divide two numbers (of any type). Then use the modulus operator to determine the remainder when dividing one number by another, and finally, raise one number to the power of another by using the exponentiation operator.
2-4. User Input with raw_input().
(a) Create a small script to use raw_input() built-in function to take a string input from the user, then display to the user what he/she just typed in.
(b) Add another piece of similar code, but have the input be numeric. Convert the value to a number (using either int() or any of the other numeric conversion functions), and display the value back to the user. (Note that if your version of Python is older than 1.5, you will need to use the string.ato*() functions to perform the conversion.)
2-5. Loops and Numbers. Create some loops using both while and for.
(a) Write a loop that counts from 0 to 10 using a while loop. (Make sure your solution really does count from 0 to 10, not 0 to 9 or 1 to 10.)
(b) Do the same loop as in part (a), but use a for loop and the range() built-in function.
2-6. Conditionals. Detect whether a number is positive, negative, or zero. Try using fixed values at first, then update your program to accept numeric input from the user.
2-7. Loops and Strings. Take a user input string and display string, one character at a time. As in your above solution, perform this task with a while loop first, then with a for loop.
2-8. Loops and Operators. Create a fixed list or tuple of five numbers and output their sum. Then update your program so that this set of numbers comes from user input. As with the problems above, implement your solution twice, once using while and again with for.
2-9. More Loops and Operators. Create a fixed list or tuple of five numbers and determine their average. The most difficult part of this exercise is the division to obtain the average. You will discover that integer division truncates and that you must use floating point division to obtain a more accurate result. The float() built-in function may help you there.
2-10. User Input with Loops and Conditionals. Use raw_input() to prompt for a number between 1 and 100. If the input matches criteria, indicate so on the screen and exit. Otherwise, display an error and reprompt the user until the correct input is received.
2-11. Menu-Driven Text Applications. Take your solutions to any number of the previous five problems and upgrade your program to present a menu-driven text-based application that presents the user with a set of choices, e.g., (1) sum of five numbers, (2) average of five numbers, ... (X) Quit. The user makes a selection, which is then executed. The program exits when the user chooses the “quit” option. The great advantage of a program like this is that it allows the user to run as many iterations of your solutions without necessarily having to restart the same program over and over again. (It is also good for the developer who is usually the first user and tester of their applications!)
2-12. The dir() Built-In Function.
(a) Start up the Python interpreter. Run the dir() built-in function by simply typing dir() at the prompt. What do you see? Print the value of each element in the list you see. Write down the output for each and what you think each is.
(b) You may be asking, so what does dir() do? We have already seen that adding the pair of parentheses after dir causes the function to run. Try typing just the name dir at the prompt. What information does the interpreter give you? What do you think it means?
(c) The type() built-in function takes any Python object and returns its type. Try running it on dir by entering type(dir) into the interpreter. What do you get?
(d) For the final part of this exercise, let us take a quick look at Python documentation strings. We can access the documentation for the dir() function by appending .__doc__after its name. So from the interpreter, display the document string for dir() by typing the following at the prompt: print dir.__doc__. Many of the built-in functions, methods, modules, and module attributes have a documentation string associated with them. We invite you to put in your own as you write your code; it may help another user down the road.
2-13. Finding Out More About the sys Module with dir().
(a) Start the Python interpreter again. Run the dir() command as in the previous exercise. Now import the sys module by typing import sys at the prompt. Run the dir() command again to verify that the sys module now shows up. Now run the dir() command on the sys module by typing dir(sys). Now you see all the attributes of the sys module.
(b) Display the version and platform variables of the sys module. Be sure to prepend the names with sys to indicate that they are attributes of sys. The version variable contains information regarding the version of the Python interpreter you are using, and the platform attribute contains the name of the computer system that Python believes you are running on.
(c) Finally, call the sys.exit() function. This is another way to quit the Python interpreter in case the keystrokes described above in problem 1-4 do not get you out of Python.
2-14. Operator Precedence and Grouping with Parentheses.
Rewrite the mathematical expression of the print statement in Section 2.4, but try to group pairs of operands correctly, using parentheses.
2-15. Elementary Sorting.
(a) Have the user enter three numeric values and store them in three different variables. Without using lists or sorting algorithms, manually sort these three numbers from smallest to largest.
(b) How would you change your solution in part (a) to sort from largest to smallest?
2-16. Files. Type in and/or run the file display code in Section 2.15. Verify that it works on your system and try different input files as well.