
The following basic steps apply to setting up a Compiere instance:
- Define the initial Chart of Accounts (account elements) template for the tenant.
- Create the tenant instance to hold your Compiere data.
- Define your calendar year and periods.
- Populate and define the data structures of the following:
- Organizations, Warehouses, Bank, Cash Books, and Unit of measures.
- Accounting schema, account elements, currencies, and charges.
- Accounting set-ups of Business Partner Groups, Product Categories, Tax, Projects, Works Orders, bank accounts, cash books, and warehouses.
- Document types, Document Sequences, Payment Terms, and Sales Regions
- Define system users and access roles.
Prior to setting up a new tenant, the account elements (Chart of Accounts) must be defined as per the import template provided. The standard account elements template can be found in the C:Compiere2dataimport directory. The template used as the default during the installation process is named AccountingUS.xls, and the default import file template is named AccountingUS.csv (note that there may be other localized templates defined for other countries). The process is that you could edit either the .xls file or the .csv file, but it is the.csv format layout that is used for the import process.
The following columns are defined in the Account Element Template, and although they are defined vertically here. these must be defined horizontally in your import file. This may be imported before or after an initial tenant is created. Do plan these fields carefully, as this is a structure used for Financial Reporting and your accounting reports.
|
Column No |
Name |
Description |
|---|---|---|
|
1 |
Account Value |
Account Values are the numeric numbering of your accounts. You should adopt some sequential logic as this will benefit you greatly in reporting and structure down the line: I propose the following numbering sequence, based on IFRS reporting: 000..999 Use these for your Summary levels 10000...19999 Assets 20000...29999 Liabilities 30000...39999 Owners Equity and Reserves 40000...49999 Revenue 50000...59999 Cost Of Sales 60000...69999 Staff related Expenses 70000....79999 Operating Expenses 80000....89999 Taxation and Shareholders Expense 90000....99999 Miscellaneous An example of this would be: 4-Trade Revenue 480-Revenue Other [ being a summary level ] 48000-Revenue Other account 1 48010-Revenue Other account 2 |
|
2 |
Account Name |
This is the name of the account or Summary Level Account |
|
3 |
Account Description |
A further description of the account |
|
4 |
Account Type |
Compiere defines five standard account types: Assets, Liabilities, Owner's Equity, Revenue, Expenses |
|
5 |
Account Sign |
The account sign, namely Positive, Negative, or Neutral. Use Neutral if you are unsure. |
|
6 |
Account Document |
Yes/No indicating if the account is document controlled, in which case journal entries may not be posted to this account. Certain system control accounts , such as bank-in-transfer and Accounts Receivable/Payable, should be indicated as document controlled. |
|
7 |
Account Summary |
Yes/No indicating whether the account is a summary level account or not. Summary level accounts are used for roll-up reporting. |
|
8 |
Default Account |
Indicates that this is a default account used for the accounting schema rules. Generally, these can be understood from their name and there is a predefined list of accounts within the import template. Compiere will release a new template if these accounts changes. |
|
9 |
Account Parent |
This indicates the account parent number of the account line. For instance, if 4 is defined as the Revenue summary account then an account 4000 Revenue Trade would be parented by 4, which in itself may be a parent of another account. |
To setup the initial tenant you have to log into the system with the SuperUser username, and select the role of System Administrator:

Select the Initial Tenant Setup from the menu, and enter your tenant details as follows:


Now that you have set up a tenant, the following system items are created through this process (these can be easily edited):
- Initial organizational admin and user roles: In the above example, this is Newco Company Group Admin and Newco Company Group User. The admin role so created will be the administrator for the tenant.
- Accounting Schema and Account Elements.
- An Initial Campaign, Business Partner, Business Partner Group, Product, Product Category, Tax, Representative (Admin and User), Project, and Cash book.
- Document types applicable to the system, together with standard numbering sequences.
A calendar and periods define the reporting and posting dimension of the system entries. An initial calendar, a year, and periods are created, and may be edited. This information is set up through the Calendar, Year, and Period menu item, and is covered in Chapter 6.
Organizations can be defined according to your business and reporting line requirements. Organizations can be used for security purposes as well, for instance having a separate 'accounts' organization for accounting data that may not be accessed by sales organization staff , but never used for organizational reporting. One of the powerful features of Compiere is that these organizations and hierarchy may be changed at any time, with future reporting trees or roll-ups reflected in the new set-up. In more advanced reporting scenarios, a specific Reporting Hierarchy may be set up which can be use for Financial Reporting (covered in Chapter 6).
Setting up your organization:
- Select the Organization window from the main menu tree.
- Enter your Organization's Search key, Name, and Description. These can be the same if there is no reason to distinguish between them for future reporting.
- Enter your Organization, and flag it at Summary level if that is applicable.
- Move the Organizations around with your mouse to indicate the correct parent-child relationship in the tree. You can have multiple reporting summary levels under each other, and are not limited in the depth of this tree.
- Validate the Organization, in order to create the appropriate costing records for the organization.

Warehouses are used for the inventory management of stock items. Warehouses are a central control point for:
- Material Receipt from a Vendor, and Customer Shipment transactions
- Cost accounting for products is at warehouse level
- Replenishment of products in the system is at warehouse level
You may have multiple warehouses per organization, and for each warehouse you may have multiple locators:

Before performing any document processing, make sure that you check your account element tree (hierarchy) structures, and ensure that these are properly defined. Although Compiere allows the element tree to be changed, it saves a lot of time down the line if it is correct from the start, so it is advised to do this up-front.
This is done through the Account Element > Element Value window/tab:
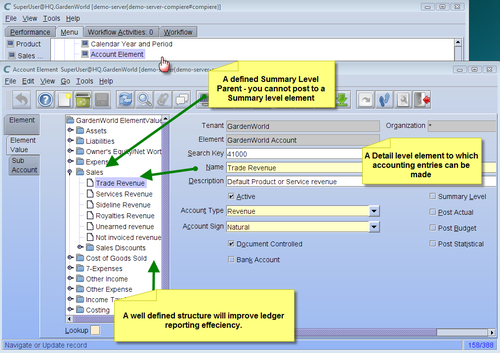
The Account Elements tree is defined through the imported account parent, and within Compiere is manually changed or moved appropriately to its parent. Some important notes on the set-up of account elements are:
- Document Controlled: This means that General Journal entries (non document transactions) will not be able to be posted to this account.
- Bank Account: This flag indicates whether this account relates to a Bank account. A bank account must be selected for such accounts.
- Summary level: If the account element is a summary level account used for reporting purposes, then you cannot post to it.
- Post Actual / Budget / Statistical: These types of posting can be made to this account through Journal entries.
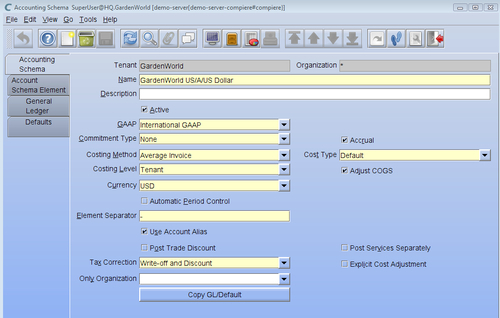
The accounting schema defines the rules set-up for default accounting principles. Most importantly, an accounting schema must be set up for each reporting currency, which is referred as the Accounted Currency. Should more than one reporting currency be applicable—for instance in multiple countries—then multiple accounting schemas must be set up. GAAP Accounting principles indicate that only one reporting currency is generally required per country, so then only one accounting schema is required. Managing multiple accounting schemas is a tricky process and not advisable unless you have such legal requirements.
Where there are multiple currencies, the accounting currency will be the currency defined in your Accounting Schema for transacting purposes (see below). Source currencies may vary, and all source currencies are converted through currency rates to the Accounted Currency. Currency rates are set up through the Currency Rate window.
The Accounting Schema defines the following:
- Accounting GAAP: Which Accounting GAAP in in place and the specific rules applicable to it. Contact your implementation partner for such custom requirements.
- Commitment type: With regards to commitment accounting—this would indicate the accounting for sales and purchase order commitments as accrued Revenue or Expenses. An implementation of this will require further customization from standard.
- Costing method: Various costing methods are available, including Standard Costing, Average PO, Average Invoice, Last Invoice, FIFO, LIFO, and Last PO price. Standard Costing and Average Invoice are the most commonly-used. Other options will require detailed customization.
- Costing level: Indicates at what level the costing method will be used, including Organization (thus Warehouse), Batch or Lot, or Tenant level (highest level).
- Currency: The accounting currency for this accounting schema.
- Automatic period control: This automatically opens a Period Control window period in the system for document processing, say 30 days prior and 30 days after the current system date.
- Tax correction: This defines the tax accounting correction level for write-off and discount entries during payment allocation.
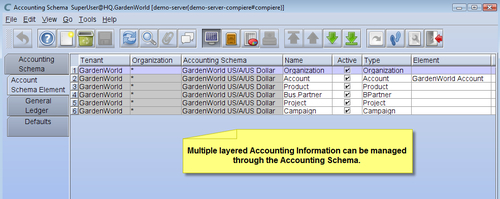
Accounting schema elements are derived from the transactional document. Where a particular transactional document has accounting consequences, the data needs to be populated based on the following available information dimensions:
- Organization
- Natural Account
- Product
- Business Partner
- Marketing Campaign
- Sales Region
- Project
- Activity
- Location From / To
- Budget
- Sub Account
- User custom fields (2)
In its most basic form, an account element's debits and credits must balance at the Organizational level. Add or change additional elements in this window as required:
The General Ledger defaults lists the suspense and balancing account setups. Posting entries are automatically generated by the system for these types of transactions, i.e. a suspense balancing entry created to the default account where a contra account is not listed by the user.
These accounts are the tenant's default account elements used by the document transactions during processing, and when creating, for instance, business partners, products, warehouses, projects, and banks. As mentioned before, these accounts are populated during the import of the initial account elements template.
Changes that are made to the default accounts can be copied by the user through their affected related default accounts, as follows:
- Business Partner Groups are updated with the new default accounts
- Product Categories are updated with the new default accounts
- Bank account defaults are updated or overridden
- Cash journal defaults are updated or overridden
- In addition to the above, the default accounts for tax, projects, and works orders (manufacturing) is updated or overridden.
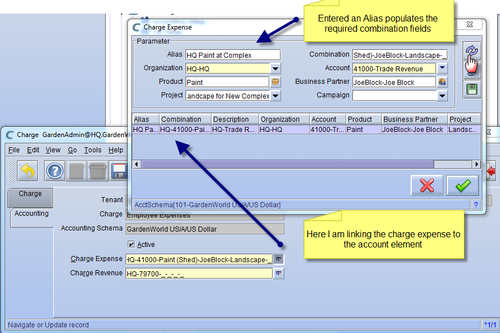
Accounting Combinations are automatically generated account information about information dimension combinations, and by linking an alias to such combination, it can be used for faster entry during journal entries or accounting set-ups. In effect, you set up an alias that refers to a specific account combination for quick reference in the system.
Aliases for generated combinations can be manually created as follows, in the Account Combination window:
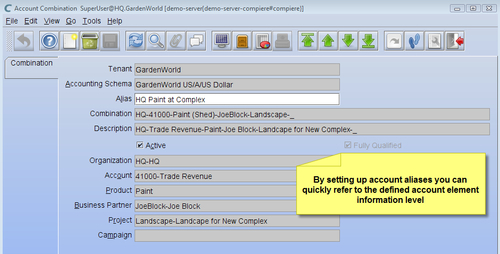
An example of using an alias for the above combination in an account setup of a charge is as follows:
More detailed financial management aspects are covered in Chapter 6.