
Chapter 18. Troubleshooting and Communications Methods and Professional Behavior
This chapter covers a portion of the CompTIA A+ 220-701 objectives 2.1, 2.2, and 6.2.
Two factors make for successful troubleshooting: extensive computer knowledge and an understanding of human psychology. You must understand how hardware and software work to troubleshoot them. That’s what the preceding chapters of this book were all about. You also must treat customers with respect. By combining these two factors, you can quickly detect and solve computer problems.
“Do I Know This Already?” Quiz
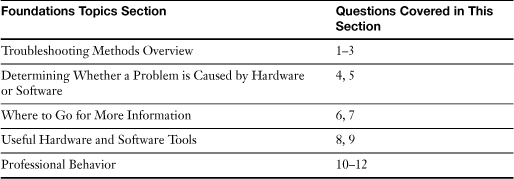
The “Do I Know This Already?” quiz allows you to assess whether you should read this entire chapter or simply jump to the “Exam Preparation Tasks” section for review. If you are in doubt, read the entire chapter. Table 18-1 outlines the major headings in this chapter and the corresponding “Do I Know This Already?” quiz questions. You can find the answers in Appendix A, “Answers to the ‘Do I Know This Already?’ Quizzes and Troubleshooting Scenarios.”
Table 18-1 “Do I Know This Already?” Foundation Topics Section-to-Question Mapping
1. You have been contacted by a client. You arrive at her location and find that she is unable to work on her computer due to a malfunction. You need to find out what has happened. What should you do first?
a. Walk in and tell the user you will handle it from here
b. Learn as much as possible when speaking to the client
c. Tell the client you will have to run some tests
d. Look to see if anything has come unplugged
2. You are sent out on a tech call. You arrive at the client’s desk. He seems to know what the problem is during the interview. Which of the following should you not do during the interview?
a. Use clear, concise statements
b. Allow the customer to complete statements
c. Use tech jargon to make you look smarter
d. Listen to the customer until he is finished
3. A client has asked you to look at her computer. She is telling you that the system will not boot or power on. You then ask if she gets any error codes or messages and she says no. Which of the following could be the cause of the problem?
a. Power problems
b. Motherboard is not working
c. The memory chip has come loose
d. The video card has stopped functioning
4. A client calls and needs to see you about a computer issue he is having. Once you arrive at his desk, he tells you that his computer is unresponsive. You ask if anything has changed on the computer. The client informs you that he has changed out the NIC. What do you need to do before you begin?
a. Remove the NIC card
b. Uninstall the NIC card
c. Try to determine whether it is a hardware or software problem
d. Boot the computer in safe mode
5. Which of the following should you do on a client’s computer before you start making any changes that might affect the computer’s settings or performance? Choose all that apply.
a. Back up the customer’s data
b. Create an image of the machine
c. Use an anti-static strap
d. Change the size of the virtual memory file
6. You have just purchased a new video card for your computer. You notice that the device does not have an installation CD with it. Where would you go to get the installation information?
a. A popular search engine
b. The manufacturer’s website
c. Look on the newsgroups
d. Windows Update
7. You have just completed work on a client’s computer. You spent a long time troubleshooting this issue. What should you do to expedite the troubleshooting process? (Choose all that apply.)
a. Note symptoms
b. Note any other problems
c. Document final resolutions
d. Document any workarounds
8. You have just achieved your A+ certification. You are in need of a kit to help you in your work. Which of the following should you have access to?
a. Screwdrivers
b. Pliers
c. Tweezers
d. Penlight
e. All of these options are correct
9. A client has contacted you about a boot system error. Which of the following will you need to restore the missing files and get the user back up and running? Choose all that apply.
a. A bootable disk
b. A floppy drive
c. An external hard drive with all system files
d. An installation CD
10. Your client is having problems with his computer. He is under a tremendous amount of stress and is very hostile. What should you do to prevent a confrontation with him?
a. Tell the client to leave the area while you work
b. Tell them you don’t have to listen to them talk like that and leave
c. Avoid having a defensive attitude
d. Call your supervisor and have them speak with the customer
11. You are at the home of one of your main customers. Since she knows and trusts you, she leaves you alone to work. Which of the following should you not do while at her home? (Choose all that apply.)
a. Look around her hard drive
b. Print personal information
c. Use her equipment for your personal tasks
d. Make her sorry she called you
12. You have been notified to work on a client’s workstation. You ask who it is and you find out it is someone who is very difficult to deal with. What should you do when you arrive at the client’s desk?
a. Go in knowing you will be confronted by the client
b. Take your time in getting to their desk
c. Try your best to smile
d. Maintain a positive attitude
Foundation Topics
Troubleshooting Methods Overview
To become a successful troubleshooter, you need to
• Learn as much as possible during the client interview
• Evaluate the client’s environment
• Use testing and reporting software to gather information about the system
• Form a hypothesis (a theory you will try to prove or disprove)
• Use the troubleshooting cycle and the CompTIA six-step troubleshooting process to isolate and solve the problem
It is necessary to approach computer problems from a logical standpoint. To best accomplish this, PC technicians will implement a troubleshooting methodology (or maybe more than one). There are several different troubleshooting methodologies available; CompTIA has included its own six-step process within the 2009 A+ objectives. Memorize the steps in Table 18-2 for the exam.
Table 18-2 The Six-Step CompTIA A+ Troubleshooting Methodology

![]()
As you attempt to troubleshoot computer issues, think in terms of this six-step process. Plug the problem directly into these steps.
For example, in Step 1 you might identify an issue; maybe the computer won’t turn on. For Step 2, a possible theory could be that the computer is not plugged in to the AC outlet. To test the theory in Step 3, you would plug the computer in. If it works, then great, but if it doesn’t, you would go back to Step 2 and establish a new theory. When you have reached a theory that tests positive, move on to Step 4 and establish the plan of action based on that theory, and then implement your solution. (Keep in mind that many plans of action will be more complicated than just plugging the computer in! Perhaps the AC outlet was loose, which would require a licensed electrician to fix it.) Next, in Step 5 you want to test. Always test and verify that the system is functioning correctly. If need be, implement preventative measures; for example, re-route the power cable so that it is out of the way and can’t be disconnected easily. Finally, in Step 6, you want to document your findings and the outcome. In many companies, documentation begins right when you first get a troubleshooting call (or trouble ticket), and the documentation continues throughout the entire process. You can track documentation on paper, or in an online system; it depends on your company’s procedures. Be sure to keep track of what happened, why it happened, and how you fixed the problem.
Because computer failures happen to the customer (who usually is less technically aware than you of the possible causes for the problem), you must work with the customer to create a complete list of symptoms so that you can find the right solution quickly and accurately. To do this, you need to
• Carefully observe the customer’s environment to look for potential causes of computer problems, such as interference sources, power problems, and user error.
• Ask the customer what (if anything) has changed recently about the computer or its environment. Anything from new hardware or software being installed, new telephone or network being installed, or even a new coffee maker or air-conditioning unit could be at the root of the problem. A simple way to ask this would be to say, “What has changed since the last time it (the PC) worked?”
• Determine what tasks the customer was performing on the PC. You can determine this not only by asking the customer questions, but by reviewing system log files, browser history, and so on
• Ask the customer detailed questions about the symptoms, including unusual system behavior, such as noises or beeps, office events taking place around the same time, onscreen error messages, and so on.
Tip
Windows generates several log files during routine use that can be useful for determining what went wrong. Many of these can be viewed through the Event Viewer. To view the contents of the Event Viewer, right-click Computer/My Computer, click Manage and click Event Viewer. The Event Viewer captures three types of information: Application errors, security audits, and system errors. See Chapter 13, “Using and Managing Windows,” for typical examples.
Because some types of computer problems aren’t easy to replicate away from the customer site, your customer might see system problems you never will, even if you attempt to reproduce the problem.
Tip
Remember, troubleshooting is the art and science of quickly and accurately determining what is wrong with a customer’s system. Troubleshooting is an art because every technician will bring his or her own experience and personality to the task. Troubleshooting is also a science because you can apply a definite method that will bring you a great degree of success.
The Client Interview
The client interview is the all-important first step in solving any computer troubleshooting situation. During the client interview, you need to ask questions to determine the following information:
• What hardware or software appears to have a problem?— The user might have an opinion about this, but don’t be unduly swayed by a statement such as “the printer’s broken”; the device or software the user believes to be at fault might simply reflect a problem coming from another source.
• What other hardware or software was in use at the time of the problem?— The user probably will answer these types of questions in terms of open applications, but you will also want to look at the taskbar and system tray in Windows for other programs or routines that are running. Pressing Ctrl+Alt+Del will bring up a task list in Windows that has the most complete information about programs and subroutines in memory. To determine the exact version of a Windows-based program in use, click Help, About. View the System properties sheet to determine the version of Windows in use.
• What task was the user trying to perform at the time of the problem?— Ask the questions needed to find out the specific issues involved. For example, “Printing” isn’t a sufficient answer. “Printing a five-page brochure from PageMaker to a laser printer” is better, but you’ll probably want the user to re-create the situation in an attempt to get all the information you need. Don’t forget to check the Event Viewer in Windows for details about the software running at the time of the error. Refer to Chapter 13 for more information.
• Is the hardware or software on the user’s machine or accessed over the network?— If the network was involved, check with the network administrator to see if the network is currently working properly. If the hardware and software are not networked, your scope for troubleshooting is simpler.
• What were the specific symptoms of the problem?— Some users are very observant, but others might not be able to give you much help. Ask about the approximate time of the failure and about error messages, beeps, and unusual noises.
• Can the problem be reproduced?— Reproducible problems are easier to find than those that mysteriously “heal” themselves when you show up. Because power and environmental issues at the customer’s site can cause computer problems, try to reproduce the problem at the customer’s site before you move the computer to your test bench, where conditions are different.
• Does the problem repeat itself with a different combination of hardware and software, or does the problem go away when another combination of hardware and software is used?— For example, if the user can print from Microsoft Word but not from PageMaker, this means that the printer is working, but there might be a problem with configuration or data types used by different applications. If the user can’t print anything, there might be a general problem with the printer hardware or drivers.
Tips for Conducting the Client Interview
During the client interview, you will make an impression on the client. Will it be “this tech knows what’s going on and wants to fix my problem” or “this tech’s a blowhard know-it all that just won’t listen!” If you want to come across as someone who’s competent and caring, and not as a blowhard who won’t listen, follow these guidelines:
• Use clear, concise, and direct statements— Clients appreciate it when you use language they can understand.
• Allow the customer to complete statements— Don’t interrupt. You might think you know what they’re going to say next, but you could be wrong. If you don’t allow the customer to complete their statements, you might miss some vital information or clues about the problem.
• Clarify customer statements—ask pertinent questions— Whether you think you understand what the customer said or are totally at sea, make sure you ask the questions that will help keep you on the right track. Try rephrasing what they said and ask them to agree or clarify: “If I understand you correctly, what you’re saying is....”
• Don’t baffle the customer with technobabble— Avoid using jargon, abbreviations, and acronyms. Explain what you mean in plain language. Remember, if you can’t explain a problem or solution in everyday language, you don’t understand it either.
• Who saw the problem? The customer!— So, listen to your customers; they may be the best way to find the solution, especially if the problem refused to show up when you’re around.
Sometimes, the client interview alone will reveal the answer. More often, however, you’ll need to go to the client’s work area and evaluate the hardware and software that are involved. For additional tips on talking to customers and working with customer property, see “Professional Behavior” later in this chapter.
How to Evaluate the Client’s Environment
Depending on the clues you receive in the initial interview, you should go to the client’s work area prepared to perform a variety of tests. You must look for three major issues when evaluating the customer’s environment:
• Power issues
• Interference sources
• Symptoms and error codes—this might require that you try to reproduce the error
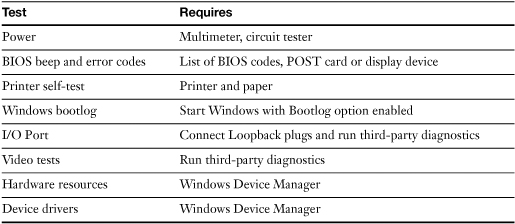
You can select from the tests listed in Table 18-3 based on your evaluation of the most likely sources of problems. You might need to perform several tests to rule out certain problems.
Table 18-3 Troubleshooting Tests and Requirements
![]()
For more information about the requirements listed in Table 18-3, see “Useful Hardware and Software Tools” later in this chapter.
Testing Power
Systems that won’t start or that have lockups or shutdowns with no error messages could be the victims of power problems. To determine whether power problems are located inside the computer or are coming from outside the system, use the tests and tools described in Chapter 5, “Power Supplies and System Cooling.” If a system malfunctions at a customer site but works properly at your test bench, power problems due to improper wiring might be to blame.
Looking for Sources of Interference
Power problems also can be caused by interference from other devices, such as copiers, vacuum cleaners, elevators, and alarm systems. If a system performs properly when moved away from its normal work area, but malfunctions when it is returned to its normal location, or if it works during the business day but not after hours (when an alarm system is activated), interference might be to blame. See the section “Power Conditioning Devices” in Chapter 5 for suggestions on dealing with sources of interference.
If the problem is network-related, it might be necessary to reroute UTP (unshielded twisted-pair) cabling away from interference sources or connect the cable to a different port on the hub or switch.
Recording Symptoms and Error Codes
If your tests rule out power and interference, you must proceed to tests that focus on the hardware or software that appears the most likely cause of the problem.
Which test or diagnostic routine is the best one to start with? Before you perform any specific tests, review the clues you gathered from the client. Examples of places where symptoms and error codes can be found include
• Event Viewer— The System log records error information regarding drivers and system files, while the Application log records information and errors about applications within the operating system.
• Device Manager— If a device in Device Manager is disabled it will be marked with a red x (Windows XP) or a down arrow (Windows Vista); if it is not configured properly there will be an exclamation point against a yellow background (Windows XP and Vista). Device Manager also displays codes in the Properties window of a device indicating particular issues.
• On screen messages— Various messages can popup on the screen while a user is working in Windows. Sometimes these messages can be helpful in finding out what the problem is. If the computer fails completely, a stop error (BSOD) will be displayed offering further information as to why the system halted.
• The BIOS— The BIOS can indicate errors by way of onscreen messages and beep codes. Use the particular system’s motherboard documentation to discern what these codes and messages mean.
• Printer Displays— The small LCD found on many printers (especially laser printers) is used to indicate the status of the printer. From this display you can verify whether the printer is online, if there is a paper jam, identify error codes, and so on.
Determining Whether a Problem Is Caused by Hardware or Software
The oldest dilemma for any computer technician is determining whether a problem is caused by hardware or software. The widespread use of Windows operating systems makes this problem even more acute than it was when MS-DOS was the predominant standard, because all hardware in a Windows system is controlled by Windows device drivers.
A troubleshooting cycle is a method that you can use to determine exactly what part of a complex system, such as a computer, is causing the problem. The troubleshooting cycle used in this section goes into more depth than the CompTIA six-step troubleshooting process. The first step is to determine the most likely source of the problem. The client interview will help you determine which subsystem is the best place to start solving the problem. In the previous example, the printing subsystem was the most likely place to start.
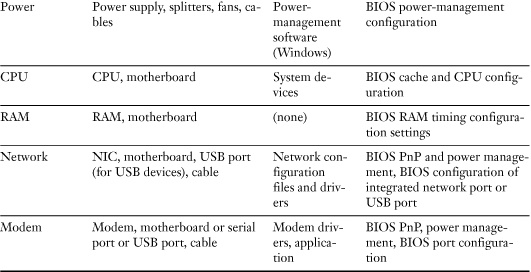
A subsystem is the combination of components designed to do a particular task, and it can include hardware, software, and firmware components. Use Table 18-4 to better understand the nature of the subsystems found in any computer.
Table 18-4 Computer and Peripheral Subsystems and Their Components

![]()
You can see from Table 18-4 that virtually every subsystem in the computer has hardware, software, and firmware components. A thorough troubleshooting process will take into account both the subsystem and all of its components. The following steps are involved in the troubleshooting cycle:
Step 1. Back up customer data (if possible). Before you do anything to a customer’s system, you should ensure that the system’s data has been backed up. The easiest way to ensure that you can restore the system to its “as-was” configuration is to use a disk-imaging program such as Symantec Norton Ghost or Acronis True Image. The current versions of these programs perform disk-imaging to preserve the contents of the system drive (and other specified drives) at both a data and operating system level. However, if you need to restore specified files only, the current versions of these programs also permit file-level restoration. For speed and convenience, use an external hard disk connected to a USB 2.0, FireWire, or eSATA port as the destination for the image (note that eSATA ports might not be supported by some disk-imaging programs).
Step 2. Find the most likely cause. Based on the client interview and the information from Table 18-4, determine the subsystem that is the most likely cause of the problem.
Step 3. Record the current configuration of the subsystem. This includes items such as the driver version, BIOS settings, cable type and length, and hardware settings. Before you change anything, record the current configuration. Depending on the item, this might include recording jumper or DIP switch settings, printing the complete report from Windows Device Manager, recording BIOS configurations, and backing up the Windows Registry. If you perform an image backup as recommended in the previous step, the Windows Registry is included as part of the backup. If you don’t record the current configuration of the system’s hardware and software before you start the troubleshooting cycle, you will not be able to reset the system to its previous condition if your first change doesn’t solve the problem.
Step 4. Change one component or setting at a time. Change a single hardware component or hardware/software/firmware setting you suspect is the cause of the problem. If you replace hardware, use a replacement that you know to be working. No matter how concerned your client is and no matter how heavy your workload, change only one component before you retest the system. Examples of changing a single component or configuration setting include swapping a data or power cable, removing the device from Windows Device Manager, changing a device’s IRQ or other hardware resource setting, reinstalling a device’s driver software, and reinstalling or repairing an application. Performing two or more of these types of tasks before you retest the system can make matters worse, and if you fix the problem you won’t know which change was the correct change to make.
Step 5. Retest after a single change and evaluate the results.
Step 6. Reconfigure or reinstall. If the problem persists, reconfigure or reinstall the device or hardware/software/firmware setting to its original condition and repeat Steps 4 and 5 with another component in the same subsystem.
Step 7. Continue until all subsystem components have been tested. Repeat Steps 4–6 until the subsystem performs normally or until you have tested all components in the subsystem. If the problem stops occurring after a change, that item is the cause of the problem. Repair, replace, or reload it as appropriate to solve the problem.
Step 8. Move on to another subsystem. If changing all components or settings in a particular subsystem does not solve the problem, move on to another subsystem that you think might be the culprit. Choose from one of the subsystems in Table 18-4. You will find that some problems can be deceiving; they will appear to be caused by one subsystem when in reality they are caused by another.
There are a few other techniques to consider when troubleshooting, including which components to check first, common points of failure, the fact that a device is known to be working doesn’t necessarily mean it’s new, and to keep track of your solutions.
What Components to Check First
As the previous subsystem list indicated, there’s no shortage of places to start in virtually any subsystem. What’s the best way to decide whether a hardware, software, or firmware problem is the most likely cause? Typically, hardware problems come and go, whereas software and firmware problems are consistent. Why? A hardware problem is often the result of a damaged or loose wire or connection; when the connection is closed, the component works, but when the connection opens, the component fails. On the other hand, a software or firmware problem will cause a failure under the same circumstances every time.
Another rule of thumb that’s useful is to consider the least expensive, easiest-to-replace item first. In most cases, the power or data cable connected to a subsystem is the first place to look for problems. Whether the cable is internal or external, it is almost always the least-expensive part of the subsystem, can easily come loose, and can easily be damaged. If a cable is loose, has bent pins, or has a dry, brittle, or cracked exterior, replace it.
When new software or new hardware has been introduced to the system and a problem results immediately afterward, that change is often the most likely cause of the problem.
Hardware conflicts such as IRQ, I/O port address, DMA channel, and memory address, or conflicts between the software drivers in the operating system are typical causes of failure when new hardware is introduced. New software can also cause problems with hardware, because of incompatibilities between software and hardware or because new software has replaced drivers required by the hardware.
Points of Failure on the Outside of the Computer
The front of the computer might provide valuable clues if you’re having problems with a system. In case of problems, check the following common points of failure for help.
• Can’t read CD or DVD media— The drive door on the CD-ROM or other optical drive might not be completely closed or the media might be inserted upside down; press the eject button to open the drive, remove any obstacles, reseat the media, and close the drive.
Tip
You can also eject optical media with Windows Explorer/My Computer. Right-click the drive and select Eject. If the drive doesn’t eject the media, there could be a problem with the drive’s data cable, cable connection, or power connection.
• Can’t shut down the computer with the case power switch— The case power switch is connected to the motherboard on ATX, BTX, and other modern desktop systems, not directly to the power supply as with older designs. The wire might be loose or connected to the wrong pins on the motherboard. Keep in mind that most systems require you to hold in the power button for about four seconds before the system will shut down. If the computer crashes, you might need to shut down the computer by unplugging it or by turning off the surge suppressor used by the computer. Some ATX and BTX power supplies have their own on-off switches.
• Can’t see the drive access or power lights— As with the case power switch, these lights are also connected to the motherboard. These wires might also be loose or connected to the wrong pins on the motherboard.
• Can’t use USB, IEEE-1394, or other ports on the front of the system— Some systems have these ports on the front of the computer as well as the rear. Front-mounted ports are connected with header cables to the motherboard. If the cables inside the case are loose, the ports won’t work. If the ports are disabled in the system BIOS, the ports won’t work.
As you can see from this section, in many situations, you will need to open the case to resolve a problem, even though the symptoms might first manifest themselves outside the computer.
“Known-Working” Doesn’t Mean “New”—Best Sources for Replacement Parts
To perform parts exchanges for troubleshooting, you need replacement parts. If you don’t have spare parts, it’s very tempting to go to the computer store and buy some new components. Instead, take a spare system that’s similar to the “sick” computer, make sure that it works, and then use it for parts. Why? Just because it’s new doesn’t mean it works.
I once replaced an alternator on my van with a brand-new, lifetime-warranty alternator that failed in less than a week. Whether it’s a cable, a video card, a monitor, or some other component, try using a known-working item as a temporary replacement rather than brand-new.
Tip
Rather than give away, sell, or discard working video cards, hard disks, and other components you have replaced with faster, bigger, better upgrades, keep at least one of each item to use as a replacement for testing purposes or as a backup in case the upgrade fails.
If you don’t have spare parts, use a spare system if possible rather than knocking another working system (and user) out of action by “borrowing” parts from an operational system. Use the same brand and model of system for known-working spares if possible, because the components inside are more likely to be identical to the “sick” system you are diagnosing.
Swapping from an identical or nearly identical systems is especially important if the system you are diagnosing uses proprietary components or is a laptop computer.
Keeping Track of Your Solutions
Make a practice of keeping detailed notes about the problems you solve. If your company has a help-desk system with tracking capabilities, use it. Even if the best you can do is write up your findings, you can use desktop search tools to find the answers to the same problems that might arise later.
Be sure to note symptoms, underlying problems, workarounds, and final resolutions. To help capture the information you need:
• Use Windows’ Screen Capture feature (press the PrtScn button and copy the clipboard contents into Paint or another image editor) to grab screens.
• Use the Save As Web Archive feature in Internet Explorer to grab web pages complete with text and links as one file.
Where to Go for More Information
After you’ve gathered as much information as possible, you might find that you still need more help. User manuals for components often are discarded, software drivers need to be updated, and some conflicts don’t have easy answers. Use the following resources for more help:
• Manufacturers’ websites— Most system and component manufacturers provide extensive technical information via the World Wide Web. You’ll want to have the Adobe Reader program in its latest version available to be able to read the technical manuals you can download (Adobe Reader itself is a free download from www.adobe.com). These sites often contain expert systems for troubleshooting, specialized newsgroups, downloadable driver updates, and other helps for problems.
• Printed manuals— Although many vendors have switched to web-based or Adobe Reader (PDF) manuals, some vendors still provided printed manuals or quick-reference diagrams. Be sure to file these in a way that permits quick access when needed.
• Web-based or PDF manuals on disc— Many vendors, especially those that use CDs or DVDs to distribute device drivers or utility programs for hardware, now put their user or reference manuals on the same medium. To view a web-based manual, open the file with your web browser. To view a PDF manual, open the file with Adobe Reader, Adobe Acrobat, or other PDF viewer/editor.
• Help for “orphan” systems and components— It’s frustrating to need information about a system whose manufacturer is no longer around. Sites such as http://www.download.com and www.windrivers.com provide information and drivers for orphan systems and components.
• Online computer magazines— If your back-issue collection of major computer magazines is missing some issues, or even if you’ve never subscribed to the print versions, you can find a lot of technical content from the major magazine publishers online: www.pcmag.com (PC Magazine), www.pcworld.com (PC World), and www.maximumpc.com (Maximum PC) are just three of my favorite resources.
• Third-party news and information sites— Tom’s Hardware (www.tomshardware.com), AnandTech (www.anandtech.com), The Register (www.theregister.co.uk), and iXBT Labs (http://ixbtlabs.com/) are just a few of the websites I rely on for product reviews, news, and insights.
• Book series— Scott Mueller’s Upgrading and Repairing PCs (www.upgradingandrepairingpcs.com) can be a lifesaver. With over 2.2 million copies sold, it’s still the single best source of information about desktop computer hardware, old and new. Other books in the series, such as Upgrading and Repairing Laptops and Upgrading and Repairing Windows, Second Edition, are also valuable. The Upgrading and Repairing Networks text is recommended for improving your network skills. When it comes to Windows, try Que’s Special Edition Using and In Depth series (www.quepublishing.com).
• Search engines— Google (www.google.com), Yahoo! (www.yahoo.com), Goodsearch (www.goodsearch.com), Bing (www.bing.com), and others and aggregators such as Dogpile (www.dogpile.com) are among the fastest ways to locate specific resources for further research. Currently, of these, my favorite is Google. Google is fast, finds text in many types of online content (not just HTML web pages, but also Adobe Acrobat, Microsoft Word, and others), can search newsgroups, and finds image and video files as well. Use its Advanced Search feature to narrow your search; you can even search a particular website only. Click the Cached button to see the site as Google last saw it if the current contents aren’t what you need or the website is down. Go to http://groups.google.com to search or browse Usenet newsgroups.
With so many sources of information available in print and online, there’s no reason to stop learning. To succeed and enjoy yourself, take every opportunity to learn more.
Useful Hardware and Software Tools
The A+ Certification test’s troubleshooting content expects you to know the use of basic diagnostic devices, so a review of this section will be useful before your exam. The following list of items also provides you with a handy reference for what you should bring on service calls.
Hardware Diagnostics
Hardware diagnostics tools can help you determine what components inside of a bootable system are not working correctly. Testing software used as part of the diagnostic process can also be used to perform burn-in tests on new hardware to help find problems before systems are put into service. Figure 18-1 shows some typical products.
Figure 18-1 Typical hardware diagnostic tools.
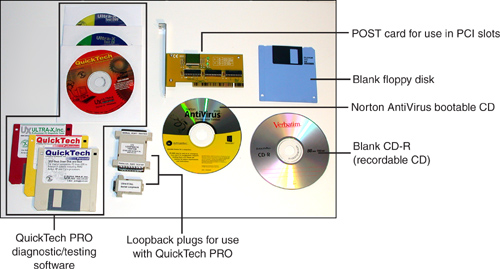
• Testing software, such as BurnIn Test Professional (www.passmark.com), CheckIt Professional Edition (www.smithmicro.com), AMIDiag Suite (www.amidiag.com), or Ultra-X QuickTech Personal or PRO (www.ultra-x.com)—Tests RAM, hardware configuration, motherboards, serial ports, parallel ports, and drives; some also check USB ports.
• Loopback plugs for USB, network, serial and parallel ports— These “loop back” transmit lines to receive lines during diagnostic testing.
Note
If the testing software you choose doesn’t include the loopback plugs you need, make sure you use compatible loopback plugs (these can be ordered from the software vendor or various online or mail-order hardware vendors). Mixing and matching serial and parallel loopback plugs and testing software can provide inaccurate results because different brands of testing programs use various wiring designs for their loopback plugs.
USB 2.0 loopback plugs (also compatible with USB 1.1 plugs) are available from PassMark Software (www.passmark.com); they are compatible with PassMark’s USB2Test and BurnIn Test Professional programs.
SuperLooper loopback plugs for various Ethernet and telecom interfaces are available from the Smartronix Store (www.smartronixstore.com).
• POST card— Displays hex POST codes during system startup to find boot errors that don’t have matching beep codes. To display POST codes on systems that don’t have PCI, PCI Express, or ISA expansion slots but have parallel ports, use a parallel-port based POST code displayer, such as Ultra-X’s MicroPost.
• Blank media (floppy disk, USB flash drive, recordable CD and DVD media)— These can be used to transfer drivers from a working machine to a similar machine that is not working. Note that you must use a floppy disk to provide a mass storage (RAID, SCSI, or SATA) driver for Windows XP during installation.
• A preinstalled Windows environment on CD or DVD matching the Windows version in use— The most famous of these is BartPE (www.nu2.nu/pebuilder/). A BartPE disc can be used to recover files, perform maintenance, and other rescue tasks on a system running Windows XP; it is created from a licensed Windows XP CD with the PE Builder program.
• Virus/malware scanning software— An up-to-date copy of a major anti-virus and anti-malware program helps find and remove viruses and Trojan Horse programs that affect systems. If you don’t have a licensed anti-virus program available to scan a system, but it has a working Internet connection, use free online scanning services, such as Trend Micro’s HouseCall (housecall.trendmicro.com), Symantec’s Security Scan (part of Google Pack; http://pack.google.com), Panda’s ActiveScan (www.pandasecurity.com), BitDefender Online Scanner (www.bitdefender.com), or others to scan the system.
Tip
Although many anti-virus programs are shipped on bootable CDs, most of these bootable CDs cannot scan NTFS-based file systems used by many installations of Windows 2000/XP. If you need a bootable CD with anti-virus and other tools that works on NTFS-based installations, check out avast! BART CD (Bootable Antivirus and Recovery Tools for Windows Server and Workstation) from Alwil Software (www.avast.com), makers of avast! 4 antivirus. Do not confuse avast! BART CD with BartPE.
Cleaning and Maintenance Tools
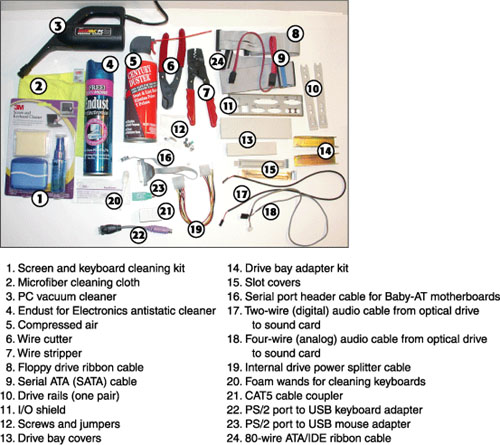
Some of the items listed in this section clean computers and peripherals to help prevent failures and keep systems in top condition. Other items can be used as spares for replacement testing or to replace missing components. Figure 18-2 shows many of the products in both categories.
Figure 18-2 Typical cleaning supplies and replacement/testing components used by computer technicians.
![]()
• Compressed air— Cleans gunk out of cases, fans, and power supplies
• Keyboard key puller— Safely removes keys to allow effective keyboard cleaning
• Computer-rated mini-vacuum cleaner— Cleans gunk out of cases, fans, power supplies, and keyboards and dust off motherboards and add-on cards
• Wire cutter and stripper— Used to build network cable
• Extra case, card, and drive screws (salvage or new)— Used as spares to replace missing or defective screws
• Extra card slot covers (salvage or new)— Used to replace missing covers to maintain proper system cooling
• Extra hard disk and motherboard/card jumper blocks (salvage or new)— Used to replace missing or defective jumper blocks when needed to configure devices
• Antistatic cleaning wipes
• Replacement ATA/IDE (40-wire and 80-wire), floppy, USB, IEEE-1394, Serial ATA, parallel, SCSI, CAT 5 network, and modem/serial cables— Customize list as needed for your organization
Recommended Equipment Cleaning Products
To clean equipment safely, don’t reach under the kitchen sink and grab the first cleaner you see. Instead, use materials designed especially for electronics and computer use, or general-purpose cleaners proven to work well on electronics and computer equipment. Some useful cleaning materials include
• Antistatic electronic wipes— Use antistatic electronic wipes for monitor cases and glass surfaces, keyboards, LCD screens, and all types of plastic and metal cases for computers and peripherals. This type of product combines effective cleaning and antistatic properties, which protect your computer investment. You can also use these wipes to clean up gunk after it’s been loosened by compressed air.
• Glass and surface cleaners— Glass and surface cleaners can be used on monitor glass and LCD screens and on other surfaces. However, they are not the preferred choice because they usually lack any antistatic properties. Endust for Electronics in pump or aerosol sprays is preferred for this use because it cleans and has antistatic properties.
Caution
With any spray cleaner, always spray the product onto the cleaning cloth, and never on the product to be cleaned. Spraying any kind of cleaner directly onto a keyboard or monitor can damage or destroy the device.
• Isopropyl alcohol— Isopropyl alcohol can be used along with foam (not cotton!) cleaning swabs to clean tape drive heads, floppy disk drive heads, and some keyboards. Some cleaning swabs are pre-moistened for convenience.
• Specialized device cleaning kits for mechanical mice, tape drives, floppy disk drives, inkjet and laser printers, and CD/DVD cleaning discs— Specialized device cleaning kits, as I have recommended in other chapters, are good ways to clean the devices they are built for. These device cleaning kits enabled me to avoid repairing or replacing at least one floppy disk drive and one inkjet printer.
• Compressed air— Compressed air is a powerful but “brainless” cleaner. Unlike the cleaners mentioned previously, compressed air cannot trap dirt and dust. Instead, dirt, dust, grit, and assorted fuzz are expelled violently out of their hiding places. If you use compressed air, put plenty of old newspapers under and around the device you are cleaning to catch the gunk compressed air expels from the device being cleaned. Use liquid cleaners or cleaning wipes to pick up residue left behind after using compressed air.
• Stabilant-22a— Stabilant-22a (sold by D. W. Electrochemicals) is often recommended for use when assembling or reassembling a system for use in memory module sockets and expansion slots. It cleans the sockets and provides a more effective electrical connection.
Selecting and Using a Computer-Compatible Vacuum Cleaner
Vacuum cleaners are great for cleaning homes and offices, but typical models use plastic parts that can build up harmful static electricity. So, instead of using an ordinary office or home vacuum cleaner to clean a computer, purchase a model especially suited for computer use.
Computer-compatible vacuum cleaners have features such as
• Small-sized tips and brushes perfect for cleaning keyboards and working around motherboards and add-on cards
• Antistatic construction
• Hand-held with an adjustable neck for easy use inside a system
Tip
Use a vacuum cleaner as an alternative to compressed air whenever possible, especially when working at the client’s site because it’s neater—there’s no flying gunk that can land in awkward places.
Professional Behavior
Passing the A+ Certification exams isn’t an end in itself—it is designed to help start (or advance) your Information Technology (IT) career. In most IT careers, how you deal with customers, whether they’re people you see day after day in your company or clients you might see only once or twice, can have as much of an impact on your career progress as your knowledge of hardware, software, firmware, and operating systems. The following sections will help you master the “soft skills” you need to move up in the computing world.
How to Talk to Customers
According to pop-culture references like the Dilbert comic strip and innumerable others, computer techs are incapable of relating to “normal” people in either social or professional situations. Unfortunately, these comic stereotypes are based on a lot of real-world data. Here’s how to reverse the stereotype, one customer interaction at a time:
• No matter how difficult the problem, maintain a positive attitude and tone of voice—Your job is to make possible the seemingly impossible. As discussed earlier in this chapter, there are abundant resources available from Microsoft, hardware vendors, and numerous forums and newsgroups to help you solve problems.
• No matter how tough the problem (or the customer), avoid arguing with customers—and drop the defensive attitude too—Your job is to solve the customer’s problem. To do that, you need to work with the customer. Get it? Got it? Good!
• No matter how many times you’ve seen the same problem show up, do not minimize customers’ problems—Sure, you might have seen a couple of dozen instances of drive failure, for example, but keep in mind that every person with a dead drive has lost valuable personal or business data—maybe even enough of a loss to wipe out a business. You wouldn’t want your handyman or mechanic acting as if your house or car problems were trivial—don’t act as if your customers’ problems are trivial, either.
• No matter how incorrect their actions or poor their judgment, avoid being judgmental of your customers—and while you’re at it, drop the insults and name-calling—Declaring “war” on your customers just adds to everyone’s stress level and doesn’t get you any closer to a solution. Even if the customer decides to call your ancestry or intelligence into question, avoid responding in kind. “Fight the real enemy”—the computer problem!
• Don’t let your cell phone, the big game on the big-screen TV, or the view out the corner office window get between you and a solution: avoid distractions and/or interruptions when talking with customers—Stay focused on what your customer is telling you, and the solution will be easier to find.
How to Treat Customers’ Property
The old Aretha Franklin song said it best: “R-E-S-P-E-C-T.” Whether it’s the device you’re servicing (laptop or desktop PC, PDA, printer, monitor, or other peripheral), or the telephone, respect it. Here’s how:
• Don’t use customer equipment for personal tasks. Make personal phone calls with your own phone (you do have a cell phone, don’t you?).
• Don’t go poking around their hard disk or PDA folders unless it’s necessary to solve the problem.
• Don’t “test” the printer by printing personal information. Use your own printer to print your resume or a pinup of your favorite movie star, sports figure, or car.
• If you need to reset the resolution on the display for testing, change it back when you’re done. Ditto with any other changes necessary for troubleshooting.
• Don’t make the customers sorry they called you or your company for help. Customers who become ex-customers have a way of helping potential customers call somebody else for help.
Exam Preparation Tasks
Review All the Key Topics
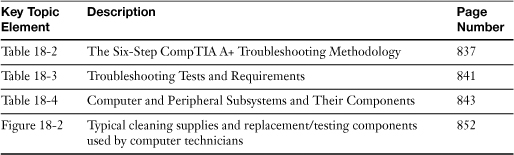
Review the most important topics in the chapter, noted with the key topics icon in the outer margin of the page. Table 18-5 lists a reference of these key topics and the page numbers on which each is found.
Table 18-5 Key Topics for Chapter 18
Complete the Tables and Lists from Memory
Print a copy of Appendix B, “Memory Tables,” (found on the CD), or at least the section for this chapter, and complete the tables and lists from memory. Appendix C, “Memory Tables Answer Key,” also on the CD, includes completed tables and lists to check your work.
Troubleshooting Scenario
You have been asked by your supervisor to help a user in the Human Resources area at work. HR is known for keeping a close eye on employee behavior. What should you do (or avoid doing) when working at the user’s desk?
Refer to Appendix A, “Answers to the ‘Do I Know This Already?’ Quizzes and Troubleshooting Scenarios,” for the answer.