In the object-oriented programming community, there is a very common design pattern known as Model-View-Controller. The Model-View-Controller design pattern says that each class you write should fall into exactly one of the following groups:
Model: Model classes describe your data. For example, if you write banking systems, you would probably create a model class called
SavingsAccountthat would have a list of transactions and a current balance. The best model classes include nothing about the user interface and can be used in several applications.View: A view class is part of the GUI. For example,
NSSlideris a view class. The best views are general-purpose classes and can be used in several applications.Controller: Controller classes are usually application-specific. They are responsible for controlling the flow of the application. The user needs to see the data, so a controller object reads the model from a file or a database and then displays the model using view classes. When the user makes changes, the view objects inform the controller, which subsequently updates the model objects. The controller also saves the data to the filesystem or database.
Until Mac OS X 10.3, Cocoa programmers wrote a lot of code in their controller objects that simply moved data from the model objects into the view objects and back again. To make common sorts of controller classes easier to write, Apple introduced NSController and bindings.
NSController is actually an abstract class (Figure 6.1). NSObjectController is a subclass of NSController that displays the information for an object (known as its content). NSArrayController is a controller that has an array of data objects as its content. In this exercise, we will use an NSArrayController.

The NSArrayController holds onto an array of model objects. When the user selects an object in the array, the NSArrayController updates all the views to reflect the new selection. When the user edits the views, the NSArrayController updates the model objects. The NSArrayController also allows the user to create new model objects and to delete existing model objects.
Of course, it would be awful if the NSController had to handle the logic of every possible view class. For this reason, some of the smarts are moved out to the views themselves. Each view has bindings that hold the information necessary to update that view.
Over the next few chapters, you will create a full-featured application for keeping track of employees and the raise that each person will receive this year. As this book progresses, you will add file saving, undo, user preferences, and printing capabilities. After this chapter, the application will look like Figure 6.2.

Create a new project in Xcode. Choose the Cocoa Document-based Application for the type and name the application RaiseMan.
What is a document-based application? An application where several documents can be open simultaneously. TextEdit, for example, is a document-based application. Conversely, System Preferences is not a document-based application. You will learn more about document architecture in the next chapter.
The object diagram for this application is shown in Figure 6.3. The table columns are connected to the NSArrayController by bindings, rather than by outlets.

Notice that the class MyDocument has already been created for you. MyDocument is a subclass of NSDocument. The document object is responsible for reading and writing files. In this exercise, we will use an NSArrayController and bindings to construct our simple interface, so we won't be adding any code to MyDocument just yet.
To create a new Person class, choose the File -> New File... menu item. When presented with the possibilities, choose Objective-C Class. Name the new file Person.m and make sure that it is going to create a Person.h file, as shown in Figure 6.4.

Edit the Person.h file to declare two instance variables and accessors for them:
#import <Foundation/Foundation.h>

@interface Person : NSObject {
    NSString *personName;
    float expectedRaise;
}

- (float)expectedRaise;
- (void)setExpectedRaise:(float)x;
- (NSString *)personName;
- (void)setPersonName:(NSString *)aName;
@end
Now edit Person.m to implement these methods and to override init and dealloc:
#import "Person.h"

@implementation Person

- (id)init
{
    [super init];
    [self setExpectedRaise:5.0];
    [self setPersonName:@"New Person"];
    return self;
}

 - (float)expectedRaise
{
    return expectedRaise;
}
 - (void)setExpectedRaise:(float)x
{
    expectedRaise = x;
}

 - (NSString *)personName
{
    return personName;
}

- (void)setPersonName:(NSString *)aName
{
    aName = [aName copy];
    [personName release];
    personName = aName;
}

- (void)dealloc
{
    [personName release];
    [super dealloc];
}

@end
Notice the method setPersonName:. When it is passed a string, the input could be an NSString or an NSMutableString. If it is a mutable string, you want to make an immutable copy of it. If it is an immutable string, you just want to retain it. This is exactly what NSString's copy method does. If the object is immutable, it is retained and returns itself. A mutable object makes an immutable copy of itself and returns that copy.
Notice that Person is a model class—it has no information about the user interface.
NSObject defines two incredibly useful methods for every object—a method for reading and a method for setting variables by name:
- (id)valueForKey:(NSString *)attrName;
- (void)setValue:(id)newValue forKey:(NSString *)attrName;
The valueForKey: method allows you to read the value of a variable by name. Of course, there may be an accessor method for the variable. You will want the accessor used if it exists. If there is no accessor method, you will want the variable read directly.
Suppose that valueForKey: is passed a string like @"foo". If the object has a method foo, it is executed and the result is returned. If there is no method foo, the method looks for an instance variable called foo. If the variable exists, the value of foo is returned. If there is neither a method nor a variable, you get an error. Thus, if you have an instance of Person, the following code will get the person's name:
NSString *theName = [aPerson valueForKey:@"personName"];
It works by calling the personName method.
The setValue:forKey: method allows you to set the value of a variable by name. Once again, the accessor method (setFoo:, for instance) is used if it exists. Otherwise, the method sets the variable directly. If there is neither a method nor a variable, you get an error. Thus, you can set a person's name this way:
[aPerson setValue:@"Grant Balfour" forKey:@"personName"];
This works by calling the setPersonName: method.
This mechanism is called key-value coding. Key-value coding enables Cocoa classes to look at and edit the attributes of your objects. Thanks to this technique, it is easy to make your application AppleScript-able. Key-value coding also makes NSController and the bindings mechanism possible.
It is very important, then, that you make your classes amenable to key-value coding. For example, if you have an instance variable foo, you should name your accessors setFoo: and foo, because that is what the key-value coding methods expect—it is more than just a convention.
In Xcode, double-click on MyDocument.nib to open it in Interface Builder.
Delete the text field that says Your document contents here. Drop a table view and two buttons on the window. Relabel and arrange them as shown in Figure 6.5

Drag out an NSArrayController and drop it in the doc window. (To find the Controllers palette, you will need to use the pop-up as shown in Figure 6.6

In the inspector, set its Object Class Name to Person. Add the keys for personName and expectedRaise as shown in Figure 6.7. Also, uncheck the box that says Preserves selection.

The first column of the table view displays each employee's name. Change the title of the column to Name. Click and double-click the column to select it (the header on the column should turn blue). In the bindings page of the inspector, set the value to display the personName of the arrangedObjects of the NSArrayController, as shown in Figure 6.8.

The second column of the table view displays each employee's expected raise. Drop a number formatter on the column, as shown in Figure 6.9. In the inspector, set the formatter to display the number as a percentage, as shown in Figure 6.10.


In the bindings page of the inspector, set the value to display the expectedRaise of the arrangedObjects of the NSArrayController, as shown in Figure 6.11.

Control-drag to make the array controller become the target of the Create New button. Set the action to insert:.
Control-drag to make the array controller become the target of the Delete button. Set the action to remove:. Also, in the bindings inspector, bind the button's enabled binding to the canRemove attribute of the NSArrayController, as shown in Figure 6.12.

Build and run your application. You should be able to create and delete Person objects. You should also be able to edit the attributes of the Person objects using the table view. Finally, you should be able to open multiple untitled documents. (No, you can't save those documents to a file. Soon, Grasshopper.)
Notice that our example contains very little code. You described what should be displayed in each of the columns in Interface Builder, but there is no code that actually calls the accessor methods of your Person class. How does this work? Key-value coding. Key-value coding makes generic, reusable classes like NSArrayController possible.
Notice that the key-value coding methods will automatically coerce the type for you. For example, when the user types in a new expected raise, the formatter creates an instance of NSDecimalNumber. The key-value coding method setValue:forKey: automatically converts that into a float before calling setExpectedRaise:. This behavior is extremely convenient.
There is, however, a problem with converting an NSDecimalNumber * into a float: Pointers can be nil, but floats cannot. If setValue:forKey: is passed a nil value that needs to be converted into a nonpointer type, it will call its own
- (void)setNilValueForKey:(NSString *)s
method. This method, as defined in NSObject, throws an exception. Thus, if the user left the Expected Raise field empty, your object would throw an exception. You should override this method in your Person class. Add the following method to Person.m:
- (void)setNilValueForKey:(NSString *)key
{
    if ([key isEqual:@"expectedRaise"]) {
       [self setExpectedRaise:0.0];
    } else {
       [super setNilValueForKey:key];
    }
}
NSObject's implementation of setNilValueForKey: throws an exception. Typically, you will override setNilValueForKey: so that it sets the instance variable to some default value. (In this case, expectedRaise is set to 0.0.)
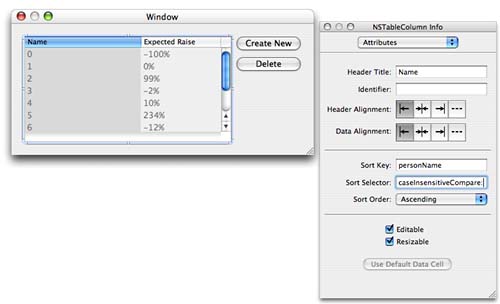
Adding sorting to your application is surprisingly easy. Open MyDocument.nib. You can set the sorting criteria in the inspector for each column. Users will be able to choose on which attribue the data will be sorted by clicking on the header of the column containing that attribute.
Select the column that displays personName. In the inspector, set the sort key to be personName and the selector to be caseInsensitiveCompare:, as shown in Figure 6.13. The caseInsensitiveCompare: method is part of NSString. For example, you might do this:
NSString *x = @"Piaggio";
NSString *y = @"Italjet"
NSComparisonResult result = [x caseInsensitiveCompare:y];

// Would x come first in the dictionary?
if (result == NSOrderedAscending)  {
      ...
}
NSComparisonResult is just an integer. NSOrderedAscending is -1. NSOrderedSame is 0. NSOrderedDescending is 1.
Select the column that displays expectedRaise. In the inspector, set the sort key to be expectedRaise and the selector to be compare:, as shown in Figure 6.14.

Build and run your application. Click on the header of the column to sort the data. Click again to see the data in reverse order.
In Chapter 5, you created a table view by implementing the dataSource methods explicitly. You might have wondered then how you could implement this sorting behavior in your own application.
The information that you added to the columns of the table is packed into an array of NSSortDescriptor objects. A sort descriptor includes the key, a selector, and an indicator of whether data should be sorted into ascending or descending order. If you have an NSMutableArray of objects, to sort it you can use the following method:
- (void)sortUsingDescriptors:(NSArray *)sortDescriptors
An optional table view dataSource method is triggered when the user clicks on the header of a column with a sort descriptor:
- (void)tableView:(NSTableView *)tableView
   sortDescriptorsDidChange:(NSArray *)oldDescriptors
Thus, if you have a mutable array that holds the information for a table view, you can implement the method like this:
- (void)tableView:(NSTableView *)tableView
              sortDescriptorsDidChange:(NSArray *)oldDescriptors
{
    NSArray *newDescriptors = [tableView sortDescriptors];
    [myArray sortUsingDescriptors:newDescriptors];
    [tableView reloadData];
}
And voila!, sorting in your application.
Objects are often arranged in a network. For example, a person might have a spouse who has a scooter that has a model name. To get the selected person's spouse's scooter's model name, you can use a key path:
NSString *mn;
mn = [selectedPerson valueForKeyPath:@"spouse.scooter.modelName"]
We'd say that spouse and scooter are relationships of the Person class and that modelName is an attribute of the Scooter class.
There are also operators that you can include in key paths. For example, if you have an array of Person objects, you could get their average expectedRaise by using key paths:
NSNumber *theAverage;
theAverage = [employees valueForKeyPath:@"@avg.expectedRaise"];
Here are some commonly used operators:
@avg
@count
@max
@min
@sum
Now that you know about key paths, we can discuss how to create bindings programmatically. If you had a text field in which you wanted to show the average expected raise, you could create a binding like this:
[textField bind:@"value"
       toObject:personController
    withKeyPath:@"[email protected]"
        options:nil];
Of course, it is usually easier to create a binding in Interface Builder.
Make the application sort people based on the number of characters in their name. You can complete this challenge using only Interface Builder—the trick is to use a key path. (Hint: Strings have a length method.)
In the first edition of this book, readers created the RaiseMan application without using NSController or the bindings mechanism. (These features were added in Mac OS X 10.3.) To do so, readers used the ideas from previous chapters. The challege, then, is to rewrite the RaiseMan application without using NSArrayController or the bindings mechanism. Bindings often seem rather magical, and it is good to know how to do things without resorting to magic.
Be sure to start afresh with a new project—in the next chapter, we will build on your existing project.
The Person class will stay exactly the same. In MyDocument.nib, you will set the identifier of each column to be the name of the variable that you would like displayed. Then, the MyDocument class will be the dataSource of the table view and the target of the Create New and Delete buttons. MyDocument will have an array of Person objects that it displays. To get you started, here is MyDocument.h:
#import <Cocoa/Cocoa.h>

@interface MyDocument : NSDocument
{
    NSMutableArray *employees;
    IBOutlet NSTableView *tableView;
}
- (IBAction)createEmployee:(id)sender;
- (IBAction)deleteSelectedEmployees:(id)sender;
@end
Here are the interesting parts of MyDocument.m:
- (id)init
{
    [super init];
    employees = [[NSMutableArray alloc] init];
    return self;
}

 // Action methods

- (IBAction)deleteSelectedEmployees:(id)sender
{
    // Which row is selected?
    NSIndexSet *rows = [tableView selectedRowIndexes];

    // Is there a selected row?
    if ([rows count] > 0) {
        unsigned int row =  [rows lastIndex];

        // Remove the selected people
        while (row != NSNotFound) {
            [employees removeObjectAtIndex:row];
            row = [rows indexLessThanIndex:row];
        }
        [tableView reloadData];
    } else {
        NSBeep();
    }
}

- (IBAction)createEmployee:(id)sender;
{
    Person *newEmployee = [[Person alloc] init];
    [employees addObject:newEmployee];
    [newEmployee release];
    [tableView reloadData];
}

// Table view dataSource methods

- (int)numberOfRowsInTableView:(NSTableView *)aTableView
{
    return [employees count];
}

- (id)tableView:(NSTableView *)aTableView
        objectValueForTableColumn:(NSTableColumn *)aTableColumn
                              row:(int)rowIndex
{
    // What is the identifier for the column?
    NSString *identifier = [aTableColumn identifier];
    // What person?
    Person *person = [employees objectAtIndex:rowIndex];

    // What is the value of the attribute named identifier?
    return [person valueForKey:identifier];
}

- (void)tableView:(NSTableView *)aTableView
    setObjectValue:(id)anObject
    forTableColumn:(NSTableColumn *)aTableColumn
               row:(int)rowIndex
{
    NSString *identifier = [aTableColumn identifier];
    Person *person = [employees objectAtIndex:rowIndex];

    // Set the value for the attribute named identifier
    [person setValue:anObject forKey:identifier];
}
Once you have it working, be sure to add sorting!