Developers often ask me if their Cocoa code can be used on other platforms. My answer is usually, “Well ... eh ... not really.” This chapter gives a longer answer to that question.
When NeXT made the OpenStep API (which was later renamed Cocoa) be an open standard, the Free Software Foundation announced that it would provide an open-source implementation of the standard. That was a decade ago, and the group has yet to release a 1.0 version of this implementation called GNUstep (http://www.gnustep.org).
GNUstep comprises replacements for Xcode, Interface Builder, and the Cocoa framework. There are also subprojects to create frameworks for Web development and database access. GNUstep should run on all sorts of Unix machines and even Windows, but I've used it only on Linux.
The effort may be a noble one, but using GNUstep is not for the faint of heart:
GNUstep is difficult to install.
The tools are buggy and crash regularly.
Porting your application from Mac OS X is difficult because the file formats for nib files are different under GNUstep. (While the OpenStep API is open, Apple has kept the nib file format closed and proprietary.)
The interface that GNUstep creates is a decent copy of the NeXT UI. It was a slick look in 1994, but now the look and feel are like neither the Mac nor a normal X11 application.
Quartz and the Apple Window Server run natively on Mac OS X. GNUstep attempts to graft this graphics model onto whatever back end it is using. (On most systems, X11 serves as the back end.) The performance and aesthetics may disappoint users who are familiar with Mac OS X.
If after reading these warnings you still feel smart enough and determined enough to install and use GNUstep, I'll do my best to show you how to get started.
Start with a nice, fresh Linux machine. The GNUstep team tends to be fairly aggressive about using the latest gcc, so you'll want to make sure the machine is up-to-date with a recent distribution. Install WindowMaker (http://www.windowmaker.org) as your window manager—the package management system on your machine should make this easy. (Any window manager will work, but the NeXT-style menus and icons look a lot better with WindowMaker.)
You'll also want to download and install ffcall. It is available via anonymous FTP at ftp.gnustep.org.
The easiest way to install GNUstep is to use CVS from the terminal. Log in to the server (just press Enter when asked for a password) and download the entire project:
% cvs -d:pserver:[email protected]:/cvsroot/gnustep login
% cvs -z3 -d:pserver:[email protected]:/cvsroot/gnustep co gnustep
This will create a directory named gnustep. Inside this directory, you will find a directory called core that has four important parts:
make: All of the makefiles needed to build GNUstep applications. It also includes a script calledGNUstep.sh, which gives you all of the necessary environment variables. By default, it is installed in/usr/GNUstep/System/Library/Makefiles/.base: The replacement forFoundation.framework.gui: The replacement forAppkit.framework.back: To make it possible to port the AppKit to several different platforms, the system-specific parts have been moved into a carefully delineated back-end, calledback.
There is also a script in the core directory called compile-all. This handy script will configure, build, and install the entire core for you. The system, for portability reasons, does not use frameworks. The libraries and headers will be installed in /usr/GNUstep/System.
With the libraries and makefiles installed, you next need to start up some daemons. The gdomap daemon owns port 538 and tracks services that your GNUstep applications create. The gdnc daemon holds the distributed notification center. You should start both when your machine boots:
# Setup for the GNUstep environment
if [ -f /usr/GNUstep/System/Makefiles/GNUstep.sh ]; then
   . /usr/GNUstep/System/Makefiles/GNUstep.sh
fi

# Start the GNUstep daemons
if [ -f $GNUSTEP_SYSTEM_ROOT/Tools/gdomap ]; then
      echo -n "Starting GNUstep services... "
      echo -n "gdomap "
      $GNUSTEP_SYSTEM_ROOT/Tools/gdomap
      echo "gdnc "
      $GNUSTEP_SYSTEM_ROOT/Tools/gdnc
fi
For each user, you will want to set the necessary environment variables. The easiest way to do so is to add the following lines to your /etc/profile:
# Setup for the GNUstep environment
if [ -f /usr/GNUstep/System/Makefiles/GNUstep.sh ]; then
   . /usr/GNUstep/System/Makefiles/GNUstep.sh
fi
You'll want to start the pasteboard server when the X server starts. Create a ~/.xinitrc file:
$GNUSTEP_SYSTEM_ROOT/Tools/gpbs
exec wmaker
At this point, reboot your machine, log in, and start the X server. At a terminal, confirm that the following processes are running:
% ps -auxw | grep GNU
root      1782   15:31   0:00 /usr/GNUstep/System/Tools/gdomap
root      1784   15:31   0:00 /usr/GNUstep/System/Tools/gdnc
aaron     1929   15:37   0:00 /usr/GNUstep/System/Tools/gpbs
aaron     1981   15:38   0:00 grep GNU
Good. If you have gotten this far, you have a system from which you can now run GNUstep applications. You are not, however, ready to develop GNUstep applications.
In the CVS-created gnustep directory, you will find dev-apps/Gorm. Gorm is the replacement for Interface Builder. At a terminal, issue two commands: make and make install. Gorm will be installed in /usr/GNUstep/System/Applications/Gorm.app.
In dev-apps/ProjectCenter, run make and make install. ProjectCenter is the replacement for Project Builder.
To start ProjectCenter, use WindowMaker's Run... menu item. When the panel appears, type openapp ProjectCenter as shown in Figure 31.1.
When ProjectCenter has started, create a new project of type GormApplication. Name it RandomApp, as shown in Figure 31.2.

Throughout this process, there are a few things to remember:
Save often. The tools do crash occasionally.
Use the option-key to trigger menu items. For example, option-q will trigger the Quit menu item.
A template project will be created for you. Double-click RandomApp.gorm under the Interfaces group as shown in Figure 31.3.

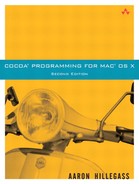
Gorm will start and open the RandomApp.gorm file. Drag a button from the palette window onto your window. Change its title to Seed random number generator,as shown in Figure 31.4.
Drop another button on the window. Change its title to Generate random number. Drag a title text field onto the window. Change its string value to ???.
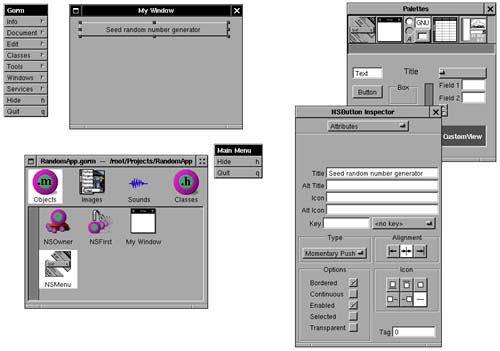
In the Classes page, select NSObject. Create a subclass of NSObject and rename it Foo. Add two actions, generate: and seed:, to the class Foo, as shown in Figure 31.5. Also add an outlet named textField.
To create the files, use the Create Class Files... menu item in the Classes menu. Save Foo.h and Foo.m in your project directory.
Using the Classes menu, create an instance of Foo.
Control-drag from the seed button to the Foo object. If you are familiar with Interface Builder, you will be surprised that no line appears. (Intellectual property trivia: Apple has a patent on the window-as-a-thin-line technique.) Instead, a green rectangle will appear around the source of the connection (the NSButton) and a purple rectangle will appear around the destination (the Foo). In the list of outlets in the connections inspector, choose target and then choose the action seed:, as shown in Figure 31.6

Control-drag from the Generate button to Foo and set the action to be generate:. Control-drag from Foo to the text field and set the textField outlet. Save the Gorm file.
In ProjectCenter, edit Foo.m as follows:
#include <AppKit/AppKit.h>
#include "Foo.h"

@implementation Foo
- (IBAction)generate:(id)sender
{
    // Generate a number between 1 and 100 inclusive
    int generated;
    generated = (random() % 100) + 1;

    // Ask the text field to change what it is displaying
    [textField setIntValue:generated];
}

- (IBAction)seed:(id)sender
{
    // Seed the random number generator with the time
    srandom(time(NULL));
    [textField setStringValue:@"Generator seeded"];
}

@end
Notice that GNUstep people do not use #import. The implementation of #import in gcc was quite poor until the most recent release. If GNUstep people do not use #import, how do they prevent the same header file from being included more than once? They use the old #ifndef trick in their header files:
#ifndef _MyFramework_H_MyClass
#define _MyFramework_H_MyClass

@class MyClass
...
@end
#endif
Another surprising style difference in GNUstep style is the set of macros that is used quite consistently. A Cocoa programmer typically creates an accessor that looks like this:
- (void)setRex:(NSCalendarDate *)c
{
    [c retain];
    [rex release];
    rex = c;
}
This would work in GNUstep, but GNUstep developers typically use an equivalent macro:
- (void)setRex:(NSCalendarDate *)c
{
    ASSIGN(rex, c);
}
Here are some of the commonly used macros:
AUTORELEASE (object): Send anautoreleasemessage to the object.RELEASE (object): Send areleasemessage to the object.RETAIN (object): Send aretainmessage to the object.DESTROY (variable): Send areleasemessage to the object stored in the variable (often an instance variable), and then set the variable tonil.ASSIGN (variable, value): Assign a value to a variable (often an instance variable). The macro retains the new value, puts the new value in the variable, and then releases the old value. If the variable already had the new value, the macro does nothing.ASSIGN_COPY (variable, value): Same asASSIGN, but copies the value (instead of retaining it) before assigning it to the variable.
Besides saving a few lines of typing, these macros allow developers to easily substitute the retain count mechanism with automatic garbage collection routines.
Now it is time to build your project. You must make sure that everything is saved: the code, the Gorm file, and the project itself. To see the build panel, click the screwdriver button in ProjectCenter. Click the screwdriver button in the build panel to begin the build, as shown in Figure 31.7.

To run your program, click the button with the screen and rocket to get the launch panel. Then click the rocket to run it, as shown in Figure 31.8.

Your application should run without a problem. If you click the buttons and nothing happens (or if there are no buttons present), chances are you have forgotten to save something.
That information should suffice to get you started.
The project created in this chapter has a lot of promise, but it is still awkward to use. The frameworks seem further along than the tools, but I wouldn't bet my business on either in their current state. In time, if enough people help, GNUstep will become a great way to run your OpenStep/Cocoa applications on many platforms.