In time, you will develop a collection of classes that are designed to work together. To make reuse of the collection easier, you can compile them into a framework. A framework is simply a directory that can include header files, a library of compiled code, and resources. When you create an application that uses this directory, you will link against the framework.
When you link against a framework, its location is recorded in the executable. If the framework is not found in that location when the application runs, the following locations are checked:
~/Library/Frameworks/Library/Frameworks/Network/Library/Frameworks/System/Library/Frameworks
Apple installs all of the standard frameworks in /System/Library/Frameworks/. If your framework is used in several applications, you will typically install it in /Library/Frameworks/. If your framework is used by only one application, you will typically embed it inside that application's app wrapper.
To make your framework easier to use, you should ensure that it includes the headers for all the code that you wish to make public. Typically, you will also create a master header that includes all the other headers. The master header makes imports like the following possible:
#import <Foundation/Foundation.h>
To speed the launch of applications that link against your framework, make sure that it can be easily prebound into an app.
In this chapter, you will build a framework that includes the BigLetterView class, the ColorFormatter class, and the FirstLetter category. The name of the framework will be BNRCocoa.
You will install the new framework in your home directory, so in Finder create a ~/Library/Frameworks directory, if one does not already exist (Figure 30.1)

Create a new project of type Cocoa Framework named BNRCocoa. From the Finder, drag the .h and .m files for BigLetterView, FirstLetter, and ColorFormatter into the Classes group of the new project (Figure 30.2). (Check the Copy check box to copy them in.) Delete the file main.c.

Note that the Cocoa framework is already included in the project.
Create a new file in Xcode of type Empty File named BNRCocoa.h. Move it under the top-level group BNRCocoa.
Edit BNRCocoa.h as follows:
#import <BNRCocoa/BigLetterView.h>
#import <BNRCocoa/ColorFormatter.h>
#import <BNRCocoa/FirstLetter.h>
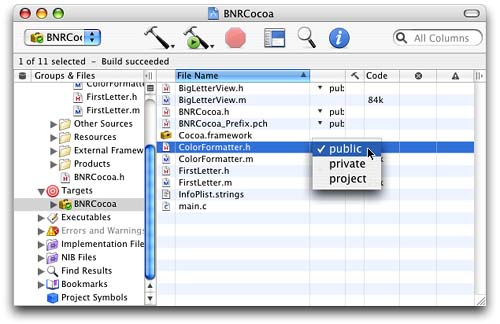
Open the Targets group on the left side of your Xcode window and select the BNRCocoa target. For each header file displayed on the right side of the Xcode window, choose public from the pop-up menu in the second column, as shown in Figure 30.3
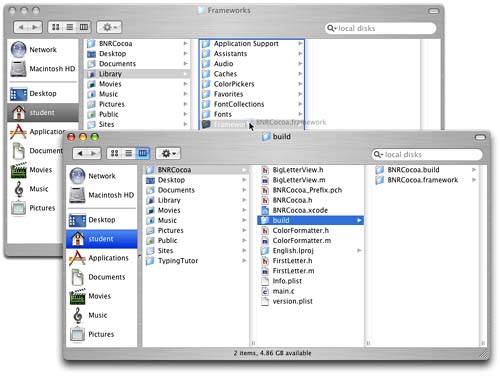
Build the framework. In the Finder, move the BNRCocoa.framework from the build directory of your project directory into ~/Library/Frameworks, as shown in Figure 30.4.
Open the TypingTutor project. Delete the files for BigLetterView, ColorFormatter, and FirstLetter. Using the Add Frameworks... menu item under the Project menu, add ~/Library/Frameworks/BNRCocoa.framework to the project (Figure 30.5).

Import the the master header in AppController.h:
#import <BNRCocoa/BNRCocoa.h>
Eliminate the lines importing BigLetterView.h and ColorFormatter.h in AppController.m.
Clean, recompile, and run TypingTutor. Ignore any warnings about prebinding. You will take care of those issues soon.
Oddly enough, to embed a framework, both the framework and the application must be compiled in a special manner.
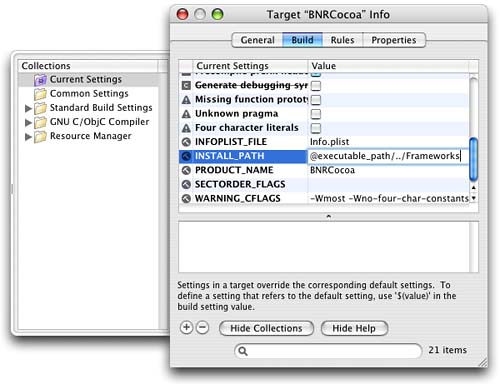
Switch back to the BNRCocoa project. Click on the BNRCocoa target under the Targets group on the left side of the Xcode window, then choose Get Info from the Project menu to open the info panel (Figure 30.6)

Click the Build tab. Scroll down to the build setting named INSTALL_PATH, and change its value to @executable_path/../Frameworks (Figure 30.7).
Close the info panel. Clean and compile the framework.
Open the TypingTutor project. You no longer want to use the framework that is in ~/Library/Frameworks, so delete it from the project. Choose Add Frameworks… from the Project menu, and add the BNRCocoa.framework that is in the build directory of the BNRCocoa project (typically ~/BNRCocoa/build/BNRCocoa.framework).
Expand the TypingTutor target under the Targets group in the left side of the Xcode window to reveal the build phases. Click on the Frameworks & Libraries build phase, then choose New Build Phase from the Project menu and select New Copy Files Build Phase from the submenu (Figure 30.8).

Select the new Copy Files build phase. Choose Get Info from the Project menu to open the info panel. Choose Frameworks from the Destination pop-up menu (Figure 30.9), and then close the info panel.

In the outline view on the left side of the Xcode window, drag the BNRCocoa.framework icon from the Frameworks folder down into the Copy Files build phase you created (Figure 30.10).

Clean and build the application. In the Terminal, browse the resulting app wrapper for the BNRCocoa.framework. Note that you can delete the BNRCocoa.framework from ~/Library/Frameworks, and the one in the BNRCocoa project directory and the application will still run because it has copied the framework into the app wrapper.
Libraries are loaded into memory at some location. Apps launch most quickly if the libraries are loaded into non-overlapping addresses. If two libraries try to claim the same space, one is moved, which can slow the launch very slightly.
While compiling an app that uses a framework that has not been “optimized,” you may receive warnings. A simple fix is to set the address where the framework is loaded to some random address by passing a flag to the linker. In your framework project, just set the address in the Other linker flags build setting in the Build tab of the target info panel like this (Figure 30.11):
-seg1addr 0x20000000

Non-Apple libraries can use any address in the range 0x00000000 to 0x3FFFFFFF. This choice can eliminate the warning and increase the speed of your launch a tiny bit.
Change the seg1addr on your BNRCocoa framework to 0x20000000 and recompile it. Note that prebinding is not disabled.
Zero-link is a nifty technology that speeds builds while you are doing development. It eliminates the need for your app to be linked every time you build it. Of course, you need to turn off this feature and rebuild the app with true linking before you ship it.
By default, your Cocoa project is created with two build styles: Development and Deployment. You've been using the Development build style throughout this book. The Deployment build style uses true linking and strips the debugging symbols out of the app. If you want to change back and forth between the two build styles, the easiest way is to add the Build Styles pop-up to your toolbar in Xcode.