When the user types, where are the corresponding events sent? First, the window manager gets the event and forwards it to the active application. The active application forwards the keyboard events to the key window. The key window forwards the event to the “active” view. Which view, then, is the active one? Each window has an outlet called firstResponder that points to one view of that window. That view is the “active” one for that window. For example, when you click on a text field, it becomes the firstResponder of that window (Figure 16.1).

When the user tries to change the firstResponder to another view (by tabbing or clicking the other view), the views go through a certain ritual before firstResponder outlet is changed. First, the view that may become the firstResponder is asked if it accepts first-responder status. If it returns NO, that means the view is not interested in keyboard events. For example, you can't type into a slider, so it refuses to accept first-responder status. If the view does accept first-responder status, the view that is currently the first responder is asked if it resigns its role as the first responder. If the editing is not done, the view can refuse to give up first-responder status. For example, if the user had not typed in his or her entire phone number, the text field could refuse to resign this status. Finally, the view is told that it is becoming the first responder. Often, this triggers a change in its appearance (Figure 16.2).

Note that each window has its own first responder. Several windows may be open, but only the first responder of the key window gets the keyboard events.
We are interested in the following methods that are inherited from NSResponder:
- (BOOL)acceptsFirstResponderOverridden by a subclass to return
YESif it handles keyboard events.- (BOOL)resignFirstResponderAsks the receiver if it is willing to give up first-responder status.
- (BOOL)becomeFirstResponderNotifies the receiver that has become first responder in its
NSWindow.- (void)keyDown:(NSEvent *)theEventInforms the receiver that the user has pressed a key.
- (void)keyUp:(NSEvent *)theEventInforms the receiver that the user has released a key.
- (void)flagsChanged:(NSEvent *)theEventInforms the receiver that the user has pressed or released a modifier key (Shift, Control, or so on).
We discussed NSEvent in terms of mouse events in Chapter 15. Here are some of the methods commonly used when getting information about a keyboard event:
- (NSString *)charactersReturns the characters created by the event.
- (BOOL)isARepeatReturns
YESif the key event is a repeat caused by the user holding the key down; returnsNOif the key event is new.- (unsigned short)keyCodeReturns the code for the keyboard key that caused the event. Its value is hardware dependent.
- (unsigned int)modifierFlagsReturns an integer bit field indicating the modifier keys in effect for the receiver. For information about what the bits of the integer mean, refer to the discussion in Chapter 15.
Create a new project of type Cocoa Application. Name it TypingTutor.
Open MainMenu.nib. Select NSView in the classes browser (Figure 16.3).

Create a subclass and name it BigLetterView (Figure 16.4).

Create the files for BigLetterView (Figure 16.5).

Save the files in the project directory.
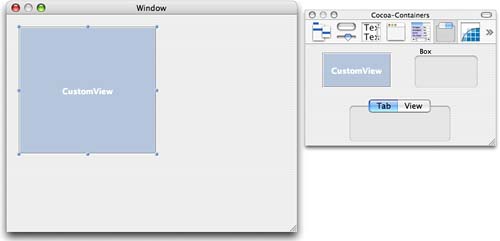
Now create an instance of your class by dragging out a CustomView placeholder and dropping it on the window (Figure 16.6).
Open the inspector and set the class of the view to be BigLetterView (Figure 16.7).

Select the new view, open the size info panel, and set it as shown in Figure 16.8. Now it will keep constant its distance from the upper-left corner of its superview. That is, it will grow and shrink with the superview.

Really small windows will mess up your nice resizing, so open the size info panel for the window and click the Current button in the Min Size box. That will prevent the user from making the window any smaller.
Drop two text fields on the window (Figure 16.9).

Now you need to create the loop of key views for your window. That is, you are setting the order in which the views will be selected as the user tabs from one element to the next. The order will be the text field on the left, the text field on the right, the BigLetterView, and then back to the text field on the left.
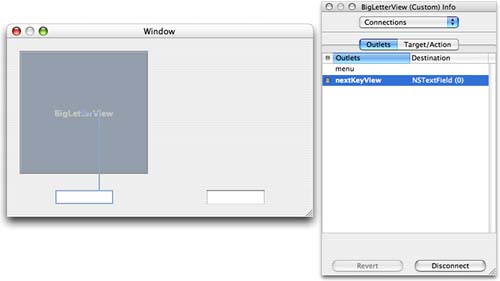
Set the left-hand text field's nextKeyView to be the right-hand text field (Figure 16.10).

Set the right-hand text field's nextKeyView to be the BigLetterView (Figure 16.11).

Finally, set the nextKeyView of the BigLetterView to be the left-hand text field (Figure 16.12). This will enable the user to tab between the three views. Shift-tabbing will move the selection in the opposite direction.
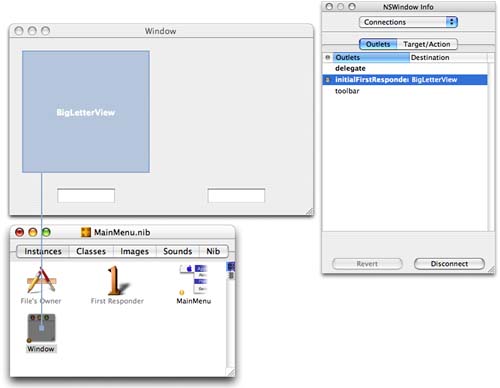
Which view, then, should be the firstResponder when the window first appears? To make the BigLetterView be the initialFirstResponder of the window, drag from the window to the text field and set the initialFirst Responder outlet (Figure 16.13).
Save and close the nib file.
In this section, you will make your BigLetterView respond to key events. You will also make it accept first-responder status. The characters typed by the user will appear in the console. The completed application will look like Figure 16.14.
Your BigLetterView will have two instance variables and accessor methods for those variables. The bgColor variable will identify the background color of the view and will be an NSColor object. The string variable will hold on to the letter that the user most recently typed and will be an NSString object.
#import <Cocoa/Cocoa.h>

@interface BigLetterView : NSView
{
    NSColor *bgColor;
    NSString *string;
}

- (void)setBgColor:(NSColor *)c;
- (NSColor *)bgColor;
- (void)setString:(NSString *)c;
- (NSString *)string;

@end
The designated initializer for a view is initWithFrame:. In this method, you will call the superclass's initWithFrame: method and initialize bgColor and string to default values. Add the following method to BigLetterView.m:
- (id)initWithFrame:(NSRect)rect
{
    if (self = [super initWithFrame:rect]) {
      NSLog(@"initializing view");
      [self setBgColor:[NSColor yellowColor]];
      [self setString:@" "];
    }
    return self;
}
Create accessor methods for bgColor and string:
- (void)setBgColor:(NSColor *)c
{
    [c retain];
    [bgColor release];
    bgColor = c;
    [self setNeedsDisplay:YES];
}

- (NSColor *)bgColor
{
    return bgColor;
}
- (void)setString:(NSString *)c
{
    c = [c copy];
    [string release];
    string = c;
    NSLog(@"The string is now %@", string);
}

- (NSString *)string
{
    return string;
}
Add the following code to the drawRect: method. It will fill the view with bgColor. If the view is the window's firstResponder, it will stroke a black rectangle around its bounds to show the user that it will be the view receiving keyboard events:
- (void)drawRect:(NSRect)rect
{
    NSRect bounds = [self bounds];
    [bgColor set];
    [NSBezierPath fillRect:bounds];

    // Am I the window's first responder?
    if ([[self window] firstResponder] == self) {
        [[NSColor keyboardFocusIndicatorColor] set];
        [NSBezierPath setDefaultLineWidth:4.0];
        [NSBezierPath strokeRect:bounds];
    }
}
The system can optimize your drawing a bit if it knows that the view is completely opaque. Override NSView's isOpaque method.
- (BOOL)isOpaque
{
    return YES;
}
The methods to become firstResponder are as follows:
- (BOOL)acceptsFirstResponder
{
    NSLog(@"Accepting");
    return YES;
}

- (BOOL)resignFirstResponder
{
    NSLog(@"Resigning");
    [self setNeedsDisplay: YES];
    return YES;
}

- (BOOL)becomeFirstResponder{
    NSLog(@"Becoming");
    [self setNeedsDisplay: YES];
    return YES;
}
Once the view becomes the first responder, it will handle key events. For most keyDowns, the view will simply change string to be whatever the user typed. If, however, the user presses Tab or Shift-Tab, the view will ask the window to change the first responder.
NSResponder (from which NSView inherits) has a method called interpretKeyEvents:. For most key events, it just tells the view to insert the text. For events that might do something else (like Tab or Shift-Tab), it calls methods on itself.
In keyDown:, you simply call interpretKeyEvents:
- (void)keyDown:(NSEvent *)event
{
    [self interpretKeyEvents:[NSArray arrayWithObject:event]];
}
Then you need to override the methods that interpretKeyEvents: will call:
- (void)insertText:(NSString *)input
{
    // Set string to be what the user typed
    [self setString:input];
}

- (void)insertTab:(id)sender
{
    [[self window] selectKeyViewFollowingView:self];
}

- (void)insertBacktab:(id)sender
{
    [[self window] selectKeyViewPrecedingView:self];
}
Of course, you want to be a tidy programmer, so you will be sure to release your instance variables when the view is deallocated:
// release instance variables
- (void)dealloc
{
    [string release];
    [bgColor release];
    [super dealloc];
}
@end
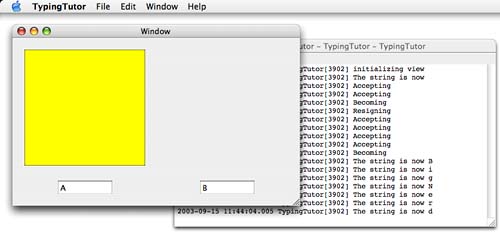
Build and run your program. You should see that your view becomes the first responder. While it is first responder, it should take keyboard events and log them to the terminal. Also, note that you can Tab and Shift-Tab between the views (Figure 16.15).

Three mouse events were not discussed in Chapter 15: mouseMoved:, mouseEntered:, and mouseExited:.
- (void)mouseMoved:(NSEvent *)event
To receive mouseMoved:, the view's window needs to accept “mouse-moved” events. If it does, the mouseMoved: message is sent to the window's first responder. To set the window to get mouse-moved events, you send it the message setAcceptsMouseMovedEvents:
[[self window] setAcceptsMouseMovedEvents:YES];
At this point, the view will be sent the message every time the mouse moves. This is a lot of events. When people ask me about mouse-moved events, I ask them why they want it. They usually say, “Uh, rollovers.”
Rollovers are very popular in Web browsers. As you roll over a region, its appearance changes to make it clear that if you clicked now, that region would accept the click. Bookmarks in Safari, for examples, become highlighted when you roll over them.
To do rollovers, you don't typically use mouseMoved:. Instead, you set up a tracking rect and override mouseEntered: and mouseExited:. When you create a tracking rect, you are given a number (called the tag) that identifies it. You can use the tag to remove the tracking rect when you are finished with it.
The tricky part is keeping the tracking rect up-to-date as the view is moved, resized, and transferred from one window onto another. Assuming that your view has an integer instance variable called rolloverTrackingRectTag, here is the code that will take care of that for you:
- (void)resetTrackingRect
{
    // Clear out the old tracking rect
    [self clearTrackingRect];

    // Create a new tracking rect
    rolloverTrackingRectTag = [self addTrackingRect:[self visibleRect]
                                              owner:self
                                           userData:NULL
                                       assumeInside:NO];
    }
}

- (void)clearTrackingRect
{
    // If we have a tracking rect, then remove it
    if (rolloverTrackingRectTag > 0) {
        [self removeTrackingRect:rolloverTrackingRectTag];
        rolloverTrackingRectTag = 0;
    }
}

// This is called automatically
// after a view is moved,
// resized, or scrolled

- (void)resetCursorRects
{
   [super resetCursorRects];
   [self resetTrackinRect];
}
Then, you change the appearance when mouseEntered: and mouseExited: are called. Assuming you have a variable called isHighlighted of type BOOL, here is the code:
- (void)mouseEntered:(NSEvent *)theEvent
{
    isHighlighted = YES;
    [self setNeedsDisplay:YES];}
}

- (void)mouseExited:(NSEvent *)theEvent
{
    isHighlighted = NO;
    [self setNeedsDisplay:YES];
}
You would then check isHighlighted in your drawRect: method and draw the view appropriately.
If your view has several different tracking rects, in the mouseEntered: method you can ask the event for the tag of the rect that was entered:
- (int)trackingNumber