This chapter is not designed to teach you OpenGL. If you want to learn OpenGL, read The OpenGL Programming Guide. This chapter is intended to show you how to do drawing with OpenGL in an application that is written using Cocoa. Like all other drawing in Cocoa, OpenGL rendering will be done in a view. Until now, all of your views have used an NSGraphicsContext to do drawing with Quartz (via NSImage, NSBezierPath, and NSAttributedString).
NSOpenGLView is a subclass of NSView that has an OpenGL drawing context. Just as you needed the focus locked on a view to do drawing with Quartz, so the OpenGL drawing context must be active for any OpenGL drawing commands to have an effect.
Here are some important methods in NSOpenGLView:
- (id)initWithFrame:(NSRect)frameRect
        pixelFormat:(NSOpenGLPixelFormat *)format
The designated initializer.
- (NSOpenGLContext*)openGLContextReturns the views in the OpenGL context.
- (void)reshapeCalled when the view is resized. The OpenGL context is active when this method is called.
- (void)drawRect:(NSRect)rCalled when the view needs to be redrawn. The OpenGL context is active when this method is called.
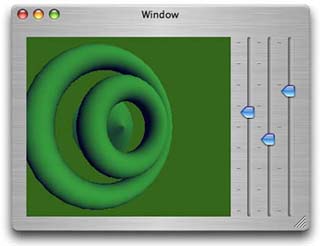
Figure 29.1 shows the application that you will create
Create a new Cocoa Application project and call it Gliss (short for “GL Bliss”). Under the Project menu, use Add Frameworks... to add the frameworks OpenGL.framework and GLUT.framework to the project. You will not be using the GLUT event model—just a couple of convenient functions.
Open MainMenu.nib and create a subclass of NSOpenGLView named GlissView. Create an outlet called sliderMatrix that will point to an NSMatrix. Create an action called changeParameter:. Create the files for GlissView.
Drag an NSOpenGLView onto the window and set its custom class to GlissView. Set it to resize with the window, as shown in Figure 29.2

Drop an NSSlider on the window. Configure the slider to be continuous and to allow values other than the markers. Option-drag one corner's resize handles (as if resizing) to make it into a matrix of three slider cells, as shown in Figure 29.3

Set the target of the matrix to be the GlissView and set the action to be changeParameter:. Set the sliderMatrix outlet of the the GlissView to point to the matrix. (Be sure to create connections in both directions.)
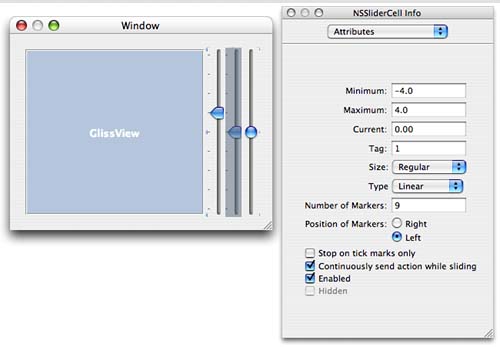
The first slider will control the X-coordinate of the light. Set its range from -4 to 4 and give it an initial value of 1. It should have a tag of 0. The inspector should look like Figure 29.4.
The second slider will control the angle from which the scene is viewed. Set its range from -4 to 4, and give it an initial value of 0. It should have a tag of 1.
The third slider will control from how far the scene is viewed. Set its range from 0.3 to 5, and give it an initial value of 4. It should have a tag of 2.
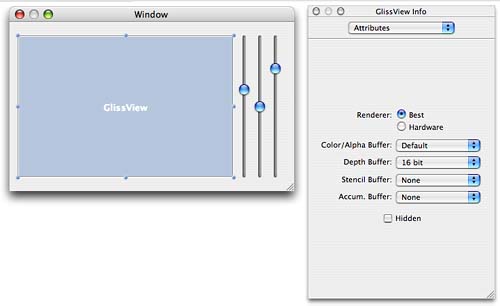
Select the GlissView. In the attributes inspector, set the view to have a 16-bit depth buffer, as shown in Figure 29.5.
Inspect the NSMatrix. Set it to autosize its cells. In the size inspector, make the matrix cling to the right edge of the window, as shown in Figure 29.6. Save the nib file.

Edit GlissView.h as follows:
#import <Cocoa/Cocoa.h>
#define LIGHT_X_TAG  0
#define THETA_TAG  1
#define RADIUS_TAG  2

@interface GlissView : NSOpenGLView
{
    IBOutlet NSMatrix *sliderMatrix;
    float lightX, theta, radius;
}
- (void)prepare;
- (IBAction)changeParameter:(id)sender;
@end
Next, edit GlissView.m:
#import "GlissView.h"
#import <GLUT/glut.h>

@implementation GlissView

- (id)initWithFrame:(NSRect)frameRect
        pixelFormat:(NSOpenGLPixelFormat *)pixFmt
{
    self = [super initWithFrame:frameRect pixelFormat:pixFmt];
    [self prepare];
    return self;
}

- (id)initWithCoder:(NSCoder *)c
{
    self = [super initWithCoder:c];
    [self prepare];
    return self;
}

- (void)prepare
{
    NSLog(@"prepare");
    float mat[4];
    NSOpenGLContext *glcontext;
    GLfloat ambient[] = {0.2, 0.2, 0.2, 1.0};
    GLfloat diffuse[] = {1.0, 1.0, 1.0, 1.0};

    // The GL context must be active for these functions to have an effect
    glcontext = [self openGLContext];
    [glcontext makeCurrentContext];

    // Configure the view
    glShadeModel(GL_SMOOTH);
    glEnable(GL_LIGHTING);
    glEnable(GL_DEPTH_TEST);

    // Add some ambient lighting
    glLightModelfv(GL_LIGHT_MODEL_AMBIENT, ambient);

    // Initialize the light
    glLightfv(GL_LIGHT0, GL_DIFFUSE, diffuse);
    // and switch it on.
    glEnable(GL_LIGHT0);

    // Set the properties of the material under ambient light
    mat[0] = 0.1;
    mat[1] = 0.1;
    mat[2] = 0.7;
    mat[3] = 1.0;
    glMaterialfv(GL_FRONT, GL_AMBIENT, mat);

    // Set the properties of the material under diffuse light
    mat[0] = 0.2;
    mat[1] = 0.6;
    mat[2] = 0.1;
    glMaterialfv(GL_FRONT, GL_DIFFUSE, mat);
}

// Called when the view resizes
- (void)reshape
{
    NSLog(@"reshaping");
    NSRect rect = [self bounds];
    glViewport(0,0, rect.size.width, rect.size.height);
    glMatrixMode(GL_PROJECTION);
    glLoadIdentity();
    gluPerspective(60.0, rect.size.width/rect.size.height, 0.2, 7);
}

- (void)awakeFromNib
{
    [self changeParameter:self];
}

- (IBAction)changeParameter:(id)sender
{
    lightX = [[sliderMatrix cellWithTag:LIGHT_X_TAG] floatValue];
    theta = [[sliderMatrix cellWithTag:THETA_TAG] floatValue];
    radius = [[sliderMatrix cellWithTag:RADIUS_TAG] floatValue];
    [self setNeedsDisplay:YES];
}

- (void)drawRect:(NSRect)r
{
    GLfloat lightPosition[] = {lightX, 1, 3, 0.0};

    // Clear the background
    glClearColor (0.2, 0.4, 0.1, 0.0);
    glClear(GL_COLOR_BUFFER_BIT |
            GL_DEPTH_BUFFER_BIT);

    // Set the view point
    glMatrixMode(GL_MODELVIEW);
    glLoadIdentity();
    gluLookAt(radius * sin(theta), 0,  radius * cos(theta),
              0, 0, 0,
              0, 1, 0);

    // Put the light in place
    glLightfv(GL_LIGHT0, GL_POSITION, lightPosition);

    // Draw the stuff
    glTranslatef(0, 0, 0);
    glutSolidTorus(0.3, 0.9, 35, 31);
    glTranslatef(0, 0, -1.2);
    glutSolidCone(1, 1, 17, 17);
    glTranslatef(0, 0, 0.6);
    glutSolidTorus(0.3, 1.8, 35, 31);

    // Flush to screen
    glFinish();
}
@end
Notice that the OpenGL calls are broken into three parts: prepare is all the calls to be sent initially, reshape is all the calls to be sent when the view resizes, and drawRect: is all the calls to be sent each time the view needs to be redrawn. Build and run the app.