Once upon a time (before Baywatch), there was a man with no name. Knight Industries decided that if this man were given guns and wheels and booster rockets, he would be the perfect crime-fighting tool. First they thought, “Let's subclass him and override everything we need to add the guns and wheels and booster rockets.” The problem was that to subclass Michael Knight, you would need to know an awful lot about his guts so that you could wire them to guns and booster rockets. So instead, they created a helper object, the Knight Industries 2000 Super Car, or “Kitt.”
Notice how this is different from the RoboCop approach. RoboCop was a man subclassed and extended. The whole RoboCop project involved dozens of surgeons who extended the man's brain into a fighting machine. This is the approach taken with many object-oriented frameworks.
While approaching the perimeter of an arms dealer's compound, Michael Knight would speak to Kitt over his watch-radio. “Kitt,” he would say, “I need to get to the other side of that wall.” Kitt would then blast a big hole in the wall with a small rocket. After destroying the wall, Kitt would return control to Michael, who would stroll through the rubble.
Many objects in the Cocoa framework are extended in much the same way. That is, there is an existing object that needs to be extended for your purpose. Instead of subclassing the table view, you simply supply it with a helper object. For example, when a table view is about to display itself, it will turn to the helper object to ask things like “How many rows of data am I displaying?” and “What should be displayed in the first column, second row?”
Thus, to extend an existing Cocoa class, you will frequently write a helper object. This chapter focuses on creating helper objects and connecting them to the standard Cocoa objects.
In the SpeakLine application, the use of your interface would be more obvious if the Stop button remained disabled unless the speech synthesizer were speaking. Thus, the AppController should enable the button when it starts the speech synthesizer and then disable the button when the speech synthesizer stops.
Many classes in the Cocoa framework have an instance variable called delegate. You can set the delegate outlet to point to a helper object. In the documentation for the class, the delegate methods are clearly described. For example, the NSSpeechSynthesizer class has the following delegate methods:
- (void)speechSynthesizer:(NSSpeechSynthesizer *)sender
        didFinishSpeaking:(BOOL)finishedSpeaking;


- (void)speechSynthesizer:(NSSpeechSynthesizer *)sender
            willSpeakWord:(NSRange)characterRange
                 ofString:(NSString *)string;


- (void)speechSynthesizer:(NSSpeechSynthesizer *)sender
         willSpeakPhoneme:(short)phonemeOpcode;
Of the three messages that the speech synthesizer sends to its delegate, you care about only the first one: speechSynthesizer:didFinishSpeaking:.
In your application, you will make the AppController the delegate of the speech synthesizer and implement speechSynthesizer:didFinishSpeaking:. The method will be called automatically when the utterance is complete.The new object diagram is shown in Figure 5.1.
Note that you do not have to implement any of the other delegate methods. The implemented methods will be called; the unimplemented ones will be ignored. Also notice that the first argument is always the object that is sending the message—in this case, the speech synthesizer.
In AppController.m, set the delegate outlet of the speech synthesizer:
- (id)init
{
    [super init];
    NSLog(@"init");
    speechSynth = [[NSSpeechSynthesizer alloc] initWithVoice:nil];
    [speechSynth setDelegate:self];
    return self;
}
Next, add the delegate method. For now, just log a message:
- (void)speechSynthesizer:(NSSpeechSynthesizer *)sender
        didFinishSpeaking:(BOOL)finishedSpeaking
{
    NSLog(@"didFinish = %d", finishedSpeaking);
}
Build and run the application. Note that the delegate method is called if you click the Stop button or if the utterance plays all the way to the end.
To enable and disable the Stop button, you will need an outlet for it. Add an instance variable to AppController.h:
IBOutlet NSButton *stopButton;
Also in AppController.h, declare the delegate method that you are going to implement:
// Speech Synthesizer delegate methods
- (void)speechSynthesizer:(NSSpeechSynthesizer *)sender
        didFinishSpeaking:(BOOL)finishedSpeaking;
Declaring methods in the header file is completely optional, but such declarations act as nice documentation for programmers who have to read your code. If you call a method that has not been declared in the header file, you will get a warning from the compiler but everything will work correctly at runtime. Notice, however, that you will never call this delegate method; thus, if you left out this declaration, you would not receive a warning from compiler.
Save the file and drag AppController.h into the nib file.
Control-drag from the AppController to the Stop button and set the outlet stopButton as shown in Figure 5.2.

The button should be disabled when it first appears on screen, so select the button and disable it in the Attributes inspector as shown in Figure 5.3. Save the nib file.

In Xcode, edit the AppController.m file to properly enable and disable the button. In sayIt:, enable the button:
- (IBAction)sayIt:(id)sender
{
    NSString *string = [textField stringValue];
    if ([string length] == 0) {
        return;
    }

    [speechSynth startSpeakingString:string];
    NSLog(@"Have started to say: %@", string);
    [stopButton setEnabled:YES];
}
In speechSynthesizer:didFinishSpeaking:, disable the button:
- (void)speechSynthesizer:(NSSpeechSynthesizer *)sender
        didFinishSpeaking:(BOOL)finishedSpeaking
{
    NSLog(@"didFinish = %d", finishedSpeaking);
    [stopButton setEnabled:NO];
}
Build and run the application. You should see that the button is enabled only when the synthesizer is generating speech.
A table view is used for displaying columns of data. An NSTableView has a helper object called a dataSource (as shown in Figure 5.4) that must implement two methods:
- (int)numberOfRowsInTableView:(NSTableView *)aTableView;

The
dataSourcewill reply with the number of rows that will be displayed.- (id)tableView:(NSTableView *)aTableView objectValueForTableColumn:(NSTableColumn *)aTableColumn row:(int)rowIndex;
The
dataSourcewill reply with the object that should be displayed in the rowrowIndexof the columnaTableColumn.
If you have editable cells in your table view, you will need to implement one more method:
- (void)tableView:(NSTableView *)aTableView
   setObjectValue:(id)anObject
   forTableColumn:(NSTableColumn *)aTableColumn
              row:(int)rowIndex;
The
dataSourcetakes the input that the user put into rowrowIndexofaTableColumn. You do not have to implement this method if your table view is not editable.
Notice that you are taking a very passive position in getting data to appear. Your data source will wait until the table view asks for the data. When they first work with NSTableView (or NSBrowser, which works in a very similar manner), most programmers want to boss the table view around and tell it, “You will display 7 in the third row in the fifth column.” It doesn't work that way. When the table view is ready to display the third row and the fifth column, it will ask its dataSource for the object to display.
How, then, will you get the table view to fetch updated information? You will tell the table view to reloadData. It will then reload all the cells that the user can see.
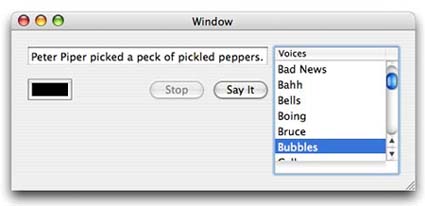
Next, you will add a table view that will enable the user to change the voice, as shown in Figure 5.5.
You are going to make your instance of AppController become the dataSource of the table view. This involves two steps: implementing the two methods listed above and setting the table view's dataSource outlet to the instance of AppController.
First, you will add the declaration of a few methods and instance variables to AppController.h:
#import <Cocoa/Cocoa.h>

@interface AppController : NSObject
{
    IBOutlet NSTextField *textField;
    IBOutlet NSColorWell *colorWell;
    IBOutlet NSButton *stopButton;
    IBOutlet NSTableView *tableView;
    NSSpeechSynthesizer *speechSynth;
}
// Action methods
- (IBAction)sayIt:(id)sender;
- (IBAction)stopIt:(id)sender;
- (IBAction)changeTextColor:(id)sender;

// Speech synthesizer delegate methods
- (void)speechSynthesizer:(NSSpeechSynthesizer *)sender
        didFinishSpeaking:(BOOL)finishedSpeaking;

// Table view data source methods
- (int)numberOfRowsInTableView:(NSTableView *)aTableView;
- (id)tableView:(NSTableView *)aTableView
objectValueForTableColumn:(NSTableColumn *)aTableColumn
                      row:(int)row;

@end
After editing it, save the file.
Open MainMenu.nib. You will edit the window to look like Figure 5.6.

Drag an NSTableView onto the window (Figure 5.7). In the inspector, make the table view have only one column. Also, disable column selection.

Double-click on the header of the column to change the title to Voices.
Interface Builder needs to be informed of the new outlet (tableView) that you added to AppController.h. Drag AppController.h from Xcode into your nib's document window (Figure 5.8).

If you inspect the AppController class under the Classes tab, you should see the outlets and actions from your AppController.h file in the Attributes page of the inspector. Notice that the delegate and data source methods don't appear; only methods that are actions are visible. An action is a method that takes one argument (usually called sender) of type id and returns nothing.
Now make the connections. Figure 5.9 shows the object diagram.

First, you will set the dataSource outlet of the NSTableView to be your instance of AppController. Select the NSTableView. Control-drag from the table view to the AppController. In the Connections page of the info panel, choose dataSource and click the Connect button (Figure 5.10).

If you do not see dataSource in the inspector, you have selected NSScrollView, not NSTableView inside it. The scroll view is the object that takes care of scrolling and the scroll bars. You will learn more about scroll views in Chapter 12. For now, just double-click in the interior of the table view until the title of the inspector window says NSTableView.
Next, you will connect your AppController object's tableView outlet to the table view. Control-drag from the AppController to the middle of the table view. In the info panel, connect to the tableView outlet (Figure 5.11).

Save the nib file and close it.
Now you have to implement the methods that you declared in AppController.h. Implement the data source methods:
- (int)numberOfRowsInTableView:(NSTableView *)tableView
{
    return [[NSSpeechSynthesizer availableVoices] count];
}

- (id)tableView:(NSTableView *)tableView
        objectValueForTableColumn:(NSTableColumn *)tableColumn
                              row:(int)row
{
    return [[NSSpeechSynthesizer availableVoices] objectAtIndex:row];
}
The identifer for a voice is actually a long string like com.apple.speech.synthesis.voice.Fred. If you want just the name Fred, replace the last method with this one:
- (id)tableView:(NSTableView *)tableView
    objectValueForTableColumn:(NSTableColumn *)tableColumn
                          row:(int)row
{
    NSString *voice = [[NSSpeechSynthesizer availableVoices]
                                                 objectAtIndex:row];
    return [[NSSpeechSynthesizer attributesForVoice:voice]
                                           valueForKey:NSVoiceName];
}
(The screenshots in this chapter assume that you've done the pretty version.)
Next, build and run the application. Notice that now you get a list of the possible voices, but selecting a voice doesn't actually do anything yet.
Besides having a dataSource outlet, a table view has a delegate outlet. The delegate is informed whenever the selection changes. In AppController.m, implement tableViewSelectionDidChange:. (The class NSNotification will be introduced later in this book. For now, just note that you are passed a notification object as an argument to this delegate method.)
- (void)tableViewSelectionDidChange:(NSNotification *)notification
{
    NSArray *availableVoices = [NSSpeechSynthesizer availableVoices];
    int row = [tableView selectedRow];
    NSString *selectedVoice = [availableVoices objectAtIndex:row];
    [speechSynth setVoice:selectedVoice];
    NSLog(@"new voice = %@", selectedVoice);
}
The speech synthesizer will not allow you to change the voice while it is speaking, so you should prevent the user from changing the selected row. By implementing a delegate method, you can explicitly accept or deny all changes of the selection:
- (BOOL)selectionShouldChangeInTableView:(NSTableView *)aTableView
{
    if ([speechSynth isSpeaking]) {
        NSBeep();
        return NO;
    } else {
        return YES;
    }
}
Your users will want to see that the default voice is selected in table view when the application starts. In awakeFromNib, select the appropriate row and scroll to it if necessary:
- (void)awakeFromNib
{
    NSColor *initialColor = [textField textColor];
    NSLog(@"setting initial color for color well");
    [colorWell setColor:initialColor];

    // When the table view appears on screen, the default voice
    // should be selected
    NSString *defaultVoice = [NSSpeechSynthesizer defaultVoice];
    NSArray *voices = [NSSpeechSynthesizer availableVoices];
    int defaultRow = [voices indexOfObject:defaultVoice];
    [tableView selectRow:defaultRow byExtendingSelection:NO];
    [tableView scrollRowToVisible:defaultRow];
}
Back in Interface Builder, control-drag from the table view to the AppController and set the delegate outlet.
Build and run the application. If the speech synthesizer is speaking, you should get a system beep when you try to change the voice. If it is not speaking, you should be able to change the voice.
There are two very common errors that people make when implementing a delegate:
Misspelling the name of the method. The method will not be called and you will not get any error or warning from the compiler. The best way to avoid this problem is to copy and paste the declaration of the method from the documentation or the header file.
Forgetting to set the delegate outlet. You will not get any error or warning from the compiler if you make this error.
Delegation is a design pattern that you will see used many places in Cocoa. The following classes in the AppKit framework have delegate outlets:
NSAlert
NSApplication
NSBrowser
NSDrawer
NSFontManager
NSImage
NSLayoutManager
NSMatrix
NSMenu
NSSavePanel
NSSound
NSSpeechRecognizer
NSSpeechSynthesizer
NSSplitView
NSTabView
NSTableView
NSText
NSTextField
NSTextStorage
NSTextView
NSToolbar
NSWindow
Notice the problem with retain counts: If object X retains object Y, and Y retains X, the objects will never be deallocated. This situation is known as a retain cycle. A retain cycle can allow large islands of garbage to accumulate in your application's memory space.
To prevent retain cycles, the standard Cocoa objects do not retain their delegates, data sources, or targets.
The delegate doesn't have to implement all of the methods, but if the object does implement a delegate method it will get called. In many languages, this sort of thing would be impossible. How is it achieved in Objective-C?
NSObject has the the following method:
- (BOOL)respondsToSelector:(SEL)aSelector
Because every object inherits (directly or indirectly) from NSObject, every object has this method. It returns YES if the object has a method called aSelector. Notice that aSelector is a SEL, not an NSString.
Imagine for a moment that you are the engineer who has to write NSTableView. You are writing the code that will change the selection from one row to another. You think to yourself, “I should check with the delegate.” To do so, you add a snippet of code that looks like this:
// About to change to row "rowIndex"

// Set the default behavior
BOOL ok = YES;

// Check whether the delegate implements the method
if ([delegate respondsToSelector:
                               @selector(tableView:shouldSelectRow:)])
{
    // Execute the method
    ok = [delegate tableView:self shouldSelectRow:rowIndex];
}

// Use the return value
if (ok)
{
     ...actually change the selection...
}
Notice that the delegate is sent the message only if it has implemented the method. If the delegate doesn't implement the message, the default behavior happens. (In reality, the result from respondsToSelector: is usually cached by the object with the delegate outlet. This makes performance considerably faster than would be implied by the code above.)
After writing this method, you would carefully make note of its existence in the documentation for your class.
If you wanted to see the checks for the existence of the delegate methods, you could override respondsToSelector: in your delegate object:
- (BOOL)respondsToSelector:(SEL)aSelector
{
    NSString *methodName = NSStringFromSelector(aSelector);
    NSLog(@"respondsToSelector:%@", methodName);
    return [super respondsToSelector:aSelector];
}
You might want try adding this method to AppController.m now.
Create a new application with one window. Make an object that is a delegate of the window. As the user resizes the window, make sure that the window always remains twice as tall as it is wide.
Here is the signature of the delegate method you will implement:
- (NSSize)windowWillResize:(NSWindow *)sender
                    toSize:(NSSize)frameSize;
The first argument is the window being resized. The second argument is a C struct that contains the size that the user has asked for:
typedef struct _NSSize {
    float width;
    float height;
} NSSize;
Return an NSSize structure containing the size that you would like the window to become.