In RaiseMan, you are already using two nib files: MainMenu.nib and MyDocument.nib. MainMenu.nib is automatically loaded by NSApplication when the application first launches. MyDocument.nib is automatically loaded each time an instance of MyDocument is created. In this section, you will learn how to load nib files using NSWindowController.
Why would you want to load a nib file? Most commonly, your application will have several windows (such as a find panel and a preferences panel) that are used only occasionally. By putting off loading the nib until the window is needed, your application will launch faster. Furthermore, if the user never needs the window, your program will use less memory.
In this chapter, you will create a preferences panel. The panel will be an instance of NSPanel, which is a subclass of NSWindow. There really are not that many differences between a panel and a general window, but because a panel is meant to be auxiliary (as opposed to a document window), it acts a little differently.
A panel can become the key window, but without becoming the main window. For example, when the user brings up a print panel, he can type into it (it is key), but the document the user was looking at remains the main window (that is what will be printed).
NSApplicationhas amainWindowoutlet and akeyWindowoutlet. Both outlets point at the same window unless a panel is involved; panels do not typically become the main window.If it has a close button, you can close a panel by pressing the Escape key.
Panels do not appear in the window list in the Window menu. After all, if the user is looking for a window, the user is probably looking for a document, not a panel.
All windows have a Boolean variable called hidesOnDeactivate. If it is set to YES, the window will hide itself when the application is not active. Most document windows have this variable set to NO; most auxilary panels have it set to YES. This mechanism reduces screen clutter. You can set hidesOnDeactivate using the window inspector in Interface Builder.
The preferences panel that you are going to add will not do anything except appear for now. In Chapter 10, however, you will learn about user defaults. In that chapter, you will make the preferences panel actually do something.
The preferences panel will be in its own nib file. You will create a subclass of NSWindowController called PreferenceController. An instance of PreferenceController will act as the controller for the preferences panel. When creating an auxiliary panel, it is important to remember that you may want to reuse it in the next application. Creating a class to act just as a controller and a nib that contains only the panel makes it easier to reuse the panel in another application. Hip programmers would say, “By making the application more modular, we can maximize reuse.” The modularity also makes it easier to divide tasks among several programmers. A manager can say, “Rex, you are in charge of the preferences panel. Only you may edit the nib file and the preference controller class.”
The objects on the preferences panel will be connected to the preference controller. In particular, the preference controller will be the target of a color well and the check box. The preferences panel will appear when the user clicks on the Preferences… menu item. When running, it will look like Figure 9.1.

Figure 9.2 presents a diagram of the objects that you will create and the nib files in which they will reside.

Open your project and create a new Objective-C class named AppController. Edit AppController.h to look like this:
#import <Cocoa/Cocoa.h>
@class PreferenceController;

@interface AppController : NSObject {
    PreferenceController *preferenceController;
}
- (IBAction)showPreferencePanel:(id)sender;

@end
Notice the Objective-C syntax:
@class PreferenceController;
This tells the compiler that there is a class PreferenceController. You can then make the declaration
PreferenceController *preferenceController;
without importing the header file for PreferenceController. You could replace @class PreferenceController; with #import "PreferenceController.h". This statement would import the header, and the compiler would learn that PreferenceController was a class. Because the import command requires the compiler to parse more files, @class will often result in faster builds.
Note that you must always import the superclass's header file, because the compiler needs to know which instance variables are declared in the superclass. In this case, NSObject.h is imported by <Cocoa/Cocoa.h>.
Save AppController.h and drag it from Xcode into MainMenu.nib in Interface Builder (Figure 9.3).

You will see the AppController class in the nib's class browser (Figure 9.4).

Use the Classes menu to instantiate an instance of AppController (Figure 9.5).

Control-drag from the Preferences… menu item to the AppController. Make it the target and set the action to showPreferencePanel: (Figure 9.6).

Close the nib file.
Now you need to write the code for AppController. Make the contents of AppController.m look like this:
#import "AppController.h"
#import "PreferenceController.h"

@implementation AppController

- (IBAction)showPreferencePanel:(id)sender
{
    // Is preferenceController nil?
    if (!preferenceController) {
       preferenceController = [[PreferenceController alloc] init];
    }
    [preferenceController showWindow:self];
}
- (void)dealloc
{
    [preferenceController release];
    [super dealloc];
}
@end
Notice that this file creates the instance of PreferenceController only once. If the preferenceController variable is non-nil, it simply sends the message showWindow: to the existing instance.
In Xcode, choose New File… from the File menu, and create a new Objective-C NSWindowController subclass. Name it PreferenceController (Figure 9.7).

Edit PreferenceController.h to look like this:
#import <Cocoa/Cocoa.h>

@interface PreferenceController : NSWindowController {
    IBOutlet NSColorWell *colorWell;
    IBOutlet NSButton *checkbox;
}
- (IBAction)changeBackgroundColor:(id)sender;
- (IBAction)changeNewEmptyDoc:(id)sender;
@end
In Interface Builder, create a new nib file. Choose Empty as the starting point (Figure 9.8).

Save the new nib into the English.lproj directory in your project directory as Preferences.nib. When asked, insert the new nib into the project (Figure 9.9).

Drag the PreferenceController.h file into the empty nib file (Figure 9.10).

Bring up the info panel, select File's Owner, and set its class to PreferenceController (Figure 9.11).

When a nib file is loaded into an application that has been running for a while, the objects that already exist need to establish some connection to the objects read from the nib file. File's Owner provides this connection. File's Owner is a placeholder in a nib file for an object that will already exist when the nib file is loaded. An object loading a nib file will provide the owner object. The owner is put into the place that File's Owner represents. In your application, the owner will be the instance of PreferenceController that was created by the AppController.
The use of File's Owner is confusing to many people. You will not instantiate PreferenceController in the nib file. Instead, you have just informed the nib file that the owner (which will be provided when the nib file is loaded) is a PreferenceController.
Create a new panel by dragging a panel from the palette window and dropping it anywhere on the screen (Figure 9.12).

Make the panel smaller and drop a color well and a check box on it. Label them as shown in Figure 9.13. (Check boxes have labels, but you will have to drag out a text field to label the color well.)

Set the target of the color well to be File's Owner (your PreferenceController) and set the action to be changeBackgroundColor: (Figure 9.14).

Also, make your PreferenceController be the target of the check box and set the action to be changeNewEmptyDoc:.
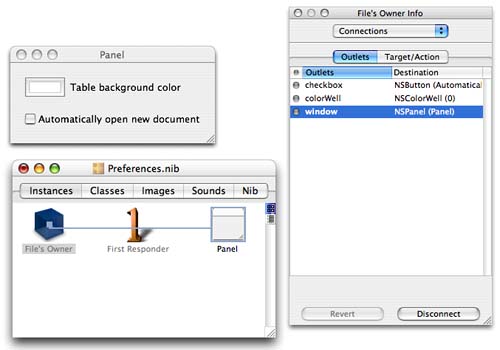
Set the colorWell outlet of File's Owner to the color well object. Set the checkbox outlet of File's Owner to the check box object. Set the window outlet of File's Owner to the panel (Figure 9.15).
Open the attributes inspector for the panel. Disable resizing.
Change the title on the window to Preferences. Save the nib file.
In Xcode, edit the PreferenceController.m to look like this:
#import "PreferenceController.h"

@implementation PreferenceController

- (id)init
{
    self = [super initWithWindowNibName:@"Preferences"];
    return self;
}

- (void)windowDidLoad
{
    NSLog(@"Nib file is loaded");
}

- (IBAction)changeBackgroundColor:(id)sender
{
    NSLog(@"Color changed: %@", [sender color]);
}

- (IBAction)changeNewEmptyDoc:(id)sender
{
    NSLog(@"Checkbox changed %d", [sender state]);
}

@end
Note that you set the name of the nib file to be loaded in the init method. This nib file will be loaded automatically when it is needed. The instance of PreferenceController will be substituted for the File's Owner in the nib file.
After the nib file is loaded, the PreferenceController will be sent windowDidLoad. It offers an opportunity (similar to awakeFromNib or windowControllerDidLoadNib:) for the controller object to initialize the user interface objects that have been read from the nib file.
When sent showWindow: for the first time, the NSWindowController automatically loads the nib file and moves the window on screen and to the front. The nib file is loaded only once. When the user closes the preferences panel, it is moved off screen but not deallocated. The next time the user asks for the preferences panel, it is simply moved on screen.
The changeBackgroundColor: and checkboxChanged: methods are pretty boring right now—they simply print out a message. In Chapter 10, you will change them to update the user's defaults database.
Build and run the application. The new panel should appear, and altering the check box or color well should result in a message in the console (Figure 9.16).

The first time a user encounters a color well, it may seem confusing. If you click on the edge of the color well, the edge becomes highlighted, the color panel appears, and the well is in “active” mode.
A bundle is a directory of resources that may be used by an application. Resources include things like images, sounds, compiled code, and nib files. The class NSBundle is a very elegant way of dealing with bundles.
Your application is a bundle. In Finder, an application looks to the user like any other file, but it is really a directory filled with nib files, compiled code, and other resources. We call this directory the main bundle of the application.
Some resources in a bundle can be localized. For example, you could have two different versions of foo.nib, one for English speakers and one for French speakers. The bundle would have two subdirectories: English.lproj and French.lproj. You would put an appropriate version of foo.nib in each. When your application asks the bundle to load foo.nib, if the user has set the preferred language to French, the bundle will automatically load the French version of foo.nib. We will cover localization in Chapter 13.
To get the main bundle of an application, use the following code:
NSBundle *myBundle = [NSBundle mainBundle];
This is the most commonly used bundle. If you need to access resources in another directory, however, you could ask for the bundle at a certain path:
NSBundle *goodBundle;
goodBundle = [NSBundle bundleWithPath:@"~/.myApp/Good.bundle"];
Once you have an NSBundle object, you can ask it for its resources:
// Extension is optional
NSString *path = [goodBundle pathForImageResource:@"Mom"];
NSImage *momPhoto = [[NSImage alloc] initWithContentsOfFile:path];
A bundle may have a library of code. By asking for a class from the bundle, the bundle will link in the library and search for a class by that name:
Class newClass = [goodBundle classNamed:@"Rover"];
id newInstance = [[newClass alloc] init];
If you do not know the name of any classes in the bundle, you can simply ask for the principal class:
Class aClass = [goodBundle principalClass];
id anInstance = [[aClass alloc] init];
As you see, NSBundle is handy in many ways. In this section, the NSBundle was actually responsible (behind the scenes) for loading the nib file. If you wanted to load a nib file without an NSWindowController, you could do it like this:
BOOL successful = [NSBundle loadNibNamed:@"FindPanel"
                                   owner:someObject];
Note that you would supply the object that will act as the File's Owner.
Delete your color well and check box. Drop an NSTabView on the preferences panel. Put the color well under one tab, and put the check box under the other. Be sure to reconnect them.