An instance of NSButton has a target and a selector (the action). When the button is clicked, the action message is sent to the target. Timers work in a similar way. A timer is an object that has a target, a selector, and a delay, which is given in seconds (Figure 21.1). After the delay, the selector message is sent to the target. The timer sends itself as an argument to the message. The timer can also be set to send the message repeatedly.
To play with timers a bit, you will create a typing tutor application. The application will have two BigLetterView objects. One will display what the user should type, and the other will display what the user has typed (Figure 21.2). An NSProgressIndicator will display how much time is left. When 2 seconds has passed, the application will beep to indicate that the user took too long. Then the user is given 2 more seconds.
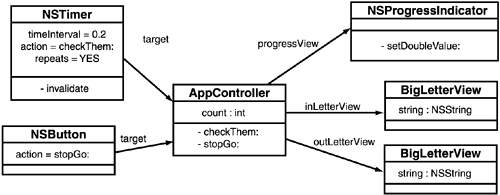
You will create an AppController class. When the user clicks the Go button, an instance of NSTimer will be created. The timer will send a message every 0.2 second. The method triggered will check whether the two views match. If so, the user is given a new letter to type. Otherwise, the progress indicator is incremented. If the user pauses the application, the timer is invalidated.
Figure 21.3 shows the object diagram.
Go back to your TypingTutor project. Open the MainMenu.nib.
Create a new subclass of NSObject called AppController. Add three outlets to AppController: inLetterView, outLetterView, and progressView. inLetterView and outLetterView will refer to BigLetterView objects. progressView will refer to an NS ProgressIndicator. Add one action: stopGo: (Figure 21.4).
Create the files for AppController. Create an instance of AppController.
Select the BigLetterView on the left. From the Layout menu, choose the Make subviews -> Box menu item. Relabel the box Type here. Group the other BigLetterView in a box, and relabel that box Match this.
Drop an NSProgressIndicator on the window. Use the inspector to make it not indeterminate. Set its range to be 0 to 100 (Figure 21.5).
Put a button on the window. Using the inspector, set its title to Go and its alternate title to Pause. Make the button type Rounded Bevel Button, and set its behavior to Toggle. Also, set it to have no icon (Figure 21.6).
Control-drag from the button to the AppController object. Set the action to be stopGo: (Figure 21.7).
Control-drag from the AppController to the NSProgressIndicator, and set the progressView outlet.
Control-drag from the AppController to the BigLetterView on the left, and set the inLetterView outlet (Figure 21.8).
Control-drag from the AppController to the BigLetterView on the right, and set the outLetterView outlet (Figure 21.9).
Add the following instance variables and methods to AppController.h:
#import <Cocoa/Cocoa.h>
@class BigLetterView;

@interface AppController : NSObject
{
    IBOutlet BigLetterView *inLetterView;
    IBOutlet BigLetterView *outLetterView;
    IBOutlet NSProgressIndicator *progressView;
    int count;         // How many times has the timer gone off?
    NSTimer *timer;
    NSArray *letters;  // The array of letters that the user will type
    int lastIndex;     // The index in the array of the
                       // letter the user is trying to type
}
- (void)showAnotherLetter;
- (IBAction)stopGo:(id)sender;
@end
Implement the following methods in AppController.m:
#import "AppController.h"
#import "BigLetterView.h"

// Number of times the timer will fire
#define TICKS 10

@implementation AppController

- (id)init
{
    if (self = [super init]) {

      // Create an array of letters
      letters = [[NSArray alloc] initWithObjects:@"a", @"s",
                     @"d",@"f", @"j", @"k", @"l", @";",nil];
      lastIndex = 0;
      // Seed the random number generator
      srandom(time(NULL));
    }
    return self;
}

- (void)awakeFromNib
{
    [self showAnotherLetter];
}
- (void)showAnotherLetter
{
    int x;
    //Choose random numbers until you get a different
    // number than last time
    x = lastIndex;
    while (x == lastIndex){
        x = random() % [letters count];
    }
    lastIndex = x;
    [outLetterView setString:[letters objectAtIndex:x]];

    [progressView setDoubleValue:0.0];
    count = 0;
}

- (IBAction)stopGo:(id)sender
{
    if ([sender state] == 1) {
        NSLog(@"Starting");

        // Create a timer
        timer = [[NSTimer scheduledTimerWithTimeInterval:0.2
                                         target:self
                                       selector:@selector(checkThem:)
                                       userInfo:nil
                                        repeats:YES] retain];
    } else {
        NSLog(@"Stopping");

        // Invalidate and release the timer
        [timer invalidate];
        [timer release];
    }
}

- (void)checkThem:(NSTimer *)aTimer
{
    if ([[inLetterView string] isEqual:[outLetterView string]]) {
        [self showAnotherLetter];
    }
    count++;
    if (count > TICKS){
        NSBeep();
        count = 0;
    }
    [progressView setDoubleValue:(100.0 * count) / TICKS];
}
@end
Build and run your application.
Note, once again, that we have separated our classes into views (BigLetterView) and controllers (AppController). If I were creating a full-featured application, I would probably also create model classes like Lesson and Student.
NSRunLoop is an object that waits. It waits for events to arrive and then forwards them to NSApplication. It waits for timer events to arrive and then forwards them to NSTimer. You can even attach a network socket to the run loop, and it will wait for data to arrive on that socket.
Most Cocoa applications have only one thread. This is possible because the one thread is controlled by the run loop. Many people who think they need to create a multithreaded application later realize that their application would have been more efficient and easier to write if they had used the run loop more wisely. It is rarely necessary to create multithreaded applications.
Change your ImageFun application so that autoscrolling is timer driven. Delete your mouseDragged: method from StretchView. In mouseDown:, create a repeating timer that invokes a method in the view every tenth of a second. In the invoked method, autoscroll using the current event. To get the current event, use NSApplication's currentEvent method:
NSEvent *e = [NSApp currentEvent];
(Remember that NSApp is a global variable that points to the instance of NSApplication.) Invalidate and release the timer in mouseUp:. Note that the autoscrolling becomes much smoother and more predictable.


