
In this recipe we will create a rusty shader to be mixed by a stencil factor with a metallic shader:

Now we are going to create the shader:
- From 1301OS_04_metal.blend | NodeTree, append the node group Metal.
- Click on New in the Material window under the Properties panel or in the Node Editor header. Rename the material
Rusty_Metal. - Switch the Diffuse shader with a Mix Shader node and in the first Shader slot select a Diffuse BSDF shader. In the second Shader slot load, under Group, the appended Metal node group.
- Add a frame (press Shift + A and go to Layout | Frame), select the Diffuse shader, the Metal group and the Mix Shader node frame and press Ctrl + P to parent them. Rename the frame
SHADERS. - Add a Texture Coordinate node (press Shift + A and go to Input | Texture Coordinate) and connect the Object output to the Tangent input of the Metal group.
- In the Metal group set IOR to 1.370, Color to
R 0.229,G 0.307, andB 0.299, Roughness to0.200, Aniso_Amount to0.200, and Anisotropy to0.600. - Add a Mapping node (press Shift + A and go to Vector | Mapping), then connect the Object output of the Texture Coordinate node to the Vector input of the Mapping node.
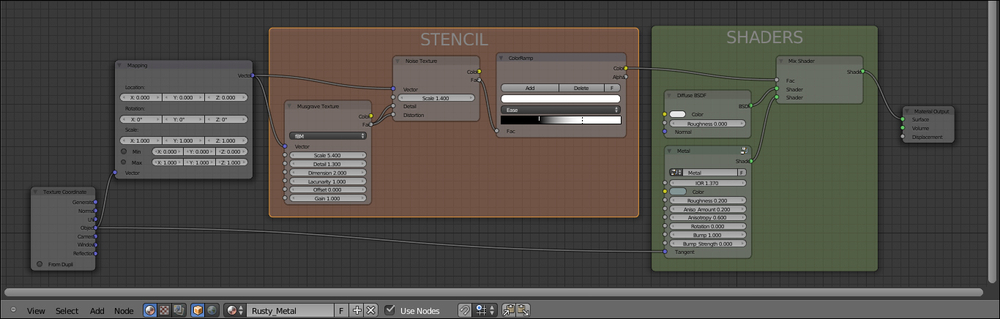
- Now add a Musgrave Texture node (press Shift + A and go to Texture | Musgrave Texture), a Noise Texture node (press Shift + A and go to Texture | Noise Texture), and a ColorRamp node (press Shift + A and go to Convertor | ColorRamp). Set the Musgrave node's Scale to
5.400and Detail to1.300; set the Noise node's Scale to1.400. - Connect the Vector output of the Mapping node to the Vector input sockets of the two texture nodes, then connect the Fac output of the Musgrave Texture node to the Detail and Distortion input sockets of the Noise Texture node.
- Connect the Fac output of the Noise Texture to the Fac input of the ColorRamp. Set the ColorRamp node's interpolation to Ease and move the black color marker one-third to the right and the white color marker one-third to left.
- Add a frame (press Shift + A and go to Layout | Frame), select the Musgrave, Noise, and ColorRamp nodes and then the frame and press Ctrl + P to parent them. Rename the frame
STENCIL. - Connect the STENCIL | ColorRamp node's Color output to the Fac input socket of the SHADERS | Mix Shader node.
- Add a Voronoi Texture node (press Shift + A and go to Texture | Voronoi Texture) and a Wave Texture node (press Shift + A and go to Texture | Wave Texture). Press Shift + D to duplicate the Voronoi Texture node and move it right under the first one. In the first Voronoi node set Coloring to Cells and Scale to
20.000; in the second one set Scale to19.000. Set the Wave Texture node's Scale to1.000. - Connect the Vector output of the Mapping node to the Vector inputs of the three texture nodes.
- Add a Mix node (press Shift + A and go to Color | Mix), set the Blend Type to Difference and the Fac value to
1.000, then connect the first Voronoi node's Color output to the Color1 input socket and the second Voronoi node's Color output to the Color2 input socket of the Difference node. - Press Shift + D to duplicate the Difference node and connect the Color output of the first one to the Color1 input socket of this duplicated one, then connect the Color output of the Musgrave Texture node to the Color2 input socket.
- Add a ColorRamp node (press Shift + A and go to Convertor | ColorRamp) and connect the output of the second Difference node to its Fac input socket. Set the ColorRamp interpolation to Ease and move the black color marker to the middle of the slider.
- Press Shift + D to duplicate the ColorRamp node, set the interpolation to B-Spline and move back the black color marker to one-third along the total length of the slider. Connect the second Difference node's Color output to the Fac input of this ColorRamp too.
- Press Shift + D to duplicate a Difference node and move it after the ColorRamp nodes; connect the two ColorRamp node's Color outputs to the Color1 and Color2 inputs of the last Difference node.
- Add a frame (press Shift + A and go to Layout | Frame), select these last nodes and then the frame itself and press Ctrl + P to parent them. Rename the frame
RUST_BUMP. - Inside the SHADERS frame, add a Bump node (press Shift + A and go to Vector | Bump). Connect the RUST_BUMP frame's final Difference node's Color output to the Bump node's Height input socket, and its Normal output to the Normal input socket of the Diffuse shader inside the SHADERS frame.

- Add an RGB Curves node (press Shift + A and go to Color | RGB Curves), a ColorRamp node (press Shift + A and go to Convertor | ColorRamp), a Noise Texture node (press Shift + A and go to Texture | Noise Texture), and a Mix node (press Shift + A and go to Color | Mix).
- Connect the Color output of the RGB Curves node to the Fac input of the ColorRamp node; click on the diagonal line inside the RGB Curves to add a control point and in the X and Y slots on the bottom of the node set X to
0.50000and Y to0.26000. Click again to add a new control point and set: X to0.51000and Y to0.75000. - Set the ColorRamp node interpolation to Constant and set the markers as shown in the following screenshot (basically a stepped graduation from the color
R 0.991,G 0.591, andB 0.084to the colorR 0.105,G 0.012, andB 0.009):
- Press Shift + D to duplicate the ColorRamp node and move it above the original. Set the interpolation to Linear then connect the Color outputs of both the ColorRamp nodes to the Color1 and Color2 input sockets of the Mix node. Set the Mix node Blend Type to Dodge and the Fac value to
1.000. - Press Shift + D to duplicate the Dodge node, set the Blend Type to Multiply and the Fac value to
0.500; connect the Dodge output to the Color1 input of the Multiply node and the Color output of the Noise Texture node to the Color2 input. - Set the Noise Texture node Scale to
16.000, Detail to2.500, and Distortion to0.000; connect the Object output of the Mapping node to the Vector input of the Noise Texture node. - Add a Hue Saturation Value node (Press Shift + A and go to Color | Hue Saturation Value) and move it to the right of the Multiply node; connect the Multiply output to the Color input socket of the Hue Saturation Value node, then set the Hue value to
0.465and the Saturation value to1.050. - Press Shift + D to duplicate the Multiply node and move it close to the Noise Texture node; set the Blend Type to Overlay and the Fac value to
0.250. Connect the Fac output of the Noise Texture to the Color1 input socket and change the value of Color2 to pure white. Connect the Overlay node output to the Value input socket of the Hue Saturation Value node. - Add a frame (Press Shift + A and go to Layout | Frame), select these last nodes and then the frame and press Ctrl + P to parent them. Rename the frame
RUST_COLOR. - Connect the output of the Multiply node inside the RUST_COLOR frame to the Color input socket of the Diffuse shader inside the SHADERS frame, then connect the Fac output of the Noise Texture node inside the STENCIL frame to the Color input of the RGB Curves node inside the RUST_COLOR frame.

..................Content has been hidden....................
You can't read the all page of ebook, please click here login for view all page.