
The single nodes (shaders, textures, input, or whatever) can be grouped together and this is probably one of the best optimizations we can use to organize our workflow.
Thanks to node groups it's easy to store complex materials in ready-to-use libraries. It's possible to share or reuse them in other files or they can also be used to build handy shader interfaces, for easier tweaking of a material properties.
- Start Blender and open the file
1301OS_02_09_basicshader.blend:
- It's a sphere leaning on a floor plane and with four little cubes at the plane's corners; as you can see in the Node Editor, the sphere (the already selected object) has a simple material composed by a Diffuse and a Glossy shaders mixed via the Mix Shader node.
- Now box select (mouse cursor in the Node Editor, press B and drag a box to include the nodes) the Diffuse and the Glossy nodes.
- Press Ctrl + G on the keyboard, a pop up appears; left-click with the mouse to confirm that you want to create a group of the selected nodes.
- The two shaders get wrapped inside a box, that actually is the node group in edit mode; that is, the node group is open and editable, and we can access and modify its content.
- Because the two shaders were already connected to the Mix Shader (that in this case we left out of the group on purpose), both the Diffuse and the Glossy outputs are now connected to two BSDF sockets automatically created on the right side of the node group.
- As for every edit mode in Blender, by pressing the Tab key we go out of edit mode, closing the node group:

The node group is still showing the two BSDF outputs (actually connected to the input sockets of the Mix Shader node), the name data block and the Fake User button; this last one is the same as in Blender Internal, it prevents the user count from ever becoming zero and therefore any non-assigned material to be deleted when you close Blender or the file. By assigning the Fake User to a material you are sure that it will not be deleted. Particularly handy when you build your material library.
- Now press Tab to enter edit mode again, click in the name data block, and change the default name NodeGroup to something else; I wrote BasicShader.
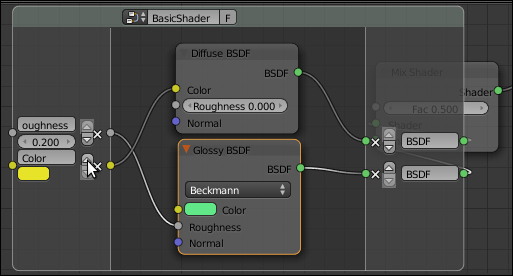
- Left click on the Roughness input socket of the Glossy shader and drag the mouse to the left side of the node group; a new link appears:

- Release the mouse button, and a new input socket for the Roughness value will be created on the left side of the node group:

- Do the same for the input socket of the color box of the Diffuse shader; new sockets are created in vertical order:

- Look at the little arrows on the side of the group sockets:
- Click on the upper arrow to move the color socket upward.
- Do the same things for the color box of the Glossy shader and for the Normal sockets of both the shaders (it's enough to create one and then connect to it the other Normal socket, because in this case we want just one single input driving the Normal sockets of both the shaders).
- Click on the names of the new sockets to rename them as DiffuseColor, SpecColor, and Bump.
- Now press Tab on the keyboard to go out of edit mode and here it is: a simple interface for the node group BasicShader:
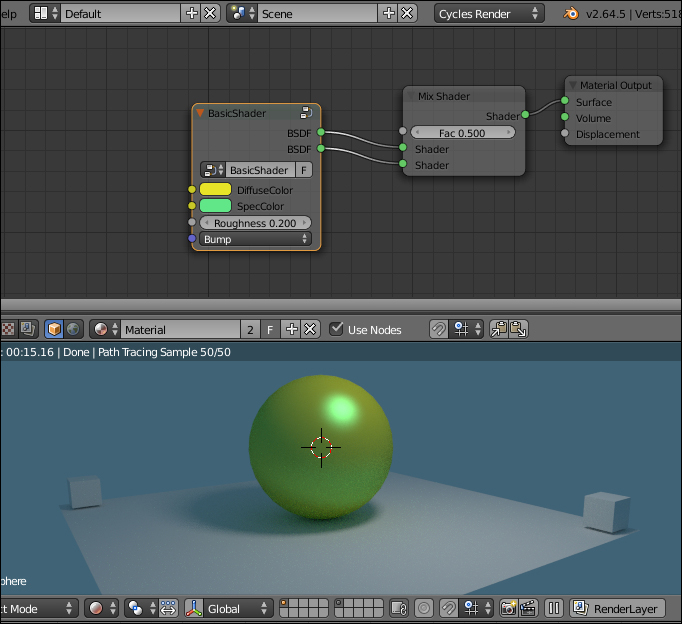
- Press Tab again to go back in edit mode; put the mouse cursor inside the node and press Shift + A to add a Mix Shader node inside the group.
- Connect the Diffuse and the Glossy to the new Mix Shader node and its output to one of the BSDF sockets; delete the other one by clicking on the X icon:

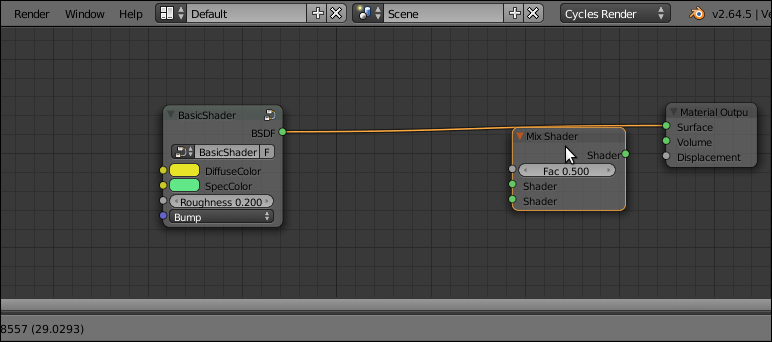
- Go out of edit mode and select the outer Mix Shader; press Alt + D (this shortcut removes a node from a network leaving the connection untouched) to disconnect it. Delete it.
I think you get the picture: basically any input or output socket of the nodes wrapped in a group can be piped to the outside of the node group itself to be tweaked; for example, we could also have made an input socket for the Diffuse roughness, or better, an input for the Fac of the inner Mix Shader, to change the reflectivity of the shader.
Another good thing about a node group is that you can make (Shift + D) instances of that node. Note that as you modify the inner structure of a node group, the modifications get reflected in all the group instances; conversely, the outer (exposed) values on the node group interface are local to each instance and can be individually tweaked.
Every newly created node group is available both in the Shift + A | Add menu and in the slots in the Material window of the Properties panel as well, under the voice Group, to be added to the network on-the-fly.
To remove a node group select it and press Alt + G; this will break the node envelope, keeping the content intact and connected.