Lesson 6. Editing Multicam Clips
Although traditional films are shot using a single camera, many types of productions use several cameras operating at the same time. Most often this multicamera technique is used when documenting a live event, such as a concert, theatrical performance, or sporting event. Multiple cameras are also frequently used for complicated stunts or for action that is difficult to stage or repeat, such as improvisational performances.
Some compromises are necessary when shooting with more than one camera. Framing options are severely limited if you want to avoid showing other cameras in the shots, and lighting must be unnaturally even to ensure that all angles get an acceptable image. This explains the very formulaic and artificial look employed by many television sitcoms and soap operas in which three cameras are operated simultaneously and the show is edited on the fly using a broadcast switcher.
Still, given the plummeting price of cameras and recording media, more and more productions are choosing to use multiple cameras for all sorts of events, even those traditionally shot with a single camera. As an editor, you’d best be able to manage multicamera footage because you’re almost certain to work with it eventually. Fortunately, editing multicamera footage is fun, exhilarating, and often easier than editing single-camera footage.
Using Multicamera Footage
When multiple cameras capture the same action at the same time, you can effortlessly cut from one angle to another without worrying about matching the timing. Not only will audio be in sync from angle to angle, but so will any action that occurs simultaneously in all the shots. In many ways, multicamera shoots are an editor’s dream, even though the limited camera angles sometimes mean that you may not have the exact close-up or insert that most clearly tells the story.
Final Cut Pro X has a special feature designed to take advantage of multicam footage: You can group multiple clips into a multicam clip. A multicam clip can hold up to 64 angles, and each of those angles can contain multiple clips. When the multicam clip is used in a project, you can move between the angles to choose which one is currently visible.
Although you can create and use multicam clips in a variety of ways, this lesson focuses on a recommended workflow that takes advantage of special features in Final Cut Pro X and also serves the creative needs of multicam editing.
Creating a Multicam Clip
Although you can combine any group of clips into a multicam clip, the feature is primarily designed for synchronous clips—especially clips photographed simultaneously by more than one camera.
Final Cut Pro X is designed to automatically ensure that all the clips are properly aligned. The software compares the timecode of the selected clips, their creation times and dates, and even optionally compares the audio waveforms, which will nearly always result in perfect sync.
1. In the Event Library, select the Fairytales Smart Collection in Lesson_06.
2. Skim through the clips to become familiar with the footage.
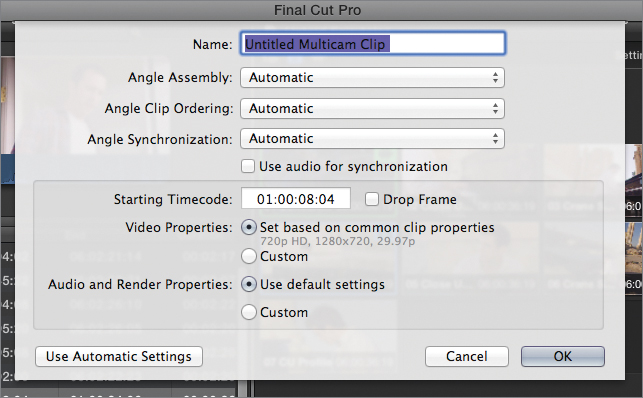
3. Select all the clips, and choose File > New Multicam Clip. The Multicam Clip sheet appears.
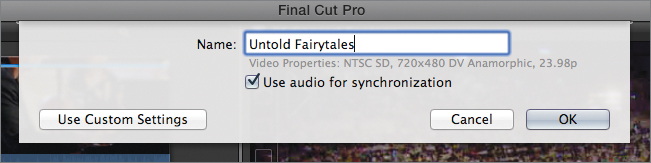
4. Name the clip Untold Fairytales, and click OK.
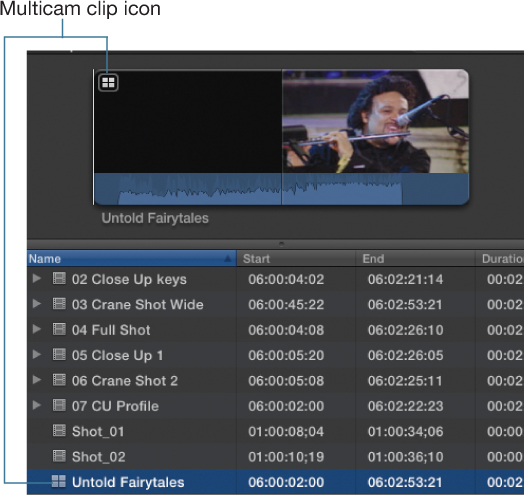
A new multicam clip is created and added to the project. (It does not inherit the keywords from its constituent clips, so it will not appear in the Fairytales Keyword Collection.) The multicam clip has a unique icon that appears both in the list view and in the thumbnail.
Tip
You can create a Smart Collection for the multicam clip type so you can easily group your multicam clips. For more on creating Smart Collections, see Lesson 1.
Note
Final Cut Pro uses a variety of information to synchronize and arrange the clips. The options for customizing or overriding its automatic settings are discussed later in this lesson.
Viewing a Multicam Clip
Before getting too deep into the options for creating multicam clips, let’s look at one.
1. From the Viewer Options pop-up menu, choose Show Angle Viewer, or press Command-Shift-7. The Angle Viewer appears to the left of the Viewer.
Tip
You may want to hide the Inspector if it is showing, and increase the size of the Viewer area to better see the details in the Angle Viewer.
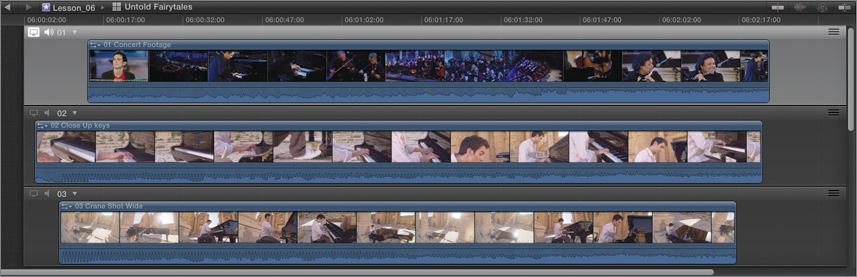
2. Skim or play the clip in the Event Browser.
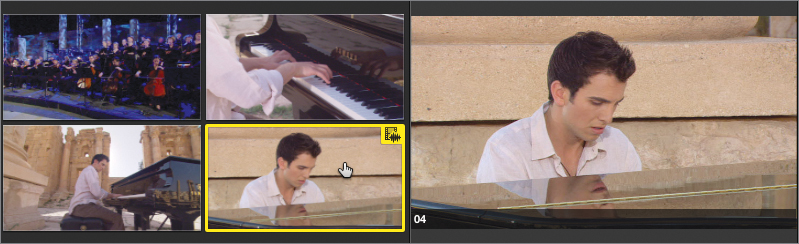
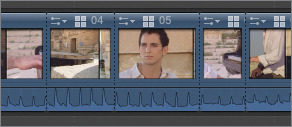
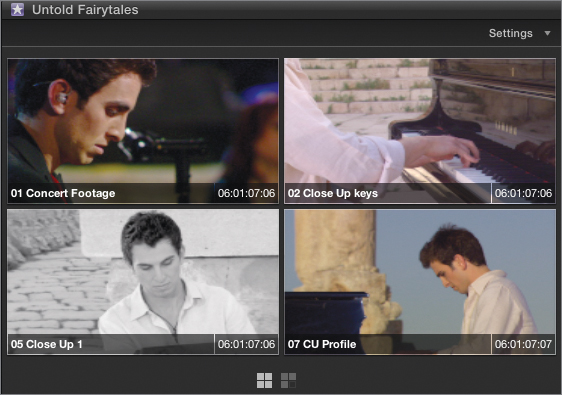
You’ll see four of the clips skimming along in the Angle Viewer. The active angle (highlighted in yellow) also plays along in the main Viewer.
Note
Some black frames are visible at the beginning of some of the angles. These frames are applied to shorter clips to maintain proper sync with the other angles.
3. In the Angle Viewer, click the different angles to change the active angle.
As you select each angle, it becomes active and appears in the Viewer.
Changing the Angle Viewer
This multicam clip contains seven angles, but only four are currently visible. There are several options to view the remaining angles. At the bottom of the Angle Viewer, two icons represent different banks of clips. The active angle is highlighted in yellow.
1. Click the right bank icon to display the remaining three clips in the Angle Viewer.
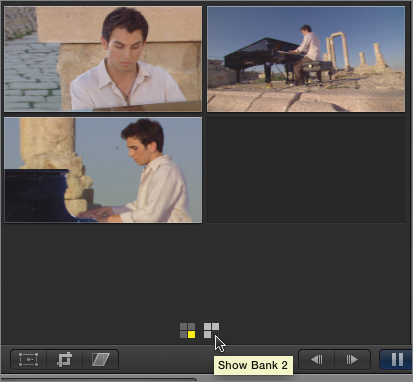
By limiting the Angle Viewer to showing no more than four angles at a time, each of the angles displays larger, and you have fewer separate angles to pay attention to. You can switch between banks while the video is playing.
Tip
If you drag the divider bar between the Viewer and the Angle Viewer left, you can force the Angle Viewer to display the clips vertically.

2. Play the multicam clip in the Event Browser to see that all the angles play at the same time.

3. While the clip plays, click the left bank icon, or press Shift-Option-; (semicolon).

The bank changes and you can see the alternative angles.
4. Press Shift-Option-’ (apostrophe) to select the next bank.
If you prefer to see all seven angles at once, you can change the Angle Viewer view settings.
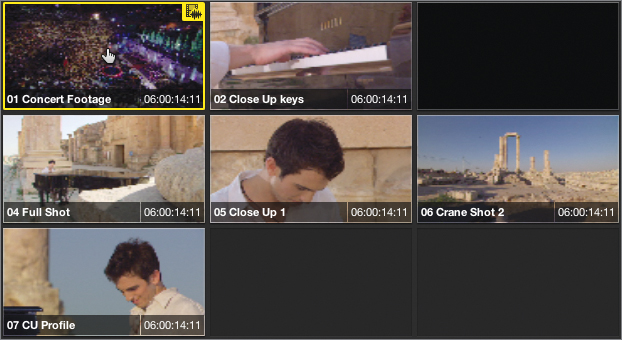
5. Click the Angle Viewer Settings button, and from the pop-up menu, choose 9 Angles.
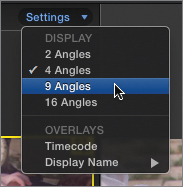
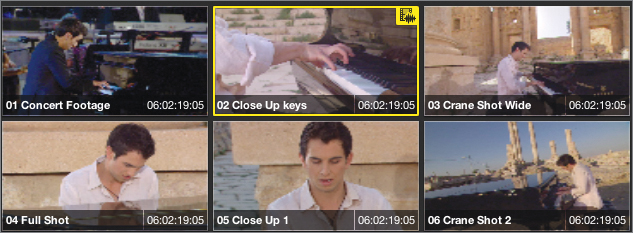
Now all seven angles are visible at once.

Tip
You can also change the number of angles displayed while the clip plays.
If you’re having trouble remembering which angle is which, you can turn on text overlays that display the angle name or the clip name as well as the timecode for each angle.
6. Click the Angle Viewer Settings button, and from the pop-up menu, choose Display Name > Angle.

The angle name is displayed in the lower-left corner of each clip in the Angle Viewer. By default, the angle name is taken from the Camera Angle field in the Info Inspector for each clip at the time the multicam clip is created.
7. Click the Angle Viewer Settings button again, and from the pop-up menu, choose Timecode. The clip timecode is displayed in the lower–right corner of each clip.

If the angle names are not very helpful, you can alternatively use the clip names.
8. Click the Angle Viewer Settings button and from the pop-up menu, choose Display Name > Clip.
Changing the Camera Angle field in the Inspector for a source angle in the Event Browser after the multicam clip has been created will not have any effect.
Editing with Multicam Clips
Viewing a multicam clip is fun, but the Angle Viewer really becomes useful when you edit a multicam clip into a project. You can cut between angles as the clip plays, allowing you to build an edit out of the various angles in a single pass.
Adding Multicam Clips to a Project
Multicam clips are edited into a project just like any other clip using an insert, overwrite, append, connect, or replace edit. You can backtime and set project edit points, and you begin—as with any other clip—by setting start and end points to identify the section of the multicam clip you want to add.
But remember: You will be able to switch back and forth between any of the angles after adding the multicam clip to the project, so generally you’ll want to add a large section into your project in one step, and later add interim edits within the clip.
1. In the Event Browser, play or skim until just before the song begins (at 14:02), and press I to set a start point.
The clip is automatically selected through the end of the shot, which is fine for this exercise.
2. Open the Project Library, and in the Lesson 06 folder, open Untold Fairytales. This project is currently empty, waiting for you to add the multicam clip.
3. Press E to add the selected portion of the multicam clip to the project.

Cutting Between Angles
Once the clip is in the project, the fun begins.
1. Play the project from the beginning.
As the clip plays, the Angle Viewer displays all seven angles. If you hover the mouse pointer over the Angle Viewer, the pointer changes to the Blade tool icon to indicate that clicking will perform a cut.

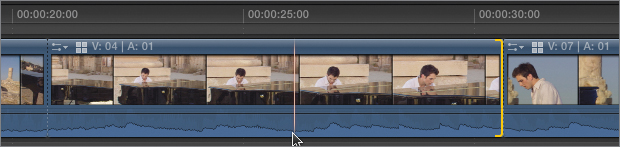
2. While the clip is playing, click a different angle when you want to cut to a new shot. Each time you cut to a new angle, a dotted line appears in the Timeline to indicate the edit.
3. Stop playback.
4. Return the playhead to the beginning of the project and play the entire project to see the results of your work.
You’ll probably notice a pretty glaring problem: The sound quality is different in each of the different takes, so each time you cut, you create a jarring audio edit. You could fix the problem after the fact, but starting over and doing it right the first time would be easier
5. Position the playhead at the very beginning of the project, and press D to overwrite another copy of the original multicam clip and erase the edits you made.

Performing Video-Only Cuts
In this example, as in many real-world cases, only one of the clips has the correct audio, and the others all have scratch tracks that shouldn’t be heard in the edited version. Final Cut Pro X allows you to edit the audio and video elements separately, so you can edit the audio from one angle and the video from a different angle at the same time.
1. In the Angle Viewer, Option-click 01 Concert Footage.
This switches the clip to display Angle 1, which has the correct audio. You still want to edit between cameras on the fly, but you want to keep playing the clean music. In this case, you want to perform video-only cuts.
2. At the top of the Angle Viewer, click the filmstrip icon, or press Shift-Option-2.

This sets the Angle Viewer to edit only video. You could also click the waveform icon (or press Shift-Option-3) to perform audio-only edits (although that is far less common).
Tip
Pressing Shift-Option-1 resets to performing audio plus video edits.
3. Play the project again from the beginning, and as it plays, click the various angles to cut between them.
Tip
You can also press the number keys 1 through 9 to cut to angles one through nine, respectively. No modifier key is necessary. This is best attempted on an extended keyboard with a numerical entry pad.
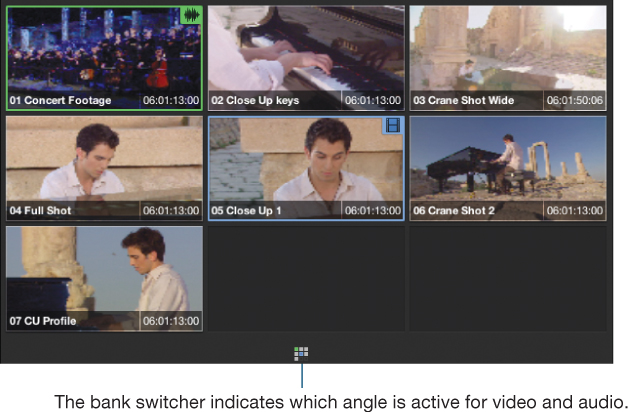
Now, only the video is cut. The audio remains consistent, playing the audio from Angle 1. The active angle in the Angle Viewer is highlighted in blue for the video and green for the audio.
Note
The bank switcher also displays the active angles using the same color coding, which is helpful when one of the active angles is currently in a hidden bank.
4. Stop playback, return to the beginning of the project (press Home), and play the project to see the result of your work.
Displaying Angle Names
You may want to change the display of clip names in the Timeline to show the currently selected angle instead of the name of the multicam clip.
1. Click the Clip Appearance button.
2. In the window that appears, set the Show pop-up menu to “Clip Names or Angles.”
Non-multicam clips will still show the clip names, but multicam clips will show the name of the active angle.
Switching Angles
After your multicam clip is edited into separate clips, you may want to choose a different angle for a particular segment. This is called switching angles, and it can be done in many ways.
1. Play or skim to the third clip in the project.
Note
Your project might not look exactly like the one pictured. Also, you may have to zoom in on the Timeline if your shots are very short.
2. In the Angle Viewer, Option-click an angle other than the currently selected angle.

The third clip is switched to the new angle, but no new edit is added.
You can just as easily change angles in the Timeline.
3. Control-click, or right-click, the fourth clip, and from the shortcut menu, choose Active Video Angle. Then choose one of the other angles to switch to that angle.

By selecting multiple clips, you can use the Active Angle setting in the Inspector to change the selected clips to a single angle all at once.
4. Press Command-4 to open the Inspector, if necessary.
5. Select a clip in the Timeline, and in the Info Inspector, from the Active Video Angle pop-up menu, choose a new angle. (The currently selected angle has a checkmark beside its name.)

Tip
You can also press Option-1 through Option-9 to switch the currently selected clip to angles one through nine.
You can also use keyboard shortcuts to step through the angles one at a time, switching from one to the next.
6. Press Control-Shift-Right Arrow to switch the currently selected clip to the next angle in the list.
7. Press Control-Shift-Left Arrow to switch to the previous angle.
Trimming Multicam Clips
When you make cuts in a multicam clip, Final Cut Pro X treats those edits as through edits. A through edit is what you get immediately after blading any normal clip: A line is drawn in the Timeline to indicate the edit, but the clip plays smoothly across that point.
With a multicam clip, the edit is likely a cut between different angles, but they’re all part of the same clip.
One advantage to through edits is that you can delete them, making the two adjacent clips into one longer clip.
1. In the Timeline, click the edit between the first and second clips to select it.

2. Press Delete.
The edit is removed, and the angle from the first clip now extends all the way to the subsequent edit.
Rolling Edits
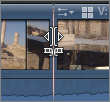
With the Select tool, when you move the pointer over a multicam through edit, the pointer changes to the Roll icon (because any other type of edit could ruin the angle synchronization in your multicam clip). Rolling allows you to change the position of the edit—making one clip shorter and another longer simultaneously. This way you could move the edits to align on music beats or to correspond with important action within the scene without ever knocking a clip out of sync.
1. With the Select tool, position the pointer over any edit in the Timeline.
The pointer shows the Roll icon. (If this were not a multicam clip, the pointer would change to the Ripple icon.)
2. Drag the edit to the left to roll it earlier in time, or drag to the right to roll the edit later in time.
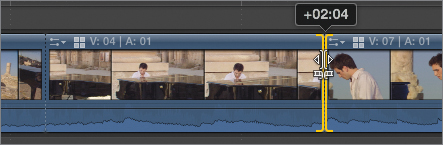
Rolling an edit on a multicam clip will never change the sync. It just changes the specific frame where the cut occurs.
Customizing Multicam Clip Settings
Now that you’ve seen the basic multicam clip workflow, let’s explore some additional options you can use when creating a multicam clip. In most cases, the Automatic settings will yield desirable results, but in other cases you may need to override or customize them. You can instruct Final Cut Pro X to use specific fields and specific data to control how the multicam clip is constructed.
1. In the Event Library, select the Lesson 06 Event.
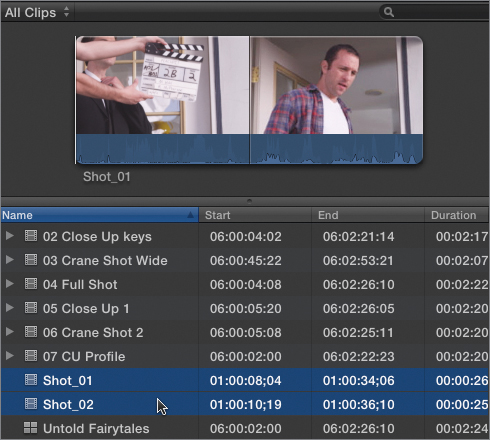
2. In the Event Browser, select Shot_01 and Shot_02.
3. Choose File > New Multicam Clip to open the Multicam sheet.
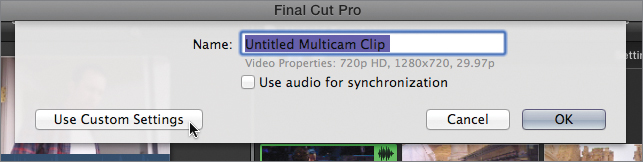
4. Click Use Custom Settings. The sheet expands to show a variety of additional options.
The various pop-up menus and other settings allow you to specify precisely what data you want Final Cut Pro X to use in order to construct the multicam clip.
Angle Assembly
The Angle Assembly setting determines how many angles are available and which clips belong in which angle. This setting is primarily used when you started and stopped one or more of the cameras during the production, but still want them linked into one tidy multicam clip.
The Angle Assembly pop-up menu allows you to specify the metadata used to determine which clips are from which cameras. You can choose among Automatic, Camera Angle, Camera Name, or Clips (which looks at the clip name and the creation time and date).
The Automatic setting scans all the metadata fields—including the Camera ID field, which is stamped onto each clip by your camera and can’t be modified after the fact—to determine the proper arrangement of clips into angles. If it guesses wrong, you can use one of the other options.
To ensure that your multicam clip is created correctly, name your camera and provide an angle name or number in the Info Inspector.
The following steps must be done prior to creating the multicam clip.
1. Click Cancel or press Esc (Escape) to exit the Multicam sheet without creating a new clip.
2. In the Event Browser, select Shot_01.
3. In the Info Inspector, in the Camera Angle field, type Side Angle.

4. In the Camera Name field, type Camera B.
You may need to switch to the general view or extended view in the Info Inspector to see the Camera Angle field.
5. Select Shot_02.
6. In the Camera Angle field, type Front Angle; and in the Camera Name field, type Camera A.
Although entering this information isn’t required, doing so helps to ensure that the multicam clip is created in the most logical and useful way.
Tip
Remember, you can select multiple clips in the Event Browser and change their settings in the Inspector simultaneously. If you had more than one clip from the same camera, this would be quicker than entering the data one clip at a time.
Angle Clip Ordering
The Angle Assembly setting determines how many angles are available and which clips belong in which angle. The Angle Clip Ordering setting controls the chronological order of each of those clips within each angle.
In most real-world scenarios, you can use the Automatic setting, which checks the starting timecode and the creation date for each clip and determines the most logical arrangement. But when you combine shots with no metadata or combine clips that were not originally shot as a multicamera scene, you may want to override the defaults.
Tip
Take care to set the clock of each camera prior to shooting the scene so you’ll have that matching data in each clip, thereby making multicam clip creation much easier. This is especially recommended for non-timecode devices such as DSLRs, iOS devices, GoPro or Flip cameras, and so on.
You can modify a clip’s Content Created Date and Time field by selecting the clip and choosing Modify > Adjust Content Created Date and Time. Changes you make in that window will override whatever metadata was originally in the clip.
Angle Synchronization
The Angle Synchronization setting determines which sync point should be used to align the multiple angles. The Automatic setting does a great job of syncing your clips without much fuss; but, once again, at times you may want to override the setting.
When the cameras are jam-synced to give all clips an identical timecode, you can use that timecode to determine the sync point by choosing Timecode from the Angle Synchronization pop-up menu.
If the cameras all have accurate Content Created Date and Time settings, you can choose Content Created.
If neither of those metadata fields are available, but you have a visual slate (as in Shot_01 and Shot_02), you can manually set a sync point using a marker.
1. Select Shot_01.
2. Skim or play until you find the frame where the slate clapper closes (at about 01:00:10:26).

3. With the playhead or skimmer on exactly that frame, press M to add a marker to the clip.
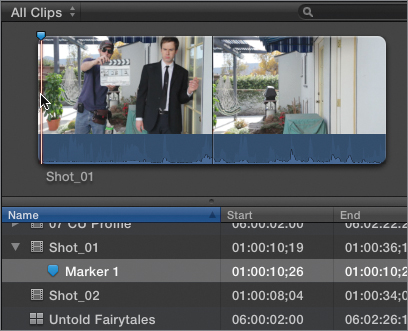
4. Select Shot_02.
5. Find the frame where the clapper closes the second time (at 01:00:10:19).

Note
Be aware that this shot includes two slate claps. Use the second one!
In this case, you’ll have to refer to the sound of the clapper because you can’t easily see the slate in the frame.
6. Press M to add a marker on that frame.
7. Select Shot_01 and Shot_02, and choose File > New Multicam Clip to open the Multicam sheet.
8. Click the Use Custom Settings button to expand the sheet.
9. From the Angle Synchronization pop-up menu, choose “First marker on the Angle” to instruct Final Cut Pro to use the markers you just added as the sync point.

Tip
Notice that the option is “First Marker.” If you’re using this method, be sure you don’t have any stray or extraneous markers prior to the intended sync point.
Using Audio for Synchronization
You can use one more tool to ensure accurate alignment of multiple angles, and it works like magic! Final Cut Pro can compare the audio waveforms in the clips to determine where they overlap, and then use this information to align the angles.
This option is reliable, powerful, and makes short work of what used to take many hours of manual syncing—although in some situations you may want to disable the setting.
For example, you may have non-identical audio on the shots or you are deliberately grouping non-synchronous clips into a multicam clip. The audio analysis in this case can be time consuming. As a result, you might want to deselect the “Use audio for synchronization” checkbox.
Tip
If “Use audio for synchronization” is selected and you are syncing using a slate marker, the audio is analyzed only in the area surrounding the marker. This means, if common audio exists around the marker, waveform analysis will be faster, and the markers need not be frame accurate.
Setting Multicam Clip Properties and Timecode
You can optionally change a few additional settings when using the custom settings for multicam clip creation. For example, you could assign a specific timecode for the first frame of the multicam clip. You could also choose exactly which video and audio settings you want your multicam clip to use.
If all your source clips are in identical audio and video formats, it makes sense for the multicam clip to inherit exactly those properties. But Final Cut Pro allows you to combine clips of different formats into a single multicam clip. You can even use still images and audio-only clips.
When clips are in several formats, you can choose a setting manually.
1. In the Video Properties section, click the Custom radio button.
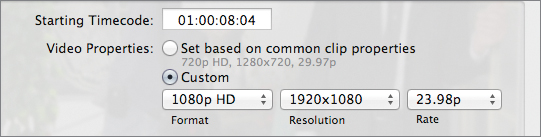
Three pop-up menus appear, in which you can choose a new format. Choosing a setting in the Format pop-up menu automatically enters values in the other two menus.
When choosing an ideal format, ask the following questions:
• What is the format of the target project receiving this clip?
If your multicam clip contains a range of formats from NTSC SD to 1080p HD, but your existing project is 720p HD, there is little advantage to making the clip resolution higher than the project resolution.
• What are the settings for the clips being joined together?
A rule of thumb is to choose the settings of the highest-quality clip in your group. So if you have four 1080p clips and two 720p clips, set the multicam clip to 1080p. The 720p shots will be scaled up (and, thereby, be of potentially lower quality), but you will have access to the full quality of the higher-resolution shots.
• In what format are the majority of the shots?
If you’ve got six 720p shots and one 1080p shot, setting the multicam clip to 720p may be preferable. That way, the one 1080 shot is scaled down, but the majority of shots remain at their native (and, therefore, at the highest-quality) resolution.
Tip
You can similarly override the audio settings (although this is less likely to be necessary in real-world situations).
2. For the purpose of this exercise, change the video properties back to “Set based on common clip properties.”
Gray text beneath the control indicates the format of the majority of selected clips.
3. Set Angle Synchronization to Timecode. (Yes, you did add those markers previously, but these clips also have identical timecode.)
4. Make sure “Use audio for synchronization” is deselected.
5. Name the new multicam clip Ukulele Girl and click OK.

The new multicam clip is created and appears in the Event Browser.
6. Select the Ukulele Girl clip to view it in the Angle Viewer.
7. Click the Angle Viewer Settings button, and from the pop-up menu, choose 2 Angles.

The Angle Viewer switches to a two-up display, which makes sense because this multicam clip contains only two angles.
Modifying a Multicam Clip
You may want to make a variety of modifications to your multicam clip that aren’t possible in the Angle Viewer—for example, to rearrange the order in which the angles appear in the Angle Viewer, or to adjust one of the angles for sync. Or, you might want to delete an angle, or add a new one. All of these tasks are performed in the Angle Editor.
The Angle Editor looks quite a bit like the Timeline, and it replaces the Timeline onscreen when it is open. In many ways the Angle Editor works just like a Timeline, but it is different and has the sole purpose of allowing you to edit the contents of multicam clips.
1. Double-click the Ukulele Girl multicam clip. The Angle Editor opens, and each of the clips is shown on its own row.

The Angle Editor displays a gray highlight around one of the angles. This indicates the monitoring angle, which is not the same as the active angle. The monitoring angle determines which angle displays in the Viewer when the Angle Editor is open. It is also used for syncing and aligning clips within the Angle Editor, as you’ll learn in the next few exercises.
The monitoring angle is relevant only when the Angle Editor is open. It does not have any impact on the angle shown when a clip is used in a project.
The upper-left corner of each row displays icons for the video and the audio to further indicate which angles are currently being monitored.
Only one video angle can be set as the monitoring angle, but you can monitor multiple audio angles simultaneously. This can be very helpful for identifying sync problems—when a clip is out of sync, you’ll hear an echo.
2. On Front Angle, click the Video Monitor icon to make it the monitoring angle.

This sets that angle to display in the Viewer while the Angle Editor is open.
Fixing Sync Errors
Although Final Cut Pro X generally does a great job of ensuring that clips are properly lined up, sometimes it makes mistakes. When that happens, you can realign the clips in the Angle Editor.
1. Press Spacebar to play the multicam clip. Watch carefully all the way to the end. Although it looks like the two shots are in sync, they are slightly misaligned. This is most evident when you see the woman swing the ukulele near the end of the shot.

In the side angle (on top), the woman has yet to start swinging the ukulele, while in the front angle (bottom), she’s already completed her swing. This error happened because the timecodes for the two clips were slightly off—the cameras were not started at exactly the same time—and you were instructed to use timecode as the alignment method in the previous exercise.
Note
If you had chosen the First Markers option, or selected the “Use audio for synchronization” checkbox, the clips would have been perfectly aligned (but you’d have no sync mistake to fix now).
2. Press Command-= (equal sign) to zoom in on the area where the ukulele is being swung.
3. Place the playhead in the frame in the monitoring angle where the ukulele is directly in front of the man’s face (at 33:05).

4. Click the arrow to the right of the Side Angle name, and from the pop-up menu, choose Sync to Monitoring Angle.
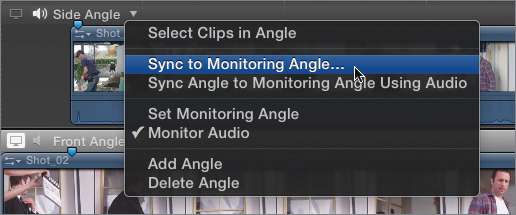
The Viewer is temporarily replaced by the Sync Angle window.

5. In the Angle Editor, skim Shot_01 until you find the corresponding frame where the ukulele is directly in front of the man’s face. Click that frame.

6. Click Done to close the Sync Angle window. Shot_01 is moved to better align with the monitoring angle.
Note
In a case as simple as this, you could also have used the Position tool to drag the side angle to the left until the two markers at the beginning of the clips line up, but then you wouldn’t have learned about this nifty feature.
7. Play the end of the multicam clip (or step through it with the arrow keys) watching the two angles in the Angle Viewer. You’ll see that now the clips are properly synced.
Note
Be aware that this change (like all changes performed in the Angle Editor) affects all instances of the multicam clip.
There is no close button to exit the Angle Editor when you finish using it. To exit the window, click the Timeline History Back button.
8. Click the Timeline History Back button.
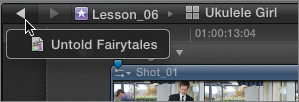
The Untold Fairytales project reopens, replacing the Angle Editor.
Tip
You can also close the Angle Editor by opening the Project Library.
Modifying the Angle Structure
You can also use the Angle Editor to change the order in which angles appear in the Angle Viewer. Additionally, you can delete or remove angles from the multicam clip.
Remember, changes made in the Angle Editor affect all instances of the multicam clip in use. So, for example, in the Untold Fairytales project, you have many instances of the Fairytales clip. Modifying any one instance in the Angle Editor will update all of them.
1. Control-click any of the clips in the Timeline.
2. From the shortcut menu, choose Open in Angle Editor.

The Timeline is replaced with the Angle Editor, and the seven angles in the Untold Fairytales clip are all visible.
To see all the angles, you may want to decrease the height of the clips.
3. Click the Clip Appearance button, and click the right-most icon size (no thumbnails). Then click anywhere outside the Clip Appearance control to dismiss it.

Let’s say you want to rearrange the angle order so the close-ups (Angles 2, 5, and 7) appear in one bank along with the concert footage, and the remaining three angles go into a second bank.
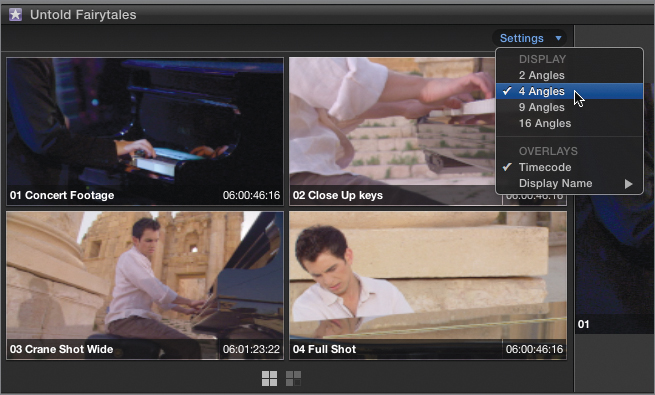
4. Click the Angle Viewer Settings button, and from the pop-up menu, choose 4 Angles. Make sure the first bank is selected.
5. In the Angle Editor, drag up the handle in the upper-right corner of the angle for Angle 5 until it is between Angles 2 and 3. The angles are rearranged, changing their display order in the Angle Viewer.
6. Drag the same handle to move Angle 7 until it is the fourth angle from the top.

Arrange the angles until bank one contains Angles 1, 2, 5, and 7; and bank two contains Angles 3, 4, and 6.
Now let’s say that you want to delete Angle 7 entirely.
7. Click the arrow to the right of the Angle 7 name, and from the pop-up menu, choose Delete Angle to remove Angle 7 from the multicam clip.
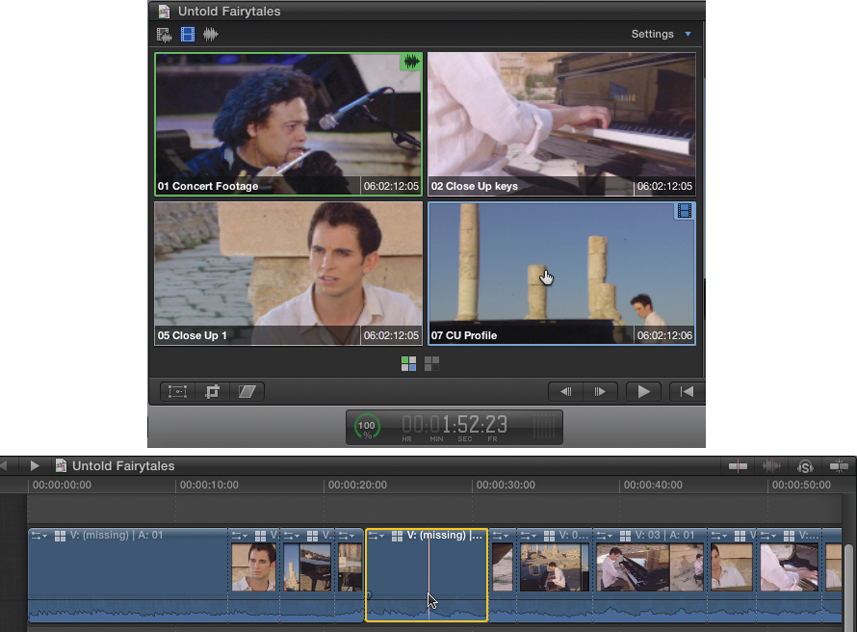
8. Click the Timeline History Back button to return to the Untold Fairytales project.

Any clips that previously used that angle now read “Missing” and display black frames when played or skimmed.
9. Click the Timeline History Forward button to open the Angle Editor showing the the Untold Fairytales multicam clip.
10. Click the arrow next to the Angle 5 name, and from the pop-up menu, choose Add Angle.
A new, empty angle is added to the clip below Angle 5.
11. Double-click the Untitled Angle name, and when the field becomes editable, type 07.

12. Click the Video Monitor icon to make the new Angle 7 the monitoring angle.
13. In the Event Browser, select the 07 CU Profile clip.

14. Position your pointer over the empty fourth angle, and press E to add the angle back into the multicam clip.
Syncing the Added Clip
Although you added the clip, you have no way of knowing if it’s properly synced with the rest of the multiclip. Let’s make sure it’s synced.
1. Click the Video Monitor icon for Angle 1.
2. Click the arrow next to the Angle 7 name, and choose “Sync Angle to Monitoring Angle Using Audio.” The clip’s audio is analyzed, and the clip is automatically adjusted to sync it to the monitoring angle. Beware that this will not automatically reassign those clips pointing to the angle you deleted in the project.
Although in this instance you have added a previously deleted angle, the software doesn’t know it’s the same angle. As a result, you’ll have to manually switch those angles that previously pointed to Angle 7 to point to the new Angle 7.
3. Click the Timeline History Back button, or press Command-[ (left bracket), to reopen the Untold Fairytales project.
4. Select an angle that is currently labeled as missing, and in the Angle Viewer, Option-click the Angle 7 image to switch the clip to Angle 4, the added angle.
Tip
Be sure to hold down Option when clicking, otherwise you’ll perform a cut and add a new (unwanted) edit to the clip.
5. Repeat step 4 for any other clips marked missing.
Adding Effects or Other Trimming
The Angle Editor is a lot like a Timeline, and there’s no reason you can’t utilize the powerful editing tools available in a regular Timeline in the Angle Editor.
You can add effects, transitions (if you have more than one clip on an angle), color correction, retiming, keyframing, and other effects to any of the clips within the multicam clip.
All of these changes will propagate and appear in every instance of that angle when used in a project.
1. Click the Timeline History Forward button to reopen the Angle Editor.
2. Press Command-5 to open the Effects Browser, if necessary.
3. In the Angle Editor, select the clip in Angle 5 (05 Close Up 1), and in the Effects Browser, double-click the 50s TV effect to apply it to Angle 5.
4. Press Command-[ (left bracket) to return to the Untold Fairytales project.
5. Play or skim any clips that are set to Angle 5 to verify that the 50s TV effect is applied to those clips.

Adding Effects in the Timeline
When you apply an effect to an angle on a multicam clip in a project, the effect is applied only to that angle.
1. Select one of the clips in the Timeline, and in the Effects Browser, double-click the Aged Paper effect to apply it to the current angle.
2. With the clip still selected, in the Angle Viewer, Option-click another angle to switch to it. Note that the Aged Paper effect is not applied to this new angle.
3. Option-click the previously chosen angle and note that it retains the Aged Paper effect.
Similar results would occur if you applied any color correction, retiming, or transformations effects. The effect would be applied only to the angle active when the effect was applied.
Note
Applying an effect to a clip in the Timeline will not cause that effect to appear on other instances of that angle in other clips. If you want an effect to apply to every instance of a particular angle, apply that effect in the Angle Editor.
Lesson Review
1. What is a multicam clip?
2. How do you create a multicam clip?
3. How are the angles in a multicam clip ordered?
4. How are the angles in a multicam clip synced?
5. Can audio and video be edited separately?
6. What’s the difference between cutting and switching?
7. Is the monitoring angle the same as the active angle?
8. How do you rearrange the order of angles appearing in the Angle Viewer?
9. What happens if you delete an angle that is currently in use?
10. Can filters and effects be applied to multicam clips?
Answers
1. A multicam clip is a special type of clip that contains from 2 to 64 angles, any one of which can be used at one time.
2. Select the clips in the Event Browser, and choose File > New Multicam Clip.
3. Angles are ordered automatically based on the metadata in the Camera Angle, Camera Name, and other fields; or manually ordered by choosing which field should be used for that purpose.
4. Angles are synced automatically by using the timecode or the content created date and time, by matching audio waveforms, or by manually specifying one of those options. Angles can also be synced using the first marker in the clips or the beginning of the clips.
5. Yes. Use the controls at the top of the Angle Viewer to determine which components are edited.
6. Cutting adds an edit in the Timeline and the clip after the cut points to the new angle. Switching changes the existing clip to a new angle.
7. No. The monitoring angle is used strictly in the Angle Editor for manually syncing angles and certain other tasks.
8. Control angle order by dragging the drag handles in the Angle Editor.
9. Clips pointing to a deleted angle display black frames, and the angle name is listed as missing.
10. Effects can be applied to individual angles within a multicam clip.
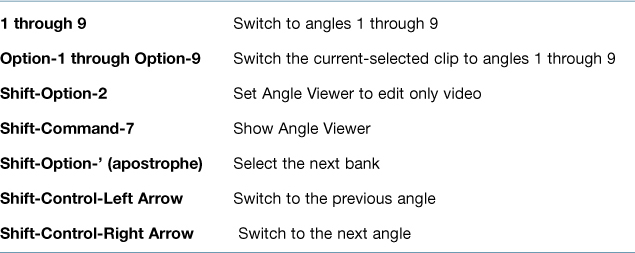
Keyboard Shortcuts