Lesson 5. Using Audio Effects
Lesson 4 focused on audio basics: levels, fades, and panning. But Final Cut Pro offers far more audio manipulation tools and techniques.
Every clip has a built-in equalizer that allows you to independently adjust the level of specific frequencies. You can apply over 100 built-in audio effects ranging from versatile limiters, compressors, and noise-gates to echo, reverberation, and pitch-shifting effects. You also have access to modulation and distortion effects typically used for musical instruments.
Each effect has a custom interface designed to visually represent the audio manipulation. Plus, many effects are actually compound presets that combine other filters and preassigned parameters to create fun and practical one-click effects such as Cartoon Animals, Telephone, Underwater, Car Radio, Spaceship, Robot, and so on.
Finally, you can also animate the parameters for any of these effects so, for instance, your character’s transformation from human to monster can develop gradually and organically.
More Info
Final Cut Pro X also offers a variety of automatic audio enhancements such as background noise and hum removal, loudness adjustments, and matching of audio EQ. To learn more about those features, visit help.apple.com.
Understanding Equalization
The most basic type of audio effect is equalization, or EQ, which is a way to adjust the volume of particular frequencies (or bands) of your clip’s audio. You can use EQ to turn down the low-pitched rumbling of nearby traffic or the high-pitched whirr of a vacuum cleaner while leaving your actor’s voice relatively unaffected.
Unfortunately, most sounds are not neatly divided. They spread across many different frequencies, so turning down the lower (bass) bands may make your actor’s voice sound tinny and small, and turning down the high (treble) bands can make his voice sound muddy or muffled. No perfect EQ setting exists, and knowing when your settings are closest to “correct” is difficult. You just have to listen and trust your ears.
To further complicate things, different loudspeakers have different characteristics that affect audio reproduction. Some speakers are much louder in the higher frequencies than the lower frequencies, and some don’t play certain frequencies at all.
Thus, it’s very important to adjust EQ (and any audio adjustments, really) while listening to a speaker system that closely matches your intended playback environment. If your program is an airline safety video that will be viewed on a noisy airplane, you should simulate that environment when finalizing your audio or risk your audience hearing a very different soundtrack mix than the one you delivered.
Note
Some of the changes you make in this lesson will be subtle and may be nearly undetectable in some listening environments.
The built-in equalizer applied to every clip in Final Cut Pro X divides your sound into 10 or 31 bands, each of which can be independently boosted (made louder) or attenuated (made quieter).
Tip
As a general rule, attenuate the sounds you don’t want rather than boost the sounds you do want, lest you risk the danger of hitting 0 dB and causing unwanted distortion.
You also have eight EQ presets to choose from if don’t want to get your fingers dirty or are intimidated by the EQ interface.
1. In the Project Library, open the Lesson 05 folder, and double-click the Sound Effects project to open it into the Timeline.
2. In the Timeline, select Shot_01, and in the Audio Inspector, double-click the Audio Enhancements section to expand the controls, if necessary.
3. Press / (slash) to play the clip and hear its tonal balance, and then from the Equalization pop-up menu, choose Bass Boost and play it again.

The Bass Boost preset increases the level of the lower-frequency bands to create a richer, warmer tone. However, taken to an extreme, this boost could make the sound muddy or thick.
4. From the Equalization pop-up menu, choose Treble Boost, and play the clip again.
Treble Boost increases the level of the higher-frequency bands, which can make your clip sound brighter or sharper, though if you go too far it can sound thin, tinny, or piercing.
Sound designers have developed a whole language to describe the feeling that different sound tones impart. There is no science to it; they’re just trying to articulate one sense to describe another. Feel free to use your own adjectives to spice things up and impress your clients. I’ve heard all of the following said with a straight face: chewy, spicy, round, fuzzy, tight, and bodacious.
Any of these presets can quickly adjust (and hopefully improve) the sound of your clips. But you can also control the equalizer manually.
5. Click the Controls button (the EQ icon) to the right of the Equalization pop-up menu.

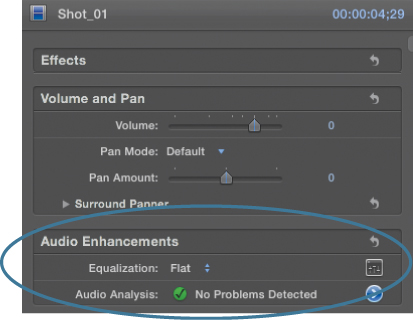
The Graphic Equalizer window opens.
The Graphic Equalizer contains 10 sliders to manipulate the level of 10 bands of frequencies. The sliders on the left control the lower frequencies, and the sliders on the right control the higher frequencies. When a slider is set above the central baseline, that frequency is boosted; when the slider is set below the baseline, that frequency is attenuated.
Currently this clip is set to the Treble Boost preset, and you can see that the sliders on the right are elevated above the baseline.
6. Click the Flatten EQ button.
The sliders are all reset to their “flat” positions.
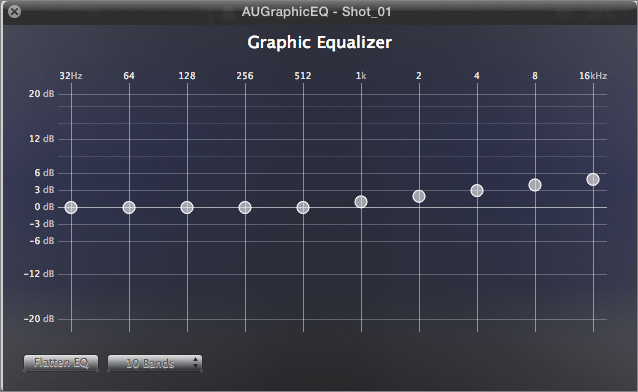
7. Drag the leftmost slider down to about –6 dB to attenuate the lowest frequencies by 6 dB, then play the clip to hear the result.
You can also modify more than one band at a time.
8. Drag across the three sliders on the left to select them as a group.
Note
To select multiple sliders, begin dragging one of the sliders.
9. Drag any one of the sliders down by about 3 dB.

The leftmost slider is lowered to –9 dB, and the next two sliders are set to –3 dB. This creates a common effect called a bass roll-off that tapers off the volumes of the lowest frequencies (which frequently contain more noise than useful content).
If you need more adjustment precision than 10 bands, you can set the graphic equalizer to 31 bands.
Note
Switching between 10 and 31 bands automatically flattens the equalizer.
10. Click the 10 Bands button, and from the pop-up menu, choose 31 Bands.

The equalizer changes to contain 31 frequency sliders. You operate the 31-band equalizer the same way you operate the 10-band one. However, the increased number of bands allows you to make more narrow and precise EQ adjustments.
11. Click the close button to close the Graphic Equalizer.
Applying Equalization Effects
In addition to the Graphic Equalizer, Final Cut Pro includes a variety of filters that provide similar or overlapping functionality. The filters have some advantages in that they have customized (and in some cases, more elaborate) user interfaces. Additionally, some filters are effectively presets created using the built-in filters.
Ultimately, there is no overall advantage or disadvantage to using EQ filters over the Graphic Equalizer. Effectively they are just different ways to achieve the same results. The filters do offer more extensive presets than the eight built into the Graphic Equalizer. Some filters incorporate EQ presets in combination with other audio filters. This is how complex effects like Telephone, Vintage Radios, or Underwater are created.
Note
Filters are applied to clips on top of any adjustments made in the Graphic Equalizer.
1. In the Timeline, select Shot_01, if necessary.
2. In the toolbar, click the Effects button, or press Command-5. The Effects Browser opens to the right of the Timeline.
3. Scroll down in the Effects Browser to the Audio section, and select the EQ category.
4. Double-click the Less Bass effect to apply it to the selected clip.
5. Locate the effect in the Audio Inspector.
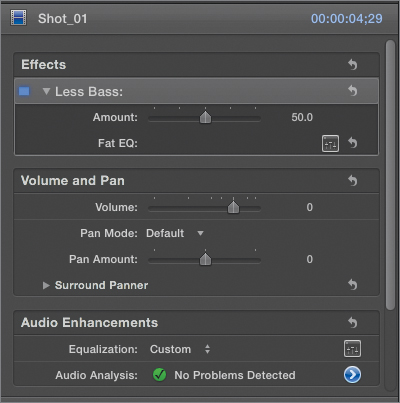
The Less Bass effect has two controls: an Amount slider and a parameter called Fat EQ, which is actually the name of the plug-in used to create the Less Bass effect.
Note
Many of the plug-ins used to create the audio effects are the same as you’ll find in Logic, the Apple professional audio mixing and editing application.
6. Click the Controls button to the right of the Fat EQ parameter. The Fat EQ window opens, revealing its custom interface.
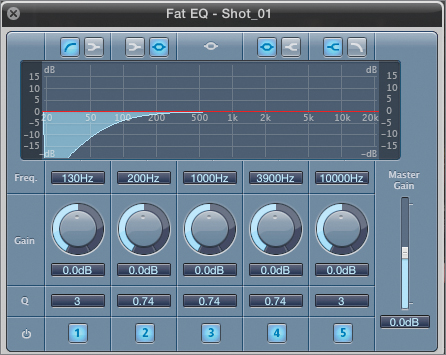
Fat EQ is a five-band equalizer plug-in. You may recognize that the preset is another example of a bass roll-off.
You have many manual controls in the Fat EQ window to further modify the equalization; but because this effect was applied as a preset, you can also just modify it using the slider in the Audio Inspector.
Tip
You can also apply a generic Fat EQ effect by double-clicking the icon in the Logic section of the EQ category of the Effects Browser.
7. In the Audio Inspector, drag the Amount slider to the right and observe the result in the Fat EQ interface.
The farther right the slider is set, the more frequencies are rolled off. The farther left you drag the slider, the fewer frequencies.
8. Press / (slash) to play the clip as you drag the slider and listen to the difference of various settings.
9. Drag the slider to 25, and close the Fat EQ window.
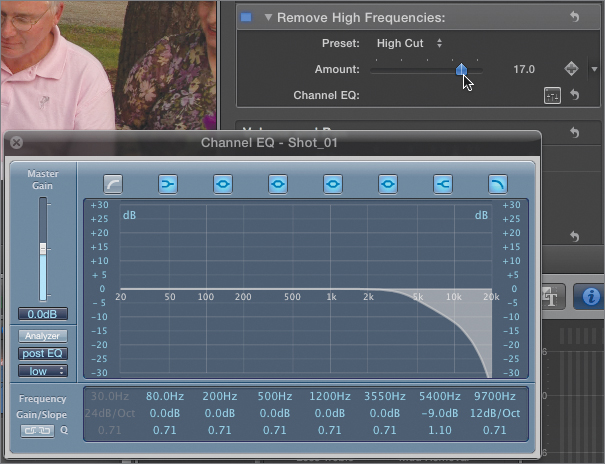
10. In the Effects Browser, double-click the Remove High Frequencies effect to apply it to the clip. This second effect is added to the clip, and the controls appear beneath the Less Bass effect.
Remove High Frequencies is similar to the Less Bass preset; but instead of attenuating the lower frequencies, it affects the higher ones. The effect has a Preset pop-up menu in which you can choose the type of filter; an Amount slider; and instead of using the Fat EQ, this preset uses the Channel EQ.
Note
Depending on the chosen preset, this effect uses either the Channel EQ or the Fat EQ plug-in. For the purposes of this lesson, keep the Preset pop-up menu set to High Cut or Strong Cut.
11. Click the Controls button to the right of the Channel EQ parameter name to open the Channel EQ interface.

Channel EQ is an eight-band equalizer, but you can see that this preset affects only the two rightmost bands.
12. In the Audio Inspector, drag the Amount slider to the right and observe the change in the Channel EQ window.
The Channel EQ window has another very useful feature called the Analyzer. It provides a visual representation of the frequencies present in the clip and can help you choose how to equalize the clip.
13. In the Channel EQ window, click the Analyzer button.
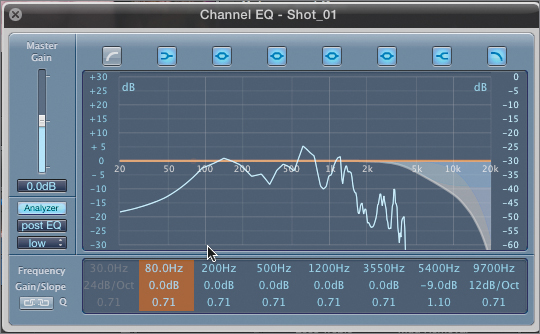
14. Play the clip.
You can see a line representing the active frequencies in the audio as it plays. You can see that there are no frequencies in the high end because the filter is rolling them off.
15. Click the Post EQ button (below the Analyzer button) to change it to Pre EQ.
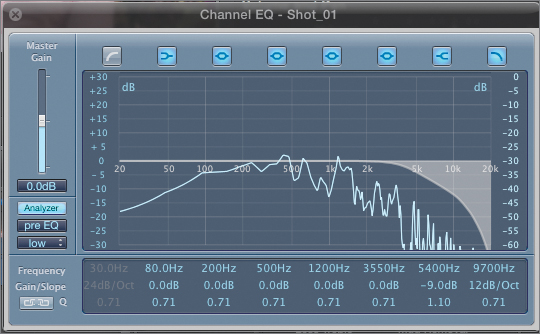
Now the analyzer shows the frequencies in the source clip before the results of the EQ. You can see that level indicators are now present in the high frequencies.
Note
Regardless of the setting, the audio you hear is the post-EQ result. To hear the clip without the filter applied, you must disable the filter in the Audio Inspector as described in the following section.
16. Close the Channel EQ window.
Controlling Audio Effects
Once you begin adding and manipulating audio effects, learning how to manage those effects is important—choosing the order in which they are applied, enabling and disabling specific effects, and moving effects from one clip to another.
Toggling Clip Effects
Each effect appears in the Audio Inspector and can be enabled or disabled without permanently removing the effect. Toggling clip effects allows you to sample or audition the clip with and without a particular effect applied.
1. Select Shot_01 in the Timeline, if necessary.
2. In the Audio Inspector, deselect the blue checkbox to the left of the Remove High Frequencies effect name to disable the effect.
3. Press / (slash) to play the clip. The clip plays without the Remove High Frequencies effect.
4. Select the blue checkbox to enable the effect again.
Tip
You can toggle the effect checkbox dynamically while the clip is playing.
Removing Clip Effects
When you decide that a particular effect is not working the way you want, you can remove it completely.
1. In the Audio Inspector, click the name of the Less Bass effect to select it.
2. Press Delete to permanently remove the effect from the clip.
Note
Be sure that the effect name is selected in the Inspector (the title bar will turn blue). If it is not selected, you will delete the entire clip from the project.
Transferring Clip Effects Between Clips
When you have an effect that you’re happy with, you can copy it to one or more clips in the project.
1. In the Timeline, select Shot_02.

2. In the Effects Browser, select the Distortion category, and then double-click the Car Radio effect to apply the effect to the clip.
Note
Be sure to select the Audio > Distortion category, not the Video > Distortion category.
3. Select Shot_02, and then choose Edit > Copy, or press Command-C, to copy the clip to the clipboard.
4. In the Timeline, select Shot_01, and choose Edit > Paste Effects, or press Command-Option-V, to copy the effect from Shot_02 to Shot_01.

Paste Effects always pastes all effects (video and audio) from the clip on the clipboard to the selected clips.
Notice that the Remove High Frequencies effect was removed from Shot_01. Pasting effects replaces any existing effects with the pasted ones.
Tip
You can paste effects to multiple clips by selecting multiple clips in the Timeline and choosing the Paste Effects command.
5. Select Shot_02 again, and delete the Car Radio effect.
Using Other Types of Effects
Final Cut Pro offers scores of other audio effects and presets, and don’t forget that you can also use third-party Logic effects if you have access to them. These additional effects are grouped into categories that suggest when and how you may want to employ them.
Levels Effects
Aside from equalization, levels effects—which alter the basic volume of a clip—are the next most common type. Final Cut Pro has a Loudness setting in the Audio Enhancements Inspector that attempts to automatically set the volume of your clips to a “good” level. But professionals will inevitably want more precise control than that setting can provide, and they will find it in the various levels effects.
Typical Levels (or dynamics) effects include limiters, compressors, and gates. A description of all available filters is beyond the scope of this book, but the following descriptions may aid you in selecting from the many levels effects. In practice, each filter is unique, and many filters incorporate more than one of the following categories:
• Limiters turn down the volume of the loudest parts of a shot (determined by identifying a threshold level) without affecting the rest of the audio. You can use them when a few brief loud noises are much louder than the rest of the shot.
• Compressors are similar to limiters in that a compressor identifies the loudest portions of a clip and turns down those bits, but then it increases the overall volume of the clip without the risk of overmodulating. This effect is often used to raise the perceived volume of TV commercials and give dialogue more “presence” in the mix. Because compressors reduce dynamic range, overuse can create an unnaturally flat sound.
• Expanders are the opposite of compressors. An expander increases the dynamic range, effectively stretching the volume of the signal so the quieter parts get quieter and the louder parts get louder.
• Gates are somewhat like the inverse of limiters. A gate can identify the quietest parts of a clip and turn them down. Gates are often used to reduce noise or to highlight the desired sound in a shot with limited background noise.
Using Reverb, Spaces, and Echo Effects
These three types of effects produce similar results, but are typically employed in different situations.
Reverb effects (called spaces in the Final Cut Pro X Effects Browser) can produce natural effects that simulate real environments. They are especially useful for matching audio recorded in dissimilar settings, and are commonly used in animated or green screen productions where the scene appears to take place in a very different type of space than the soundstage in which it was recorded.
Echo effects (also called delay effects) simulate natural phenomena, too, but they’re also great fun when used to represent a disturbed or confused character’s mental state. Each echo can be assigned a different volume, pitch, and pan setting, permitting a wide range of complex effects.
Final Cut Pro has a variety of customizable preset effects in both categories to speed your work, or you can choose from one of the core effects and manually adjust all the parameters for total control.
1. In the Timeline, select Shot_02.
2. In the Effects Browser, select the Spaces category, scroll to the Logic effects section, and double-click the Space Designer effect.

The effect is added to the clip and its controls appear in the Audio Inspector.

At first glance, this effect appears to have no parameters (they’re hidden in the collapsed Parameters section), but the Space Designer is one of the most powerful reverb effects, and has more than 50 built-in presets.
3. From the Preset pop-up menu, choose 02 Medium Spaces > 06 Indoor Spaces > 1.6s Narrow Staircase.
4. Press / (slash) to play the clip and hear the results.
5. From the Preset pop-up menu, choose 01 Large Spaces > 06 Outdoor Spaces > 05.2s Deep Canyon, and press / (slash) to hear the difference.
6. Experiment with some of the other presets.
Some presets are labeled based on the type of space being simulated (such as cathedral, cave, garage, and so on). Others are labeled for a type of mechanical reverberation originated in traditional analog reverb devices (such as plate or spring). Still others are labeled to indicate the musical instrument that might best benefit from that preset (piano reflection, horn chamber, small guitar hall). Every situation is different, and you’ll likely want to experiment with a variety of settings before settling on one. You can also click the Controls button and further customize any of the presets using the custom graphical interface.
7. In the Audio Inspector, click the Space Designer title bar, and press Delete to remove the effect from the clip.
8. In the Effects Browser, select the Echo category, scroll to the Mac OS X group, and double-click the AUDelay preset.
9. In the Inspector, click the Controls button to the right of the effect name to open the Apple Delay window.

The vertical bars indicate the echo. By default, the echoes occur once every second, and the volume (represented by the height of the line) is reduced on each repetition.
10. Press / (slash) to play the clip.
11. Drag the first echo handle to the left until it lines up with the 0.5 seconds indicator, and raise the top of the bar until it reaches 75%.
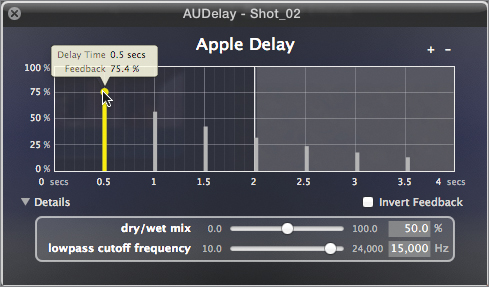
12. Press / (slash) to play the clip again.
Now the echoes occur more frequently and are louder. The farther you drag the bar to the left, the faster the echoes will occur.
This Apple Delay effect provides very precise control over the speed and volume of the echo, but other echo effects provide even more control and include presets that let you choose from predetermined settings rather than manually assigning them.
For example, the Delay Designer effect lets you modify pitch, panning, and many other parameters, as well as the duration and volume of each echo. You can also enable a recording mode and tap out the echoes manually.
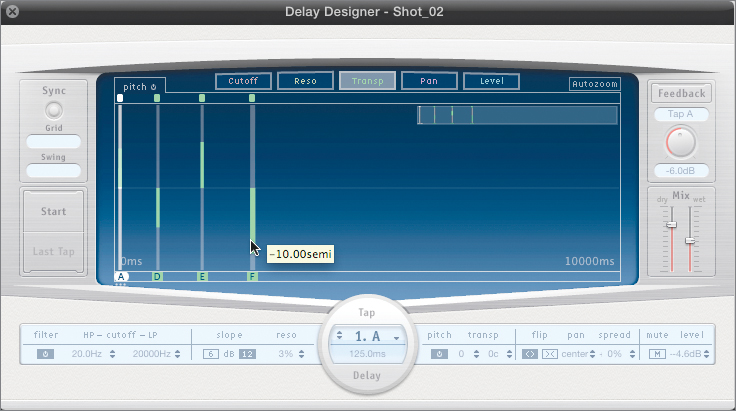
For extra credit, experiment with the Delay Designer effect (or any of the others) to learn more about the power these effects provide.
Employing Distortion Presets
Another category of audio filters is distortion effects. Some of these are the kind of distortion that rockers apply to their guitars to make them sound grungy; another collection of preset filters are used to make your audio sound like it’s coming out of a poor-quality speaker.
Distortion presets include Car Radio, Television, Telephone, Underwater, Walkie Talkie, and more. And, as expected, each of those presets has additional settings. For example, the Vintage Radios preset allows you to choose from one of four radio types identified by date and style.
1. In the Timeline, select Shot_03.
2. In the Effects Browser, select the Audio > Distortion category.
3. Click the Low Tech effect once to select it (don’t double-click), and press the Spacebar to hear a preview of the effect.
Tip
When audio skimming is enabled (Shift-S), you can skim the mouse over the effect to hear a choppier version of the effect preview.
4. While the preview is playing, click some of the other effects to preview those effects.
5. Press the Spacebar again to stop the preview.
6. Double-click the Vintage Radios effect to apply it to the clip.

7. Play the clip to hear the effect.
Distortion presets such as this combine multiple core plug-in effects to create a particular result. For example, the 1931 Radio preset uses three separate plug-ins to create its unique sound.
You can click the Controls button for any of the plug-ins to further customize the effect and make it perfect for your situation.
8. Click the name of the Vintage Radios effect in the Audio Inspector and press Delete to remove the effect.
Using Pitch Shifting and Voice Effects
Voice effects are similar to the distortion effects, but as the name implies, specifically designed to modify/distort human voices. Presets make it easy to quickly turn your boss into a Robot, Alien, Cartoon Animal, or Monster. Less extreme effects such as Brightness, Voice Over Enhancement, and De-esser can improve human voices in subtle ways, as can as a variety of more multipurpose pitch- and voice-related plug-ins, each with its own presets and custom user interface.
1. In the Timeline, select Shot_03, if necessary.
2. In the Effects Browser, select the Voice category.
3. Click the Alien effect to select it (don’t double-click), and press the Spacebar to preview the effect.
4. While the preview is playing, click some of the other effects to preview them, too.
5. Press the Spacebar again to stop the preview.
Just as with the distortion effects, the voice effects are based on a group of plug-ins you can further modify to customize the results.
1. In the Timeline, select Shot_03, if necessary.
2. In the toolbar, from the Retime pop-up menu, choose Slow > 50%.
The clip is slowed to half-speed.

3. Click the Retime pop-up menu again, and ensure that the Preserve Pitch setting is enabled.
4. Play the clip.
When Preserve Pitch is enabled, the clip audio will play at the normal pitch, even when the clip speed is faster or slower than normal.
5. From the Retime pop-up menu, choose Preserve Pitch to disable it.
6. Play the clip again.
Now the pitch is lowered in accordance with the 50% speed setting. Using this control you can choose whether or not retiming effects affect the pitch of the audio.
Animating Audio Effects
As if experimenting with all these powerful audio filters wasn’t enough, Final Cut Pro also allows you to animate any of these effects to change the results over time.
So, you can have your hero’s voice gradually turn into that of a cartoon moose. Or more practically speaking, you can change the amount and type of reverb dynamically as your character walks through the hallway and out into the courtyard.
1. In the Timeline, select Shot_02.
2. In the Audio Inspector, delete any filters currently applied to the clip.
3. In the Effects Browser, select the Audio > All category, and then in the search field at the bottom of the window, type cathedral.

Searching for specific text will filter the Effects Browser to show only effects containing the search term.
4. Double-click the Cathedral effect to apply it to the selected clip.
5. In the search field, click the Reset button to show all the effects.
6. In the Timeline, position the playhead over the first frame of the clip.
7. In the Inspector, drag the Amount slider of the Cathedral effect all the way to the left to 1.0.

8. Click the Keyframe button to the right of the slider.

9. In the Timeline, position the playhead five seconds into the clip at 10:00.

10. In the Inspector, drag the Amount slider to 50.

11. Press / (slash) to play the clip. The reverb effect appears gradually over five seconds.
Many audio filters don’t have an Amount slider. In that case, you may need to click the disclosure triangle next to the Parameters section of the Inspector and keyframe the specific parameters you want to change over time.
Note
Some audio effects have no keyframeable parameters.
Modifying Audio Effect Animations
You can also animate audio effects directly in the Timeline. Doing so enables you to see a graphical representation of the changing parameters displayed over time.
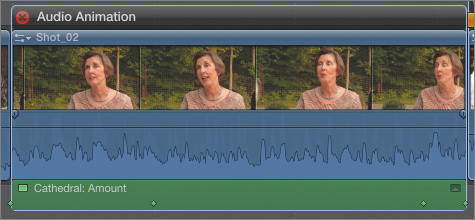
1. Ensure that Shot_02 is still selected, and choose Clip > Show Audio Animation, or press Control-A. The keyframe graphs for the audio effects appear and display the two keyframes you added to the Cathedral Amount slider.

By default keyframe graphs are collapsed, so you can see where the keyframes appear in time, but the actual keyframe values are not apparent.
Note
If the Solo Animation command in the Clip menu is selected, only one effect graph will appear at a time. If Solo Animation is disabled, you will see graphs for each effect.
2. Double-click the keyframe graph. The graph expands to show the positions of the keyframes and their relative values.

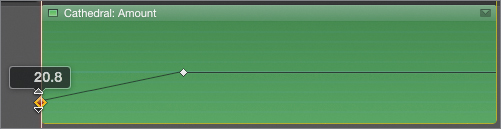
3. Drag the first keyframe up to about 20.
Note
You can drag a keyframe either horizontally (to change its place in time), or vertically (to change its value), but not in both directions at once.
The clip now begins with a small amount of reverb, which increases from that point until the second keyframe.
If you wanted the reverb to decrease towards the end of the clip, you could add a new keyframe.
4. Near the end of the clip, Option-click the keyframe line twice to add two new keyframes.

5. Drag the last keyframe to the lower-right corner of the graph.
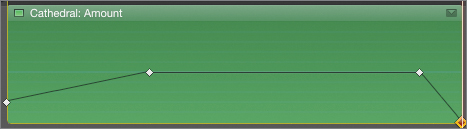
6. Play the clip. The reverb effect now fades out as the clip comes to an end.
When you are satisfied with the settings you have made, you can collapse the graph or hide it completely.
7. Double-click the keyframe graph to collapse it.
8. On the Audio Animation bar above the clip, click the close button, or press Control-A. The audio animation graph disappears, but the animated settings you made remain applied.
Lesson Review
1. What is equalization?
2. What is an EQ band?
3. Is it better to boost the desired frequencies of an audio clip or attenuate the undesired parts?
4. Which EQ effect has the Analyzer function?
5. Can you copy one of two applied audio effects from one clip to another?
6. What does a Compressor effect do?
7. In which category of effects does a delay effect belong?
8. Where would you find a preset to simulate the sound of a telephone speaker?
9. True or false: When speeding up a clip using the Retime pop-up menu, the pitch of the audio will always go up.
10. How many keyframe graphs can you view in the Timeline at once?
Answers
1. Independently modifying the volume of different frequencies
2. A range of frequencies
3. It’s generally preferable to attenuate the less desirable frequencies.
4. Channel EQ
5. No, you can only copy all clip effects at once.
6. It reduces the dynamic range of a clip, enabling you to make it louder.
7. Echo effects
8. Distortion category
9. False, you can enable the Preserve Pitch setting, which will compensate for the pitch shift that would otherwise occur.
10. You can view as many graphs as you have effects (just be sure the Solo Animation setting is disabled).
Keyboard Shortcuts
